Envato Elements Adds WordPress Themes And Plugins – One Price, Unlimited Downloads

If you’re one of Netflix’s 104 million subscribers, you know that paying one fixed price for access to a huge library of content is pretty dang awesome. Rather than purchasing individual shows (expensive!), you just pay $10 per month for the pleasure of gorging yourself on heaps of TV shows and movies. Pretty cool! So ... Read more

The post Envato Elements Adds WordPress Themes And Plugins – One Price, Unlimited Downloads appeared first on Learn WordPress with WPLift.

MicroJob Engine Theme Review

Since the big success of Fiverr, new micro job platforms have been popping up every once in a while. Every new micro job platform tries to add more features and flexibility for both the freelancers and the customers in order to have a competitive advantage. Engine themes developed MicrojobEngine to enable any WordPress user to ... Read more

The post MicroJob Engine Theme Review appeared first on Learn WordPress with WPLift.

How to Appear in Google Answer Boxes with Your WordPress Site

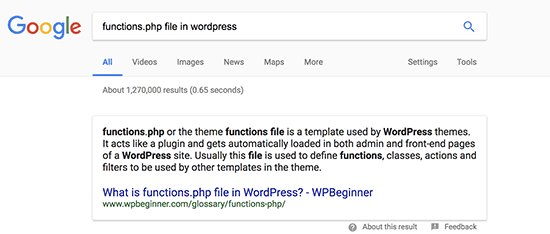
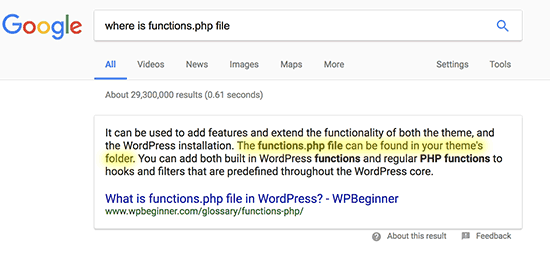
Do you want your articles to appear in Google answer boxes? Answer boxes are Google’s push to answer questions directly on the search results page. In this article, we will explain how to appear in Google Answer Boxes for WordPress users.

How to appear in Google Answer Boxes for WordPress users

What is a Google Answer Box?

Google Answer box is part of Google’s Knowledge graph. It is an algorithm that tries to answer user’s questions right on the search page.

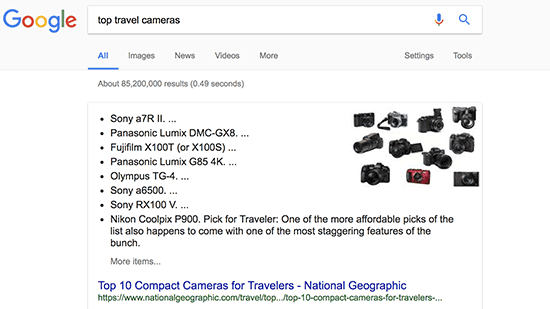
A search term displaying Google Answer Box

It uses carousels, side boxes, lists, tables, and answer boxes to display the most relevant information at the top. This information is gathered from various sources and the algorithm decides which results should be displayed inside an answer box.

According to research conducted by Advanced Web Ranking, Answer boxes secure almost 32.3% CTR. This makes them immensely important for your WordPress SEO strategy.

How Google Displays Information in The Answer Box?

The purpose of Answer Boxes is to offer instant gratification to the users. This works particularly well when users are looking for factual information like public figures, distances, conversion rates, scores, and similar information.

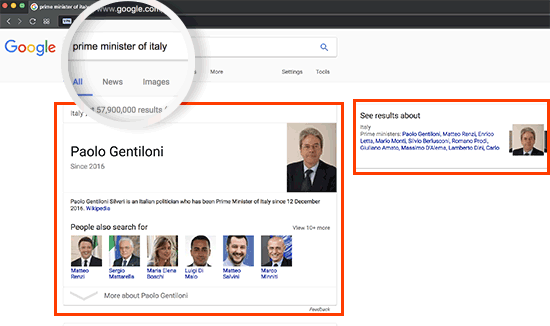
Instant answer in Google Search result using Knowledge Graph

In such cases, if users got the exact information they needed, then they can move on and search for something else. For many queries it can just display a sidebox from the web’s most reliable knowledge sources like Wikipedia.

In a way, it might sound like Google is trying to keep all the traffic for itself. However, not all users are looking for information that Google’s knowledge graph can answer with accuracy.

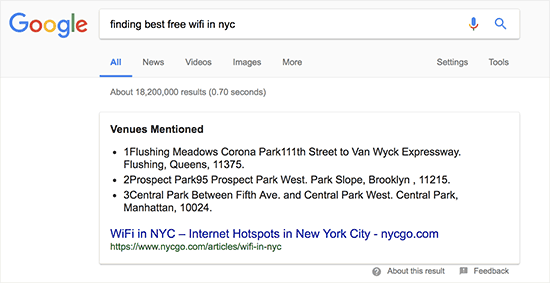
If user’s keywords require an opinionated, well thought, or research based answer, then Google relies on other web sources.

Google Answer box displaying other web sources

If you are among the top 10 results for a keyword, then you are already closer to appear in Google Answer Box.

How to Make Your Pages Appear in Google Answer Box?

Google Answer Box results change quite often, and you can easily appear as the best answer by simply improving your content.

Let’s explore a number of content optimization steps that you can take to appear in the answer box.

Add Short and Helpful Answers in Your Content

The purpose of Answer Boxes is to provide quick answers. Make sure that your article answers the question as early in the article as possible.

You also need to make your answer short, concise, and easy to understand.

Provide short and helpful answers in your article

It also helps to include your keywords in the form of a question followed by the short answer.

After that, feel free to add as much detail to your answer as you want. Adding more information will allow you to use the keyword throughout the article, and you can even use the same article to answer other questions your users may have about the same topic.

Answer other questions about the same topic

Optimize Your Page’s Meta Description

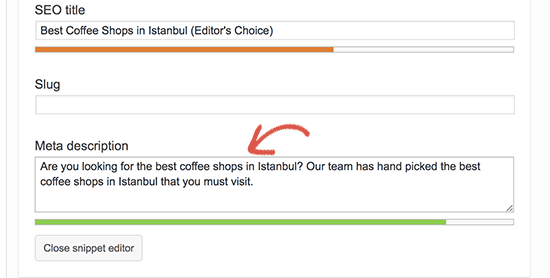
Meta description is a brief description explaining what your page is about. It is added in the <head> section of your site’s HTML.

You can add meta description for your articles by using a WordPress SEO plugin like Yoast SEO or All in One SEO plugin.

Optimize meta description for answer box

Make sure that your meta description includes your target keyword. It also needs to explain what questions or topics this particular page will be answering.

For example, our article about WordPress SEO tools and plugins uses this meta description:

“Are you looking for best WordPress SEO plugin and tools to boost your SEO? Check out our list of 9 best WordPress SEO Plugins and Tools.”

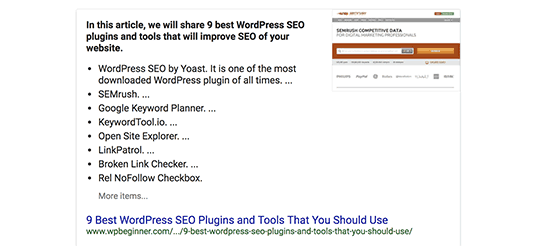
Here is how it appears in the answer box.

Meta description optimization effect on Google Answer Box

Utilize Lists, Tables, Table of Contents

Users love properly formatted content because it helps them quickly get the information they need. That’s why websites like list25 are so popular. They publish informative content in a viral listicle format that is easier to consume and share.

Google understands that and tends to highlight the websites that use formatting to make content consumption easier for users.

Tables in Google Answer Box

This includes:

  • Pages that use tables to list items.
  • How to articles that use step by step instructions.
  • Top lists that simply just list items.
  • Lenghty articles that utilize table of contents
  • and more.

This does not mean that you must always use one of these formats to write your articles. However, if using formatting can help your users get to the information quickly, then use it.

Lists in Google Answer Box

Optimize Content with Data Driven Decisions

Data is the most important thing you need for an effective content strategy. This is where Google Analytics comes in. It helps you understand your audience and plan accordingly.

You will need MonsterInsights to properly track user engagement in WordPress. It is the best Google Analytics plugin in the market, and it will help you learn where your users are coming from, and what they do while they are on your site.

These stats provide you a clear picture of what’s already working on your website. You can then expand on it and make informed decisions for better SEO.

Follow SEO Best Practices

Apart from answering the user questions, you also need to make sure that Google can find your page and understand it just as easily.

This means you still need to optimize your posts for SEO just like you would normally do.

  • Include your keywords in SEO title, description, and keywords.
  • Add your focus keyword in content and sub-headings in your article.
  • Properly utilize categories and tags.
  • Make sure there is enough content to cover the topic.
  • Make internal linking a habit and link to your other posts and pages
  • Add title and alt tags to your images.

Are Google Answer Boxes Worth The Effort?

Yes, absolutely. As we mentioned earlier the click-through rate for results in the answer box is way higher. Depending on the topic and your content, it could go as high as 51.2%.

However, we do not recommend you overthink it. The purpose of Answer boxes is to help users find information quickly. If you focus on answering questions through helpful and informative content, then search results will start picking it up.

Google’s search features are always changing. There are no shortcuts that will help you win forever. Building your website as an authority / reliable source of useful information will help you win in the long run.

We hope this article helped you learn how to appear in Google Answer Boxes. You may also want to see our list of the must-have WordPress plugins that will help you take your website to the next level.

If you liked this article, then please subscribe to our YouTube Channel for WordPress video tutorials. You can also find us on Twitter and Facebook.

The post How to Appear in Google Answer Boxes with Your WordPress Site appeared first on WPBeginner.

Introducing Maintaingo – An Agency-Powered WordPress Maintenance and Support Service

WordPress maintenance is boring. I mean, is there anything exciting about running a backup or preventing a future malware attack? But WordPress maintenance is also essential. Because as unsexy as backups, security, and their ilk are, they’re necessary to keep your WordPress site safe, secure, and running smoothly. So if you don’t like having to ... Read more

The post Introducing Maintaingo – An Agency-Powered WordPress Maintenance and Support Service appeared first on Learn WordPress with WPLift.

Evolution of WordPress User Interface (2003 – 2017)

WordPress user interface has evolved steadily since its first release in 2003. WordPress started out as a simple blogging platform and has now matured into a full-fledged CMS platform. In this article, we will take you to back in time to show the different stages in the evolution of WordPress user interface since 2003 until now.
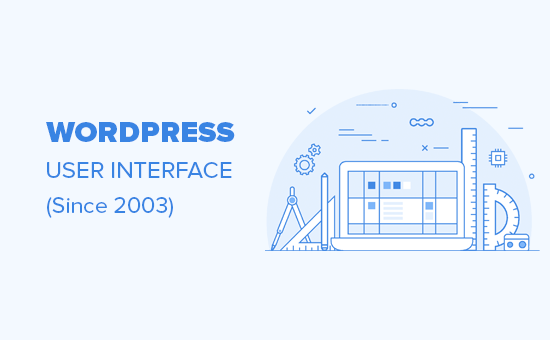
Evolution of WordPress user interface since 2003

The Beginnings of WordPress

WordPress started out in 2003. Mainly because the development on an already popular blogging software b2/cafelog was discontinued by their main developers.

Two passionate users of b2/cafelog, Matt Mullenweg and Mike Little, decided to build a new platform on top of b2/cafelog. This is how WordPress was first released on 27th May, 2003. Learn more about the origin story of WordPress in our article on the history of WordPress.

Since then, there has been a total of 276 WordPress releases so far (November 2017). In this article, we will highlight the ones that introduced a big change in admin panel user interface.

WordPress 0.71 – (June 2003)
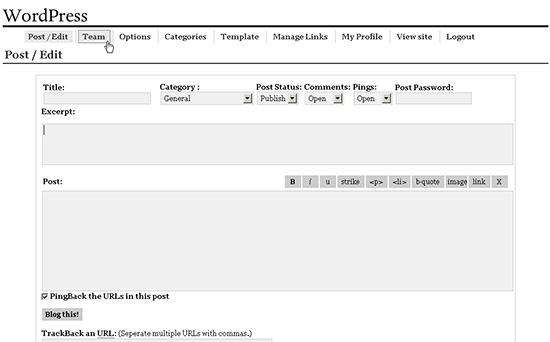
The landing page of WordPress 0.71 admin panel was directly the write post page. As you can see there was no dashboard.

Features were very limited, and it was kept simple. You could only assign one category to each post. This version of WordPress had a tedious installation method where you would have to change a lot of information manually.

WordPress 1.0.1 (Miles – 2004)
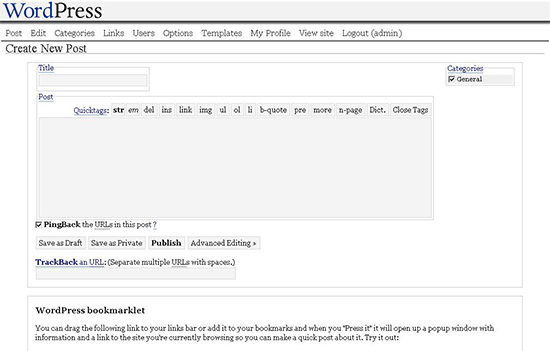
WordPress 1.0.1 Miles was released January 3, 2004

Starting this version, WordPress started naming its major releases after Jazz musicians. As you can see this release was named after a famous musician, Miles Davis.

In this version, WordPress stopped using the b2 file structure and moved toward its own style of filing structure. New features included multiple category selection, SEO friendly URL structure, comment moderation, new installer, and several other improvements.

WordPress 1.2 – Mingus (May 2004)
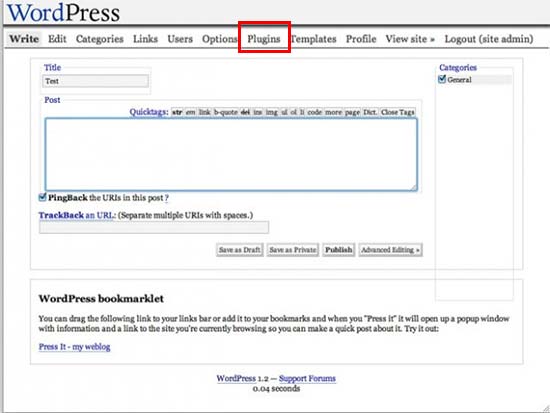
WordPress 1.2 Mingus User Interface

Named after Charles Mingus, WordPress 1.2 was a monumental release. One of the most important upgrades in this version was the introduction of “Plugins”.

Other notable changes were Sub categories, custom fields, thumbnail creation, post preview, encrypted passwords, and the ability to ping more than one service at a time.

WordPress 1.5 – Strayhorn (Feb 2005)
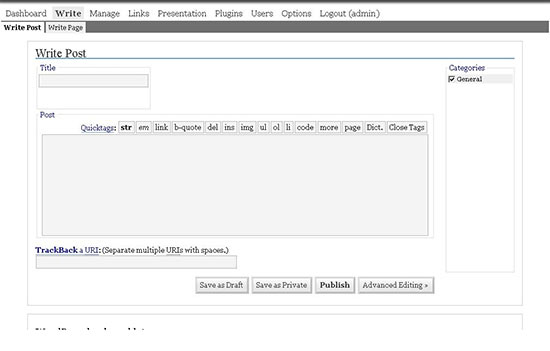
This version of WordPress was named after Billy Strayhorn. It showed the first glimpse of a new dashboard style. It didn’t use Ajax and was way slower than the WordPress we use today.

Another significant feature was the introduction of pages along side posts, allowing users to create static pages that were not part of their blog. This release also added support for installing multiple themes in a single WordPress installation.

WordPress 2.0 – Duke (Dec 2005)
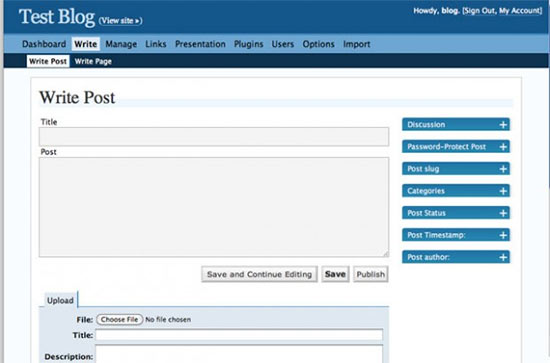
WordPress 2.0 Duke

WordPress 2.0 brought a major uphaul to the WordPress admin interface. It had a large blue header on top a complete overhaul of the admin area. It was way faster than previous releases as it utilized Ajax to perform certain tasks.

This release also included a full WYSIWIG editor. Akismet was introduced as a plugin to combat with the growing comment spam problem. Some other notable features were image/file uploading, theme preview via thumbnail (screenshot.png), improved posting speed, new hooks for developers, and more.

WordPress 2.1 – Ella (Jan 2007)
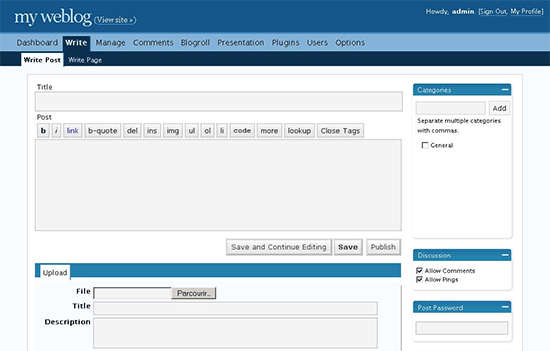
WordPress 2.1

WordPress 2.1 Ella was the first release to introduce a new admin screen to manage comments. The comment management process was significantly improved as users were able to delete or approve comments without reloading admin screens.

WordPress 2.3 – Dexter (Sep 2007)
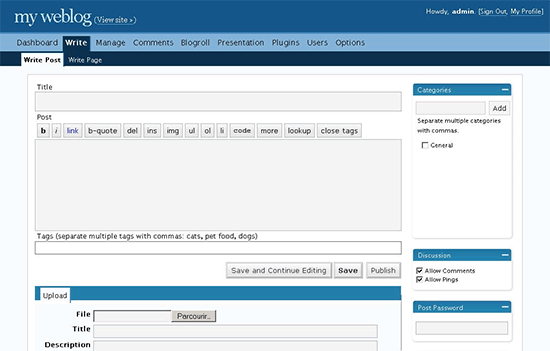
WordPress 2.3

This release didn’t drastically change WordPress user interface but added several significant improvements. For the first time WordPress improved native support to add tags to your posts.

It also introduced update notifications allowing WordPress core and plugins to show notifications when there is a new version available. This release also started auto-redirecting users to correct WordPress URL as defined in the settings.

WordPress 2.5 – Brecker (Mar 2008)
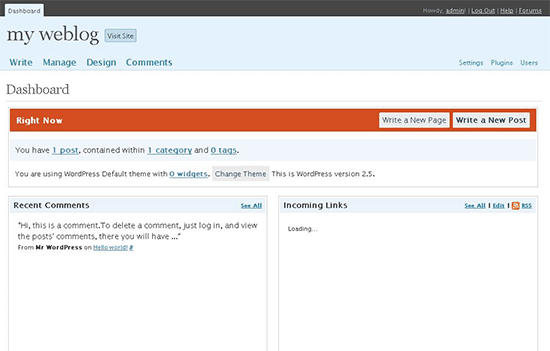
WordPress 2.5

For WordPress 2.5, the WordPress team collaborated with Happy Cog, a leading web design consultancy firm, to overhaul WordPress user interface. It was a major re-design or rather reimagining of WordPress how we use it today.
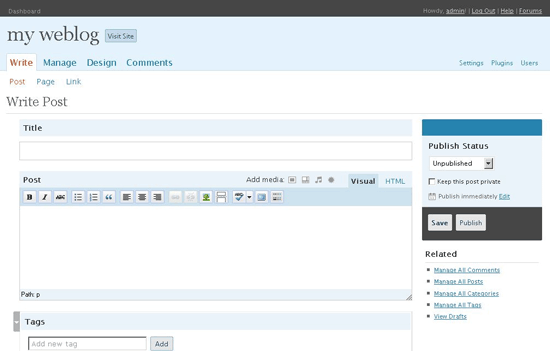
WordPress 2.5 Editor

The dashboard got much better as they added more useful information there. This was the first version where we saw one click upgrade for plugins which were in WordPress plugin directory. Much better visual editor and a built-in gallery was also included in this release.

Many of the core components of this redesign are still a major part of the software. However, its appearance quickly changed just 10 months later.

WordPress 2.7 – Coltrane (Dec 2008)
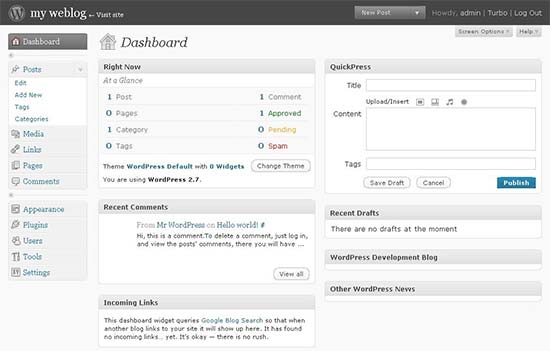
WordPress 2.7

WordPress 2.7 brought another major upgrade to the WordPress admin user interface. Users were now able to readjust WordPress dashboard elements. Screen options were introduced so that users can show and hide elements to meet their requirements.

Other notable features included automated installation for plugins through the WordPress admin panel. Reply to comments from the admin panel, threaded comments, sticky posts, keyboard shortcuts, comment paging, and more.

WordPress 2.9 – Carmen (Dec 2009)
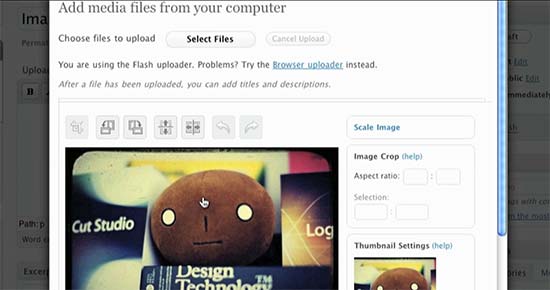
WordPress 2.9 Image editing

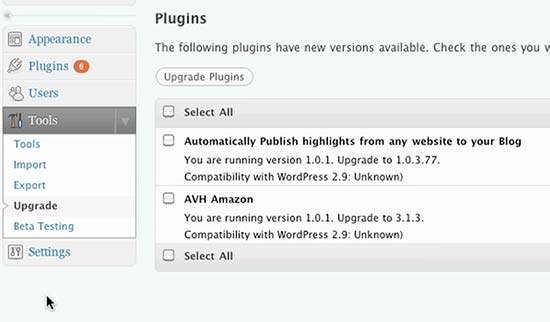
WordPress 2.9 Plugin update screen

WordPress 2.9 didn’t change user interface but added several new features that integrated beautifully in the WordPress interface. One of these changes was a plugin update system, that allowed users to update their plugins to the newer version with a single click.

Another major change in the release was image editing features, which allowed users to crop, resize, rotate, scale, and flip images in WordPress.

WordPress 3.0 – Thelonious (2010)
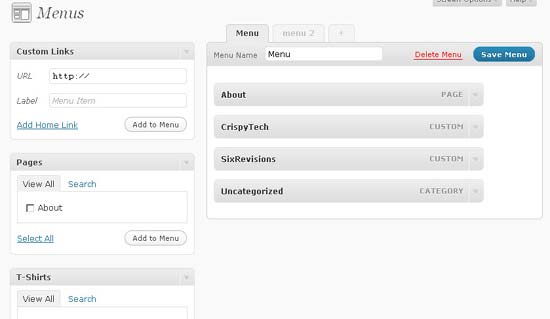
WordPress 3.0

WordPress 3.0 Thelonious was a major WordPress upgrade which truly transformed WordPress from a blogging platform to a full fledged CMS. It introduced post types, taxonomies, custom backgrounds, headers, shortlinks, and navigation menus. It also started the tradition of introducing a new default theme each year, this new default theme was called Twenty Ten.

This release merged a WordPress sister project called WordPress MU into core WordPress itself. This feature is now known as WordPress multisite. The basic style of the admin interface was capable of adapting all these major changes without a significant overhaul of the admin area.

WordPress 3.1 – Django Reinhardt (2011)
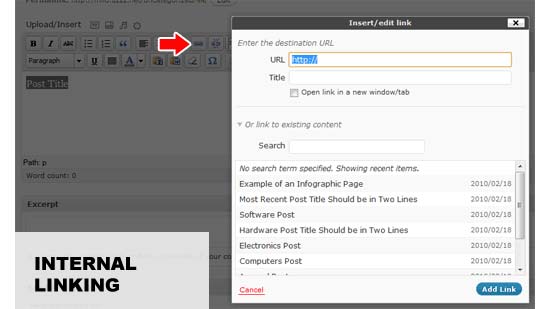
WordPress 3.1

WordPress 3.1 continued adding feature to the robust WordPress user interface. With this new release, WordPress introduced the admin bar, post formats, and a better internal linking feature.

WordPress 3.3 – Sonny (2011)
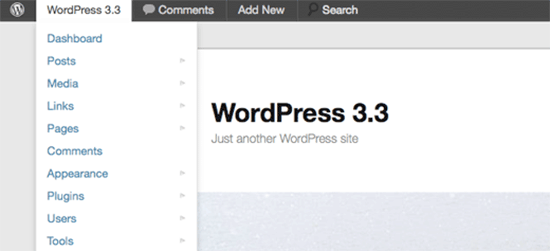
WordPress 3.3 UI

Released in December of 2011, WordPress 3.3 came packed with features and improvements to existing WordPress UI. It added fly out menus for better navigation in the admin area, a revamped admin bar, drag and drop to upload media, and tool tips. See more features and screenshots of WordPress 3.3.

WordPress 3.5 – Elvin (2012)
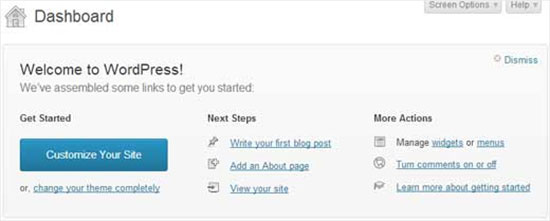
WordPress 3.5

Mobile and high resolution devices were already becoming accessible to all users. WordPress 3.5 streamlined the user interface for modern retina display devices. This included upgraded icons and adaptive styles that looked great on any screen resolution. See more features and screenshots of WordPress 3.5.

WordPress 3.8 – Parker (2013)
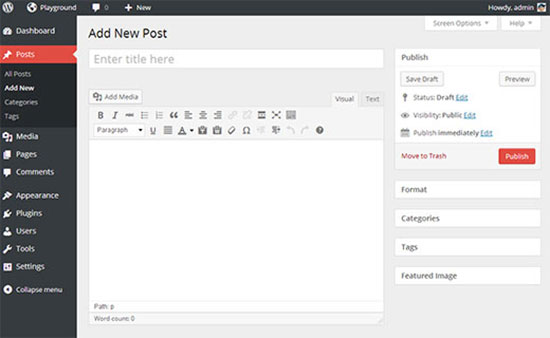
WordPress 3.8 Admin UI

The appearance and basic style of WordPress UI wasn’t changed since 2008 and was way overdue for a major upgrade. The goal for this upgrade was to handle mobile devices more elegantly and make WordPress more accessible. After a ton of work, the new WordPress user interface was released with WordPress 3.8.

The new user interface which is still used (with minor enhancements) was mobile responsive, had more color schemes, used icon fonts, and Open Sans for typography.
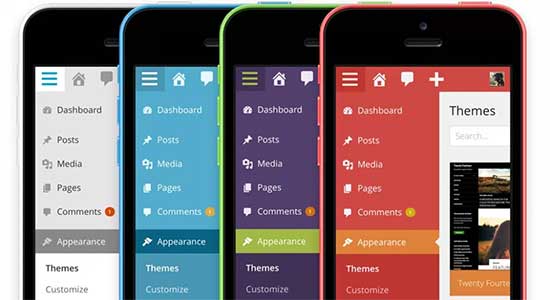
WordPress 3.8 mobile

WordPress 3.9 – Smith (2014)

WordPress 3.9

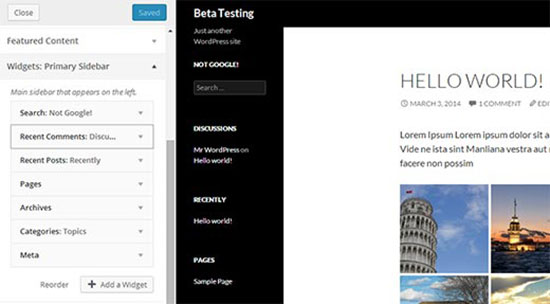
WordPress kept improving the UI to handle new features. WordPress 3.9 made several enhancements it started using flat buttons in the post editor, drag and drop image uploads, gallery previews, and more. It also added live previews when adding widgets in theme customizer. See more features and screenshots of WordPress 3.9.

WordPress 4.0 – Benny (2014)
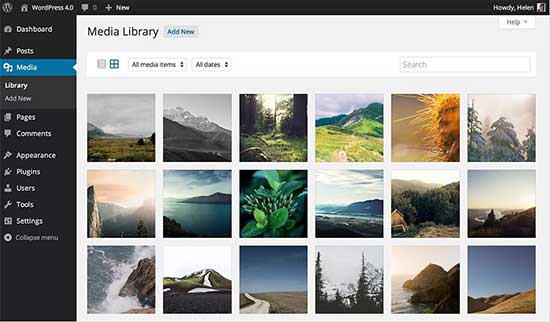
WordPress 4.0

The same year WordPress 4.0 was released. There was no major change in the UI. However, there were some cool changes that fit right into the existing WordPress admin look.

A new grid view for Media gallery was introduced with infinite scroll and smooth editing. See screenshots and features of WordPress 4.0.

WordPress 4.2 – Powell (2015)
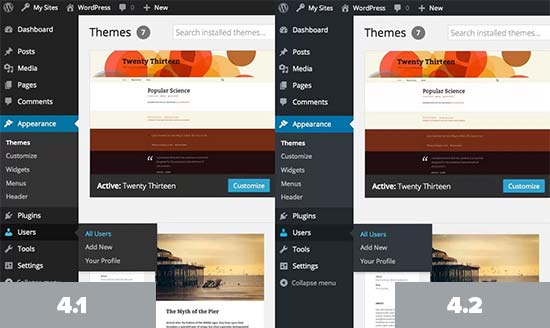
WordPress 4.2

WordPress 4.2 came with a tiny but significant improvement in the admin area color scheme. The grays were given a slight blue hue and the blues were changed to pure blue with no red channel. See more features and screenshots of WordPress 4.2.

WordPress 4.5 – Coleman (2016)
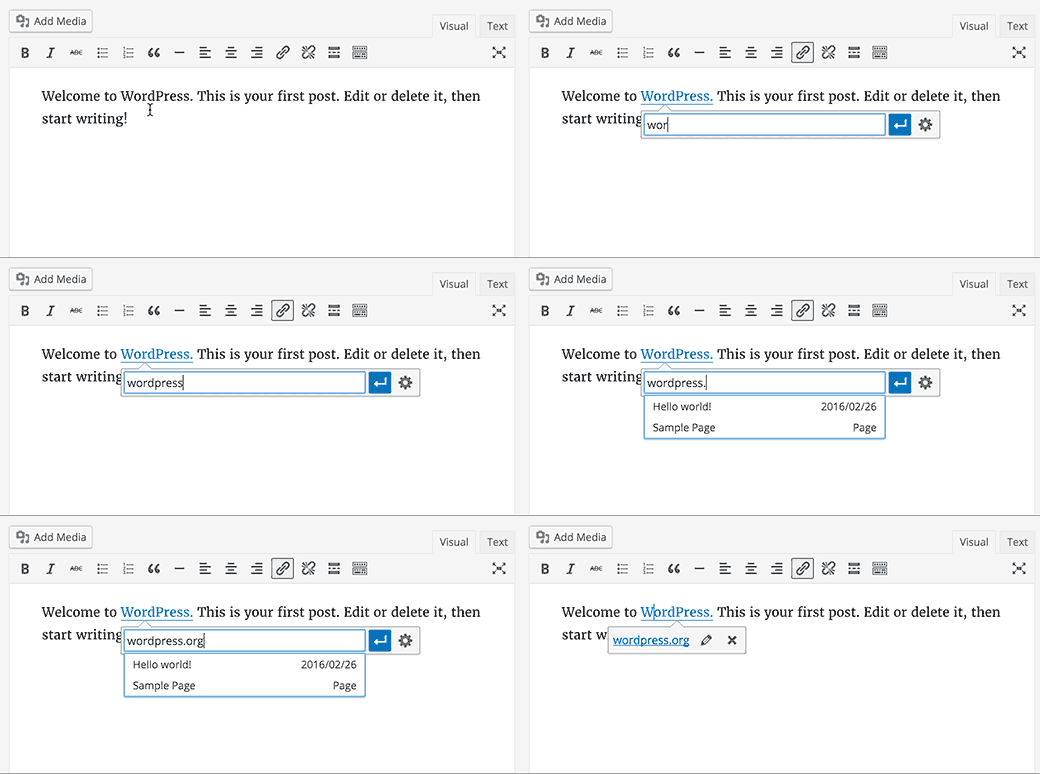
Inline link editing in WordPress 4.5

WordPress 4.5 brough some improvements in the default WordPress visual post editor. A new inline link editing feature was introduced along with some new inline text shortcuts.

Responsive previews were added in theme customizer which allowed users to preview their theme desktop, tablet, and mobile without changing devices. For more features see our article on the release of WordPress 4.5 with screenshots.

WordPress 4.6 – Pepper (2016)

Shiny updates in WordPress 4.6

In WordPress 4.6, the core team decided to start using native fonts instead of loading Open Sans from Google servers. This release also streamlined updates, which allowed users to install, update, and delete plugins/themes without leaving a page.

WordPress 4.8 – Vaughan (2017)
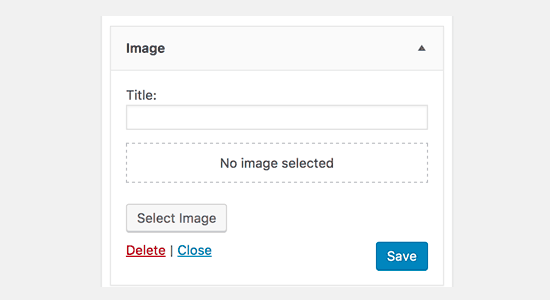
Media Widgets introduced in WordPress 4.8

WordPress 4.8 introduced a new set of widgets to add media like images, audio, video, and rich text. It also added a new dashboard widget that displayed WordPress news and events. For more features and screenshots, see our overview of WordPress 4.8.

WordPress 4.9 – Tipton (2017)
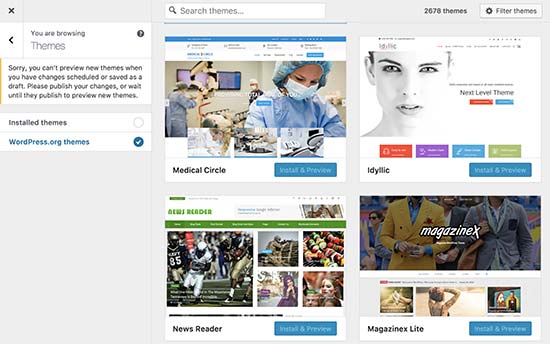
New Theme browsing experience in WordPress 4.9

The last major release of WordPress for 2017 added more features to Theme Customizer. It added a new theme browsing and preview experience in customizer.

It also made code editing in custom CSS and theme/plugin editors much easier by adding syntax highlighting and auto-completion features.

The Future of WordPress User Interface

As you may have noticed that WordPress user interface hasn’t changed much since 2013. However WordPress itself has improved a lot since then with tons of new features, better performance, and improved security.

Today, the user interface feels a bit out-dated compared to the many other top website builders in the market.

But this is about to change.

Core WordPress developers are working on a project codenamed Gutenberg. This project will add drag and drop functionality to WordPress post and page editor. It will allow new users to drag and drop blocks into their website like they do in a page builder plugin.
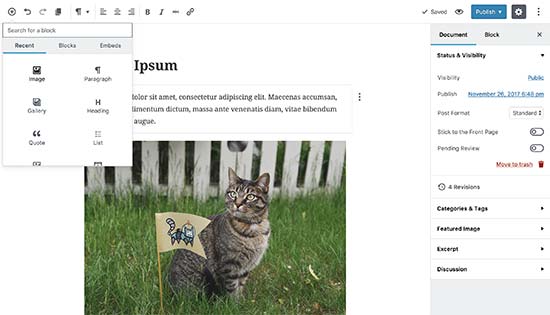
Gutenberg

We are very excited about this new upcoming release, and will keep you updated through out the process.

We hope this article helped you see the evolution of WordPress user interface since its first release in 2003. You may also want to see our list of the top WordPress companies and businesses.

If you liked this article, then please subscribe to our YouTube Channel for WordPress video tutorials. You can also find us on Twitter and Facebook.

The post Evolution of WordPress User Interface (2003 – 2017) appeared first on WPBeginner.
How to Prevent Authors From Deleting Posts in WordPress

By default, users with the author user role can delete their own posts, even when these posts are already published. If you run a multi-author blog, then you may want to stop authors from deleting their own posts specially once it’s published. In this article, we will show you how to easily prevent authors from deleting their own posts in WordPress.

How to prevent authors from deleting posts in WordPress

Why Prevent Authors From Deleting Their Own Posts in WordPress

WordPress comes with a powerful user role management system. Each registered user on your WordPress website is assigned a user role, and each user role comes with different permissions.

Users with the ‘author‘ role can write posts and publish them on your website. This role is generally used by multi-author WordPress blogs.

Authors can also delete their own posts, including those already published. As a website owner, you may want to prevent authors from doing that. The easiest way to do that is by modifying the author user role and changing its permissions in WordPress.

Let’s take a look at how to easily prevent authors from deleting their own posts.

Method 1: Prevent Authors From Deleting Posts Using Plugin

This method is easier and recommended for all users.

First thing you need to do is install and activate the Capability Manager Enhanced plugin. For more details, see our step by step guide on how to install a WordPress plugin.

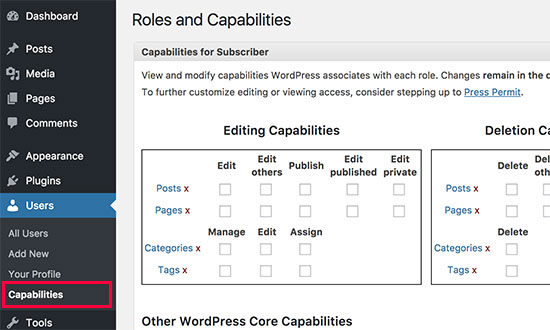
Upon activation, you need to visit Users » Capabilities page. Here you can load any WordPress user role and change its capabilities and permissions.

User roles and capabilities manager

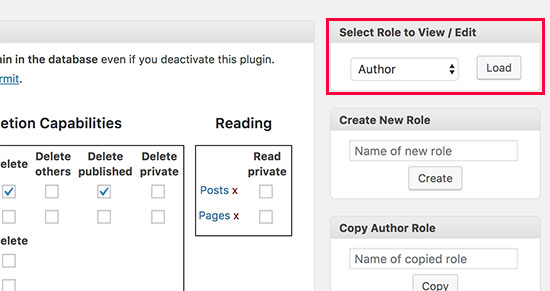
You need to start by locating the ‘Select Role to View / Edit’ box in the right column, and then select ‘Author’ user role from the drop down menu. After that you need to click on the ‘Load’ button to load the author user role capabilities.

Load author user role

The plugin will now load the ‘Author’ user role capabilities. Under the deletion capabilities section, you need to uncheck the box next to delete and delete published options.

After that you can go to the bottom of the page and click on the save changes button to store your settings.

Now, users with the author user role will not longer be able to delete any posts on your WordPress site.

Giving Back Permissions

User role capabilities are defined explicitly. It means that once you remove a capability from a user role, it will not come back unless you explicitly define it again. Even if you uninstalled the plugin, the capability changes you made will not revert automatically.

If you want to give back authors permission to delete, then you will have to repeat the process and check the boxes next to the delete and delete published posts options.

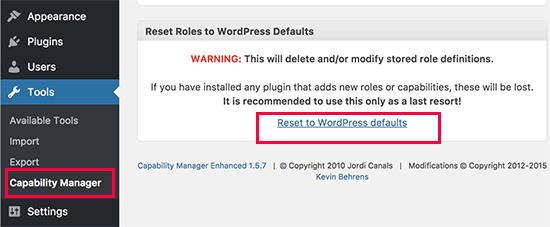
If you want to uninstall the plugin and revert back to default WordPress capabilities, then first you need to visit Tools » Capability Manager page and click on ‘Reset to WordPress defaults’ link.

Reset user role permissions

Method 2: Manually Prevent Authors From Deleting Their Own Posts

This method requires you to add code to your WordPress files. If you haven’t done this before, then take a look at our guide on how to copy and paste code in WordPress.

You will need to add the following code to to your theme’s functions.php file or a site-specific plugin.

function wpb_change_author_role(){
	global $wp_roles;
	$wp_roles->remove_cap( 'author', 'delete_posts' );
	$wp_roles->remove_cap( 'author', 'delete_published_posts' );

}
add_action('init', 'wpb_change_author_role');

This code changes the author user role and removes their capability to delete their own posts.

If you want to revert back the permissions, then simply removing the code will not make any change. You will need to explicitly redefine the removed capabilities by replacing the first code snippet with the following code:

function wpb_change_author_role(){
	global $wp_roles;
	$wp_roles->add_cap( 'author', 'delete_posts' );
	$wp_roles->add_cap( 'author', 'delete_published_posts' );

}
add_action('init', 'wpb_change_author_role');

We hope this article helped you learn how to prevent authors from deleting their own posts in WordPress. You may also want to see our ultimate step by step WordPress security guide for beginners.

If you liked this article, then please subscribe to our YouTube Channel for WordPress video tutorials. You can also find us on Twitter and Facebook.

The post How to Prevent Authors From Deleting Posts in WordPress appeared first on WPBeginner.
Booster for WooCommerce Review: Jetpack For Your WooCommerce Store

Ever wished that there were something like Jetpack for your WooCommerce store? Something where you could just install one plugin and then pick and choose between a ton of helpful modules rather than trying to hunt down 20 different plugins? I think you see where this is going… Booster for WooCommerce is that Jetpack for ... Read more

The post Booster for WooCommerce Review: Jetpack For Your WooCommerce Store appeared first on Learn WordPress with WPLift.

How to Turn Off PHP Errors in WordPress

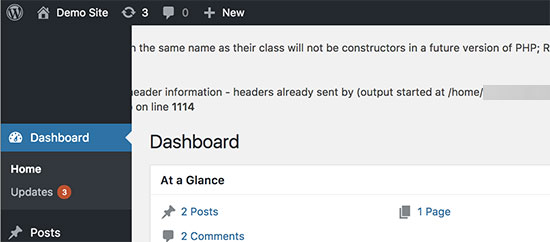
Recently one of our readers asked how to turn off PHP errors in WordPress? PHP warnings and notices help developers debug issues with their code. However it looks extremely unprofessional when they are visible to all your website visitors. In this article, we will show you how to easily turn off PHP errors in WordPress.

How to turn off PHP errors in WordPress

Why and When You Should Turn Off PHP Errors in WordPress?

PHP errors that you can see on your WordPress site are usually warnings and notices. These are not like internal server error, syntax errors, or fatal errors, which stop your website from loading.

Notices and warnings are the kind of errors that do not stop WordPress from loading your website. See how WordPress actually works behind the scenes for more details.

PHP errors in WordPress admin area

The purpose of these errors are to help developers debug issues with their code. Plugin and theme developers need this information to check for compatibility and best practices.

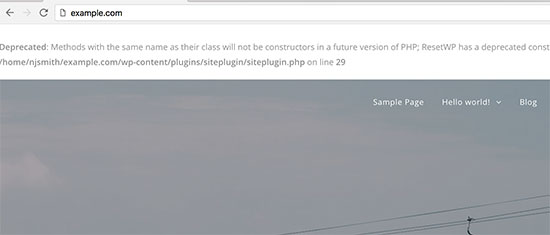
However, if you are not developing a theme, plugin, or a custom website, then these errors should be hidden. Because if they appear on the front-end of your website to all your visitors, it looks extremely unprofessional.

WordPress warning errors on homepage

If you see an error like above on on your site, then you may want to inform the respective theme or plugin developer. They may release a fix that would make the error go away. Meanwhile, you can also turn these errors off.

Let’s take a look at how to easily turn off PHP errors, notices, and warnings in WordPress.

Turning off PHP Errors in WordPress

For this part, you will need to edit the wp-config.php file.

Inside your wp-config.php file, look for the following line:

define('WP_DEBUG', true);

It is also possible, that this line is already set to false. In that case, you’ll see the following code:

define('WP_DEBUG', false);

In either case, you need to replace this line with the following code:

ini_set('display_errors','Off');
ini_set('error_reporting', E_ALL );
define('WP_DEBUG', false);
define('WP_DEBUG_DISPLAY', false);

Don’t forget to save your changes and upload your wp-config.php file back to the server.

You can now visit your website to confirm that the PHP errors, notices, and warnings have disappeared from your website.

Turning on PHP Errors in WordPress

If you are working on a website on local server or staging area, then you may want to turn on error reporting. In that case you need to edit your wp-config.php file and replace the code you added earlier with the following code:

define('WP_DEBUG', true);
define('WP_DEBUG_DISPLAY', true);

This code will allow WordPress to start displaying PHP errors, warnings, and notices again.

We hope this article helped you learn how to turn off php errors in WordPress. You may also want to see our list of the most common WordPress errors and how to fix them.

If you liked this article, then please subscribe to our YouTube Channel for WordPress video tutorials. You can also find us on Twitter and Facebook.

The post How to Turn Off PHP Errors in WordPress appeared first on WPBeginner.
Weekly WordPress News: WordPress Black Friday Deals

Rejoice, fellow WordPress lovers! It’s Black Friday – which means a ton of WordPress Black Friday deals. Save big on Elegant Themes, Beaver Builder, Elementor, SiteGround, and lots more. When you’ve reached the limit on all of your credit cards, there’s also an interesting podcast episode on the WordPress Theme Review team. And we put ... Read more

The post Weekly WordPress News: WordPress Black Friday Deals appeared first on Learn WordPress with WPLift.

7 PayPal Alternatives for Freelancers to Collect Payments in WordPress

Are you looking for PayPal alternatives for freelancers to collect payments in WordPress? PayPal is one of the easiest platforms to collect payments on your website. However, it is not available in all countries and not all of your clients may want to use it. In this article, we will share some of the best PayPal alternatives for freelancers to collect payments in WordPress.

Best PayPal Alternatives for Freelancers to collect payments in WordPress

Why Look for PayPal Alternatives to Accept Online Payments

PayPal has made online transactions fast and hassle free. Allowing WordPress site owners to make money online by selling products and services.

However, there are certain issues with PayPal which leads to many searching for PayPal alternatives.

For example, there are a number of developing countries where PayPal does not work. PayPal transaction charges are also on the higher side and can significantly build up over time.

Perhaps the biggest reason why people are searching for PayPal alternatives is its uncertain behavior. Many PayPal accounts have been blocked or suspended for small issues, which has caused major losses for a number of PayPal users.

That being said, here are 7 payment services that you can use as PayPal alternatives on your WordPress site.

1. Stripe

Stripe

Stripe has quickly become the most popular PayPal alternative and one of the most popular payment gateways. Unfortunately, it is only available in select few countries.

The best part about using Stripe is lower fees, ease of use, and seamless integration into popular WordPress eCommerce platforms like WooCommerce and Shopify.

If you don’t want to setup a complete online store, then you can create a simple form with WPForms to collect payments via Stripe from your clients.

Stripe fees vary depending on which country you are in. For the United States, they have a fixed 2.9% + 30¢ fees for any successful credit card charge.

2. Transferwise

TransferWise

Transferwise allows your clients to pay you directly in your local currency. Your clients will be charged for the payment, and it will be sent to your bank account as a local transfer.

It is available in many countries and currencies. Transferwise fees vary depending on the location of both sender and receiver. However, we have found it to be often way lower than other payment services or a direct wire transfer. They also use the same exchange rate that you see on Google or XE, which also saves you additional money in currency exchange.

One downside is that Transferwise doesn’t allow business payments to be sent in some countries. Make sure to check the country page before requesting your clients to send you money for pricing and business payment status.

3. Bitcoin

Bitcoin

Cryptocurrencies are all the rage these days. Bitcoin is one of the first and the most well-known cryptocurrency in the world. Bitcoin also allows users to send and receive money across borders without the need for an intermediary such as a bank or a money transfer operator who takes a cut out of the transaction.

If your client is familiar with Bitcoin, then they can easily transfer money to your Bitcoin wallet. You can then convert this amount into local currency through a Bitcoin exchange, use the amount online, or transfer it to any other payment service.

Coinbase, a bitcoin trading platform, allows businesses to accept bitcoin payments. It is already being used by top companies like Expedia, Dell, Intuit, Wikimedia Foundation, and more.

4. Payoneer

Payoneer

Payoneer is a reliable name in the online payments industry. It is available in many countries around the world. There are currently no integrations available to connect it directly to your eCommerce or membership website. However, you can request clients to send payments via Payoneer.

Payoneer also makes it quite convenient to withdraw payments into your local bank account or use Payoneer branded debit card to withdraw payments from ATMs anywhere in the world. The downside is that their fees are higher compared to Stripe or PayPal, but lower than some other payment service providers.

For accepting credit card payments directly from clients, you will be charged 3% of the transaction amount. Additionally you will be charged $1.50 for local bank transfer in the same currency. If you are withdrawing amount in another currency account, then you will pay an additional 2% of the transaction amount.

5. Payza

Payza

Payza is a another popular PayPal alternative payment service. It is available in many countries and have integration addons available for some popular WordPress eCommerce plugins. Due to its availability in many countries, it is quickly becoming popular among freelancers.

Payza allows you to withdraw funds using wire transfer, bank transfer, Bitcoin, and through their Payza branded Mastercard.

Sending money through Payza is free, but withdrawing money is not so cheap. Depending on which withdrawal method you choose, you may end up paying quite a lot of your freelance earnings to Payza. For the United States, you will pay 2.90 % + $0.30 USD per transaction. Credit card payments will start at 5.49 % + $ 0.65 receiving fee.

6. 2Checkout

2Checkout

2Checkout is a one of the most known payment gateways and a good PayPal alternative. All popular eCommerce plugins for WordPress have addons to integrate 2Checkout as your payment gateway. You can also add it to your online store and start selling products to countries where Stripe or PayPal are not supported.

2Checkout offers different payment withdraw methods, and you can even integrate your Payoneer debit card to withdraw payments. Other notable features include recurring payments, hosted checkout experience, multiple currencies and languages support.

2Checkout charges differ depending on which country you are located in. For the United States, you will be charged 2.9% of the transaction amount + 30¢ on each transaction.

7. Google Wallet

Google Wallet

Google Wallet is another excellent option to replace PayPal for your payments. It is currently only available in the United States and the United Kingdom, and you cannot send payments from the US to UK. It doesn’t have an out of box integration available for any WordPress ecommerce platform.

Like many other Google tools and services, it does not charge any fees for sending or receiving money. This makes it a great option for freelancers who want to request client payments through Google Wallet.

We hope this article helped you find the best PayPal alternatives to collect payments in WordPress. You may also want to see our ultimate step by step WordPress security guide for beginners.

If you liked this article, then please subscribe to our YouTube Channel for WordPress video tutorials. You can also find us on Twitter and Facebook.

The post 7 PayPal Alternatives for Freelancers to Collect Payments in WordPress appeared first on WPBeginner.