Category Archives: WordPress Plugins

How to Fix the Mixed Content Error in WordPress (Step by Step)

Are you seeing the mixed content error in WordPress? Mixed content error in WordPress is caused by incorrect HTTPs/SSL settings. Often times it doesn’t affect your website’s functionality, but it can have adverse affects on your website’s SEO and user experience. In this article, we will show you how to fix the mixed content error in WordPress.

How to fix the mixed content error in WordPress

What is Mixed Content Error in WordPress?

It is highly recommended to add HTTPS / SSL in WordPress because after July 2018 Google Chrome will mark all http versions of website as insecure.

SSL adds an additional security layer around data transferred from your website to users’ browsers. Search engines like Google recommend using SSL on your website as well.

All best WordPress hosting companies are now offering free SSL as part of their packages. If your hosting company doesn’t offer that, then you can get free SSL through Let’s Encrypt for your WordPress site.

If you have correctly implemented SSL on your website, then you will see a green padlock icon next to your website’s URL in the browser address bar.

Secure content sign

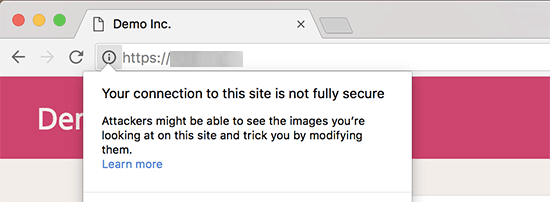
On the other hand if your HTTPs/SSL settings are not properly setup, then you will see an info sign or a broken padlock icon in the address bar.

Not fully secure due to mixed content

This indicates that while your website is using a SSL certificate, some content on your website is still served from non HTTPS urls.

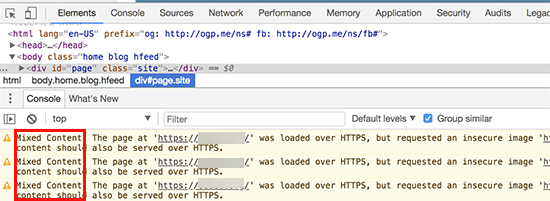
You can find out which content is served through insecure protocol by using the Inspect tool. The mixed content error will be displayed as a warning in the console with details for each mixed content item.

Mixed content displayed in developer tools

If it is just a single item that you can manually fix, then you can go ahead and fix it by editing the post, page, or theme file where it appears.

However, in most cases these items are added dynamically by WordPress or stored in your database. In that case, it will be hard to detect all of them and fix them manually.

That being said, let’s take a look at how to easily fix the mixed content error in WordPress.

Fixing Mixed Content Error in WordPress

First thing you need to do is install and activate the SSL Insecure Content Fixer plugin. For more details, see our step by step guide on how to install a WordPress plugin.

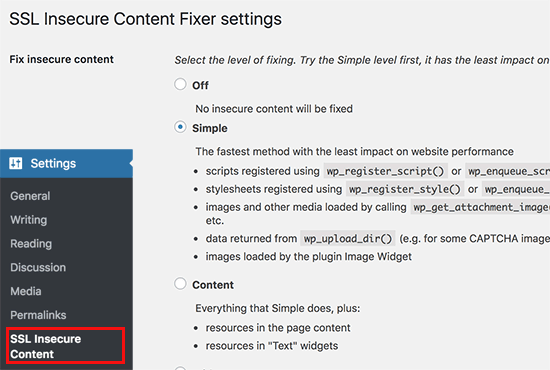
Upon activation, you need to visit Settings » SSL Insecure Content page to configure the plugin settings.

SSL secure content plugin settings

This plugin provides different levels of fixes to the mixed content error. We will explain each one of them, what they do, and which one is best for you.

1. Simple

This is the fastest and recommended method for all beginner users. It automatically fixes the mixed content error in WordPress for scripts, stylesheets, and WordPress media library images.

2. Content

If the simple method doesn’t fix the mixed content error on your website, then you should try this method. It will use all the features of simple, in addition to checks for fixes inside WordPress content and text widgets.

3. Widgets

This includes all fixes applied in content level plus an additional fix to resources loaded in all WordPress widgets on your website.

4. Capture

This method captures everything on every page of your website from header to footer and replaces all URLs with HTTPs. It is slower and would affect performance of your website.

5. Capture all

When all above levels fail, then you can try this method. It attempts to fix everything which may result in some unexpected behavior on your website. It will also have the most negative impact on performance.

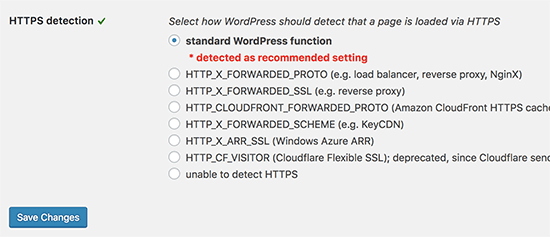
After selecting a content fix level, you need to scroll down to the HTTPS detection section. This is where you can choose how to detect the HTTPs content on your website.

HTTPS detect

The default option is to use a WordPress function, which would work for most website.

Below that you will find other options which are particularly useful if you’re using Cloudflare CDN, nginx web server, and more. Go ahead and select the method that you think applies to your website depending on your particular setup.

Don’t forget to click on the save changes button to store your settings.

You can now visit your website to see if this resolved the insecure content issues on your website. Make sure to clear your WordPress cache before checking your website.

If the mixed content error in WordPress is not fixed, then revisit the plugin’s settings page and readjust the fix levels.

We hope this article helped you learn how to fix the mixed content error in WordPress. You may also want to see our list of the most common WordPress errors and how to fix them.

If you liked this article, then please subscribe to our YouTube Channel for WordPress video tutorials. You can also find us on Twitter and Facebook.

The post How to Fix the Mixed Content Error in WordPress (Step by Step) appeared first on WPBeginner.

Swarmify SmartVideo Review: A Better Way To Embed Videos In WordPress

If you’ve been using WordPress for some time, you probably know that it’s a horrible idea to use the WordPress Media Library to host videos on your site. Not only are those files large and going to use a lot of bandwidth, but your visitors are probably going to have an equally horrible experience because ... Read moreSwarmify SmartVideo Review: A Better Way To Embed Videos In WordPress

The post Swarmify SmartVideo Review: A Better Way To Embed Videos In WordPress appeared first on Learn WordPress with WPLift.

How to Disable Specific WordPress Plugins for Mobile Users

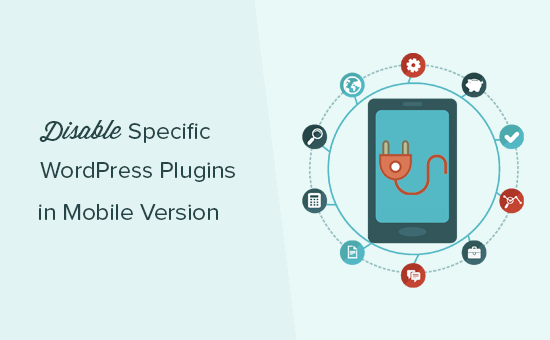
Recently one of our readers asked if it is possible to disable specific WordPress plugins on the mobile version of their website? Like with anything in WordPress, there’s a plugin for that. In this article, we will show you how to easily disable specific WordPress plugins in mobile version of your site.

Disable specific WordPress plugins in mobile

Why Disable Specific WordPress Plugins for Mobile Users

WordPress does not load inactive plugins when someone visits your website. However, it does loads all the active plugins and then depending on a plugin it will load required scripts and stylesheets as well.

See our guide on how WordPress works for a behind the scene look at how it loads plugins.

All good WordPress plugins try to only load when needed. However, sometimes it is difficult for plugin authors to guess whether you will need the plugin or not. In such situations, they opt to load the required files just in case.

Some users who want to get a perfect score in the Google speed and performance test, often want to disable specific plugins for mobile.

That’s where this article can help.

Let’s take a look at how to easily disable individual WordPress plugins for mobile version of your website.

Setting up WordPress Plugin Organizer Plugin

First thing you need to do is install and activate the Plugin Organizer plugin. For more details, see our step by step guide on how to install a WordPress plugin.

Important: Plugin organizer is a very powerful plugin. Reordering or disabling plugins can cause conflicts and unexpected behavior which could make your site inaccessible. We recommend that you create a complete WordPress backup before disabling or reordering any plugins.

Upon activation, you need to visit Plugin Organizer » Settings page to configure plugin settings.

Apart from default options, right now you just need to turn on the following options.

  • Selective plugin loading
  • Selective mobile plugin loading

Don’t forget to click on the ‘Save Settings’ button to store your changes.

Creating a Must-Use Plugin for Plugin Organizer

Plugin Organizer needs a must-use plugin to work properly. It will automatically try to create it for you, but if it fails, then you will have to create it on your own.

Let’s start by checking if the plugin was able to create the MU plugin automatically.

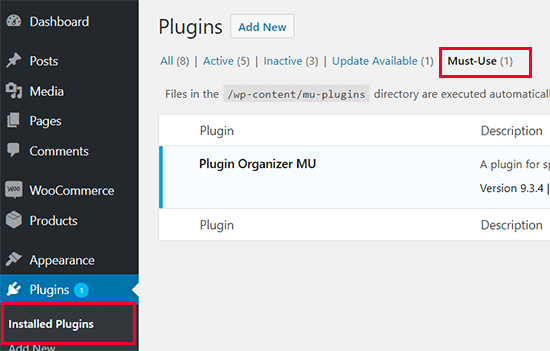
You can do this by going to the Plugins » Installed Plugins page. You will see a new link labeled Must-Use and clicking on it will show you the installed MU plugins on your site.

Must use plugin installed

If you don’t see the plugin or Must-Use plugins link, then this means that the plugin organizer failed to create the file, and you will need to manually do it yourself.

First, you need to connect to your website using an FTP client or File Manager app in cPanel.

Next, you need to go to the /wp-content/mu-plugins/ folder. If you don’t have a mu-plugins folder in your /wp-content/ folder, then you need to create one.

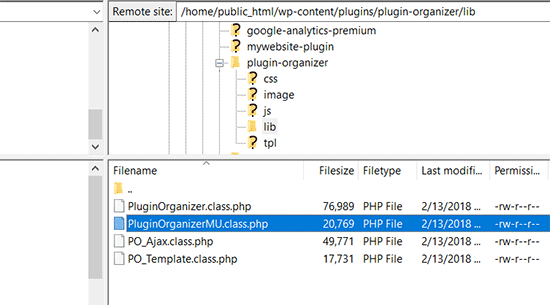
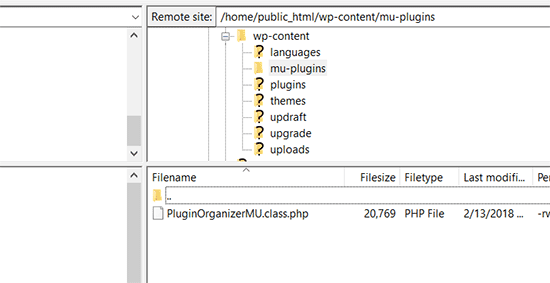
After that you need to go to /wp-content/plugins/plugin-organizer/lib/ folder and download the file called ‘PluginOrganizerMU.class.php’ to your computer.

Copy MU Plugin

Next, you need to go to the /wp-content/mu-plugins/ folder and upload the file from your computer.

Upload MU plugin

The Plugin Organizer can now use this file to properly manage your plugins on mobile as well as desktop.

Disable Specific WordPress Plugins in Mobile Version

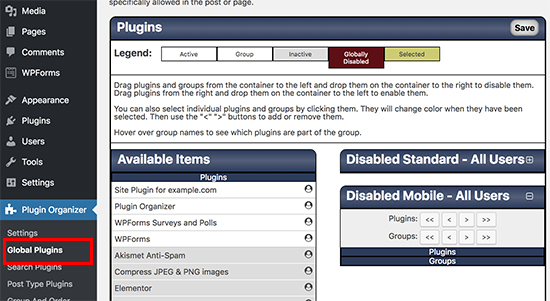
Plugin Organizer makes it very easy to disable any WordPress plugins on mobile. Simply head over to the Plugin Organizer » Global Plugins page.

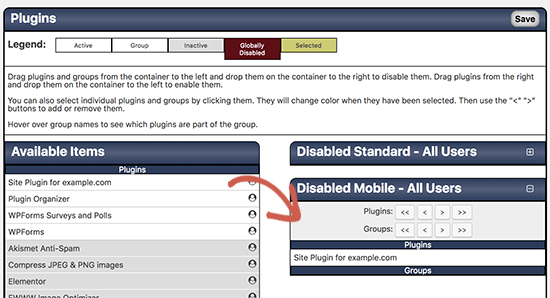
You will see two columns on the screen. The first column is for ‘Available items’ which contains all your installed WordPress plugins. The second column is for ‘Disabled items’ with disabled standard and disabled mobile boxes.

Global Plugins

First you need to click on the Disabled Mobile box to expand it. After that drag and drop the plugins you want to disable from the available column to the disabled mobile box.

Disable plugins in mobile version

After adding the plugins don’t forget to click on the ‘Save’ button to store your changes.

That’s all. The plugin organizer will now disable these plugins on your mobile site.

Plugin Organizer also makes it easy to disable individual WordPress plugins for specific posts, pages, user role, and other parameters. For more detailed instructions, see our guide on how to use Plugin Organizer to speed up WordPress.

We hope this guide helped you learn how to easily disable specific WordPress plugins in mobile version. You may also want to see our list of must have WordPress plugins you should install on your website.

If you liked this article, then please subscribe to our YouTube Channel for WordPress video tutorials. You can also find us on Twitter and Facebook.

The post How to Disable Specific WordPress Plugins for Mobile Users appeared first on WPBeginner.

How to Create a Survey in WordPress (with Beautiful Reports)

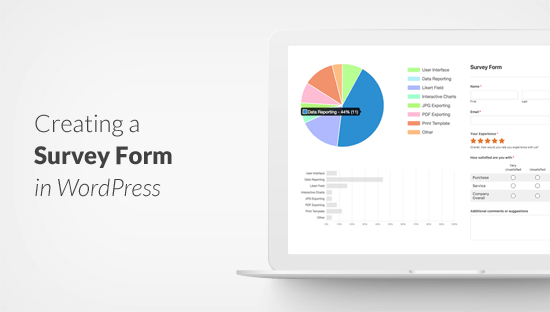
Do you want to create a survey in WordPress? Surveys help you gather valuable information, so you can use to make data-driven decisions. In this article, we will show you how to easily create a survey in WordPress and generate beautiful reports.

Survey Plugin for WordPress

Choosing The Best Survey Tool for WordPress

There are many online services that allow you to create survey forms and embed them in WordPress. The downside of these forms is that the data is stored on third-party servers, and you have limited customization options.

Some of these forms are also limited to the number of responses you can collect. You have to pay extra to get more responses and usually these services have high monthly costs.

Wouldn’t it be nice if you could run surveys on your own website without relying on third-party services?

This is where WPForms comes in. It is the best WordPress form builder plugin in the market.

They recently announced a powerful new WordPress surveys and polls addon that you can use to easily create survey forms on your website.

With WPForms survey feature, you get the following:

  • Powerful drag and drop form builder to create surveys
  • Smart survey fields like Rating, Likert Scale, and more
  • Conditional logic to personalize survey fields based on user input
  • Interactive survey reports with bars, graphs, charts, and tables
  • Ability to export survey graphs as JPEG, PDF, or Print Formats
  • Export survey results as CSV to use elsewhere

That being said, let’s take a look at how to easily create and add survey in your WordPress website.

Disclosure: WPForms is created by the same team behind WPBeginner. It is one of our premium WordPress plugins.

Creating a Survey in WordPress

First thing you need to do is install and activate the WPForms plugin. For more details, see our step by step guide on how to install a WordPress plugin.

WPForms surveys and polls addon is part of their Pro plan. WPBeginner users can use our WPForms coupon to ge 10% OFF on all WPForms licenses.

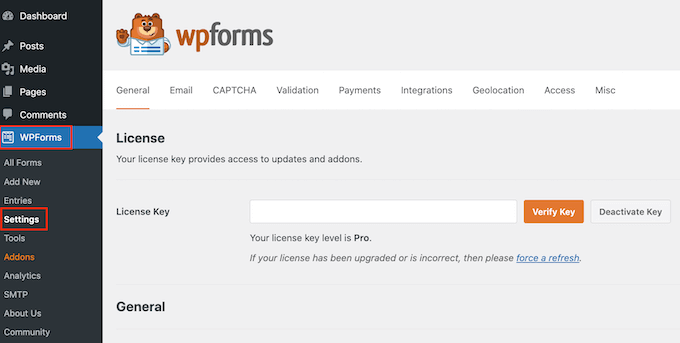
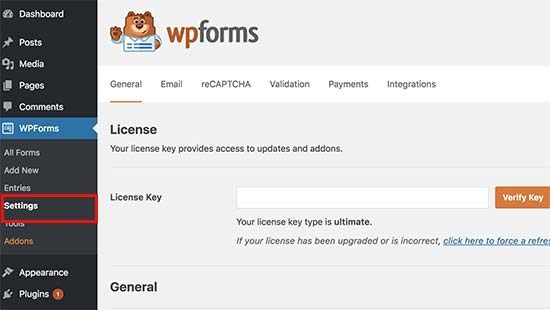
Once the plugin is activated, you need to head over to WPForms » Settings page to enter your license keys. You can find this information under your account on the WPForms website.

WPForms License

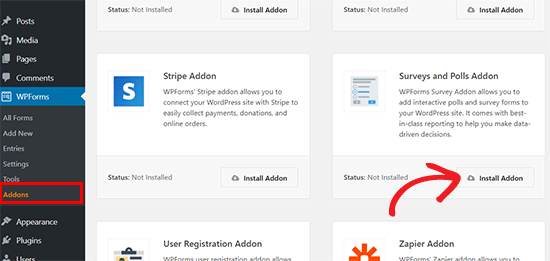
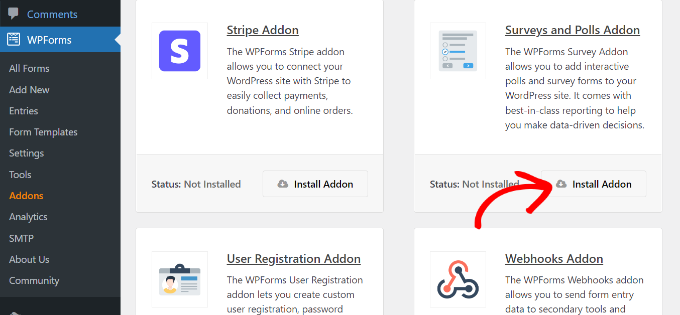
Next, you need to visit the WPForms » Addons page and scroll down to the Surveys and Polls addon. Go ahead and click on the Install addon button to install the survey addon. Once installed, you need to click on the ‘Activate’ button to start using the addon.

Install survey and polls addon

Now you are ready to create a survey form.

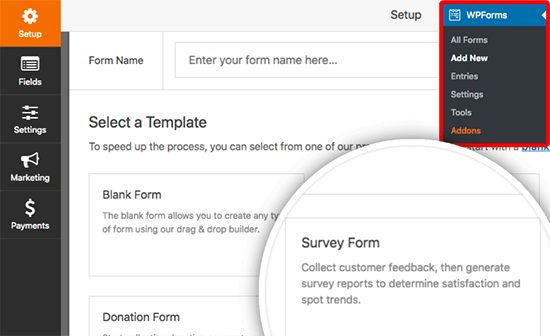
You need to visit WPForms » Add New page to create a new form. This will launch the WPForms’ drag and drop form builder interface.

Create survey form

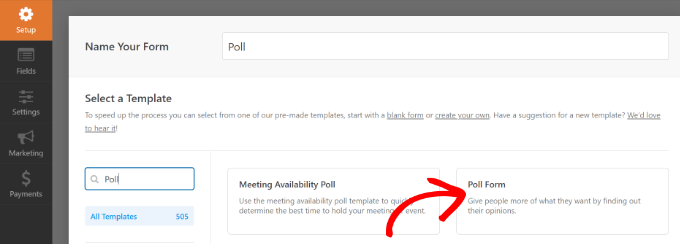
First you need to provide a title for your survey form and then click on the Survey Form template.

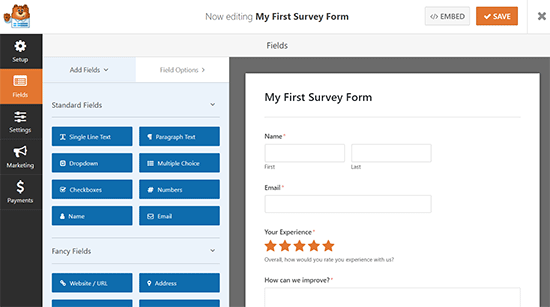
This will load a sample customer feedback form template with several fields already added into the form.

Survey form template

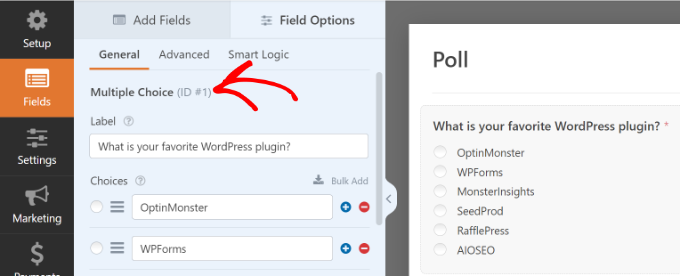
You can just point and click to edit any field, rearrange them with drag and drop, or remove them from the form. You can also add new form fields from the left column.

WPForms supports all commonly used form fields including drop down, radio buttons, checkboxes, likert scale, text input, rating scale, and many more. This makes it super easy for you to build highly interactive survey forms.

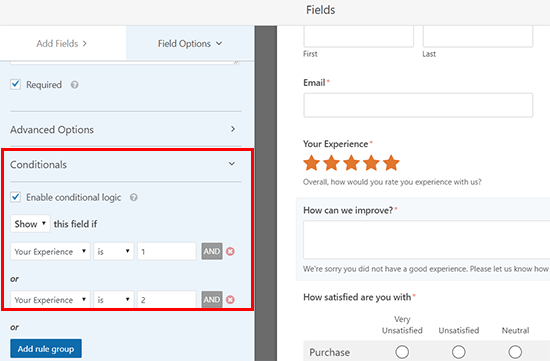
WPForms also includes conditional logic which means you can personalize your survey questions based on user input in one of the previous fields.

Conditional fields

Once you have created the form, you need to click on the save button to store your form settings. You can now click on the close button to exit the form builder.

Adding The Survey Form in Your WordPress Website

WPForms makes it very simple to add your forms anywhere on your website. You can easily add your survey form in any WordPress post, page, custom post type, or your sidebar.

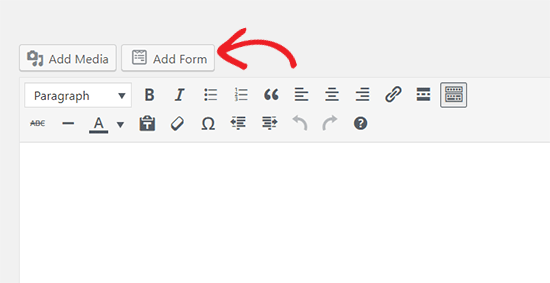
To add the survey form in a WordPress post, page, or post type, you need to visit the post edit screen and click on the ‘Add Form’ button.

Add form button

This will bring up a popup where you can select the survey form you created earlier and click on the insert form button to continue.

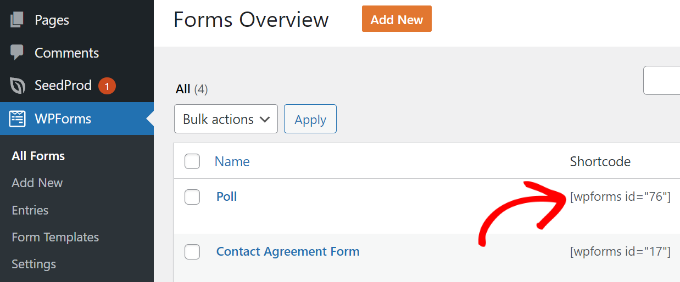
You will now see the form shortcode added into the post editor.

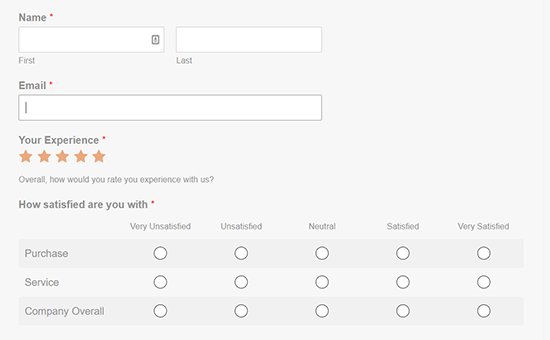
Once you are done editing the post, go ahead and publish it. You can visit your website to see your survey form live in action.

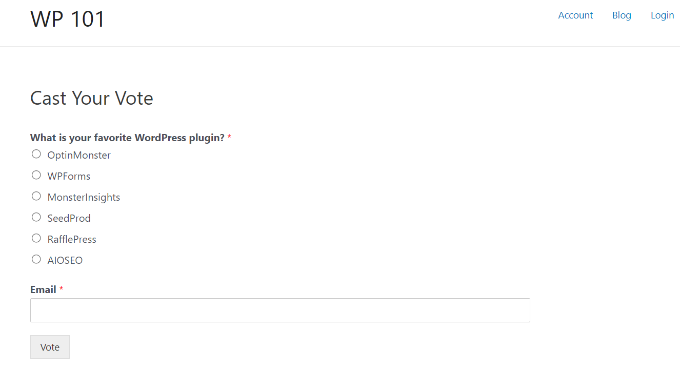
Survey form preview

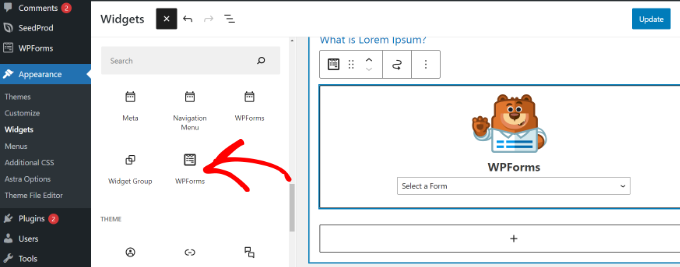
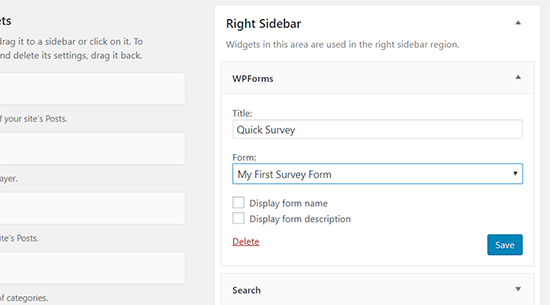
WPForms also allows you to easily add your survey form into any sidebar or widget ready area. Simply head over to the Appearance » Widgets page in your WordPress admin area and drag the WPForms widget to any sidebar.

Survey form widget

In the widget settings, select the survey form you created earlier and don’t forget to click on the save button to store your changes.

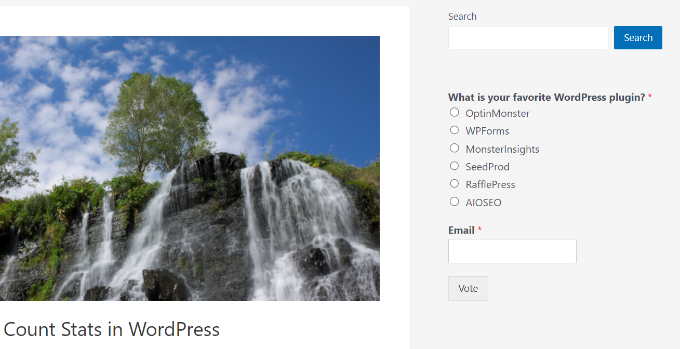
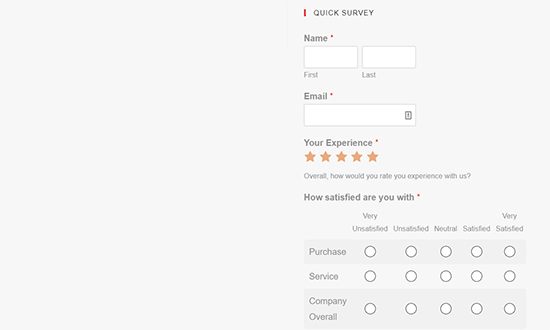
You can now visit your website to see your survey form displayed in the sidebar.

Sidebar survey widget

Viewing Your Survey Form Results

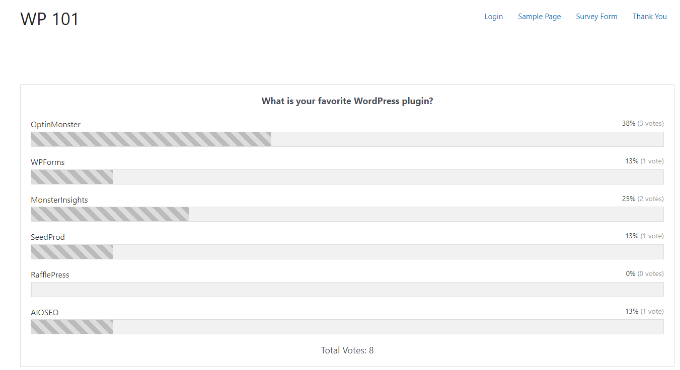
WPForms shows survey results in beautiful charts and graphs. You can also print survey results and export them to use in your favorite spreadsheet software.

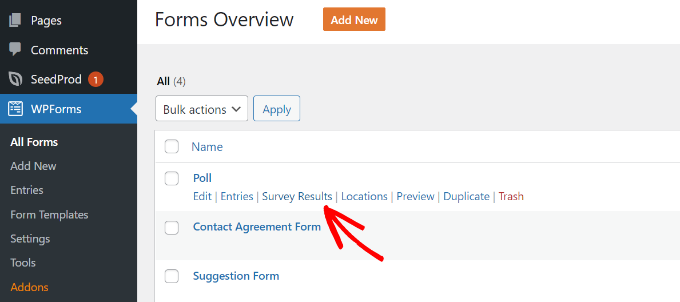
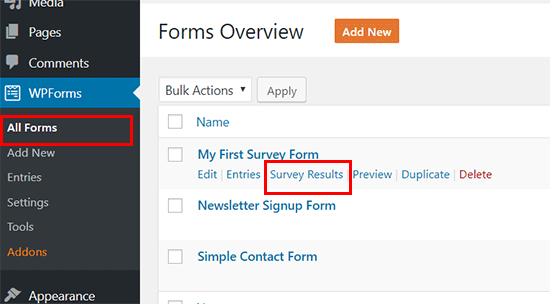
To view your survey results, you need to visit WPForms » All Forms page and click on the ‘Survey Results’ link below your survey form.

View survey results

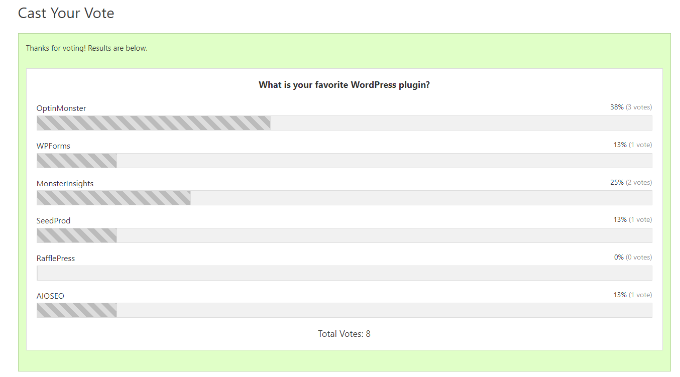
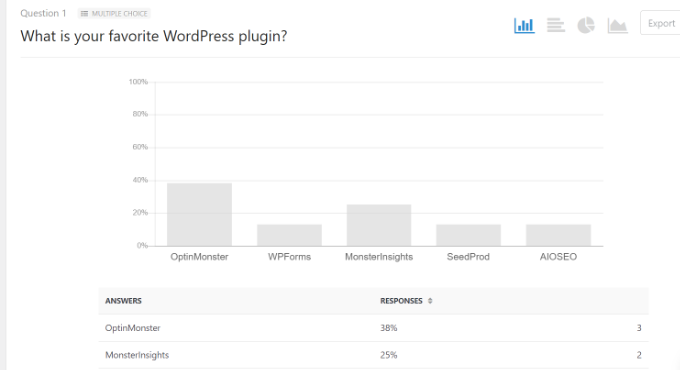
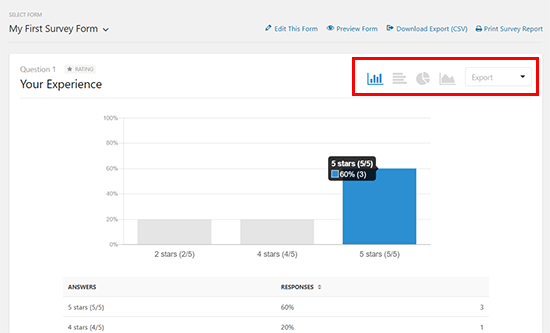
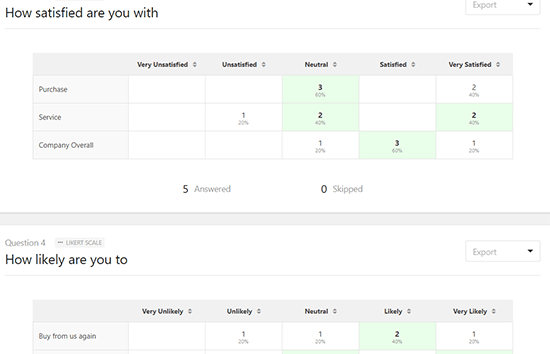
On the results page, you will see your survey responses displayed in an interactive chart and tables. You can export responses to a single question, as well as the entire survey.

Survey results

On the top, you will see options to switch to different chart types and the export option. You can save individual survey results as JPEG, PDF, and Print formats to easily share them on presentation slides, blog posts, or social media.

Result tables

Convert Any Form into a Survey

WPForms also allows you to make any form into a survey form and display past results as a survey. You can even select specific form fields that you want to be treated as survey fields.

This is particularly useful if you want to gather data through other forms like a contact form, user registration, or newsletter sign up forms.

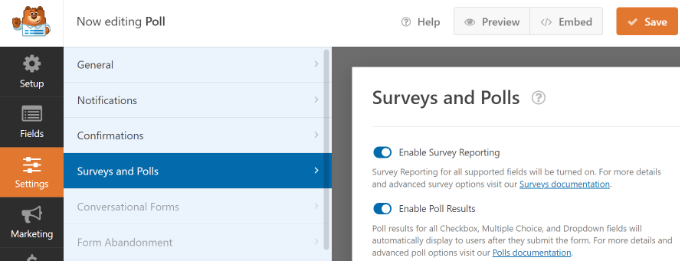
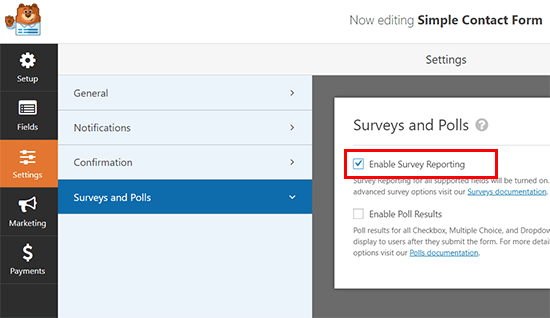
To convert an existing WPForms form into a survey, simply edit the form in WPForms and go to the Settings » Surveys and Polls section. You need to check the box next to ‘Enable Survey Reporting’ option and save your changes.

Enable survey reporting for any form in WPForms

To enable survey reporting for an individual form field, simply edit the form and then click on the field that you want to enable.

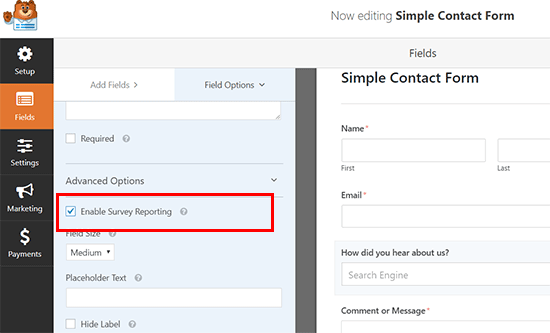
Under the ‘Field Options’ section on your left side, you need to click on the Advanced Options and check ‘Enable Survey Reporting’ option.

Enable survey reporting for any form field

We hope this article helped you learn how to easily create and add beautiful survey forms in WordPress. You may also want to see our beginner’s guide on how to track user engagement in WordPress with Google Analytics.

If you liked this article, then please subscribe to our YouTube Channel for WordPress video tutorials. You can also find us on Twitter and Facebook.

The post How to Create a Survey in WordPress (with Beautiful Reports) appeared first on WPBeginner.

How to Use the Plugin Organizer to Speed Up Your WordPress Site

After WordPress hosting, plugins are the second biggest reason that can cause your WordPress site to be slow. Often times this can be mitigated by either disabling the plugin or stop it from loading in areas where you don’t need them. In this article, we will show you how to use the Plugin Organizer to speed up your WordPress site.

Using Plugin Optimizer to speed up WordPress

How WordPress Plugins Affect Your Website Speed?

One of the most frequently asked questions that we get is how many WordPress plugins are too many? The two things that concerns most users are WordPress security and how plugins may affect speed and performance?

All good WordPress plugins are coded in a way that they are only loaded on your website when needed. You can see our infographic on how WordPress actually loads plugins (behind the scenes).

WordPress doesn’t load inactive plugins which means they don’t affect your website’s performance. However, it does load all active plugins which then run their code when needed.

Now sometimes plugin authors cannot anticipate when and where you will use their plugin features on your website. In that case, they may load their code whether or not you need it. If the plugins are loading JavaScript and CSS files, then this may increase your website’s page load time.

How WordPress Plugin Organizer Can Speed Up Your Site

Depending on the plugins that you’re using, there may be some that you only need on specific pages, posts, or post types. Some plugins you may only need in the WordPress admin area, so they shouldn’t load on the front-end of the website.

WordPress Plugin Organizer allows you to do the following things:

  • Selectively enable or disable plugins based on URL
  • Enable or disable plugins for user roles
  • Enable or disable plugins based on post types
  • Rearrange the order in which plugins are loaded
  • Disable plugins and only load them when needed

Basically, it gives you the ability to fine-tune your website performance.

That being said, let’s take a look at how to use the Plugin Organizer to speed up WordPress.

Using WordPress Plugin Organizer to Manage Active WordPress Plugins

First, thing you need to do is install and activate the Plugin Organizer plugin. For more details, see our step by step guide on how to install a WordPress plugin.

Important: Plugin organizer is a very powerful plugin. Reordering or disabling plugins can cause conflicts and unexpected behavior which could make your site inaccessible. We recommend that you create a complete WordPress backup before disabling or reordering any plugins.

Once you are ready, you need to head over to the Plugin Organizer » Settings page to configure your settings.

Plugin organizer settings

There are several options on this page, and we will look at each option, what it does, and which ones you should turn on.

Fuzzy URL Matching

This option allows you to enable/disable plugins on child URL. This means that settings will affect http://example.com/sample-page/ and all subsequent URLs under it. For example, http://example.com/sample-page/child-page1/ and http://example.com/sample-page/child-page2/.

Ignore URL Protocol

This option is turned off by default. It allows the plugin organizer to ignore http and https part of plugin URLs. This is particularly helpful if you have SSL enabled on your WordPress site.

Ignore URL Arguments

This option allows you to ignore URL arguments. For example, http://example.com/page/?foo=1&bar=2 is a URL with arguments. Turning on this option is only helpful on URLs with arguments. You should leave it OFF in most cases.

Only allow network admins to change plugin load order?

If you are running a WordPress multisite network, then turning on this option will only allow Network Administrator to rearrange plugin order. We highly recommend that you turn this on if you have a WordPress multisite network.

Custom Post Type Support

This option allows you to select the post types where you want to enable/disable plugins. This option is particularly useful if you have plugins that you only need for specific post types.

Auto Trailing Slash

This option adds or removes the trailing slash at the end of plugin filter URLs based on your WordPress permalink settings.

Selective Plugin Loading

This option allows you to selectively load plugins even if they are disabled in plugin settings. You need to turn on this feature if you want to enable or disable plugins on individual content types.

To properly use this option, you need to add a must use plugin or mu-plugin in WordPress. MU plugins can be added to any WordPress site, and they are activated by default. The plugin will try to create an MU plugin itself, but if it fails then you will need to create it. We will show you how to do that later in this article.

Selective Mobile Plugin Loading

This option allows you to selectively enable or disable plugins on mobile browsers.

Selective Admin Plugin Loading

You can turn on this option if you want certain plugins to only load inside the WordPress admin area.

Disable Plugins By Role

This option allows you to disable plugin by user roles. You can turn on this option and then select user roles that you want to use in the next box.

Don’t forget to click on the save settings button to store your changes.

Creating an MU Plugin for Plugin Organizer

Plugin Organizer needs an MU plugin to work properly. The plugin will try to automatically add it to your website, but if it fails then you will have to create it yourself.

To find out whether the plugin has successfully created the MU plugin. You need to visit Plugins » Installed Plugins page. You will see a new link labeled Must-Use, clicking on it will show you the installed MU plugins on your site.

Must Use plugins installed in WordPress

If you don’t see the plugin or Must-Use plugins link, then this means that the plugin organizer failed to create the file, and you will need to manually do it yourself.

First, you need to connect to your website using an FTP client or File Manager app in cPanel.

Next, Go to the /wp-content/mu-plugins/ folder. If you don’t have a mu-plugins folder in your /wp-content/ folder, then you need to create one.

After that you need to go to /wp-content/plugins/plugin-organizer/lib/ folder and download the file called ‘PluginOrganizerMU.class.php’ to your computer.

Copy MU plugin file

Next, you need to go to the /wp-content/mu-plugins/ folder and upload the file from your computer.

Plugin Organizer mu-plugin file

The Plugin Organizer can now you use this file to properly manage your plugins efficiently. You can go ahead and continue with plugin settings.

Set up Global Plugin Options

Plugin Organizer allows you to activate plugins but keep them disabled. To set up which plugins remain active and which plugins are disabled, you need to go to the Plugin Organizer » Global Plugins page.
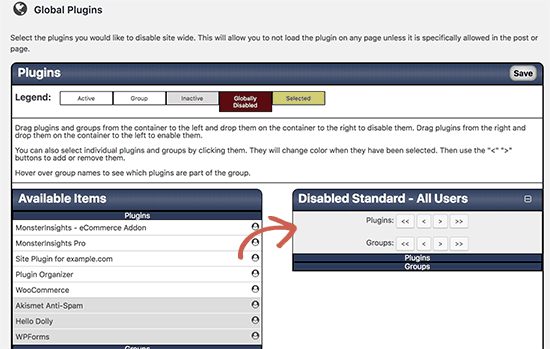
Set plugins to disable globally

You will see your installed plugin on the left. Active plugins will be highlighted and displayed on top. If you want to disable a plugin, then you can simply drag and drop it to the Disable column.

This will disable the plugins without deactivating them.

You can re-enable the plugin you disabled for individual post types, single post or page items, individual URLs, from different pages in the plugin settings. We will walk you through each of them later in this article.

Enable or Disable Plugins on Search Results Page

To disable or enable certain plugins on search results, you will need to visit the Plugin Organizer » Search Results page.

Disable plugins on search results page

On this screen, you need to simply select a plugin from the left column and drop it to the disable column. You will notice that the disable column has different boxes. You will need to click on the box where you want to disable the plugin. For example, adding a plugin to ‘Disabled Standard’ box will disable the plugin for all users on all pages.

If you previously set a plugin to be disabled globally, and you want it to be loaded on search results page, then you can simply drag and drop it from disabled plugins column back to available plugins.

Enable plugins on search results page

Selectively Enable / Disable Plugins for Custom Post Types

To control which plugins work on certain post types, you need to visit Plugin Organizer » Post Type Plugins page.
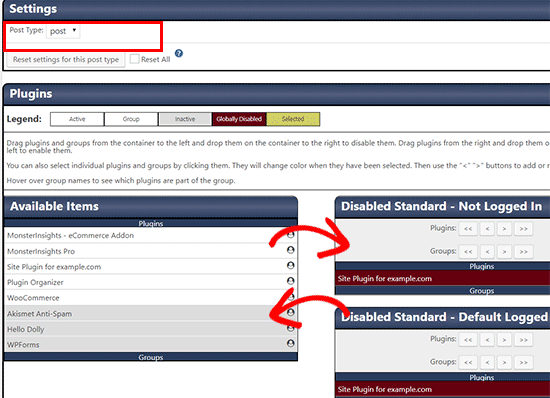
Enable or disable plugins for post types

First, you will select the post type where you want to apply the changes. After that, you can drag and drop plugins from available items column to the disable column.

You can also enable a plugin that you have disabled in Global Plugins page by dragging it from the Disabled column to the available items.

Group Plugins and Change Plugin Load Order

By default, WordPress loads your current active plugin files alphabetically. This alphabetical order may sometimes cause conflicts if you have plugins depending on each other’s code.

For example, if you have a plugin file apple.php which relies on functions in another plugin called zebra.php, then you may need the zebra.php file to load first so that apple.php works properly.

Plugin Organizer allows you to manually change the plugin order and group plugins. However, be very careful as this could make your website inaccessible.

To rearrange the plugin load order, you need to visit Plugin Organizer » Group and Order Plugins page.

The plugin organizer will display your plugins in default alphabetical order, and you can rearrange the order by simple drag and drop.

You can also group plugins together by selecting ‘Create new group’ from the drop down menu at the top. Next, you need to enter a name for the group and select the plugins you want to add in it.
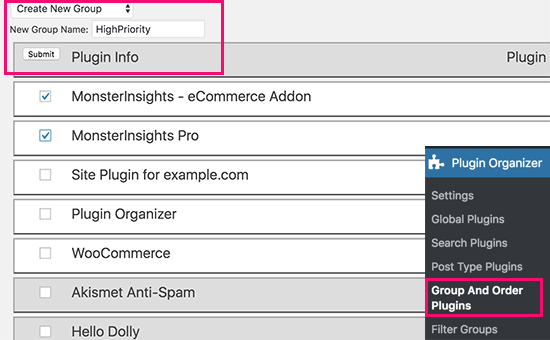
Creating a plugin group

Once you are done with the group, click on the Submit button to continue. Plugin organizer will now create a plugin group for you.

Now if you go to the Plugins page, then you will see a new link named after your group name. When you click on it, you will see all the plugins inside that group.

Plugin group list on the plugins page

Creating Plugin Filters with Plugin Organizer

Plugin Organizer allows you to enable or disable plugin based on URL. To do that you need to create Plugin Filters. These filters will allow you to enable or disable plugins that match specific URLs.

First you need to go to the Plugin Organizer » Plugin Filters page and click on ‘Add Plugin Filter’ link.
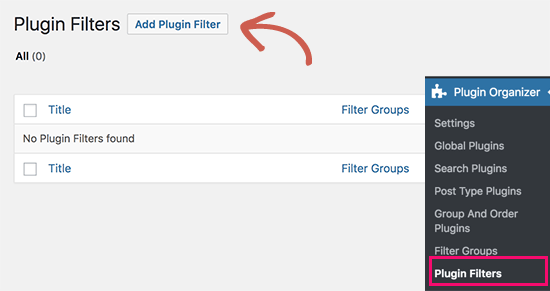
Add plugin filter

This will bring you tothe add new plugin filter page. You will need to provide a name for your plugin filter and then add permalinks (URLs) that you want to be affected by this filter.
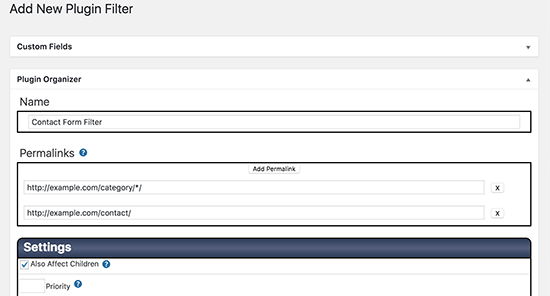
Creating a plugin filter

You can add multiple URLs by clicking the Add Permalink button.

Under the settings section, you can choose whether this filter will also affect child URLs of permalinks you have added. You can leave the priority field blank.

After that, scroll down to the ‘Plugins’ section. Here you can drag and drop plugins from the available items to Disabled boxes.

Disable plugins based on URL filters

Similarly, you can also drag and drop a plugin from the disabled column to available items to make a plugin load when this filter is matched.

Additionally, you can save this filter inside a filter group. Filter groups are like categories. Their purpose is to help you sort similar plugin filters together.

Organize your filters in groups

Once you are done, click on the publish button to make this plugin filter active. It will start working as soon as you click on the publish button.

Enable or Disable a Plugin on a Single Post or Page

Plugin Organizer also allows you to load or disable plugins on a single post, page, or custom post type item. First you need to make sure that you have enabled the post type support on Plugin Organizer » Settings page.
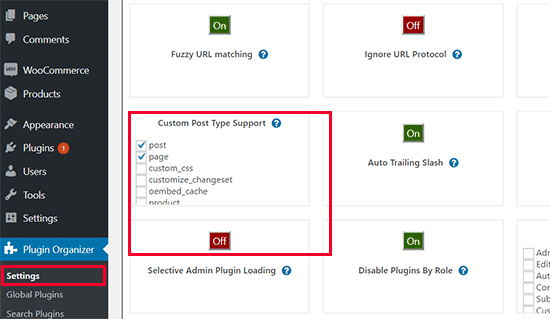
Post types enabled

Next, go ahead and edit the post, page, or custom post type you want to change. On the post edit screen, scroll down to the ‘Plugin Organizer’ section.

Plugin organizer section on post edit screen

You will see the plugin organizer settings with your plugins. You can drag and drop plugins to disable them or drag disabled plugins to available items to make them active.

Don’t forget to click on the save changes or update button to store your changes.

Troubleshooting Plugin Organizer Issues

Plugin Organizer plugin is used to change the default behavior of WordPress plugins on your website. Your settings may cause unexpected results including fatal errors, syntax errors, or white screen of death.

A quick way to resolve those issues is by deactivating all your WordPress plugins via FTP. This will deactivate plugin organizer as well.

To uninstall Plugin Organizer, simply delete the plugin from the plugins page. This will not only delete the plugin itself, but it will also delete all plugin settings. You can then reinstall the plugin if you want.

For most errors, see our comprehensive list of most common WordPress errors and how to fix them. If the error you are seeing is not listed, then try our step by step WordPress troubleshooting guide to find the cause of the error and possible solutions.

We hope this article helped you efficiently use WordPress plugin organizer to speed up your WordPress site. If you want to just install best of the best plugins, then see our list of must have WordPress plugins for all websites.

If you liked this article, then please subscribe to our YouTube Channel for WordPress video tutorials. You can also find us on Twitter and Facebook.

The post How to Use the Plugin Organizer to Speed Up Your WordPress Site appeared first on WPBeginner.
How to Add a Cookies Popup in WordPress

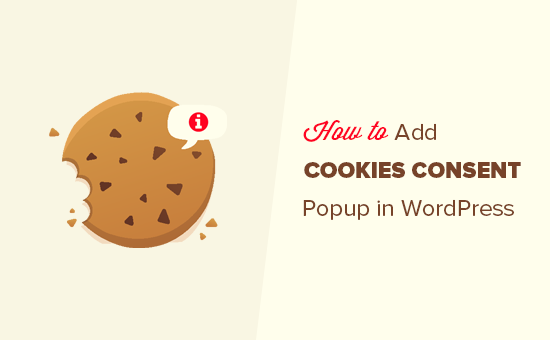
Do you want to add a cookies consent popup in WordPress? The European Union’s cookie law requires websites to get user consent to set any cookies on their computers. As a WordPress website owner, your website may be using cookies as well. In this article, we will show you how to add a cookies popup in WordPress.

How to add cookies consent popup in WordPress

How WordPress Uses Cookies?

By default WordPress uses cookies for authentication purposes to store session information for logged in users. It also sets a cookie when someone leaves a comment on your site.

Apart from these, WordPress plugins can set their own cookies to store different information. For example, WP Favorite Posts plugin shows a user’s favorite posts by storing them in a cookie.

While cookies are extremely useful, they can also be used to collect information about a user and share it with third party advertising platforms.

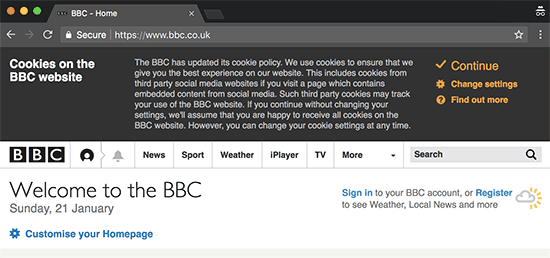
This is why in Europe and few other countries, website owners are required to let users know about their usage of cookies. If your website is based in one of those countries or mainly targets audiences in those regions, then you need to show a cookie consent disclaimer on your website.

Cookies notification popup displayed on the BBC website

That being said, let’s take a look at how to easily display a cookie consent popup in WordPress.

Showing a Cookie Consent Notification in WordPress

First thing you need to do is install and activate the Cookie Consent plugin. For more details, see our step by step guide on how to install a WordPress plugin.

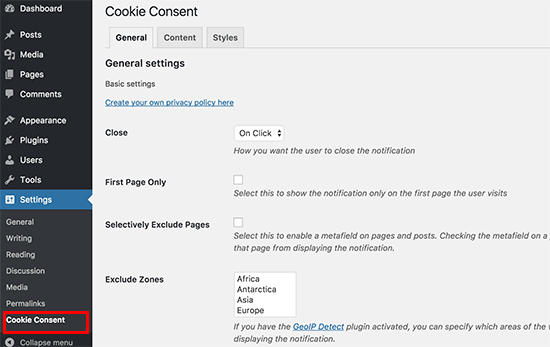
Upon activation, you need to visit Settings » Cookie Consent page to configure plugin settings.

Cookie consent notification settings

On this page, you can control when and where you want to show the cookie consent notification. You can also select how you would like it to be closed.

In other settings, you can show or hide it for people visiting from specific geographic locations and set an expiration time for the cookie.

The default settings would work for most websites. Don’t forget to click on the ‘Save Changes’ button to store your settings.

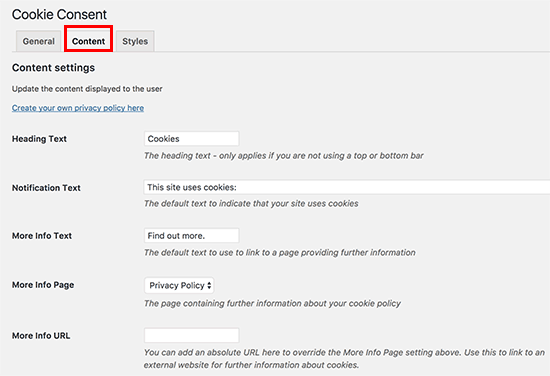
Next, you need to switch to the ‘Content’ tab. This is where you can edit the content that will be displayed to your users in the notification.

Edit cookie consent notification content

Here you also need to select your privacy policy page. If you haven’t already created a privacy policy page, then you can follow our guide to create a privacy policy page in WordPress and then select it here.

Once you are done, click on the save changes button to store your settings.

Changing the Appearance of Your Cookie Consent Notification in WordPress

Your cookie consent popup is almost ready. You just need to setup how you would like it to be displayed.

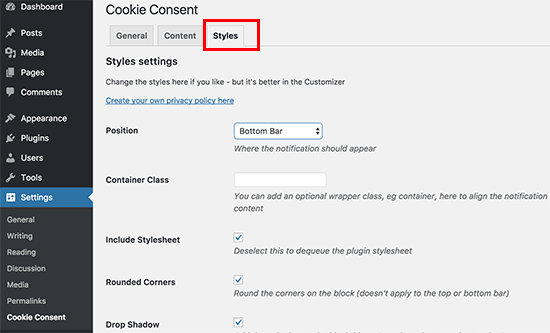
First you need to visit Settings » Cookie Consent page and then click on the Styles tab.

Cookie consent popup notification style

On this tab, you can choose the position, colors, borders, and style for your cookie consent popup notification. You can also set a container class and then add custom CSS for your popup.

Once you are finished, click on the save changes button to store your settings.

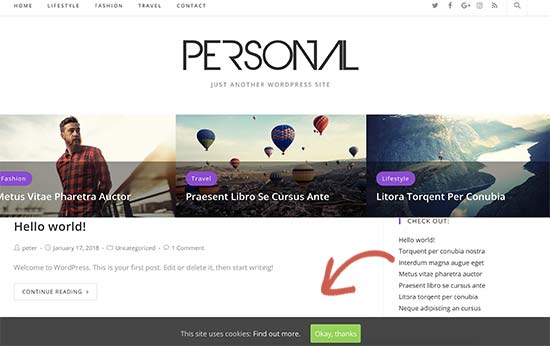
You can now visit your website to see your cookie consent popup in action.

Cookie consent popup on a WordPress website

We hope this article helped you add a cookie consent popup to your WordPress site. You may also want to see our ultimate step by step WordPress SEO guide for beginners.

If you liked this article, then please subscribe to our YouTube Channel for WordPress video tutorials. You can also find us on Twitter and Facebook.

The post How to Add a Cookies Popup in WordPress appeared first on WPBeginner.
21+ Best Free WooCommerce Plugins for Your Store (2018)

Are you looking for the best free WooCommerce plugins for WordPress? WooCommerce, just like WordPress, comes with thousands of extensions and plugins. These plugins add new features to your eCommerce store and help you grow your business. In this article, we have hand-picked the best free WooCommerce plugins for WordPress that you can try right away.

Best Free WooCommerce Plugins

If you haven’t started your online store yet, then we have a step by step guide on how to start an online store with WooCommerce. It walks you through how to choose the best WooCommerce hosting, install WooCommerce, select a theme, and everything that you need.

Having that said, let’s take a look at the best free WooCommerce plugins for WordPress.

1. YITH WooCommerce Wishlist

YITH WooCommerce Wishlist

YITH WooCommerce wishlist plugin allows your customers to save products to their wishlist. They can use the wishlist to make the purchase later or share their wishlist with friends and family.

This is a perfect addon for your online store during busy holiday seasons when people are making their shopping lists and purchasing gifts.

2. WooCommerce Multilingual

WooCommerce Multilingual

Non-English WordPress websites surpassed the English WordPress websites in 2014. Since then more WooCommerce stores are created in languages other than English. WooCommerce Multilingual adds compatibility layer with the popular WPML WordPress multilingual plugin.

This allows you to translate your product and other WooCommerce pages in multiple languages. Your customers can choose to browse your website in their preferred language.

3. WooCommerce Products Slider

WooCommerce Products Slider

WooCommerce Products Slider allows you to easily create beautiful product sliders and carousels and add them anywhere on your WooCommerce store.

4. WooCommerce Customizer

WooCommerce Customizer

WooCommerce Customizer provides an easy user-interface to use built-in WooCommerce filters. These filters allow you to customize things like button text, labels, fields, and much more.

Normally, you would have to write PHP code to use these filters. With WooCommerce customizer, you can easily use those filters from a simple settings page (no coding necessary).

5. WooCommerce EU VAT Compliance

WooCommerce EU VAT Compliance

As the name suggests, this simple plugin makes your WooCommerce shop compliant with the new EU VAT. It will automatically detect your customer’s location and will display prices with correct VAT from the first page.

6. Order Delivery Date for WooCommerce

WooCommerce Order Delivery Date

This plugin allows users to choose a delivery date for products during the checkout. WooCommerce store owners can see the desired delivery date on their orders page in the admin area.

7. YITH WooCommerce Quick View

YITH WooCommerce Quick View

WooCommerce Quick View allows your customers to peek into product details by simply taking their mouse over a button. This enables customers to quickly get the product information without leaving the product listings or shop page.

Users will be able to see a larger product image, product description, and an add to cart button in a lightbox popup.

8. WooCommerce PDF Invoices & Packing Slips

 Download WooCommerce PDF Invoices & Packing Slips

This nifty plugin allows you to send PDF invoices and packing slips to customers via email. Users can also download their invoices and slips from their account area. As a site admin, you can also bulk generate invoices, download them, and email them to users from an admin area.

9. YITH WooCommerce Compare

WooCommerce Compare

As the name suggests, this plugin allows your customers to compare two or more WooCommerce products side by side. You can choose which fields users will see in the comparison table and reorder them as needed.

10. WooCommerce Menu Bar Cart

WooCommerce Menu Bar Cart

Normally, your WooCommerce theme would prominently display a cart button at the top. However, if your theme doesn’t show a cart button, or you don’t like its placement, then WooCommerce Menu Cart will fix this for you.

It allows you to add the cart button into your WordPress navigation menu. It works with any WordPress theme and will display cart icon, items and price in your navigation menu.

11. YITH WooCommerce Ajax Search

Ajax Product Search

Speed is crucial for the success of any website, particularly for online stores. A single second delay in page load can significantly increase cart abandonment and lower user engagement.

YITH WooCommerce Ajax Search offers a powerful search feature to instantly display products as users start typing. It uses Ajax to fetch the results which means your users can search without leaving the page they are currently viewing.

See also: Proven tips to Reduce Shopping Cart Abandonment

12. MailChimp for WooCommerce

MailChimp for WooCommerce

MailChimp is one of the top email marketing services in the world. MailChimp for WooCommerce is their official WooCommerce extensions that integrates email marketing into your ecommerce website.

13. WooCommerce Checkout Field Editor

WooCommerce Checkout Field Editor

Do you want to add custom fields to WooCommerce checkout page? The WooCommerce Checkout Field Editor plugin allows you to easily add, customize, and rearrange fields on the checkout page of your online store.

This allows you to customize the whole checkout experience for your customers and use the data to grow your business.

14. Minimum Purchase for WooCommerce

Minimum Purchase for WooCommerce

Minimum Purchase for WooCommerce allows you to setup minimum purchase rules to your products. You can add rules for a single product or create rules for a product group.

The plugin also allows you to apply rules on minimum purchase amount or quantity, set different rules based on user role, and set up custom messages to display when rules are not matched.

15. WooCommerce Gift Cards

WooCommerce Gift Cards

Gift cards for WooCommerce allows you to add gift cards to your online store. Your customers will be able to purchase gift cards of different amounts and give them to their friends and family who then apply the gift card when shopping on your store.

You can setup gift cards of different pricing and sell them as virtual products. When a customer applies the gift card on purchase, the equivalent amount is deducted from their bill.

16. WooCommerce Currency Switcher

WooCommerce Currency Switcher

As the name suggests, this plugin allows your customers to easily switch currencies and get real time conversion rates in their local currency. You can add the currency switcher by using the shortcode or a sidebar widget.

17. WooCommerce Colors

WooCommerce Colors

WooCommerce Colors adds a WooCommerce section to the theme customizer where you can change the color of buttons and other WooCommerce elements. It is simple and highly useful if you want to customize WooCommerce elements without adding any custom CSS.

18. WooCommerce Products Filter

WooCommerce Products Filter

WooCommerce Products Filter allows your site customers to filter products by categories, attributes, product tags, product custom taxonomies, and price. You can add the filter anywhere using the shortcode or the sidebar widget.

19. WooCommerce Shortcodes

WooCommerce Shortcodes

WooCommerce comes with a bunch of shortcodes that you can use throughout your website to add products, buttons, and more. The WooCommerce Shortcodes plugin adds a drop down in your WordPress visual editor, allowing you to easily select and insert shortcodes in content areas like post, page, or products.

20. Booster for WooCommerce

WooCommerce Booster

Booster for WooCommerce allows you to add several useful features to your WooCommerce website that allow you to run your online store more efficiently. It uses a modular approach similar to Jetpack and acts like a plugin suite with tons of features.

21. Custom Product Tabs for WooCommerce

Custom Product Tabs for WooCommerce

Normally, product pages require users to scroll down to view more information. Custom Product Tabs for WooCommerce allows you to divide product description and details into tabs. This helps users switch to the section they want to view while making sure that your website looks neat and organized.

Bonus Plugins

These plugins are not free, but we believe they are highly useful for any WooCommerce store.

22. WooMarketing Bundle

WooCommerce WooMarketing Bundle

The Woo Marketing bundle is a pack of WooCommerce marketing extensions developed and maintained by the folks behind WooCommerce. It includes email marketing, dynamic pricing, smarter discounts, transaction emails, Facebook retargeting, and more.

23. Woo Pack & Ship Bundle

Woo Pack & Ship Bundle

If you pack and ship products to customers, then you’ll need this bundle. It is maintained by the WooCommerce team and includes extensions like invoices, packing slips, customize shipping options, product kits, multi-address shipping, track shipping, and more.

Purchasing this bundle also gives you access to the WooCommerce 360° images extension, WooCommerce Storefront and all its child themes.

24. OptinMonster

OptinMonster

OptinMonster is the most powerful conversion optimization software in the market. It helps you convert abandoning website visitors into subscribers and customers.

You can use it on your eCommerce website to reduce cart abandonment, increase sales conversion, grow your email list, show targeted website messages, onsite retargeting, and more.

If you’re serious about growing your email list and boosting sales, then you need this conversion optimization optimization toolkit.

We hope this article helped you find some of the best free WooCommerce plugins for your online store. You may also want to see our expert pick of the best WooCommerce themes for your ecommerce website.

If you liked this article, then please subscribe to our YouTube Channel for WordPress video tutorials. You can also find us on Twitter and Facebook.

The post 21+ Best Free WooCommerce Plugins for Your Store (2018) appeared first on WPBeginner.
Modula Gallery Review: An Easy-To-Use WordPress Gallery Plugin

Sometimes (actually, a lot of times…), the built-in WordPress gallery functionality just doesn’t cut it. And when that happens, you’re going to need to turn to a WordPress image gallery plugin, of which there are…a ton. With so many image gallery plugins out there, it can be hard to find the one that’s best for ... Read moreModula Gallery Review: An Easy-To-Use WordPress Gallery Plugin

The post Modula Gallery Review: An Easy-To-Use WordPress Gallery Plugin appeared first on Learn WordPress with WPLift.

How to Create an Online Course with WordPress using LearnDash (Review)

Do you want to create an online course in WordPress? Selling online courses allows you to make money from your blog by teaching others how to do what you’re good at. In this article, we will show you how to create and sell an online course in WordPress using LearnDash.

Creating online learning course in WordPress using LearnDash

What Do You Need to Create / Sell an Online Course?

You will need the following things to start selling courses online with WordPress.

  1. A domain name. This will be your website’s address (Example, wpbeginner.com).
  2. A WordPress hosting account. This is where your website’s files are stored.
  3. A learning management addon to create and manage courses.

You can create your online course with WordPress in less than an hour, and we’ll walk you through every step of the process.

Let’s get started.

Step 1. Setting up Your WordPress Website

There are plenty of website builders that you can use to build your website. However, we always recommend WordPress because it offers you the flexibility and freedom to take your website in any direction you want.

There are two types of WordPress, and often beginners end up confusing the two. First there is WordPress.com which is a hosting service, and then you have the original WordPress.org also known as self-hosted WordPress. See our guide on the difference between WordPress.com vs WordPress.org.

We recommend using WordPress.org because it gives you access to all the WordPress features that you will need.

To start a self hosted WordPress.org website, you will need a domain name ($14.99 / year), WordPress hosting ($7.99 / month), and SSL certificate to accept online payments ($69.99 / year).

This is quite a lot of start up money.

Luckily, Bluehost, an officially recommended WordPress hosting provider, has agreed to offer our users a free domain name, free SSL certificate, and a discount on web hosting.

Basically, you can get all of the above for $2.75 per month.

→ Click here to Claim this Exclusive Bluehost offer ←

After purchasing hosting, head over to our guide on how to create a WordPress website for step by step set up instructions.

Step 2. Install and Setup LearnDash LMS Plugin

LearnDash is the best LMS plugin for WordPress. It is an all-in-one solution with complete course management, lesson plans, quizzes, assignments, course progression, and more.

Disclaimer: At WPBeginner, we believe in transparency. If you sign up with LearnDash using our referral link, then we will earn a small commission at no extra cost to you. We would get this referral fee for recommending just about any other solution, but we only recommend products that we personally use and believe will add value to our readers. And no, we were not paid to write this review.

Now that we’re on the same page, let’s get started with the course setup process.

First, you will need to install and activate the LearnDash plugin. For more details, see our step by step guide on how to install a WordPress plugin.

Upon activation, you need to visit LearnDash LMS » Settings page and click on the LMS License tab to enter your email address and the license key. Once you have entered the information, click on the ‘Update License’ button to store your settings.

Enter your LearnDash license key

Next, you need to switch to the ‘PayPal Settings’ tab. This is where you will enter your PayPal information to receive online payments from your users.

LearnDash PayPal payment settings

Don’t forget to click on the ‘Save’ button to store your settings.

LearnDash also has Stripe and 2Checkout payment gateways available as Addons. You can install those if you don’t want to use PayPal.

Once you have configured the payment settings, your LearnDash LMS plugin is ready to go, and you can start creating courses.

Step 3. Creating Your First Course

LearnDash makes it super easy to create and manage online courses.

First, you need to visit LearnDash LMS » Courses page and then click on the ‘Add New’ button.

Adding a new course in LearnDash

This will bring you to the ‘Add New Course’ screen. You will need to start by providing a title for your course and then adding a detailed description. You can also add course categories / tags, and a featured image also known as course thumbnail.

Creating course

Below the course description, you will see the course options box. This is where you can set different options for the course including course price and what type of course it is: open, free, closed, buy now, or recurring.

Course options

Once you are satisfied with your course options, you can click on the save or publish button to make your course publicly available.

You can click on the preview button to see your course in action.

Note: You will not see the ‘Take This Course’ button if you are viewing the course page while logged in as an administrator in WordPress. We recommend opening an incognito browser window or log out to preview the course page.

Step 4. Adding Lessons to Your Course

Now that you have created your first course. It’s time to add lessons to the course. LearnDash allows you to create highly interactive lessons and then add them to your online course.

You can add a lesson by visiting LearnDash LMS » Lessons page and then click on the ‘Add New’ button at the top.

Adding new lessons in LearnDash

First you need to provide a title for your lesson and then start adding lesson content. You can add text, images, embed videos, and more.

Below the lesson editor box, you will find lesson options. Here you can add the lesson to a course by selecting the course you created earlier from ‘Associated Course’ drop down box.

Lesson settings

You can also choose whether this lesson requires submission of assignments, lesson timer, lesson progression, and more.

Once you are satisfied with the lesson, you can click on the publish button to save your lesson.

Your lesson will now automatically appear on the course page below the course details. You can repeat the process to add more lessons to your course.

You can also break down an individual lesson into topics. Simply go to LearnDash LMS » Topics page and click on the ‘Add New’ button to add a topic.

Creating a topic is similar to creating a lesson. Instead of associating it to a course, you will just need to associate it to a lesson.

Adding topics to your lessons

Step 5. Adding Quizzes and Assignments to Your Online Course

LearnDash comes fully equipped with dynamic quizzes and assignments. This allows you to make your online course a dynamic and engaging experience for your students.

You can make the quizzes and assignments required for your users before they can progress to the next lesson or course. You can also review assignments and give feedback to students.

Creating Quizzes in LearnDash

To add a quiz, you need to visit LearnDash » Quizzes page and click on the Add New button.

Adding new quiz

First you will need to provide a title and description for your quiz. After that you need to scroll down to ‘Quiz’ box and associate your quiz to a course, lesson, or topic.

Quiz settings

The default quiz settings would work for most cases, but you can customize the settings as needed from the advanced quiz settings area.

Once you are done, click on the save or publish button to save your quiz. You will now notice the new option to add questions to your quiz.

You need to switch to the ‘Questions’ tab and then click on ‘Add Question’ button.

Add question to the quiz

This will bring you to the ‘Add new question’ screen. LearnDash allows you to create different type of questions (multiple choice, true or false, fill in the blank, essay, free choice, etc).

You can add multiple answers for your question, add the correct answer, choose message to display for correct or incorrect answers, and more.

Don’t forget to click on the save button before you move onto the next section.

Depending on your settings, your quiz would appear on your lesson, topic, or the course page.

Enable Assignments in LearnDash

You can easily add assignments by editing a lesson and going to the lesson options area. You need to check the box next to upload assignment option.

Enable assignment upload option

After that, you can provide the assignment instructions in your lesson. At the end of the lesson, users will see an option to upload their assignment.

Upload assignment form

Once users have uploaded their assignments, you can view them by visiting LearnDash LMS » Assignments page.

Review assignments

Here you can edit assignments, approve, or give comments on submitted assignments.

Step 6. Giving Certificates on Course Completion

LearnDash allows you to automatically give certificates upon completion of a course. However, creating a certificate in LearnDash requires some basic knowledge of HTML.

First, you will need a certificate image file. This is basically the background image you want to use for your certificates.

You can find certificate templates on free image creating websites like Canva. Once you find a template you like, simply delete all text from it and download it to your computer.

Creating a certificate template

Next, you need to visit LearnDash LMS » Certificates page and click on the ‘Add New’ button.

Add new certificate

On the add new certificate screen, you need to set the certificate background image as featured image and click on the save button to reload the page.

You will now see your certificate template in the background of the visual editor. You can start adding text you want to be displayed on the certificate.

Certificate editing

To insert user’s name in the certificate, click on the LearnDash icon in the editor to insert the username shortcode.

Once you are satisfied with the certificate, you need to publish it.

Next, you need to edit the quiz you added to your course lesson. In the Quiz options box, you need to associate your certificate to the completion of the quiz.

Add certificate to the quiz

You can now save your quiz settings.

Users who complete the course and pass the quiz will see the option to print their certificate.

Print certificate

Taking Your Online Courses To Next Level

Now that you have learned how to easily create an online course in WordPress, you are ready to launch your online learning course website.

LearnDash seamlessly integrates with numerous providers including WordPress eCommerce platforms like WooCommerce, and it can run alongside your existing online store.

It also works with MemberPress, the best WordPress membership plugin in the market. This allows you to not just sell your courses, but you can also run a membership website with powerful subscription models.

We hope this LearnDash review helped you learn how to create an online course with WordPress. You may also want to see our ultimate step by step WordPress SEO guide for beginners.

If you liked this article, then please subscribe to our YouTube Channel for WordPress video tutorials. You can also find us on Twitter and Facebook.

The post How to Create an Online Course with WordPress using LearnDash (Review) appeared first on WPBeginner.
How to Add a Stats Dashboard On Your WordPress Site

Do you want to add a stats dashboard on your WordPress site? Analytics help you find out how people find and use your website, so you can keep them coming back. In this article, we will show you how to easily add a stats dashboard on your WordPress site.

How to add a stats dashboard in WordPress

Why You Need a Stats Dashboard in WordPress

Normally you can install Google Analytics and view your reports by logging into your Google analytics account. This sounds great, but most people forget to check their blog stats on a regular basis.

The two biggest reason for that are:

  1. You have to login to a separate website (Google Analytics) to check the stats.
  2. You have to dig around Google Analytics to actually find what you’re looking for.

While Google Analytics is a powerful tool, it often requires some digging to get to the good parts of the reports you want to view. Most beginners never make it this far.

Adding a stats dashboard to your WordPress website solves this problem. You will be able to quickly view the stats that matter without leaving your WordPress admin area, and it will require far easier.
That being said, let’s take a look at how to easily add a stats dashboard on your WordPress site.
Adding a Stats Dashboard in WordPress

First thing you need to do is install and activate the MonsterInsights plugin. For more details, see our step by step guide on how to install a WordPress plugin.

Upon activation, you need to visit Insights » Settings page to enter your license key. You can find the license key under your account on the MonsterInsights website.

MonsterInsights license key

Next, you need to connect your website to your Google Analytics account. You can do this by visiting the Insights » Settings page and clicking on the ‘Authenticate with your Google account’ button.

Authenticate with your Google account

This will redirect you to Google accounts where you will be asked to sign in or select a Google account if you are already signed in.

Sign in or select your Google account to continue

You need to click on ‘Next’ to continue.

After that, you will be asked to allow MonsterInsights to access your Google Analytics account. This step is necessary, so MonsterInsights can bring the report back to your WordPress dashboard.

Allow MonsterInsights to access your Google Analytics account

Go ahead and click on the ‘Allow’ button to continue.

The final step is to select the profile you want to track. You need to select your website here and then click on the ‘Complete authentication’ button to continue.

Select your website profile

You will now be redirected back to your WordPress site.

That’s all you have successfully installed and setup Google Analytics on your WordPress site. If you haven’t installed Google Analytics on this website before, then it will take sometime before Google Analytics starts showing your stats.

Viewing Your WordPress Stats Dashboard

Now that you have set up Google Analytics using MonsterInsights, you can view your WordPress stats by visiting Insights » Reports page.

Website stats reports

On top of the stats dashboard, you will see a graph of your WordPress page views and visitor sessions for the last 30 days. This gives you a quick overview of incoming traffic to your blog.

Below that, you will see a comparison of your website stats against previous 30 days. It will show numbers of sessions, page views counter, session duration, and bounce rate.

Stats break down

After that you will see charts showing new vs returning visitors and devices used to access your website. This is followed by top countries people visiting your website from and top referral websites sending you the most traffic.

MonsterInsights also acts as a pageview counter and shows your most popular WordPress posts and pages. This helps you find your top performing content, so you can plan your content strategy accordingly.

Top posts and pages

Viewing More WordPress Stats with MonsterInsights

MonsterInsights also shows custom reports depending on your settings. You can switch to publishers, ecommerce, search console, and dimensions.

The publishers tab shows reports made for content-rich websites like blogs, news, or magazine websites. It will show you the following stats:

  • Top landing pages
  • Top exit pages
  • Top outbound links
  • Top affiliate links
  • Top download links
  • Age, gender, and interests (visible only if you have them enabled in Google Analytics)

Tracking Ecommerce Stats in WordPress with MonsterInsights

If you run an online store using WooCommerce or Easy Digital Downloads, then you’ll love MonsterInsights eCommerce tracking features.

First, you will need to visit Insights » Addons page to install and activate the MonsterInsights eCommerce addon.

Ecommerce addon

Next, you need to visit Insights » Settings and click on the tracking tab.

Enable eCommerce tracking

On the tracking tab, you need to scroll down and select the eCommerce settings and then check the box next to ‘Use Enhanced eCommerce’ option.

Don’t forget to click on the save changes button to store your settings.

Now you can view your ecommerce stats in WordPress by visiting Insights » Reports page and clicking on the ecommerce tab.

ecommerce stats in WordPress

Ecommerce reports will show you the break down of the following stats:

  • Conversion rate, transactions, revenue, and average order value
  • Top products
  • Top conversion sources
  • Total add to cart and total remove from cart
  • Time to purchase and session to purchase stats

We hope this article helped you learn how to easily add a stats dashboard in WordPress. You may also want to see our ultimate WordPress SEO guide to improve your search rankings and get more traffic for your website.

If you liked this article, then please subscribe to our YouTube Channel for WordPress video tutorials. You can also find us on Twitter and Facebook.

The post How to Add a Stats Dashboard On Your WordPress Site appeared first on WPBeginner.