All posts by Editorial Staff

How to Import & Export WooCommerce Products with Images

Do you want to import and export WooCommerce products with images?

Importing or exporting WooCommerce products with images allows you to easily move your store or add new products in multiple stores.

In this article, we will show you how to easily import and export WooCommerce products with images.

How to Import & Export WooCommerce Products with Images

Why Import & Export WooCommerce Products?

Many users need to import and export WooCommerce products for a number of reasons.

  • You may want to move products from one WooCommerce store to another
  • You may want to start an online store with a new WordPress website but with the same WooCommerce products
  • You may want to move your website to a new server but need a better way to move products
  • You may want a faster way to add your products to multiple stores that you manage
  • and more

Now normally if you are moving your website to a new server, then you can just duplicate your entire website and set it up on your new host.

We have a complete step-by-step guide for that, see how to easily move WordPress to a new host or server.

On the other hand, if you only want to move products, then this tutorial will help you learn how to properly export and import WooCommerce products with images and other product data.

We’ll show you two methods, you can choose one that works best for you.

Method 1. Import & Export WooCommerce Products without a Plugin

WooCommerce comes with built-in functionality to easily import and export products with images, but without using any additional plugins.

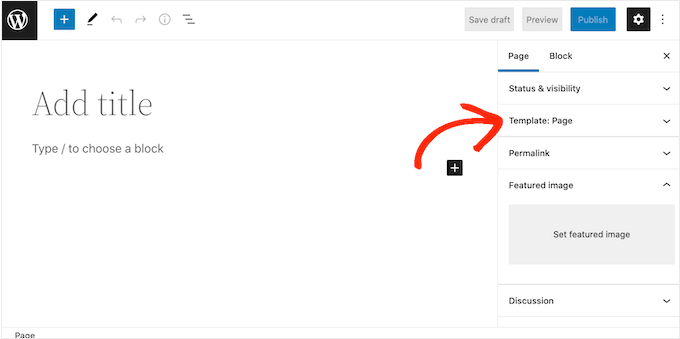
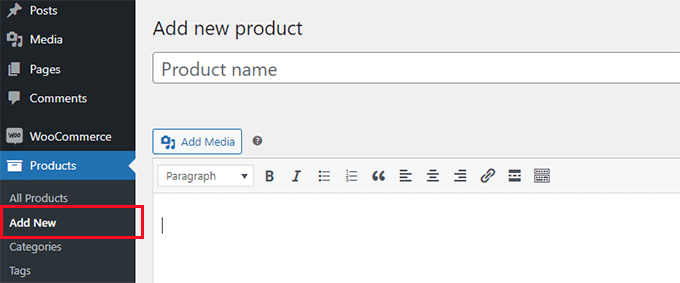
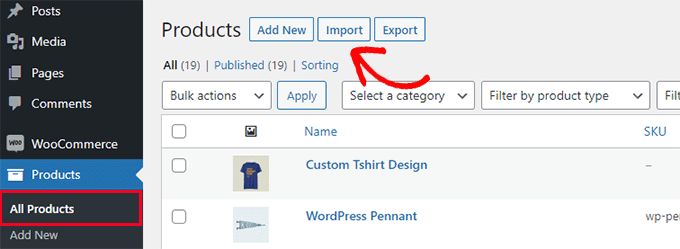
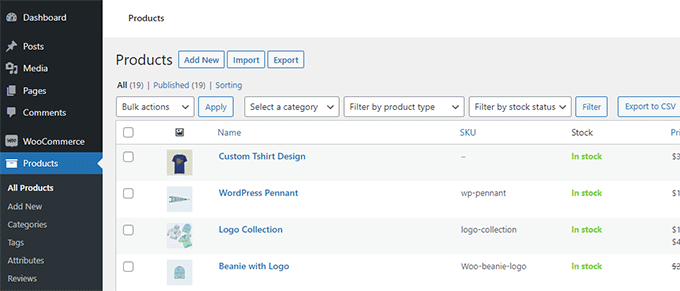
First, you need to visit the Products » All Products page in your WordPress admin area. There, you will see two buttons at the top to ‘Import’ or ‘Export’ products.

Import export WooCommerce products

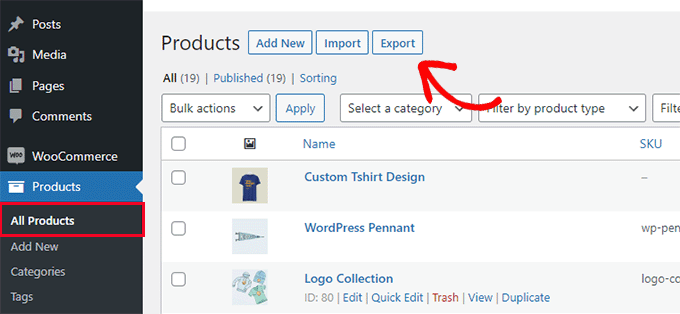
Let’s first check out how the export feature works.

Exporting WooCommerce Products without Using a Plugin

Simply click on the ‘Export’ button at the top to continue.

On the next screen, you’ll see a bunch of options to choose what data you want to export.

Default WooCommerce product export options

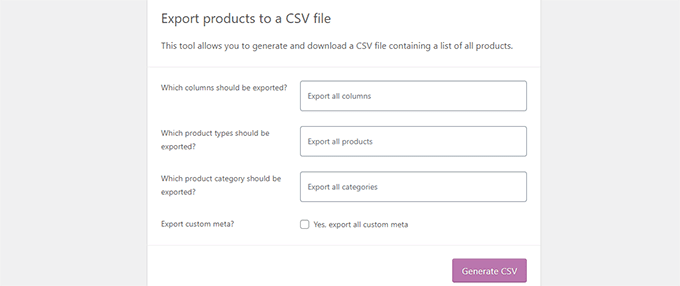
For instance, you can choose to only export certain columns from product data. You can also choose to export specific product types or products in specific categories.

To export all products with images and all other data, you can leave these options unchecked.

Optionally, you can check the ‘Export custom meta.’ If you are unsure, then it’s better to check it so that you have the data.

Go ahead and click on the ‘Generate CSV’ button to continue.

WooCommerce will now prepare a CSV file and download it to your computer.

What is a CSV File?

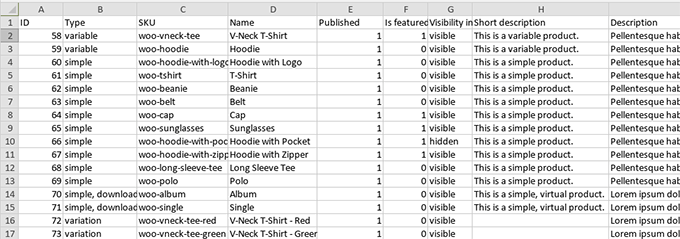
CSV is short for Comma Separated Values, and it is file type of plain text that separates different columns or fields of data with a comma.

You can open it with any spreadsheet software like Google Sheets or Microsoft Excel. Here is how it would look:

CSV file opened in spreadsheet software

Importing WooCommerce Products without Using a Plugin

Simply go to the Products » All Products page and click on the Import button at the top.

Import products

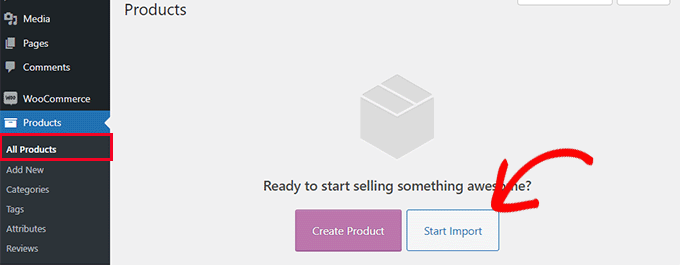
If your WooCommerce store is empty, then instead of the buttons at the top, you will see buttons at the center of the page.

Click on the ‘Start Import’ button to begin the import.

Start import

This will bring up the import wizard.

First, you need to click on the ‘Choose File’ button to select the WooCommerce export CSV file you downloaded earlier.

Choose import file

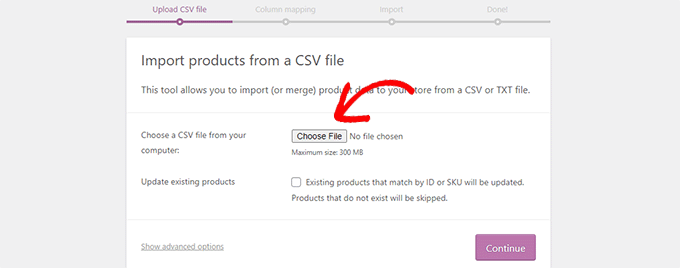
Click on the continue button to upload the CSV file.

WooCommerce will now check to see if your CSV file is in a compatible format. After that, it will ask you to map that data to existing WooCommerce product data.

Map columns

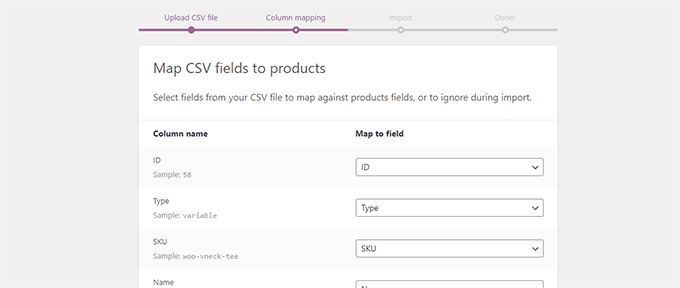
The default settings here will work for most WooCommerce stores.

However, you still need to review and if a column is missing, and then click on the drop-down menu next to it and select a matching field if available.

Particularly, if you are using variations attribute for products, then make sure to scroll down to the attributes columns and match fields.

Match attribute fields

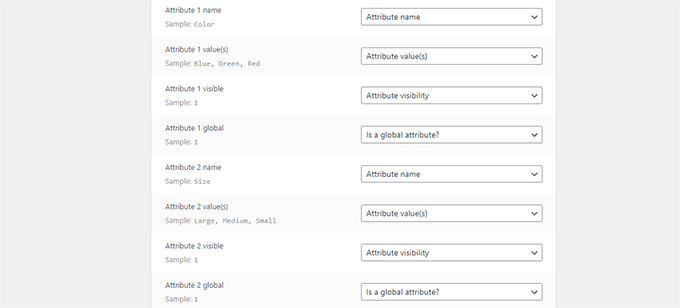
This will allow you to ensure that the fields in your CSV file match the corresponding WooCommerce fields.

Click on the ‘Run’ the Importer button to begin.

WooCommerce will now start importing data from CSV file. It will also download any images attached to your products.

Products imported

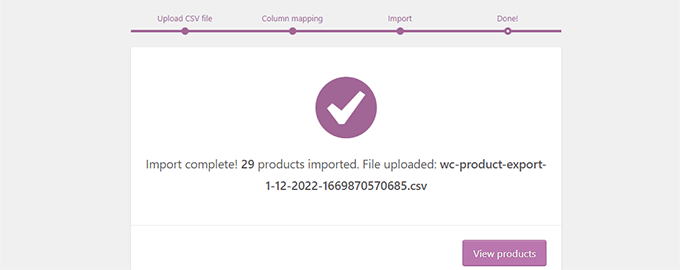
Once finished, you can visit the Products » All Products page to see the imported products.

Make sure to visit your shop and product pages to check that everything is working as expected.

Method 2. Import & Export WooCommerce Products with a Plugin

For this method, we’ll be using a plugin to import and export WooCommerce products.

The advantage of this method is that it offers more flexible options and also allows you to export / import product reviews.

Plus, it allows you to import / export WooCommerce products in batches which comes in handy if you have a large store with many products and images.

Exporting WooCommerce Products with a Plugin

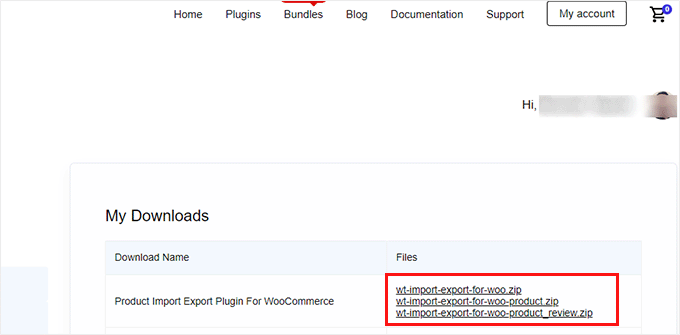
First, you need to install and activate the Product Import Export for WooCommerce plugin. For more details, see our step-by-step guide on how to install a WordPress plugin.

The plugin comes as three separate addons. You’ll need to download and install all of them.

Download plugins

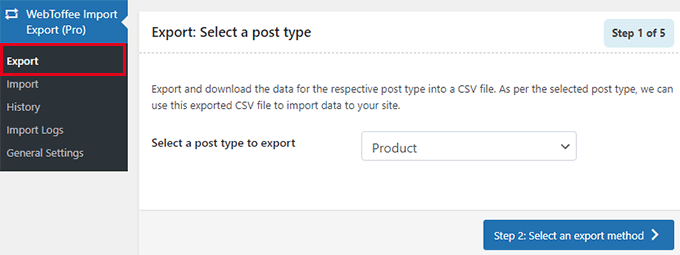
Upon activation, you need to visit the Webtoffee Import Export (Pro) » Export page and select the ‘Product’ as the post type you want to export.

Exporting WooCommerce products using a plugin

On the next screen, you need to select an export method.

The default Quick Export method automatically selects all your products for export.

Quick export method

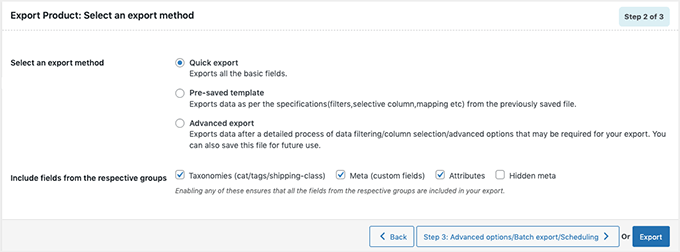
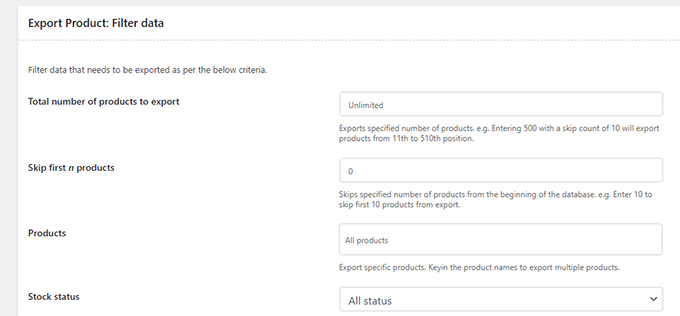
Optionally, you can also choose ‘Advanced Export’ which allows you to filter products by category, tag, and status.

You can also exclude individual products manually.

Advanced filtering options

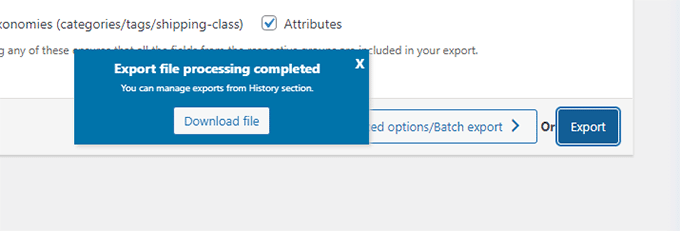
Click on the Export button to continue and the plugin will start preparing your product data.

Once finished, you’ll be prompted to download the export file to your computer.

Download export file

Importing WooCommerce Products with a Plugin

Now that you have your export file ready, you can use it to import products on another WooCommerce store.

Simply install and activate the Product Import Export for WooCommerce plugin on the store where you need to import the products.

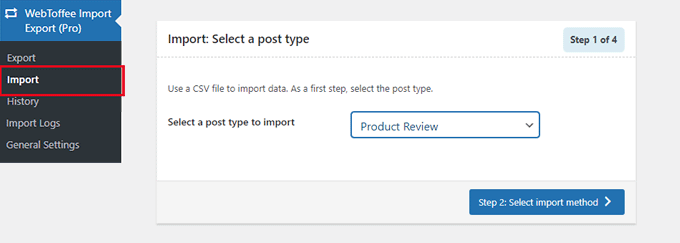
After that, go to the Webtoffee Import Export (Pro) » Import page and select ‘Product’ as the post type you want to import.

Import products using a plugin

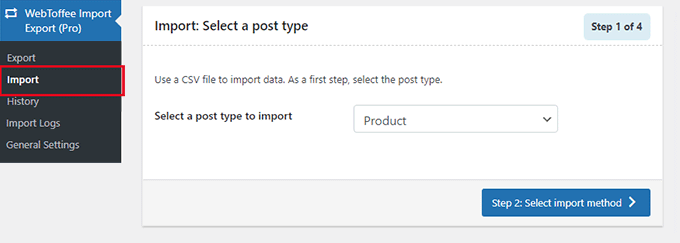
Click on the ‘Step 2: Select import method’ button to continue.

Next, you need to select an import method and upload the exported file you downloaded earlier to your computer.

Import method

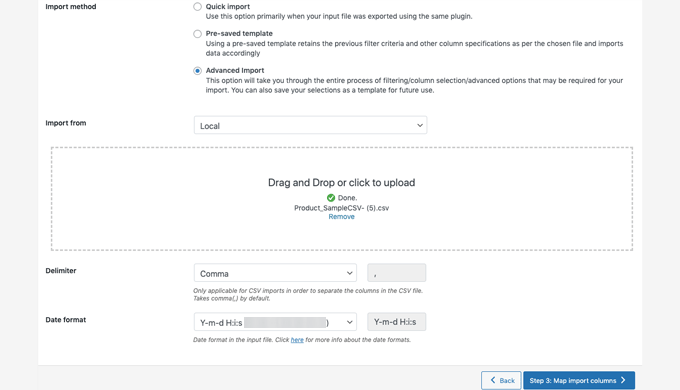
Click on the ‘Step 3: Map and Import Columns’ button to continue.

On the next screen, you’ll see a list of fields and the matching fields from your import file. If you see an empty field, you can choose a matching field for it in the next column.

If you are using product variations like sizes and colors, then make sure to click on the Attributes tab to match attribute fields.

Map fields

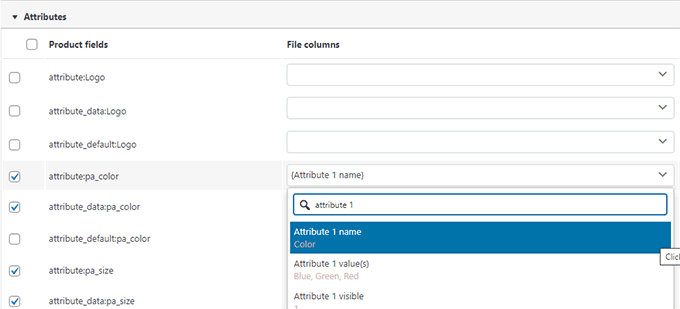
However, if you are not using any products with variations or custom attributes then you can use the default settings.

Click on the ‘Step 4: Advanced Options / Batch Import’ button to continue.

On the final screen, you’ll see advanced options. For instance, you can choose to match products by ID or SKU, choose what to do if a product already exists, and more.

Import options

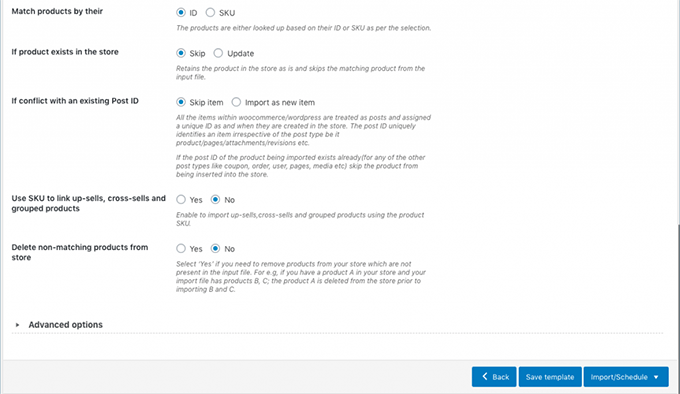
If you are importing products into an empty WooCommere store, then you can use the default settings.

Finally, click on the ‘Import’ button to run the product import process.

You’ll see the progress of the import on screen. Once finished, you can click on ‘View Products’ to check if everything has been imported correctly.

products imported

The plugin also allows you to import and export Product Reviews.

If you want to import or export the product reviews too, then simply choose ‘Product Reviews’ post type on the import or export page.

Import or export product reviews

Improve Your WooCommerce Store with Automations

If you find yourself doing a lot of manual work around your WooCommerce store and want to save time, then we recommend using Uncanny Automator for workflow automation.

Uncanny Automator helps you connect over 100+ plugins and apps with a simple no-code visual builder. You can use it to create automated workflows for things that you normally do without writing any code.

There’s a free version that you can try out, and it’s already used by over 20,000 websites.

Aside from workflow automation, if you’re looking for a marketing automation tool for WooCommerce, then we recommend using FunnelKit Automation. It will help you grow your sales and improve conversions without the high costs.

We hope this article helped you learn how to easily import and export WooCommerce products with images in WordPress. You may also want to see our pick of the essential WooCommerce plugins or see these practical tips on recovering abandoned cart sales in WooCommerce.

If you liked this article, then please subscribe to our YouTube Channel for WordPress video tutorials. You can also find us on Twitter and Facebook.

The post How to Import & Export WooCommerce Products with Images first appeared on WPBeginner.

How to Fix the ERR_CONNECTION_REFUSED Error in Chrome

Are you seeing the ERR_CONNECTION_REFUSED error when trying to access a website or when viewing a website resource using your browser’s inspect tool?

This error message appears when your browser is unable to connect to the website you’ve requested. You might also see it in your browser’s inspect tool when you are exploring why a certain resource on the website won’t load.

In this article, we’ll show you how to fix the ERR_CONNECTION_REFUSED error in Chrome.

How to Fix the ERR_CONNECTION_REFUSED Error in Chrome

What Is the ‘ERR_CONNECTION_REFUSED’ Error in Chrome?

The ERR_CONNECTION_REFUSED message is displayed in Google Chrome when it is trying to open a web page or website resource but is unable to do so. This error code is usually included inside an error message such as:

  • ‘This site can’t be reached’
  • ‘Failed to load resource’

There are lots of common WordPress errors, but this error may stop you from visiting your own website and logging in to the WordPress admin area. You’ll typically want to solve this problem as quickly as possible.

Often when you see this error message, your WordPress website is still working, but something is stopping the browser from accessing it. In many cases, you will only need to fix a problem with your own browser or internet connection.

With that being said, let’s take a look at how to fix the ERR_CONNECTION_REFUSED error in Chrome. First, we’ll look at how to fix the error when you can’t access an entire website, then we’ll show the solution for when you can’t access a specific file or resource on a website.

How to Fix the ‘This Site Can’t Be Reached’ Error

Usually, this message is displayed when you can’t access an entire website.

You will see the Chrome error message ‘This site can’t be reached’ along with the ERR_CONNECTION_REFUSED error code. The message may even suggest a few things to try to fix the error, such as checking the connection, proxy, firewall, and DNS configuration.

This Site Can't Be Reached Error

Other browsers will display similar messages, such as:

  • ‘Unable to connect’
  • ‘Hmmm…can’t reach this page’

There are many things that can interfere with your connection to the website, and you will need to follow some troubleshooting steps to identify and fix the problem.

We’ll briefly cover the steps you should take below. For detailed instructions, see our guide on how to easily fix the ‘This site can’t be reached’ error in WordPress.

Check Your Internet Connection

The simplest fix is to check that you’re connected to the internet and restart your modem and router. Resetting your internet connection may be all it takes to reconnect to your website.

If not, you should check to see whether your website is working. Simply visit the Website Uptime Status Checker website, then enter the URL of your own site.

IsItWP Uptime Checker Tool

If your site is down, then you should contact your WordPress hosting provider to let them know your website is down.

Clear Your Browser Cache

Your web browser stores files and data from the websites you visit, so it doesn’t have to download them again. However, this can cause problems if the cached files become outdated or corrupt.

You can easily clear the browser cache in Google Chrome by clicking on the three-dotted icon in the upper-right corner and then selecting ‘More Tools,’ followed by ‘Clear Browsing Data…’

How to clear the browser cache in Google Chrome

In the popup that appears, check the box next to ‘Cached images and files’ and then click the ‘Clear data’ button.

Now try revisiting the website to check whether you can access it.

Troubleshoot the Software on Your Computer

Some of the security and networking software you run on your computer may be interfering with your connection to the website. This can include your firewall, antivirus software, VPN, and proxy server.

We offer detailed instructions on how to troubleshoot each of these in our guide on how to fix the ‘This site can’t be reached’ error.

Troubleshoot Your DNS Settings

Similar to the browser cache, your computer stores the IP addresses of all the websites you visit. This means the browser doesn’t have to look up the same IP address multiple times.

By flushing your DNS cache, you’ll get the very latest information about a website, including its new domain name or address.

To help you out, we’ve created a complete guide on how to clear your DNS cache for Mac, Windows, and Google Chrome.

If you still can’t access the website after doing this, then you can try changing your DNS server as well. You can follow the detailed instructions in the change the DNS server step of our guide on how to fix the ‘This site can’t be reached’ error.

Add the Addresses for Google's DNS Servers

Reset the TCP/IP Settings

Finally, if there’s a problem with how your internet connection is configured, then renewing your TCP and IP protocol will return the connection to its default settings, which may solve the problem.

You can learn how to do this step-by-step in the reset the TCP/IP settings section of our guide on how to fix the ‘This site can’t be reached’ error.

Click the 'Renew DHCP Lease' Button

How To Fix the ‘Failed To Load Resource’ Error

You might notice that, while your website loads, a certain resource or file doesn’t. This file could be an image or other media file, JavaScript, or a CSS stylesheet. A missing resource can cause your website to misbehave or not function properly.

When that happens, the browser will add a notice in the error console for debugging purposes.

In most cases, you would see this error in your browser’s error console when using the Inspect tool. You might see the error message Failed to load resource: net::ERR_CONNECTION_REFUSED.

Refused to Load Resource Error

This error message happens when your website’s code mentions the file, but your browser is unable to download it. This can happen when there is a problem with the file itself, or the URL that points to it.

To fix the problem, you will need to either replace the resource in question or fix the URL. We offer detailed instructions for both of these in our guide on how to fix the ‘Failed to load resource’ error in WordPress.

We hope this tutorial helped you learn how to fix the ERR_CONNECTION_REFUSED error in Chrome. You may also want to see our ultimate WordPress security guide, or check out our list of easy ways to increase your blog traffic.

If you liked this article, then please subscribe to our YouTube Channel for WordPress video tutorials. You can also find us on Twitter and Facebook.

The post How to Fix the ERR_CONNECTION_REFUSED Error in Chrome first appeared on WPBeginner.

How to Create a Custom Home Page in WordPress

Do you want to create a custom homepage in WordPress?

By default, WordPress shows your latest blog posts on the homepage. However, you can often create a better first impression by designing a custom homepage that highlights your site’s most popular content, products, services, and more.

In this article, we will show you how to easily create a custom homepage in WordPress.

How to create a custom home page in WordPress

What is a Homepage?

A homepage is the first page visitors see when they type in your domain name. For many people, this homepage is their introduction to your business, blog, or website.

An example of a custom homepage

A good homepage will make visitors want to learn more about your WordPress website. It will also provide easy access to the links, search bars, menus, and anything else that can help visitors find interesting content.

By default, WordPress shows your latest blog posts on the homepage.

The default WordPress blog homepage

This may be a good fit for personal blogs or hobby bloggers. However, many WordPress blogs and websites can benefit by replacing the standard homepage with a custom homepage.

The good news is that WordPress makes it easy to show a custom page as your homepage, rather than the default list of recent posts.

Selecting a Custom Page to be Used as Homepage in WordPress

In this guide, we’ll show you a few different ways to create a custom homepage. However, afterward, you’ll need to let WordPress know that it should use this page as the homepage.

To do that, simply go to Settings » Reading in the WordPress dashboard.

Changing the WordPress homepage

Here, scroll to ‘Your homepage settings’ and select ‘A static page.’

You can now open the ‘Homepage’ dropdown and choose the page that you want to use as the new homepage.

How to change the WordPress homepage

Then, simply scroll to the bottom of the screen and click on ‘Save Changes.’ You can now visit your site to see the new custom homepage live.

If you have a blog, then make sure you create a separate blog page to display your posts. If you don’t, then visitors will struggle to find your latest blogs.

With that being said, let’s see how you can design a custom homepage in WordPress. Simply use the quick links below to jump straight to the method you want to use.

Method 1. Create a Custom Homepage Template Using the Block Editor

If you’re using a block theme, then you can design a custom homepage template using the full site editor.

This method doesn’t work with every theme, so if you’re not using a block-based WordPress theme then we recommend using a page builder like SeedProd or Beaver Builder instead.

To start, simply create a new page or open an existing page that you want to use as the homepage. Then, click on the ‘Page’ tab in the right-hand menu and click to expand the ‘Template’ section, if it isn’t already open.

Creating a new homepage template

WordPress will now show which template this page is currently using.

To create a custom homepage template, just click on the ‘New’ link.

Creating a new custom homepage template

In the popup, give your template a name. The name is just for your reference so you can use anything you want.

After that, go ahead and click on ‘Create’ to launch the full site editor.

How to create a custom homepage

 The template editor works similarly to the standard WordPress block editor.

To add blocks to your custom homepage, just click on the blue ‘+’ button. You can then drag and drop any block onto your layout.

Adding blocks to a custom homepage in FSE

Since we’re creating a custom homepage, you’ll typically want to start by adding a big hero image such as your website’s logo or banner.

To do this, simply find the ‘Image’ block in the left-hand menu and then add it to your layout using drag and drop.

Designing a custom homepage in the full site editor

You can now either choose an image from the WordPress media library or upload a new file from your computer.

To get more engagement, you may want to show recent comments on your homepage by adding a ‘Latest Comments’ block.

Showing the latest comments on a WordPress homepage

For more information, please see our guide on how to show comments on the homepage of your WordPress theme.

A good homepage helps visitors find interesting content. With that being said, it’s a good idea to add a ‘Navigation’ block to your custom homepage.

Adding a navigation menu to the WordPress home page

To learn more, please see our step-by-step guide on how to add custom navigation menus in WordPress themes.

After adding a block, make sure you click to select it in your layout. You can then configure the block using the settings in the right-hand menu and the buttons in the mini toolbar.

How to set up a main navigation menu

To build your custom homepage, simply keep adding more blocks and then configure them using the full site editor settings.

For example, you may want to add blocks such as Latest Posts, Search, Social Icons, Cloud Tag, and more.

A custom WordPress home page created using the FSE

When you’re happy with how the template looks, click on the ‘Publish’ button.

The page you created earlier will now be using the new homepage template. You can now tell WordPress to use this page as your homepage by following the process described above.

Method 2. Create a Custom Homepage in WordPress using a Page Builder (Recommended)

The WordPress block-based editor allows you to create a custom homepage using the tools you’re already familiar with. However, it doesn’t work with all themes and is limited in flexibility and features.

If you want to create a completely custom homepage that works with any WordPress theme, then you’ll need a page builder plugin.

For this method, we’ll be using SeedProd. It is the best page builder plugin on the market and allows you to create a custom homepage using a simple drag-and-drop editor.

It also comes with lots of professionally-designed templates and ready-made blocks that you can use on your homepage.

Note: There is a free version of SeedProd on available on WordPress.org but we’ll be using the Pro version since it has more templates, blocks, and features.

The first thing you need to do is install and activate the SeedProd plugin. For more details, see our step-by-step guide on how to install a WordPress plugin.

Upon activation, you need to enter your license key.

Entering the SeedProd license key

You can find this information under your account on the SeedProd website. After entering the license key, go ahead and click the ‘Verify Key’ button.

Next, you need to visit SeedProd » Pages and click on the ‘Add New Landing Page’ button.

Creating a new homepage design with SeedProd

After that, it’s time to choose a template for your custom homepage. SeedProd has lots of professionally-designed templates that you can customize according to your website’s needs.

To select a template, simply hover your mouse over it and then click the ‘Checkmark’ icon.

Choosing a template for your custom WordPress homepage

We’re using the ‘Juicy Sales Page’ template in all our images, but you can use any design.

Next, go ahead and type in a name for the custom homepage. SeedProd will automatically create a URL based on the page’s title, but you can change this URL to anything you want.

When you’re happy with the information you’ve entered, click on the ‘Save and Start Editing the Page’ button.

How to create a custom homepage in WordPress using SeedProd

Next, you’ll be taken to the SeedProd drag-and-drop page builder, where you can customize your template.

The SeedProd editor shows a live preview of your design to the right and some block settings on the left.

A homepage template created using SeedProd

The left-hand menu also has blocks that you can drag onto your layout.

For example, you can drag and drop standard blocks like buttons and images or use advanced blocks such as the countdown, contact form, social sharing buttons, and more.

Adding a social sharing section to the homepage

To customize any block, simply click to select it in your layout.

The left-hand menu will now show all the settings you can use to configure that block. You can also change background colors, add background images, or change the color scheme and fonts to better match your brand.

Changing the branding of your WordPress homepage

To start, you’ll want to replace any placeholder images with your own photos or custom logo. To do this, simply click to select any Image block in the live preview.

In the left-hand menu, click on the ‘Select Image’ button.

Adding images to your design

You can now either choose an image from the WordPress media library or upload a new file from your computer.

SeedProd also comes with ‘Sections,’ which are collections of blocks that are often used together. For example, SeedProd has a header, hero image, call to action, testimonials, contact formFAQs, features, footer sections, and more. These can help you create a custom homepage, fast.

To look through the different sections, simply click on the ‘Sections’ tab. To preview any section, just hover your mouse over it and then click on the magnifying glass icon.

Adding sections to the custom page layout

To add the section to your design, simply click on ‘Choose This Section.’

This will add the section to the bottom of your homepage.

A ready-made customer testimonials section

You can move sections and blocks around your layout using drag and drop.

When you’re happy with how the homepage looks, don’t forget to click the ‘Save’ button to store your changes.

Saving your SeedProd design

SeedProd makes it super easy to connect your homepage to popular email marketing services like Constant Contact or Mailchimp.

To do this, simply click on the ‘Connect’ tab and then select your email service provider.

Connecting your email provider to the SeedProd page builder

SeedProd will now show you how to integrate the homepage with your email provider.

If your provider isn’t listed, then don’t worry. SeedProd works with Zapier which acts as a bridge between SeedProd and more than 3000+ other apps.

How to connect SeedProd and Zapier

Once you’ve done that, you’re ready to publish your custom homepage. Simply click on the ‘Page Settings’ tab.

There are more options under the Page Settings tab that you may want to look at. For example, you can change the SEO settings, edit the page title, and connect a custom domain.

Changing the settings for your homepage

When you’re happy with how the page is set up, go ahead and select the ‘General’ tab.

You can now click on the ‘Page Status’ toggle to change it from ‘Draft’ to ‘Publish.’

Publishing a unique homepage design

Now, you simply need to head over to Settings » Reading and set this page as your new custom homepage.

Method 3. Manually Create a Custom Homepage in WordPress (Coding Required)

You can also create a custom homepage using code. However, this method is complicated and coding mistakes can cause all kinds of common WordPress errors.

That being said, we don’t recommend this method for beginners.

Your WordPress theme is made up of many different files. Some of these files are called templates and they control how different areas of your website look. For more information, please see our WordPress template hierarchy cheat sheet.

One of these templates is called front-page.php.

If your theme has this template, then WordPress will automatically use it to show your homepage. This means you can create a custom homepage by editing this file or replacing it with a new file.

To get started, you’ll need an FTP client such as FileZilla, or you can use the file manager supplied by your WordPress hosting provider.

If this is your first time using FTP, then you can see our complete guide on how to connect to your site using FTP.

After connecting to the server, go to /wp-content/themes/ and then open the folder for your current WordPress theme.

Connecting to your site using an FTP client

If this folder already has a front-page.php file, then you can go ahead and open that file in any text editor, such as Notepad. You can then make any changes you want by editing the code.

If your theme doesn’t have a front-page.php file, then you can create a new file with the name front-page.php.

After that, you just need to upload front-page.php to your current theme’s folder on your WordPress hosting account.

As soon as you upload this file, WordPress will start using it to display your homepage. However, since the file is completely empty, you will see a blank page as your homepage.

To fix this, just open the file in a text editor app and start adding HTML code.

If you’re starting with an empty file, then you can save yourself some time by using the existing code and templates in your WordPress theme.

For example, it usually makes sense to include the theme’s header and footer.

In the following sample code, we’ve removed the content and sidebars while fetching the header and navigation templates from the theme.

<?php /*
This page is used to display the static frontpage.
*/
 
// Fetch theme header template
get_header(); ?>
    <div id="primary" <?php astra_primary_class(); ?>>
 
    <div class="custom-homepage-container"> 
 
    You custom homepage code goes here
 
    </div> 
 
    </div><!-- #primary -->
//Fetch the theme footer template
<?php get_footer(); ?>

Tips on Making an Effective Custom Homepage in WordPress

The homepage is your site’s most important page. People will visit this page to learn more about your business, products, and services.

To help visitors find what they’re looking for, we recommend keeping your homepage design as simple as possible and avoiding any clutter.

It’s also a good idea to place your most important content at the top of the page so it’s the first thing visitors see.

Before designing your page, it may help to write down the goals you want to achieve. You can then design every part of the homepage to help you reach this clear target.

Many businesses and blogs want to convert visitors into customers. To achieve this, we recommend adding OptinMonster to your custom homepage.

OptinMonster is the best WordPress popup plugin and lead generation software. It allows you to create all kinds of popups, floating bars, full-screen welcome mats, slide-in scroll boxes, inline personalized lead forms, gamified spin to win optins, and more.

OptinMonster's gamified banner template

Next, you’ll want to track how your custom homepage is performing. You can then use this insight to fine-tune the page design and get even more conversions.

MonsterInsights is the best plugin for Google Analytics. It allows you to easily install Google analytics in WordPress and shows you helpful reports directly in the WordPress dashboard.

The MonsterInsights Google Analytics plugin

The best part about using MonsterInsights is that you can add the Google Analytics tracking code without editing code or hiring a developer. Plus, it has a Dual Tracking feature, which makes it super easy to switch to Google Analytics 4.

You should also make it easy for visitors and potential customers to contact you. For this, we recommend WPForms which is the best WordPress form plugin on the market.

Finally, it’s a good idea to look at your competitors and other popular sites in your industry or niche. While it’s never a good idea to copy, you can use them as inspiration or learn best practices that you can then apply to your own homepage layout.

We hope this article helped you easily create a custom homepage in WordPress. You may also want to see our proven tips to increase your blog traffic and our expert pick of the best social proof plugins for WordPress.

If you liked this article, then please subscribe to our YouTube Channel for WordPress video tutorials. You can also find us on Twitter and Facebook.

The post How to Create a Custom Home Page in WordPress first appeared on WPBeginner.

How to Track WordPress Widget History (Easy Method)

Do you want to track your WordPress widget history to monitor changes made to the widgets on your site?

Widgets are blocks of content that you can add to your website. They allow you to add different elements to your sidebars such as signup forms, images, recent posts, and more. Tracking widget history allows you to easily monitor changes and undo them as needed.

In this article, we’ll show you how to easily track your WordPress widget history.

How to track widget history in WordPress

Why Should You Track WordPress Widget History?

By default, WordPress comes with a feature called revisions for content types like posts and pages. Revisions make it easier to what changes were made by which user, and allow you to easily undo those changes if needed.

However, there is no built-in revisions feature for WordPress widgets.

Tracking widget history will allow you to keep track of changes made to widgets on your WordPress website. You can see which user added, removed, or changed a widget, and then you can keep those changes or undo them by editing your widget.

Similarly, if something in a widget has stopped working, then you can pinpoint which changes caused the problem and fix them manually.

That being said, let’s take a look at how to easily track widget history in WordPress.

How to Easily Track WordPress Widget History

The easiest way to track WordPress widget history is by using the Simple History plugin.

First, you need to install and activate the Simple History plugin. For help, see our guide on how to install a WordPress plugin.

Keep in mind that plugin will only track changes made after the plugin is activated.

After installing the plugin, let’s make a few changes to your WordPress widgets. Simply go to the Appearance » Widgets page and make some changes to your existing widgets.

Make changes to widget

Don’t forget to click on the Update button to save your widget changes.

After that, you can go to the Dashboard » Simple History page inside WordPress admin area.

You’ll see the changes you made to your widgets appear at the top.

Widget changes view

Apart from widget changes, Simple History will also be able to track the following changes and user activity on your website:

  • theme updates
  • plugin installation
  • sidebar widget history
  • Comments history
  • user logins
  • user profiles

If you want to change the settings of the plugin, then you can simply head over to Settings » Simple History from the WordPress admin dashboard.

Go to Simple history settings from the dashboard

From here, you can modify the plugin settings according to your needs.

If you want to track the widget history of your WordPress site directly from the dashboard, then you can check the ‘On the dashboard’ option beside the ‘Show History’ option.

This will allow you to access Simple History by simply heading over to Dashboard » Simple History from the WordPress admin panel.

You can also select the number of items you want to show on your log page as well as your dashboard page.

Additionally, you can enable the RSS feed option by checking the box next to it if you want to receive daily log updates about your website.

Don’t forget to click the ‘Save Changes button at the bottom once you’re satisfied.

Enable RSS Field

Next, you may want to switch to the Debug tab. From here, you can view all the log events displayed as Loggers.

Plus, you will also be able to see the names of tables that plugin has created in your WordPress database.

Debug options

The plugin also allowss you to easily downoad the logs file to your computer.

Siply switch to the Export tab on the plugin’s settings page and choose which format you want to use for the export.

You can choose either JSON or CSV format. We recommend using the CSV option as you can open the CSV files in any spreadsheet software like Google Sheets or Microsoft Excel.

Check CSV option

After that, click on the Download Export File button and plugin will send a download file to your browser.

Here is how it would look when you open it in a spreadsheet software.

Excel file

Final Thoughts

Having an activity log is very important as it helps you keep your website safe. Simple History does that for widgets and many other plugins.

Other plugins like WPForms have added revisions to WordPress form building, and WPCode has also added version control for custom code snippets.

Lastly, if you’re looking for a comprehensive activity log solution for WordPress security, then we recommend taking a look at WP Activity Log plugin.

We hope this tutorial helped you learn how to easily track your WordPress widget history. You may also want to check out our guide on how to start a podcast, and our top picks of the best WooCommerce plugins for your store.

If you liked this article, then please subscribe to our YouTube Channel for WordPress video tutorials. You can also find us on Twitter and Facebook.

The post How to Track WordPress Widget History (Easy Method) first appeared on WPBeginner.

Welcome Thrive Themes to the WPBeginner Family of Products

Today, I’m extremely excited to share that Thrive Themes is joining Awesome Motive, and they’re now part of the WPBeginner family of products.

Thrive Themes is the company behind some of the most powerful growth tools for WordPress. Over 200,000+ smart website owners use the Thrive premium plugin suite to easily convert website visitors into email subscribers, paying customers, and raving fans.

Welcome Thrive Themes to the WPBeginner Family

Introduction to Thrive Themes – Quick Overview

Thrive Themes is a popular brand among business owners because their suite of tools give you everything needed to build and grow your online business at drag & drop speed.

Although the brand name is Thrive Themes, it’s actually an ecosystem of powerful conversion focused WordPress plugins that work seamlessly together to help you start and grow your online business. 

Thrive Suite consists of four key areas to help you grow your online business: Build, Convert, Sell, and Engage.

Powerful WordPress Website Building Tools

They offer two powerful drag & drop WordPress design building tools called Thrive Architect and Thrive Theme Builder. They work together to help you build high-converting websites without any coding needed.

Thrive Architect is a visual drag & drop page builder for WordPress that helps you build custom landing pages and blog post designs faster than ever before. It comes with over 350+ conversion focused landing page templates and conversion elements that you can use to build high-converting websites. 

Thrive Architect - WordPress Page Builder

Thrive Theme Builder is a marketing centered custom WordPress theme builder that lets you visually build the conversion focused site of your dreams no matter your experience level (all drag & drop). Basically you can launch your site in under 15 minutes, update your brand everywhere in seconds, and everything is professionally designed with conversions in mind.

It comes with hundreds of design and site building elements to improve your workflow, and it integrates with just about every powerful business tool like WooCommerce, email marketing services, CRMs, and more to help save you time.

Don’t take my word, see what the users are saying.

Thrive Theme Builder Testimonials

WordPress Lead Generation & Conversion Tools

Thrive Suite is built by marketers for marketers which means there’s a big focus on creating advanced lead generation tools to help you get more email subscribers and grow your sales faster.

Their conversion tools for WordPress include Thrive Leads, Thrive Quiz Builder, Thrive Optimize, Thrive Ovation, and Thrive Ultimatum.

Thrive Leads is a drag and drop builder that allows you to create any type of lead generation form imaginable. It comes with a huge selection of opt-in form templates, or you can create your own custom one within minutes. 

You can use it to create popups, sticky ribbons, in-line forms, 2-step optin forms, slide-ins, screen filler overlay, content lock forms, scroll mat, yes / no or multiple choice forms, and more.

ThriveLeads - Design Examples

The best part is that you get advanced targeting features that lets you display relevant and hyper-targeted offers to visitors based on posts, categories, tags, and more. You also get A/B testing for opt-in forms as well as actionable reports.

Thrive leads integrates with all the popular email marketing services and CRMs.

Thrive Quiz Builder is a WordPress quiz plugin that lets you create highly engaging quizzes to help grow your email list, social shares, while giving you the data you need to grow your business.

It lets you build those viral social media quizzes with branching logic with zero coding. You can also use it to build personalized product recommendation quizzes to help users make a decision on which product they should pick on your website. 

Thrive Quiz Builder

The best part is that each answer helps you segment visitors based on their interests, so you can build a hyper-targeted email list and improve your email open rates.

You can also further improve your quiz conversions with A/B testing various quiz stages, and this is basically every marketers dream come true.

Thrive Optimize is a WordPress A/B testing tool that helps you launch tests faster, more often, and for crazy cheap prices compared to SaaS alternatives with no coding needed.

You can use it to create unlimited tests, unlimited variations, setup conversion goals, choose traffic distribution, and everything is done with visual editing (no code). Once the test is done, it automatically chooses your highest converting test as a winner.

Thrive Optimize - WordPress Split Testing Plugin

Thrive Ovation is a set-and-forget testimonial plugin for WordPress. Studies show that testimonials can boost conversions by 34%, and this is the easiest way to start taking advantage of one of the most underestimated conversion boosters.

It lets you gather testimonials without a hassle where you can transform WordPress comments into testimonials in a single click. You can also automatically convert any social media comment into a beautiful testimonial card.

Lastly, it has a built-in auto-pilot testimonial gathering feature to help you collect more relevant and meaningful testimonials for your business.

Thrive Ovation - WordPress Testimonial Template Example

Thrive Ultimatum is a powerful scarcity marketing tool for WordPress. You can use it to create both fixed and evergreen countdown timers on your website.

It comes with dozens of countdown timer designs that you can customize to match your style & brand with drag & drop ease. The targeting feature allows you to show the offer to the right audiences.

This is a must have tool for increasing product sales, building a buzz around your launch, and even boost established eCommerce sales. 

Thrive Ultimatum Examples

Sell Online Courses with Results Focused LMS Plugin

Thrive Apprentice lets you create pro-looking courses straight from your WordPress dashboard. It’s a WordPress membership and LMS plugin to build and grow your online business.

It comes with a drag & drop course builder that lets you create modules, chapters, lessons, and more in a well-organized manner. 

Thrive Apprentice Course Builder

You get access to advanced drip functionality such as unlocking content at consistent intervals for each student or unlocking new content on specific weekday or day of the month. 

You have the option to unlock lessons based on the results of a quiz in Thrive Quiz builder, and you can even add custom tags to each user for personalized communication using Thrive Automator.

Thrive Apprentice lets you protect content based on the user’s membership level, award certificates to those who complete your courses, and so much more.

Last but not least, it gives you detailed insights about your students and courses, so you can get insights like where are students dropping in your course, how many lessons did a particular student complete, overall engagement reports, and so much more.

Boost Your WordPress Engagement with Smart Comments

Thrive Comments help you turn the most overlooked feature on your WordPress website into your most valuable asset. 

You can supercharge your WordPress comment area to spur engagement like Reddit and Facebook. It basically adds the most addictive elements of social media and community forms into your WordPress comments.

Users can get satisfaction by seeing likes / upvotes on their comments, unlock achievements through badges, get validation through being featured in comments, and get a chance to have their comments shared on social.

Thrive Comments Engagement Features for WordPress

Basically Thrive Comments help you turn your comments into conversions. Based on what the user does, you can show selective actions such as redirecting first time comments to a welcome to community gfit page, or repeat commenters to a share modal, and more.

Thrive Comments Animation

And unlike third-party comment systems like Disqus, there is no lock-in, and definitely no intrusive ads. This is your comment area and you get to customize it the way you want.

Whether you’re a small business owner or a marketer, I highly recommend adding Thrive Suite to your WordPress toolkit.

And now that you know all about Thrive Themes, I think you’ll find the background story of this acquisition even more interesting.

Background Story – Why Thrive Themes? 

In 2009, when I started WPBeginner, I spent hours every day learning and writing about new WordPress plugins, themes, and tools to help small businesses grow and compete with the big guys.

In the process, I came across Shane and Paul’s work when they created Hybrid Connect back in 2012. It was a WordPress popup plugin that I tried before I ended up building OptinMonster in 2013.

Ever since then I have closely followed their journey as they launched multiple products and eventually rebranded everything under the Thrive Themes brand.

Over the last 8 years, we have been friendly competitors working on the same mission: helping small businesses grow & compete with the big guys.

What a lot of beginners don’t often see is that WordPress is an open source platform. Unlike other industries, the competition is fair and friendly. Most of us WordPress product owners have great relationships with each other, and we even collaborate at times. This type of competition is known as co-opetition. We have learned from Thrive, and I’m sure Thrive has learnt from our brands.

While there are similarities in few of our existing products, there are also unique differences in our offerings. For example, Thrive has a powerful quiz builder for WordPress, an engaging comments plugin, and a proper A/B testing solution. Whereas the WPBeginner family of brands offered solutions like AIOSEO, WPForms, and MonsterInsights. Between us, we had a lot of mutual customers.

That’s why the brands will continue to operate independently and serve our respective customers (of course with deeper integration with each other)..

Last year, Shane reached out to me through the WPBeginner Growth Fund page because he was looking to move on to the next chapter of his life. But he only wanted to sell the business to someone who will carry his legacy forward while taking care of customers and protecting the team, and they chose us because of our reputation and values.

I was extremely familiar with Thrive Suite and have a lot of respect for what Shane and Paul had built, so it was a no brainer for us.

We worked through the logistics, and outside of the two co-founders, the entire team will be joining Awesome Motive. The team will be led by Brad Stevens, the current General Manager of Thrive Themes.

I will be working closely with him, and I’m super excited about bringing you more powerful solutions to help grow your website.

Note: Want to join our remote team to work on something awesome & make an impact? We’re hiring. Come work alongside me and help shape the future of the web.

What’s Coming Next? 

Our work is just starting.

While I have some ideas and features I’d like to add in certain Thrive suite plugins, there is already an amazing feature roadmap in place based on existing customer feedback. 

My goal is to do everything I can to help make those features become a reality, as quickly as possible.

I’m really looking forward to doing a deeper dive in some of the conversion tools, especially quizzes because I know they can be a game changer when used properly.

Whether you’re a small business owner or a marketer, I think you will want to choose Thrive Suite to grow your business faster.

If you have suggestions on features you’d like to see in the various Thrive plugins, then please let us know by sending us a message via WPBeginner contact form.

As always, I want to thank you for your continued support of WPBeginner. 

Every time I share an announcement like this, I realize that I’m only able to do what I love every day because of you, our amazing readers, and I’m extremely grateful for your support throughout the years.

WPBeginner and Awesome Motive would not be here without YOU, and I just want to say how much I appreciate all of you.

And I look forward to continuing serving you, and the larger WordPress / web ecosystem for years to come.

Yours Truly,

Syed Balkhi
Founder of WPBeginner

The post Welcome Thrive Themes to the WPBeginner Family of Products first appeared on WPBeginner.

How to Create an Etsy-Like Store with WordPress (Step by Step)

Do you want to build an Etsy-like store with WordPress?

Etsy is an online marketplace for creative folks who want to sell handmade goods, artwork, and other unique items. However, Etsy can be a bit limited in terms of what you can do with your store.

In this article, we will show you how to create an Etsy-like store with WordPress, and how to properly move an existing Etsy store to WordPress.

Making an Etsy like store with WordPress

Etsy vs WordPress – Which one is better?

Etsy is an online marketplace for creative folks. Usually, people use Etsy to sell handicrafts, custom designs, jewelry, clothing, and more. It has become a niche marketplace for such unique items.

Etsy website

However, as an eCommerce platform, Etsy is quite limited in terms of functionality. Plus, it also takes a significant portion of your earnings which reduces the profitability and long-term growth of your business.

On the other hand, WordPress is the world’s most popular website builder. It allows you to create almost any kind of website imaginable, including full-fledged eCommerce stores.

Using WooCommerce on your WordPress website you can sell anything online including handicrafts and other unique handmade items.

You can sell physical goods (that need shipping), as well as digital downloads (spreadsheets, software, music, worksheets, online courses, and memberships).

More importantly, WordPress doesn’t charge you a listing fee or a transaction fee on each item you sell.

Note that there are two different types of WordPress platforms.

WordPress.com which is a hosted platform and WordPress.org which is also called self-hosted WordPress. See the difference in our WordPress.com vs WordPress.org comparison.

Throughout this article, when we say WordPress, we are talking about the more popular, self-hosted WordPress.org platform. We recommend using WordPress.org because it gives you access to all WordPress features out of the box.

That being said, let’s take a look at how to easily create an Etsy-like store in WordPress. Here is a quick overview of the topics we’ll cover in this article.

Etsy and WordPress both enable you to sell products online but which one you should choose? Let’s take a look at the pros and cons of both platforms.

Pros and Cons of Setting up an Etsy Shop

Let’s take a look at the advantages and disadvantages of using Etsy to sell your products online.

Pros of Using Etsy

  • Ease of Use – Setting up an Etsy store is very easy and does not require any technical skills. Simply upload your product listings, add your payment information, and you are good to go.
  • Targeted Audience – Etsy has a large customer base of users interested in unique handmade products, gift items, artistic and creative products, and more. Opening up a shop on Etsy gives you access to a marketplace with interested buyers.
  • Security and Trust – Etsy takes care of payments and ensures product delivery. This has helped them build trust among both buyers and sellers.

Cons of Using Etsy

  • Higher Fees – Etsy charges $0.20 per listing (renews every four months) and a 6.5% transaction fee on the sale price (not including shipping costs). If you are using PayPal, then there is also a payment processing fee.
  • Lack of Control – You have no control over the platform, and how your products are featured. Etsy can remove a seller if they feel that the seller’s products don’t meet their policies or the seller fails to satisfy a customer.
  • Limited Growth Options – As your business grows, you will be paying a lot more to Etsy with limited options to grow your own brand and business.

Pros and Cons of Using WordPress

WordPress is the best platform to build any kind of website. However, it has its own pros and cons that you would want to consider.

Pros of Using WordPress

  • Complete Control – You have complete ownership and full control of your website.
  • Unlimited Features – You can add any feature to your website by installing extensions. There are more than 55,000 free WordPress plugins that you can install.
  • Unlimited Listings – You can add as many items to your shop as you want. There are no listing fees because you own and manage the platform yourself.
  • Low Costs – There is no commission and no transaction fee on each sale. You will only pay a small fee to your payment gateway.

Cons of Using WordPress

  • Website Management – You are responsible for managing updates and making backups. There are plugins that help you automate those tasks.
  • Learning Curve – WordPress is fairly easy to use. However, from time to time you may need some help. There are plenty of WordPress resources to help you out.

To learn more about WordPress, see our complete WordPress review with detailed pros and cons of the platform.

That being said let’s take a look at how to create an Etsy-like store with WordPress.

Requirements for Creating an Etsy-like Store with WordPress?

You’ll need the following things to build your own Etsy-like store with WordPress.

  1. A domain name (This will be your shop’s address on the internet i.e wpbeginner.com)
  2. A website hosting account (This will be the shop’s home and where all your files will be stored)
  3. SSL Certificate (You need this to accept payments)
  4. Your undivided attention for 30 minutes.

Ready? let’s get started.

Getting Started with Your Etsy-Like Shop in WordPress

Normally, a domain name will cost you $14.99 per year, website hosting $7.99 per month, and an SSL certificate around $69.99 per year.

This is a lot of money if you are just getting started.

Thankfully, the folks at Bluehost have agreed to offer WPBeginner users a free domain name + free SSL certificate, and a 60% discount on hosting.

They are also an officially recommended WordPress and WooCommerce hosting provider, and one of the largest hosting companies in the world.

Basically, you can get started for $2.75 / month.

Let’s go ahead and purchase your domain + hosting + SSL.

First, you need to visit the Bluehost website and click on the green ‘Get Started Now’ button.

Getting started with personal website on Bluehost

On the next screen, select the plan that you need (basic and plus plans are the most popular among WPBeginner users).

After that, you will be asked to enter the domain name for your website.

choose domain name

Need help choosing a domain name? See our beginner’s guide on how to choose the perfect domain name for your website.

Lastly, you will need to add account information and finalize the package info to complete the process.

On this screen, you will see optional extras that you can purchase.

We don’t recommend purchasing these items because they will increase your hosting bill. You can always add them later if you think these are needed.

Finalize package

You can now go ahead and enter your payment information to complete the purchase.

After that, you will receive an email with instructions to log into your hosting control panel.

Bluehost will automatically install WordPress for you, and you will be able to log in to your WordPress site directly from the hosting dashboard.

Bluehost hosting dashboard

Once logged in, you will see the WordPress admin area. This is where you will manage your online shop, change settings, and add new items.

Installing WooCommerce on Your Website

Now that you have purchased hosting and installed WordPress, the next step is to turn your website into an online store like Etsy.

To do this, you need to install and activate the WooCommerce plugin on your website. For more details, see our step-by-step guide on how to install a WordPress plugin.

Upon activation, click on ‘Run the setup wizard’ button to quickly set up your WooCommerce store.

WooComerce setup wizard

The setup wizard will guide you through the basic setup.

During step 4, you need to switch to the ‘Free features’ tab and uncheck ‘Add recommended business features to my site’ feature.

Exclude free features

This option installs additional plugins. You can always install these plugins later if needed.

Click on the continue button to select a theme and then finish the setup. Don’t worry, we’ll talk more about theme and store design options later in this article.

Adding Items to Sell in WooCommerce

After setting up WooCommerce, let’s add a few items to sell on your online store.

Simply go to Products » Add New page to add your first item.

Add new product

First, provide a title for your product and then a detailed description.

On the right-hand column, you can add product categories, tags, and images.

Product options

Below the description area, you will see the ‘Product Data’ box.

From here you can set product price, inventory, shipping, and other attributes.

Product data

Once you are satisfied with all the product information you have added, you can click on the ‘Publish’ button to make it live on your website.

Repeat the process to add more products as needed.

Importing an existing Etsy Store to WordPress

Do you already have an Etsy store that you want to move to WordPress? In this section, we will show you how to easily import your Etsy shop to WordPress.

First, you need to do is install and activate the Easy Esty Importer plugin. For more details, see our step-by-step guide on how to install a WordPress plugin.

Upon activation, the plugin will add a new menu item labeled ‘Etsy Importer’ to your WordPress admin sidebar. Clicking on it will take you to the plugin’s settings page.

Etsy importer

You will be asked to provide your license key. You can find this information under your account on the plugin’s website.

After activation, the settings page will ask you to provide the following information.

  • Etsy API Key
  • Etsy Secret Key
  • Your Etsy Shop Name
Etsy API Key

To get these API keys, you need to visit the Etsy Developers ‘Apps You’ve Made‘ website.

Once there, click on the ‘Create a new app’ link.

Create Etsy app

This will bring you to a new page where you will be asked to provide a name for your app.

You need to select that you are creating the app for yourself, and it will not be used for commercial purposes.

App details

After that, click on ‘Read terms and create app’ button.

You will now see your app information page. From here you need to copy the ‘Keystring’ and ‘Shared Secret’ keys.

Copy Etsy API keys

Now, switch back to the Easy Etsy Importer plugin’s settings page. After entering your API keys, click on the ‘Save & Verify’ button to continue.

This will take you to the Etsy website where you will be asked to allow access to the app. Click on the ‘Allow’ button to continue.

Allow connection

The plugin will now try to connect to your Etsy shop.

Once connected, it will show a success message.

Next, you need to switch to the settings tab.

The default settings will work for most websites, but you can still review and change them as needed.

Importer settings

Don’t forget to click on the ‘Save’ button to store your settings.

Now you can move to the ‘Import’ tab. The plugin provides you options to selectively import items or import all listings.

The default settings will work for most websites, so you can just go ahead and click on the ‘Import’ button.

Start import

The plugin will now start importing your Etsy listings to WooCommerce. Once finished, you will see a success message, and you will be able to see the imported products under Products » All Products page.

Next, you can switch to the reviews tab to import your Etsy reviews to WooCommerce.

Import reviews

Congratulations, you have successfully imported your Etsy store listings to your WooCommerce website.

Choosing an Etsy-like WordPress Theme for Your Store

WordPress gives you access to thousands of free and paid website designs that you can use. These designs are called WordPress themes.

WordPress themes

Each WordPress theme contains various template files to give your website a beautiful design.

You don’t need any coding or programming skills to use a theme, and each of them comes with different options that you can use to customize the design to your liking.

Due to such a large variety of WordPress themes available, often users feel overwhelmed by the choices. To make it easier, we have hand-picked the best WooCommerce WordPress themes that you can use on your website.

The list contains both free and paid WordPress themes and all of them are mobile-ready.

You may not find a theme that looks exactly like the Etsy website. However you can find a theme with the same design qualities and then use the theme’s settings to make it look more similar.

Need more help? See our beginner’s guide on how to choose the perfect WordPress theme for your website.

If you want to create a custom WordPress theme with drag & drop builder, then we recommend using the SeedProd plugin. We also have a detailed tutorial on how to create a custom WordPress theme with no code.

Extending Your Store with WordPress Plugins

Unlike Etsy, you have full control of your WordPress store. You can modify it in any way you want with the help of thousands of WordPress plugins.

Plugins are like apps for your WordPress website. You can install them to add new features to your website like contact forms, Google Analytics, and more.

With more than 55,000 plugins, you can easily find a plugin for almost anything.

Here are some of the plugins that we use on all our websites.

There are also tons of plugins made specifically for WooCommerce. See our list of the best free WooCommerce plugins. You can also use drag & drop page builder plugins to further customize your website’s look and feel.

Mastering WordPress Skills

Now that you have a WordPress powered online store, you may want to expand your website by adding new features and growing your business.

WPBeginner is the largest free WordPress resource site in the world. We have tons of articles, videos, and step by step tutorials to help you take your website to the next level.

Here are some of the handy resources you will find on WPBeginner, all of them are completely free.

  • WPBeginner Blog – This is where we publish our WordPress tutorials, how-tos, and step by step guides.
  • WPBeginner Videos – These step-by-step videos will help you learn WordPress FAST.
  • WPBeginner on YouTube – Need more video instructions? Subscribe to our YouTube channel with more than 283,000 subscribers and 40 Million+ views.
  • WPBeginner Engage – Our Facebook community with more than 90,000 users. Helps you quickly ask questions and get help from users like yourself.
  • WPBeginner Glossary – The best place for beginners to start and familiarize themselves with the WordPress terms and lingo.
  • WPBeginner Deals – Exclusive discounts on WordPress products and services for WPBeginner users.

You can also use Google to find tutorials on WPBeginner. Simply add ‘wpbeginner’ next to your search term, and you will find answers to all your WordPress questions.

We hope this article helped you move away from Etsy and create an Etsy-like store with WordPress. You may also want to checkout our list of the must have WordPress plugins for business websites.

If you liked this article, then please subscribe to our YouTube Channel for WordPress video tutorials. You can also find us on Twitter and Facebook.

The post How to Create an Etsy-Like Store with WordPress (Step by Step) first appeared on WPBeginner.

How to Track Link Clicks and Button Clicks in WordPress (Easy Way)

Do you want to track link clicks and button clicks in WordPress?

Tracking links and button clicks help uncover how users interact with your website. You can use the insights to improve your website and plan your marketing and content strategies accordingly.

In this guide, we’ll show you how to easily track link clicks and button clicks in WordPress.

How to track link clicks and button clicks in WordPress

Why Should You Track Link and Button Clicks in WordPress?

Links and buttons are two of the most common ways users interact with any website on the internet. These elements also lead website visitors to make purchases, sign up, and convert into customers.

Tracking how your users interact with different elements on your WordPress website helps you learn what’s working on your website. More importantly, it helps you understand what’s not working and needs improvement.

For instance, if users are not clicking on the ‘add to cart’ button in your online store, then you can investigate what’s stopping them from doing so. Another great example is your affiliate links. You can track which links your users click more often than others.

These insights can help you make data-driven decisions for the success of your business. Having said that, let’s look at how you can easily track links and button clicks in WordPress.

We have broken down this guide into the following sections, so you can easily follow along.

Tracking Link and Button Clicks in WordPress Using MonsterInsights

The best tool to collect marketing data on your website is Google Analytics. However, despite Google’s best efforts, many beginners and even experienced marketers find it a bit intimidating.

This is where MonsterInsights comes in. It is the best Google Analytics plugin for WordPress that allows you to properly set up Google Analytics and make the most out of it.

MonsterInsights goes beyond just adding a tracking script in the footer. It automatically adds proper event tracking to all links, buttons, cart areas, and more. Most importantly, it also shows you human-readable reports inside your WordPress dashboard.

MonsterInsights has a free version, but you’ll need at least the Pro plan to take full advantage of all the powerful tracking features it offers.

Setting up MonsterInsights is super easy.

First, you need to install and activate the MonsterInsights plugin. For more details, see our step-by-step guide on how to install a WordPress plugin.

Upon activation, you’ll see the welcome screen and the setup wizard. Simply click the ‘Launch the Wizard’ button and follow the onscreen instructions to connect your website to Google Analytics.

Launch setup wizard

If you need detailed instructions, then see our tutorial on how to install Google Analytics in WordPress, which will walk you through the entire setup.

The MonsterInsights setup wizard automatically configures all the right settings based on the type of your website and also lets you set up a Google Analytics 4 property. It truly is effortless.

For more information, please see our guide on how to switch to Google Analytics 4 in WordPress.

Once you have set up MonsterInsights, you can resume this tutorial. Now that everything is running, let’s start setting up click tracking.

A lot of web publishers use affiliate marketing to make money online.

As an affiliate marketer, you’ll need to learn how your affiliate links are doing. Obviously, you can track your affiliate earnings from third-party resources, but that does not give you an accurate picture of how users interact with your affiliate links.

Most affiliate marketers use a link-cloaking plugin like ThirstyAffiliates. This allows you to create shorter affiliate links and manage all your links inside WordPress. For example, https://www.example.com/refer/awesomeproduct/.

MonsterInsights makes it easy to set up affiliate link tracking in WordPress.

Simply go to Insights » Settings and switch to the ‘Publisher’ tab. From here, you can add your affiliate link’s unique path to start tracking.

Change affiliate link settings

Don’t forget to click the ‘Save Changes’ button to store your settings.

Within a few hours, you will be able to see your affiliate link performance in your Publisher reports located under the Insights » Reports menu in WordPress.

Outbound and affiliate links report

Outbound links are links pointing to external websites. These could also be uncloaked affiliate links, links to your partner websites, or other websites you own.

MonsterInsights automatically tracks all clicks on those outgoing links. You can view them by visiting the Insights » Reports page under Publishers report.

Outbound links report

Pro tip: If you see that you’re sending a lot of clicks to an external website, then you should contact them to work out a strategic partnership. This can be a sponsorship, cross-promotion, affiliate partnership, etc.

For more details, please see our guide on how to track outbound links in WordPress.

Ecommerce Tracking in WordPress

If you run an eCommerce business using WooCommerce or Easy Digital Downloads, then you should track which products get the most clicks.

MonsterInsights comes with powerful eCommerce tracking features. Now it’s time to turn on eCommerce tracking on your website.

First, you need to visit your Google Analytics dashboard. From there, you need to switch to the Admin view.

Go to admin settings

Next, you need to click on the eCommerce settings option.

It will be located under the ‘View’ column.

Ecommerce settings

After that, you will see the options to turn on eCommerce tracking and reporting in Google Analytics.

Go ahead and click the toggles for the ‘Enable Ecommerce’ and ‘Enable Enhanced Ecommerce Reporting’ options.

Enable ecommerce and enhanced ecommerce reporting

Now that you have enabled eCommerce in Google Analytics, let’s enable the MonsterInsights eCommerce addon.

First, you need to go to the Insights » Addons page. From here, you need to install the ‘eCommerce’ addon for MonsterInsights.

Install the eCommerce addon

After that, you need to head over to the Insights » Settings page and switch to the eCommerce tab.

From here, you can turn on enhanced eCommerce tracking. MonsterInsights will automatically detect your eCommerce plugin and turn it on for you.

Use enhanced ecommerce option

That’s all you have successfully enabled eCommerce tracking on your website.

The best part is that MonsterInsights shows the performance of your online store in your WordPress dashboard. Simply go to Insights » Reports and switch to the ‘eCommerce’ tab.

Ecommerce report in MonsterInsights

On top, you’ll see an overview of your eCommerce conversions. Below, you will find your top referral sources, as well as the exact conversions and revenue for each source.

This information helps you learn which referral sources to maximize and which are not doing well.

You may want to see our step-by-step guide on how to properly set up eCommerce tracking in WordPress.

Tracking File Downloads in WordPress

If you have a membership site that sells digital downloads or offers downloadable content on your website, then tracking file download buttons will help you find how users interact with those files.

MonsterInsights automatically tracks file downloads for common file types like documents, spreadsheets, presentations, PDFs, and zip files.

You can also add other file types that you may want to track. Simply go to the Insights » Settings page and then switch to the ‘Engagement’ tab.

Engagement tab settings

From here, you’ll need to scroll down to the File Downloads section.

Here, you can add the file type extension you want to track.

Add file download extensions

You can view file download stats by visiting Insights » Reports and switching to the ‘Publisher’ tab.

After that, scroll down to the ‘Top Download Links’ report to see which files get the most downloads.

Top file download links report

Tracking Form Conversions in WordPress

Forms play an important role in the success of any website. You use forms for an email newsletter, shopping cart, purchase and order forms, and all your contact forms.

It is crucial to understand how users interact with your forms, which forms get more conversions, and which forms are not getting enough attention.

Let’s start tracking forms in WordPress using MonsterInsights.

First, you need to head over to the Settings » Addons page. From here, install the ‘Forms’ addon.

Install forms addon

Once enabled, MonsterInsights will automatically detect the forms on your website and start gathering interaction data. It works seamlessly with all popular WordPress form plugins like WPForms, Formidable Forms, Gravity Forms, and more.

To view your form reports, you need to go to the Insights » Reports page and switch to the ‘Forms’ tab.

Forms report

For more details, please see our guide on how to set up WordPress form tracking in WordPress.

So far, we have discussed how to track links and button clicks across your website automatically. What if you wanted to track a specific link on your WordPress site and create custom reports?

Luckily, MonsterInsights makes this easy as well. It’s called a custom link attribution feature, and here is how you can add that to any link on your website. Simply add your link in the following format:

<a href="https://www.example.com" data-vars-ga-category="Call to action clicks" data-vars-ga-action="CTA link click" data-vars-ga-label="Homepage CTA clicks">My custom link</a> 

This link contains three new link attributes:

  • data-vars-ga-category: Sets a category for your link
  • data-vars-ga-action: Describes the action this link performs
  • data-vars-ga-label: A label for your link which helps you identify it

To insert the link in your content, first head to the content editor by editing a post or a page. Next, you’ll need to click the 3 dots to view more options and then select the ‘Edit as HTML’ option.

Switch to the HTML view

This will change your text from the visual view to the HTML view.

Now go ahead and add your custom link. Once that is done, simply update or publish your page or post.

Add your custom link in content

MonsterInsights will now start to track your custom links in Google Analytics.

You can find your custom link tracking report in Google Analytics by going to the Behavior » Events » Top Events section.

View custom link category in GA

We hope this article helped you learn how to track link clicks and button clicks in WordPress. You may also want to see our complete guide on WordPress SEO and our comprehensive guide on how to increase your blog traffic.

If you liked this article, then please subscribe to our YouTube Channel for WordPress video tutorials. You can also find us on Twitter and Facebook.

The post How to Track Link Clicks and Button Clicks in WordPress (Easy Way) first appeared on WPBeginner.

How to Embed Facebook Albums in WordPress

Do you want to embed Facebook albums in WordPress?

Embedding Facebook albums is a great way to get more engagement on both your WordPress website and your Facebook page. It can also grow your social media following.

In this article, we’ll show you how to easily embed Facebook albums in WordPress.

How to embed Facebook albums in WordPress

Embedding a Facebook Album in WordPress

Showing albums on your WordPress website can make your pages more engaging.

As you add more photos to Facebook, they’ll appear on your site automatically, so it’s also a great way to keep your website fresh, even for regular visitors.

You can even use embedded albums to promote your Facebook page. If visitors see lots of interesting photos then they’ll want to follow you on Facebook. This can get you some extra followers and more engagement.

WordPress used to come with built-in embed support for Facebook albums. Just like you embed a YouTube video, you could simply copy and paste the URL of any Facebook album and WordPress would display that album automatically.

However, Facebook and Instagram have since made changes to their API. These changes make it impossible for WordPress to continue oEmbed support for Facebook and Instagram.

If you try to embed a link to an album, then WordPress will tell you that ‘Sorry, this content could not be embedded.’

The Facebook album embed error

Thankfully, there is a way to fix Facebook and Instagram embeds in WordPress using a plugin.

Let’s see how you can easily embed Facebook albums in WordPress, including how to show a specific album on any page or post.

Installing a Facebook Album Plugin

The best way to embed Facebook albums in WordPress is by using the Smash Balloon Custom Facebook Feed plugin.

This plugin lets you show Facebook albums, comments, reviews, community posts and more on your site.

How to embed Facebook photos in your WordPress website using Smash Balloon

It also lets visitors take a closer look at your photos and images without having to visit Facebook, by opening a lightbox popup on your website.

In this guide, we’ll be using the pro version of Smash Balloon as it allows you to embed Facebook albums, display videos, show photos in a custom Facebook feed, and more. However, there’s also a free version that allows you to create a custom Facebook feed for WordPress, no matter what your budget.

The first thing you need to do is install and activate the Smash Balloon Custom Facebook Feed plugin. For more details, see our guide on how to install a WordPress plugin.

Upon activation, you’ll need to go to Facebook Feed » Settings and enter your license key into the ‘License Key’ field.

Adding your license key to Smash Balloon

You’ll find this information under your account on the Smash Balloon website.

After entering the key, click on the ‘Activate’ button.

Connect Your Facebook Page or Group to WordPress

Smash Balloon Custom Facebook Feed allows you to embed albums from your different Facebook pages and groups. You can even show the latest comments in a dropdown box below the photo, along with the like and shares.

To connect your Facebook page or group to WordPress, go to Facebook Feed » All Feeds and then click on ‘Add New.’

Adding a Facebook group or page to WordPress

Smash Balloon lets you show posts from your photo albums, timeline, events, and more.

To embed your Facebook albums, you’ll need to click on ‘Albums’ and then click on ‘Next.’

Choosing the Smash Balloon 'Albums' template

Now, you need to select the Facebook page or group where you’ll get the albums from.

To get started, click on ‘Add New.’

Choosing a source for your Facebook album

On the next screen, choose whether you want to show albums from a page or group.

After that, just click on ‘Connect to Facebook.’

How to connect Smash Balloon and WordPress to Facebook

This opens a popup where you can log into your Facebook account and choose the pages or groups where you want to embed albums from.

After making this decision, click on ‘Next.’

Choosing Facebook pages and groups to embed albums from

Once you’ve done that, Facebook will show all the information that Smash Balloon will have access to, and the actions it can perform.

To restrict Smash Balloon’s access to your Facebook account, just click any of the switches to turn it from ‘Yes’ to ‘No.’ Just be aware that this may affect the albums and photos that you can embed on your WordPress blog or website.

With that being said, we recommend leaving all the switches enabled.

Giving Smash Balloon access to your Facebook page

When you’re ready, click on ‘Done.’

After a few moments, you should see a message confirming that you’ve connected your WordPress website to Facebook. With that done, it’s time to click on ‘OK.’

How to connect Facebook albums to your WordPress website

Smash Balloon will now take you back to the WordPress dashboard automatically.

How to Embed Facebook Albums in WordPress

You will now see a popup with the group or page you just linked to your website. Simply select the radio button next to your source and then click on the ‘Add’ button.

How to embed albums from a Facebook page or group

If you accidentally closed the popup, then don’t panic. You can simply refresh the tab to reopen the popup.

After that, WordPress will take you back to the Facebook Feed » All Feeds page automatically. Just like before, click on the ‘Add New’ button, select ‘Albums’ and then click on the ‘Next’ button.

Now, select your Facebook page or group, and click on ‘Next.’

Selecting a source for your Facebook album

On this screen, you can choose the template you’ll use as the starting point for your feed. All of these templates are fully customizable so you can fine-tune the design depending on how you want to show the Facebook albums on your website.

We’re using the ‘Default’ template, but you can choose any template you want.

Choosing a template for your Facebook albums

With that done, click on the ‘Next’ button.

Smash Balloon will now go ahead and create an album feed based on your source and the template you’ve chosen. This is a good start, but you may want to fine-tune how the albums appear on your WordPress website.

How to Customize Your Embedded Facebook Albums

The Smash Balloon Custom Facebook Feed plugin gives you lots of ways to customize how the albums are displayed. With that in mind, it’s worth seeing what changes you can make.

On the Facebook Feed » All Feeds screen, find your album feed and then click on its ‘Edit’ button, which looks like a small pencil.

Customizing your Facebook albums feed

This opens the Smash Ballon feed editor, which shows a preview of your Facebook albums to the right.

On the left-hand side, you’ll see all the different settings you can use to customize how these albums appear on your site. Most of these settings are self-explanatory, but we’ll quickly cover some key areas.

Editing the Facebook albums feed

To start, you can change how the albums are displayed by clicking on ‘Feed Layout.’

On this screen, you can switch between different layouts, such as masonry and grid, and change the feed height. As you make changes, the preview will update automatically so you can try different settings to see what looks the best.

Choosing a new feed layout in WordPress

By default, the feed will show the same number of posts on desktop computers and mobile devices such as smartphones.

You can preview how your albums will look on desktop computers, tablets, and smartphones using the row of buttons in the upper-right corner.

Choosing a new feed layout in WordPress

Mobile devices usually have smaller screens and less processing power, so you may want to show fewer albums on tablets and smartphones.

To do this, just type a different number into the ‘Mobile’ field under ‘Number of Posts.’

Changing how your embedded Facebook albums appear on mobile devices

By trying out different layouts you can create a custom feed that looks great, no matter what device the visitor is using.

By default, the Facebook feed shows less columns on smartphones and tablets, compared to desktop computers. This helps all your albums and photos fit comfortably on smaller screens.

After testing the mobile version of your WordPress website, you may be unhappy with how the columns look on smartphones and tablets. If this is the case, then you can show fewer columns by changing the numbers in the ‘Columns’ section.

Changing the column layouts using Smash Balloon

When you’re happy with the changes you’ve made, click on the ‘Customize’ link.

This will take you back to the main Smash Balloon editor, ready for you to explore the next settings screen, which is ‘Color Scheme.’

Changing the color scheme for your Facebook photo feed

By default, Smash Balloon uses a color scheme inherited from your WordPress theme, but this screen allows you to switch to a ‘Light’ or ‘Dark’ look,

You can also create your own color scheme by selecting ‘Custom’ and then using the controls to change the background color, change the text color in WordPress, and more.

Adding a custom color to your Facebook album feed

By default, Smash Balloon adds a header to your feed, which is your Facebook profile picture and the name of the page or group.

To change how this section looks, click on ‘Header’ in the left-hand menu.

Customizing the header of your Facebook album feed

On this screen, you can change the size of the header, its color, hide or show your Facebook profile picture, and more.

If you want to remove the header completely, then click to turn off the ‘Enable’ toggle.

How to embed Facebook albums in WordPress

By default, Smash Balloon shows the title of each album. If you want to hide the title, then select ‘Posts’ from the main Smash Balloon editor menu.

Then, click on ‘Post Style.’

Changing the style of your Facebook album feed

Here, you can remove the album titles by clicking on the ‘Show album title’ slider.

This can be useful if your album titles distract attention away from the photos, or they don’t make sense when embedded on your website.

Showing the album title in your WordPress Facebook feed

On this screen, you can also choose whether to show how many photos are in each album.

To add this number, simply click on the ‘Number of posts in album’ toggle.

Adding the number to Facebook albums in WordPress

By default, Smash Balloon doesn’t include the Facebook ‘like’ button in your feed. To get more Facebook followers, you may want to add this button by selecting ‘Like Box’ from the editor’s left-hand menu.

After that, simply click on the ‘Enable’ button so that it turns blue.

Adding a 'like' button to your Facebook albums feed in WordPress

By default, Smash Balloon adds this button below your embedded photo albums, but you can change this by opening the ‘Position’ dropdown and choosing ‘Top.’

On this screen you can also change how the ‘like’ section looks including adding a custom call to action, showing how many people follow you on Facebook, and more.

Customizing the Facebook follow button in WordPress

When you’re happy with how the ‘like’ button looks, you can move on to the ‘Load More Button’ screen.

The Load More button encourages visitors to scroll through more of your Facebook feed, so Smash Balloon adds it to your embedded photo albums by default.

Adding a 'Load More' button to a custom Facebook photos feed in WordPress

Since it’s such an important button, you can help Load More stand out by changing its background color, text color, and label.

Another option is to remove the button completely, by clicking the ‘Enable’ toggle.

Removing the 'Load More' button from embedded Facebook albums

By default, Smash Balloon allows visitors to look through your Facebook albums without leaving your website.

They can simply click on any album to open a lightbox, as you can see in the following image.

Smash Balloon's lightbox feature

The visitor can then use the arrows to scroll through the album.

If they want to like a photo, leave a comment, or share the image with their Facebook friends, then they can click on the ‘View on Facebook’ link.

Visiting a Facebook group or page from the lightbox

There are a few different ways that you can customize the default lightbox.

To see your options, click on ‘Lightbox’ in the left-hand menu.

Customizing the Facebook photos lightbox

Here, you can change the color of the lightbox’s text, links, and background colors.

The lightbox feature makes it easy for people to engage with your photos, but it also allows people to scroll through your albums without visiting your Facebook page. If you want to get more visitors to your Facebook page then you can disable the lightbox feature by clicking on the ‘Enable’ toggle.

Disabling the lightbox feature on your WordPress website

Now, if a visitor clicks on an album they will be redirected to your Facebook page in a new tab.

When you’re happy with how the photo albums look, don’t forget to click on ‘Save’ to store your changes.

You’re now ready to add these albums to your WordPress website.

How to Add Facebook Albums to WordPress

You can add your Facebook albums to WordPress using a block, widget, or shortcode.

If you’ve created more than one feed using Smash Balloon, then you’ll need to know the feed’s code if you’re going to use a block or widget.

Simply go to Facebook Feed » All Feeds and then look at the feed="" part of the shortcode. You’ll need to add this code to the block or widget, so make a note of it.

In the following image, we’ll need to use feed="4".

Embedding Facebook albums using code

If you want to embed your Facebook albums in a page or post, then you’ll typically use the Custom Facebook Feed block.

Simply open the page or post where you want to embed your albums. Then, click on the ‘+’ icon to add a new block and start typing ‘Custom Facebook Feed.’

When the right block appears, click to add it to your page or post.

How to add a Custom Facebook Feed block to WordPress

The block will show one of your Smash Balloon feeds by default. If you want to use a different feed instead, then simply find ‘Shortcode Settings’ in the right-hand menu.

You can now add the feed="" code to this box. After that, click on ‘Apply Changes.’

Embedding Facebook photos in WordPress

The block will now show the albums from your Facebook page or group. Just publish or update the page to make the albums live on your website.

Another option is to add the feed to any widget-ready area, such as the sidebar or similar section. This allows visitors to see your Facebook photos from any page of your site.

Simply go to Appearance » Widgets in the WordPress dashboard and then click on the blue ‘+’ button.

Adding Facebook albums to your website's sidebar

Once you’ve done that, find the Custom Facebook Feed widget.

Then, just drag it onto the area where you want to show the feed.

How to embed Facebook albums and photos in WordPress

The widget will show one of the feeds you created using Smash Balloon.

To show a different feed instead, type the feed’s code into the ‘Shortcode Settings’ box and then click on ‘Apply Changes.’

Showing different Facebook feeds in a Smash Balloon block

You can now click on the ‘Update’ button to make the widget live. For more information, please see our step by step guide on how to add and use widgets in WordPress.

Finally, you can embed your albums on any page, post, or widget-ready are using shortcode.

Simply go to Facebook Feed » All Feeds and copy the code in the ‘Shortcode’ column. You can now add this code to your site.

For more information, please see our detailed guide on how to add a shortcode in WordPress.

Add a Specific Facebook Album in WordPress

Smash Balloon also allows you to embed a specific Facebook album anywhere on your WordPress site. This allows you to show your latest or best album to visitors, or to display an album that’s relevant to the rest of the page’s content.

To embed a particular Facebook album, you’ll need to buy and install the Album extension by going to Facebook Feed » Extensions.

Here, find the ‘Album’ extension and click on its ‘Add’ button.

The Smash Balloon Single Album extension

This will open the Smash Ballon website in a new tab, with instructions on how to purchase the extension.

Once you have the extension, you can install it in exactly the same way you install a plugin. If you need help, then please see our guide on how to install a WordPress plugin.

After activating the plugin, go to Facebook Feed » All Feeds and click on ‘Add New.’

Under ‘Advanced Feed Types,’ select ‘Single Album’ and then click ‘Next.’

Showing a specific album on your WordPress website

You can now choose the page or group that you want to use as your source, and choose a template by following the same process described above.

On the next page, you’ll need to enter the ID of the album that you want to embed.

Embedding a specific album in WordPress

In a new tab, simply open the Facebook album that you want to display.

You can now copy the numbers after the = symbol, and inbetween the first two periods. For example, in the following image we need to copy 447443907512397.

Getting the ID of a Facebook album

You can now paste these numbers into the WordPress dashboard.

After that, click on ‘Next’ and Smash Balloon will fetch the album.

Adding a Facebook album ID to WordPress

After that, you can style the album and add it to your site following the same process described above.

We hope this article helped you learn how to embed Facebook albums in WordPress. You may also want to check out our guide on how to create a custom Instagram photo feed in WordPress, and how to create an email newsletter to connect with your visitors after they leave your website.

If you liked this article, then please subscribe to our YouTube Channel for WordPress video tutorials. You can also find us on Twitter and Facebook.

The post How to Embed Facebook Albums in WordPress first appeared on WPBeginner.

25 Best Sales Page WordPress Themes for Marketers

Are you looking for the best sales page WordPress themes for your marketing campaign?

Sales page or landing page WordPress themes help marketers convert visitors into paying customers. Choosing the right theme means you can highlight specific brands or products to avoid distractions and increase sales.

In this article, we will share some of the best sales page WordPress themes for marketers.

Best Sales Page WordPress Themes for Marketers

Creating a Sales Page Website with WordPress

A good sales page prominently displays call-to-action buttons, along with a breakdown of your product or service’s features and unique selling points.

To create a sales page website with WordPress, you will need a domain name and a web hosting account.

A domain name is your website’s address on the internet, like google.com or wpbeginner.com. Web hosting is the storage space for your website files. Your web host makes your site available all across the world, 24/7.

We recommend using Bluehost. It’s one of the largest hosting companies in the world and an official WordPress hosting partner.

Bluehost WordPress Hosting offer for WPBeginner Users

For WPBeginner users, Bluehost offers a free domain name, a free SSL certificate, and a BIG discount on web hosting.

After signing up for the hosting, just check out our complete guide on how to make a WordPress website. It will take you step by step through the process of creating your site.

Let’s take a look at some of the best sales page WordPress themes for marketers.

1. Astra

Astra WordPress sales theme

Astra is one of the most popular WordPress themes on the market. It lets you create custom landing page designs with over 180+ starter templates.

With fast-loading templates, Astra can be the perfect choice for designing sales pages. It also integrates with WooCommerce to create a full eCommerce website. This lets you collect online payments using Payhip, Stripe, or other payment gateways.

Astra also works seamlessly with tools like OptinMonster if you also plan to use your website for lead generation. This lets you create opt-in popups and forms for your email list and can dramatically boost your conversion rates.

2. SeedProd

SeedProd website builder

SeedProd is the best WordPress theme and website builder. It’s also the most popular landing page builder on the market, with ready-made sales page templates for marketers and agencies.

With SeedProd, you can create a fully custom website and then add a sales landing page. And you can do everything with a beginner-friendly drag-and-drop builder.

SeedProd seamlessly integrates with WooCommerce and its extensions. This helps set up the best sales page with online payment options and other features without writing code or hiring a professional developer.

3. Divi

Divi WordPress sales theme

Divi is a classic WordPress all-purpose theme and an ultimate page builder plugin. It comes with hundreds of layout templates. If you want to create a sales page from scratch, then it provides a visual editor to add elements, text, and images.

Divi is highly customizable and lets you change colors, fonts, and backgrounds without knowing any CSS code. You have the full range of Google fonts to choose from, plus elements like dividers and call-to-action buttons to help you build the perfect sales page on your website.

Divi is also designed for good WordPress SEO, helping you get search engine traffic to your sales page.

4. OceanWP

OceanWP WordPress sales theme

OceanWP is a free WordPress theme designed beautifully to create marketing and sales pages. It offers free and premium ready-made demo templates to set up websites in just a few clicks.

With powerful extensions, you can quickly add fullscreen backgrounds, social media icons, a registration form, sticky navigation, and more. OceanWP supports RTL languages, so you can also create a multilingual website.

5. Hestia Pro

Hestia Pro

Hestia Pro is a fantastic WordPress multipurpose theme for any type of website. It has one-page and multi-page templates for small businesses to provide a great user experience.

It has an attractive layout design that supports video embeds in the background and other widgetized areas. You can use the WordPress live customizer to make changes on the pages easily.

6. Ultra

Ultra WordPress sales theme

Ultra is a powerful and flexible WordPress theme with a built-in visual drag-and-drop page builder. It also includes several ready-made templates for different niches like agencies, spas, apps, businesses, and so on.

With its easy and powerful page builder, the Ultra theme is ideal for creating beautiful sales pages in just a few minutes. It also comes with portfolios, sliders, image galleries, custom widgets, and more.

7. Sydney Pro

Sydney

Sydney Pro is a stunning sales page WordPress theme that you can easily use on multi-page sites. It’s designed for small businesses, app landing pages, products, or photography websites.

It features a large fullscreen background image on the homepage with a navigation menu and a custom logo at the top. It also comes with homepage layouts, creative header styles, and portfolio templates.

8. Breakthrough Pro

Breakthrough Pro

Breakthrough Pro is built on top of the Genesis theme framework and designed to be a single or multiple-page theme. It has a beautiful parallax scrolling effect and a large fullscreen header image with a call-to-action button.

The homepage layout is fully widgetized, so you can drag and drop content blocks to set up your sales page. Other features include full WooCommerce support, custom widgets, page templates, and crisp typography.

StudioPress is now part of WP Engine, the most popular managed WordPress hosting company. You can get this theme and all 35+ other StudioPress themes when you sign up for WP Engine hosting to build your website.

Bonus: WPBeginner users also get an additional 20% OFF. Get started with WP Engine today!

9. Indigo

Indigo

Indigo is an elegant WordPress theme that lets you create beautiful sales page layouts. It comes with drag-and-drop modules that let you design unique pages to match your needs.

To make it even easier, Indigo includes demo content and ready-made websites that you can use as a starting point for your projects. It also offers multiple templates, photo galleries, header styles, and unlimited sidebars.

10. OneEngine

OneEngine

OneEngine is a single-page WordPress theme with a bold and creative design. It has a bright fullscreen header on the top, followed by a navigation menu and then content widgets.

It includes services, team members, a portfolio, and an about section. With the OneEngine theme, it’s easy to create a custom sales page for any product or service.

11. Angle

Angle

Angle is an excellent WordPress multipurpose theme with flexible options to create your sales page using drag and drop.

It includes parallax scrolling, image sliders, and a built-in portfolio section. It is easy to set up and customize with multiple homepage layouts and landing page templates.

12. Struct

Struct

Struct is designed as a sales page theme for software, apps, and products. It features a clean and modern layout with large header background and prominent call-to-action buttons.

Struct has a fully widgetized homepage layout with several custom widgets to add content and social media features. It also includes services, projects, FAQs, testimonials, and slideshows out of the box.

13. Digital Download

Digital Download

Digital Download is a premium-like free sales page WordPress theme. As you would expect from its name, you can use this theme to sell digital downloads like PDF documents, tutorials, ebooks, etc.

It integrates with the Easy Digital Downloads plugin to set up an online marketplace in just a few clicks. The theme is fully customizable for colors, font, and layout design.

14. Balance

Balance

Balance is a creative WordPress eCommerce sales page theme for online businesses. It includes several user engagement features like a call-to-action button, a subscription form, a contact form, and more.

The theme attractively displays your products on the homepage and other landing pages. It also supports popular page builder plugins that lets you create custom sales page layouts.

15. Landing

Landing is a WordPress sales page theme that comes with a pre-designed layout. It has a drag and drop page builder to edit existing landing pages and create new ones from scratch.

You get multiple header types, so you can design countless sales pages with different styles and layouts. Plus, it includes a portfolio, testimonials, events, and social media integration.

16. Silk

Silk

Silk is a WordPress sales page theme for beauty bloggers, cosmetic businesses, fashion agencies, and more. It has a beautifully designed homepage with a layered layout.

With Silk, you get a built-in section to add your Instagram shoppable feed to engage users and boost sales. Plus, it fully supports WooCommerce, so you can easily start an online store on your site.

17. Convert

Convert Pro Sales theme

Convert is a professional WordPress sales page theme. It has an eye-catching layout with over 30 customizer options for the header section and gives you complete control of the website.

It has multiple global sections that work smoothly with your favorite page builders like Elementor or Visual Composer to build fully custom layouts. You also get built-in templates for one-column and multi-column pages.

18. The Launcher

The Launcher

The Launcher is a free landing page theme for your upcoming product launch. It’s ideal for a product landing page and can also be used as a regular sales page for your products or services.

The Launcher comes with easy customization options, call-to-action buttons, a sticky navigation menu, a clients section, and a pricing table. Plus, it’s fully responsive so that your website will look great on mobile devices.

19. Altitude Pro

Altitude Pro

Altitude Pro is a WordPress business theme built for sales pages. It comes with a beautiful fullscreen header image and a call-to-action button. If you’re an author, it could make a good book landing page theme for selling ebooks.

Inside, you will find a spacious layout that offers a great user experience. Atmosphere Pro has large featured images and crisp typography. Plus, the theme is optimized for speed and performance.

20. Beauty Studio

Beauty Studio

Beauty Studio is a free WordPress sales page theme for salons, spas, and beauty products. It has a full-width header with dark colors that create a powerful first impression on your users.

Other features include call-to-action buttons, custom sidebar areas, social media integration, an image slider, and more. You also get a featured section to display your top products.

21. Float

Float

Float is a beautiful WordPress theme optimized for sales and conversion. It ships with a built-in page builder that lets you create or modify page layouts. It includes eye-catching animations to make your sales page more attractive.

It offers parallax scrolling, social media integration, custom backgrounds, unlimited colors, custom widgets, and more.

22. Screenr

Screenr

Screenr is a free one-page WordPress business theme. The homepage has a fullscreen header image, followed by widgetized sections to add your content.

It includes custom widgets, custom page templates, and parallax background effects. It’s easy to change different options about your site using the live WordPress customizer.

23. Monochrome Pro

Monochrome Pro

Monochrome Pro is a modern WordPress black-and-white theme for apps, digital media, SAAS, and product websites. It features multiple widgetized areas, a large header image, and custom widgets to build your sales page in a few clicks.

It comes with a theme options panel for easy customization. You also get several layout choices, color schemes, and a fully customizable header area.

Monochrome Pro uses a responsive design, so it looks great on all devices and screen sizes. It’s a StudioPress theme, so you can get a great deal on it by signing up for WP Engine’s hosting.

24. Modules

Modules

Modules is a well-crafted WordPress theme perfect for creating any kind of sales page. It comes with several ready-to-use elements that you can drag and drop to build custom layouts.

It offers demo websites to set up your sales page quickly. Plus, you get several custom widgets, unlimited sidebars, header styles, video background support, and Google Fonts support.

The Modules theme is also coded with WordPress best practices in mind. This means it’s fully compatible with all popular WordPress plugins to help you build the best landing page.

25. Solopreneur

Solopreneur

Solopreneur is a premium WordPress theme to create landing pages that convert and help maximize your revenue. It has a minimalist layout design with a logo, navigation menu, and social icons.

It comes with a widgetized sidebar to add recent posts, a search bar, a comments section, and a newsletter signup form for email marketing. The theme is fully responsive and looks great on all screen sizes and devices.

We hope this article helped you find the best sales page WordPress themes for your projects. You may also want to check out our guides to the best business phone services and how to make a high converting sales funnel in WordPress.

If you liked this article, then please subscribe to our YouTube Channel for WordPress video tutorials. You can also find us on Twitter and Facebook.

The post 25 Best Sales Page WordPress Themes for Marketers first appeared on WPBeginner.

How to Change Sender Name in Outgoing WordPress Email

Do you want to change the default sender name and email address for outgoing WordPress emails?

By default, WordPress uses ‘WordPress’ as the sender name for all outgoing WordPress notification emails. This doesn’t look very professional, and you may want to change that to your business name.

In this article, we will show you how to easily change the default sender name and email address in outgoing WordPress emails.

Changing sender name and email address in outgoing WordPress emails

Why You Should Change the Default Sender Information in WordPress?

WordPress sends several email notifications to the site administrator as well as other users on your website.

This includes important email notifications such as forgot password emails, website error and recovery emails, new user registration, and more.

By default, it uses ‘WordPress’ as the sender’s name and a non-existent email address ([email protected]) as the sender’s email.

Many spam filters block your WordPress emails, believing them to be junk. Sometimes it does not even make it to the spam folder, but is deleted immediately due to filters.

For more on this topic, look at our guide on how to fix the WordPress not sending email issue.

The outgoing email notifications are important, and you should use your own brand and email address. This increases the authenticity of your brand and increases name recognition among your users.

For instance, if you run an online store, then you would want customers to get email notifications with your store name as the sender.

See our guide on how to get a free business email address for your website in 5 minutes.

Let’s see how to change the default sender name and email address in outgoing WordPress email notifications.

Method 1. Changing Default Sender Name and Email using WP Mail SMTP

This method is easier and recommended for all WordPress users.

For this method, we’ll be using the WP Mail SMTP Pro plugin. It is the best WordPress SMTP plugin, used by over 3 million website owners.

This plugin allows you to easily change the default sender name and email address for outgoing WordPress emails. It also helps you fix the WordPress email deliverability problem.

The first thing you need to do is install and activate the WP Mail SMTP Pro plugin. For more details, see our step-by-step guide on how to install a WordPress plugin.

Upon activation, you need to visit WP Mail SMTP » Settings to configure plugin settings. Under the Mail section, you can simply enter the email address and the name you want to use to send WordPress emails.

Change sender name and email in WordPress using WP Mail SMTP

Below, you can find the options to set up an SMTP server to send WordPress emails. By default, the plugin will use the PHP method provided by your WordPress hosting company which is less reliable.

We recommend using any of the listed SMTP services to properly send WordPress emails for higher guaranteed deliverability.

Select Mailer

If you choose an SMTP service, then follow the on-screen instructions to connect the plugin with your SMTP service provider.

Don’t forget to click on the ‘Save Settings’ button to save your changes.

Test Your WordPress Emails

WP Mail SMTP Pro also allows you to test your WordPress email settings. Simply go to the WP Mail SMTP » Tools page and switch to the ‘Email Test’ tab.

Test WordPress emails using WP Mail SMTP

From here, you just need to provide an email address that you can access and then click on the ‘Send Email’ button.

The plugin will now send a test email to the address you provided. You can check your inbox to make sure that you can receive WordPress emails and that it has the correct sender name and sender email address.

WP Mail SMTP works with all popular WordPress plugins like WooCommerce, WPForms, and more.

For more detailed instructions, you may want to see our article on how to use SMTP to send WordPress emails.

Method 2: Changing Default Sender Name and Email using WP Change Email Sender

This method is only recommended if you don’t use an SMTP service or if the first method is not working.

Using this method does not improve your WordPress email deliverability or make it easier to troubleshoot email issues. However, if your WordPress emails are working, then it will allow you to change the sender name and email address.

First thing, install and activate the WP Change Email Sender plugin. For more details, see our step-by-step guide on how to install a WordPress plugin.

Upon activation, you need to go to Settings » General in your WordPress admin area. There you’ll find the ‘Email Sender Name’ and ‘Sender Email Address’ fields.

WP Change Email Sender

You will need to enter the name and email address you want to be used for outgoing WordPress emails.

Don’t forget to click on the ‘Save Changes’ button to store your settings.

That’s all. Your WordPress notification emails will now show the name and email address you entered in the plugin settings.

There is no method provided by the plugin to test your email settings. You can do that by performing actions that generate WordPress notification emails, like creating a new user, requesting a password reset, and more.

Method 3: Changing Sender Name and Email Address using WPCode

Another excellent way to change your sender name and email address are by adding a code snippet. And we recommend WPCode, the easiest and safest way to add code to WordPress.

You usually need to add code to your functions.php file, but WPCode makes it simple and easy to add this code snippet with just a few clicks.

Not only that, but WPCode has many other snippets available to help customize your site. Plus, you can easily add your custom snippets.

First, you need to install the free WPCode plugin. For more information, check out our step-by-step guide on how to install a WordPress plugin.

Next, click on Code Snippets » Add Snippet to your WordPress admin dashboard. Simply type ‘sender’ into the search bar and press the ‘Use snippet’ button under ‘Change Outgoing Email Sender’.

WPCode Use Snippet

Then you’ll be taken to the Edit Snippet page.

Here you need to update the sender’s email and name in the code snippet.

WPCode Edit snippet

And then, switch the toggle to ‘Active’ and click on the ‘Update’ button.

One of the benefits of using WPCode is that it comes with a library filled with pre-made snippets. There’s a good chance you can find some to replace other plugins on your site, such as disabling automatic updates, allowing SVG files to be uploaded, or even using the Classic editor instead of the default block editor.

You don’t have to use the library, either. You can also add any other code you ever need by selecting ‘Add Your Custom Code (New Snippet)’ button instead of searching the library.

Add New Custom Snippet

Then, all you have to do is just paste your own code in and decide where it should run on your site.

For example, you can copy and paste this snippet below into the WPCode’s custom code snippet and customize it to change the sender name and email.

// Please edit the address and name below.
// Change the From address.
add_filter( 'wp_mail_from', function ( $original_email_address ) {
	return '[email protected]';
} );

// Change the From name.
add_filter( 'wp_mail_from_name', function ( $original_email_from ) {
	return 'Tim Smith';
} );

We hope this article helped you learn how to change the sender’s name and email address in outgoing WordPress emails. You may also want to see our guide on the best bulk email marketing services to bulk send emails to all your users and our comparison of the best WordPress page builder plugins to customize your site without any code.

If you liked this article, then please subscribe to our YouTube Channel for WordPress video tutorials. You can also find us on Twitter and Facebook.

The post How to Change Sender Name in Outgoing WordPress Email first appeared on WPBeginner.