All posts by Editorial Staff

How to Send Automated Coupons in WordPress to Bring Back Customers

Do you want to send automated coupons in WordPress to bring back customers?

By sending the right coupon to the right person at the right time, you can re-engage customers who are losing interest. This can get you more sales, create brand loyalty, and help you keep your best customers.

In this guide, we’ll show you a few different ways to send automated coupons in WordPress, and bring back customers.

How to send automated coupons in WordPress to bring back customers

Why Send Automated Coupons to Bring Back Customers?

You may have heard the saying that it costs five times more to get a new customer than keep an old one.

While lead generation will help grow your business, you also need to keep your existing customers happy. Over time, people may lose interest in your website, forget about your products, or start shopping with a competitor.

That’s where automated coupons come in.

The best WordPress automation tools and plugins can watch your customers for signs they’re becoming disengaged. For example, a customer may not place an order for 2 months or stop opening your emails.

One way to bring those customers back is to automatically send them a coupon code via email. By creating this automated workflow in WordPress, you can retain customers without having to do all the hard work yourself.

Pro Tip: If you send coupons via email, then you’ll need to make sure those messages land in the customer’s inbox and not in the spam folder. Here, a good SMTP service provider is essential for improving your email deliverability. We also recommend using WP Mail SMTP as it allows you to easily send WordPress emails using any SMTP service provider.

With that being said, let’s see how you can send automated coupons in WordPress and bring back customers. Simply use the quick links below to jump to the method you want to use.

Method 1. Using FunnelKit (Best for WooCommerce Users)

One way to send automated coupons in WordPress, is by using FunnelKit Automations.

FunnelKit is a WordPress sales funnel builder and optimization plugin that allows you to create powerful customer winback campaigns. It also lets you create unique, personalized coupons, which can really catch the shopper’s attention.

FunnelKit integrates with WooCommerce and has lots of features that are designed to grow your online store. With that in mind, FunnelKit is a great choice if you already use WooCommerce to sell products and services online.

How to Set up the FunnelKit WordPress Plugin

First, you’ll need to install and activate the free version of FunnelKit Automations, as it provides the base for the premium plugin’s features. For more details, please see our guide on how to install a WordPress plugin.

After that, you’ll need to install and activate the FunnelKit Automations Pro plugin.

After activating both plugins, go to FunnelKit Automation » Settings. You can now go ahead and add the license key to the ‘License’ field.

Adding a license to the FunnelKit Automations WordPress plugin

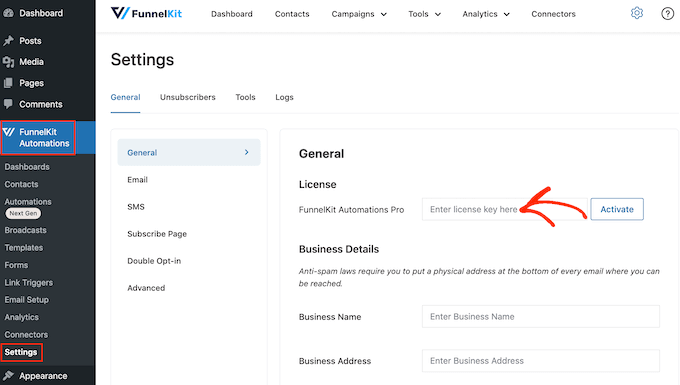
You’ll find this information in your account on the FunnelKit website. After adding this information, click on the ‘Activate’ button.

How to Create an Automated Coupon Workflow for WordPress

Now, we’re going to create a workflow that will generate a personalized coupon and send it to the customer via email. This workflow will run once 30 days have passed since the customer’s last order.

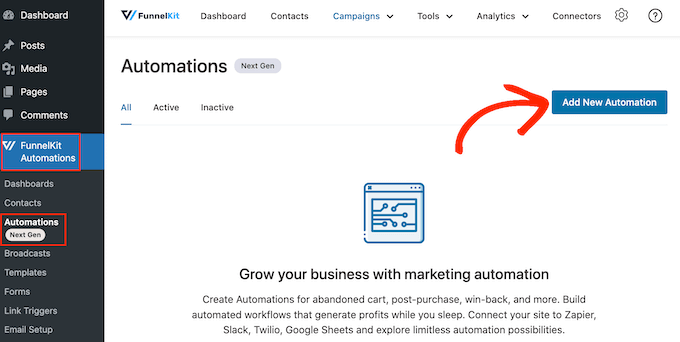
To create the workflow, go to FunnelKit Automations » Automations (Next Gen) in the WordPress dashboard. Then, click on the ‘Add New Automation’ button.

Creating a new WordPress automation with FunnelKit

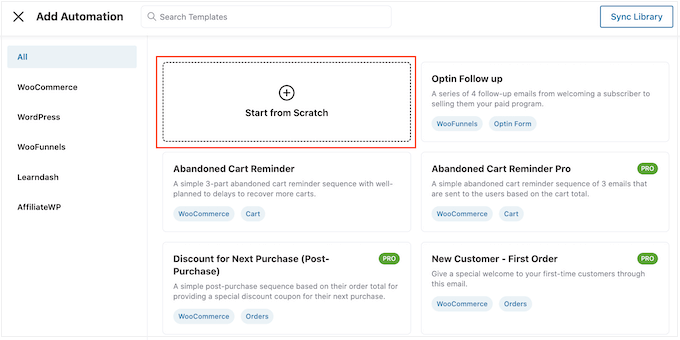
You’ll now see all the different automation templates that you can use.

Since we want to create our own workflow, select ‘Start from Scratch.’

Creating a custom automated workflow in WordPress

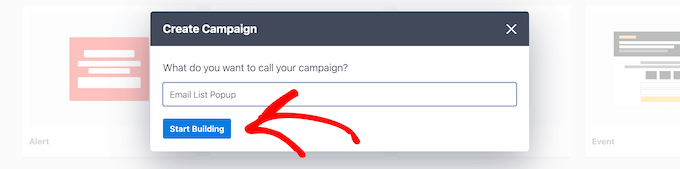
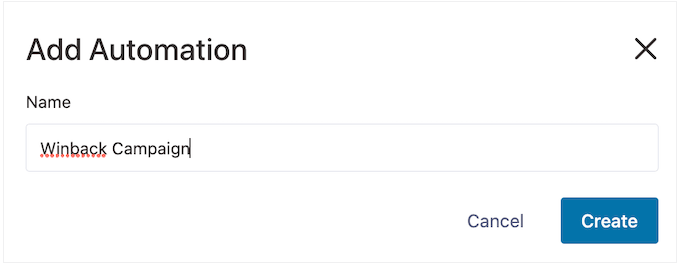
In the popup that appears, type in a name for the automation. This is just for your reference, so you can use anything you want.

With that done, click on ‘Create.’

Add a name to your FunnelKit automation workflow

Now, we need to choose the action that will kickstart the workflow, so click on ‘Select Trigger.’

In the left-hand menu, choose ‘WooCommerce’ and then click to select ‘Customer Win Back.’

Adding a 'customer winback' trigger to an automation workflow

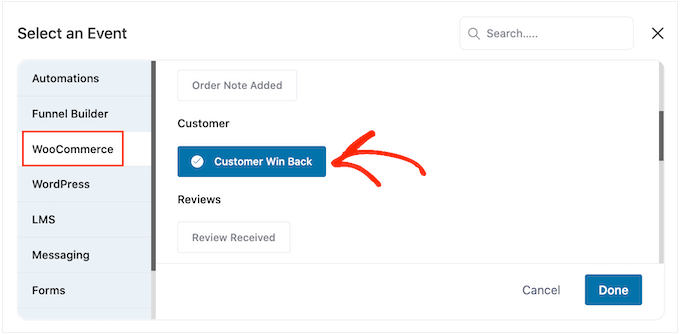
With that done, click on ‘Done’ to add the trigger to your automation workflow.

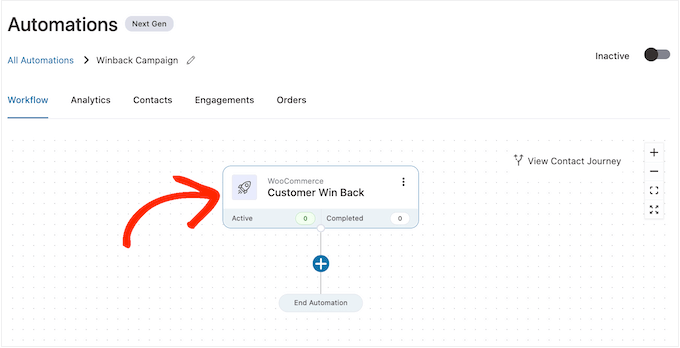
Back in the main editor, click on the ‘Customer Win Back’ trigger.

Adding a trigger to the FunnelKit automation editor

In the ‘Customer Last Ordered Period’ section, you can type in how long FunnelKit will wait before running the workflow.

For example, in the following image the workflow will run when 30 days have passed since the customer’s last order.

FunnelKit will repeat this automation once every 24 hours, so it’s important to only run it for a short period of time. For this reason, we’ve set the workflow to stop when 35 days have passed since the customer’s last order.

Adding an order period to the automation recipe

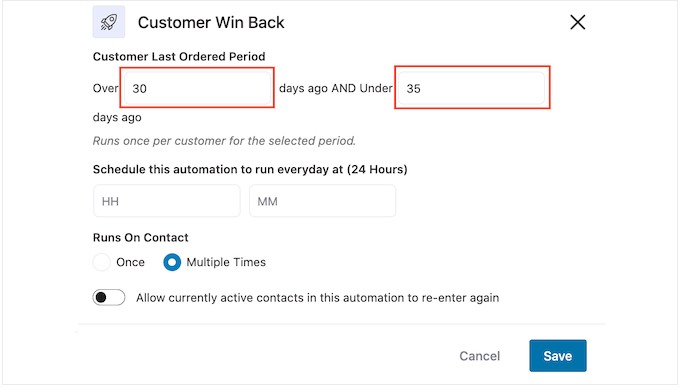
In this way, you won’t annoy customers by sending them dozens of emails.

Next, you can set the time when the automation will run, using the ‘Schedule this….’ fields. FunnelKit will use your store’s timezone, so you may want to change your online store settings if you want to use a different timezone instead.

Scheduling an automated coupon code

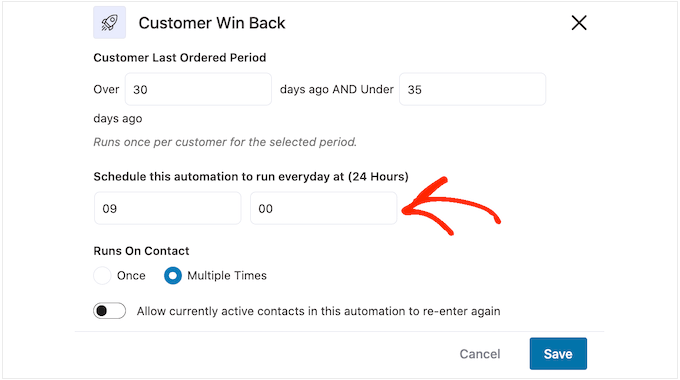
With that done, click on ‘Save.’

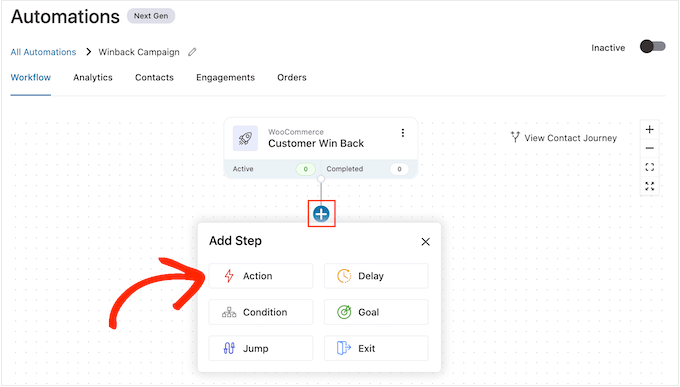
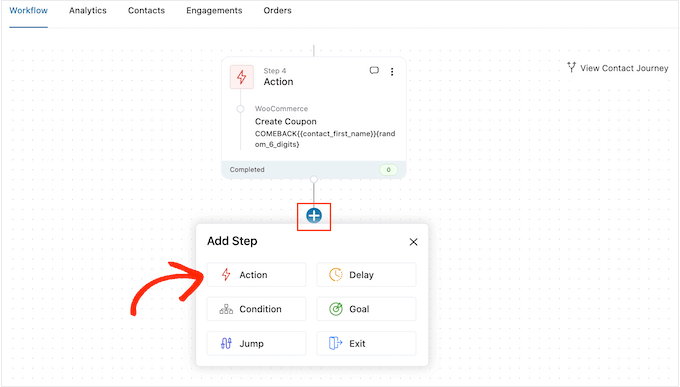
Back in the main workflow editor, click on ‘+’ and then select ‘Action.’

Adding actions to an automated workflow in WordPress

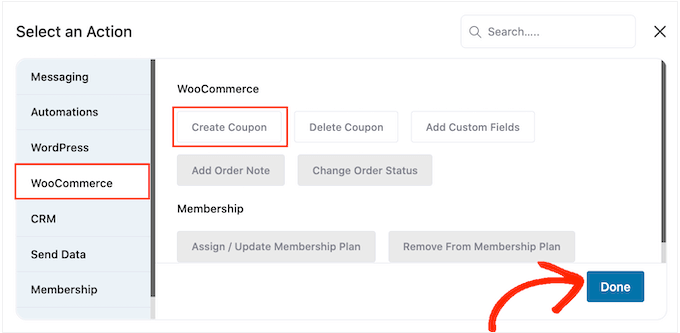
In the popup that appears, select ‘WooCommerce’ and then click on ‘Create Coupon.’

Simply click on ‘Done’ to add this action to the workflow.

How to create an automated coupon using FunnelKit

Back in the main FunnelKit editor, click on the action you just added. This opens a popup where you can customize the ‘Create Coupon’ action.

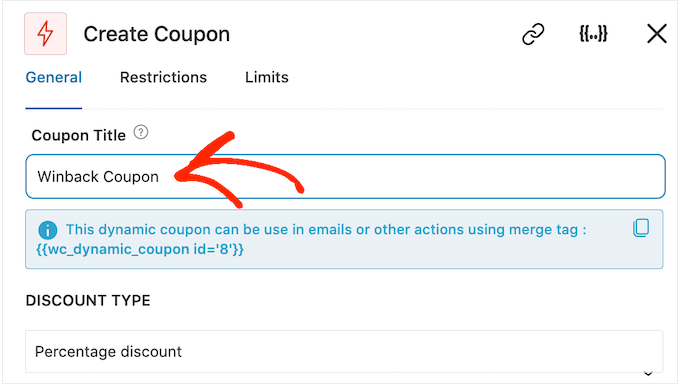
To start, type a name for the coupon into the ‘Coupon Title’ field. This is just for your reference so you can use anything you want.

Creating a winback customer automation workflow in WordPress

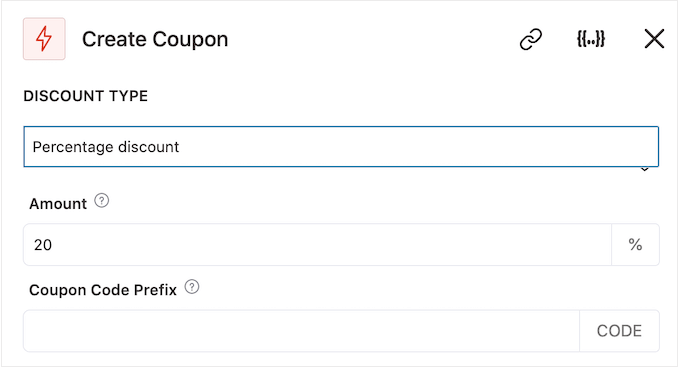
After that, choose the type of coupon that you want to create, using the ‘Discount Type’ dropdown menu.

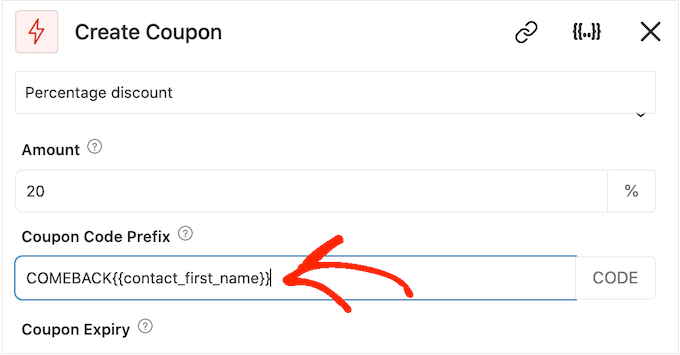
FunnelKit supports percentage discount, fixed cart discount, and fixed product discount. Most of the time, you’ll want to select ‘Percentage Discount’ to make sure all customers get a similar benefit, no matter how much they spend or what products they buy.

After that, type an amount into the ‘Amount’ field. For example, you might offer customers 20% off, or a $5 discount on all purchases.

How to create an automated percentage discount coupon

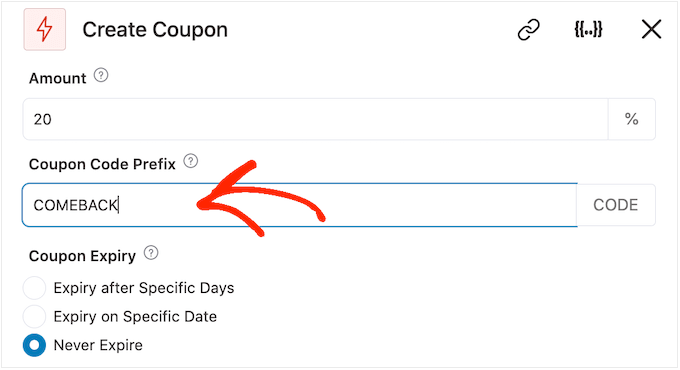
FunnelKit automatically creates a unique coupon code for each contact. However, you can add a prefix to the start of the coupon, which can either be plain text or dynamic tags. FunnelKit will replace these tags with real text every time it creates a code, so this is a great way to create personalized coupons.

Since we want to bring shoppers back in, you may decide to include the customer’s name in the coupon. This can catch their attention, and also makes your code easier to remember.

To add plain text as a prefix, simply type into the ‘Coupon Code Prefix’ field.

Adding a prefix to the automated coupon code

To add one or more tags, click on the ‘Merge tags’ icon.

This is the button that has curly braces.

Adding dynamic text to the automated coupon code

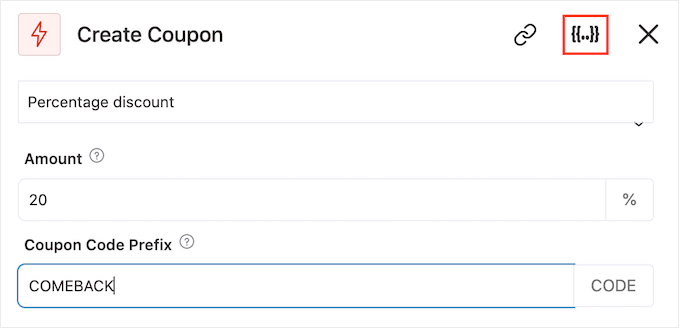
Now, you’ll see all the tags that you can use in the automated coupon.

We’re going to use the {{contact_first_name}} tag, but you can use any tags you want.

How to create a personalized coupon code with merge tags

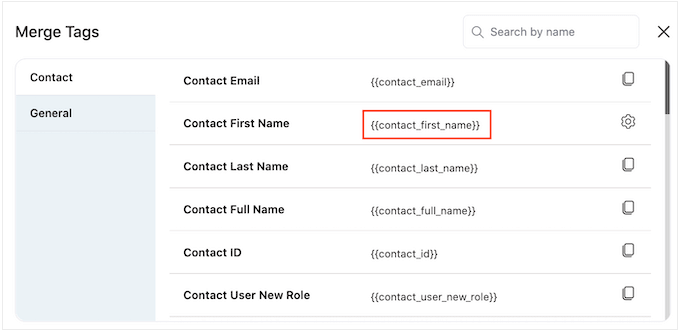
Simply copy each tag and then paste it into the ‘Coupon Code Prefix’ field.

As you can see in the following image, you can use a mix of plain text and tags.

How to create a personalized and dynamic coupon code

By default, the coupon will never expire. A sense of urgency and FOMO can push customers to use a coupon, so you may want to select the radio button next to ‘Expire after Specific Days’ or ‘Expire on Specific Date.’

You can then use the controls to specify when the coupon will expire.

Adding a coupon expiration date to your WordPress coupon

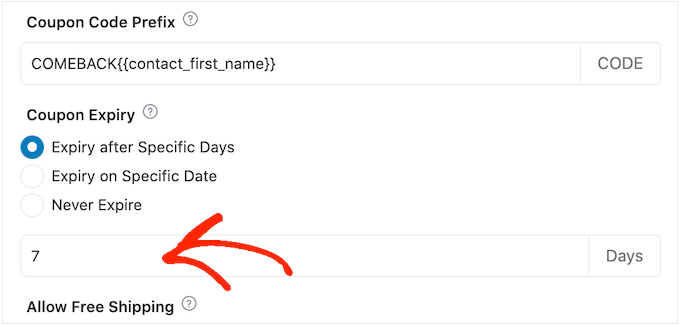
Finally, you can choose whether the coupon gives customers a free shipping discount.

Shoppers love free shipping, so you may want to consider adding this to your coupon by selecting the ‘Yes’ radio button under ‘Allow Free Shipping.’

How to create a free shipping discount for your online store

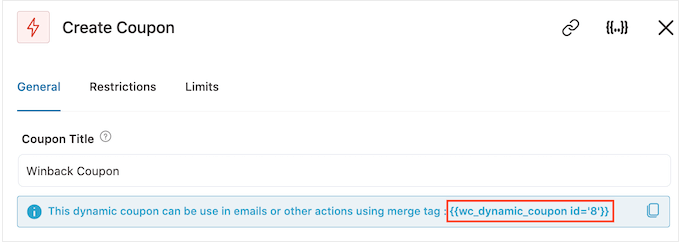
When you’re happy with how the coupon is set up, make sure you copy the small pieces of code under the ‘Coupon Title.’

You’ll need this coupon code for the email we’ll be creating in the next step, so store it somewhere safe.

Creating an automated coupon to win back customers

With that done, click on ‘Save’ to store your changes.

Now we have a coupon, it’s time to create the email that FunnelKit will send to your customers. To add an email action, click on the ‘+’ button and then select ‘Action.’

Add an email action to win back customers

If it isn’t already selected, then click on ‘Messaging’ in the left-hand menu.

Then, select ‘Send Email’ and click on ‘Done.’

Choosing an action in the FunnelKit automation plugin

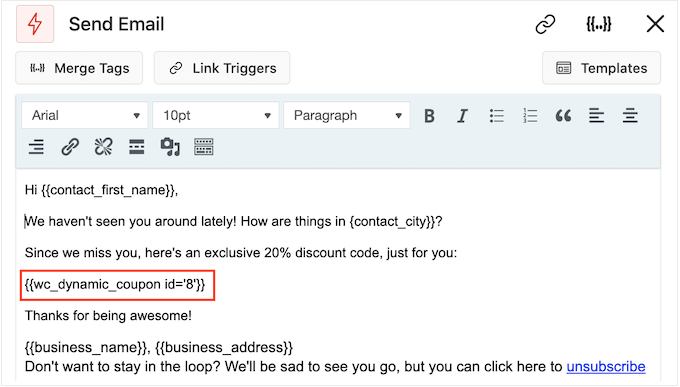
You can now create an email by typing in a subject and preview, and adding body text.

Similar to creating a coupon, it’s best to use a mix of plain text and tags. To add dynamic tags, click on the ‘Merge Tags’ icons that appear next to the To, Subject, and Preview Text fields.

How to create a personalized email to win back customers

If you want to add tags to the email body, then you can click on the ‘Merge Tags’ button.

To add your coupon code, simply paste or type in the {{wc_dynamic_coupon id= code we copied in the previous step.

Create a personalized email to bring back customers

When you’re happy with how the email looks, click on ‘Save & Close.’

That’s it. When you’re ready to make the automation live, click on the ‘Inactive’ slider so it turns to ‘Active.’

Making your workflow automation live

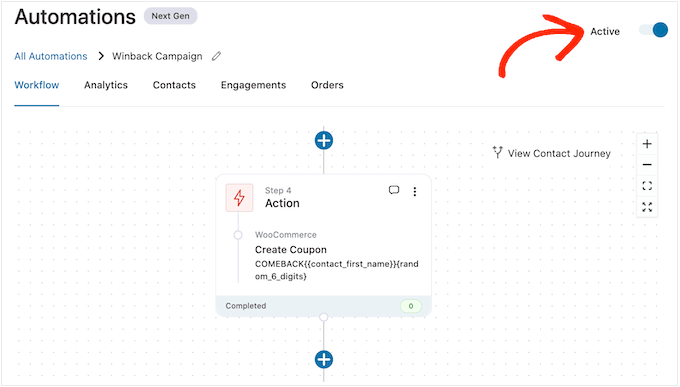
Now, FunnelKit will automatically send the coupon to any customer who hasn’t purchased from you in the past 30 days.

Method 2. Using Uncanny Automator (Over 100 Integrations)

Another way to send automated coupons in WordPress, is by using Uncanny Automator. It is one of the best WordPress automation plugins on the market and lets you create powerful workflows to save time and help you respond to customers more quickly.

Uncanny Automator works seamlessly with WooCommerce, plus all of the must have WordPress plugins and third-party tools. If you’re already using lots of different software on your online store, then Uncanny Automator may be a good choice for you.

There is a free Uncanny Automator plugin that lets you automate many common tasks. However, we’ll be using Uncanny Automator pro because it works with WooCommerce.

To start, you’ll need to install Uncanny Automator pro, plus the free plugin as it provides the base for the premium version. If you need help, then please see our guide on how to install a WordPress plugin.

Upon activation, go to Automator » Settings and enter your license key into the ‘Uncanny Automator Pro license key’ field.

Adding an Uncanny Automator license to your WordPress website

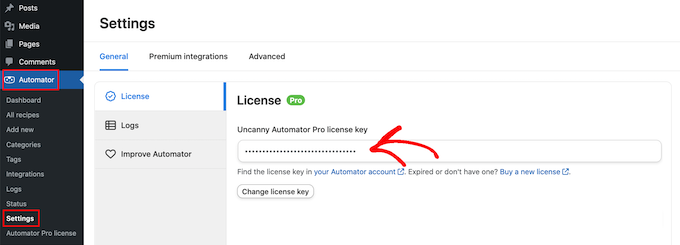
You’ll find this information under your account on the Uncanny Automator website.

Uncanny Automator is a powerful and flexible plugin, so there’s lots of different ways that you can bring customers back to your site. Let’s take a look at a few options.

Automatically Send Coupons to Logged-Out Customers

It’s smart to let customers create an account with your online store, as it encourages brand loyalty and makes it easier for shoppers to buy from you in the future.

User registration can also help with lead generation. If you get the shopper’s email address, then you can target them with email marketing, personalized ads, an email newsletter, and much more.

If you’re using WooCommerce, then this plugin automatically creates all the pages customers need to create and manage an account. WooCommerce also adds a new Customer role, which it automatically assigns to any shoppers who register with your store.

Are you using a different eCommerce solution that doesn’t support customer registration? Then see our guide on how to allow user registration on your WordPress site.

After that, you can simply create a new role for your customers. For detailed instructions, please see our beginner’s guide to WordPress user roles and permissions.

If you allow user registration, then you can track when a shopper logs out of their account, as this suggests they’re losing interest in your store. You can then send a coupon to encourage them to log back in.

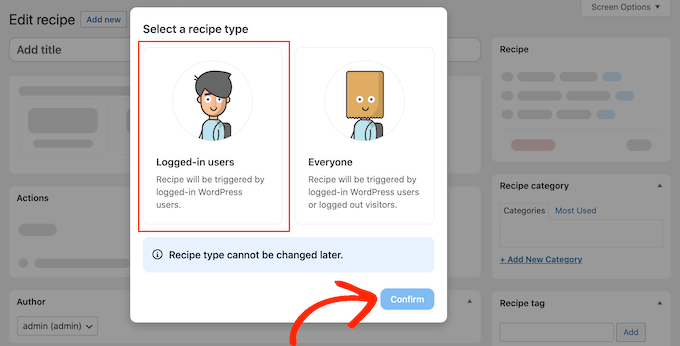
To create this recipe, simply go to Automator » Add new in the WordPress dashboard.

Uncanny Automator will now ask whether you want to create a recipe for logged-in users, or everyone. Go ahead and select ‘Logged-in users,’ then click on the ‘Confirm’ button.

Creating a logged-in automation recipe with Uncanny Automator

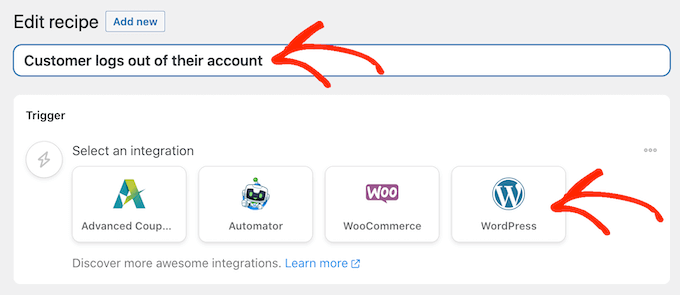
Next, you can give the recipe a name by typing into the ‘Title’ field. This is just for your reference so you can use anything you want.

Once you’ve done that, click on ‘WordPress’ in the ‘Select an integration’ area.

Select WooCommerce as an integration

You can now choose a trigger, which is anything that kickstarts the recipe.

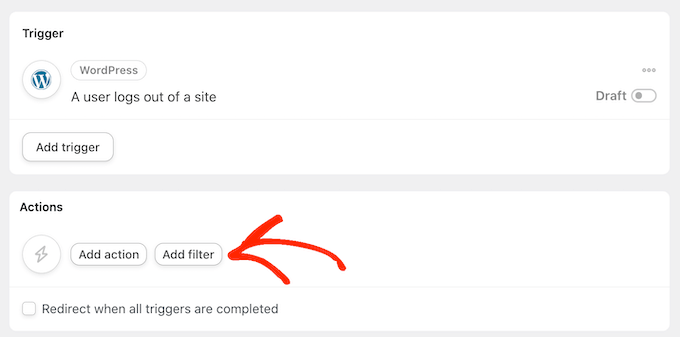
In the dropdown menu, start typing the following ‘A user logs out of a site’ and then select the right option when it appears.

Choosing a trigger for the automated coupon recipe

We only want to run the workflow when someone with the ‘Customer’ user role logs out of their account.

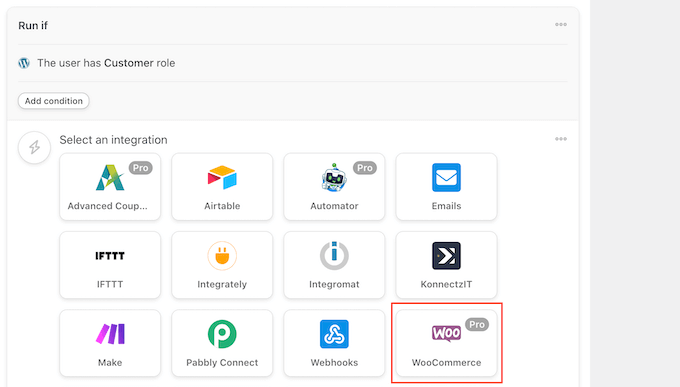
With that in mind, click on the ‘Add filter’ button.

How to create an automation workflow for your WooCommerce customers

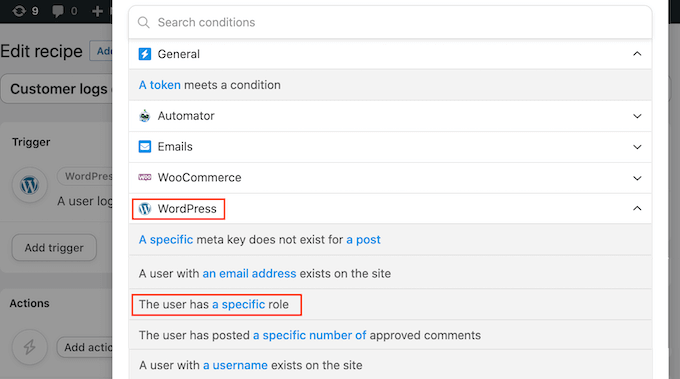
In the popup that appears, click on ‘WordPress.’

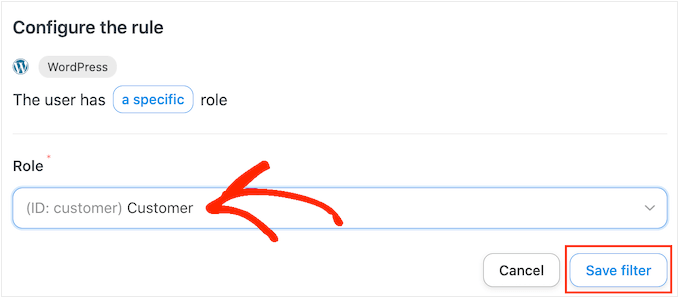
Next, find ‘The user has a specific role’ in the dropdown menu.

Filtering your users based on WordPress role

Open the ‘Role’ dropdown and select the role you’re using for your customers.

After that, go ahead and click on ‘Save filter.’

Sending an automated coupon to your WooCommerce customers

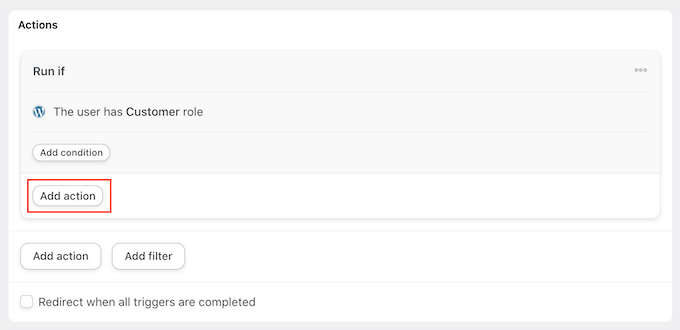
Now it’s time to specify the action that Uncanny Automator will perform every time this workflow runs.

We’re going to send the customer an email containing a coupon, so go ahead and click on ‘Add action.’

Adding actions to an automated recipe

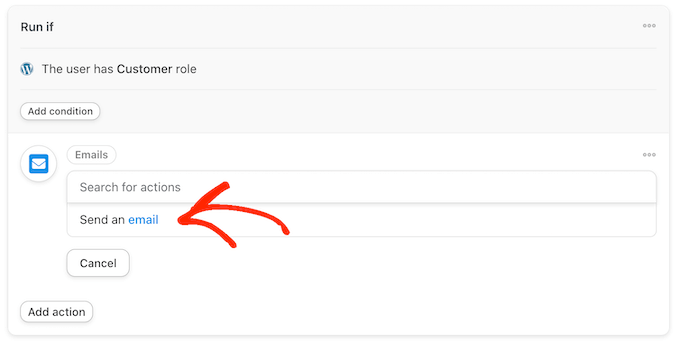
Since we want to send an email, select ‘Emails’ as the integration.

In the dropdown that appears, click on ‘Send an email.’

Send automated coupons in WordPress to bring back customers

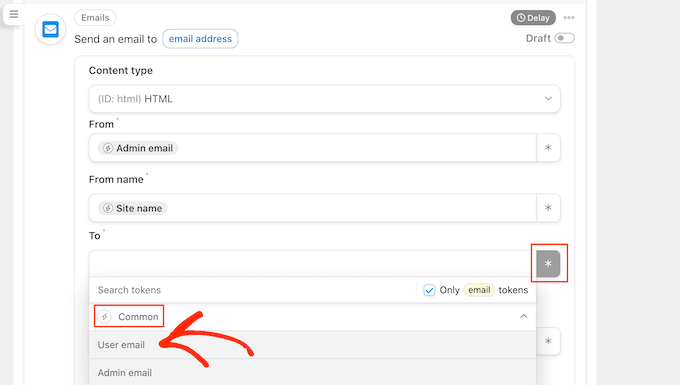
This adds all the fields that you can use to create the email.

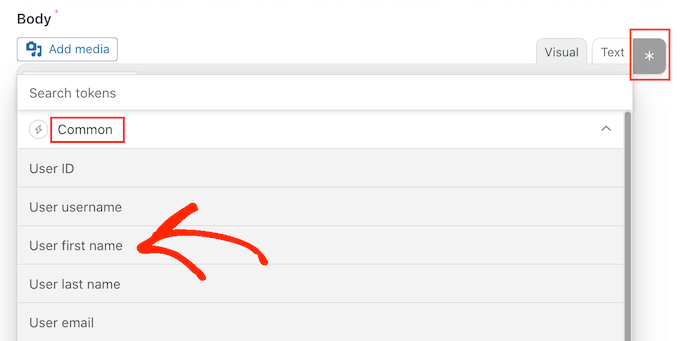
To start, we need to make sure the message goes to the right user, by clicking on the asterisk next to the ‘To’ field. Then, select ‘Common’ and ‘User email.’

Getting the customer's email address

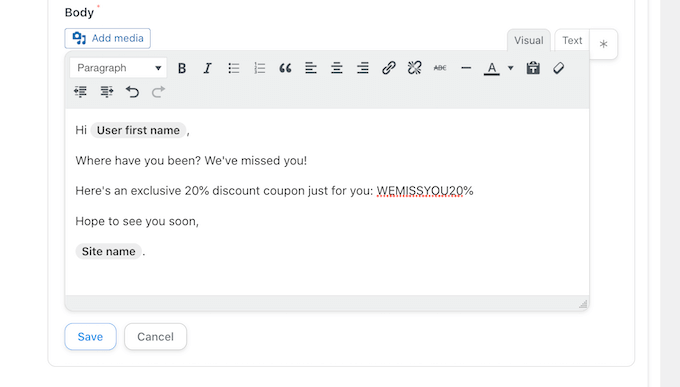
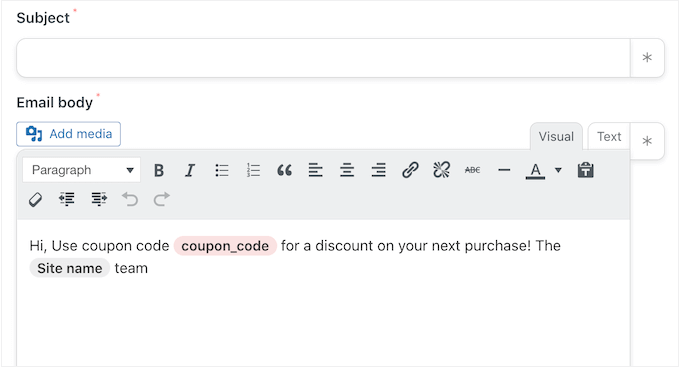
You can now create the email by adding a subject line and body text.

Here, you can use a mix of plain text and tokens, which are placeholders that Uncanny Automator replaces with real values automatically. For example, if you want to use the customer’s name, then you can click on the asterix and select ‘Common.’

Simply select the ‘User first name’ token to create the personalized greeting.

Adding a dynamic user name token to the coupon workflow

You’ll also need to create a coupon and add it to the email.

The easiest way is by using the Advanced Coupons plugin, which is the best WordPress coupon code plugin on the market. It lets you create lots of different advanced coupons to get more sales and grow your business.

For a step-by-step guide, please see our post on how to create smart coupons.

After creating a coupon, you can simply add it to the email.

Sending an automated coupon email in WordPress to bring back customers

When you’re happy with how the email looks, click on ‘Save.’

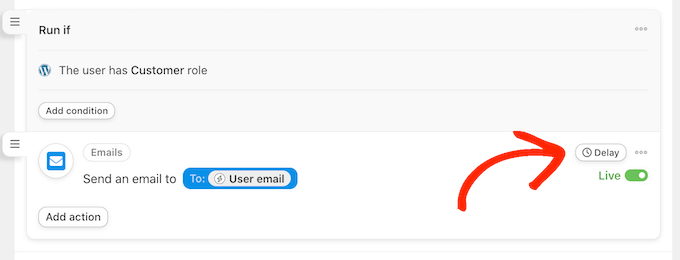
After that, it’s time to set a delay. This is how long Uncanny Automator will wait after the customer logs out, before sending them the coupon.

To add a delay, hover your mouse over the ‘Email’ action. When it appears, click on ‘Delay.’

How to add a delay to an automation workflow

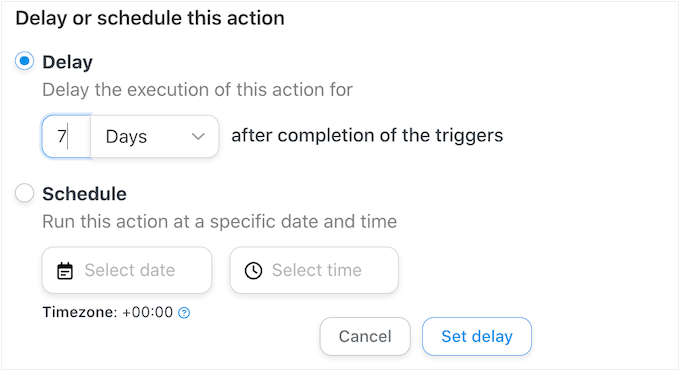
You can then add your delay in the popup that appears.

Once you’ve done that, go ahead and select ‘Set delay.’

Adding a time delay to the automated coupon recipe

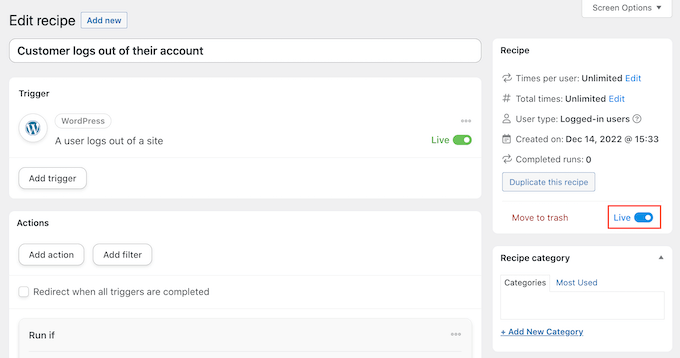
When you’re happy with how the recipe is set up, it’s time to make it active.

In the ‘Recipe’ box, click the ‘Draft’ switch so that it shows ‘Live’ instead.

Publishing the automated coupon recipe

That’s it. Now, when a customer logs out of their account, Uncanny Automator will wait for the specified amount of time before sending them a coupon code.

Automatically Send Coupons for a Specific Product

Sometimes a shopper may look at a product multiple times. This suggests they’re interested in the item, but something is stopping them from making a purchase.

In this case, you may want to send them a coupon, which will encourage them to splash out on the product.

To get started, create a new recipe for logged-in users following the same process described above. After that, click on ‘WooCommerce’ in the ‘Select an integration’ area.

Adding WooCommerce as an integration in Uncanny Automator

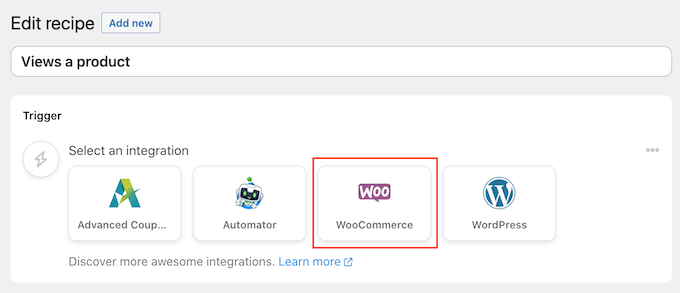
Next, choose a trigger by typing the following ‘A user views a product.’

When the right trigger appears, give it a click.

Get more sales with an automated coupon recipe

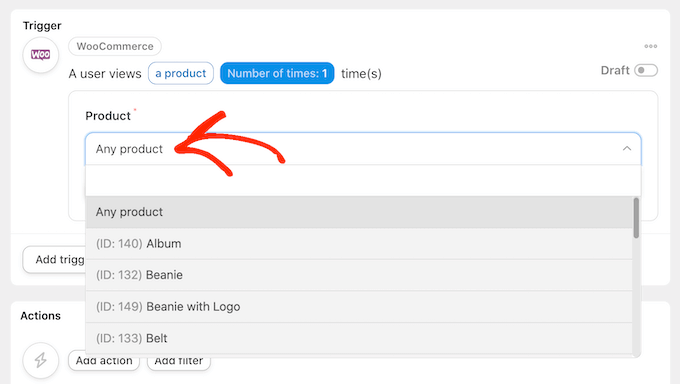
By default, this trigger is set to ‘Any product.’

If you want to link the recipe to a specific product, then open the ‘Product’ dropdown and choose that product from the list.

Choose a WooCommerce product from the dropdown menu

Once you’ve done that, click on the ‘Number of times’ button.

By default, the recipe will run every time a customer looks at a product. You should change this, so the customer has to look at the product multiple times before triggering the recipe. To do this, type a different number into the ‘Number of times’ field.

Triggering a workflow when the customer views a product multiple times

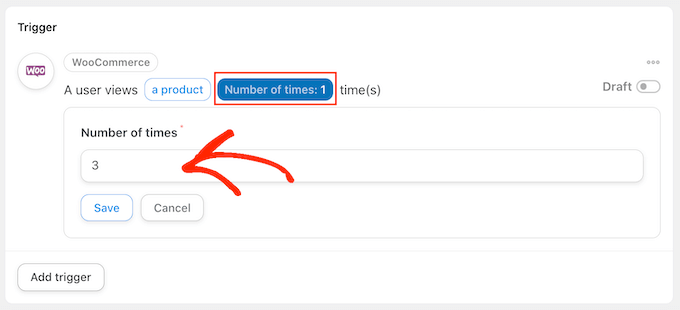
When that’s done, click on ‘Save’ to store your settings.

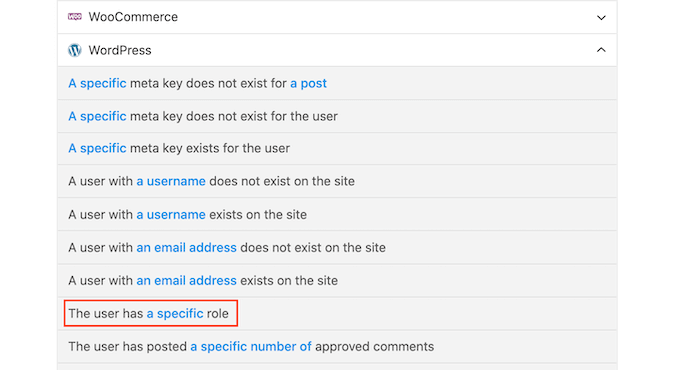
This recipe should only run when a customer views a product, so click on ‘Add Filter.’ In the popup that appears, click on ‘WordPress’ and then choose ‘The user has a specific role.’

Adding WooCommerce features to an automation recipe

After that, open the ‘Role’ dropdown and select the role you’re using for your customers.

When you’re ready, click on ‘Save filter.’

Configuring the automated coupon rule

Now it’s time to add the action. There are a few different ways to send automated coupons from your WordPress website.

To email a code to your customers using Uncanny Automator and Advanced Coupons, simply follow the same process described above.

Another option is to generate the code using WooCommerce. To do this, click on ‘Add Action’ and then select ‘WooCommerce’ as the integration.

Selecting the WooCommerce eCommerce plugin as an integration

In the search bar, start typing ‘Generate and email a coupon code to the user.’

When the right option appears, give it a click.

Generating a WooCommerce coupon

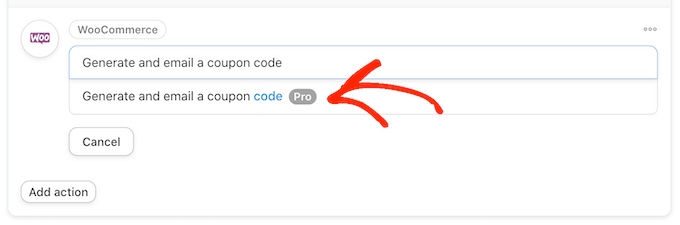
This will add some new settings where you can create the coupon code.

To generate a code automatically, simply leave the ‘Coupon code’ field blank.

How to create a coupon for your WooCommerce online store

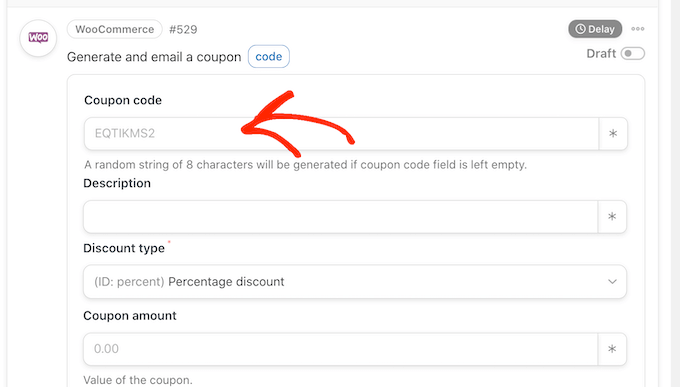
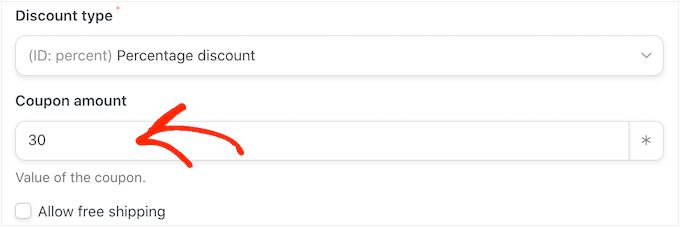
In the ‘Discount type’ field, choose the kind of coupon that you want to create, such as a fixed cart discount or percentage discount.

For this guide, we’ll select ‘Percentage discount’.

How to create a percentage discount code

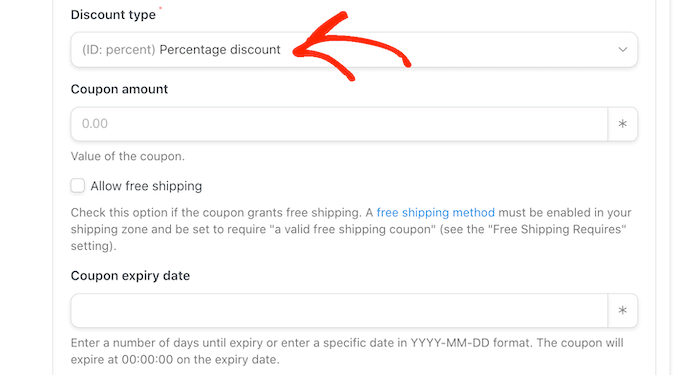
After that, type the percentage discount into the ‘Coupon amount’ field.

In the following image, we’re offering customers a 30% discount on their purchase.

Creating a percentage coupon code

In the next field, you can set an expiry date for the coupon, either by using the YYY-MM-DD format or typing in the number of days until the coupon expires.

For example, in the following image the coupon will expire after 7 days.

Adding an expiration date to an automated coupon code

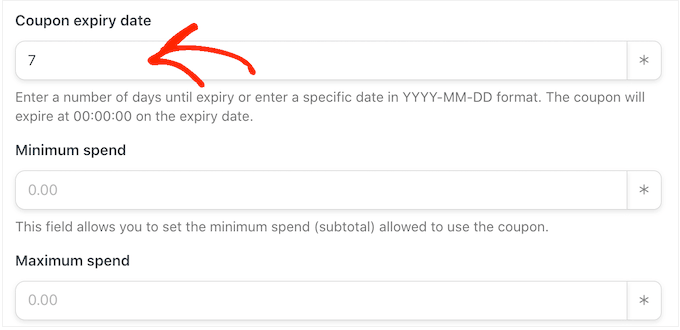
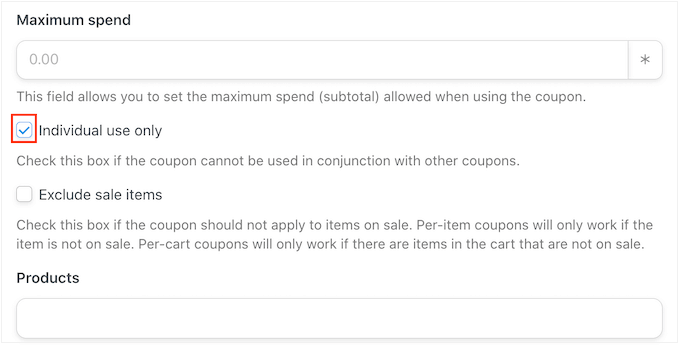
You can also set a minimum and maximum spend for the coupon. We’ll leave these fields blank so the customer can use the code with any purchase.

You may also want to check the ‘For individual use only’ box so customers can’t use this code in combination with other coupons.

Creating a coupon for individual use

Next, scroll to the ‘Usage limit per coupon’ section. The shopper should only be able to use the coupon once, so type in ‘1.’

There are lots of other settings you can change for the coupon. It’s a good idea to look through these settings to see whether you want to make any more changes.

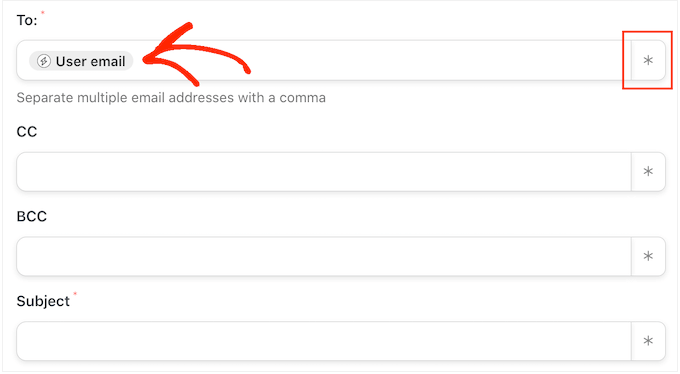
When you’re happy with how the coupon is set up, scroll to the ‘Email’ section. To start, find the ‘To’ field and then click on the asterisk next to it. Then, click on ‘Common’ and select ‘User email.’

Creating an automated coupon email to bring back shoppers

With that done, you can add a subject line and change the text in the email body.

To create a more personalized email, it’s a good idea to use a mix of plain text and tokens, by following the same process described above.

Adding a coupon to your WooCommerce email

When you’re happy with the email, click on the ‘Save’ button to store the recipe.

After that, you can make the recipe live by clicking the ‘Draft’ switch so that it shows ‘Live.’

Making an Uncanny Automator recipe live on your WordPress website

Now, every time someone views a product multiple times, it’ll trigger the recipe workflow.

We hope this article helped you learn how to send automated coupons in WordPress to bring back customers. You may also want to check out our guide on how to create a WooCommerce popup to increase sales and the best WooCommerce plugins for your store.

If you liked this article, then please subscribe to our YouTube Channel for WordPress video tutorials. You can also find us on Twitter and Facebook.

The post How to Send Automated Coupons in WordPress to Bring Back Customers first appeared on WPBeginner.

How to Export Email Addresses from WordPress Comments

Do you want to export email address from your WordPress comments?

The people who comment on your site are already engaged with your content, and that makes them the perfect audience for email marketing or retargeting ads. As long as you get the right permissions, you can target these users by exporting their contact information.

In this article, we will show you how you can export email addresses from the WordPress comment section.

How to export email addresses from WordPress comments

Why Export Email Addresses From WordPress Comments?

There are a few different reasons why you may want to export email addresses from WordPress comments but the most common is to build an email list.

However, according to digital privacy guidelines, you must have permission to contact the people who comment on your website. The default WordPress comment form doesn’t give users a way to opt into your email updates, which means you can’t simply add these people to your mailing list. One easy fix is to add custom fields to the comment form in WordPress so that anyone who leaves a comment can opt into getting emails from you.

The following screenshot shows an example of how this might look on your website.

An example of a custom comment form

When the person posts their comment, their response is added as comment meta data. You can then export the meta data along with the email address, and see whether you have permission to email that person.

In the following image, you can see an example of a spreadsheet containing one comment author who has opted into getting email updates and one author who doesn’t want to receive any messages from you.

A list of exported email addresses

This allows you to build a mailing list without breaking important privacy rules such as GDPR.

There may also be some sites where you already have permission to email anyone who comments on your content. This often includes private WordPress blogs such as a classroom website or a family blog. In this case, simply exporting the list of email addresses may be easier than asking every single person for their contact information.

With that in mind, let’s see how you can export email addresses from WordPress comments.

How to Export Email Addresses from WordPress Comments

The easiest way to export email addresses from your WordPress comments is by using WordPress Comments Import & Export.

This plugin lets you export different information from the WordPress comment section including email addresses and any meta data that was added via a custom field.

To begin, you’ll need to install and activate the plugin. If you need help, then please see our guide on how to install a WordPress plugin.

Upon activation, go to Comments » Comments Im-Ex.

The WordPress Comments Import & Export plugin

By default, the plugin will export data from all the comments that people have posted across your website.

Depending on your site, this might be a lot of information for you to read through.

With that being said, you may want to filter the comments that the plugin exports. One option is to only export comments that were posted within a particular timeframe.

To set a time limit, scroll to the ‘Date’ section. You can then click on each date field and then choose a start and end date from the calendar popup.

Filtering the WordPress comments export

You can also export comments from a specific post only. For example, you might be running a giveaway or contest where everyone who comments on a particular post gets entered into a prize draw.

You can then export the email addresses from this post and pick your winner.

To limit the export to a specific page, click on the box next to ‘Articles’ and then select any post from the list.

Filtering the WordPress comment export

Once you’ve done that, scroll to the ‘Columns’ section which lists all the information you can include in the export.

By default, the plugin exports all the data from each comment, so you’ll typically want to uncheck the information you don’t need. For example, if you’re not interested in the author’s IP address then you can click to uncheck the comment_author_ip box.

Building the comment form export

You can check or uncheck any boxes you want. However, since we want to export a list of email addresses it’s important to check the comment_author_email box.

Did you add a custom opt in field to the comment form? Then make sure you check the comment_meta box so you can see whether the author opted into receiving email updates.

Exporting custom meta data from WordPress comments

When you’re happy with how the export is set up, go ahead and click on the Export Comments button.

The plugin will now export all the email addresses and you can download that CSV file.

Next, open the file using any app or program that supports the CSV format, such as Microsoft Excel or Google Sheets, as you can see below.

How to export email addresses from WordPress comments

You can now filter the comments based on whether these people opted into receiving emails.

How to Get the Most Out of Your Exported Email Addresses

After exporting the email addresses from your WordPress comments, there are a few different ways that you can use them.

If the comment author opted into getting email updates from you, then you might add them to your email newsletter. You can then send these people news, tips, and updates about your business or website.

You can also add the users in your CRM to do regular personal reach outs to build your network.

Another use for your exported email addresses is for Facebook retargeting ads. Facebook lets you upload a list of email address so you can target only those users with your ad campaign.

We hope this article helped you learn how to export email addresses from WordPress comments. You may also want to check out our guide on how to allow user registration on your WordPress site and the best contact form plugins.

If you liked this article, then please subscribe to our YouTube Channel for WordPress video tutorials. You can also find us on Twitter and Facebook.

The post How to Export Email Addresses from WordPress Comments first appeared on WPBeginner.

7 Best Web Push Notification Software in 2020 (Compared)

Are you looking for the best push notification software for your website?

Web push notifications are a powerful tool that allows you to connect with visitors after they leave your website. You can send targeted messages to your users which leads to more traffic, conversions, and sales.

In this article, we’ll share our pick of the best web push notification software for your website.

The best push notification software compared

Why Push Notifications Are a Powerful Marketing Tool

Push notifications allow you to engage and retain visitors after they leave your website.

You can send targeted personalized messages to users and bring them back to your website. This could be blog post notifications, product announcements, abandoned cart reminders, and more.

An example push notifiation from PushEngage

Push notifications go directly to the user’s web browser or mobile device which means it has a much higher engagement rate.

Many big sites like Facebook use push notifications. However, most small businesses haven’t yet realized how powerful they are. On WPBeginner website, push notifications are consistently a top 5 traffic source.

If you’re not using push notifications, then now is a great time to start, so you can get ahead of your competition.

With that said, here’s our comparison of the best push notification tools that you can try. All of them are fully compatible with WordPress which is the most popular website builder in the world.

1. PushEngage

PushEngage

PushEngage is the best push notification tool on the market. It allows you to connect with visitors after they leave your site with targeted push messages.

You can set it up to automatically send your new blog post notifications, or use it to manually send custom messages.

It is super easy to set up and is a perfect solution for both beginners as well as advanced users. It works on both HTTP and HTTPs websites, and they support all devices / browsers.

PushEngage comes with powerful features such as A/B testing, automatic drip campaigns, smart opt-in reminders, custom triggered campaigns, and more.

Their triggered campaign feature lets you automatically create abandoned cart notification, schedule messages, send price drop alerts, and more.

Plus, you can track the performance of each campaign and even calculate the revenue generated from them using goal tracking.

PushEngage’s dynamic segmentation helps you send more targeted messages based on users’ actions. For example, you can segment visitors who added products to the cart, bought something, viewed a specific page, and more.

This level of personalization helps you get maximum results, so you get more traffic and sales.

Over 10,000+ companies use PushEngage, including big name brands like Dominos, TUI, Harvard Business Review, and of course WPBeginner.

Price:

PushEngage costs from $25/month, which gives you 5,000 subscribers and unlimited notifications.

There’s also a limited free plan, which gives you up to 2,500 subscribers and 120 notifications/month.

Editor’s note:

Our founder, Syed Balkhi, fell in love with this platform because of the impact it had on our business. In October 2020, we acquired PushEngage, and it’s now part of WPBeginner’s family of products.

2. OneSignal

OneSignal

OneSignal is a popular push notification tool. It has similar features to PushEngage. You can use it to create automatic push notifications, announcements, abandoned cart notifications, and more.

You can easily set your push prompt to display after a certain number of page views and/or seconds. This means you don’t need to display the push prompt the moment someone arrives on your site.

Along with offering push notifications, OneSignal lets you create in-app messages and emails. Like PushEngage, OneSignal offers A/B testing and useful analytics. You can also segment your audience for better targeting.

One key drawback to OneSignal is that it gets expensive as you need more features. It also has fewer automation, personalization, and customization options than PushEngage.

Price:

At the time of writing this article, OneSignal’s paid plans started at $99/month. They have introduced a Growth plan which will be available in November at $9 per month.

However, this plan is still limited, and you will need their Professional plan at $99/month to get the most features. There’s also a free plan available with up to 10,000 subscribers.

3. VWO Engage (PushCrew)

VWO Engage

VWO Engage, which used to be called PushCrew, has a web push notifications tool that works on both desktop and mobile.

It’s designed to let you create push notification campaigns, which have entry and exit triggers. That means the campaign can automatically start based on the user’s actions, such as clicking a particular link.

Users can also be automatically opted out of the campaign when they take a set action, such as clicking a button or filling out a form.

VWO Engage offers segmentation, analytics, personalized notifications, and A/B testing. However, their segmentation tools and engagement campaigns are quite limited.

Price:

VWO Engage costs from $99/month. This gives you up to 10,000 subscribers and unlimited notifications.

There’s no free plan available. However, you can take a free trial for 30 days, with no credit card required.

4. iZooto

iZooto

iZooto offers real-time push notifications, recurring notifications, and scheduled notifications.

Like the other tools we’ve featured, iZooto allows you to personalize push notifications. You can also set up segmentation for more targeted messaging.

It includes A/B testing, Timezone based notifications, capture key user attributes and interests, and more.

Your initial push prompt can appear when the user scrolls down, after a certain length of time, or after a button click. This can help you increase the percentage of site visitors signing up for push notifications.

The iZooto customer success team will help you transfer over your subscribers if you’re already using a different push notification tool.

iZooto only works with https websites, which means your site needs to be using an SSL certificate.

Price:

iZooto costs from $85/month, which gives you up to 30,000 subscribers and unlimited notifications.

There’s no free plan available. However, you can take a 14-day free trial (no credit card required).

5. Webpushr

Webpushr

Webpushr is a straightforward web notifications platform that supports all popular browsers. It offers a range of different prompt templates that you can customize.

Webpushr makes it easy to transfer subscribers from another platform. It includes features like user segmentation, automatic web push, and HTTP support. Plus, it’s designed to integrate seamlessly with both WordPress and WooCommerce.

Webpushr gives you unlimited team members and unlimited segments for your subscribers. It also supports large images, action buttons, emoji, and custom branding.

Unlike most push notification plugins, Webpushr gives you all features on all plans. This includes their free plan. The only difference is how many subscribers you can have.

Price:

Webpushr costs from $19/month for up to 100,000 subscribers and unlimited notifications.

There’s also a free plan available. This gives you up to 60,000 subscribers and unlimited notifications.

6. PushAssist

PushAssist

PushAssist is a push notification tool that supports Chrome, Firefox, and Safari browsers. It’s easy to set up, and works on both desktop and mobile.

With PushAssist, you get audience segmentation, personalization, scheduling tools, and insights into your customer data.

You also have the option to monetize your push traffic by letting advertisers send out push notifications to your audience. This could help you make money online.

You can use PushAssist with an HTTP or HTTPs website. However, you cannot remove the PushAssist branding unless you’re using the Business plan or higher.

Price:

PushAssist costs from $9/month for up to 3,500 subscribers.

There’s also a free plan available. This gives you up to 3,000 subscribers and unlimited notifications.

7. WonderPush

WonderPush

WonderPush works in a similar way to most other push notification plugins. It lets you segment your subscribers, automate notifications based on behavior or time, access real-time analytics, and more.

WonderPush lets you create various types of notification. These include eCommerce push notifications, such as automated abandoned cart notifications.

You get all the features however much you’re paying. This includes unlimited staff members, unlimited notifications, A/B testing, personalization, and more.

Price:

WonderPush has a different pricing model from the other tools we’ve featured. It costs from €1 per month for up to 1,000 subscribers, then it’s an extra €1 for every 1,000 subscribers after that.

There’s no free plan, but you can take a 14-day free trial. This doesn’t require a credit card.

Which is the Best Push Notification Software?

PushEngage is the best push notification software on the market. It’s beginner-friendly and easy to get started with, yet it also offers lots of powerful features.

Their free plan is suitable for small businesses and blogs. Their pricing is the most competitive as it scales which is a big reason why many large businesses use PushEngage. Their platform is robust and the support team is top-notch.

OneSignal can be a good fit too. However, their free plan is quite limited and even the paid plans have fewer features and customization options.

We hope this article helped you learn about the best push notification software for websites. You might also like our article on the best email marketing services, and the best business phone services for your small business.

If you liked this article, then please subscribe to our YouTube Channel for WordPress video tutorials. You can also find us on Twitter and Facebook.

The post 7 Best Web Push Notification Software in 2020 (Compared) appeared first on WPBeginner.

How to Embed Actual Tweets in WordPress Blog Posts

Do you want to embed individual tweets in your WordPress blog posts? Embedding Tweets in your blog posts allows you to easily quote tweets inside your posts as well as make them more engaging.

You may have seen many popular blogs and news websites embedding tweets from organizations and individuals in their articles.

It makes the quotes more authentic while allowing your users to follow the full conversations for more information.

In this article, we will show you how to easily embed tweets in WordPress blog posts and pages.

How to Easily Embed Tweets in WordPress Blog Posts

Video Tutorial

If you prefer written instructions, then please keep reading.

Embedding Actual Tweets in WordPress Posts – Step by Step

WordPress makes it easy to embed third-party services in your blog posts. This includes YouTube videos, tweets, and other social network posts.

This feature uses a method called oEmbed. Basically, you can just add the URL of a third-party website, and WordPress will request an embed code from them.

You can only add whitelisted oEmbed services in WordPress, and Twitter is one of those services.

The WordPress block editor comes with a built-in Twitter embed block to let you easily insert tweets in your posts and pages.

First, you need to go to Twitter and find the tweet that you want to embed. After that, click on the down arrow icon on the right, and then select ‘Copy link to Tweet’ option.

Copy Link to Tweet

Next, you need to edit the WordPress post or page where you want to embed the tweet.

On the post edit screen, click on the + icon to add a new block and then select the Twitter block under the Embeds section.

Add Twitter Embed Block in WordPress Editor

You’ll now see the Twitter Embed block added into the post edit area. You need to paste the tweet URL that you copied earlier in the block settings.

Embed Twitter in WordPress Post Editor

WordPress will now automatically fetch and display the actual tweet in your post content.

Actual Tweet Embedded in WordPress Post

You can save your post or publish it to see a live preview. This is how it looked on our demo website.

Actual Tweet Embedded in WordPress Blog Post Preview

Pro Tip: You can also paste the Tweet URL in a paragraph block and WordPress will automatically convert it into a Twitter embed block.

Auto embed tweets by just pasting the URL

How to Embed Tweets in Classic WordPress Editor

If you are still using the old WordPress classic editor, then you will need to copy and paste the tweet link directly in the post editor.

Unlike the block editor, the classic editor is a single text box for your whole content. That’s why you need to paste the tweet URL in a separate line in the editor.

Add Twitter URL in Classic WordPress Editor

Once done, it will immediately load the actual tweet in your post editor.

Tweet Embedded in Classic WordPress Editor

Don’t forget to update or save your changes and preview your post or page.

How To Automatically Embed Latest Tweets in WordPress

By default, WordPress allows you to manually embed tweets in your articles, and you can only add one tweet at a time.

What if you wanted to showcase recent tweets from your account, another user, or a hashtag?

This is where Smash Balloon Custom Twitter Feeds comes in. It allows you to easily embed a twitter feed with beautiful layouts and tons of customization options.

First, you need to install and activate the Smash Balloon Custom Twitter Feeds plugin. For more details, see our step by step guide on how to install a WordPress plugin.

Note: there’s a free version of custom Twitter feeds plugin available as well. We’re showcasing the pro version because it has more features.

Upon activation, you need to visit Twitter Feeds » License page and enter your license key. You can find this information under your account on the Smash Balloon website.

Enter your Smash Balloon license

Next, you need to click ‘Activate License’ and then click on Save Changes.

After that, you can go to Twitter Feeds » Configure and click the big blue button to connect your Twitter account.

Connect your Twitter account

This will take you to the Twitter website and you’ll be asked to login. Once logged in, you need to click on the ‘Authorize App’ button to continue.

Authorize app

After that, you’ll be redirected back to your website where you’ll see the Access Token and Access Token Secret fields filled out. Make sure you save your changes.

Displaying Your Twitter Feed in WordPress

Once you have set up the plugin, you can add your recent tweets to any WordPress post or page.

Simply edit the post or page where you want to display the Twitter feed. On the post edit screen, click on the (+) button to add the Twitter Feed block to your page.

Add Twitter feed to page

As soon as you add the block, it will automatically load recent tweets from your Twitter account. You can now save your post or page and visit it to see your Twitter feed in action.

Twitter feed on page

Now you have a feed of your Tweets that is automatically updated every time you Tweet.

You can even set up your feed to show a particular hashtag if you want. Here’s how you’d do it.

Go back to Twitter Feeds » Twitter Feeds and scroll down to your Feed Settings. Then select the option for ‘Hashtag’ and enter your hashtag of choice into the field.

Smash Balloon hashtag settings

Make sure to save your changes, and then check your site. You’ll see a list of Tweets using the hashtag you chose.

Twitter hashtag feed

Now, let’s look at how you can easily customize your feed.

Customizing Your Twitter Feed in WordPress

Smash Balloon Twitter Feed allows you to display Twitter feeds in various layouts with several customization options.

Simply head over to the Twitter Feeds » Customize tab, and you’ll see your first set of options to display your feed. You have quick links at the top to navigate to the section you want to customize.

Customize layout

Let’s start by clicking on the layouts section. From here, you can choose from a number of options including list, carousel, and masonry styles.

Choose your layout

You can also show and hide different items like header, twitter links, reply and retweet actions, and more. Once you are finished, don’t forget to click on the Save Changes button to store your settings.

You can now visit your Twitter feed page to see your changed applied to the feed.

Twitter feed 2 column masonry layout

If you are using the classic editor, then you’ll need to copy and paste the shortcode [custom-twitter-feeds] where you want your feed to be in your page or post.

You can also use the shortcode or the Twitter Feed widget to add your Tweets in your sidebar or footer. Just go to Appearance » Widgets and drag the Twitter Feed widget to your sidebar, or wherever you want.

Add Twitter feed to sidebar

Creating Multiple Twitter Feeds in WordPress

What if you want to display multiple Twitter feeds on one page or post? You can do this easily using the shortcodes available.

Just head over to Twitter Feeds » Twitter Feeds and then select the ‘Display Your Feed’ tab.

Display your feed

On this page, you will see a bunch of shortcode examples that you can use.

For instance, you could simply use this shortcode: [custom-twitter-feeds screenname=optinmonster num=6] to display 6 recent tweets from OptinMonster.

Change the ‘screenname’ to any Twitter name you want to use. And then choose whatever number you want in the ‘num=6’ option to display the number of Tweets.

Next, you’ll add it to your post using the shortcode block by clicking the (+) and then choosing the shortcode widget.

Twitter shortcode widget

From there, add the shortcode inside the block settings and save your post or page.

Insert Twitter shortcode

You can now save or publish your post and visit your website to see it in action.

OptinMonster Twitter feed

We hope this article helped you to learn how to embed actual Tweets in WordPress blog posts. You may also want to see our guide on how to create an email newsletter to grow your traffic, and our expert pick of the best Twitter plugins for WordPress to get more followers.

If you liked this article, then please subscribe to our YouTube Channel for WordPress video tutorials. You can also find us on Twitter and Facebook.

The post How to Embed Actual Tweets in WordPress Blog Posts appeared first on WPBeginner.

How to Create a Separate Page for Blog Posts in WordPress

Do you want to create a separate page for blog posts in WordPress? By default, WordPress displays your blog posts on the homepage.

However, if you are making a business website or simply want to customize your homepage, then you may want a separate page for your blog section.

In this article, we will show you how to easily create a separate page for blog posts in WordPress.

Creating a separate blog page in WordPress

Setup WordPress to Create a Separate Blog Page

WordPress allows you to easily configure your website to have a custom home page. This feature also allows you to choose any other page on your website to be used as your blog page.

First, you need to create two pages in WordPress that you would like to use as your homepage and blog page.

Publish blog and home pages in WordPress

You don’t need to add any content to those pages, and you can even name them anything else if you want. For instance, some business websites use News for their blog page.

Once you have created those pages, you can head over to the Settings » Reading page in the WordPress admin area.

Under the ‘Your homepage displays’ section, you need to click on the ‘ A static page’ option. After that, you can select the home and blog pages you created earlier.

Select blog and home page

You can now go to Pages » All Pages section in admin area. You’ll notice your blog and homepage with new labels. Go ahead, and click on the View link under those pages to preview them.

Blog page preview

The appearance of these pages depends on your WordPress theme, and you may need to configure your theme settings.

Since each WordPress theme has different options, you’ll have to check out your theme’s documentation or check the options under Appearance » Customize page.

We’ll also show you other methods later in this article.

Put The Blog Page Link to Your Website’s Navigation Menu

Blog link in navigation menu

Now that you have created a separate blog page let’s help your website visitors find that.

Simply visit the Appearance » Menus page and add the Blog page you created earlier to your website’s navigation menu.

Adding blog page link to navigation menu

For more detailed instructions, see our beginner’s guide to navigation menus in WordPress.

Customizing Your Homepage

By default, many WordPress themes come with a built-in template to display a static page as your website’s front page. However, you’ll still need to set it up under Appearance » Customize.

Theme customizer

Some WordPress themes also allow you to choose a homepage template for your page. If your theme comes with such a template, then you can select it by editing the Home page.

Selecting a page template

Finally, you can use a WordPress page builder plugin to use simple drag and tools to create your homepage from scratch.

We recommend using Beaver Builder as it is the best WordPress WordPress page builder plugin on the market. It is super-easy to use, includes ready-made templates, and super-flexible to create any layout you want.

Editing homepage in Beaver Builder

For more details, see our tutorial on how to create a how to create a custom home page in WordPress.

Customize Your Blog Page Design

By default, WordPress automatically looks for a template in your WordPress theme to display posts on a separate blog page.

If your theme does not have one, then it automatically falls back to the archive template. For more details, see our guide on the WordPress template hierarchy.

Now, if you don’t like how your theme handles your blog page, then you can change that using some extra tools and without writing any code.

First, you will need to install and activate the Beaver Builder and Beaver Themer plugins. For more details, see our step by step guide on how to install a WordPress plugin.

Beaver Themer is an add-on plugin for Beaver Builder and enables you to not just create pages but entire new WordPress themes from scratch.

First, you need to visit Beaver Builder » Themer Layouts page and click on the Add New button.

Themer Layout

From here you can provide a name for your layout, select ‘Themer Layout’ as your type, and then select Archive as your layout.

This will create a themer layout for the archive templates. On the next screen, you need to select ‘Post Archive’ for location option and then click on the ‘Launch Beaver Builder’ button.

Launch Beaver Builder

This will open the Beaver Builder with your selected layout. You can simply point and click at any item on the screen and start editing it. You can also add new rows, columns, and web elements to the page.

Editing your blog posts layout in Beaver Builder

For more details, see our guide on how to create a custom WordPress theme (without coding).

Once you are finished editing, you can simply publish your layout. After that, visit your blog page to see it in action.

Blog page template

We hope this article helped you create a separate page for blog posts in WordPress. You may also want to see our guide on how to increase blog traffic and our list of must have WordPress plugins.

If you liked this article, then please subscribe to our YouTube Channel for WordPress video tutorials. You can also find us on Twitter and Facebook.

The post How to Create a Separate Page for Blog Posts in WordPress appeared first on WPBeginner.

How to Use Cookie Retargeting in WordPress to Show Custom On-Site Messages

Do you want to use cookie retargeting in WordPress?

Cookie retargeting is the secret tool already used by many of the most popular websites. It allows you to show custom on-site messages to your users based on their past behavior which helps you boost sales.

In this article, we’ll show you how to use cookie retargeting in WordPress to show custom on-site messages and boost conversions.

How to use onsite cookie retargeting in WordPress

What is Cookie Retargeting?

Cookie retargeting is a marketing technique where websites use cookies to track user behavior and offer a personalized experience.

There are two types of cookie retargeting techniques.

First, there is off-site cookie retargeting. This method is used to track user activities across the web.

Facebook pixel and Google remarketing are two of the most popular advertising programs that allow you to use their massive reach and show targeted ads to people who visit your website.

Secondly, you have on-site cookie retargeting, which allows you to show targeted messages to users based on how they interact with your WordPress website.

What are cookies?

Cookies are small text files containing pieces of data. Websites set cookies in users’ browsers to store temporary information such as login status, user preferences, session details, and more.

How to Use On-Site Cookie Retargeting to Boost Conversions?

There are a number of ways website owners use on-site retargeting messages to boost conversions and increase sales.

For instance, eCommerce stores can show custom offers to users based on how they interact with other offers. This allows you to create a dynamic sales funnel that leads users to make a purchase.

Another use-case scenario would be lead generation. With on-site retargeting, if a user closes one sign-up form, then you can show them a different message with another offer.

On-site retargeting messages are highly effective because:

  • It shows personalized messages to users at a time when they are already engaged with your website.
  • Allows you to create customized campaigns that get better with each user interaction until they convert
  • You save money on paid advertising campaigns by utilizing your existing website traffic to the max

That being said, let’s take a look a how to use cookie retargeting in WordPress.

Creating On-Site Retargeting Campaign in WordPress

The best way to create on-site retargeting messages is by using OptinMonster. It is the best conversion optimization and lead generation software in the world.

You can use it to easily create attention-grabbing signup forms, popups, welcome mats, in-line offers, custom offers, and more.

First, you need to signup for an OptinMonster account by visiting the website and clicking the ‘Get OptinMonster Now’ button. You’ll need at least their Pro plan for cookie retargeting and Growth plan for follow-up campaigns.

OptinMonster

Next, you’ll need to install and activate the OptinMonster plugin. For more details, see our step-by-step guide on how to install a WordPress plugin.

This plugin acts as a connector between your WordPress site and the OptinMonster app.

Upon activation, you will see the welcome screen. Simply click the ‘Connect Your Existing Account’ button.

Connect your existing account

Next, a new window will open, where you’ll need to sign in to your account and connect your website with OptinMonster.

Go ahead and click the ‘Connect to WordPress’ button.

Connect OptinMonster to WordPress

Now, you’re ready to create a new campaign.

First, you’ll need to go to OptinMonster » Campaigns from your WordPress admin panel and then click the ‘Create Your First Campaign’ button.

Create first OptinMonster campaign

This will take you to the OptinMonster website, where you’ll be asked to choose a campaign type and a template.

You can choose any campaign type or template, but for this tutorial, we’ll be creating a lightbox popup.

Choose a campaign type and template

You can select any template that you’d like to use for your campaign.

Next, you’ll be asked to provide a name for your campaign and click the ‘Start Building’ button.

Click start building

After that, you’ll enter the drag-and-drop campaign builder interface.

It is a powerful design tool where you can simply point and click on any item to edit it. You can also add new items like buttons, images, columns, and more to your popup campaign.

Edit your onsite targeting campaign

Next, you can switch to the ‘Display Rules’ tab at the top.

Here, OptinMonster will give you different options for displaying your onsite targeting campaigns.

Select display rules

For instance, you can show the popup after users spend a certain time on the page, are from a particular location, or are about to exit your website.

By default, OptinMonster will show your campaign after a visitor spends at least 5 seconds on the site. Plus, it appears on all the pages.

Set up display rules

Once you are satisfied, simply switch to the publish tab.

Next, you’ll need to make your campaign live by changing its status from Draft to Publish. Don’t forget to click the ‘Save’ button when you’re done.

Publish your onsite targeting campaign

Now by default, OptinMonster will show this campaign to all users who visit your website. Users will be able to close the popup or perform their desired action.

Creating a Retargeting Campaign to Show Custom Messages

Now that you have launched your first campaign, let’s add another campaign using the follow-up retargeting feature.

Click on the create new campaign button in the OptinMonster dashboard and select your campaign type and template. Since we have used a lightbox popup, we’ll be using a ‘Floating bar’ as our retargeting campaign.

Choose a floating bar template

After selecting a template, you’ll enter your campaign name.

Then simply click the ‘Start Building’ button to continue.

Click start building

After that, you’ll enter the OptinMonster builder where you can design your campaign using simple drag-and-drop tools.

You can edit the optin text, adjust the countdown timer to generate FOMO, add a coupon, and so much more.

Edit the floating bar campaign

Once you are satisfied with the design, it is time to select which users you want to show this custom message to.

Simply switch to the Display Rules tab at the top of the builder. OptinMonster offers a ton of display rules that you can choose from. You can also add multiple rulesets.

Choose has closed display rule

Next, under the If menu, go to the ‘Personalization’ display rules options and select Has Closed.

After that, select ‘Campaign’ and then select your previous campaign.

Select previous campaign

Next, you need to switch to the ‘Publish’ tab.

Here, simply change your campaign status from Draft to Publish under ‘Publish Status.’ Once that’s done, simply click the ‘Save’ button and exit the campaign builder.

Publish has closed campaign

You can now visit your website in the incognito browser tab to see your campaign and the follow-up retargeting message.

Adding Cookie Retargeting with Custom Messages

Cookie retargeting allows you to show custom messages to users based on their previous actions, cart status, shopping history, and more.

This allows you to create promotions and upsells designed for customers at different stages of your sales funnel.

When customizing your campaign, simply switch to the ‘Display Rules’ tab.

Under the If menu, you can go to the ‘Targeting (Who)’ display rules options and select Cookie Targeting.

Select cookie targeting

Next, you’ll need to enter the cookie key and value. The key is the cookie name, and the value parameter is the contents of the cookie.

OptinMonster lets you select different operators to use for the display rule. These include options like match exactly, contain, exist, start with, ends with, and more operators.

For instance, if you are using WooCommerce, then you can use WooCommerce cookies to target users who have added products to their cart. This way, you can cross-sell items in their cart, reduce cart abandonment, and more.

Enter cookie key and value

After adding cookie retargeting rules, go to the ‘Publish’ tab.

From here, simply change the Publish Status from Draft to Publish for your campaign.

Publish has closed campaign

OptinMonster will now display your custom message based on the cookie-targeting rules you have set.

We hope this article helped you learn how to use cookie retargeting in WordPress to show custom on-site messages. You may also want to see our guide on how to recover abandoned cart sales in WooCommerce as well as our comparison of the best live chat software for websites.

If you liked this article, then please subscribe to our YouTube Channel for WordPress video tutorials. You can also find us on Twitter and Facebook.

The post How to Use Cookie Retargeting in WordPress to Show Custom On-Site Messages first appeared on WPBeginner.

61 Best Free WordPress Blog Themes for 2020

Are you looking for a free WordPress blog theme for your website?

There are thousands of free blog themes for WordPress making it harder for beginners to choose one for their sites. These blog themes are further divided into different niches and categories.

In this article, we have hand-picked some of the best free WordPress blog themes that you can use on your new blog.

Best free blog themes for WordPress

Getting Started with WordPress

First, you need to make sure that you are using the right platform. Self hosted WordPress.org site is the perfect platform to start your blog because it gives you more freedom, flexibility, and control.

It is open source and comes with support for thousands of free templates and extensions that help you grow your blog faster. See our guide on why you should use WordPress for more details.

You can use our step by step beginner’s guide on how to start a WordPress blog for full instructions.

Once you are up and running, it is time to choose a theme for your website. You can choose a theme from our expert selection below and then follow the instructions in our how to install a WordPress theme guide to set it up properly.

Having said that, let’s take a look at some of the best free WordPress blog themes that you can install on your website.

1. Astra

Astra

Astra is a fully customizable and free WordPress blog theme. It’s well suited for personal blogs, portfolios, business blogs, and even eCommerce websites. It works perfectly with all the popular page builders, including Beaver Builder, Divi, Elementor, etc.

It comes with built-in support for WooCommerce to easily add an online store to your blog if needed. It is also translation-ready and can be used to make blogs in any language.

It is a lightweight theme with tons of colors options and fonts. You can find the theme options in the WordPress customizer with live preview.

2. OceanWP

OceanWP

OceanWP is one of the most popular free WordPress themes with tons of premium-like features. It has its own companion plugin and recommends installing a free page builder plugin upon activation. It can be used for any kind of website, including blogs, magazines, business website, or an eCommerce store.

It includes multiple layout choices, fullwidth pages, 2 navigation menus on the top, custom logo support, multiple sidebar areas, beautiful image galleries, and more. It is super flexible but still very easy to set up with live customizer support.

3. Hestia

Hestia

Hestia is a highly flexible free WordPress theme for all types of websites. It comes with an easy setup wizard and a companion plugin which adds testimonials and services section to your website.

It can be used with popular page builder plugins and is ready for WooCommerce out of the box. The homepage can be easily set up using the live theme customizer where you can just add sections and rearrange them with drag and drop.

4. Bento

Bento

Bento is a powerful multi-purpose WordPress blog theme with tons of features. It works great with the most page builder plugins and even recommends installing one upon activation.

For a free WordPress theme, Bento comes packed with great customization options. All of them can be accessed using the WordPress theme customizer.

5. Go

Go

Need a blog theme with a minimalist approach to design? Checkout Go. It is a simple WordPress blog theme with a welcome message and call-to-action buttons in the header.

Designed to improve readability it uses clean typography and elegantly handles featured images.

6. Ribosome

Ribosome

Ribosome is a magazine-style free WordPress blog theme. It comes with a custom header, custom background, and unlimited colors. It has a single navigation menu and a social menu on the top.

It comes with a 2-column layout with a sidebar on the right. Ribosome has six different Google Fonts, round or square thumbnails, 2 widgets areas at beginning and end of posts, perfect for displaying ads or related posts.

7. Poseidon

Poseidon

Poseidon is a free multi-purpose WordPress blog theme. Featuring a spacious layout, it comes with a full-width slider, homepage layout, and multiple page templates.

The homepage layout can be easily set up using widgets.

8. SiteOrigin Unwind

Unwind

SiteOrigin Unwind is a free multi-purpose WordPress theme with full WooCommerce support. Designed with a minimalist style, Unwind is highly customizable using SiteOrigin Page Builder plugin.

It comes with multiple layouts, custom header, background, and color support.

9. Hemingway

Hemingway

Hemingway is a clean WordPress blog theme featuring a 2-column layout and a full-width header image area with parallax effect.

It supports custom accent color, custom logo upload, custom widgets (video, Flickr, and Dribbble), page templates, etc. All theme options are quick and easy to set up.

10. Maxwell

Maxwell

Maxwell is a minimalistic and elegant WordPress theme. It features a clean magazine-style layout with beautiful typography.

Other notable features include various post layouts and a gorgeous featured posts slideshow.

11. Writee

Writee

Writee is a free WordPress theme suitable for personal websites, adventure, and travel blogs. It features a large slider on top using featured images from blog posts.

It also comes with multiple templates and custom widgets among many other features.

12. Fascinate

Fascinate

Fascinate is a beautiful WordPress blog theme designed specifically for professional writers, personal portfolios, lifestyle blogs, and fashion businesses.

It uses beautiful typography, elegant color schemes, and an eye-catching featured slider.

13. Moderne

Moderne

Moderne is an elegantly crafted WordPress blog theme. It is designed with readability in mind and creates a visual appearance that puts your content at the center.

It comes with a featured content carousel slider on the homepage, and a 2-columns layout showing your content beautifully.

14. Kent

Kent

Kent is a modern WordPress blog theme with a 2-column layout. It comes with a collapsible navigation menu, custom logo, custom background, and header support.

All theme options are quite easy to set up using the live WordPress customizer.

15. Lovecraft

Lovecraft

Lovecraft is a clean and simple free WordPress blogging theme. It features a full-width custom header at the top and uses bold headlines for post titles.

It comes with a left sidebar and one navigation menu at the top.

16. Baskerville

Baskerville

Baskerville is a modern and stylish WordPress blog theme. It features a large full-width header image followed by your posts presented as a grid on the homepage. It comes with gorgeous templates for single posts and pages.

17. Admiral

Admiral

Admiral is a magazine-style WordPress theme suitable for sports blogs, magazines, and news websites. It features a three-column layout with 2 sidebars on both sides and the content column in the middle.

It comes with a featured posts slideshow, a magazine homepage template, a widgetized header area, 2 different post layouts, and support for infinite scroll.

18. Shapely

Shapely

If you are looking for a WordPress blog theme with a fullscreen background, then try Shapely. It comes in a 1-column layout with several homepage widgets, parallax sections, and call-to-action buttons.

The theme supports popular WordPress plugins that you need to maximize the functionality of your blog. It’s fully optimized for SEO.

19. Ashe

Ashe

Ashe is a beautiful free blog theme for WordPress. It has a magazine-style layout with a large header image and a featured content slider.

It integrates with popular page builders like Beaver Builder, Elementor, and more for easy customization.

20. Hiero

Hiero

Hiero is a free WordPress blog theme with a magazine layout. It uses bold colors for header and accent. It features a 2-column layout and has a clear navigation menu on top.

The homepage displays your latest posts with excerpts and featured images.

21. Tracks

Tracks

Tracks is a thoughtfully designed WordPress blog theme for personal, magazines, and photography websites. It includes a logo uploader, social media icons, search bar, widget-ready areas, and crisp typography.

The homepage features a grid layout of your posts with featured images.

22. Mesmerize

Mesmerize

Mesmerize is a colorful WordPress blog theme. It is highly flexible and uses over 30 content sections to showcase your blog content.

It supports video background, slideshow background, header content types, and gradient overlay on the homepage.

23. The Columnist

The Columnist

The columnist is a free WordPress blog theme featuring a magazine-style look. It comes with different layouts for homepage, archives, single pages, bbPress, and BuddyPress.

It also includes a responsive customizable slider and four color schemes.

24. Satori

Satori

Satori is a highly customizable WordPress theme for blogs and personal websites. It features a full-width header on the homepage and comes with different page templates, including support for WooCommerce, multiple widget-ready areas, and post formats.

25. Phlox

Phlox

Phlox is a highly customizable free WordPress blog theme. It has a beautiful homepage layout with a fullscreen header background image on top and featured content below.

It comes with multiple widget-ready areas, page templates, custom headers, backgrounds, social icons, and color schemes.

26. Illdy

Illdy

Illdy is a multi-purpose WordPress theme suitable for business, personal, and magazine websites. It is built on bootstrap framework, features large header images, 2-column or full-width layout, custom background, and color selection.

27. Primer

Primer

Primer is a simple and clean WordPress blog theme. It features a classic blog layout with a content column and a right sidebar.

It has a fullscreen header image with a custom logo, a navigation menu, and a call-to-action button to redirect users to your landing page.

28. Blog Diary

Blog Diary

Blog Diary is a multi-purpose WordPress blog theme featuring a beautiful black and white layout. It has unlimited color choices, crisp typography, and custom widgets.

The theme supports the Gutenberg block editor out of the box.

29. Garfunkel

Garfunkel

Garfunkel is a stylish WordPress blog theme featuring a grid layout on the homepage. It supports custom headers, custom backgrounds, six post formats (including a gallery slideshow), six custom widgets, a social menu, and 2 page templates.

30. Author

Author

Author is a beautiful WordPress blog theme for authors and writers. It features a simple 2-column layout with a sidebar and navigation menu in the left column while content on the right.

It supports custom colors, background, and multiple post formats. It is optimized for accessibility and performance.

31. Tempo

Tempo

Tempo is a modern WordPress blogging theme that can be easily used as a business website as well. It features clean crisp typography with a bright breezy layout.

It supports custom header, parallax, header buttons, custom logo, custom colors, custom background, social links, left and right sidebar, and custom widgets.

32. Hueman

Hueman

Hueman is one of the most popular free WordPress themes. It comes with a multi-column layout and can be easily used on any kind of content-rich blog or magazine website.

You also get support for custom headers, 2-column layout, full-width layout, and tons of easy customization options.

33. iFeature

iFeature

iFeature is a modern and stylish WordPress theme suitable for magazines, business, personal, and portfolio websites. It features a full-width background image and a slider on top followed by your content.

It includes features like sticky headers, author bio box, multiple widget areas, and page templates. The theme options can be easily set up using drag and drop in the live customizer.

34. Natural Lite

Natural Lite

Natural lite is a simple blogging theme with earthy tones. It uses large featured images, supports custom header, and background.

It comes with multi-column layouts and easy customization options.

35. Responsive

Responsive

Responsive is a beautiful WordPress theme designed for flexibility. It is suitable for authors, personal websites, photography, and even business websites.

It comes with 9 page templates, 11 widget areas, 6 template layouts, 4 menu positions, and more. Responsive is WooCommerce compatible, multilingual ready, and supports all RTL-languages.

36. Virtue

Virtue

Virtue is a beautiful and free WordPress blog theme. It has a clean layout with 2 navigation menus and a large full-width header image.

All the theme options are easily customizable using the live theme customizer. It also comes with multiple post formats for videos, gallery, audio, chat, aside, quote, etc.

37. Otography

Otography

Otography is a classic WordPress free blog theme. It has a beautiful large size image slider with social icons, navigation menu, and eye-catching colors.

It includes typography options and easier theme setup with drag and drop settings under live customizer. It is an ideal theme for personal, blog, magazine, photography, and fashion websites.

38. Ignite

Ignite

Ignite is a stylish WordPress blog theme featuring a classic blog look. It comes with a 2-column layout, a compact top bar used for navigation menus, site title, and description.

It uses medium size featured images before post titles and utilizes crisp typography for better reading experience on your blog.

39. Avant

Avant

Avant is a highly customizable and free WordPress theme suitable for all kind of websites. It is ready for eCommerce with full WooCommerce support and can be easily used to create content-rich websites as well.

It includes 7 header layouts, 5 blog layouts, 3 footer layouts, unlimited color choices, and lots more settings all built neatly into the WordPress customizer. It is tested to work with all popular page builders and other essential WordPress plugins.

40. Responsive Mobile

Responsive Mobile

As the name suggests, Responsive Mobile is a WordPress theme designed with a mobile-first approach. It looks equally great on all devices and screen sizes.

This theme features 9 page templates, 11 widget areas, 6 template layouts, 4 menu positions, call-out section with a call to action button, custom fonts, custom background image, and more. Suitable for business websites, it is very easy to use and can be quickly set up.

41. Vogue

Vogue

Vogue is a stylish WordPress theme designed specifically for fashion, lifestyle, and eCommerce websites. It comes with full WooCommerce support and allows you to set up an online store easily.

It offers multiple header layouts, custom WooCommerce design, multiple footer layouts, multiple blog layouts, and a bunch of extra layout customization. It has unlimited color settings all built neatly into the WordPress customizer.

42. Magbook

Magbook

Magbook is a beautifully designed WordPress theme for content-rich websites, including magazines, newspapers, blogs, and more. It features a clean minimalist design with multiple layout choices and a quick 1-click demo installer.

It comes with ready-to-use templates for contact us, gallery, and magazine pages. Tested with all popular WordPress plugins, Magbook can also be used to create an online store or a multilingual WordPress site.

43. Panoramic

Panoramic

Panoramic is another excellent free WordPress theme suitable for all kinds of blogs, websites, and online stores. It comes with flexible customization options and a beautiful homepage slider.

It is very easy to use even for absolute beginners. You can find the theme options under live customizer which allows you to make changes to your site with a live preview.

44. Conica

Conica

Conica is a super-flexible WordPress multi-purpose theme that can be used to build almost any kind of website. It includes 2 site layouts, 2 color schemes, 4 header layouts, 5 blog layouts, 3 footer layouts, multiple page templates, and a bunch of theme options to customize your colors and layouts settings.

45. CityLogic

CityLogic

CityLogic is a premium-like free WordPress theme suitable for all kinds of sites, including small business websites. It features a modern design with a large header on the homepage, a transparent navigation menu, a welcome message, and your most important content.

It also comes with a built-in slider and can be used with other slide plugins as well. It is WooCommerce ready and can be used to create beautiful online stores.

All the theme options are quite easy to follow and allow you to easily customize it to your requirements.

46. Agama

Agama

Agama is a clean and spacious free WordPress theme suitable for all kind of websites. It is super-flexible and comes with simpler theme options allowing you to quickly set it up.

It is built on Bootstrap with parallax support, responsive design, and minimal layout. It is WooCommerce ready and can also be used to create multilingual websites.

47. Fury

Fury

Fury is a simple WordPress theme with a minimal design and layout. It works out of the box and has very easy to use theme options. It is built on Bootstrap with responsive design and fast performance.

It includes a sticky header, unlimited colors, blog page template, a smooth scroll effect, and more. It is WooCommerce ready and can be easily used with any WordPress page builder.

48. Ascend

Ascend

Ascend is a beautiful WordPress multi-purpose theme. It comes with support for the upcoming Gutenberg feature which adds drag and drop block editing features to WordPress. It also supports all popular page builder plugins.

Inside you will find tons of useful options all of which are neatly organized under theme customizer. It also includes a transparent header, multiple navigation menus, sidebars, color options, and more.

49. Wisteria

Wisteria

Wisteria is a simple WordPress blog theme with a focus on beautiful typography and content. It comes with a custom background, custom colors, custom header, and a left sidebar.

Wisteria also has a single navigation menu on top and beautiful homepage design that shows your posts with custom excerpts and featured image.

50. Blogasm

Blogasm

Blogasm is a simple free blog theme for WordPress. It features a minimalist and clean design with a focus on your blog posts. This theme can be used to create a personal, fashion, lifestyle, and photography blog.

It comes with a header social menu, header search icon, column layout, custom header, and sidebar. All the theme options are easy to set up using the live theme customizer.

51. The Writers Blog

The Writers Blog

The Writers Blog is a free multi-purpose WordPress theme designed specifically for writers, bloggers, journalists, authors, and content-savvy blogs. It comes with an image slider to impress the visitors in the first look.

It allows you to select a color scheme of your choice. It is easy to set up, responsive, and fully customizable WordPress theme.

52. Blogstart

Blogstart

Blogstart is the perfect theme to start your blog right away. It is free to download with a clean and simple layout design that can engage your users with its features.

It lets you display featured posts alongside the navigation menu. Blogstart is optimized for page load speed and performance.

53. Creativ

Creativ

Creativ is a modern free WordPress blog theme. It has a full-width boxed frame layout for the header with an image slider, navigation menu, search bar, and social menu.

It features a custom logo in the middle of the header section. It has blurbs for landing pages on the homepage.

54. Blogger Era

Blogger Era

Blogger Era is a well-thought free blog theme for WordPress. It is suited for an online magazine, personal blog, publisher, news, or portfolio site. It has an about section for you to add an image and excerpt in the sidebar.

It offers a centralized layout to post your content. This theme is fully responsive and translation ready to create a multilingual website.

55. Queens Magazine

Queens Magazine

Queens Magazine is a user-friendly free WordPress blog theme built for bloggers and online magazines. It has a lot of space for your content. With the 3-column layout, you can display multiple featured posts in the first fold of your blog.

It comes with custom settings for logo and tagline. Queens Magazine theme offers multiple sidebars and footers to give you a layout variety.

56. Balanced

Balanced Blog

Balanced is a clean and responsive WordPress blog theme. It has a custom logo with a full-width header background on the top.

The theme has 2-column layout and cross style for posts. You can use the WordPress widgets in the sidebar. It is SEO optimized and supports WPML for translations.

57. Infinity

Infinity

Infinity is a minimalist and free blog theme. It has bold colors for borders and background well-suited for small businesses, creative agencies, etc.

The homepage follows a navigation menu on top with social icons. It allows you to add a custom logo with a tagline.

58. Interserver

Interserver

Interserver is a beautiful free mommy blogger theme for WordPress. It is fully customizable with many options at the admin backend for blog layout and landing pages.

You can add the image slider and categories on the homepage. It has beautiful colors and design for the entire blog.

59. Journal

Journal

Journal is a stylish free WordPress blog theme for personal journals and all types of bloggers. It has stunning typography and beautiful layout design.

It offers a space to add your short bio on the homepage. Journal is a fully responsive and search engine friendly theme.

60. Bold Photography

Bold Photography

Bold Photography is a modern and free blog theme for photographers, writers, and authors. The homepage has a fullscreen background image slider that you can replace with your most popular or featured photos.

It has custom widgets, color choices, parallax sections, and more. Bold Photography has a fast page load time and lazy load images to perform better than usual.

61. Sparker

Sparker

Sparker is a lightweight free WordPress blog theme. This theme can also be used to create small business websites and online stores.

It features custom widgets, beautiful slider section, featured post column, footer options, and ad spaces. It is easy to use and optimized for SEO.

We hope this list helped you find the best free WordPress blog themes for your website. You may also want to check out this guide on why you must avoid nulled WordPress themes and plugins and our pick on the best email marketing services.

If you liked this article, then please subscribe to our YouTube Channel for WordPress video tutorials. You can also find us on Twitter and Facebook.

The post 61 Best Free WordPress Blog Themes for 2020 appeared first on WPBeginner.

How to Easily Create a Multilingual WordPress Site

Do you want to translate your WordPress site in multiple languages?

WordPress powers more than 35% of all websites on the internet. Many of them serve non-English or multilingual audiences.

In this article, we will show you how to easily create a multilingual WordPress site. We will cover three different solutions, so you can choose the one that works best for you.

With each solution, you’ll be able to easily translate your WordPress posts, pages, tags, categories, and themes into as many languages as you like.

Creating a multilingual WordPress site

What is a Multilingual WordPress Website?

A multilingual WordPress website serves the same content in multiple languages. It can automatically redirect users to a language based on their region, or users can select their preferred language using a dropdown link.

There are few different approaches used to create a multilingual website.

The first approach allows you to manually translate all the content into languages of your choice with the help of human translators.

The second method does not actually create a multilingual site but uses machine translations of your existing content by using auto-translate services.

However, Google Translate has stopped supporting new accounts for website translation. The other options are either not-free or not very good in quality.

It goes without saying that manually translating your content is a much better approach. This allows you to maintain quality throughout your website. You can translate the content yourself or hire professionals to do that.

Choosing a WordPress Multilingual Plugin

There are several WordPress plugins that you can use to translate your website into multiple languages. You need to choose a plugin that helps you easily manage translations without making things unnecessarily difficult for your users.

In this guide, we will show you three of the top WordPress multilingual plugins with step by step instructions on how to set them up.

If you know which plugin you are going with, then you can directly jump to the instructions.

  1. TranslatePress
  2. WPML
  3. Polylang

All three of them comes with the necessary features you’ll need to make a robust multilingual website.

  • They allow you to translate posts, pages, products, and other post types
  • You can easily translate your categories, tags, plugins, and themes
  • They allow you to set up SEO friendly URLs for each language

With that said, let’s get started.

1. Create Multilingual WordPress Website Using TranslatePress

TranslatePress is one of the best WordPress translation plugins on the market. It is a bit different than other solutions mentioned in this guide.

Normally, multilingual plugins ask you to create multiple versions of the same article in order to translate it. TranslatePress allows you to create translations at the same time.

It also allows you to use a live editor to translate all the visual aspects of your website.

Most importantly, you can combine machine and human translations. This means you can use Google Translate or similar AI-powered tools to generate machine translations and only improve the parts that artificial intelligence missed.

The first thing you need to do is install and activate the TranslatePress plugin. For more details, see our step by step guide on how to install a WordPress plugin.

If you want to translate your website to more than one language, then you will also need to install ‘Extra Languages’ add-on. You can do this from the download addons button under your account on the TranslatePress website.

Download addons

After downloading the add-on, you can install and activate it like any other WordPress plugin.

Upon activation, you need to visit Settings » TranslatePress page to configure plugin settings.

Add license

First, you need to switch to the license tab and enter your license key. You can find this information under your account on the TranslatePress website.

After that, you need to switch to the General settings tab to set up other settings.

TranslatePress settings

The first option on the page is to choose the default language of your website, and the languages you want to translate your website into.

Next, you need to choose whether you want to display language names in the native language. The default option is ‘No’ which means language names will be shown in the default language.

After that you need to choose whether you want to display the default language name in the URL as a subdirectory. For example, http://example.com/en/.

The default choice is no which means only the other languages will have the language name in URL as a subdirectory. We recommend leaving this setting as-is for best SEO.

TranslatePress settings

This brings you to the next setting, ‘Force language in custom links’. The default option is ‘Yes’, because that will change custom links for translated languages making the URLs more SEO friendly.

Next, you need to choose whether you want to use Google Translate for automatic translations. The default choice is ‘No’, but you can change that if you would like to use Google Translate.

You will need to provide a Google Translate API key in the next option. You will find a link under the option which will show you instructions on how to get one.

Finally, you will come to the options on how you want to display the language switcher on your website. TranslatePress provides you with three choices.

You can use a shortcode, add switcher to your navigation menu, or display a floating menu. We will show you how to add the language switcher to your website later in this article.

Go ahead and click on the ‘Save Changes’ button to store your settings.

Translating Your Website Content

To translate your website, you can simply click on the ‘Translate Site’ tab on plugin’s settings page or the button in your WordPress admin bar.

Translate site button

This will open the live translation editor in a new browser tab.

In this live editor, you can click on any text on your website in the right pane and TranslatePress will load it in the left column to translate.

Translating site in TranslatePress

Now click on the language you want to translate the string into and then provide your translation.

After entering the translation, click on the ‘Save Translation’ button on the top and then click on the next button. TranslatePress will automatically load the next string on the page for you to translate.

You can also just click on the drop-down menu below your default language, and it will show you the list of translatable text strings on the page. You can select a string and then provide its translation.

Select and translate strings on a page

You can translate all content on any page. This includes navigation menus, buttons, sidebar widgets, meta text, and more.

You can also visit any page by clicking on the links on the screen and start translating that page.

TranslatePress allows you to instantly start translating any page or post on your site when logged in. Simply click on the ‘Translate Page’ button on the top to enter the live editor.

Start translating any page

Once you have translated a string, the plugin will automatically translate it for you on other places. For example, if you translated a post title, then the post title in your sidebar widgets will be automatically translated.

Adding Language Switcher to Your Website

Language switcher allows your website visitors to select a language when they visit your website. It usually displays the flag of each country to indicate languages available on your site.

TranslatePress allows you to add language switcher by using a shortcode, as a navigation menu item, or as a floating banner. The language switcher can be displayed as flags, language names, or both.

Adding language switcher in WordPress using shortcode

You just need to add [language-switcher] shortcode to posts, pages, or a sidebar widget where you want to display the language switcher.

Shortcode switcher

Adding language switcher to your WordPress navigation menu

Simply go to Appearance » Menus page and click on the ‘Language Switcher’ tab in the left column. Now select the languages you want to display and then click on add to menu button.

Adding language switcher to WordPress navigation menus

You will now see languages added to your WordPress navigation menu. Don’t forget to click on the ‘Save Menu’ button to store your changes.

This is how it looked on our test site:

Language switcher in navigation menu

Adding a floating language switcher

Go to plugin’s settings page and scroll down to language switcher section. From here make sure the box next to the ‘Floating language selection’ option is checked.

Floating language switcher

Don’t forget to click on the save changes button to store your settings.

You can now visit your website to see the floating language switcher at the bottom of every page on your website.

Floating language switcher

2. Create Multilingual WordPress Website Using WPML

WPML (short for WordPress Multi-lingual) is one of the oldest and most popular WordPress multilingual plugin.

First thing you need to do is install and activate the WPML (WordPress Multi-language) plugin. For more details, see our step by step guide on how to install a WordPress plugin.

Upon activation, the plugin will add a new menu item labeled ‘WPML’ in your WordPress menu. Clicking on it for the first time will take you to plugin’s settings wizard.

WPML Setup - Choose primary language

WPML will automatically detect your WordPress site’s language. You can change it here now if you want.

After that click on the next button to continue.

On the next screen, you will be asked to select the languages you want to enable on your site. Simply select the languages from the list that you want to add to your site.

WPML select languages

You can always add or remove languages later if you need them. Once you have selected the languages, click on the Next button.

Now you will be asked to add a language switcher to your site. This language switcher will allow your users to choose a language to view content in their preferred language.

WPML language switcher

WPML allows you to automatically add content switcher as a sidebar widget, in your navigation menu, a plain list, or in the footer area.

Next, you will be asked if you like to send a compatibility report to WPML regarding the plugin and themes you are using.

WPML compatibility report

It is up to you to decide whether or not you want to send this data to WPML.

As the final step, you will be asked to enter your site key. If you have not generated one yet, then you can click on ‘Generate a key for this site’ button.

WPML site key

This will take you to the WPML website, where you will be asked to add the site you are coming from to your WPML account.

Once your site is added, you can click on it to get to your site key. Copy and paste this key into your WordPress site.

That’s all you have successfully finished the WPML setup wizard. You can now click on the Finish button to exit the setup.

Adding Multilingual Content into WordPress with WPML

WPML makes it really easy to translate every area of your WordPress site into multiple languages.

You will be able to easily translate your WordPress posts, pages, tags, categories, and themes into as many languages as you like.

Adding Multilingual Posts and Pages

Simply click on the posts menu to view your existing posts. You will notice the language column next to your post titles.

WPML translate posts and pages

WPML assumes that your existing content is in your site’s primary language. It will show Add buttons for each language next to your posts. Click on the add button under a language to translate a post.

You can also manage translations by editing a post.

On the post edit screen, you will notice the new ‘Language’ meta box to manage translations.

Managing translations while editing a post

WPML also offers a better way to manage users who work as translators on your website. If you purchase their Multilingual CMS Plan, then you can use their translation management module.

The translation management module allows you to add users as translators regardless of what role they have on your WordPress site. You can even add subscribers as translators.

Adding translators
Instead of editing posts, these translators will be able to add translations directly in WPML.

Adding Translations for Categories and Tags

WPML allows you to easily translate categories and tags, or any other custom taxonomies that you may be using.

Visit WPML » Taxonomy Translation and load the custom taxonomies you want to translate.

For example: in this screenshot we selected categories, and it displayed all categories from our example site.

Translate categories and tags

Click on the add button next to the taxonomy term to add the translation.

Translating Navigation Menus

WordPress comes with a robust navigation menu system. WPML allows you to translate it just like you would translate posts or taxonomies.

Visit Appearance » Menus page on your site. If you have more than one menus, then select the menu you want to translate.

In the right-hand column, you will see your menu with links to translate into other languages enabled on your site.

Translate Menus in multilingual WordPress

Clicking on a language will create a new menu for that language. You will need to add the same menu items as in your primary language menu.

If you have your posts and pages in navigation menus, then you will first need to translate them. After that, you can add them from the tabs on the left in edit menu screens.

Don’t forget to click on the Save button to save your menu.

Translating Themes, Plugins, & Other Text with WPML

WPML multilingual CMS allows you to choose between official translations of themes and plugins or use its own string translator.

Go to WPML » Themes and plugins localization page.

WPML themes & plugin translations

By default, WPML will look for your plugin’s translation files if they are available, and use them.

However, if your WordPress theme or WordPress plugins are not translated into the languages you are using, then you can translate them using the WPML string translation feature.

WPML string translations

Simply scan your theme or plugin to load the strings and then start translating those strings.

This module will also allow you to translate custom fields, widgets, and other translatable strings generated by WordPress.

3. Create Multilingual WordPress Website Using Polylang

Polylang is a free WordPress multilingual plugin with more than 500,000 active installs. It allows you to easily create a multilingual website without purchasing the premium version.

Note: If you are running WooCommerce or need support, then you may want to upgrade to the Polylang Pro or purchase their WooCommerce addon.

For this tutorial, we’ll be using the free version of the plugin.

The first thing you need to do is install and activate the Polylang plugin. For more details, see our step by step guide on how to install a WordPress plugin.

Upon activation, you need to visit Languages » Languages page to configure the plugin.

Adding languages

The language settings page is divided into three tabs. The first tab is labeled ‘Languages’. This is where you add the languages you want to use on your site.

You will need to add the default language, as well as select all other languages that users can choose on your site.

After adding the languages, switch to the ‘Strings Translations’ tab. Here you need to translate site title, description, and then choose the date and time format.

Translate website title, description, and date format

Next, you need to visit Languages » Settings page. From here you can set the URL settings for languages and set up SEO friendly URLs.

Polylang settings

Once you are done, click on the save changes button to store your settings.

Translating Content in WordPress with Polylang

Polylang makes it super easy to add content in different languages. Simply create a new post/page or edit an existing one. On the post edit screen, you will notice the language meta box.

Adding multilingual content in Polylang

Your default language will automatically be selected, so you can first add content in your default language, and then translate it into others.

To translate, you need to click on the + button next to a language and then add content for that language.

Polylang translations

Repeat the process for all languages. Once you are done, you can publish your posts and pages.

Translating Categories, Tags, and Custom Taxonomies

You can also translate categories and tags, or any custom taxonomies you may be using.

If you want to translate categories, then go to Posts » Categories.

Translating categories

Add a category in your default language and then click on the plus icon for each language to start adding translations.

Displaying Language Switcher on Your WordPress Site

Adding a language switcher allows users to select a language when viewing your site. Polylang makes it super simple. Just go to Appearance » Widgets and add the language switcher widget to your sidebar or another widget-ready area.

Polylang language switcher widget

You can choose a drop-down, or use language names with flags. Once you are done, click the save button to store your widget settings.

You can now preview your site to see the language switcher in action.

Language switcher preview

FAQs About Creating a Multilingual WordPress Site

Having helped thousands of beginners start their websites, we know a thing or two about making a multilingual website. Following are some of the top questions we have been asked about multilingual WordPress websites.

1. Which WordPress multilingual plugin is the best?

All three plugins mentioned in this guide are the best. However, they are slightly different in some aspects.

If you are a beginner looking for an easier solution then we recommend using TranslatePress. Its live editor makes translations easier.

Advanced users and eCommerce websites may find WPML more comprehensive for their needs. Lastly, if you are looking for a free solution, then Polylang is the best option for you.

2. How to translate my WordPress admin area for users?

WordPress allows each user on your website to select the admin interface language. They simply need to edit their user profile and there they will find the option to select language.

User language

3. How do I translate my WordPress theme?

All three plugins will allow you to automatically fetch theme translations. You can also find and translate a WordPress theme by yourself and then upload translation files to your website.

4. How do I translate a WordPress plugin

Many of the top WordPress plugins are translation ready. However, they may not be translated into all languages. TranslatePress and WPML allow you to easily translate strings within the plugin interface.

You can also translate WordPress plugins on your own and upload the translations to your website manually.

We hope this article helped you learn how to make a multilingual WordPress site like a pro. You may also want to see our guide on how to easily get more traffic to your website.

If you liked this article, then please subscribe to our YouTube Channel for WordPress video tutorials. You can also find us on Twitter and Facebook.

The post How to Easily Create a Multilingual WordPress Site appeared first on WPBeginner.

How to Add a FTP like File Manager in Your WordPress Dashboard

Do you want to add an FTP like file manager in your WordPress admin area? A file manager can help you edit WordPress configuration, themes, plugins, and other files right from your WordPress dashboard. In this article, we will show you how to easily add an FTP like file manager in WordPress.

Adding an FTP like file manager in WordPress

Why You Need an FTP like File Manager in WordPress?

A file manager in WordPress allows you to manage files on your WordPress website directly from your WordPress admin area. It works like a web-based FTP client allowing you to browse and manage files with a simple user interface.

Our recommendation is to always use an FTP client using SSH or SFTP protocols to securely transfer WordPress files.

However, a file manager is helpful when you don’t have access to FTP or cPanel of your website. It works similar to an FTP client, so you can edit, preview, upload, and download the WordPress configuration and other files.

That being said, let’s take a look at how to easily add an FTP like file manager in WordPress.

Adding a FTP like File Manager in WordPress

First thing you need to do is to install and activate the File Manager plugin. For more details, see our step by step guide on how to install a WordPress plugin.

Upon activation, the plugin will add a new menu item labeled ‘WP File Manager’ in the WordPress admin sidebar. Clicking on it will launch the file manager app, which will show your WordPress files and folders.

WP File Manager

You can find the settings in the toolbar above the files section. This toolbar is similar to the settings in an FTP client. It allows you to preview, edit, upload, download, and delete files or folders.

Toolbar

You can select a file and choose the option in the toolbar to perform an action.

The folders will work the same way as they do in any modern FTP client. You can click on any folder to open and view its contents.

Edit plugin files

You can edit any file using the toolbar menu option. It’ll open the file in a popup, so you can make changes and save it.

Edit file manager

If you don’t want to make changes in the file, then you can click on the preview option to see the code.

You can access the media files in the wp-content » uploads folder. The ‘Upload Files’ option in the toolbar allows you to upload multiple images in 1-click. You can also upload zip files and extract them in the file manager.

Extract zip file

That’s all. We hope this article helped you learn how to add a FTP like file manager in WordPress. You may also want to see our guide on useful WordPress configuration tricks that you may not know.

If you liked this article, then please subscribe to our YouTube Channel for WordPress video tutorials. You can also find us on Twitter and Facebook.

The post How to Add a FTP like File Manager in Your WordPress Dashboard appeared first on WPBeginner.

How to Add Social Media Icons to WordPress Menus

Do you want to add social media icons on your WordPress menu? While WordPress does not come with a social media profiles section, you can easily use WordPress navigation menus to add and display social media icons on any widget-ready area in WordPress. In this article, we will show you how to add social media icons to WordPress menus.

How to Add Social Media Icons in Menu

Why You Should Add Social Media Icons to Menus?

The biggest advantage of adding social media icons using WordPress menus is that you have the ability to change the order they appear in with a simple drag and drop interface.

While you can use third-party plugins to display social media icons in your sidebar, most of those solutions aren’t as flexible.

Aside from the easy drag & drop interface, when you add social media icons to WordPress menus, you can display it on any widget-ready area on your site including your sidebar, footer area, below posts, etc.

That being said, let’s take a look on how to easily add social media icons to WordPress menus.

Adding Social Media Icons to WordPress Menus

First thing you need to do is to install and activate the Menu Image plugin. For more details, see our step by step guide on how to install a WordPress plugin.

Upon activation, you need to visit Appearance » Menus page and create a new menu.

New social menu

Next, you need to add custom links for each social media channel separately in your new social menu.

You will notice that there is a menu image button option under each menu item. You can use it to upload your social media icon here.

Set menu icon

It allows you to upload a different icon on hover with the main icon image to display on mouseover.

After that you can select a size for the social icon. There are multiple options for the image size. Make sure that you select the same size for all your social menu icons, so it doesn’t break the menu area.

Social icon size

Next, you need to select a position to display the name of each social channel with your icon. If you only want to display the social icon without any label, then you need to select the ‘Hide’ option under the Title position setting.

Menu title position

Simply repeat the same to add as many social icons as you need.

Once you are done adding menu items, you need to select the display location for your social menu and click on the ‘Save Menu’ button.

Menu display location

Now you can visit your website to see the social media icons in your WordPress menu.

Social media menu

You can also add the social icon menu in your WordPress sidebar. Simply go to Appearance » Widgets page and drag the ‘Navigation Menu’ widget in the sidebar widget area.

Social menu in widget

In the Select Menu dropdown, you should select the social menu that you created above and click on the ‘Save’ button.

Social menu in sidebar

Note: The above image is displayed for example purposes only. To get the widget to look exactly like that, you will need to add custom CSS.

That’s all. We hope this article helped you learn how to add social media icons to WordPress menus. You may also want to see our guide on how to style WordPress navigation menus.

If you liked this article, then please subscribe to our YouTube Channel for WordPress video tutorials. You can also find us on Twitter and Facebook.

The post How to Add Social Media Icons to WordPress Menus appeared first on WPBeginner.