Do you want to check if your WordPress posts are ranking for the right keywords?
Most beginners manually check rankings for their articles by typing keywords in Google. This does not give you an accurate idea of where your articles stand for the target keyword.
In this article, we will show you how to easily check if your WordPress blog posts are ranking for the right keywords.
Why Check Keyword Rankings for Your WordPress Posts?
If you follow our complete WordPress SEO guide, then you will learn how to optimize each article on your website for specific keywords. This helps you get more traffic to your website.
Most beginners simply search on Google to see if their posts are appearing for those keywords. Even then, they usually only check the first or second page at best.
The issue is that sometimes your article might be ranking way below the first two pages or worst it may not even be ranking for the keyword that you want.
If you rely on manually checking your keyword rankings, then you are missing out on useful information that you can use to improve your SEO rankings and increase traffic.
That being said, let’s take a look at how to properly check keyword rankings for your WordPress blog posts. We’ll cover three different keyword reference tools, and then show how to use keyword ranking information to increase traffic to your site.
Semrush is one of the best SEO and keyword research tools on the market. It’s a comprehensive SEO suite with all the useful tools you’ll need.
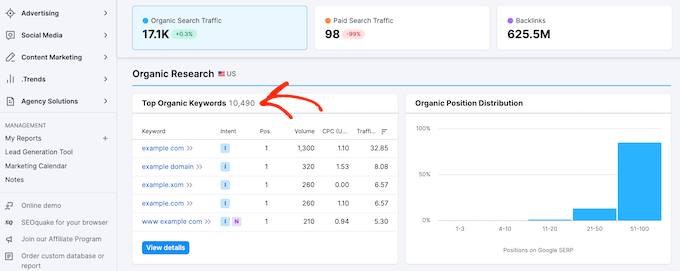
It comes with a powerful organic research tool that can show keyword rankings for any domain name. You don’t need to type in URLs for individual articles. It will automatically fetch results for all URLs on that domain name.
Simply enter the domain name you want to look up and Semrush will get a ton of information. After that, click on the organic research tab to view the full list of all keywords your website is ranking for.
You can sort the results by position, URL, traffic, and more. You can also export the results to a CSV file and research offline using your favorite spreadsheet program.
You can also track specific keywords with Semrush, and they will track those keywords on your dashboard, so you can instantly see their performance.
Semrush can also do these things for any domain name. That means you can enter your competitor’s domain name and see which keywords they are ranking for.
You will also be able to see their paid search traffic, paid keywords, and other useful information that you can use to outrank them.
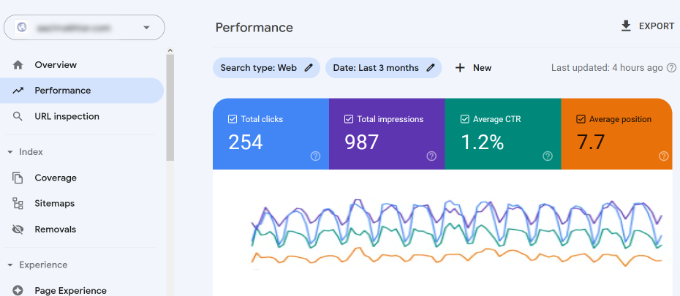
At the top of the Performance tab, you will see a graph of your website’s performance in search results.
As you scroll down, you will see the keywords data. Next to each keyword, you will see how many clicks and impressions it gets, and its position on the search results page.
You can sort this data by clicking on any column.
If you sort the list by position, then you will be able to see your top ranking keywords. As you scroll down the list, you will see keywords where your site appears lower on search engine results pages.
You can also export this data and open it with your favorite spreadsheet software.
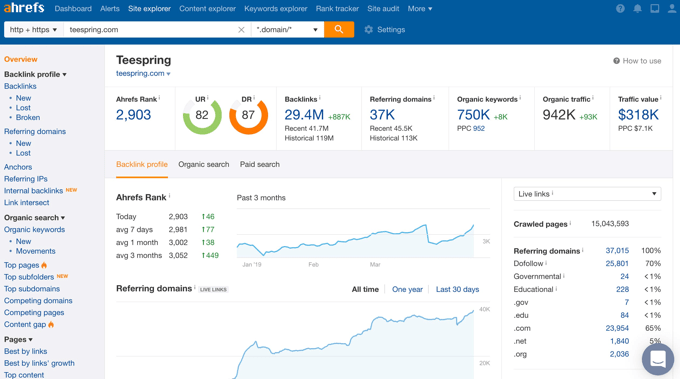
Ahrefs is another popular SEO tool among professional marketers. It comes with an easy to use interface and tries to make information understandable even for new users.
Simply enter your website domain name in the search box, and it will create a neatly organized report with beautiful graphs and charts.
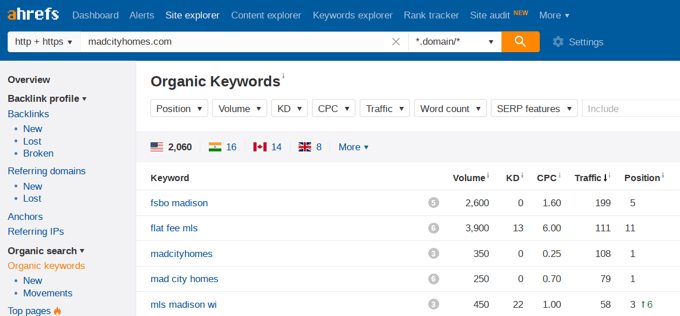
You will find all your keyword rankings under the organic keywords report.
Next to each keyword, you’ll be able to see its search volume, keyword ranking position, keyword density, and more.
Using Keyword Rankings to Get More Traffic in WordPress
Now that you have learned how to check keyword rankings for your WordPress site, let’s talk about improving your rankings.
How to Analyze Which Keywords Need Improvement
When you’re deciding which keywords to improve, it’s important to note that not all keywords are created equal.
For example, ranking #5 on a high traffic keyword is way better than ranking #1 for a low traffic keyword.
Also, appearing in the #1 position won’t always bring you the most traffic. You might notice that while some of your keywords rank pretty well, they don’t get a significant number of clicks or impressions.
During your research, you might also find some surprise keywords that you didn’t know you were ranking for.
If these keywords have a significant number of impressions and search volumes, then you should see if you can make strategic changes to your content to improve the rankings for those keywords as well.
How to Improve Rankings for Specific Keywords
After you decide which keywords you need to work on, you can go ahead and see which of your articles are ranking on those keywords and what you can do to optimize them better.
Here are a few tips.
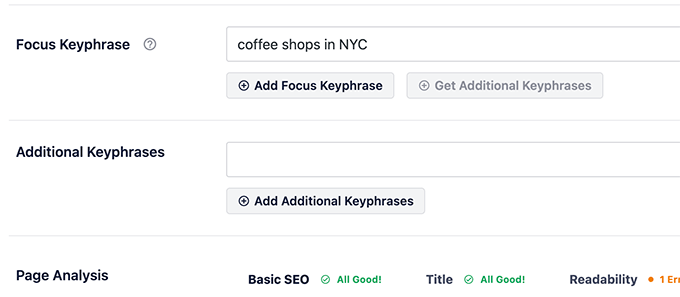
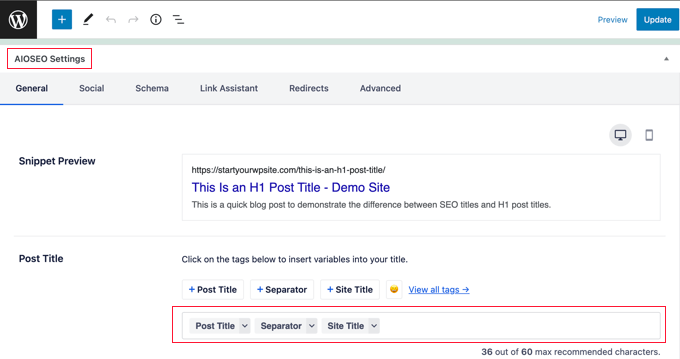
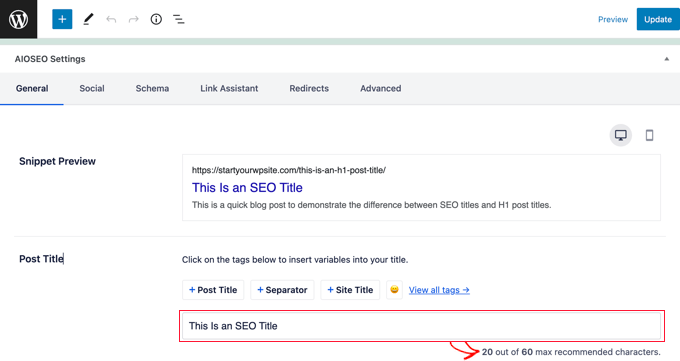
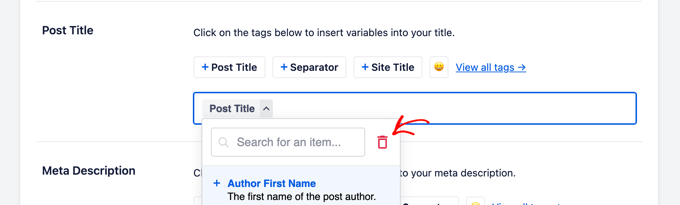
You can find helpful suggestions on how to improve these important keywords by using the All in One SEO plugin. When editing a post, simply scroll down to the AIOSEO settings at the bottom and you will find fields for your ‘Focus Keyphrase’ and ‘Additional Keyphrases’.
Simply enter the most important keyword for the post in the ‘Focus Keyphrase’ field then click the ‘Add Focus Keyphrase’ button. You can add other keywords as additional keyphrases.
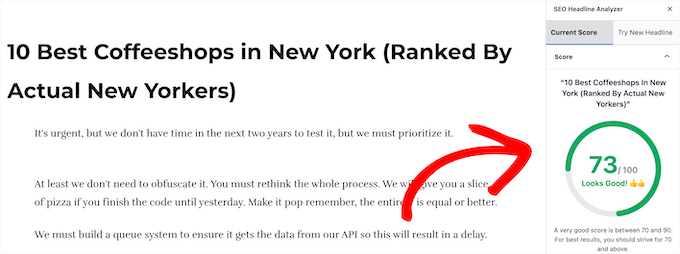
All in One SEO will now analyze your content for that particular keyphrase and will show you a score along with practical tips to improve your content for that keyphrase.
Next, you should look for articles that are old, don’t have enough content, or contain outdated information. Updating these articles with newer information and just improving the content can give them an SEO boost.
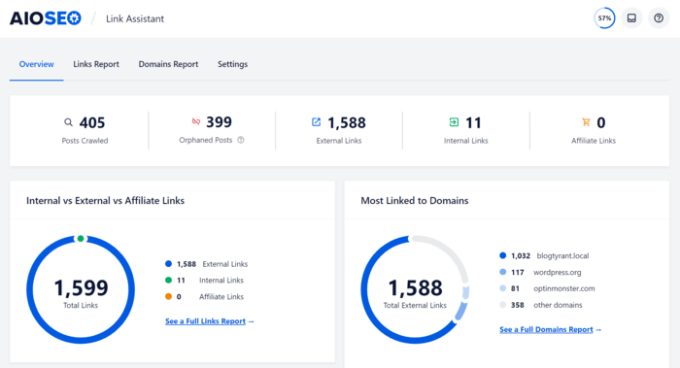
Finally, see if you can improve your internal linking, where you link to an article from other pages of your site. Linking to an article from other related posts can give it an SEO bump. Use your target keyword as the anchor text when linking to it from other articles on your website.
Semrush and Google Search Console can help you find your keyword positions, but they can’t show you how many visitors are coming to your articles, where they are from, and what they do when they are on your website.
This information is crucial when planning your content strategy to rank for certain keywords.
This is where Google Analytics comes in. It shows you the number of pageviews for your articles, your top content, your visitor information, and more.
Google Analytics can be difficult to set up for beginners, that’s why we recommend using MonsterInsights. It’s a Google Analytics plugin for WordPress that will help you easily install Google Analytics and see all reports inside your WordPress dashboard.
Are you looking a Typeform alternative for your website?
Typeform is a tool that lets you create different types of forms. However, it is expensive software, especially for small businesses. There are other WordPress form plugins and other alternatives that offer more features and are extremely affordable.
In this article, we’ll show you the best Typeform alternatives. We’ll include free and paid options so that you can choose the best plugin for your business.
Why Do You Need a Typeform Alternative?
Typeform is a popular software for creating different forms for your WordPress website. You can use it to make a survey or a poll for your business. It also allows you to create quizzes, application forms, and order forms.
While Typeform offers many features and form templates, it has some drawbacks. For instance, because Typeform is a SaaS (software as a service) tool, it stores data on its external servers. This can be a security vulnerability, as you’ll be trusting someone else with your customer’s personal data.
Another drawback of using Typeform is the cost. The basic plan starts from $25 per month, which can be expensive for small businesses. Plus, you cannot remove the Typeform branding in the basic plan.
If you want more features and integrations, or if you want to use your own branding, then you’ll need to upgrade to a higher pricing plan. Not to mention that they restrict the number of responses you can collect in a month. For example if you want more than 100 responses a month, you’ll be paying $600 per year, and then the next level up is $996 per year.
This will significantly drive up the cost of running a website and make Typeform less attractive for WordPress users.
There is also a free version of Typeform, but it lacks many features. This is why most smart website owners use WordPress plugins as alternatives and get more options for free.
That said, let’s look at the best Typeform alternatives.
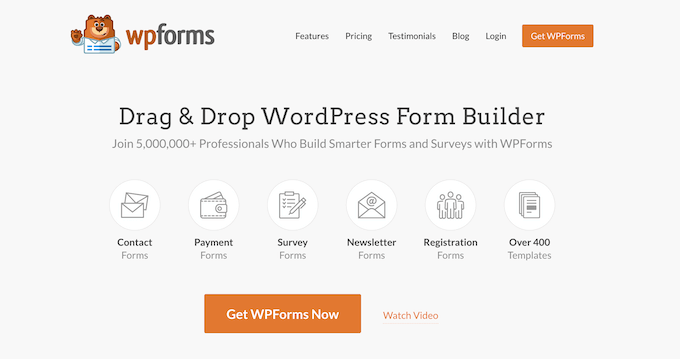
WPForms is the best WordPress contact form plugin and offers a lot more features compared to Typeform. Over 5 million professionals use WPForms on their websites to create all types of forms.
It is super easy to use and offers a drag-and-drop form builder. Plus, you get many prebuilt form templates and multiple customization options.
Even in the free version of WPForms, you get features like spam protection, basic form fields, email notifications, and more. This is more than what Typeform’s free version offers users.
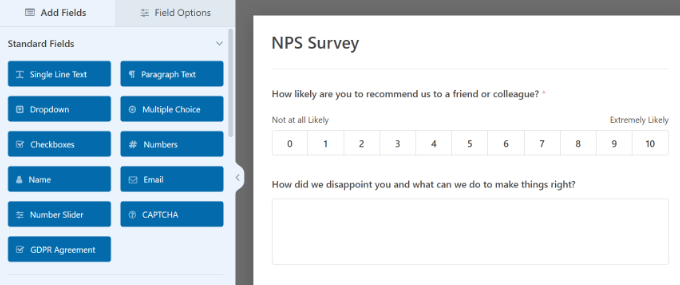
Besides that, WPForms comes with powerful addons. For instance, you can create a conversational form in just a few clicks or create stunning surveys and polls with ease. You also get interactive survey reports and advanced fields like the Likert scale, net promoter score (NPS), and star ratings.
Another advantage WPForms offers over Typeforms is that it easily integrates with popular email marketing tools, payment gateways to accept online payments, and other WordPress plugins like OptinMonster.
For instance, you can add a form from WPForms to an OptinMonster campaign and show it in a popup. Similarly, you can track form conversions and performance by integrating it with MonsterInsights.
Besides that, WPForms also offers other features that you won’t find in Typeform. For example, WPForms lets you track user journeys, collect geolocation data, track and reduce form abandonment, allow file uploads, and more.
Pricing: WPForms premium plans start from $49.50 per year. WPBeginner users can avail of an exclusive 50% OFF discount on all plans using our WPForms coupon. There is also a WPForms Lite version you can use for free.
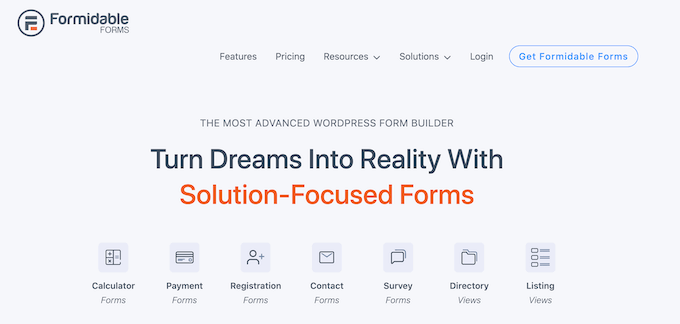
Formidable Forms is an advanced WordPress form plugin and a great alternative to Typeform. You can create complex and technical forms without editing code, which is not possible in Typeform.
For instance, Formidable Forms makes it super easy to create calculators like mortgage calculators, quote request calculators, or car payment calculators.
Besides that, you can use the plugin to collect customer feedback and data by creating polls and surveys. It also makes it super easy to set up automated quizzes with grading, collect online payments, and even display form data on the front end of your website.
Other features offered by Formidable Forms include an easy-to-use drag-and-drop form builder, conditional logic, multiple form templates, visual form styler, landing pages, and more.
Pricing: Formidable Forms pricing starts from $39.50 per year. You can also use a free version of the plugin as an alternative to Typeform.
Gravity Forms is a popular Typeforms alternative you can use for your website. It is used by some of the biggest brands, like Nike, ESPN, NASA, and UNICEF.
Gravity Forms offers robust features and helps create complex form solutions at a fraction of the cost compared to Typeforms. For instance, you can use it to create quizzes, surveys, web directories, and accept user-generated content on the front end of your site.
Besides that, the plugin offers a drag-and-drop visual form builder, prebuilt form templates, and many customization options. You can also set up automated workflows and show or hide form fields, buttons, and form sections based on user behavior.
Pricing: Gravity Forms is a premium alternative to Typeforms, with prices starting from $59 per year.
HubSpot Form Builder is the next Typeform alternative on our list, and it is a powerful all-in-one marketing toolkit. It includes a form builder, live chat, analytics, popups, and other marketing tools.
Using HubSpot, you get a complete customer relationship management (CRM) platform. This helps to automatically sync your WordPress form with your contacts, easily manage them, create different segments, and more.
HubSpot Form Builder also makes a great alternative to Typeforms if you’re already using other HubSpot products, like its email marketing tool. Besides that, it easily integrates with other contact form plugins like WPForms and Formidable Forms.
Another advantage of using HubSpot is that you get to see how your forms are performing. You don’t have to integrate it with a third-party tool like Google Analytics. With built-in analytics reports, you can see which forms are converting the best.
Pricing: You can sign-up for free on HubSpot and use the CRM, live chat, and other features for free. However, their premium plans start from $45 per month (billed annually).
Jotform is a popular form builder that makes it super easy to create different types of online forms. Whether you want a simple contact form or a form to collect online payments, Jotform lets you build one in just a few minutes.
What makes Jotform a great Typeform alternative is that you can customize your forms and add your own branding and logo even in all the paid plans.
Besides that, you get a lot more features in the free version of Jotform compared to Typeform. For example, you can create up to 5 forms, get 100 monthly submissions, 100MB of storage space, and more.
Jotform also offers other products along with a form builder. You can use its store builder to create an online store, add tables, build online apps, turn form responses into visual reports, edit PDF files for free, and more.
Pricing: Jotform premium plans start from $34 per month, and you get a 30-day money-back guarantee. There is also a free Jotform version you can use to get started.
Ninja Forms is another Typeform alternative you can use for free. It lets you create interactive online forms with no coding skills required. Plus, the drag-and-drop form builder makes it super easy to design all types of forms without hiring a designer.
Asides from that, Ninja Forms also offers premium extensions for more features. For instance, you can create conversational forms using conditional logic addon or set up a multi-step form.
Other paid addons include an advanced date picker, file uploader, PDF form submission option, and more. Ninja Forms also integrates with different payment services like PayPal and Stripe, email marketing tools like MailChimp CRMs like Salesforce, and other tools like Slack and Webhooks.
Pricing: The base plugin of Ninja Forms is free to use. However, if you want more features, then you’ll need its premium extensions. The Personal plan starts from $49 per year and includes 4 addons.
Zoho Forms is a premium form builder that offers lots of features and seamless integration. It is a great alternative to Typeform if you’re already using Zoho CRM and other Zoho tools.
Zoho Forms lets you create over 30 different types of forms, including contact forms, surveys, polls, and more. Plus, it offers different form templates for multiple industries, like businesses, medical institutions, eCommerce sites, and more.
Besides that, Zoho Forms also provide multiple security options. These include SSL, field encryption, form audit, CAPTCHA, and more.
Pricing: Zoho Forms prices start from $10 per month and offers 10,000 submissions per month, 500MB storage, unlimited forms and reports, and more.
Google Forms is a free form building tool by Google and is very easy to use. You can create all types of online forms, surveys, questionnaires, feedback forms, and more.
It is a great Typeform alternative if you’re looking for a basic form builder that gets the job done. It has a simple interface and offers a drag-and-drop builder.
You can also add images to your form, break up long forms into multiple steps, get email notifications in Gmail, add skip logic to form fields, and more. Plus, your form responses get organized and stored in Google Sheets.
That said, it provides limited customization options compared to other form plugins on our list. If you want more features, then do check out our guide on Google Forms alternatives.
Pricing: Google Forms is free to use.
Which Typeform Alternative Should You Use?
After going through multiple WordPress form plugins and tools, we believe that WPForms is the best Typeform alternative. It offers the most customization options and form templates, and it has a very beginner-friendly interface.
You can create all sorts of online forms for your website using WPForms. Plus, it easily integrates with other plugins, payment methods, email marketing tools, CRMs, and other tools.
The best part is that WPForms has a free version that has more features and options compared to Typeform’s free version.
On the other hand, if you’re looking to create complex form solutions like calculators, then we recommend Formidable Forms. It offers pre-built templates and customization options, which aren’t available in Typeform.
Do you want to run a virtual class online on your WordPress website?
Creating an online virtual classroom may sound too technical or expensive. Luckily, there are easy tools that allow you to run a virtual classroom online without any special technical skills.
In this article, we’ll be showing you how to run a virtual classroom online class with WordPress using different tools.
Why Create a Virtual Classroom for My Business?
Almost anything can be taught online. Just type your class’s topic into YouTube’s search bar, and you’ll likely find hundreds or thousands of videos of people teaching that skill.
One great advantage of virtual classes is that you don’t have to teach them live. You can record videos in advance if you want. That way, it doesn’t matter if it takes you several attempts to explain or show something.
Taking your class online could be the best thing you’ve ever done for your business. It’ll let you reach people all around the world, and you won’t be limited by how many people can fit in your classroom or fitness studio.
This isn’t just for large classes, either. You might offer a one-to-one service, like math tutoring or career counseling. You can create an online classroom without a lot of tech skills or expensive tools.
Here’s what you’ll need.
What You’ll Need to Run Your Class Online (Virtual Classroom)
So where do you even begin to set up a virtual class? There are a few key things you need to get into place.
To run a class online, you’ll need these 3 things:
A WordPress website or online platform for your class. This is a place where students can find and access the class content.
A way for students to sign up for your class, like a fillable form.
A way to frequently communicate with your students, like email.
You’ll also likely want a way for students to talk and interact with each other, such as an online group or forum. Besides that, you can offer members-only recorded content such as video or audio seminars so that students can work through it at their own pace.
Your virtual classroom can also include live video content with features like interactive polls, audience feedback, screen sharing, and audience questions.
Plus, an LMS or membership site plugin is really useful for managing repeat payments, creating members-only content, and creating different levels of your class.
Don’t worry if that sounds like a lot. We’ll help you decide on the right tools and platforms for your virtual classroom. Here’s a quick outline that you can click to jump straight to a particular section in this article.
It’s possible to run an online class through a private Facebook group or an email list where you link to videos you’ve posted on YouTube.
However, these aren’t great options. Not everyone uses Facebook, for instance. Plus, Facebook or YouTube could decide to ban you without any fault of your own.
An alternative is to sign up for a site like Teachable. This is a popular option, but it’s definitely not free. The most basic Teachable package costs $29/month, and you’ll pay a 5% transaction fee for each student on top of that.
Instead of third-party platforms, we recommend that you create a website for your class. There are lots of ways you can do this, but the #1 website builder in the world is WordPress. Over 43% of the websites on the internet are powered by WordPress.
The best part about WordPress software is that it’s completely free. However, you’ll need a domain name and web hosting to build a website. This is required for making any type of website.
Bluehost, one of WordPress’s recommended hosting providers, is offering our readers a great deal. You can get a free domain name and web hosting for just $2.75/month for your first year.
Note: If you are looking for a Bluehost alternative, then you can also try SiteGround, another popular WordPress hosting company that’s offering a great discount for small business owners.
Once you have signed up, you will need to install WordPress. Bluehost does it automatically for you, and other hosting companies make it super easy with just a few clicks.
After you have installed WordPress, you will need to install a few WordPress plugins to get your online classroom ready. Plugins are like apps for your WordPress site that lets you add essential features like contact forms, membership restrictions, and more.
We’re going to take a look at some important plugins to help you run your online class.
Getting Students to Sign Up for Your Class
You’ll need a way for students to register for your class. Even if you’re not charging for the class, you’ll want to know how many people are planning to attend. You may also want to get some information from them beforehand.
The lite version of WPForms is totally free, but you may want to pay for the Pro version of WPForms, so you can integrate payments and email marketing services with your form.
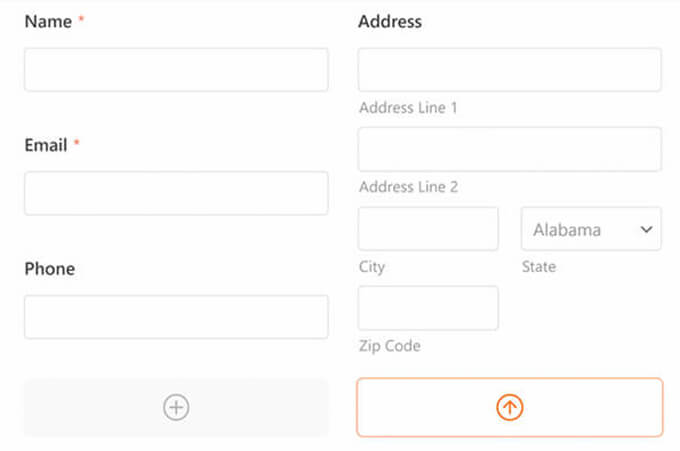
You can modify the event registration form template as much as you want. Here’s how a very simple registration form for a free class could look:
Communicating With Your Students in a Virtual Classroom
Whatever type of online class you’re running, you’ll need a way to communicate with your students.
Even if you’re just running a one-off class, you’ll still want to be able to remind students that it’s happening. You’ll also want a way to follow up, so you can let them know if you create another class.
There are lots of possible ways you could communicate with your students. For instance, you can send them messages on Facebook or WhatsApp. However, we strongly recommend using email.
That’s because virtually everyone has email. Most people are used to giving out their email addresses when signing up for things online. Asking them for their mobile number or Facebook details will put many students off from registering.
It’s important to use a reputable email marketing service to communicate with your students. That way, you can be confident that your messages will get through to them. Also, you won’t fall foul of any anti-spam laws.
We recommend using Constant Contact. They offer a free trial and excellent support.
If you’re creating a membership site, we recommend using either ConvertKit or Drip for your email service. These tools have advanced marketing automation features that you will likely find helpful.
If you’re on a very tight budget and need a free email marketing service, that’s possible too. We recommend looking at SendinBlue or MailerLite.
All of these options are good, reliable solutions for sending bulk personalized emails to your students.
If you’re using WPForms to take class sign-ups, then you can even integrate your form with your email marketing service. This means that students will be automatically added to your chosen email list when they sign up.
WPForms Lite works with Constant Contact, and if you pay for WPForms Pro, then you can choose from many other email marketing integrations as well.
Student Collaboration and Group Interactions in Virtual Classroom
Do you want your students to be able to interact with one another? If so, you’ll need to provide a straightforward and accessible way for them to do so.
There are lots of possible options here. If most or all of your students are on Facebook, then a private Facebook group could be a good option. Alternatively, you might want to create a forum on your website. We recommend using the bbPress plugin for this.
Another option is to create a private Slack channel for your students.
If you’d like students to be able to interact with one another live, then you’ll want to look at how you deliver your classes. Zoom, which we’ll cover in a moment, is a great tool for interactive live video classes.
Important: If you’re running a class aimed at children, it’s definitely not a good idea to allow them to contact one another. This could create serious legal issues. You could, however, provide a space where parents of your students can interact.
Offering Pre-Recorded Content for Online Classrooms
One way to run an online class is to record content ahead of time and add it to your site. This is a good option if you’re feeling nervous or unsure about the technology involved.
Plus, pre-recorded content is a great option for a class that you want to run over and over again. You can create it once and sell it an unlimited number of times. Students can easily take the course at their own pace.
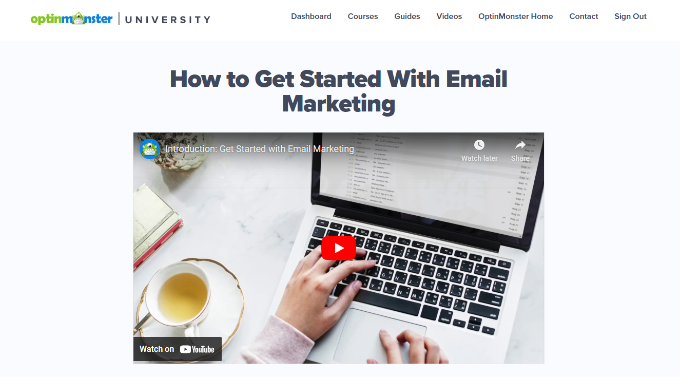
For example, OptinMonster University offers customers access to courses that can help them make the most of the software and boost conversions. There are pre-recorded videos that users can view at their own convenience.
To get started, you’ll need a webcam if you’re recording a video of yourself. You’ll also need a microphone. You can find our microphone recommendations in our article about how to start a podcast.
If you’re on a really tight budget, you could use your computer’s built-in microphone and webcam. However, higher-quality equipment will definitely help you produce a more professional class recording.
You may also want to record your screen, perhaps to show PowerPoint slides. You can do this using specialist screen recorder software, or you could run a Zoom call and record it. We’ll cover more on Zoom in a moment.
Don’t Host Videos on Your Website
When you put your content on your website, it’s very important not to host your videos yourself. If hundreds of students want to watch it at once, then this might slow down or even crash your website.
Plus, video files are incredibly large, and they will fill up your hosting service‘s available storage in no time.
Instead, you should use one of our recommended free video hosting sites. That way, you can simply embed the video on your site, so students can watch it there without taking up your site’s valuable resources.
If you want to password-protect your content or restrict it to members only, then we recommend creating a membership site. This also lets you charge different amounts for different levels of access.
If you’re interested in going that route, we recommend using MemberPress.
Offering Live Content in Online Classrooms
You may want to teach your class live. This could work really well for a class that you used to teach in person and are now taking online.
For live classes, we strongly recommend Zoom. It’s a tool that lets you host video calls with as many people as you want. The free plan gives you access to loads of features, with the one key restriction that your calls can’t be longer than 40 minutes.
You can schedule meetings in advance and send out an invite to your students. They can click a special link to sign in on their computer, or they can use the Zoom app on their phone.
Zoom has lots of useful options. For instance, you can use it to share your screen with students. This means you can show PowerPoint slides or demonstrate part of the lesson in real time.
Zoom lets you see your students, too. They can dial in with their cameras on if you want. They can also talk to you live, though you can mute them. We recommend that you mute everyone by default while you’re teaching your class. You can let students ask questions at the end.
There’s also a text chat feature in Zoom, which students can use to interact with one another while you’re teaching. You can even poll your students to find out what key topics they most want you to cover.
There’s also a ‘record Zoom call’ option, which lets you run a live class plus record it so students who can’t attend can watch it later.
Automatically Register Students for Zoom Webinars and Meetings
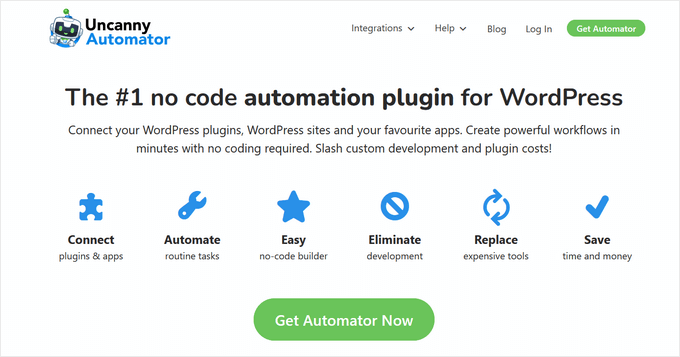
The paid version of Zoom lets you run webinars. However, manually sending out invites to webinars and class meetings can be time-consuming. A simple way to speed up the process is by automating it.
Do you want to turn your website into a virtual classroom? Or perhaps you want to lock content to make sure that only paid-up members can access it?
You’ll need to pay for this functionality, but it could well be worth it if you’re running a series of classes. Using your site as a learning platform works well for courses that last more than a few weeks.
For instance, you might be running a 12-week class. Students need an easy way to refer back to the earlier weeks’ material, and that will be tricky if you simply send out all the content by email.
Using LMS Plugins to Create Online Courses
With an LMS (Learning Management System) solution, you can even offer quizzes and grade students’ performance. You’ll need an LMS plugin for WordPress.
Our top recommendation here is LearnDash. It lets you create as many different courses as you like, with lessons, topics, quizzes, and categories. You can schedule lessons to be released over time if you want.
With LearnDash, you can also offer quizzes and tests for your students. You can even set assignments that you can approve and comment on. It also lets you create course-specific forums where your students can interact.
What if you don’t want a whole learning environment, but instead you want to lock content on your site? You can do that with a membership site plugin.
We recommend using MemberPress as your membership site plugin. It’s easy to set up and has powerful access controls. You can restrict access not only to posts and pages but also to specific categories, tags, files, and more.
You can use MemberPress to ‘drip’ content to your students. This means they only get access to certain content after they’ve been a member for a specified period of time. You can even integrate it with LearnDash if you want.
We know there’s a lot to consider when setting up a virtual class. You can set up a simple class for free on your WordPress site.
You’ll only need to pay for your website domain name and web hosting, which doesn’t need to cost much. Besides that, you can use free WordPress plugins, software, and email marketing tools to connect with students, record lectures, and more.
Do you want to add a Facebook giveaway in WordPress to boost engagement?
A contest can get more people to visit your Facebook page and interact with your content. If these people like what they see, they even decide to start following your page or group.
In this guide, we’ll show you how to easily add a Facebook giveaway in WordPress to boost engagement, and get some extra followers.
Why Run a Facebook Giveaway in WordPress?
Social media contests can help you reach a new audience and grow your following across different plaforms.
However, unlike some other platforms, Facebook doesn’t allow you to offer a prize for liking or following your page. This is a big problem if your goal is to get more Facebook followers.
The good news is that the guidelines don’t stop you from asking people to visit your Facebook page or interact with a particular post.
For example, visitors might enter a contest by liking your most recent Facebook post or commenting on a picture.
This can get more traffic to your group and will boost engagement for a particular post on your Facebook page. If your page has lots of great content then these people may even decide to follow your page.
In this way, you can grow your Facebook following without breaking any rules.
If you use a flexible giveaway plugin, then you can often add multiple entry methods to a single competition. For example, visitors may be able to enter your contest by liking your Facebook post or subscribing to your email newsletter.
This means you can still get the person’s contact information and do lead generation, even if they choose not to follow you on Facebook.
Running a Facebook Giveaway in WordPress
The easiest way to run a Facebook contest in WordPress is by using RafflePress. It’s the best WordPress giveaway plugin and lets you create all kinds of competitions using a simple drag-and-drop editor.
You can add a prize photo, schedule the start and end times, choose a winner at random, and use templates to quickly launch new giveaway campaigns.
RafflePress comes with social entry methods so you can direct users to your Facebook page. You can also have multiple entry methods and make certain methods mandatory so anyone who wants to join the contest must engage with your Facebook content in some way.
Note: There is a free version of RafflePress that has everything you need to create a simple giveaway in WordPress. However, in this guide, we’ll be using the premium plugin since it has more features, templates, and giveaway actions including entry methods that allow you to create a photo contest in WordPress.
The first thing you need to do is install and activate the RafflePress plugin. For more details, see our step-by-step guide on how to install a WordPress plugin.
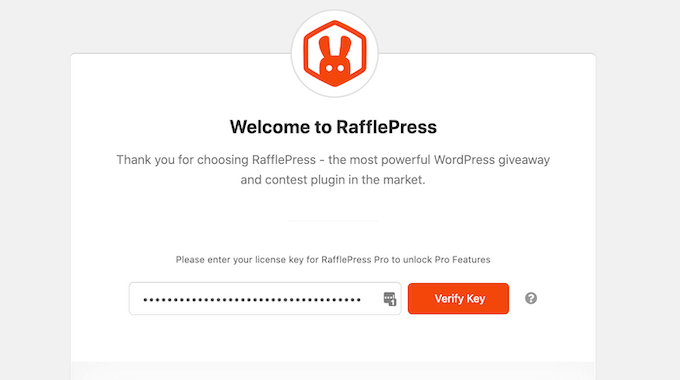
Upon activation, you’ll see the RafflePress welcome screen in the WordPress dashboard. You can now go ahead and enter your license key.
You’ll find this information in your account on the RafflePress website. After that, click on the ‘Verify Key’ button.
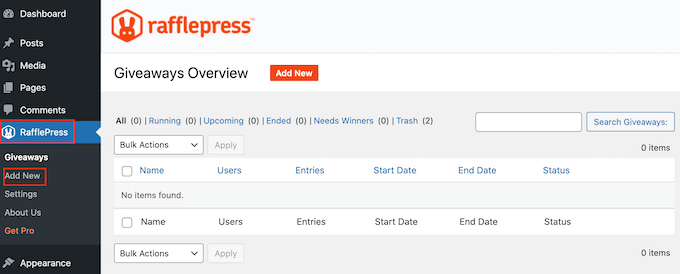
Now, you’re ready to create a Facebook giveaway in WordPress by going to RafflePress » Add New.
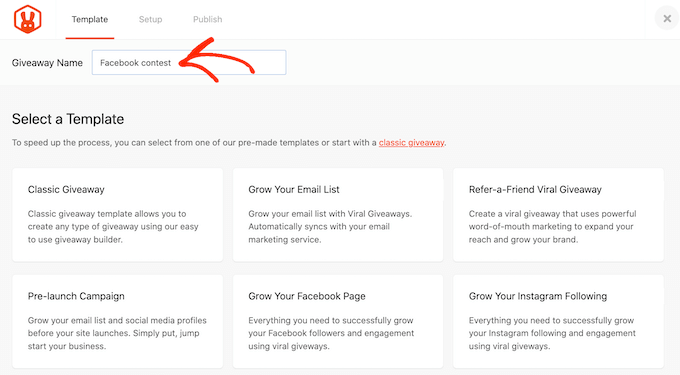
On the next screen, you’ll need to give your Facebook contest a name.
You can use anything you want, but it’s a good idea to choose a name that helps you identify the Facebook giveaway in the WordPress dashboard.
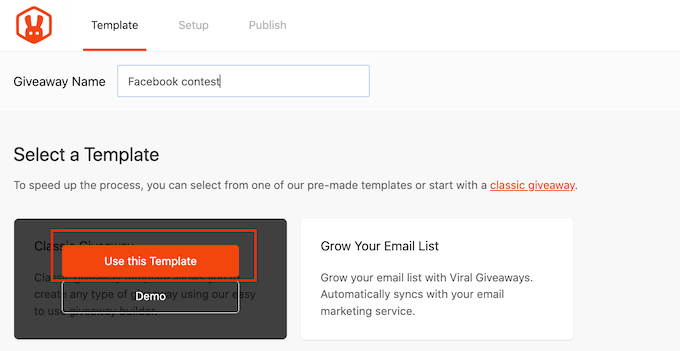
You can select the template that best suits your goals, but for this guide, we’ll be using the ‘Classic Giveaway’ template as it lets us create a Facebook giveaway from scratch.
Simply hover your mouse over the ‘Classic Giveaway’ template and then click on the ‘Use this Template’ button when it appears.
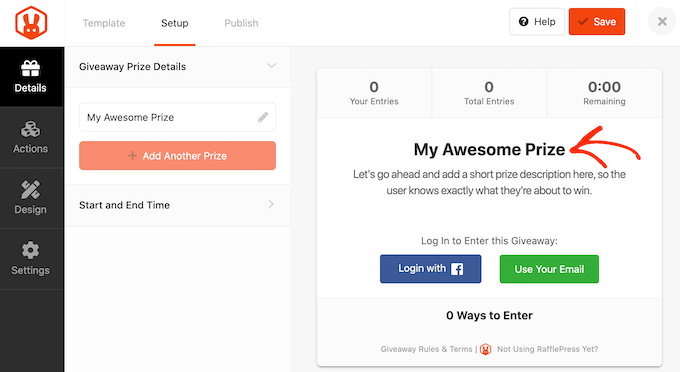
This opens the template in RafflePress’ drag-and-drop builder.
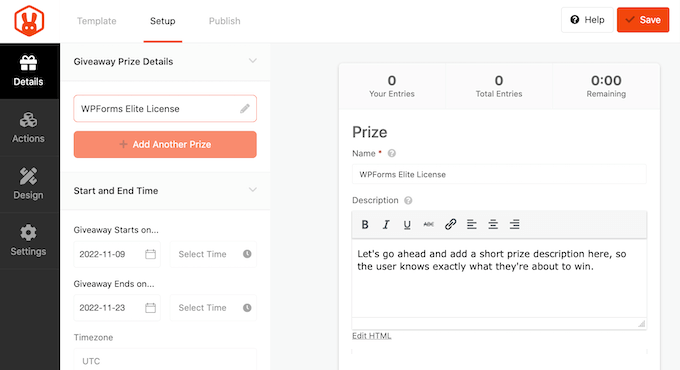
We’re going to start by adding the prize to our Facebook contest. Simply click to select the headline area, which shows ‘My Awesome Prize’ by default.
You can now go ahead and type a title into the ‘Name’ field. To encourage visitors to enter the Facebook contest, you’ll typically want to talk about your prize in the headline.
After that, type in a description, which will appear below the headline. For example, you may want to add some more information about your competition, such as why visitors will want the prize, how much it’s worth, and why you’re running the Facebook giveaway.
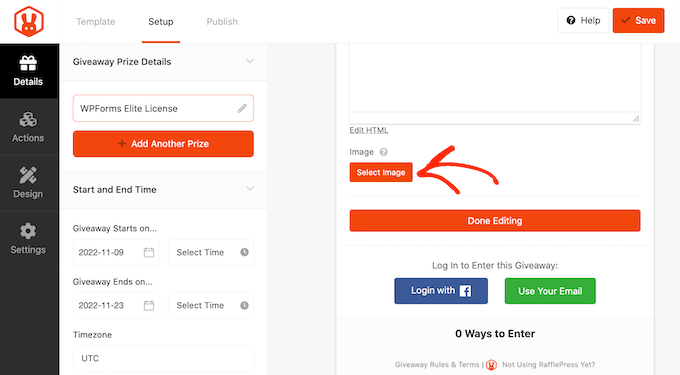
It’s also smart to add a photo of the prize, so people can see what’s on offer just by glancing at the giveaway. If your prize is digital then you can easily create professional-looking images to promote your prize using web design software such as Canva.
To add a photo or graphic, simply click on ‘Select Image’ and then either choose a file from the WordPress media library or upload a new image from your computer.
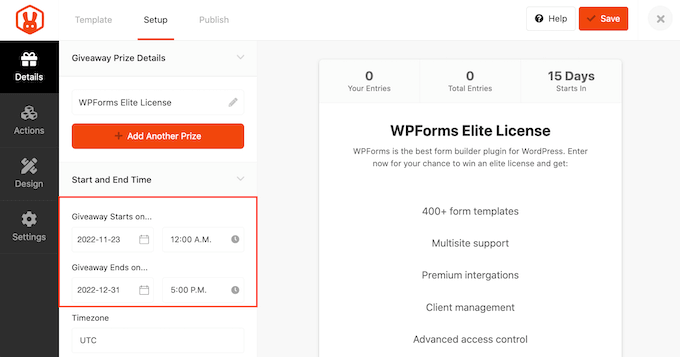
Once you’ve done that, you can set the start and end date for the Facebook giveaway. If you plan to run lots of contests, then it’s a good idea to schedule them in advance as it guarantees that the competition will start and end on time, no matter how busy you get.
By scheduling your Facebook contest in advance, you’ll also have time to promote the giveaway properly. This helps you build a sense of excitement and anticipation before the contest goes live.
To schedule the Facebook giveaway, simply enter a date and time into the ‘Giveaway starts…’ and ‘Giveaway ends…’ sections.
When you’ve finished making changes to this section, click on the ‘Done Editing’ button.
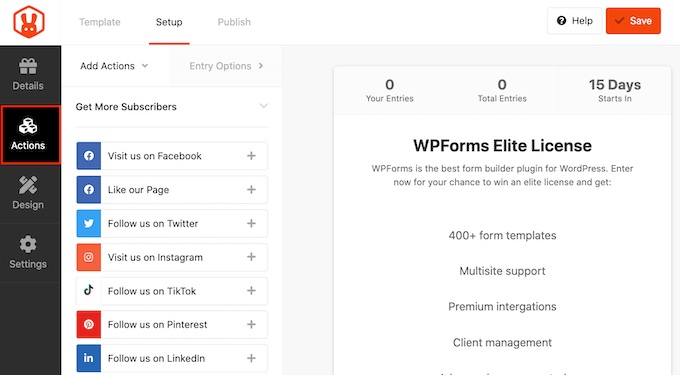
Step 2. Adding More Actions to Your Facebook Giveaway
Now let’s add some actions, which are the ways that visitors can participate in the contest, such as subscribing to your podcast, joining your email newsletter, or visiting a WooCommerce product on your online store.
To see the different actions that you can add to your Facebook contest, click on ‘Actions.’
To add an action to your giveaway, simply give it a click.
Since we want to boost Facebook engagement, you’ll want to add actions such as Visit us on Facebook, Like our Page, View a Facebook Post / Video, or Share on Facebook.
Giving visitors multiple ways to participate can get you more entries, so you may want to add multiple actions.
There may also be some people who complete all the actions in order to give themselves the best possible chance of winning. In this way, you can get lots of Facebook engagement from a single participant.
Even though we want to boost engagement on Facebook, you may want to consider adding some entry methods that aren’t related to Facebook. This will allow more people to enter your contest, including people who don’t have a Facebook account.
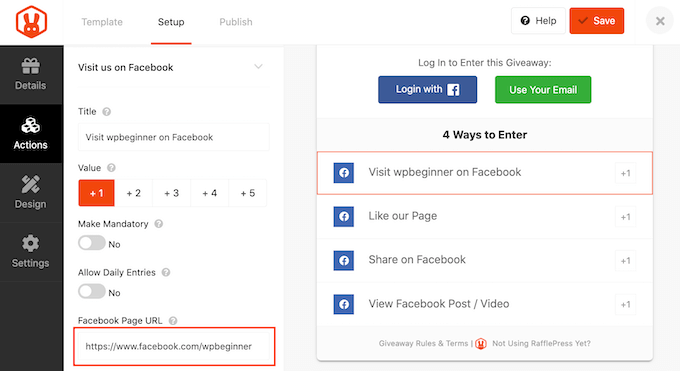
After adding an action, click to select that action in the giveaway preview. You can now configure the action using the settings in the left-hand menu.
For example, if you’re adding the ‘Visit us on Facebook’ action, then you’ll need to enter your page’s URL into the ‘Facebook Page URL’ field.
Similarly, if you’re using ‘View Facebook Post / Video’ then you’ll need to enter the URL of the post or video that you want people to visit.
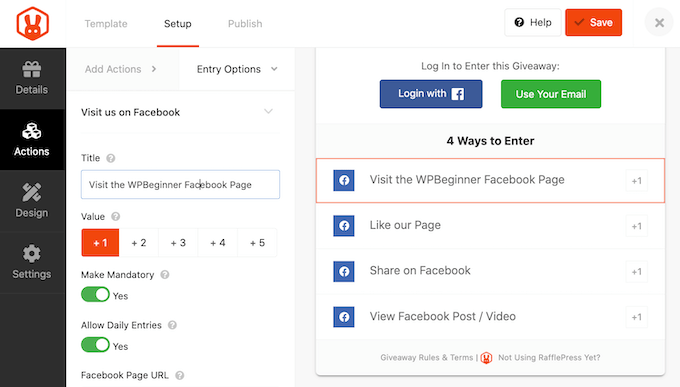
Each action also has some basic settings. You can type in a title, make an action mandatory, and even allow users to submit daily entries.
After that, you need to assign a value to the action, which is the number of entries users will earn for performing that action. By default, all actions are worth 1 entry.
If you have several entry methods, then you can use the value settings to make certain methods more attractive to visitors. For example, if your goal is to get more Facebook followers then you might make the ‘Like our Page’ action worth 2 entries.
Once you’ve filled in these settings, you can click on the ‘Add Actions’ tab and add more entry methods to your competition.
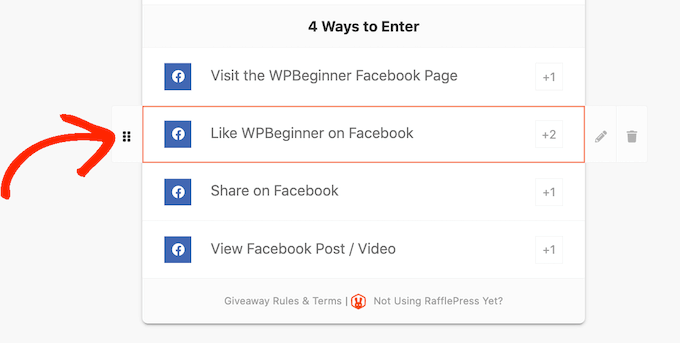
It’s also a good idea to arrange your actions based on your campaign goals. For example, if you want to get more shares, then we recommend placing the ‘Share on Facebook’ action at the very top of the ‘Entry Methods’ list.
Simply hover over the action in the editor and then grab the dotted button that appears to the left of the action. Then, move the entry method using drag and drop.
When you’re happy with how the Facebook giveaway is set up, don’t forget to click on ‘Save’ to store your changes.
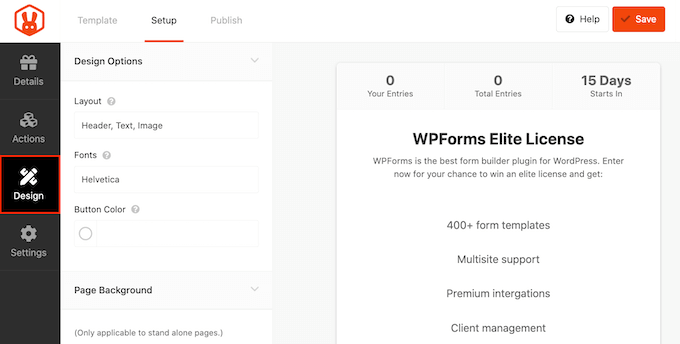
Step 3: Design your Facebook Giveaway to Stand out
Now that your Facebook giveaway is set up, you can change how the contest looks.
Simply switch to the ‘Design’ tab, and you will see options to select a new button color, change the fonts, and more.
RafflePress lets you embed the Facebook contest in a page or post, or publish it as a separate landing page.
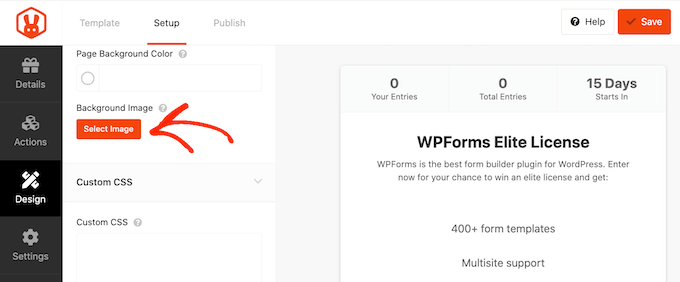
If you’re going to post your Facebook giveaway as a standalone page, then you can add a background image or change the background color.
To add an image, scroll to the ‘Background Image’ section and click on ‘Select Image.’ You can now either choose an image from the media library or upload a new file.
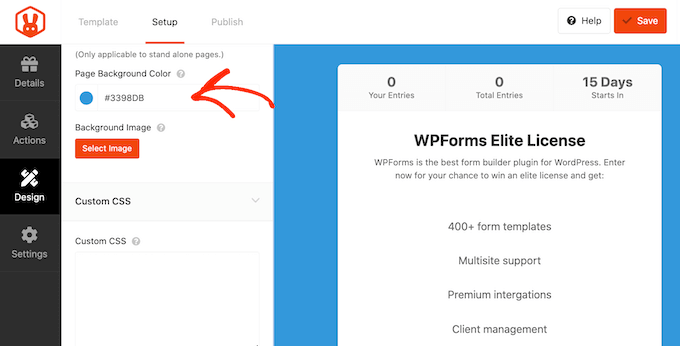
Another option is to change the background color by clicking on ‘Page Background Color.’
You can now make your selection from the popup that appears.
When you’re happy with how the giveaway looks, click on ‘Save’ to store your changes.
Step 4. Fine Tuning Your Giveaway Settings
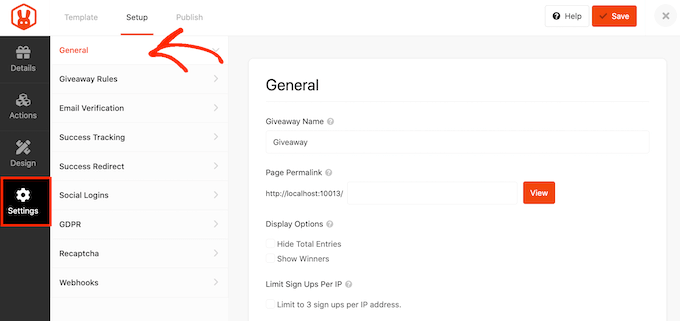
Now that your giveaway looks great, let’s check its settings by switching to the ‘Settings’ tab.
Most of these settings are self-explanatory, but we’ll go through them one by one. First, we’ll look at the ‘General’ settings.
Here, you can set the basic options for your giveaway including whether you’ll show the giveaway winners and the total number of entries.
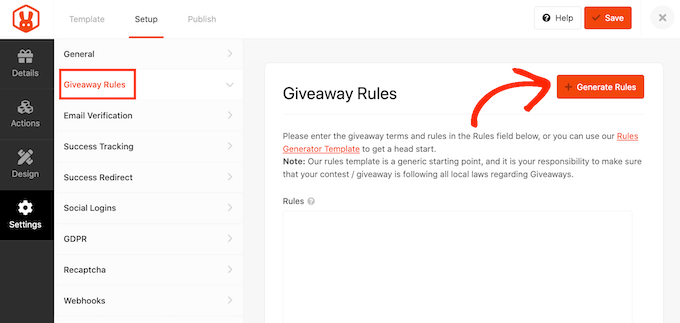
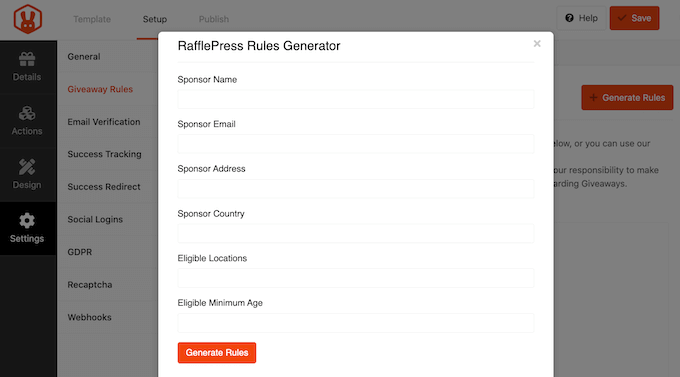
Next, you can create the rules for joining the Facebook giveaway by selecting the ‘Giveaway Rules’ tab.
RafflePress comes with a Rules Generator that will create rules for your campaign using a sample template. To get started, click on the ‘General Rules’ button.
This will open a form where you can type in some information about the Facebook contest.
In most cases, you or your company will be the contest’s sponsor. This means you’ll need to type in your company name and your business email address.
RafflePress will then use this information to create some basic rules for the giveaway.
Every area has its own rules about Facebook contests, so it’s a good idea to review these automatically generated rules and add any missing information.
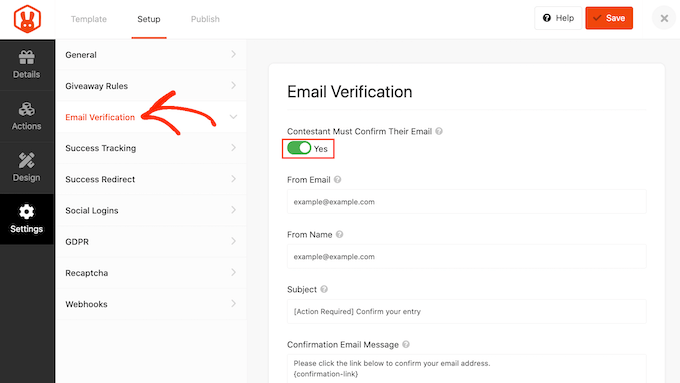
If you’re using the contest to do lead generation or get more email subscribers, then it’s a good idea to only accept entries from people who verify their email addresses.
To do that, select the ‘Email Verification’ tab and then click on the ‘Contest must Confirm Their Email’ toggle to turn it from ‘No’ to ‘Yes.’
You can also use these settings to change the verification email that users will get when they enter your giveaway.
If you want to add Google Analytics or other tracking codes like Facebook pixel, then RafflePress allows you to track users who have successfully entered your giveaway.
To do this, click on the ‘Success Tracking’ tab and then add your Google Analytics script or Facebook retargeting pixel code.
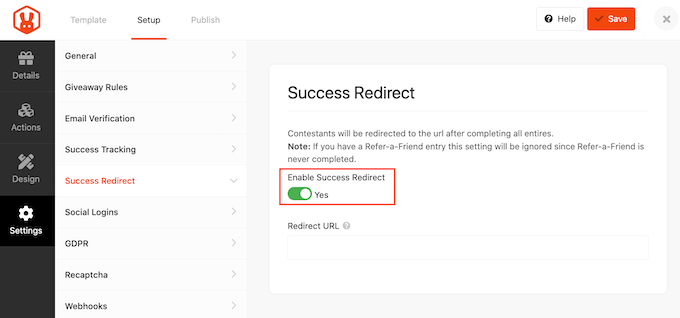
When a visitor enters your Facebook contest, it’s not the end of the process. You may want to redirect the person to a thank you page, your top-performing blog, or some other page.
To create a redirect, select the ‘Success Redirect’ tab and then click the ‘Enable Success Redirect’ toggle.
In the ‘Redirect URL’ field, type in the URL where you want to send participants.
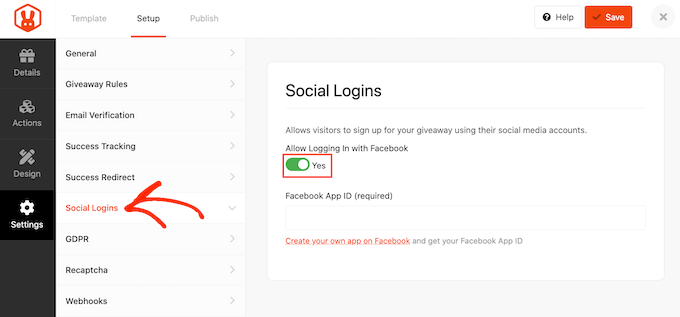
Since we’re creating a Facebook giveaway, you may want to give visitors the option to enter your contest using their Facebook accounts. This can be quicker and easier than asking them to type in their email address, so this may get you some more entries.
To enable Facebook login for your contest, simply select the ‘Social Logins’ tab and then click to enable the ‘Allow logging…’ toggle.
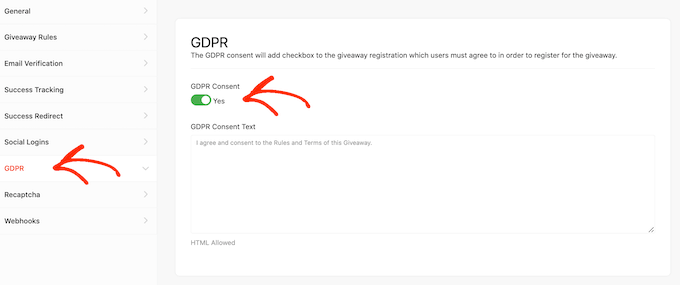
After that, click on the ‘GDPR’ tab. The General Data Protection Regulation (GDPR) is a European Union (EU) law that gives EU citizens more control over their personal data.
If you break GDPR then you could get a fine or even jail time. To help you comply with GDPR, RafflePress can ask for the visitor’s consent before they enter your giveaway.
To add this checkbox, simply click on the ‘GDPR Consent’ toggle to turn it from ‘No’ to ‘Yes.’
RafflePress has a default GDPR disclaimer that it will show to visitors, but you can edit the disclaimer to add any missing information. For more information on the topic, see our ultimate guide to WordPress and GDRP compliance.
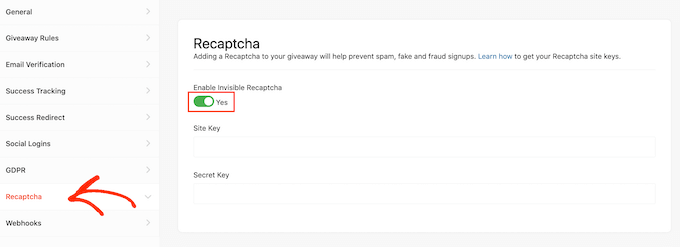
Spammers and bots can make it harder to achieve your contest’s goals. With that in mind, you may want to protect your Facebook giveaway with an invisible recaptcha.
Regular captchas usually ask users to complete a puzzle, which makes it more difficult for visitors to enter your Facebook giveaway. The good news is that invisible recaptchas run in the background so you can block spammers without adding friction to the user experience.
To add an invisible recaptcha to your Facebook contest, click on the ‘Repatcha’ tab. After that, activate the ‘Enable Invisible Recaptcha’ toggle.
When you’re happy with how the Facebook contest is set up, click on the ‘Save’ button to store your changes.
Step 5. Add Your Facebook Giveaway to a WordPress Post or Page
There are a few different ways to add a RafflePress giveaway to your WordPress website.
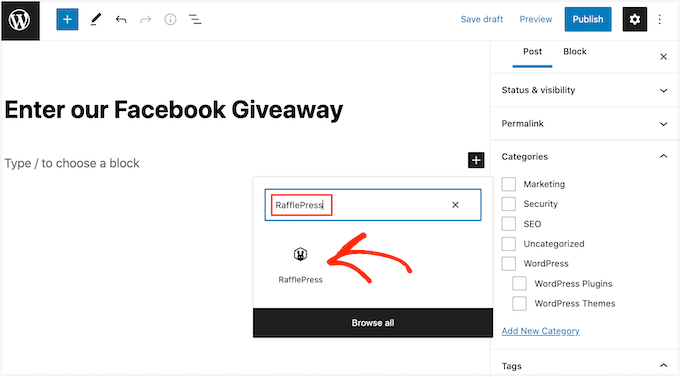
You can add the contest to any page or post using the RafflePress block. This is a great choice if you want to embed the Facebook contest in a blog post or other page.
To start, simply open the page or post where you want to include the giveaway. Then, click on the ‘+’ button and type in ‘RafflePress.’ You can then select the right block when it appears.
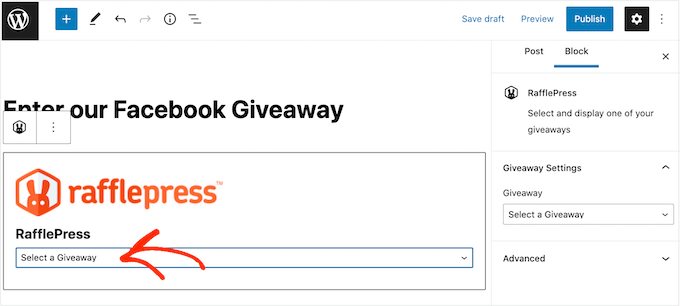
After adding the block, open the dropdown and choose the Facebook giveaway you created earlier. The RafflePress block will now load a preview of your giveaway widget inside the WordPress block editor.
You can then either publish or update the page to make the contest live on your WordPress blog or website.
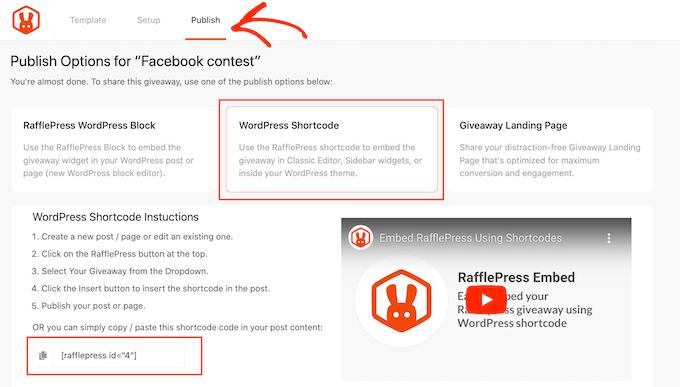
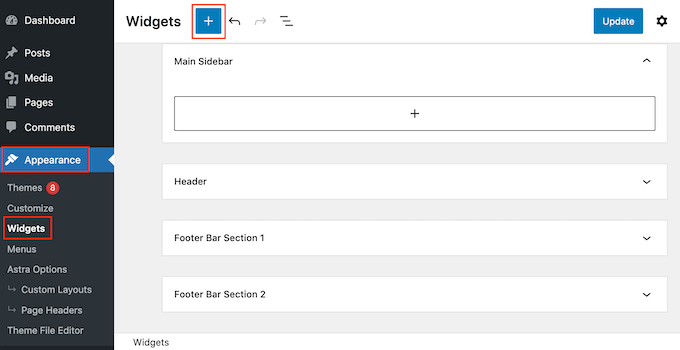
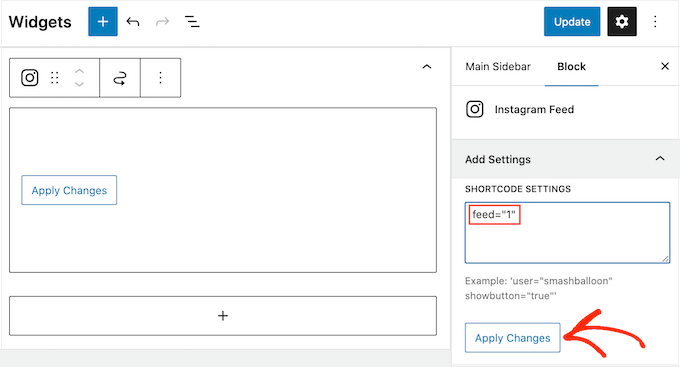
You can also add the giveaway to any page, post, or widget-ready area using the shortcode. This is particularly useful if you want to show the Facebook contest in a sidebar widget so that it appears across your website.
In the RafflePress giveaway editor, go ahead and click on the ‘Publish’ tab. From here, click on ‘WordPress Shortcode’ and RafflePress will show the shortcode you can use.
Simply copy the code and then add it to any page, post, or widget-ready area. For more details, please see our guide on how to add a shortcode in WordPress.
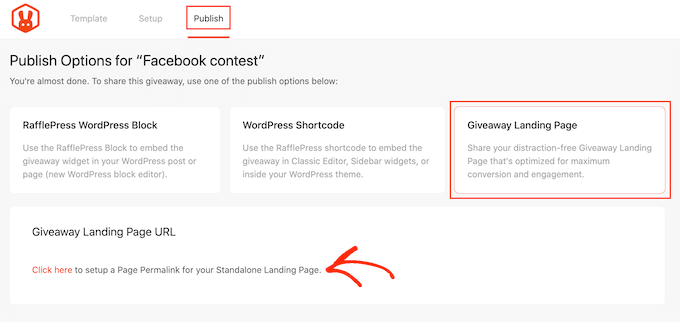
Another option is to create a giveaway landing page. This is a great option if you want a standalone page that you can easily share on social media or add to your email newsletter.
In the RafflePress editor, select the ‘Publish’ tab. Then, choose ‘Giveaway Landing Page’ and select the ‘Click here…’ link.
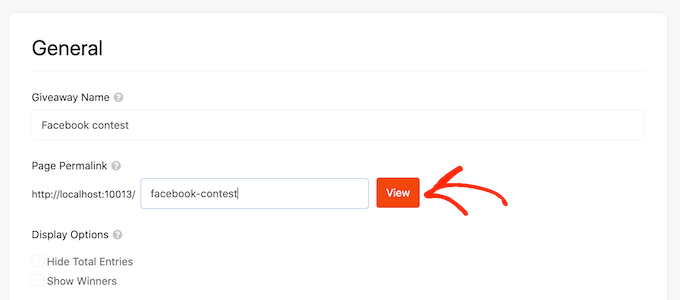
In ‘Page Permalink,’ type in the URL where you want to publish your giveaway landing page.
After that, simply click on the ‘View’ button.
RafflePress will now publish your giveaway as a landing page.
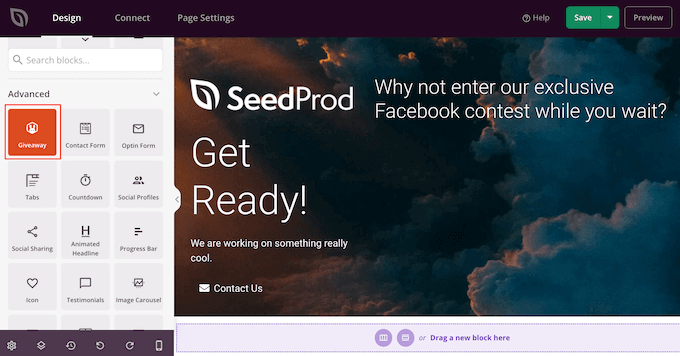
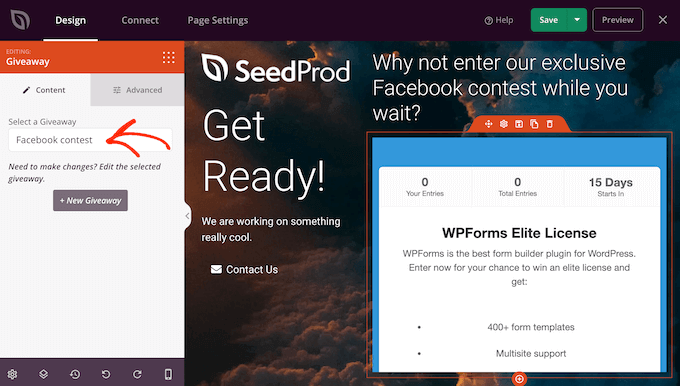
If you’re using the SeedProd page builder plugin, then you can design a landing page using ready-made templates, blocks, and a drag and drop editor. You can then add your giveaway using a special Giveaway block.
This block integrates with RafflePress, so you can simply drag and drop it onto the page.
Then, choose the RafflePress giveaway you created earlier.
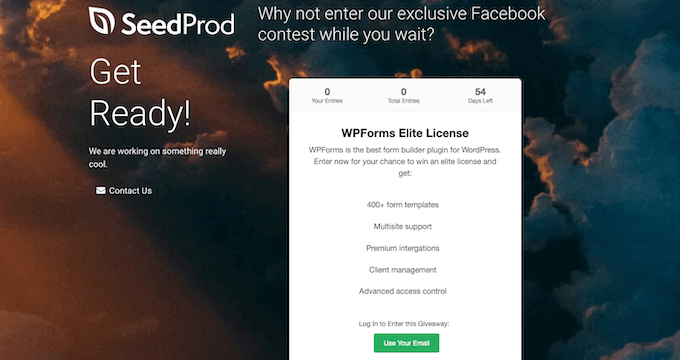
SeedProd will now show the giveaway inside your beautifully designed landing page.
If your Facebook contest is going to be a big success, then it’s smart to start promoting the contest before publishing it. By putting in some hard work before publishing your giveaway you can increase the chances of your campaign going viral, which will help you get more entries and achieve your goals.
You can start by sending an email newsletter to your subscribers and announcing the Facebook competition on your other social media profiles.
You might even send web push notifications asking your subscribers to enter the competition or refer any friends or family members who might want to take part in the Facebook giveaway.
Step 7. Announcing The Giveaway Winners
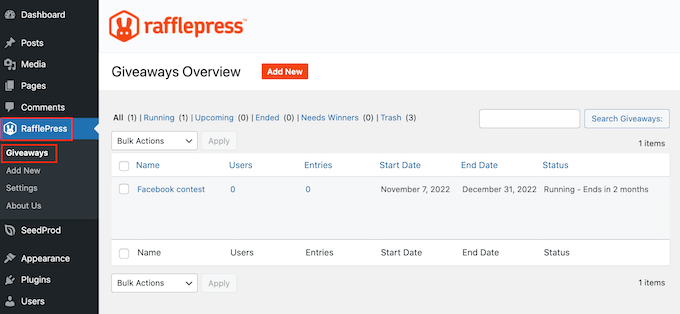
Once your giveaway closes, you need to pick a lucky winner. RafflePress automates the whole process, so simply go to RafflePress » Giveaways.
If you scheduled the contest to end automatically, then you can simply find the giveaway and click on the ‘Need Winners’ link.
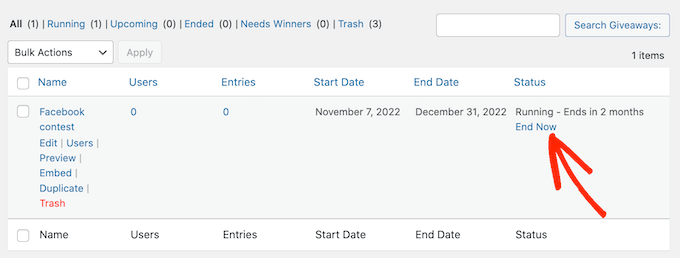
If you didn’t set an end date for the Facebook giveaway, then you can close it manually by hovering your mouse over the competition and selecting ‘End Now.’
After that, just click on the ‘Need Winners’ link that appears.
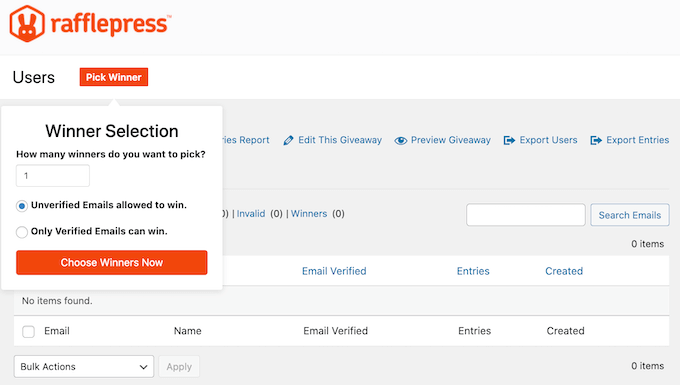
On the following page, RafflePress will show all the people who entered your Facebook contest. Just type in the number of winners you want to pick and choose whether you want to allow unverified emails to win.
If you plan to contact the winner via email, then you’ll typically want to make sure only people with verified emails can win.
After that, just click on ‘Choose Winners Now’ and RafflePress will show the winner highlighted at the top of the list.
Do you want to add third-party fonts to your website without slowing down your website speed?
Custom fonts improve the typography and user experience of your website, but they take longer to load. The good news is that you can host your fonts locally to ensure your website is always fast.
In this article, we’ll show you how to host local fonts in WordPress.
Why Host Fonts Locally in WordPress?
While typography and custom fonts can improve the overall website aesthetics, they do have a negative impact on your WordPress performance. For example, if you are using a custom font from Google fonts, then they’re loaded from third-party services which will slow down your website.
Luckily, there is a way to use custom fonts without slowing down your site. A new Webfonts API was introduced in WordPress 6.0. This allows you to host fonts locally so they load faster.
Another reason to host Google Fonts locally is to stay GDPR compliant. That’s an important legal consideration if you have website visitors from the European Union.
When someone visits a website that uses Google Fonts, their IP address is logged by Google when the fonts are loaded. Because this is done without their permission, the EU now considers that a breach of privacy regulations, and you may be liable for damages.
That being said, let’s take a look at how to host local fonts in WordPress for a faster website. We’ll cover two methods, and the first method is recommended for most users.
Method 1: Hosting Local Fonts in WordPress With a Plugin
The first thing you need to do is install and activate the OMGF (Optimize My Google Fonts) plugin. For more details, see our step-by-step guide on how to install a WordPress plugin.
OMGF is one of the best WordPress typography plugins. It offers a beginner-friendly way to improve performance and GDPR compliance by hosting Google Fonts locally.
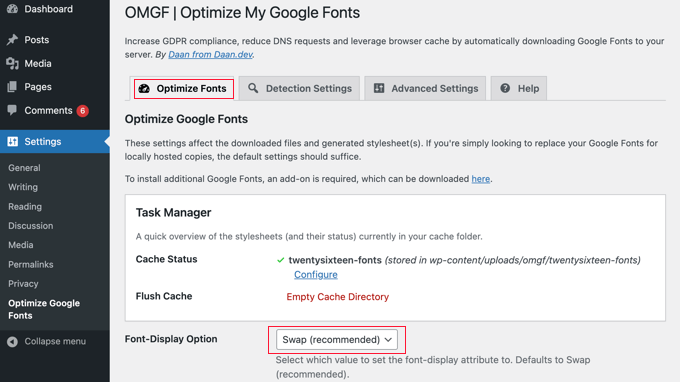
Upon activation, you need to visit Settings » Optimize Google Fonts to configure the plugin. You should be looking at the ‘Optimize Fonts’ tab.
Notice the statement under the ‘Optimize Google Fonts’ heading that you just need to use the default settings to automatically replace your Google Fonts with locally hosted copies.
That means that as you scroll down the settings page, all you need to do is make sure that the ‘Font-Display Option’ has the default setting of ‘Swap (recommended)’ selected.
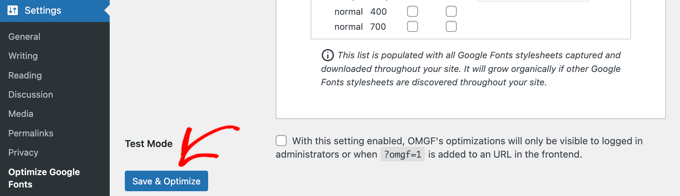
All you need to do now is click the ‘Save & Optimize’ button at the bottom of the page.
You’ll see a message at the top of the screen that says ‘Optimization completed successfully.’
Congratulations! Your Google Fonts are now hosted locally. Your website will load faster and you have reduced the risk of European lawsuits.
Method 2: Hosting Local Fonts in WordPress Manually
You can also host fonts locally without using a plugin by using the @font-face method from our guide on how to add custom fonts in WordPress. While this method requires more work, it allows you to use any font that you like on your website.
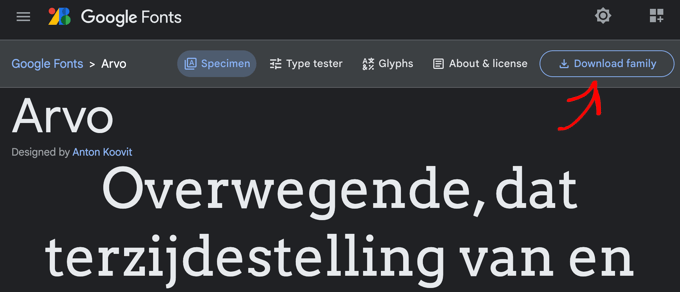
You need to download the fonts you wish to use in a web format. There are many places to find great free web fonts, such as Google Fonts, Typekit, FontSquirrel, and more.
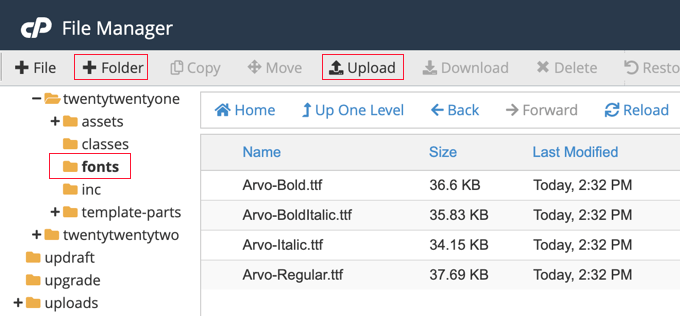
You should create a new folder called ‘fonts’ in the directory of your theme or child theme and upload it there.
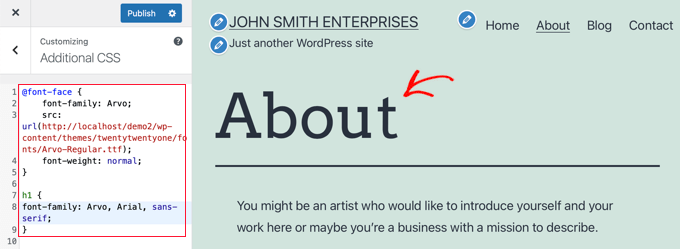
Once you have uploaded the font, you need to load the font in your theme’s stylesheet using custom CSS. You can add the code directly to your theme’s style.css file, or by using the Additional CSS section of the theme customizer.
You can do that using CSS3 @font-face rule like this:
Don’t forget to replace the font family and URL with your own.
After that, you can use that font anywhere in your theme’s stylesheet or the Additional CSS section of the theme customizer. The CSS you use will depend on your theme and where you wish to use the local font. Here’s an example from our demo website:
h1 {
font-family: Arvo, Arial, sans-serif;
}
As you can see, our heading is now using the locally hosted Arvo font.
Do you want to get email notifications for post changes in WordPress?
By default, WordPress doesn’t send notifications when posts are changed by a user. If you run a multi-author WordPress site, then you may want to stay informed about post changes on your website.
In this article, we will show how to get email notifications for post changes in WordPress.
Why Set Up Email Notifications for Post Changes in WordPress?
If you’re the only one working on your own WordPress website, then it is easier to keep an eye on everything that is happening on your website.
For instance, you may want to be alerted when a new post is published or if changes were made to an older article.
This also helps all team members be accountable. If they make a mistake, then it can be easily caught and remedied quickly.
That said, let’s take a look at how to get email notifications for post changes in WordPress. We’ll cover two methods so you can choose one that works best for you. We’ll also show you how to undo post changes and make sure your notification emails are delivered.
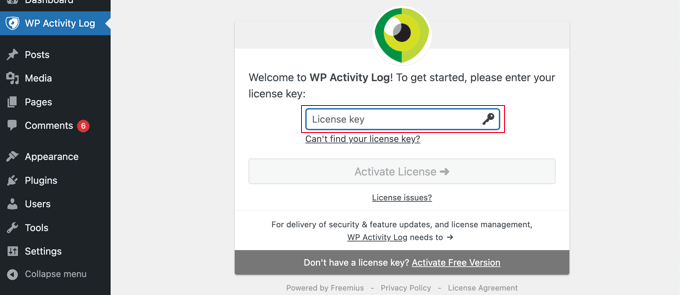
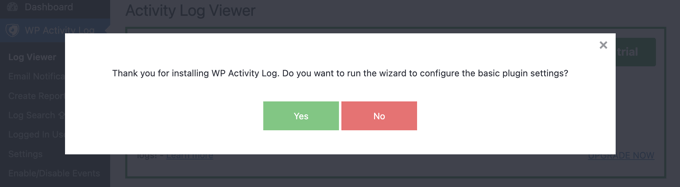
Upon activation, you’ll be asked to enter your license key. You can find this information under your account on the WP Activity Log website.
Next, you’ll be given the option to run the setup wizard. You can answer a few quick questions to set up important monitoring and logging features.
All these things can be changed later in plugin settings too.
Setting Up Email Notifications for Post Changes in WordPress
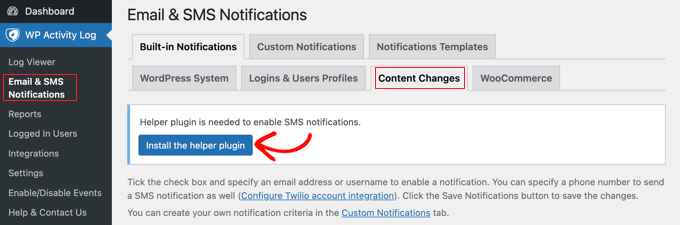
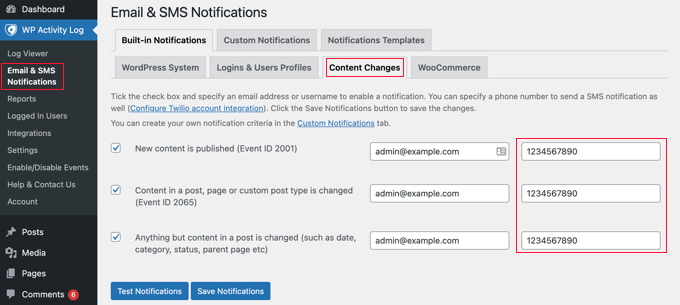
After that, you need to visit the WP Activity Log » Email & SMS Notifications page and switch to the ‘Content Changes’ tab.
You will see a message that a helper plugin is needed to enable SMS notifications.
If you want to receive SMS notifications as well as email notifications, then simply click the button labeled ‘Install the helper plugin’. You will finish setting up SMS notifications in the next step.
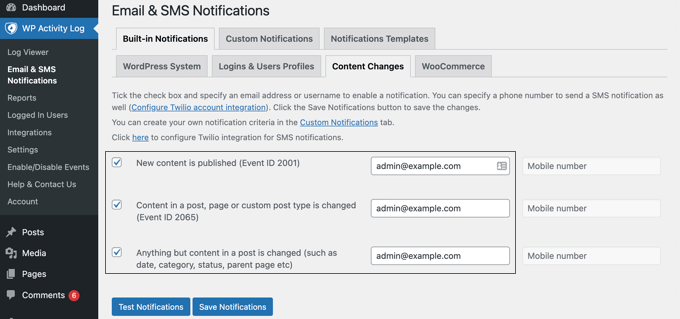
Now you need to select the events that will trigger notifications. The plugin comes with three default notifications covering most content changes.
Next to each event, you need to enter the email address the notifications should be sent to. In the next step, you will also add a mobile phone number if you want to get SMS notifications for post changes.
Finally, click on the ‘Save Notifications’ button to store your changes.
Setting Up SMS Notifications for Post Changes in WordPress
WP Activity Log allows you to easily receive SMS notifications for post changes and other WordPress activities. To do that, you’ll need a Twilio account and a phone number.
Twillio is a paid service with a pay-as-you-go pricing model for SMS messages. Pricing starts at $0.0079 per SMS, and you’ll also need to purchase a virtual phone number which will be used to send messages.
Simply go to the Twilio website and signup for a free trial account.
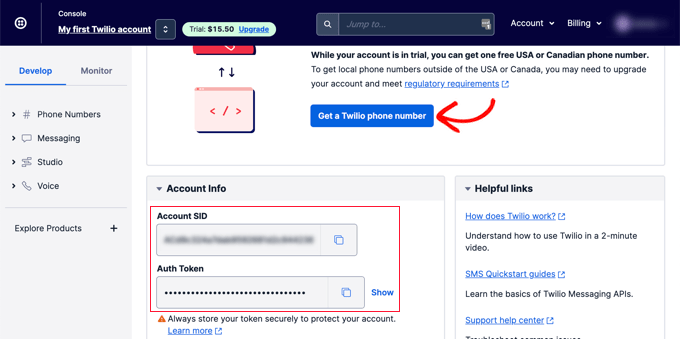
After setting up your account, you’ll reach the Twilio Console.
Here, you can copy your Account SID, Auth Token, and get a trial phone number.
Copy and paste these values to a text editor or leave this browser tab open.
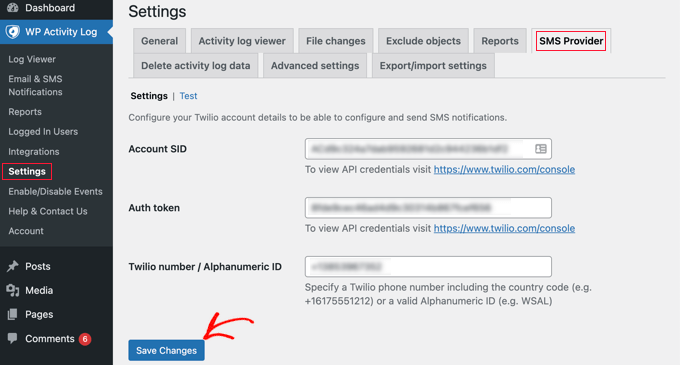
Next, you need to switch back to your WordPress website admin area and visit the WP Activity Log » Settings page. From here, switch to the SMS Provider tab and enter your Twilio Account SID, Auth token, and number.
Don’t forget to click on the ‘Save Changes’ button to store your settings.
Now you can navigate back to WP Activity Log » Email & SMS Notifications and switch back to the ‘Content Changes’ tab. Here you can add a mobile phone number to get SMS notifications for post changes.
Testing Post Change Notifications with WP Activity Log
WP Activity Log allows you to easily test your post change notifications.
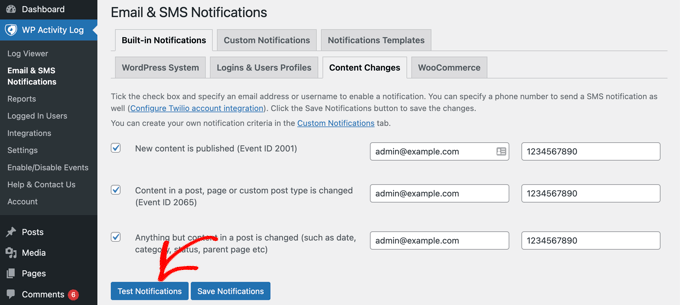
First, make sure you are on the ‘Content Changes’ tab of the WP Activity Log » Notifications page.
Now you can scroll down and click the ‘Test Notifications’ button.
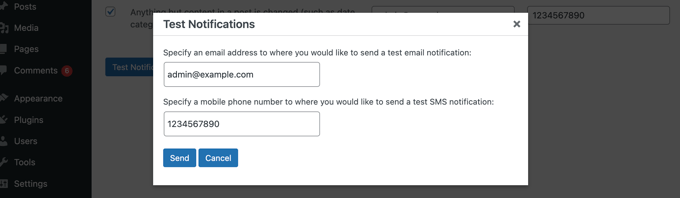
This will bring up a popup window where you can enter an email address and a mobile phone number to send notifications.
WP Activity Log will then send test notifications. If you do not receive an email notification right away, then you can jump to the section below on troubleshooting email notifications.
If you fail to receive SMS notifications, then check your Twilio credentials to make sure they are correct.
Method 2: Getting Notifications for Post Changes With Better Notifications for WP
This method is easy to use, but it doesn’t come with ready-made templates. While this method will send an email notification when a post is changed, you will have to write the email yourself and investigate the activity on your own.
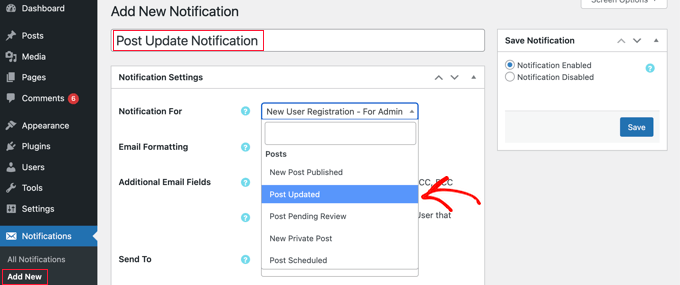
Upon activation, you need to visit the Notifications » Add New page to create your first custom notification.
First, you need to provide a title for the notification. After that, you can choose a ‘Notification For’ option from the drop-down menu. This is the event that will trigger this notification, such as ‘Post Updated’ in the screenshot above.
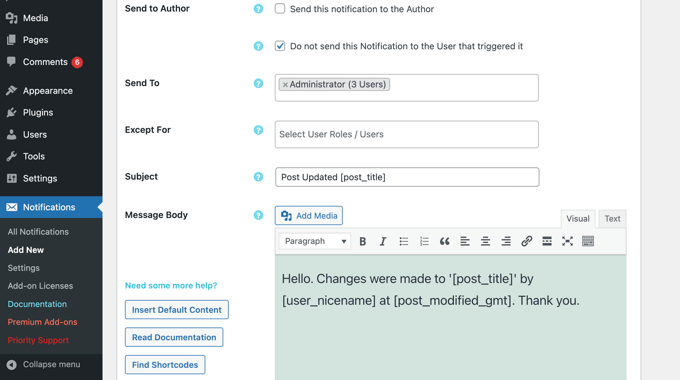
If you like, you can check the ‘Additional Email Fields’ box so you can enter custom email addresses for the sender, cc, and more. If this option is left unchecked, then the plugin will simply use your default WordPress email settings.
Next, you need to select the users or user roles that will receive this notification under the ‘Send To’ option. Below that you can write the email subject and the message itself.
The Better Notifications for WP plugin doesn’t come with a template for post changes. This means you’ll need to write your own email message.
The plugin comes with a bunch of shortcodes that you can use to customize your notifications. You can view all of them by clicking on the ‘Find Shortcodes’ button.
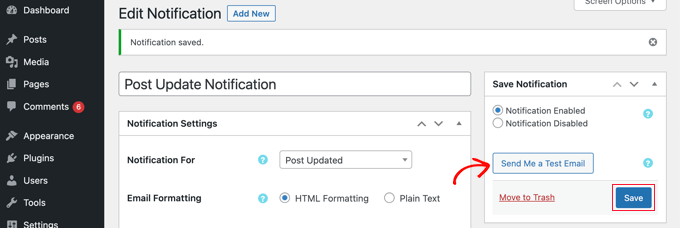
Lastly, you need to click on the ‘Save’ button to store your email notification. Once you’ve done that, you’ll be able to click on the ‘Send Me a Test Email’ button to see if it is working.
Better Notifications for WP is not an activity monitoring plugin. This means you’ll need to set up multiple notifications to cover different types of content changes in WordPress.
For instance, you may want to set up a ‘Post Published’ notification or another one for when a category or tag is changed.
The plugin also allows you to create custom notifications or modify default WordPress notifications as well. For more details, see our article on how to create better custom notifications in WordPress.
Revising and Undoing Post Changes in WordPress
Once you have received an email notification for post changes, you may want to see what changes were made, who made them, and when.
WordPress comes with a built-in revision management system that keeps track of all changes made to an article.
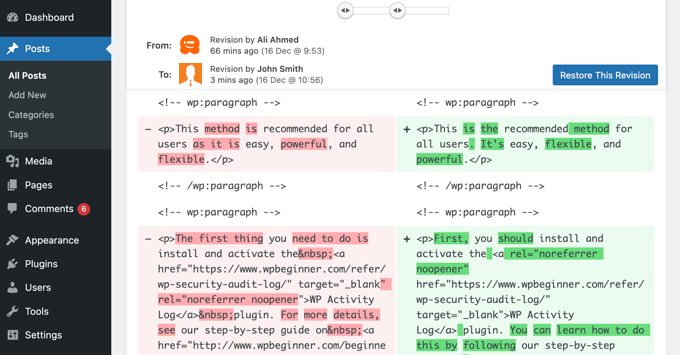
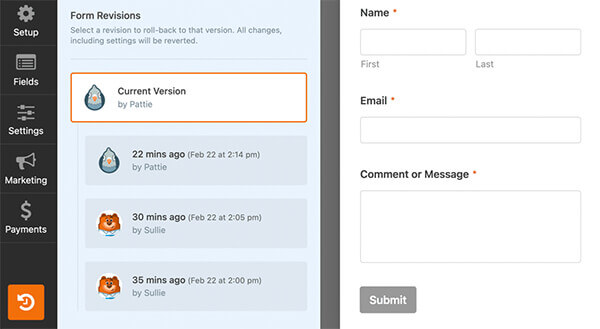
Simply edit the post or page that you want to review and then click on the ‘Revisions’ tab under the ‘Post’ settings from the right column.
This will bring you to the post revisions screen.
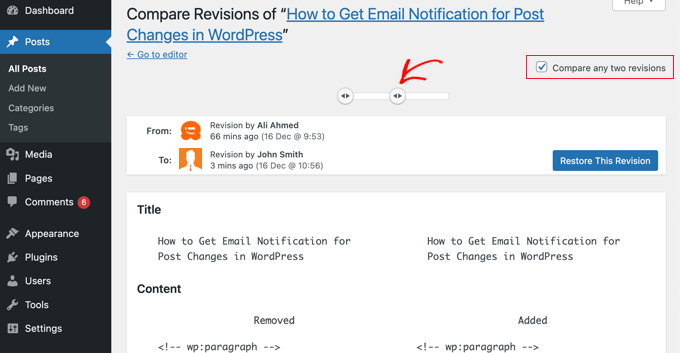
You can check the ‘Compare any two revisions’ box and then move the slider below to compare the changes.
When you scroll down the post, you will see the changes between the two revisions highlighted in red and green colors.
If you don’t like the changes, then you can simply click on the ‘Restore This Revision’ button to undo them and return to the previous version.
By default, WordPress uses the PHPmail() function to send emails. This method does not use proper authentication (login or password) which means it can be easily misused. This is why most spam filters mark such emails as spam or block them altogether.
To fix this, you need to use a proper SMTP service provider to send out WordPress emails. There are even free SMTP servers like SendLayer, Gmail, Sendinblue, Sendgrid, and more that you can use with WordPress.
WP Mail SMTP allows you to connect your WordPress site to your SMTP service provider and send all your WordPress emails with much higher deliverability.
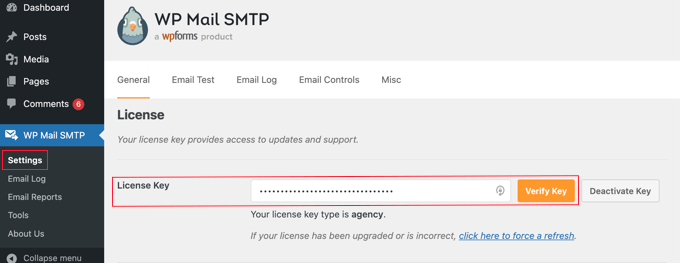
Upon activation, you need to go to the WP Mail SMTP » Settings page in your WordPress admin area to set up the plugin.
First, you need to enter your license key. You can find this information under your account on the WP Mail SMTP website.
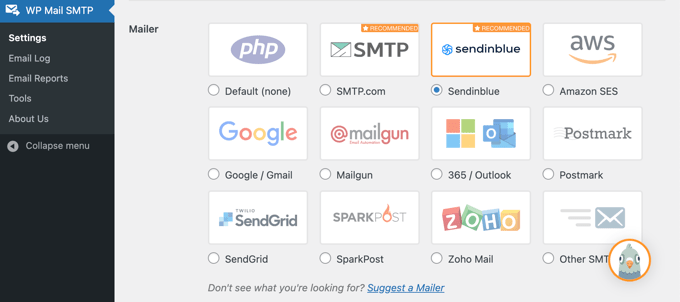
After that, scroll down to the ‘Mailer’ section to select your SMTP service provider. WP Mail SMTP will show all top SMTP service providers. You can click on your provider and then enter the required information below (usually an API key).
If your mailer is not listed, then you can simply choose ‘Other SMTP’ option and enter the required information.
We are often asked by users why they should blog and what are the benefits of blogging.
Blogging has been around since 1993 and has become an essential marketing tool for many businesses. But is it still relevant in the age of social media?
In this article, we’ll talk about why you should blog. And what are the benefits of blogging?
Top Reasons and Benefits of a Blog
Blogs began as a way for individuals to write about their passions, day-to-day life, and things they found interesting. They were like online journals or diaries.
However, blogging quickly became an important part of the marketing strategy for businesses due to its benefits.
Currently, there are 1.9 billion websites in the world, and over 600 million are blogs. That means that the blogging industry makes up a third of the web.
A typical business website consists of a few important pages. You may have a homepage, landing pages for your products/services, a contact page, and a few more.
Search engines may not find your website more important than thousands of other much older websites in the same industry.
For instance, let’s say you sell gardening hoses on your website. There are thousands of companies selling similar products and users may never find your website on their own.
However, with blogging, you can add more content relevant to the topics they’re searching for.
For instance, you can write about ‘Environment-friendly gardening tools’ or ‘water preservation.’ You can also write guides on how to maintain small lawns and gardens and more.
Writing content for a blog opens a doof for more traffic to your website, allowing you to reach more customers, gain a wider audience, and even poach business from big-name brands.
2. Blogging Helps you Generate More Leads and Conversions
Now bringing traffic to your website by creating a blog was the easy part. The more complex part is to convert that traffic into sales and growth for your business.
More than 70% of people visiting your website today, will never find it again. That’s because there is so much content and information on the internet.
A blog helps you convert website traffic into potential leads, convert them into subscribers and social media followers, and allow you to reach out to them later.
Edit YouTube videos to create content for TikTok, Instagram Stories, and more.
These are all the ways that we reuse WPBeginner content across our social media and marketing channels and it works really well.
4. Helps you Build Authority in Your Industry
It is harder to prove your expertise and authority on a subject if all you have is a five-page website selling your products/services.
Adding a blog allows you to regularly publish content on topics related to your industry. This helps you establish authority and win users’ trust.
If you are consistently publishing new content, you’ll become the go-to place for your users and other businesses interested in those topics.
Whether you are a business or an individual, this trust is an invaluable asset. It will unlock tremendous growth opportunities.
5. Helps You Strengthen Brand Recognition
A blog helps you strengthen your brand identity. It gives you more opportunities to use your custom logo across your website, your social profiles, search results, and more.
This brand recognition when combined with customer trust and authority adds enormous value to your digital assets.
As an individual, you get recognized by industry leaders, influencers, and enthusiasts. This opens doors to many opportunities.
Similarly, as a business, your brand becomes more valuable and this weight will be considered by any potential buyer if you want to sell your business in the future.
6. Helps You Build an Engaging Audience
A static website doesn’t leave much room for a conversation. It is uninspiring and often quite boring.
Adding a blog to your website helps you bring the conversation to your website. Now users can engage with your blog posts by leaving a comment, sharing it on social media, writing about it, and more.
We recommend all our users engage with comments and other user activity on their blogs.
It helps you build a community around your business which is extremely useful.
When people leave a few comments on your blog, they develop an affinity with your brand which pays off when they are looking to make a purchase.
These users are also more likely to recommend your products/services to their friends and family.
7. Share Business News, Announcements, Sales, and More
On a typical static website, it is hard to share your business news, announcements, sales events, and more.
A blog on the other hand makes it super easy. In fact, you can get into more details, add context, and write more persuasive content.
For instance, if you are launching a Black Friday sale, you can promote it with a blog post. And then promote that blog post across your website with a floating header or footer banner.
You can make it more rewarding for your regular users and offer a special coupon code to your blog readers.
8. Helps You Improve Long Term SEO
A static website has fewer pages and even if they are ranking high you are still limited to a fixed set of keywords.
Adding a blog allows you to target related keywords and cover more ground by writing on different but related topics.
Over a period of time, you will have multiple posts ranking top on several keywords. Each of these pieces of content is like a soldier in your army.
When asked why they read blog posts, 33% of people said they wanted to learn something new.
Blog posts allow you to educate customers about different ways they can use your products.
You can utilize this opportunity to compare your product with competitors, showcase product features, inform users about benefits, and more.
This makes your blog posts highly valuable even for your existing customers. They can use blog articles to learn about new features that they may not be using.
Basically, it is an opportunity for you to provide real value to your users while promoting your products/services at the same time.
11. Build Additional Revenue Streams for Your Business
Blogs provide many opportunities to generate additional revenue for your business and make money online using your WordPress blog.
For instance, you can display ads in your blog posts using Google AdSense. You can also promote affiliate products and make money with affiliate marketing.
Adding a blog provides you with more opportunities to expand your marketing skills. You’ll have more content to promote which may be suitable for even more marketing channels.
For instance, you will find more opportunities to promote new posts on social media websites. You will also have more useful content to include in your newsletter.
As you explore different opportunities to promote each piece of content, you get to learn more marketing skills to reach new audiences.
13. Unlocks Partnerships and Opportunities for Growth
Blogs are a magnet to attract partnership opportunities to boost your business growth.
With all the activity going on with your blog, you will attract the attention of individuals and businesses looking for mutually beneficial opportunities.
For instance, new vendors may reach out to offer you better pricing or wholesale pricing, smaller shops may want to sell your products, large businesses may want to partner with you regionally, and more.
Similarly, if you sell services or just promoting your personal brand, then your blog may help you get the introduction to the right people. You’ll be able to gradually grow your network and influence.
14. Helps You Find Your Dream Job
Your blog may eventually lead you to find your dream job. Blogging is a popular tool to build a personal brand and promote your services and skills online.
You can show your passion, skills, and knowledge in your specific interests. This may get the attention of businesses looking for talented individuals like you.
Even if businesses don’t reach out to you, you can reach out to them. Your blog will help you see your interest, passion, and expertise in a more interesting way than a plain CV.
How to Get Started with Blogging Right Away
Getting started with a blog is quite easy.
First, you need to choose the right platform. We recommend using WordPress which is the world’s most popular blogging platform.
Now when we say WordPress, we mean WordPress.org and not WordPress.com.
To start a WordPress.org blog, you’ll need a domain name and a hosting account.
Our friends at Bluehost are offering WPBeginner users a free domain name with a generous discount on hosting. Basically, you’ll be able to get started with just $2.75 per month.
Once you have signed up for a domain name and hosting, Bluehost will automatically install WordPress for you.
Need more help? See our complete beginner’s guide on how to start a blog with step-by-step instructions.
We hope this article helped you learn why you should blog and the benefits of blogging. You may also want to see our list of popular online business ideas or take a look at our guide on starting an online store with your blog.
If you liked this article, then please subscribe to our YouTube Channel for WordPress video tutorials. You can also find us on Twitter and Facebook.
Do you want to embed Instagram feeds in WordPress?
Showing Instagram photos and videos on your website helps keep your content fresh, increases user engagement, and builds trust. It’s also a great way to promote your Instagram account and get more followers.
In this article, we will show you how to embed Instagram in WordPress, step-by-step.
Why Embed Instagram on Your WordPress Site?
With over 1.21 billion monthly active users, Instagram is a great place to promote your products and services, build brand awareness, and grow your audience.
However, people won’t see your Instagram content if they just visit your website. With that in mind, it’s smart to embed your Instagram feed in WordPress, so everyone can see it.
This is an easy way to promote your social media page and encourage more people to follow you on Instagram. It can also keep your WordPress website fresh, since new Instagram posts will appear on your site automatically.
All of this new content can improve the search engine optimization (SEO) of your site, and encourage visitors to keep coming back to check the latest posts.
You can even display reviews in WordPress, show hashtag feeds, and embed any posts you’ve been tagged in. All of this is powerful social proof that can build trust and get you more sales.
With that being said, let’s see how you can embed an Instagram feed in WordPress.
This free plugin lets you show photos from one or more Instagram accounts, in a fully customizable feed.
In this guide, we’ll be using the free version of Smash Balloon as it has everything you need to add an Instagram feed to your WordPress website. However, there’s also a pro version that allows you to display hashtag feeds, add Instagram shoppable images, and more.
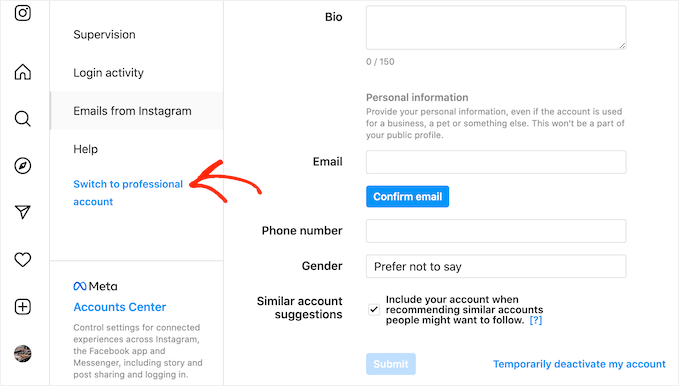
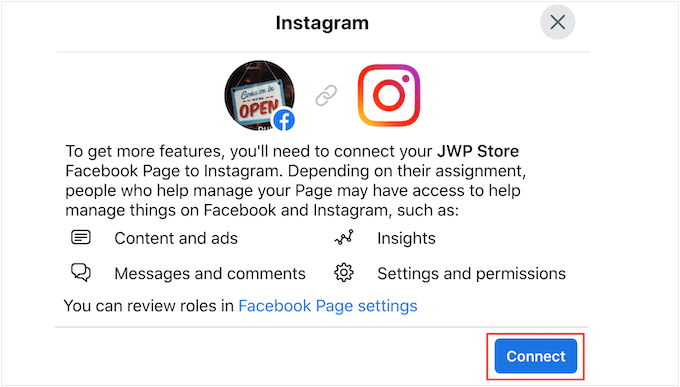
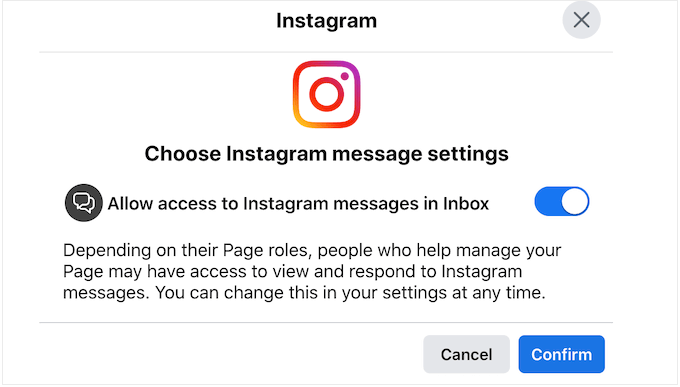
Before getting started, you’ll need to connect your Instagram account to a Facebook page. If you have a personal Instagram account, then you may also want to turn it into a business account as this allows Smash Balloon to show your Instagram bio and header automatically.
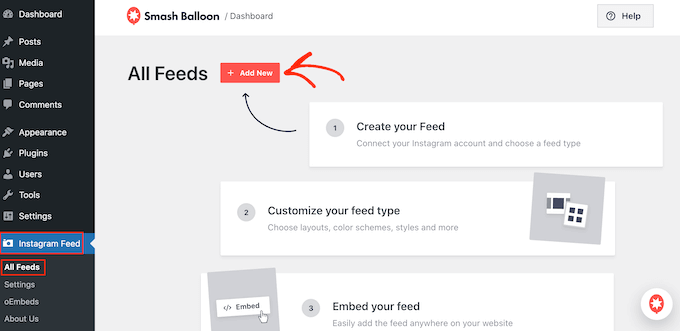
When you’re ready, go ahead and install and activate the Smash Balloon Social Photo Feed plugin. For more details, see our guide on how to install a WordPress plugin.
How to Connect an Instagram Account to WordPress
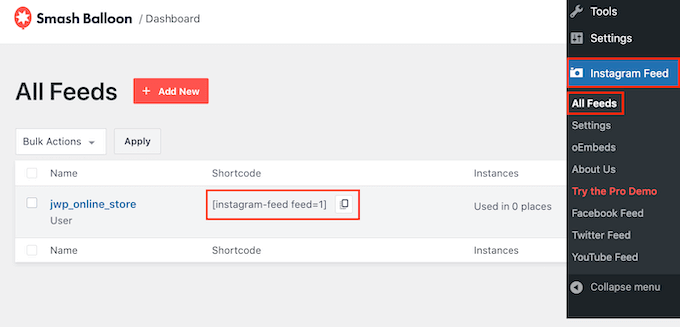
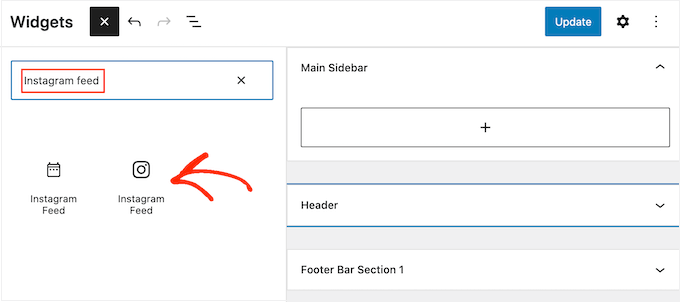
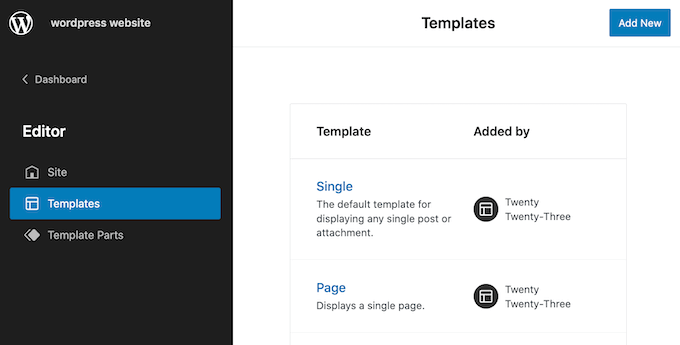
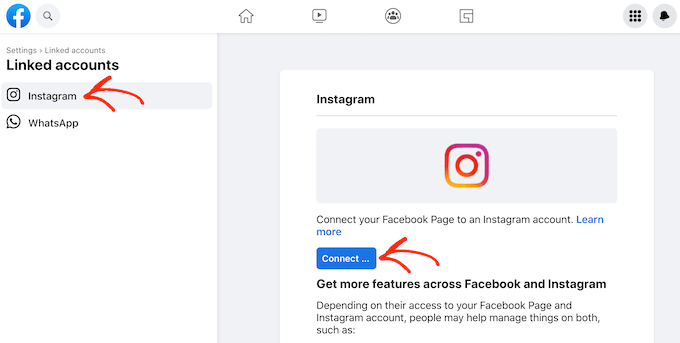
After activating the plugin, your first task is connecting your Instagram account to WordPress. Simply go to Instagram Feed » Settings and then click on ‘Add New.’
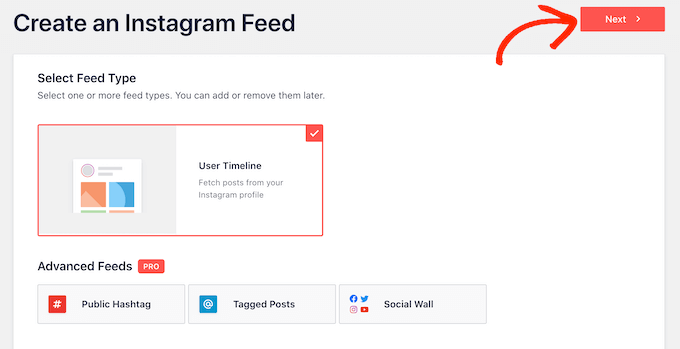
With Smash Balloon pro, you can create feeds from tagged posts and hashtags, or even create a social wall with content from lots of different social media websites.
Since we’re using the free plugin, simply select ‘User Timeline’ and then click on ‘Next.’
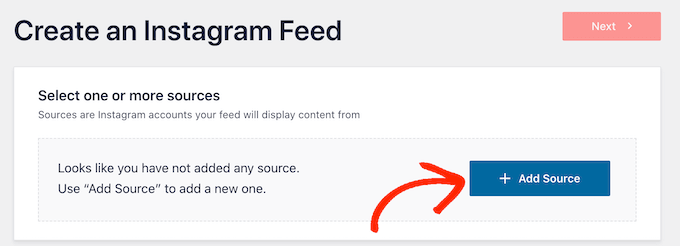
Now, simply choose the Instagram account where you’ll get the photo feed from.
To get started, click on the ‘Add Source’ button.
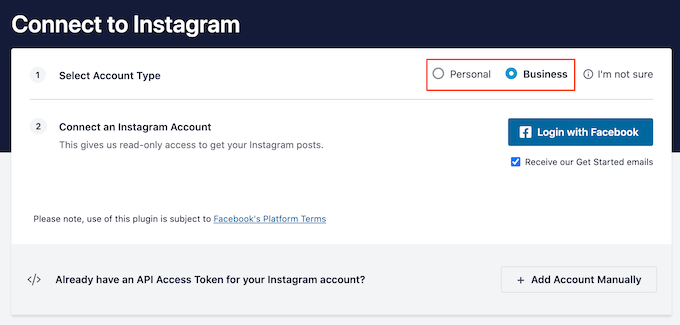
On the next screen, choose whether you want to show photos from a personal or business Instagram account.
If you check the box next to ‘Personal’ then Smash Balloon won’t include the Instagram avatar and bio in your header by default. However, you can always add the Instagram avatar and bio later in the plugin’s settings.
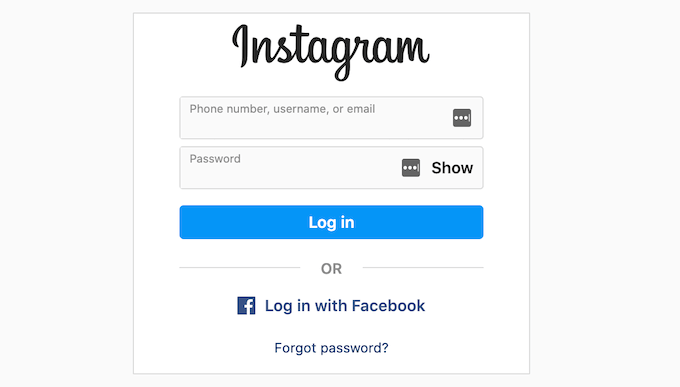
After choosing ‘Personal’ or ‘Business,’ go ahead and click on ‘Login with Facebook.’
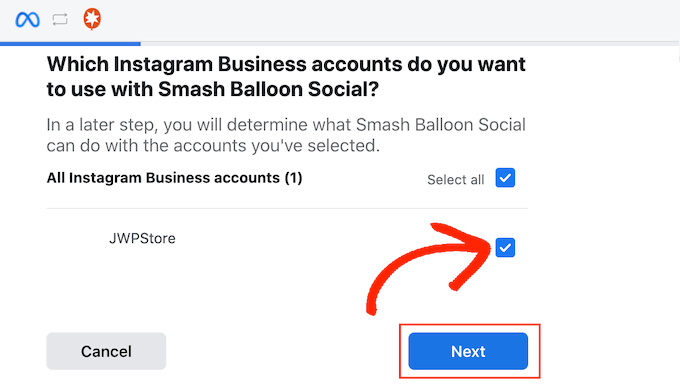
You can now select the Instagram account that you want to feature on your WordPress website, and click on ‘Next.’
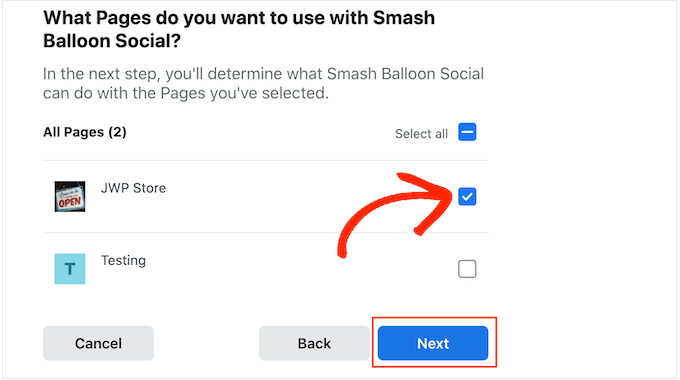
After that, check the box next to the Facebook page that’s linked to your Instagram account.
When you’ve done that, click on the ‘Next’ button.
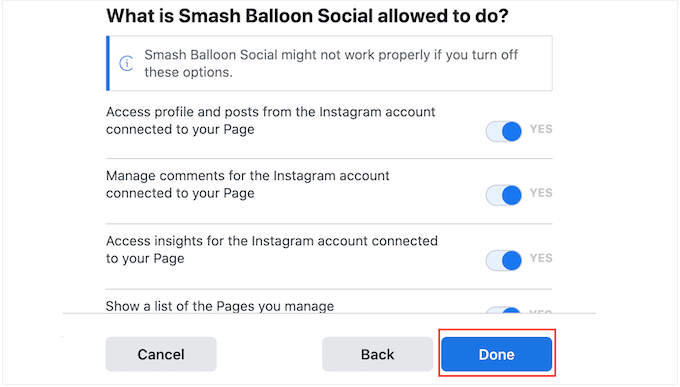
You’ll now see a popup with all the information Smash Balloon will have access to and the actions it can perform.
To restrict Smash Balloon’s access to your Instagram account, just click any of the switches to turn it from ‘Yes’ to ‘No.’ Just be aware that this may affect the photos and videos that you can show on your WordPress blog or website.
With that in mind, we recommend leaving all the switches enabled.
When you’re happy with the settings, click on ‘Done.’
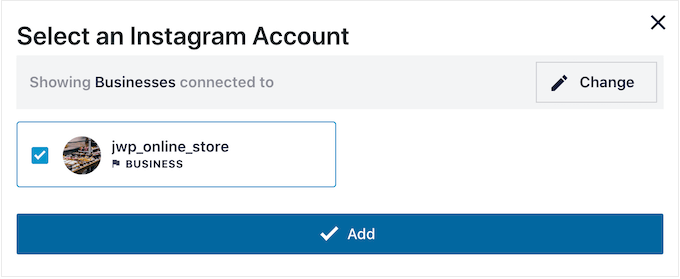
You’ll now see a popup with the Instagram account you just added to your website.
Simply check the box next to that account and then click on ‘Add.’
Smash Balloon will now take you back to the Instagram Feeds » All Feeds screen.
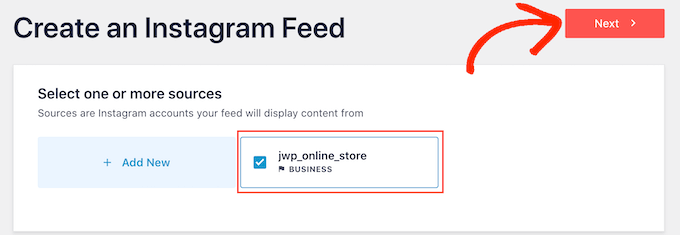
To create a feed, simply check the box next to the Instagram account that you want to use. Then, click on ‘Next.’
The plugin will now create an Instagram photo feed that you can add to any page, post, or widget-ready area.
However, before embedding the Instagram feed you may want to customize how it looks and add any missing information.
How to Customize Your Instagram Photo Feed
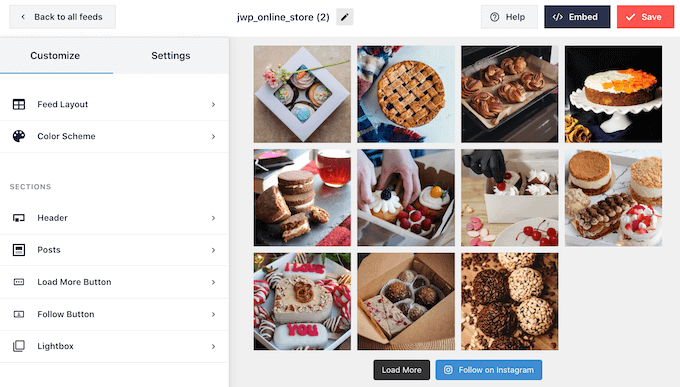
By default, Smash Balloon will open your feed in its editor ready for you to customize.
On the right, you’ll see a preview of your Instagram photo feed. On the left-hand side are all the settings you can use to customize the photo feed.
Most of these settings are self-explanatory, but we’ll quickly cover some key areas.
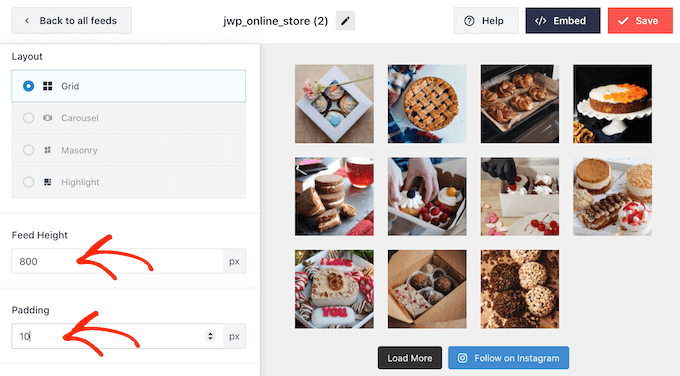
To start, you can change the Instagram photo layout and add padding by selecting ‘Feed Layout’ from the left-hand menu.
As you make changes, the preview will update automatically so you can try different settings to see what looks the best.
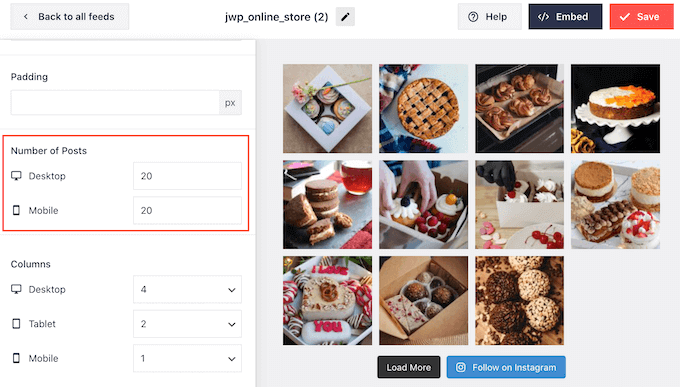
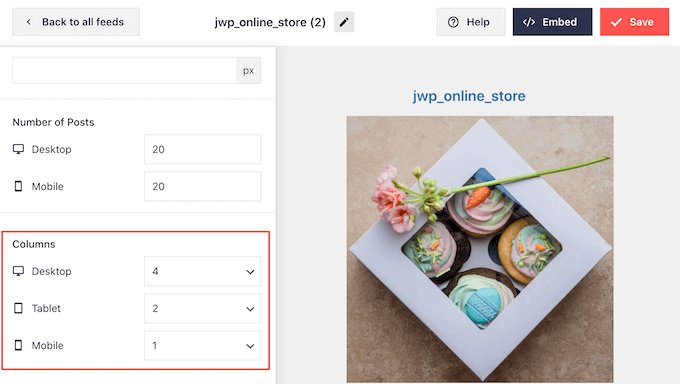
By default, Smash Balloon shows the same number of photos whether the users are on desktop computers or mobile devices.
You can preview how the Instagram feed will look on desktop computers, tablets, and smartphones using the row of buttons in the upper-right corner.
Smartphones and tablets typically have smaller screens and less processing power, so you may want to show fewer Instagram photos and videos on mobile devices.
To do this, just type a different number into the ‘Mobile’ field under ‘Number of Posts.’
By creating different layouts for smartphones, tablets, and desktop computers you can make sure the feed looks great, no matter what device the visitor is using.
By default, the plugin feed shows fewer columns on smartphones and tablets, compared to desktop computers. This helps your photos and videos fit comfortably on smaller screens.
To change these default settings, simply type new numbers into the ‘Columns’ settings.
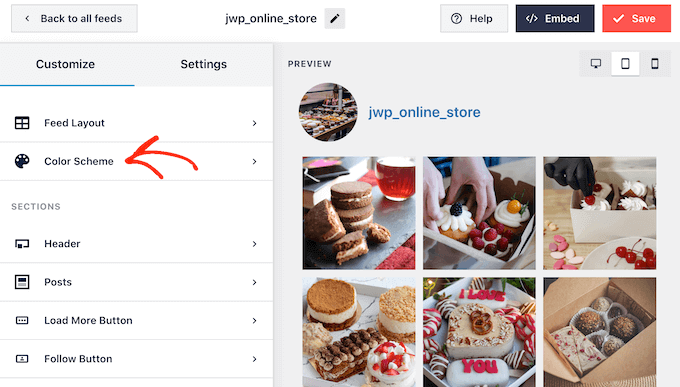
After making your changes, click on the ‘Customize’ link.
This will take you back to the main Smash Balloon editor, ready for you to explore the next settings screen, which is ‘Color Scheme.’
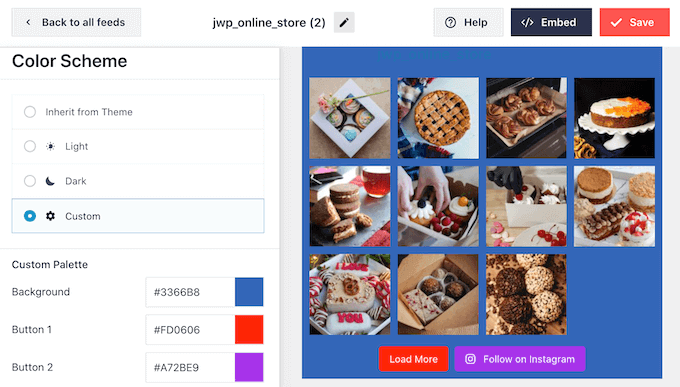
By default, Smash Balloon uses a color scheme inherited from your WordPress theme, but it also has ‘Light’ and ‘Dark’ themes that you may want to use instead.
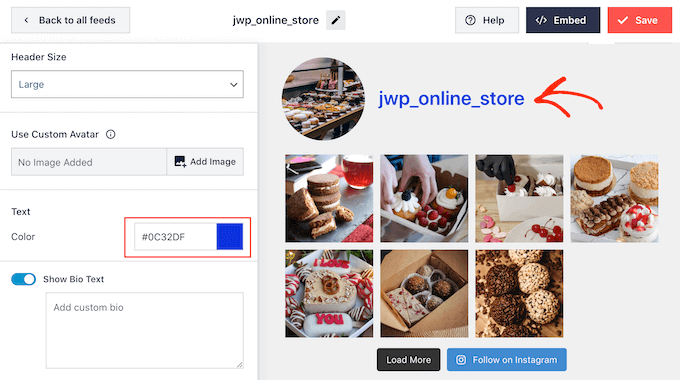
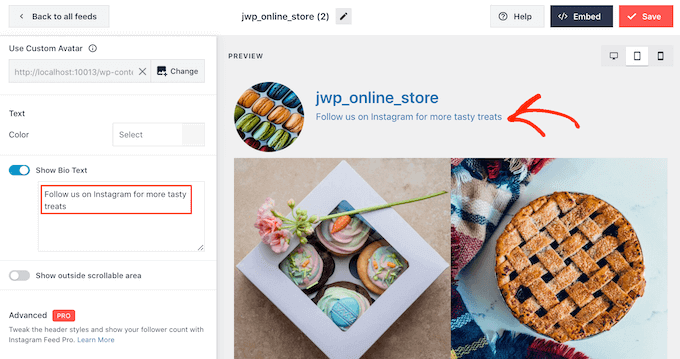
By default, Smash Balloon adds a header to the Instagram feed, which is your profile picture and the name of your page. To change how this section looks, click on ‘Header’ in the left-hand menu.
On this screen, you can change the size of the header, add a new color, or show your Instagram bio.
Sometimes, you may want to show a different profile picture. For example, your Instagram avatar may not stand out from your theme so you want to show a custom logo instead.
To change the profile picture, click on ‘Add Image’ under ‘Show custom avatar.’ You can then either choose an image from the WordPress media library or upload a new photo.
You can also add a different bio. For example, you might encourage people to visit your profile on Instagram or to simply follow your account.
To create a unique Instagram bio, simply type into the ‘Add custom bio’ box.
Smash Balloon automatically analyzes your Instagram photos and shows them at the best resolution. We recommend using these default settings, but you can make the Instagram images bigger or smaller if you need to.
To change the image size, click on ‘Posts’ from the left-hand menu. Then, select the ‘Images and Videos’ option.
You can now choose between thumbnail, medium, and full-size images using the dropdown menu that appears.
If you’re unhappy with how the feed looks, then you can go back to this screen at any point and select ‘Auto-detect (Recommended)’ from the dropdown.
By default, Smash Balloon adds a ‘Load More’ button to the bottom of your Instagram feed so visitors can scroll through your photos and videos.
You can change how this button looks by selecting ‘Load More Button.’
Here, you can help the ‘Load More’ button stand out by changing its background color, text color, and hover state.
You can also try adding your own messaging to the button, by typing into the ‘Text’ field. This way your visitors will be more inclined to click.
While we do recommend leaving this button enabled, you can remove it. For example, you might encourage people to visit your Instagram by limiting the number of photos they can see on your site.
To remove the button, simply toggle the ‘Enable’ slider to turn grey.
If visitors like what they see, they may decide to subscribe using the ‘Follow on Instagram’ button that appears below the embedded feed.
Since it’s such an important button, you may want to add some custom styling to help it stand out.
You can do this by selecting ‘Follow Button’ in the left-hand menu. Here, you can change the button’s background color, hover state, and text color.
By default, the button shows a ‘Follow on Instagram’ label.
You can replace this with your own call to action by typing into the ‘Text’ field.
When you’re happy with how the Instagram feed looks, don’t forget to click on ‘Save’ to store your changes.
You’re now ready to add the Instagram feed to your WordPress website.
How to Embed Instagram Feed in WordPress
You can add the Instagram feed to your website using a block, widget, or shortcode.
If you’ve created more than one feed using Smash Balloon Social Photo feed, then you’ll need to know the feed’s code if you’re going to use a widget or block.
To get this code, go to Instagram Feed »All Feeds and then look at thefeed=""part of the shortcode. You’ll need to add this code to the block or widget, so make a note of it.
In the following image, we’ll need to usefeed="1"
If you want to embed the Instagram feed in a page or post, then we recommend using the Instagram Feed block.
Note: If you’re using a block-enabled theme, you can follow the instructions below to add the block anywhere on your site using the full-site editor.
Just open the page or post where you want to embed your Instagram photo and video feed. Then, click on the ‘+’ icon to add a new block and start typing ‘Instagram Feed.’
When the right block appears, click to add it to the page or post.
The block will show one of your Smash Balloon feeds by default. If you want to show a different Instagram feed instead, then find ‘Shortcode Settings’ in the right-hand menu.
Here, simply add thefeed=""code and then click on ‘Apply Changes.’
The block will now show the photos and videos from your Instagram account. Just publish or update the page to make the feed live on your website.
If you’re using a theme that does not use full-site editing, you can add the Smashballoon Instagram Feed to any widget-ready area, such as the sidebar or similar section so visitors can see it anywhere they go on your site.
Simply go to Appearance » Widgets in the WordPress dashboard and then click on the blue ‘+’ button.
In the search bar, type in ‘Instagram Feed’ and select the correct widget when it appears.
WordPress has a built-in ‘Instagram Feed’ block, so make sure you choose the one that shows the official Instagram logo.
After that, simply drag the widget onto the area where you want to show the Instagram feed, such as the sidebar or similar section.
The widget will automatically show one of the feeds you created using Smash Balloon. If you want to show a different Instagram feed, then just type the feed’s shortcode into the ‘Shortcode Settings’ box.
As long as you are adding the shortcode to the ‘Shortcode Settings’ box, you do not need to include the brackets around it.
After that, click on ‘Apply Changes.’
You can now make the widget live by clicking on the ‘Update’ button. For more information, please see our step-by-step guide on how to add and use widgets in WordPress.
Another option is embedding the Instagram feed on any page, post, or widget-ready area using a shortcode.
Simply go to Instagram Feed »All Feeds and copy the code in the ‘Shortcode’ column. You can now add this code to any Shortcode block.
Finally, if you have a block-enabled theme, then you can use the full-site editor to add the Instagram Feed block anywhere on your site.
In the WordPress dashboard, simply go to Appearance » Editor.
By default, the full-site editor will show the theme’s home template. If you want to add the Instagram feed to a different template, then click on the arrow next to ‘Home.’
You can then choose any design from the dropdown, such as the footer template.
If you don’t see the template in the list, then click on ‘Browse all templates.’
The full-site editor will now show a list of all the templates you can edit. Simply click on the template where you want to show the Instagram feed.
After choosing a template, just hover your mouse over the area where you want to add the Instagram photo feed.
Then, click on the blue ‘+’ button.
After that, start typing in ‘Instagram Feed.’
When the right block appears, click to add it to the template. This will be the one with the official Instagram logo.
As always, Smash Balloon will show a feed by default if you do not add a specific shortcode. You can change this feed by adding a shortcode following the same process described above.
FAQs About Embedding Instagram in WordPress
Smash Balloon makes it easy to show Instagram photos and videos on your website. That being said, here are some of the most frequently asked questions about adding an Instagram feed in WordPress.
How Do I Create an Instagram Business Account?
Smash Balloon Social Photo Feed can display photos from either a personal or business Instagram account.
However, Smash Balloon can’t automatically fetch the Instagram avatar and bio from a personal Instagram account. With that in mind, you may want to check whether you have a personal or business account, and then switch to a business account so Smash Balloon can fetch your avatar and bio automatically.
To check, just visit your Instagram account and click on the three-lined icon in the side menu.
After that, select ‘Settings.’
If you don’t have a business account, then this screen will show ‘Switch to professional account’ in the left-hand menu.
If you currently have a personal account and want to switch to a business account, then simply give this link a click.
How Do I Connect a Facebook Page to an Instagram Account?
Before you can add an Instagram feed to WordPress, you’ll need to connect your Instagram account to a Facebook page.
To do this, head over to the Facebook page that you want to use and then click on ‘Settings’ in the left-hand menu.
After that, click on ‘Linked Account.’ You can now select ‘Instagram’ and click on the ‘Connect’ button.
Facebook will now show all the information it will be able to access, and the actions it can perform on Instagram.
If you’re happy to go ahead, then click on the ‘Connect’ button.
Just be aware that anyone else who manages your Facebook page will be able to see your Instagram messages, and respond to them. If you want to keep your Instagram messages private, then click to disable the option.
When you’re happy and ready to move on, click ‘Confirm.’
This opens a popup where you can type in your Instagram username and password.
After that, go ahead and click on ‘Log In.’
After a few moments, you’ll see a message saying that your Instagram and Facebook accounts are now connected.
Did you know that every WordPress post or page can have two titles, and they are used for different purposes?
These different post titles help you attract potential readers by showing them what your content is about in a clear and interesting way. They are also used by search engines when it comes to SEO rankings.
In this article, we’ll explain the difference between SEO titles and H1 post titles, so you can better optimize your content for higher rankings.
What’s the Difference Between SEO Titles and Post Titles?
Every post and page on your WordPress website will have two titles, one that visitors will see at the top of the post, and one that search engines use when indexing your site. While these are two completely different use-cases, the two titles will most often be the same.
The title that is displayed at the top of every WordPress post is called the H1 post title, because WordPress will surround it with <h1>HTML tags to show that it is the most important heading in the post.
This title should let your visitors know what the post is about and attract their attention, so they click on the post and read it.
Search engines like Google pay close attention to your <h1> header tags, but they also look for a different title, one enclosed in HTML <title> tags. This is your post’s SEO title and is also known as the meta title.
The SEO title is used when search engines rank your page and display it in search results.
Your visitors won’t see the SEO title anywhere on your website. However, it will be used as the page title in the browser tab, and other websites may use it when linking to your post.
By default, the SEO title will follow the following template: ‘Post Title — Site Title’. This will work fine for most blog posts. However, if you wish to customize the SEO title of a post or page, then you will need to use a WordPress SEO plugin.
With that being said, let’s take a look at how to add H1 post titles and SEO titles in WordPress.
How to Add H1 Post Titles in WordPress
Adding a title to your post is simple. When you add a new post in WordPress, the block editor will ask you to add a post title, and then allow you to create blocks where you can add the content of the post.
You can add a post title by simply typing it on the first ‘Add title’ line of the post.
Your website visitors will see this title displayed at the top of the post on your blog, and it will also be used in the post list on your blog’s home page.
When you view the HTML source of the post, you will notice that WordPress has wrapped the title in <h1> tags to identify it as the post title.
The <h1> tag is the most important heading tag, and should be used only for the post’s title. If you use subheadings in your post, then you should use less important heading tags, such as <h2>, <h3>, and <h4>.
How to Add SEO Titles in WordPress
The easiest way to add and customize SEO titles is with the All in One SEO (AIOSEO) plugin. AIOSEO is the original WordPress SEO plugin that’s used on over 3 million websites including our own.
In this tutorial, we’ll use the free version of All in One SEO because it allows you to customize the SEO title. However, AIOSEO Pro offers even more features to help you rank better in search engine results pages.
Now, when you are adding or editing a post or page, there will be an ‘AIOSEO Settings’ section below the post content. Here you will find a section labeled ‘Post Title’ where you can customize the SEO title.
Notice that the default SEO title is the H1 post title followed by a separator and the site title.
You will also see a preview of how the title will look in a Google search and the number of characters you used. This will help you create a title that is not too long. The recommended length of an SEO title is 60 characters so it isn’t cut off on search engine results pages.
You might like to leave the default SEO title as it is, or you can customize it using smart tags (more on that later) or by simply typing a new SEO title like this:
When you view the HTML source of the post, you will notice that WordPress has used <title> tags to identify it as the SEO title.
Visitors to your website will see the H1 post title at the top of the post. They will see the SEO title in their browser tab and on search engine results pages.
How to Customize the Default SEO Title in WordPress
You can customize the default SEO title used for posts and pages using the All in One SEO plugin.
First, you need to navigate to the All in One SEO » Search Appearance page and then click the ‘Content Types’ tab.
Near the top of that page, you will see the ‘Posts’ section. Make sure you’re on the ‘Title & Description’ tab and you will see the default SEO title used for posts next to ‘Post Title’.
By default, you will see smart tags for the post title, a separator, and the site title. You can customize the default SEO title by adding or removing smart tags.
For example, to make the SEO title just the post title without the site name at the end, simply delete the ‘Separator’ and ‘Site Title’ smart tags. You can do this with the backspace key on your keyboard, or by clicking on a smart tag and then clicking the trash icon on the popup.
You can also easily add smart tags to the default SEO title. You can do this by clicking the buttons for commonly used tags found above the Post Title field, or clicking the ‘View all tags’ link to see a list of all smart tags.
Simply click on a smart tag to add it to the SEO title. When finished, make sure you click the ‘Save Changes’ button at the top of the screen to save the new default post title.
You can customize the default page title in a similar way by scrolling down to the ‘Pages’ section below.
Tips for Creating the Best Post Titles in WordPress
Choosing the right title for your blog post can help it rank higher in search results. It can also motivate users to click on your article when they see it in the search results thus boosting your CTR (aka click through rate).
Here are some tips on how to write more effective post titles.
Write Your Posts Titles for Users, Not Search Engines
When you think of a title to use for your post, keep your users in mind, not just search engines.
When you write a title for users, you’re likely to come up with something that’s more engaging, and it will lead to more clicks.
You want to make sure that your title is readable, understandable, memorable, and clearly describes the content of the post.
Make Sure the Title Is Not Too Long
The length of an SEO title is important because if it is longer than 600 pixels, then Google will not be able to display the full title in search engine results. Because of this, we recommend keeping your SEO titles shorter than 60 characters.
You can check the length of the SEO title and see a preview of how it will look in a Google search when you customize it using All in One SEO.
Include the Focus Keyword in the Title
You can make your blog post title more SEO-friendly by using your focus keyword in the title. We also recommend making it catchy and click-worthy. That’s because your organic click-through rate (CTR) plays an important role in SEO.
The best way to improve your titles is with the AIOSEO headline analyzer tool. This will evaluate your headline, give it a score, and offer tips to make your headline even better.
Rank Even Higher by Adding a Meta Description and Keywords
Now that you’ve taken time to craft an effective title, you should also add keywords and a meta description to help your post rank even higher. You can learn how to do this step-by-step in our guide on how to add keywords and meta descriptions in WordPress.
When Should You Use a Different SEO Title?
In most cases, your H1 post title and SEO title will be the same. However, there are times when you may want to customize the SEO title so that it is different from the H1 post title.
A More Engaging SEO Title
For example, you may want to tweak the SEO version of the title, so it is more engaging to potential visitors and more likely they will click on it in a Google search. You could then display a more detailed and descriptive H1 title on your website.
A Shorter SEO Title
Another reason to change the SEO title is if you have created the perfect H1 title for your post, but it is longer than 600 pixels. In that case, Google will not have room to display the full title in the search results, and you should create a shorter SEO title.
A Longer SEO Title
On the other hand, if your H1 title is very short, then you can take the opportunity to make your SEO title longer by adding relevant keywords that will improve your page ranking.
Warning: Google Regularly Changes Your SEO Title
There’s one last thing about titles we should warn you about. Google is likely to rewrite your SEO title to try to make it more suitable for those performing searches. In fact, a study has found that Google is changing more than 60% of post titles to improve search quality.
This can be frustrating if you have worked hard on crafting the perfect SEO title.
What we have found is that your title is more likely to be changed when your SEO title is different from the H1 title. When these two titles match, the study found that Google rewrites the title only 20% of the time. This is a good reason to use the same title in both places if you can.
2022 is about to come to an end, and like every year it brings us an opportunity to look back at our accomplishments and goals.
This year, slow economic activity drove many people to start a new website or online business. A large number of users took advantage of WPBeginner’s free resources to launch their businesses online.
We are grateful for the continued support of our users, which provides us with inspiration and energy to move forward.
To keep up with our tradition, in this article we’ll share our staff pick of the best of best WordPress tutorials on WPBeginner.
We’ll also share an overview of 2022 from our CEO to gain some perspective and reflect upon the progress.
WPBeginner Recap 2022 by Syed Balkhi
2022 has been a wonderful year, and it was full of new experiences.
This year, I definitely pushed myself to new limits when it came to time management, balancing priorities, and business growth.
I turned 32, visited 8 countries including a trip to the Arctic circle and an African safari where I saw a black Rhino, bought a few companies, launched new products, and overall I’m ending the year stronger than ever.
None of this would be possible without the support of my wife, Amanda, and my family.
We accomplished a lot in 2022, and like always I learned a ton of lessons.
Note: I did a personal 2022 year end review on my blog that has more lessons and insights along with my goals for 2023.
This year WPBeginner turned 13 years old which means we officially have a teenager on our hand.
We spent a lot of time this year creating new content, but most importantly updating hundreds of previously written tutorials to ensure they’re all up to date.
I’m really proud of the work our team has done. Aside from the content side, our software products passed the milestone of 20 million active installs. We celebrated it with a NASDAQ billboard in Time Square.
This was a pretty huge moment for our entire team — going from a blog to being on Time Square in New York City!!!
For me personally, it was a dream come true moment, and this is proof that hard work does pay off.
Our WPBeginner Engage community on Facebook passed 90,000 members, and it’s the largest WordPress facebook group (it’s free to join).
WPBeginner YouTube Channel passed 282,000 subscribers, and we passed 43 million video views.
We launched the WPBeginner podcast this year, and we got over 29,000 views on YouTube as well as over 4000+ downloads. This is a new content experiment for us, and I can see our monthly downloads continue to grow steadily.
Our team has now grown to over 230+ people across 45 different countries. We’re hiring for full-time remote positions. If you’re interested, check out our Careers page.
Our growth is a direct result of the incredible growth of WordPress. It is the world’s most popular website builder used by over 43% of all websites.
I shared 3 trends that I believe will help WordPress market share grow to 50% and beyond.
We have a lot free tools in the works for WPBeginner readers, and I can’t wait to share them with you over the next two months.
One of the questions I often get from new readers is how does WPBeginner make money? Well, it’s through our suite of premium plugins and SaaS application. I did a brief overview of WPBeginner income, but here’s a quick recap of our various products.
AIOSEO
All in One SEO (aka AIOSEO) is one of the most popular WordPress SEO plugins that’s now being used by over 3 million websites. This year the team worked really hard to make it by far the best SEO toolkit in the market.
If you want to improve your SEO rankings, then you should use AIOSEO.
We added a powerful Link Assistant feature to help automate the internal linking process. It also lets you see which domains you’re linking out to, which posts have no links, and so on. This is great for both SEO pros and business owners.
I had this feature built to help our businesses improve our content marketing, and also do SEO cleanups when we acquire new businesses.
We also introduced the Next-Gen Schema generator to help you level up your on-page SEO game. Basically you can generate custom schema templates to improve your SEO rankings without writing any code.
There is a reason why AIOSEO has seen the level of growth that we did this year as more people are switching away from legacy WordPress SEO plugins to AIOSEO. Here are 9 reasons why you should switch to AIOSEO.
WPForms is the fastest growing online form builder for WordPress with over 5 million active installs. It’s now the #7 most popular plugin in the WordPress.org plugin directory. Here’s a link to the WPForms free version.
This year we added several powerful features to help you improve your workflow and save time. For example, we introduced Form Revisions which adds version control for online forms. We also added form tags, ability to recover deleted forms, form locator, and form search to make managing forms a breeze.
We added a form layout field to allow you to create multi-column form layouts without any code. This was a much requested feature, and I’m glad the team was able to get it out.
WPForms is continuing to raise the bar, and I’m really proud of our team.
The WPForms team also did their own 2022 Year in Review post which is far more interactive and super cool.
WPCode
We launched a new product called WPCode which is a WordPress code manager to future-proof your website customizations using smart code snippets.
WPCode is like the ultimate Swiss-Army knife tool that will help you replace dozens of existing WordPress plugins while making your website faster. My ultimate goal here was to help website owners save time and hassle while managing website customizations.
The idea came mainly from our users because about a decade ago in 2012, I created a free plugin called Insert Headers and Footers. This plugin made it easy for you to add code in WordPress header or footer area such as Google Analytics script, FB pixel, other tracking codes, and such.
Over the years, the plugin grew to over 1 million active installs. Every month, I would get requests from users to add more functionality such as the ability to conditionally load scripts on certain pages, ability to add code snippets in other areas of the website, and so on.
So we rebranded the plugin to WPCode (much better name), and we made it 100x more powerful. Best of all we kept most things free.
I can say it’s by far the MOST POWERFUL plugin you’ll install on your WordPress site, and I’m not exaggerating. You can read my full announcement here or watch this video on WPBeginner channel to see why I am so excited about this plugin.
We have big plans for it. Just last month, we launched the Private Cloud Snippets library to improve developer workflow. You can now save all your code snippets to cloud and re-use them across multiple client projects.
We also added code revisions (aka version control) to WordPress admin area, built deeper integration for WooCommerce & EDD, created device-specific snippet rules, and a whole lot more.
You can expect a lot of great things coming from WPCode in 2023.
SendLayer
SendLayer is another new product that we launched this year. It’s an email delivery platform that helps you get your website emails into your user’s inbox with maximum deliverability, reliability, and scalability.
You can use SendLayer with WordPress or any other platform that you prefer because it’s a powerful SMTP email service API. It gives you reliable email delivery while protecting your domain reputation from spam filters and giving you detailed email logs along with open & click analytics.
2023 will be a big year for SendLayer — we’re planning some big announcements in the next couple months.
Last year, we acquired WP Simple Pay as part of the Sandhills product acquisition. It’s a simple yet powerful solution that helps you accepting one-time and recurring payments on your WordPress site without setting up a shopping cart.
We redesigned the website to highlight the features it offers, and we also added tons of other powerful features like the ability to add Buy Now Pay Later, Automatic tax calculation based on user location, flexible coupon management, pre-made payment form templates along with deep integration with WordPress page builders, a brand new onboarding wizard, and so much more.
There’s a free version available as well that you can use to accept payments securely on your website with mobile-optimized forms, card validation, and more.
I’m really proud of how this product is evolving, and we have some big features coming next year.
Other Notable Product Highlights
OptinMonster which is the #1 popup and conversion optimization plugin that I created for our business added revenue attribution this year, so now you can see exactly how much revenue you generate from each popup campaign. We also added dozens of new templates, smart blocks, field mapping, and deeper integrations.
MonsterInsights is the best WordPress analytics plugin in the market used by over 3 million websites. This year we introduced a new WordPress User Journey feature for eCommerce which shows you all the steps the user took before making a purchase.
Easy Digital Downloads team launched version 3.0 which was a major re-factor. Now includes support for block editor, multi-currency, improved checkout forms, better reporting, and more. This is the eCommerce plugin that I use to sell our digital products.
MemberPress which is the best membership plugin for WordPress added certifications, so now you can offer certificates to students upon completion of the course. MemberPress continues to be the leading solution for creating membership sites & LMS sites.
Smash Balloon is the most popular social media feeds plugin for WordPress. This year the team completely revamped all the plugins to add a much improved social feed customizer with live preview and more.
Uncanny Automator, the leading WordPress workflow automation plugin now has over workflow 100+ integrations to help you automate your WordPress site. This plugin can help you eliminate Zapier so you can save more money and time with website automations.
Acquisitions and Investments
This year we did few really great acquisitions & investments. Here are the new products that have joined the WPBeginner family
FunnelKit (formerly WooFunnels) is a leading sales funnel builder and marketing automation platform for WooCommerce. Over 18,000+ smart store owners use FunnelKit to create high-converting checkouts, order bumps, one click upsells & automations that are proven to boost profits.
They also have a really powerful email automation and CRM product called FunnelKit Automation (formerly Autonami). It’s basically an ActiveCampaign alternative for WordPress which gives you the email marketing & SMS features for a fraction of the cost.
We also acquired WP Charitable, a popular donation and fundraising plugin. Over 10,000+ non-profit organizations and website owners across the world use Charitable to create fundraising campaigns and raise more money online (see the full story).
End of November, one of the WPBeginner Growth Fund companies, Strategy11, acquired WP Tasty and Nutrifox.
Strategy11 is the team behind Formidable Forms, Business Directory Plugin, and Advanced Classified. Steve & Steph Wells joined the WPBeginner Growth Fund in 2018, and we have seen tremendous growth in the business since then.
When the opportunity presented itself, we decided to acquire the WP Tasty plugin suite which offers a suite of tools for food bloggers including a WordPress recipe plugin, a smart roundup plugin, affiliate management plugin, and a better Pinterest integration.
Nutrifox is a SaaS nutrition label generator for food bloggers as well food brands who’re looking to show nutrition labels for compliance reasons on their website.
Aside from these, we have recently acquired few other businesses, but the announcement is not public yet, so I will be sharing those likely in January or February
Want us to acquire or invest in your business? Learn more about the WPBeginner Growth fund where I invest in WordPress and SaaS companies.
With that said, let’s take a look at 2022’s best WordPress tutorials on WPBeginner.
How to Create a Video Membership Site in WordPress – WordPress makes it easier to sell on-demand and members-only content. In this tutorial, we walked users through the steps to build a video membership website in WordPress.
How to Create a Facebook Ads Landing Page in WordPress – If you are running Facebook ads, then you would want to direct users to a properly optimized landing page. In this tutorial, we showed how to easily create a beautiful Facebook ad landing page in WordPress for higher conversions.
How to Disable Widget Blocks in WordPress (Restore Classic Widgets) – WordPress replaced the widget screen with new widget blocks. However, many users have themes built for legacy widgets. In this article, we showed how to disable widget blocks and use legacy classic widgets.
How to Add Nofollow Links in WordPress Navigation Menus – Adding nofollow attribute to external links is helpful for SEO but how do you add it to a navigation menu link? In this tutorial, we showed +how to easily add nofollow links in navigation menus.
March
How to Add IndexNow in WordPress to Speed Up SEO Results – IndexNow is a new SEO feature that allows websites to get their new content indexed by popular search engines. In this tutorial, we explained how to add IndexNow in WordPress to improve SEO.
How to Properly Use Focus Keyphrase in WordPress – Optimizing your content for a focus keyphrase helps you improve SEO rankings. In this article, we explained how to properly use focus keyphrase in WordPress to improve search rankings.
18+ Best ClickFunnels Alternatives – ClickFunnels is a website builder tool for marketers to create sales funnels and boost conversions. In this article, we discussed its pros and cons and shared the best ClickFunnels alternative that are actually better and less expensive or free.
Best Internal Linking Plugins for WordPress – Internal linking is critical for better SEO rankings and higher pageviews. In this article, we showcased the best internal linking plugins for WordPress that you can use to automatically or manually add internal links.
How to Accept Apple Pay in WordPress – Apple Pay is a convenient payment solution for customers and small businesses. In this article, we showed how to easily accept Apple Pay in WordPress without hiring developers.
Elementor vs Divi vs SeedProd (Compared) – Users often ask us about which is the best page builder among the top contenders. In this article, we compared Elementor vs Divi vs SeedProd to figure out which is the best site builder tool for WordPress beginners.
How to Accept Recurring Payments in WordPress – Many online businesses rely on recurring payments instead of one-time payments. In this beginner’s guide, we shared four methods to easily accept recurring payments in WordPress.
May
Beginner’s Guide: How to Use WordPress Block Patterns – Block patterns are a new WordPress feature that allows site owners to quickly insert common layouts into their pages using the Gutenberg content editor. In this article, we explained WordPress block patterns and how to use them.
How to Easily Add a Download Link in WordPress – Adding a download link in WordPress makes it easier for your customers to download files. In this tutorial, we showed multiple ways to easily add a download link to WordPress.
How to Limit the Number of WordPress Form Entries – Do you want to limit the number of entries users can submit using a WordPress form? In this tutorial, we showed how to easily limit the number of WordPress entries.
June
How to Add Text on Top of an Image in WordPress – We have been often asked by users about how to add text on top of an image in WordPress. In this article, we showed multiple ways to easily add text on top of an image in WordPress.
How to Display WordPress Form Entries on Your Site – Some website owners want to collect data via forms and display it on their website. Whether is a survey, feedback, or other user generated content. In this article, we showed how to easily display WordPress form entries on your website.
Best Call Center Software For 2022 – Many users like to talk to a business on the phone instead of email. Adding a call center software for your support and sales team can help convert those users into paying customers. In this article, our experts picked the best call center software for small businesses.
How to Create a Reddit-Like Website with WordPress – Reddit is a popular online community with millions of highly engaged users. In this article, we showed how you can easily create a Reddit-like website with WordPress.
How to Connect Multiple WordPress Sites Together – Do you want to connect multiple WordPress websites to automate everyday admin tasks? In this article, we shared 3 easy ways to connect multiple WordPress sites together.
How to Sell Digital Art and Graphics Online – WordPress makes it super easy to sell anything online. In this article, we talked about how to easily sell digital and graphics online using WordPress.
How to Set Up Automated Drip Notifications in WordPress – Drip notifications allow you to send scheduled notifications to subscribers via email or push notifications. In this article, we showed how to set up automated drip notifications in WordPress.
How to Customize WooCommerce Emails – Default WooCommerce emails are quite plain and boring. In this article, we showed two ways to easily customize WooCommerce emails to make them more useful.
How to Customize the Search Results Page in WordPress – The default WordPress search is too basic for most websites. In this tutorial, we walk you through the steos you can take to customize WordPress search results page with better results and user experience.
September
Best Monthly Web Hosting Plans – Are you looking for a monthly web hosting plan? In this showcase, our experts picked the best monthly web hosting plans (starting at $4.95 per month).
The Ultimate Guide to GA4 in WordPress for Beginners – With the current version of Google Analytics being sunset on July 1, 2023, we got a ton of questions from users about the new Google Analytics 4 (GA4). In this beginner’s guide, we explained Google Analytics 4 for WordPress users.
How to Create a Table of Contents in WordPress Posts and Pages – a Table of Contents improves user experience for longer articles and can also help with SEO when used properly. In this tutorial, we showed how to easily create a table of contents in WordPress posts and pages.
2022 Blogging Statistics, Trends & Data – For this article, our research tream collected the most interesting and significant blogging statistics, trends, and data. This information can help you analyze some of the latest trends in blogging and how it has evolved over time.
How to Speed up WooCommerce Performance – Speed is crucial for the success of an online store. In this guide, we shared easy to implement tips to speed up WooCommerce performance.
How Much Traffic Can WordPress Handle? – One of the common misconceptions about WordPress is that it is harder to scale for large traffic. In this article, we debunked this myth by explaining how much traffic can WordPress handle.
In October, our research team published three new resources:
2022’s CMS Market Share Report – A look at the market share of different Content Management Systems with stats, data, and latest trends.
November
The WordPress SEO Crawl Budget Problem and How to Fix It – Search engine bots set a crawl budget for each website, and your website may end up wasting it on unnecessary pages. In this article, we explained the SEO crawl budget problem and how to easily fix it.
How to Easily Add Browser Tab Notification in WordPress – You may have noticed some websites with tabs highlighted with animations, icons, and text. In this tutorial, we showed how to easily add browsser tab notification in WordPress.
How to Add a Buy Now Button in WordPress – Do you want to add a quick buy now button in WordPress? In this tutorial, we showed 3 ways to easily add a buy now button in WordPress.
December
How to Sell Excel or Google Spreadsheets in WordPress – Excel and Google spreadsheet files are popular items sold online. These can be templates, printable workbooks, and more. In this tutorial, we showed how to easily sell Excel or Google spreadsheets in WordPress.
A History of Blogging (1993 – Present Day Timeline) – Our team compiled and updated a useful resource about blogging. In this resource, you’ll see a comprehensive history of blogging from 1993 to present time.
How to Enable Maintenance Mode for WooCommerce – Worried about misplaced orders when you are performing maintenance tasks on your WooCommerce store? In this tutorial, we showed how to enable maintenance mode for WooCommerce to safely execute maintenance tasks.
How to Add Venmo in WordPress & WooCommerce – Venmo is a popular and convinient payment gateway. In this guide, we showed how to easily add Venmo in WordPress and WooCommerce as a payment method.
These were some of the best WordPress tutorials on WPBeginner in 2022. We hope that you found them helpful.
We want to thank all WPBeginner users, who visited our website, offered feedback, left comments, and shared it with others. We truly appreciate you.
We look forward to adding even more useful WordPress tutorials in 2023. Have a Happy New Year.
If you liked this article, then please subscribe to our YouTube Channel for WordPress video tutorials. You can also find us on Twitter and Facebook.