All posts by Editorial Staff

7 Best WordPress Job Board Plugins and Themes

Are you looking for the best WordPress job board plugin? There are several WordPress job board plugins that you can use to easily create a job board and charge other companies to post jobs. It is one of the ways to make money from your blog, and you can even use it to post your own job openings. In this article, we have picked the best WordPress job board plugins and themes that you can use.

WordPress job board plugin and themes

Building a Job Board Website with WordPress

WordPress is currently one of the most popular website builders in the market, powering more than 30% of all websites on the internet. It can be used to build almost any kind of website including a job board website.

There are two types of WordPress websites which often confuses new users. First, there is WordPress.com which is a hosted solution. Second, you have WordPress.org also called self-hosted WordPress. See our article on WordPress.com vs WordPress.org for a side-by-side comparison.

We recommend using self-hosted WordPress.org because it gives you instant access to all WordPress features without any restrictions.

To get started, you will need a domain name and a WordPress hosting account.

We recommend using Bluehost because they are an officially recommended WordPress hosting provider, and one of the largest web hosting companies in the world.

They’re also offering our users a free domain, free SSL, and 60% off their web hosting package. See the difference between domain name and web hosting.

After you have purchased hosting, follow our step by step guide on how to make a website.

Once you have created your WordPress site, you can install a job board plugin.

Having said that, let’s take a look at some of the best WordPress job board plugins and themes that you can use to build a job board website.

1. WP Job Manager

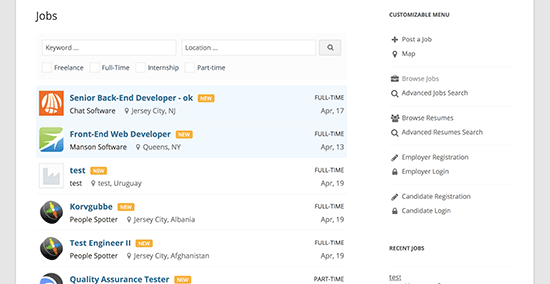
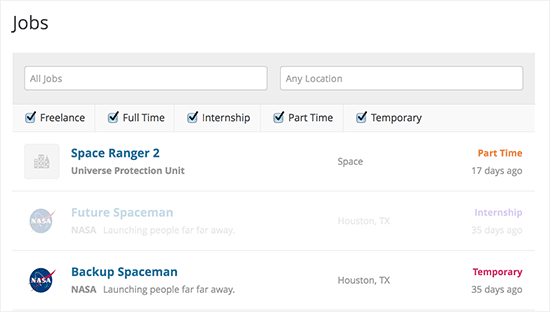
WP Job Manager

WP Job Manager is an extremely easy to use WordPress job board plugin. Simply create new pages, add shortcodes, and you can have a live job board in minutes. It allows users to register on your website and post their job listings. Users can also manage their listings from a simple dashboard.

You can also use it to make money online with paid listings through add-ons. It also has add-ons to integrate with ZipRecruiter, Indeed, Facebook, WooCommerce stores, and more.

For detailed instructions, see our article on how to create a job board in WordPress.

2. WPJobBoard

WPJobBoard

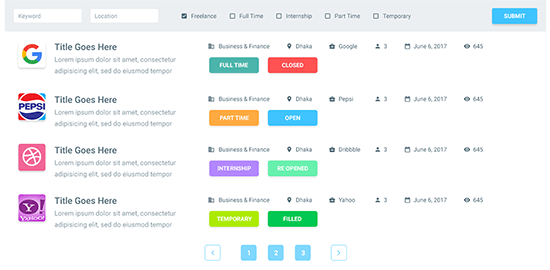
WPJobBoard is a paid WordPress job board plugin that allows you to add a powerful job search engine to your website. It includes a front-end admin panel for users to submit jobs and resumes. It also includes a resume database and employer portal allowing users to search for the right candidate.

The plugin integrates with all WordPress themes and comes with its own free theme as well. It also allows you to accept payments, offer coupons, discounts, and even membership packages to employers.

3. Job Board Manager

Job Board Manager

Job Board Manager is another great plugin to add a job board to your WordPress website. It comes with an easy to use shortcode that you can add to different pages for displaying job listings, adding new job listing, showing user dashboard, and more.

It is SEO friendly and uses Schema.org rich snippets markup for job listings.

It comes with free add-ons to add company profiles, locations, widgets, and breadcrumbs. You can also use paid add-ons for WooCommerce paid listings, job alerts, applications manager, and more.

4. Simple Job Board

Simple Job Board

Simple Job Board is another easy to use WordPress job board plugin. It does not allow employers to create an account on your website or add their own job listings. Basically, you can use it to manually enter job listings with categories and job types. There are no built-in monetization options in the plugin settings, but you can extend it by adding a simple order form in WordPress.

It allows you to add as many details for each listing as needed, and you can display custom job application forms for job listings.

5. Apply Online

Apply Online

Apply Online is a classified ads management plugin which allows users to quickly respond to listings. It allows you to easily add a job board to your website and start accepting applications.

It has powerful features like ad categories, filters, application form fields, email notifications, and more. One disadvantage of the plugin is that you cannot use it to create a paid job listings website, and you will need to add membership plugin to create subscriptions plans or use a contact form plugin to accept orders.

6. JobRoller

JobRoller

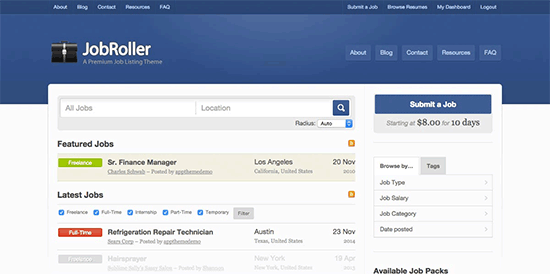
JobRoller is a powerful WordPress job board theme. It comes with excellent monetization options allowing you to get paid for job listings. It includes separate sections to create a blog page or add landing pages to your job board website.

It supports both employers and job seeker accounts, includes a resume or CV bank, and comes with Ajax powered search / filter features. It has multiple display options and powerful theme options panel which helps you quickly setup everything.

7. JobEngine

JobEngine

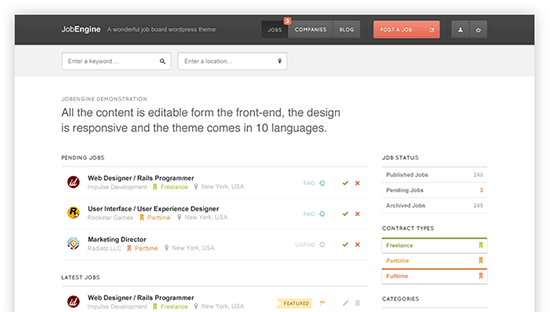
JobEngine is a WordPress app theme designed to create a powerful job board website. It allows your users to easily create an account and add listings. You can charge for the job listings on a per job basis or create premium plans. You can also sell featured listings separately. It supports PayPal, Stripe, 2Checkout, and Authorize.net payment gateways.

As a theme, it has multiple color choices and design options to control the appearance of your job board. It has multiple sidebars, landing page options, translation-ready and support for multilingual websites.

We hope this article helped you find the best WordPress job board plugins and themes for your website. You may also want to see our list of the best drag & drop WordPress page builder plugins to further customize your website.

If you liked this article, then please subscribe to our YouTube Channel for WordPress video tutorials. You can also find us on Twitter and Facebook.

The post 7 Best WordPress Job Board Plugins and Themes appeared first on WPBeginner.
How to Fix Add Media Button Not Working in WordPress

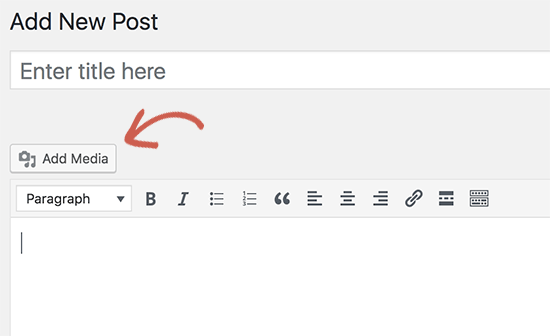
Recently one of our users reported that the ‘Add Media’ button on their WordPress site has suddenly stopped working. This problem does not display any error or warning which leaves users clueless about why their ‘Add Media’ button is not working. In this article, we will show you how to easily fix the ‘Add Media’ button not working issue in WordPress.

Fixing add media button not working in WordPress

What causes the WordPress ‘Add Media’ Button to Stop Working?

This problem is commonly caused by conflicting scripts or stylesheets loaded by WordPress plugins or themes installed on your site. The default behavior of WordPress is to load all required scripts and stylesheets by combining the requests.

This is usually done in the WordPress admin area to improve performance and speed.

The WordPress post editor uses JavaScript for all buttons on the screen including the add media button. A conflict can stop JavaScript from working which will disable the ‘Add Media’ button.

Add media button stopped working in WordPress

That being said, let’s take a look at how to troubleshoot and fix the ‘Add Media’ button not working in WordPress.

Fixing Add Media Button Not Working Issue in WordPress

The quick fix is to add the following code to your wp-config.php file. You can do this by editing wp-config.php file and adding this code just before the line that says ‘That’s all, stop editing! Happy blogging’.

define('CONCATENATE_SCRIPTS', false );

This code simply tells WordPress to load each script separately which helps avoiding a JavaScript conflict with buggy scripts and the core WordPress features.

After you have added the code, go ahead and the visit post edit screen to see if the add media button is working as expected.

Note: Adding this code is not a proper long-term solution because you still have a script that is causing the issue. An easier way to find the source of the problem is by using the inspect tool. It will show you console errors which can lead you to the source of the conflict.

If you want a long-term fix for this issue, then you need to perform the basic WordPress troubleshooting tips to figure out which plugin or theme may be causing the issue.

We strongly recommend that you do this on your staging site instead of a live site. Here’s a step by step guide on how to create a WordPress staging site. All the best WordPress hosting companies like Bluehost, SiteGround, WP Engine, and Liquid Web offer 1-click staging functionality.

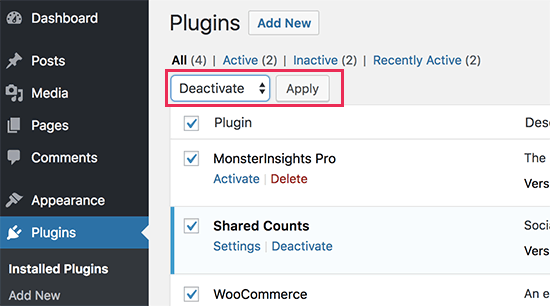
On your staging site, you need to start by deactivating all your WordPress plugins and then check if it fixed the ‘Add Media’ button. If it does, then this means one of the plugins was causing the issue.

Deactivate all plugins

You can now activate the plugins one-by-one, and after activating a plugin check the ‘Add Media’ button. This will help you find out which plugin is causing the issue. After you find the culprit, you can replace it with another plugin or ask plugin author for help.

If deactivating plugins doesn’t solve the issue, then the next step is to temporarily switch to a default WordPress theme like Twenty Seventeen.

Switch to a default WordPress theme

If switching to the default theme fixes the issue for you, then this means your theme is causing the conflict. You can ask theme author for support or switch to a different WordPress theme.

Once you find the source of the problem on your staging site, then you can apply the fix on your live WordPress site.

We hope this article helped you learn how to fix add media button not working in WordPress. You may also want to see our list of the most common WordPress errors and how to fix them.

If you liked this article, then please subscribe to our YouTube Channel for WordPress video tutorials. You can also find us on Twitter and Facebook.

The post How to Fix Add Media Button Not Working in WordPress appeared first on WPBeginner.
How to Easily Import and Export WordPress Users

Do you want to import and export WordPress users from one website to another? This could be really helpful when you are merging multiple sites and want to automatically shift all users from existing websites. In this article, we will share how you can easily import and export users in WordPress.

Import and Export Users in WordPress

Why or When You May Need to Import and Export Users in WordPress?

While there are several use-cases for importing and exporting WordPress users, the most common scenarios when you need to import and export users are:

  • When you purchase a website and want to merge the content and user base.
  • When you want to consolidate two sites and merge their content and user base.
  • When you want to import all users into an email list or your CRM.

On large multi-author sites or a membership site in WordPress, each user profile has tons of useful data (like profile photo, bio information, social links, and more).

While you can surely ask them to recreate their profile, it’s inconvenient and not an ideal user experience.

Let’s take a look at how you can easily import and export users from one WordPress site to another.

Exporting Users in WordPress

First thing you need to do is install and activate the Import Export WordPress Users plugin. For more details, see our step by step guide on how to install a WordPress plugin.

Upon activation, you need to visit Users » User Import Export page and scroll down to the export section.

User Export

On this page, you need to select a user role to export from your website, select fields that you want to export with the user, and more.

By default, all user fields will be exported. If you don’t want to export a specific item, then you can simply uncheck it from the columns section.

After selecting the settings, you need to click on the Export button. It will save a CSV export file in your computer.

You can use this file to import users into another WordPress site.

Importing Users in WordPress

This step will also require the same Import Export WordPress Users plugin that we used above to export users. Make sure that you have this plugin installed and activated on the site where you want to import users.

Next, you need to visit Users » User Import Export page and click on the Import Users button.

Import Users

On this page, first you need to click on the Browse button and then select the CSV file you want to import. After selecting the CSV file, you need to click the Upload file and import button.

Upload File

Once done, you will see a success message with details on how many users imported, status message, and more details on the process.

User Import

The plugin will not only import users, it will also automatically assign them correct user role and fill in other profile settings.

We hope this article helped you learn how to easily import and export WordPress users. You may also want to see our guide on how to track user engagement in WordPress.

If you liked this article, then please subscribe to our YouTube Channel for WordPress video tutorials. You can also find us on Twitter and Facebook.

The post How to Easily Import and Export WordPress Users appeared first on WPBeginner.
9 Best WordPress Facebook Plugins to Grow Your Blog

Ae you looking for the best Facebook plugins for WordPress? Facebook is the world’s largest social media platform with more than 1 billion active users. In this article, we have hand-picked the best WordPress Facebook plugins to help you grow your blog and get more traffic.

Best Facebook plugins for WordPress

1. Shared Counts

Shared Counts

Shared Counts is one of the best social media plugins for WordPress. It allows you to easily add social sharing buttons to your WordPress posts including the Facebook share button.

It is highly optimized for speed and performance and can accurately show shares count for Facebook, Twitter, LinkedIn, and more. It comes with multiple button styles which allows you to choose the one that looks best on your site.

2. Custom Facebook Feed

Custom Facebook Feed

Custom Facebook Feed allows you to display your posts from a Facebook page on your WordPress website. This custom Facebook feed is responsive, SEO friendly, and customizable. You can even fetch multiple feeds from different Facebook pages and display them anywhere on your website using a shortcode.

You can create a new page for your Facebook feed or display it in your blog’s sidebar. The plugin is optimized for speed and makes it super easy to change colors / style of your feeds from the WordPress admin area. For detailed instructions, see our article on how to create a custom Facebook feed in WordPress.

3. Pixel Cat – Facebook Pixel

Pixel Cat - Facebook Pixel

Pixel Cat Facebook Pixel plugin allows you to add your Facebook retargeting pixel to your WordPress site. This pixel allows you to show customized ads to Facebook users who have visited your website. To learn more, see our article on how to install Facebook retargeting pixel in WordPress.

Aside from making it easy to install the Facebook pixel in WordPress, this plugin also helps you track WooCommerce customers and show them better ads in their Facebook feeds.

4. Facebook Reviews

Facebook Reviews

Facebook Reviews plugin allows you to display Facebook page reviews on your WordPress website. It comes with an easy to use widget that allows you to connect your website to your Facebook page and display Facebook users reviews.

This helps you add social proof to your website and build trust in your brand. The free version works fine, but you will need the pro version to display reviews in Schema.org rich snippets format.

5. Facebook Widget

Facebook Widget

Facebook Widget plugin allows you to easily add a Facebook page plugin to your blog’s sidebar. It is extremely easy to use and comes with a shortcode that you can use to display the Facebook Like box anywhere on your website.

It comes with the same customization options as the default Facebook page plugin. You can show or hide profile pics, page cover, customize width / height, and select language.

6. Nextend Social Connect

Nextend Social Login

Nextend Social Connect plugin allows users to register and login on your website using their social profiles. It supports login with Facebook, Google, and Twitter.

It works seamlessly with the default WordPress login and registration forms, so users have the option to use Facebook or use the default signup method. Once registered, users can disconnect their social account at any time by visiting their user profile page inside the admin area.

7. AccessPress Facebook Auto Post

As the name suggests, AccessPress Facebook Auto post allows you to automatically share new articles on your Facebook page or profile. Upon activation, you will need to connect to your profile and authorize your website.

It allows you to choose which content you want to share: posts, pages, and custom post types. You can even disable sharing for a single item before publishing it. For detailed setup instructions, see our article on how to automatically post to Facebook from WordPress.

8. WP Embed Facebook

WP Embed Facebook

WP Embed Facebook plugin makes it easier to embed Facebook events, pages, profiles, and Facebook videos on your WordPress website.

You can also use it to add a Facebook like or share button. The plugin comes with a handy shortcode that you can use to embed different items anywhere on your site. It also comes with really good documentation to help you make the most out of it.

9. Yoast SEO

Yoast SEO

Yoast SEO is the complete WordPress SEO plugin on the market. Apart from adding SEO meta tags, it does so many other things to improve your website including social features.

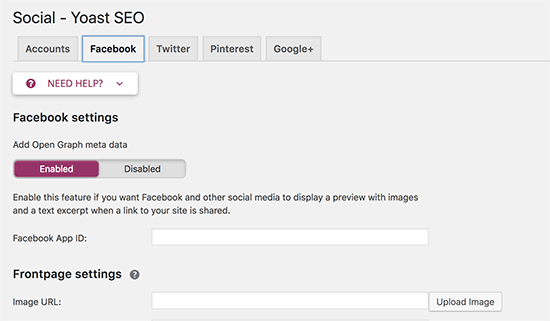
You can use it to fix incorrect Facebook thumbnail issue and automatically add Facebook Open Graph meta tags to every page on your website. You can also let search engines discover social media profiles associated with your website.

That’s all, we hope this article helped you discover the best WordPress Facebook plugins to grow your blog. You may also want to see these actionable tips to drive traffic to your WordPress site.

If you liked this article, then please subscribe to our YouTube Channel for WordPress video tutorials. You can also find us on Twitter and Facebook.

The post 9 Best WordPress Facebook Plugins to Grow Your Blog appeared first on WPBeginner.

How to Create Your Company Org Chart in WordPress

Do you want to display a beautiful organizational chart on your WordPress site? Org charts are helpful in showing the company hierarchy and introducing users to the team running the business. In this article, we will show you how to create a company org chart in WordPress.

How to Create an Org Chart in WordPress

What is an Organizational Chart and Why is it Important?

An organizational chart present a company’s hierarchical structure based on job title and responsibilities, from top management to the executives.

It helps improve your brand’s reputation by showing the human side of your business. At the same time, it also allows users to find who they should contact for various business opportunities, feedback, and suggestions.

Organizational Chart

That being said, let’s take a look at how to easily create and manage a company organization chart in WordPress.

Creating an Organization Chart in WordPress

First thing you need to do is install and activate the Easy Org Chart plugin. For more details, see our step by step guide on how to install a WordPress plugin.

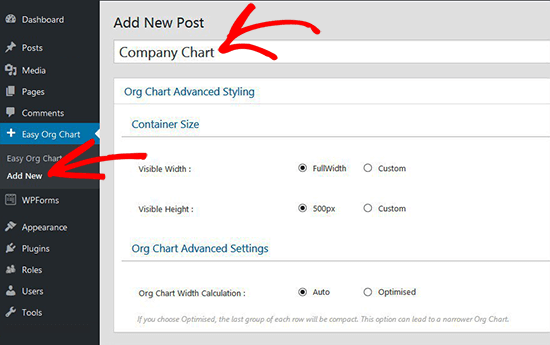
Upon activation, you need to visit Easy Org Chart » Add New from your WordPress admin area to create a new org chart.

Add New Chart

First, you need to provide a title for your chart. After that, your need to scroll down to the Build your Org Chart section to start adding team members.

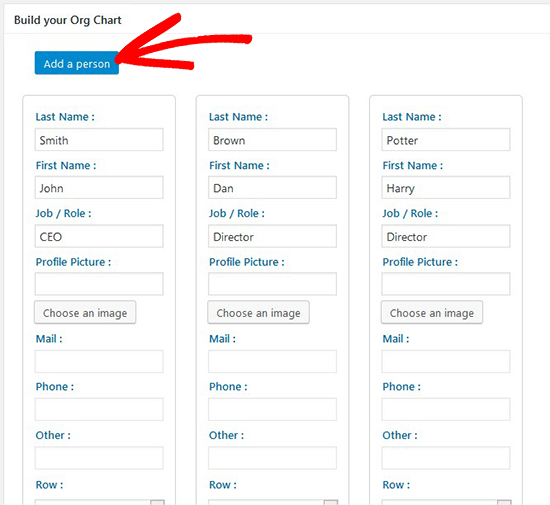
In the first column, you will need to add details of your team members like their name, job title, profile picture, and contact information.

Next, you need to click on Add a person button to add another team member. Go ahead and repeat the process to add all team members that you want to show in your org chart.

Add New Member

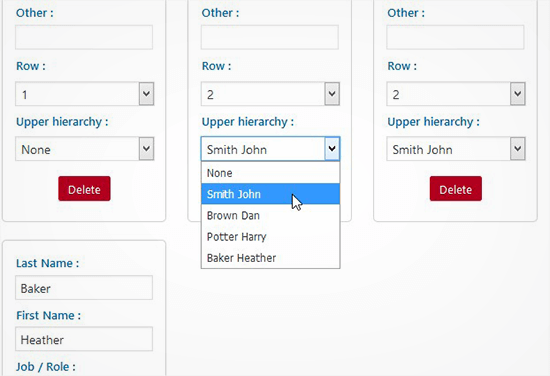
You can drag and drop team members to the right or left in the WordPress admin area. You will also need to define the upper hierarchy and row number for each team member according to your company’s hierarchical structure.

Set Upper Hierarchy

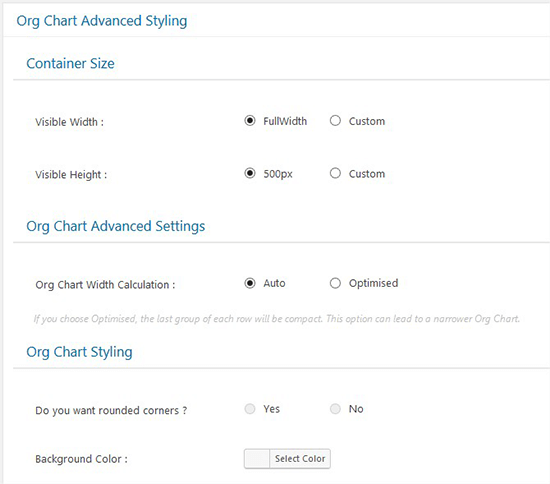
After adding team members, you need to scroll down to advanced styling section. From here, you can configure how the chart should appear. You can choose the container size, corners, background color, box template, field styling, and more.

Chart Advanced Styling

Once you are done with styling, click on the Publish button to save your changes.

To display your org chart on your website, you need to visit the Easy Org Chart page in WordPress admin to copy the shortcode.

Copy Shortcode

You can now paste this shortcode in any WordPress post, page, or sidebar widget to display your organization chart.

Organizational Chart

It would be a good idea to add a contact form below your org chart in WordPress. We recommend using WPForms because it’s the best contact form plugin in the market. They also allow users to select recipients in WordPress contact form.

We hope this article helped you learn how to create a company org chart in WordPress. You may also want to see our guide on how to create a WordPress intranet for your organization while keeping it private and secure.

If you liked this article, then please subscribe to our YouTube Channel for WordPress video tutorials. You can also find us on Twitter and Facebook.

The post How to Create Your Company Org Chart in WordPress appeared first on WPBeginner.

7 Best WordPress Real Estate Plugins Compared (2018)

Are you looking for the best WordPress real estate plugins? WordPress is used by many real estate websites to showcase listings and get new customers. In this article, we have hand-picked the best WordPress real estate plugins that you can use to grow your business.

Best WordPress real estate plugins

How to Make a Real Estate Website Using WordPress?

WordPress is the most popular website builder in the world. It is easy to use and flexible enough to make almost any kind of website imaginable.

There are two different types of WordPress which often confuses beginners. First, there is WordPress.com which is a hosted solution. Second, you have WordPress.org also known as self-hosted WordPress. See our article on WordPress.com vs WordPress.org for a side-by-side comparison.

We recommend using WordPress.org because it allows you to use all WordPress features out of the box without any restrictions.

To start your own self-hosted WordPress.org website, you will need a domain name and website hosting.

We recommend using Bluehost. They are one of the largest hosting companies in the world and an officially recommended WordPress hosting provider. They’re offering our users over 60% off and a free domain name.

Once you have purchased hosting, head over to our guide on how to make a website for step by step set up instructions.

That being said, let’s take a look at the best WordPress real estate plugins that you can use. These plugins will allow you to easily add your real estate listings and attract more customers.

1. IMPress Listings

IMPress Listings

IMPress Listings is one of the best WordPress real estate plugins. It is easy for beginners to get started, and flexible for advanced users to create powerful real estate websites.

It is mobile responsive and works with any WordPress theme. You can add as many details for each listing as you want with images and video support. Listings are beautifully displayed in a grid layout, and a single listing page allow users to get all the information they need including location maps.

It also allows you to import listings from your MLS database and support IDX integration with an addon plugin. It comes equipped with contact forms so that interested buyers can directly contact you.

2. WP-Property

WP-Property

WP-Property is another all-in-one WordPress real estate management plugin. It includes an easy to use interface to add and manage all your listings. You can add detailed information with tons of fields to add rooms, bathrooms, area, features, and more.

Listings are beautifully displayed on your website and the plugin website also offers free themes that you can use. It includes Google Maps support, powerful search feature with filters, SEO friendly URLs, featured listings, and more.

It is available in multiple languages and can be easily translated into any other language. It also comes with sidebar widgets and shortcodes that allow you to display listings through-out your website.

3. Estatik

Estatik

Estatik plugin is another excellent option to manage your real estate listings in WordPress. This powerful plugin comes with an easy to use property management system allowing you to easily add listings to your website.

It includes photo gallery, property search widget, Google Maps support, built-in social sharing, and multilingual support. It also includes a fields builder which allows you to easily add new fields to your listings.

It has an ajax powered search feature with auto-complete. Users can also sort listings by price, date, and popularity. Plugin developer also provides paid IDX/MLS services and add-ons to add more features if needed.

4. Easy Property Listings

Easy Property Listings

Easy Property Listings is another powerful and highly customizable WordPress real estate plugin. It allows you to easily build a real estate website without touching code and without changing themes.

It has a beginner friendly listing management interface which makes it super easy to manage your properties. It comes with mobile-friendly listing templates to display your properties in a grid layout or a single listing page.

Advanced features include support for REAXML, JUPIX, worldwide MLS systems, translations / multilingual support, advanced maps, and more. Paid addons and extensions allow you to add many other features including a real estate agents directory and management system.

5. WP Real Estate

WP Real Estate

WP Real Estate is a relatively new real estate plugin for WordPress with tons of cool features. It can be used for buying, selling, and rental properties as well.

It includes an advanced search feature, Google Maps, IDX/MLS integration, contact forms, custom fields, and list or grid layout views. It also comes with shortcodes and widgets so that you can display different real estate listings throughout your website or create your own landing pages for different properties.

6. AgentPress Listings

AgentPress

AgentPress requires Genesis theme framework and is designed to work with their own AgentPress Pro theme which helps you quickly create a real estate website.

The plugin adds a listings custom post type and taxonomies to help you categorize properties. You can also use widgets to add listings search to a widget ready area.

7. WPL Real Estate

WPL Real Estate

WPL Real Estate plugin is flexible and powerful WordPress real estate management system. It has an easy to manage section to add your listings with a filterable search feature for the front-end. It has real estate agent profiles, Google Maps, different listing views, and a powerful custom fields feature to add property features.

It can be integrated with MLS/IDX services as an additional paid feature, other customizations are also provided by the plugin developer as a service. It already works well with some of the best WordPress themes in the market.

We hope this article helped you find the best WordPress real estate plugins for your website. You may also want to see our list of the best WordPress real estate themes.

If you liked this article, then please subscribe to our YouTube Channel for WordPress video tutorials. You can also find us on Twitter and Facebook.

The post 7 Best WordPress Real Estate Plugins Compared (2018) appeared first on WPBeginner.

6 Best Product Review Plugins for WordPress

Are you looking for the best product review plugins for WordPress? If you regularly add detailed product reviews on your website, then you can use a product review plugin to make them more SEO friendly. In this article, we have hand-picked the best product review plugins for WordPress.

Best product review plugins for WordPress

Why Use Product Review Plugin in WordPress?

What do you do when you want to buy something? If you are like most people, then you probably check out product reviews to compare different options.

That’s why there are so many popular reviews websites like Yelp, TripAdvisor, Rotten Tomatoes, and more. Even Amazon, world’s largest online store features product reviews so prominently.

Many WordPress site owners write product reviews to make money online. Some get paid directly by the company for the review while others use affiliate marketing to earn revenue.

You can write a product review as a blog post. However, a plain blog post does not use product review format supported by search engines. This means your article will not be highlighted in search results as a review.

SEO Reviews Snippet

For better SEO, you need to write your reviews with schema.org rich snippets format. A product review plugin helps you easily write search engine friendly reviews that also look great on your website.

Let’s take a look at some of the best product review plugins for WordPress.

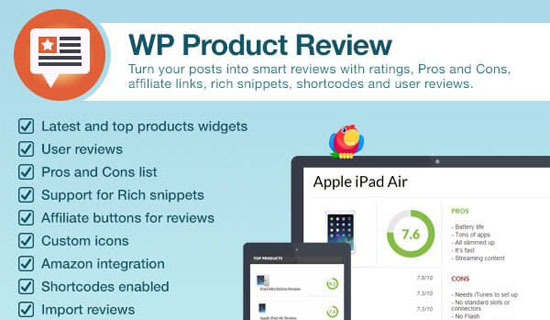
1. WP Product Review Pro

WP Product Review

WP Product Review is the best WordPress product review plugin. It comes with a detailed settings section allowing you to choose how you want to manage and display reviews on your website.

Adding a product review is quite easy. Simply select the product review option when writing a blog post and the plugin will show you all settings to write your review. You can break down your review into features, add images, pros and cons, and more.

It comes with sidebar widgets allowing you to showcase your reviews. You can also use it to collect user submitted reviews or allow your users to add their own rating and reviews in the comments. All reviews are displayed in schema.org rich snippet format for maximum SEO benefit.

For detailed instructions, see our guide on how to create a niche review website in WordPress.

2. All in One Schema Rich Snippets

All in One Schema Rich Snippets

As we mentioned earlier, your reviews need to be in a proper SEO friendly format. All in one Schema Rich Snippets plugin allows you to write different types of posts using the rich snippets format including product reviews.

Simply select ‘Item Review’ from a drop-down menu when writing a blog post, and the plugin will show review options like reviewer name, product name, and star rating. It will display this information below your blog post with the correct SEO friendly markup.

The plugin can also be used to add articles, products, recipes, software and more. For detailed instructions see our article on how to add rich snippets in WordPress.

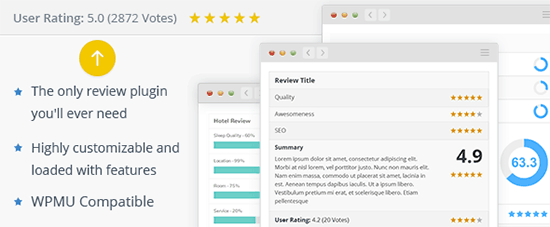
3. WP Review Pro

WP Review

WP Review is another excellent option to add product reviews in WordPress. It is beginner friendly and quite easy to use. Upon activation, simply write a new post and select the review type.

It supports three types of review ratings stars, points, and percentage. You can also add different ratings for individual features if you want. It also supports user ratings which simply allows users to submit their own ratings for a product.

It also comes with styling options located under Settings » WP Review page. From here you can choose your own colors for the review box to match your theme colors.

4. Rich Reviews

Rich Reviews

Rich Reviews is a simple free plugin that allows you to add reviews of your own products, services, or website. You can also allow your users to submit reviews.

It uses shortcodes to display reviews, and you can display a review anywhere on your website including posts, pages, and sidebar widgets.

If you are collecting user-submitted reviews, then this plugin allows you to manually approve each review before publishing it. The plugin’s settings panel comes with detailed instructions on how to use it.

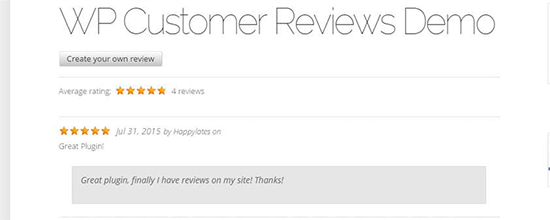
5. WP Customer Reviews

WP Customer Reviews

WP Customer Reviews plugin allows you to collect customers reviews as well as create your own product reviews. Upon activation, simply edit a blog post where you want to add a product review and check the reviews option.

Next, you need to go to the Reviews » All Reviews page and click on the add new button. After that, you can select the post and write your review. The plugin also allows you to enable user submitted reviews which you can then approve and publish to display on your website.

This plugin also allows you to customize the review form shown to users and comes with a how to use page with detailed instructions.

6. Site Reviews

Site Reviews

Site Reviews allows you to collect customer reviews for your products, services, or local business. It comes with a simple settings page allowing you to control how you want to gather reviews, and how you want to display them. You can customize the review form and display it anywhere on your website using a shortcode.

You can also display reviews using the shortcode. The plugin adds an easy to use shortcode inserter on the post edit screen to manually display reviews, review form, and review summary.

We hope this article helped you find the best product review plugins for WordPress. You may also want to see our list of the best testimonial plugins for WordPress.

If you liked this article, then please subscribe to our YouTube Channel for WordPress video tutorials. You can also find us on Twitter and Facebook.

The post 6 Best Product Review Plugins for WordPress appeared first on WPBeginner.

How to Blog Anonymously Using WordPress

Do you want to blog anonymously using WordPress? There are many users who want to start a blog but don’t what to put their real name on it. In this beginner’s guide, we will show you how to easily blog anonymously using WordPress while keeping your personal information safe.

How to anonymously blog using WordPress

Note: This guide is not for journalists or whistle-blowers doing high-risk work. They should use something like TOR or other tools. This is for an average blogger who wants to blog anonymously.

Anonymous Blogging Pros & Cons

There are many users who simply want to blog anonymously to express their opinions. Most of them want to remain anonymous because they fear it may affect how people see them in real lives. Some want to do it just to be more creative.

There are pros and cons to blogging anonymously, and it’s important that you understand them before you start blogging.

Pros of Anonymous Blogging using WordPress

  • Freedom to express your opinions without being judged
  • Protect your personal identity and information
  • Creative and artistic freedom

Cons of Anonymous Blogging Using WordPress

  • Not able to meet with people who follow your blog
  • Limited monetization options, you can still use Google AdSense, but you will have to share your personal information with Google.
  • If someone is really determined, then they can still trace your blog back to you.

That being said, let’s see how to blog anonymously using WordPress.

How to Start an Anonymous Blog using WordPress

There are two types of WordPress websites. First, there is WordPress.com which is a hosted blogging service, and then you have WordPress.org also known as self-hosted WordPress. For comparison, see our guide on the difference between WordPress.com vs WordPress.org.

There are other blogging platforms as well. However, we recommend using self-hosted WordPress.org to have complete control on the privacy and ownership of your website.

You will need a domain name and a website hosting account to start your self-hosted WordPress blog.

We recommend using Bluehost. They are one of the largest hosting companies in the world and an officially recommended WordPress hosting provider. They’re offering our users a free domain and 60% off their web hosting.

For details, see our article on how to start a WordPress blog with complete step by step instructions.

After you have installed WordPress, let’s make it anonymous.

Using Whois Privacy

When you purchase a domain name, you are required to provide contact information, like name, address, phone number, and email address. This information is publicly accessible and anyone can look up for it.

To protect customer’s privacy, many domain name providers offer a service called Whois privacy. For a small fee, this service displays their contact information instead of yours. If someone sends an email to the address displayed on WHOIS privacy page it will be forwarded to you.

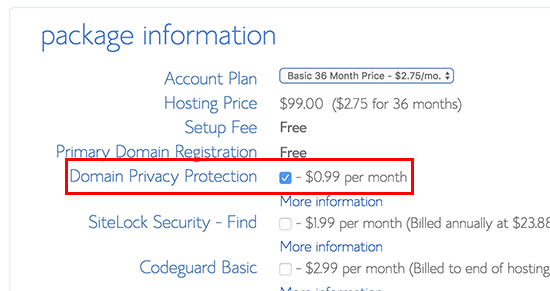
You can purchase domain privacy during the set up on most hosting companies. For example, Bluehost provides you an option to do so during the sign up. We normally don’t recommend it due to the additional cost, but since you want to create an anonymous blog, you would want to check this option.

Domain privacy

If you didn’t purchase it during set up, then you can always enable it from your hosting account’s dashboard under the domains section.

Using a Blogging Email Address

Next step is to create a new email account to use for your WordPress website, and your author profile in WordPress. You can use a free email service provider like Gmail or use a more private email service like Proton Mail.

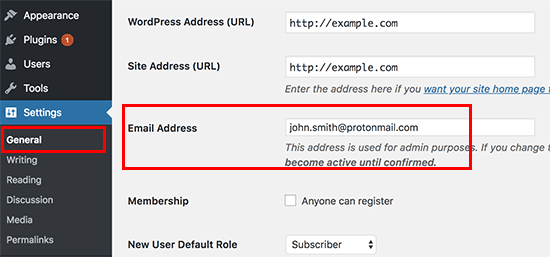
After you have created an email account, you need to add it as a WordPress administrative email address. This email address is used to send WordPress notification emails.

You can do this by going to Settings » General page in the WordPress admin area and add your new email address there.

Adding admin email address in WordPress

Don’t forget to click on the save changes button to store your settings.

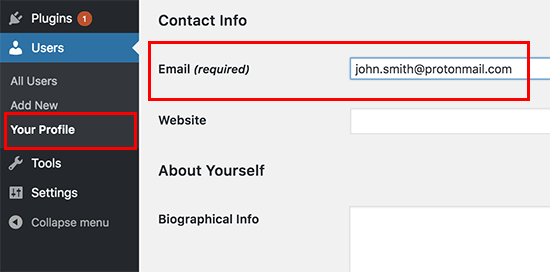
Next, you need to add the same email address to your author profile page. Simply go to the Users » Your Profile page and add the email address under your contact info.

Change your author profile email address

Don’t forget to click on the Update Profile button to save your changes.

You can also use gravatar to display an anonymous profile picture next to your author bio under your blog posts.

Tip: If you are not receiving WordPress emails, then see our guide on how to fix WordPress not sending emails issue.

Using a Psuedonym for Anonymous Blogging

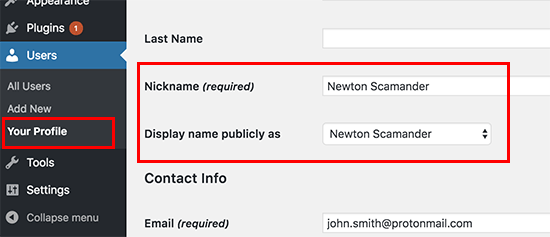
You will need to choose and use a pseudonym on your blog. For better WordPress security, you cannot just use admin as your username or author name. You will need to think of a different nickname that you can use to sign your posts.

To add your pseudonym, you need to visit Users » Your Profile page and add the name next to the Nickname field. After entering your nickname, click on the drop-down menu next to ‘Display name publicly as’ option and select your nickname.

Pseudonym

It’s important that you don’t add your real first and last name in this user profile.

Don’t forget to click on the Update Profile button to save your changes.

Using a VPN

VPN is a Virtual Private Network that helps you secure your internet connection and protect your identity.

Normally, all your internet traffic travels through different servers spread across the world. Hackers and governments can spy on this traffic and see what you are doing online.

VPN acts as a network between your computer and outside world. All your internet traffic goes to a VPN service where it is encrypted and sent to the destination using a random server in a different geographic location.

How VPN works

Here is a list of the best VPN service providers. We recommend using IPVanish. They offer military grade encryption with hundreds of servers. They also have the easiest software to turn on VPN with the click of a button on any device including laptops, tablets, and mobile phones.

We hope this article helped you learn how to blog anonymously using WordPress. You may also want to see our ultimate step by step WordPress SEO guide for beginners.

If you liked this article, then please subscribe to our YouTube Channel for WordPress video tutorials. You can also find us on Twitter and Facebook.

The post How to Blog Anonymously Using WordPress appeared first on WPBeginner.

How to Create a Referral Program in WordPress

Do you want to create a referral program in WordPress? Referral programs are a great way to get more people to promote your products to a larger audience. In this article, we will show you how to easily create a referral program in WordPress and get more customers.

Creating referral program in WordPress

Why Create a Referral Program in WordPress?

Referral program or affiliate program allows you to get more people to help you sell your products and services. In return, you pay them a small commission on each sale they make. For more details, see our ultimate affiliate marketing guide to see how it works.

In simple terms, it is like building your own sales army without paying them a salary.

These affiliate marketers use tools and plugins to create marketing content. They make money online by referring their users to right products and services.

To manage a referral or affiliate program, you will need a tool that can manage your affiliate program. It will allow affiliate marketers to join your referral program. It will also help you track sales and traffic sent by each affiliate partner.

Why Use AffiliateWP to a Create Referral Program in WordPress?

For this tutorial, we will be using AffiliateWP plugin to create a referral program in WordPress. It is one of the best affiliate management plugins for WordPress.

Like everything else in life, AffiliateWP has it’s own pros and cons that you should consider.

Pros of Using AffiliateWP

Following are some of the benefits of using AffiliateWP to manage your referral program in WordPress.

  • Very easy to use and blends in your WordPress site like a native app.
  • Very cost effective with plans starting from $99/year to $499 for a lifetime license.
  • Integrates with WooCommerce stores, Easy Digital Downloads, PayPal, Stripe, and more
  • Large number of addons including free, paid, and third-party add-ons to extend AffiliateWP
  • Real-time affiliate tracking with detailed reports for you and your affiliate partners

Cons of Using AffiliateWP

Here are some of the disadvantages of using AffiliateWP to manage your referral program.

  • It has limited reach compared to affiliate networks which already have thousands of affiliate marketers actively looking for products to promote
  • It does not come with advanced fraud detection features that are offered by popular affiliate networks.
  • There is no automatic payout system, and you will have to manually send payments each month
  • Does not calculate taxes and 1099 forms for payouts. As a business owner, you will have to manage it on your own.
  • It is less convenient for affiliate partners. They will have to create an account and login to view their reports, compared to affiliate networks where they can see all their earnings at one place.

A good alternative to AffiliateWP would be ShareASale, which is a large affiliate network with thousands of skilled affiliate marketers actively looking for new products to recommend.

For a more detailed comparison, you may want to see this article on setting up your own affiliate program by Syed Balkhi (Founder and CEO of WPBeginner).

With that being said, let’s take a look at how to create a referral program in WordPress using AffiliateWP.

Creating a Referral Program in WordPress

First thing you need to do is install and activate the AffiliateWP plugin. For more details, see our step by step guide on how to install a WordPress plugin.

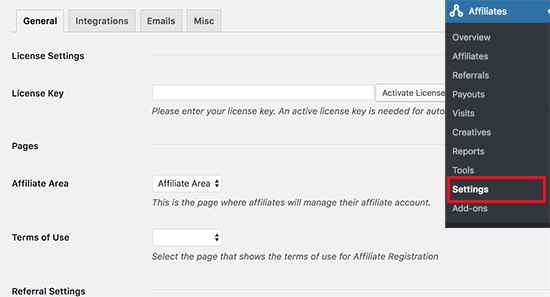
Upon activation, you need to visit Affiliates » Settings page to enter your license key. You can find this information under your account on AffiliateWP website.

Enter your license key

After activating your license key, you need to select a page to be used for Affiliate Area. AffiliateWP automatically creates one for you, but if you want to use a different page, then you can select it here.

Next, you need to choose the terms of service page. You can check out affiliate program terms pages on other websites to create one for your own site. After creating the page you can select it here.

After that, you need to review other settings on the page and set them up based on your own referral program policies.

Don’t forget to click on the ‘Save Changes’ button to store your settings.

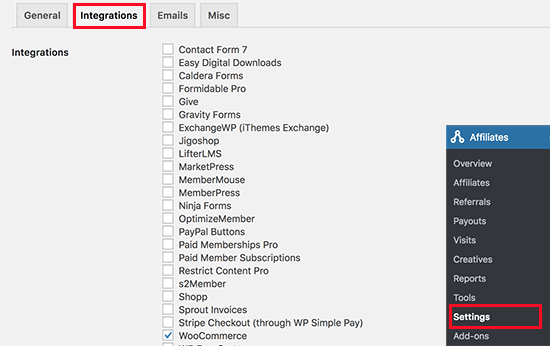
Next, you need to switch to the integrations tab on the Settings page. From here you need to select the integrations you want to enable. AffiliateWP supports most popular eCommerce, membership, contact form, and LMS plugins.

AffiliateWP integrations

Click on the save changes button and then switch to ‘Emails’ tab on the Settings page.

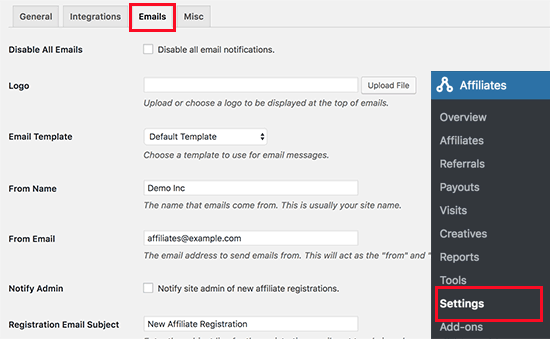
AffiliateWP allows you to edit emails sent out to your affiliates. You can also upload your business logo, create your own email templates, and choose the email address you want to use to send out affiliate emails.

Email notifications

Note: If you are unable to receive email notifications, then follow our guide on how to fix WordPess not sending email issue.

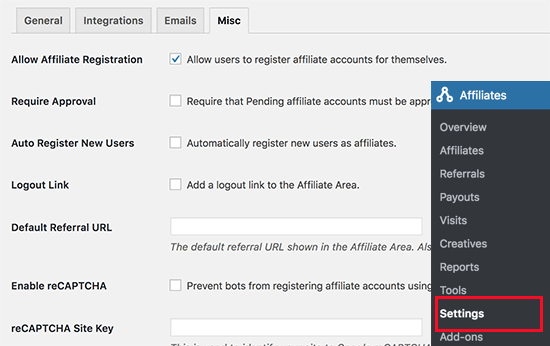
Lastly, switch to the Misc tab on the settings page to set up advanced settings for your affiliate program. The first option on the page is to allow affiliates to register themselves. You can check this if you want affiliates to be able to sign up for your referral program.

Misc settings

Next, you would also want to enable reCAPTCHA to prevent bots from registering as affiliates.

You will need to carefully review each setting and change them as needed. Don’t forget to click on the save changes button to store your settings.

Adding Links to Your Referral Program

Now that you have set up your referral program, the next step is to add links to it. For example, if you have enabled affiliate registration, then you may want to add a link to affiliate area so that interested marketers can register themselves.

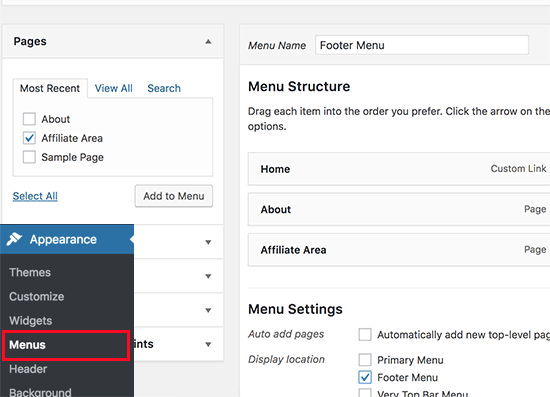
Simply go to Appearance » Menus page and add your affiliate area page to a navigation menu. For detailed instructions, see our beginner’s guide to adding navigation menus in WordPress.

Add link to affiliate area

Clicking on the link will take users to the affiliate area where they can register to join as a new affiliate, or login to their account to see their reports.

Affiliate area

Managing Your Referral Program in AffiliateWP

AffiliateWP comes with powerful tools to manage your affiliates, view reports, and effectively run your affiliate program without leaving WordPress.

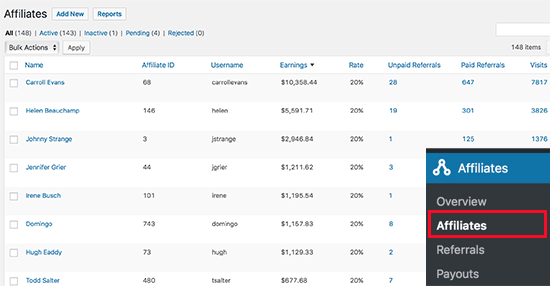
To view affiliates that have joined your referral program, simply go to Affiliates » Affiliates page.

Affiliates

On this page, you can see a list of all your affiliate partners, their earnings, unpaid earnings, referral visits, and more. You can edit any affiliate account individually.

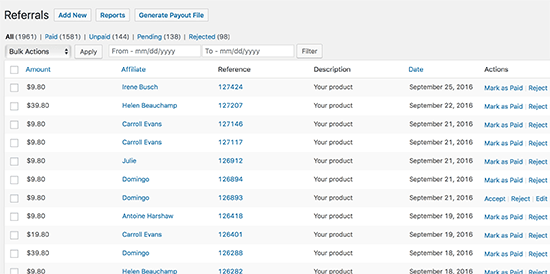
To view each sale made through a referral partner, you need to visit Affiliates » Referrals page. Here you will see all referral sales, affiliate partner, amount, and more. You can also click on ‘Reject’ link if you suspect a referral to be fraudulent.

Referrals

Viewing Your Referral Program Reports in AffiliateWP

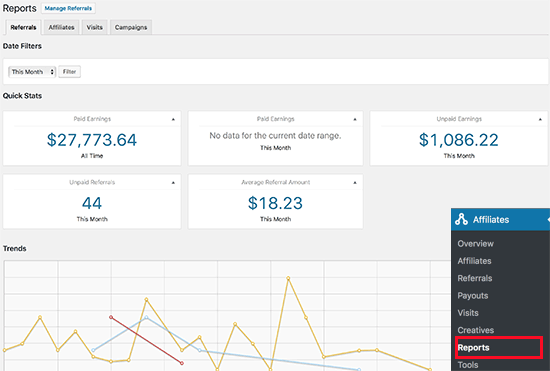
Reporting is crucial to run a successful referral program, and AffiliateWP comes with powerful reporting features. Head over to Affiliates » Affiliates page for a full overview.

Reports overview

You can filter the reporting period by time and specific affiliate partner name. You can also view reports for affiliates, referral visits, and campaigns.

Sending Payments to Your Affiliates

Unfortunately, AffiliateWP doesn’t come with automatic payouts, which means you will have to manually send payments. AffiliateWP makes it easy to manage your payouts.

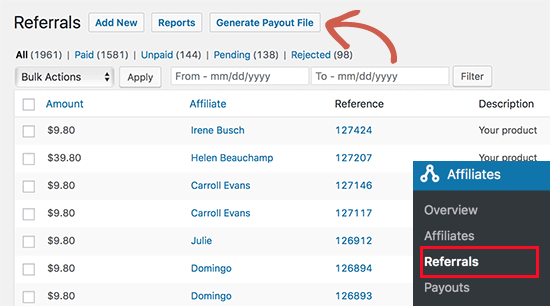
Depending on when and how often you want to pay your referral partners, you can head over to the Affiliates » Referrals page and click on the ‘Generate Payout File’ button.

Generate payout file

This will generate a payout file which is compatible with PayPal’s mass payment system. The file also works with Skrill and other payment services that support mass payment feature. It contains the amount and payment email addresses for all your unpaid referrals.

We hope this article helped you learn how to create a referral program in WordPress. You may also want to see our ultimate step by step WordPress SEO guide for beginners.

If you liked this article, then please subscribe to our YouTube Channel for WordPress video tutorials. You can also find us on Twitter and Facebook.

The post How to Create a Referral Program in WordPress appeared first on WPBeginner.

How to Create Interactive Images in WordPress

Do you want to create an interactive image for your WordPress blog? An interactive image allows you to highlight, link, and animate certain areas of your image. In this article, we will show you how to create interactive images in WordPress.

Create Interactive Images in WordPress

What is an Interactive Image?

An interactive image has hotspot areas, highlights, links, colors, and more. It’s different from a simple image that you upload in WordPress. Interactive images are eye-catching and attract users to see details of the image. You can add description on different parts of an image, add links to pages, highlight sections, and more.

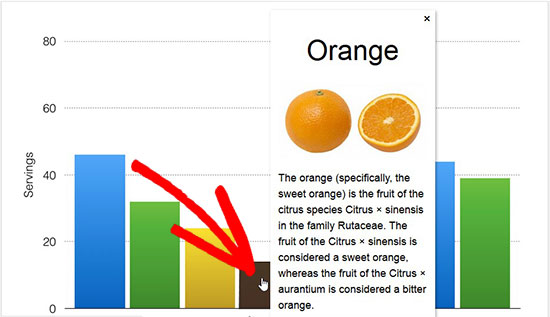
Description Demo for Interactive Images

In this image, you can see the description of fruits on mouse over to different bars. You can use these interactive images to boost user engagement and time spent on site.

Let’s take a look on how you can draw attention of your visitors with interactive images.

Creating Interactive Images in WordPress

First thing you need to do is install and activate the Draw Attention plugin. For more details, see our step by step guide on how to install a WordPress plugin.

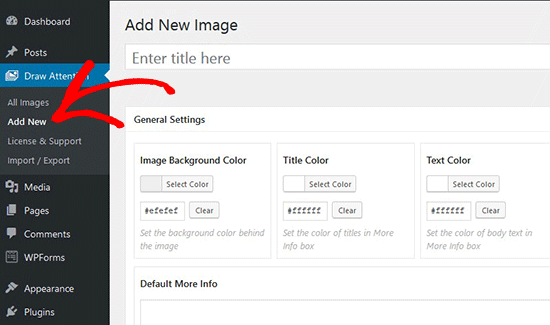
Upon activation, you’ll see a new custom post type in your WordPress admin area. You need to go to the Draw Attention » Add New page to create an interactive image.

Add New Image

Start by adding a title for this new interactive image, so you can easily remember it. On this page, you can create interactive design on new or previously uploaded images. You can add a new image by clicking on the upload image icon, or you can select an image from your WordPress media library.

Upload or Select Image

Next, you need to click on Publish button.

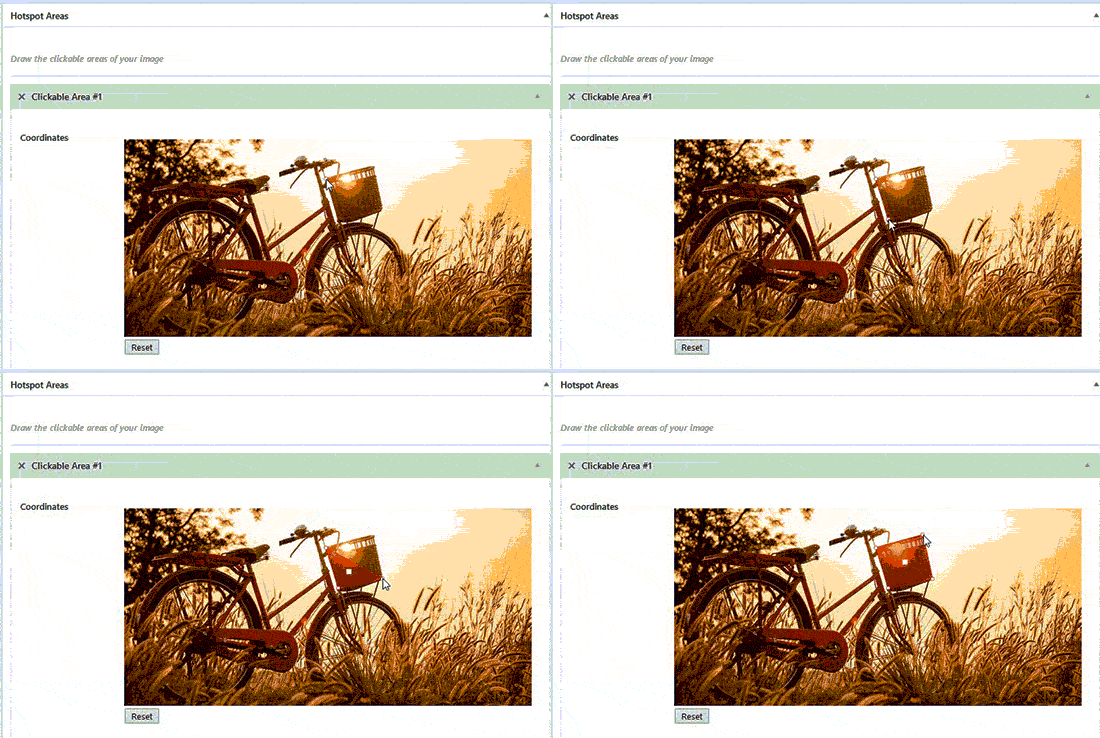
After publishing, the plugin allows you to edit the image and highlight specific areas, add colors, links, draw hotspot areas, and more. You can scroll down to the Hotspot Areas section and expand the clickable area to preview image.

Simply move your mouse and draw clickable areas on the image. You can easily select the hotspot areas and expand them to create a selection.

Draw Hotspot Areas

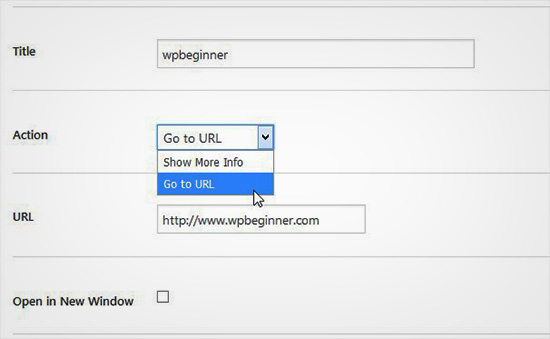
After drawing the hotspot area, you need to scroll down to the Action dropdown and select an action for the selected area on image. If you choose Show More Info, then you can simply add a description to explain the hotspot area on the image. You can also add a link on the selected area by using the ‘Go to URL’ option.

Add Action

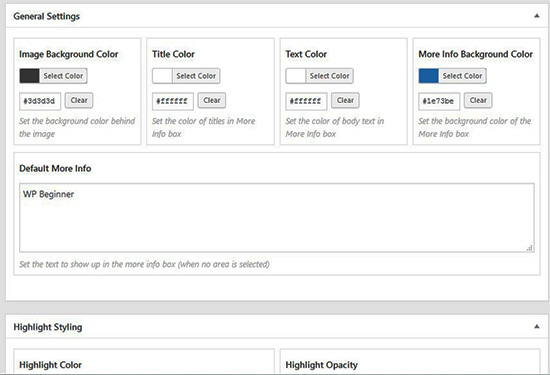
You can also manage general settings and highlight styling for action link, action text, info background and more. These settings can help in making your image more interactive.

General Settings

Next you need to click on the Update button and copy the shortcode to add it in your WordPress post or page.

Copy Shortcodes

The plugin allows you to create as many interactive images as you need using your previously uploaded or new images.

Clickable Interactive Image

Import and Export Interactive Images

If you are working on multiple sites and want to import / export interactive images, then it requires the same Draw Attention plugin on both sites.

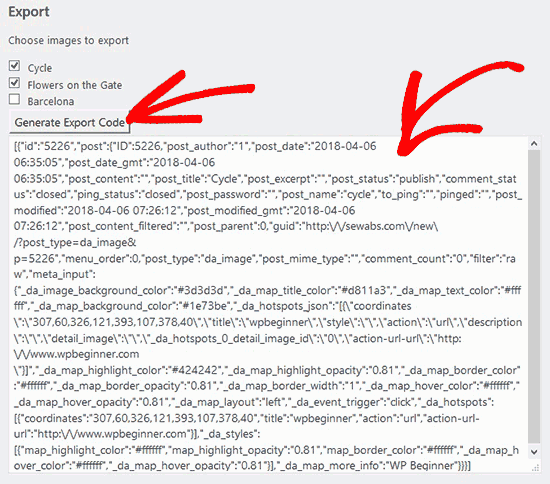
On the first site, you need to visit Draw Attention » Import / Export page and check mark the images that you want to export. Next, click on the Generate Export Code button and copy the code.

Export Code Interactive Images

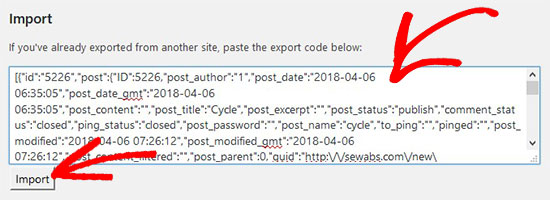
After that you need to go to the next website and make sure that you have Draw Attention plugin activated. Next, you need to go to Draw Attention » Import / Export page from WordPress admin and paste the code in import field.

Paste Code Interactive Images

Go ahead and click on the Import button and your images will be imported will all the interactive details that you added previously.

These interactive images are good for WordPress SEO and attract more visitors on your site. However, it’s recommended to compress images before you upload them to improve site performance.

We hope this article helped you learn how to create interactive images in WordPress. You may also want to check our guide on how to lazy load images in WordPress.

If you liked this article, then please subscribe to our YouTube Channel for WordPress video tutorials. You can also find us on Twitter and Facebook.

The post How to Create Interactive Images in WordPress appeared first on WPBeginner.