All posts by Editorial Staff

24 Best WordPress Themes for SEO Experts

Are you looking for the best WordPress themes for SEO experts? As an SEO expert, you may want to choose a theme that showcases your SEO and marketing skills while helping you convert visitors into clients. In this article, we have hand-picked some of the best WordPress themes for SEO experts that you can use for your website.

Best WordPress themes for SEO experts

Building an SEO Business Website Using WordPress

WordPress is the most search engine friendly website builder in the world. That’s why top brands are using WordPress for their websites.

There are two types of WordPress available. WordPress.com which is a fully hosted platform and WordPress.org also known as self-hosted WordPress. For a detailed comparison, see our guide on the difference between WordPress.com vs WordPress.org.

We recommend using WordPress.org because it instantly gives you access to all WordPress features out of the box.

You will need to purchase a domain name and hosting to build a self-hosted WordPress website.

We recommend using Bluehost. It is one of the largest hosting companies in the world and an officially recommended WordPress hosting provider.

Once you have purchased hosting, follow our guide on how to make a website for step by step set up instructions.

That being said, let’s take a look at some of the best WordPress themes for SEO experts, consultants, and marketing experts.

1. Ultra

Themify Ultra

Ultra is a multi-purpose WordPress theme with complete ready-made designs suitable for SEO experts. All of these designs can be installed with 1-click including the demo content. You can then just go ahead and replace the content with your own to make it yours.

It includes a powerful drag and drop page builder, which allows you to edit any page layout with a simple point and click interface. Inside you will find multiple design options with several templates, header designs, blog layouts, page templates, and sidebars.

2. Spencer

Spencer

Spencer is an elegantly designed WordPress theme for SEO businesses, marketing agencies, and entrepreneurs. It has a modern business homepage style which is easy to set up with simple drag and drop widgets.

It has ready to use templates for to add landing page, contact form, about page, and a separate blog page. All theme options are neatly organized under live theme customizer which allows you to easily customize every option and set up your website.

3. Corporate

Corporate

As the name suggests, Corporate is a WordPress business theme designed to be suitable for any type of business including SEO experts and agencies. It ships with several ready-made landing page designs and a built-in drag and drop builder to easily edit them.

It has multiple layout choices for different page templates, smooth background color change effect, CSS animations, testimonials, and more. It comes with a beginner friendly theme options panel with 1-click demo installer and full customizer support.

4. Academy Pro

Academy Pro

Academy Pro is a powerful WordPress theme built on top of the Genesis theme framework. It is perfect for SEO websites selling online courses and training along with SEO services and other products.

It is super easy to set up with a widgetized homepage layout, custom widgets, and a theme options page. It is eCommerce ready with full support for WooCommerce.

5. Indigo

Indigo

Indigo is a multi-purpose WordPress theme suitable for SEO experts, agencies, and businesses. It takes a modular approach to design and allows you to just drag and drop modules to create page layouts. You also get several ready-made designs that can be installed with 1-click.

Other notable features include custom widgets, social media icons, contact form, Google fonts, and more. All theme settings are quite straightforward and easy to follow even for beginners.

6. Authority Pro

Authority Pro

Authority Pro is another powerful WordPress theme to build your online presence as an SEO expert. Built on Genesis framework, it features a fresh and modern design with a large header image, welcome message, and an email subscription form at the top.

It includes 4 widget ready areas, two navigation menus, and a unique vertical navigation menu. Theme settings are controlled by a theme options panel and live theme customizer which makes it quite easy to set up and use.

7. Roxima

Roxima

Roxima is a modern WordPress business theme perfect for SEO consultants and agencies. Its homepage features a large background image with your call to action and beautiful parallax background effects.

It comes with custom widgets, several widget ready areas, page templates, unlimited color choices, and more. It is easy to use with tons of options in live theme customizer.

8. Create

Create

Create is a clean and professional WordPress theme perfect for SEO and marketing agencies. Its homepage features a highly engaging layout with beautiful slider on top followed by your most important content.

It has multiple header styles, built-in mega menu navigation, contact forms, icon fonts, and more. It ships with a slider plugin and works well with popular page builder plugins. It is easy to use with tons of options to customize it in any way you want.

9. Plum

Plum

If you are looking for a free WordPress theme for SEO services provider, then check out Plum. This multi-purpose WordPress theme includes a beautiful homepage with slider, CSS animations, a featured content area, and widget-ready areas.

It can be used with any top page builder plugins to create your own page layout if needed. It is ready for WooCommerce and can be easily translated into other languages.

10. Presence

Presence

Presence is a multi-purpose WordPress theme created for all kind of business websites. It comes with 10 ready-to-use demos including one for digital agencies, which would be perfect for SEO service providers.

It includes portfolio section, team members, testimonials, custom widgets, with flexible layouts and 6 color schemes. It is designed to work out of the box for beginners while offering tons of choices for advanced users.

11. Creativo

Creativo

Creativo is a stylish and powerful multi-purpose WordPress theme. It comes in 7 skins, 3 design layouts, multiple header styles, and unlimited color combinations.

It includes freebies like a page builder, slider, and live chat plugin to extend theme features. Inside you will also find portfolio and testimonial sections, sidebars, custom widgets, social media integration, and more. It is WooCommerce ready out of the box and has beautiful templates for shop and product pages.

12. Capital

Capital

Capital features a modern and professional business website look, which is perfect for SEO consultants. This WooCommerce ready WordPress theme comes with easy to use sections to add your services, portfolio, client testimonials, team members, and more.

It is quite easy to use with visual settings, live customizer support, and tons of easy to use options to make it your own. It is translation ready and can also be used to create multilingual WordPress websites.

13. Corner

Corner

If you are looking for a minimalist and distraction-free design, then take a look at Corner. This clean and simple WordPress business theme comes with a simple two column layout.

It features a narrow left sidebar and a wider content area with lots of white space. It is designed to work out of the box but offers color controls, custom widgets for Twitter, Flickr, and content discovery widgets. It is powerful enough to be extended with any page builder plugin or add an online store with WooCommerce.

14. Bulk

Bulk

Bulk is another excellent free WordPress theme that can be used to build any kind of business website. Designed to work with popular WordPress landing page plugin, it allows you to create engaging page layouts that help you win customers.

It is WooCommerce ready and can also be used as a one-page WordPress theme. All theme options are simple and easy to use allowing you to quickly set it up with minimal effort.

15. Koehn

Koehn

Koehn is a uniquely designed WordPress theme suitable for SEO experts, marketing agencies, and similar businesses. Its homepage features a fullscreen slider on top followed by widget ready areas, which allow you to just drag and drop content widgets to set up.

It also includes projects, team members, testimonials, and custom widgets for social media and content discovery features. It is tested for SEO and compatibility with essential WordPress plugins.

16. Atmosphere Pro

Atmosphere Pro

Atmosphere Pro is built on top of Genesis theme framework. It is a WordPress business theme featuring a beautiful full-screen header image with a call to action on top.

It uses large featured images and elegant typography to make your content stand out. Other features include a customizable header, custom widgets, theme options panel, and live customization support.

17. Atomic

Atomic

If you are looking for an elegant design with beautiful typography, then you’ll love Atomic. This multi-purpose WordPress theme is suitable for all type of business websites.

Its main features include large images, spacious layout, a customizable header, and full WooCommerce support. It is designed to work out of the box and requires a minimum set up.

18. Nayma

Nayma

Nayma is another excellent WordPress multi-purpose theme suitable for SEO experts, affiliate marketers, and agencies. It uses modules to build page layouts which allows you to just drag and drop elements to readjust design for your needs.

It includes ready to use modules for sliders, testimonials, portfolio, contact forms, and more. It comes with full WooCommerce support and can also be used for multilingual websites.

19. Highend

Highend

Highend is a feature-packed WordPress multi-purpose theme which is designed to be suitable for any kind of business website. It comes with several ready-to-use demo templates, including a beautiful landing page demo.

It ships with a drag and drop page builder, sliders, and icon fonts. Other notable features included are page templates, custom widgets, multiple sidebars and navigation menu styles.

20. Integral

Integral

Integral is a free WordPress business theme that can also be used as a one-page theme. It features a modern homepage design with a large background image, welcome message, and call to action buttons.

It comes with beautiful parallax background effects, multiple sidebars, projects and features section, and more. You can change theme colors, fonts, widget sections, and more through live customizer.

21. Propel

Propel

Propel is a stunningly beautiful WordPress business theme which is designed to impress and engage. It is a one-page theme, but works just as beautifully on multi-page websites.

Notable features include a portfolio section, beautiful animations, parallax backgrounds, fullscreen header, and more. It comes with a 1-click demo installer to quickly set up your website.

22. Potenza

Potenza

If you are looking for a more formal design for your SEO agency website, then take a look at Potenza. It is a WordPress business theme with a professional and corporate feel to it. It is a one-page WordPress theme with vertical navigation with links to different sections on the page.

The homepage is made up of widget-ready areas, which means you need to add content widgets to fill it up and you will be good to go. It includes a contact form, multiple colors, social media icons, Google Maps and support for popular page builders.

23. Float

Float

Need a more versatile WordPress theme for your SEO business? Check out Float. This multi-purpose WordPress theme is packed with multiple designs, layout choices, header, and navigation styles.

It includes an integrated page builder, templates for blog, shop, single pages, and posts. It has multiple sidebars and several custom widgets. You will find theme settings quite easy to follow with a custom theme dashboard with all the options.

24. Port

Port

Port is an amazingly elegant WordPress theme for agencies, SEO consultants, and other businesses. Its homepage has a fullscreen background image with a welcome message, your logo or business name, and a collapsed navigation menu. Other sections appear with parallax effects as users scroll down the page.

It has services, projects, testimonials, and video sections. Other features include shortcodes, contact form page, Google fonts, and localization support.

We hope this article helped you find the best WordPress themes for SEO experts. You may also want to see our ultimate guide on how to improve WordPress speed and performance for a faster website.

If you liked this article, then please subscribe to our YouTube Channel for WordPress video tutorials. You can also find us on Twitter and Facebook.

The post 24 Best WordPress Themes for SEO Experts appeared first on WPBeginner.

How to Instantly Switch Between User Accounts in WordPress

Do you want to instantly switch between user accounts in WordPress? Sometimes when testing new features on your website, you may need to switch back and forth between user accounts with different user roles. While you can manually log out and login to the new account, it’s not the most efficient use of your time. In this article, we will show you how to instantly switch between user accounts in WordPress.

Instantly Switch User Accounts in WordPress

Why and When Do You Need to Switch User Accounts?

By default, WordPress allows you to add new users and authors to your website. Each user on your website has a user role assigned to them which gives them permissions to perform different tasks on your website.

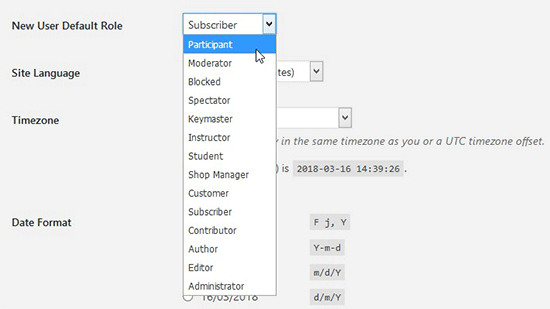
You can also allow users to register on your website and set a default user role for all new users by visiting the Settings » General page.

New Default User Role

As the site owner, you are automatically assigned the administrator user role on your website. This gives you complete control including the ability to manage all user accounts.

While testing new features on your website, you may need to see how things would look for users with different user roles and permissions. This is particularly essential when you are running a WordPress membership website or an online store. The manual way to do this is to simply log in using the credentials for each user account and test those features.

However, this would take a lot of time. Wouldn’t it be better if you could just switch to any user account instantly and then switch back when you are done testing?

Let’s take a look at how to instantly switch between user accounts in WordPress without entering passwords.

Using a Plugin to Instantly Switch Between User Accounts

First you need to install and activate the User Switching plugin. For more details, see our step by step guide on how to install a WordPress plugin.

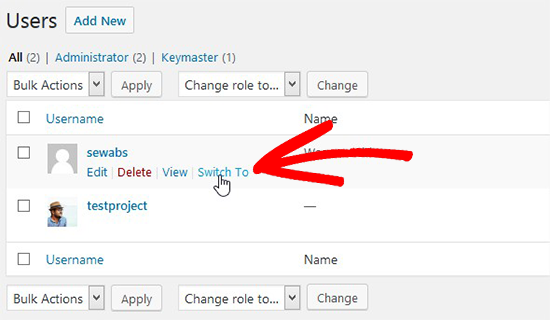
Once activated, you need to go to the Users page in your WordPress admin. On this page, you will see a ‘Switch to’ link next to each user account.

Swtich to Option

User switching is only available for users with an administrator user role. Once you have switched to a new user account, you can continue testing your website logged in as that user.

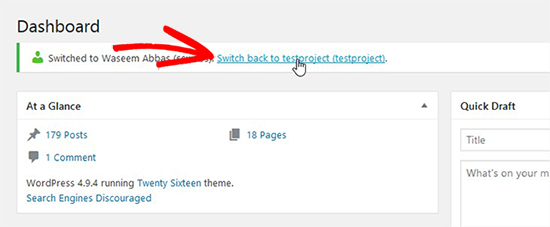
Switch Back Account

Once you are done, you can switch back to your own user account by clicking on the notification displayed on the screen.

We hope this article helped you instantly switch between user accounts in WordPress. You may also want to check out our guide on how to allow website visitors to submit blog posts in WordPress without logging into your website.

If you liked this article, then please subscribe to our YouTube Channel for WordPress video tutorials. You can also find us on Twitter and Facebook.

The post How to Instantly Switch Between User Accounts in WordPress appeared first on WPBeginner.

The Ultimate Affiliate Marketing Guide for Beginners – Step by Step

Affiliate marketing is one of the most popular ways to make money online from your blog. It allows you to add a steady income stream to your blog’s monetization strategy. In this affiliate marketing guide for beginners, we will explain how affiliate marketing works, and how to get started right away.

Ultimate affiliate marketing guide for beginners

What is Affiliate Marketing?

By definition, affiliate marketing is a referral arrangement in which an online retailer (advertiser) pays you a commission when users purchase their product from your referral link.

Unlike other ad types which pays based on clicks or views, affiliate marketing works on a CPA (cost-per-acquisition), or CPL (cost-per-lead) basis. In other words, you only earn a commission when someone takes an action (i.e buys the product or signup for a free trial).

Because there is less risk for the advertiser, affiliate programs pay out much higher commissions to publishers compared to Google AdSense or other types of ads.

Affiliate marketing requires a more hands-on approach. You have to find a product or service that you believe will be helpful to your users. After that you have to strategically add it in your blog posts and other areas of your site, so users can purchase the product using your referral link.

How Does Affiliate Marketing / Tracking Work?

First, you have to find a company or product that you want to promote. You need to select a product or service that you believe will be relevant to your blog’s topic and useful for your audience. The product or company you choose will be called a ‘Merchant’.

Next, you have to partner up with the company by joining their partner program. This makes you their ‘Affiliate’. Some companies also use the terms associates, partners, etc.

Once you have joined their partner program (also called Affiliate Program), you will get a unique affiliate ID. You will need to use this affiliate ID in all affiliate links that you add in your website to promote the product.

You can promote the product by adding an in-depth product reviews, recommend it in your articles, display banner ads, sending an email newsletter, and more. All traffic you send to the merchant website with your unique ID will be tracked.

Once a user makes a purchase, you will earn a commission. Your payment is issued once your earnings reach a particular threshold typically 45 – 60 days.

How to Get Started with Affiliate Marketing

First, you need to make sure that you are using the right blogging platform, and you are allowed to run affiliate marketing campaigns on your website.

For example, if you are using WordPress.com, then there are some restrictions regarding the products and services you can link to. For more details see our comparison of WordPress.com vs WordPress.org.

On the other hand if you are on self-hosted WordPress.org website, then you can add any affiliate link you want and efficiently manage your affiliate campaigns.

If you haven’t created a website already, then you can get started right away. Simply follow the instructions in our step by step guide on how to start a blog, and you’ll be up and running in less than 30 minutes.

Next, you need to let your users know how you make money from your website by adding a disclosure page. See WPBeginner’s disclosure page and feel free to use it as a template.

You will also need to add a privacy policy and terms of service page to your blog.

These are amongst the must have pages for every WordPress blog. They not only save you from legal issues in the future, but they also help you build trust with your audience.

Finding Affiliate Products and Services to Promote

There are many ways to find products and companies that you can partner up with as an affiliate. Here are some of the easiest ways to find the products you can promote.

1. Become an affiliate for products you already use

First, you need to look at the products and services that you already use and find useful. This makes it easy for you to convince your users about the product since you already know the pros and cons.

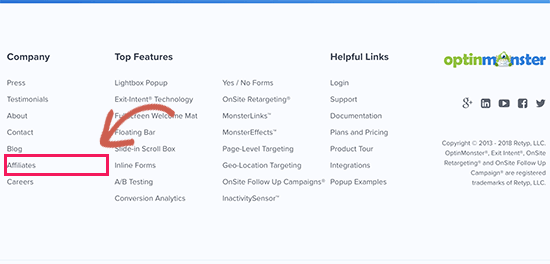
Next, you need to go to the product’s website and search for terms like ‘Affiliate program’, ‘Partners’, or ‘Affiliates’. Many companies are actively looking for affiliate marketers to promote their products that’s why they add a link to their affiliate page in their website’s footer.

Finding affiliate programs to join

2. Look for products other blogs are recommending

Another way to find products is by looking at other blogs similar to yours. You will be able to find many similar blogs that are using affiliate marketing to make money.

But how do you know that they are promoting affiliate products?

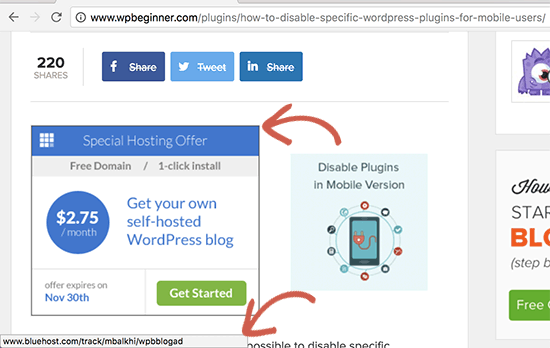
First, look for the obvious and easily noticeable banner ads on their website. Take your mouse to the banner ad, and you will see a link in your browser’s status bar.

finding affiliate links

This link will usually have an affiliate ID. Affiliate ID helps merchants track which affiliate partner is sending them traffic / sales.

Sometimes these links may look like internal links, but when you click on them they will take you to a product website with affiliate marketer’s ID in the link. You will also find similar affiliate links through-out their content.

3. Join Bigger Affiliate Networks

Another way to find products to promote is by joining affiliate networks. These websites act as a middleman between affiliate marketers and merchants.

You will notice that many products and companies that you want to partner with already use an affiliate network. This helps you quickly find a lot of products that you can start promoting on your website.

4. Reach out to Companies

If you really want to promote a product but can’t find any information about their affiliate program, then you can simply ask them via email.

Some companies may not be actively promoting their affiliate program. If they have an affiliate program, then they can invite you to join.

What are Affiliate Networks? Why You Should Join Them?

Affiliate networks act as a middleman between you (the affiliate marketer) and merchants (companies that want to sell their products).

For merchants, they provide their platform as a service to list their products, track affiliate traffic, manage affiliates, and send payments.

For affiliate marketers, they offer an easy to use platform to search for products, sign up as an affiliate, track your campaign performance and earnings.

Following are some of the most popular affiliate networks that you can join.

  • ShareaSale – One of the largest affiliate networks with many high-paying affiliate products for almost every category imaginable. Popular WordPress hosting company, WPEngine, uses ShareASale to manage their affiliates. WPEngine’s Affiliate program offers a very generous payout to their affiliate partners.
  • CJ Affiliate (Formerly, Comission Junction) – Another top affiliate network with a huge number of merchants and products neatly organized in categories and easily searchable. Companies like GoDaddy, Expedia, and many others use CJ.
  • ClickBank – This is a large online marketplace for selling digital products in various categories from different vendors. It is easy to use and has tons of learning resources for new affiliate marketers.
  • Amazon Associates – Amazon is world’s largest ecommerce store with millions of products. You can sign up for their affiliate program and start earning by sending people to a website they already use for their online shopping.

Which affiliate networks should you join?

You should join affiliate networks that have the products you want to promote. You can join multiple affiliate networks for different products. We use all the above networks and few others.

Make sure that you always check the network program policies. You also need to review program policies of individual products and merchants. This will give you a clear idea about your earnings, payments, additional incentives, and more.

Affiliate Marketing Tips to Increase Earnings

Now that we have covered the basics, let’s dive into some more tips on how to actually make money from affiliate marketing.

1. Choose good products and companies to promote

As an affiliate marketer, you don’t have control over the future of products that you are recommending. That’s why you need to make sure that you are recommending the best products from reputable companies.

The best way to do this is by recommending the products and services that you have actually used. If you want to recommend a product that looks useful, then feel free to contact them to learn more.

If you ask nicely, most companies will gladly offer you a free account or copy to review / test their product or service.

2. Offer highly useful and valuable content

You can add affiliate links and banners anywhere on your WordPress site. However, simply adding links will not result in convincing your users to actually buy those products.

You need to convince your users by offering useful and valuable information about the product. Many affiliate marketers do that by writing in-depth product reviews, video reviews, product comparisons with pros and cons, and more.

3. Keep your audience in mind

Keep your website’s audience and their interests in mind when choosing the product. For example, if you run a fashion blog, then you would want to promote fashion accessories, clothing, and similar products that your audience would want to buy.

You also need to make sure that you are not just recommending products because they are offering higher commissions. If a user buys a product based on your recommendation, and it doesn’t turn out useful, then they will never trust your recommendations again.

Affiliate Marketing Plugins and Tools for WordPress

As your blog grows, you will be recommending a lot of different products. This will make it difficult for you to manage all the affiliate links, banners, and ads spread all over your website.

Luckily, there are excellent affiliate marketing tools and plugins for WordPress that you can use to help with management.

1. ThirstyAffiliates

Manually adding links to your content becomes quite difficult as your site grows. You will have to copy the URL with your affiliate ID every time you mention the product and paste it into WordPress.

This is where ThirstyAffiliates can help. It is an affiliate link management plugin that allows you to easily add affiliate links in WordPress.

It also lets you change lengthy affiliate links into cloaked pretty links which are more user-friendly.

ThirstyAffiliates also has the option to automatically replace keywords with affiliate links which can significantly help you boost your affiliate revenue.

2. AdSanity

AdSanity is the best WordPress ad management plugin and a must-have for every affiliate marketer’s toolbox. It allows you to create banner ads from your WordPress site and manage them from a single dashboard.

AdSanity also makes it easy to insert ads into your WordPress posts, pages, and sidebar widgets. You can use it to manage your third-party ads like Google AdSense ads and banners as well. For detailed instructions, see our guide on how to manage ads in WordPress with AdSanity.

3. MonsterInsights

MonsterInsights is the best Google Analytics plugin for WordPress. It allows you to see where your users are coming from and what they do when they are on your website.

It also helps you track your outbound affiliate links using Google Analytics. This enables you to find out which affiliate links are clicked more often and help you discover missed opportunities.

Need more tools? See our full list of top affiliate marketing tools and plugins for WordPress.

We hope this ultimate affiliate marketing guide for beginners helped you learn how to become an affiliate marketer. You may also want to see our ultimate WordPress SEO guide to bring more visitors to your website.

If you liked this article, then please subscribe to our YouTube Channel for WordPress video tutorials. You can also find us on Twitter and Facebook.

The post The Ultimate Affiliate Marketing Guide for Beginners – Step by Step appeared first on WPBeginner.

How to Enable Customer Tracking in WooCommerce with Google Analytics

Do you want to enable customer tracking in WooCommerce?

Customer tracking allows you to offer a personalized shopping experience based on customer behavior in your eCommerce store.

In this article, we will show you how to easily enable customer tracking in WooCommerce with Google Analytics.

How to Enable Customer tracking in WooCommerce with Google Analytics

Why Enable Customer Tracking in WooCommerce with Google Analytics?

Google Analytics allows you to see where your visitors are coming from and what they do on your website. In other words, it helps you track your traffic sources as well as user engagement on your website.

For eCommerce platforms, Google Analytics offers an enhanced eCommerce tracking feature. This allows you to better understand users’ shopping and checkout behavior. Plus, you can see which products perform the best and track your WooCommerce store’s sales performance.

By default, a WooCommerce store allows your customers to create an account or checkout as guest users. Creating an account helps the user save their shipping and billing information for faster checkout next time. It also helps you offer customers a personalized shopping experience based on their browsing and shopping history.

Wouldn’t it be great if you could track logged-in users with their user IDs in Google Analytics and also see the path customers took before making a purchase?

This will give you access to a treasure trove of information and insights on customer behavior. You can use it to offer a better on-site experience and boost your sales.

Let’s take a look at how to easily enable customer tracking in WooCommerce. Here are quick links that you can use to jump ahead to any section:

Set up Ecommerce Tracking in WordPress with Google Analytics

The best way to set up WooCommerce customer tracking in Google Analytics is using Monsterinsights. It is the best Analytics solution for WordPress and helps you set up tracking without editing code.

The plugin offers an eCommerce addon, which automatically detects WooCommerces and starts tracking customer behavior in Google Analytics. It also comes with a Customer Journey addon that allows you to see users’ behavior before they make a purchase.

First, you will need to install and activate the MonsterInsights plugin. For more details, see our step-by-step guide on how to install a WordPress plugin.

You will need to be on the ‘Pro’ plan to access the eCommerce and User Journey addon, which we will use for this tutorial. However, there is also a MonsterInsights Lite version you can use for free.

Upon activation, you will see the welcome screen and the setup wizard. Simply click the ‘Launch the Wizard’ button and follow the on-screen instructions.

Launch setup wizard

For detailed instructions, see our article on how to install Google Analytics in WordPress.

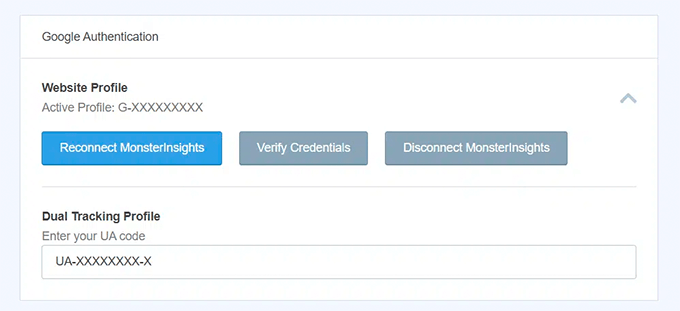
MonsterInsights also helps you set up Google Analytics 4 (GA4) property through its Dual Tracking feature. GA4 is the latest Analytics version, and it will soon replace Universal Analytics.

MonsterInsights Dual Tracking GA v4

If you haven’t created a Google Analytics 4 property, then now is the best time. That’s because, after July 1, 2023, Universal Analytics will sunset and won’t track your website data. Setting up GA4 after the sunset date will mean you’ll have to start from scratch and won’t have any historical data for comparison.

For more details, please see our guide on how to switch to Google Analytics 4 in WordPress.

Install the MonsterInsights eCommerce Addon

Once you’ve configured Google Analytics on your website, the next step is to install the eCommerce addon.

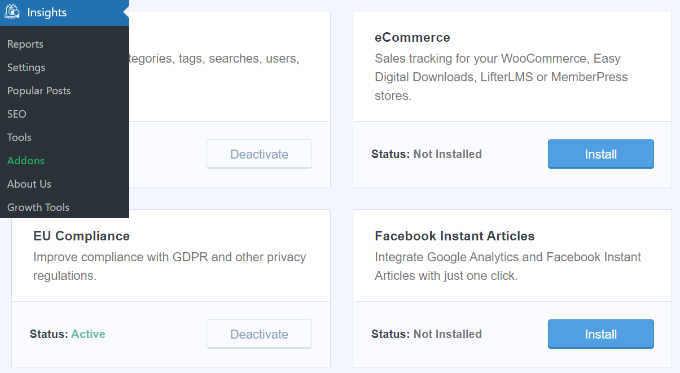
You need to visit the Insights » Addons page from your WordPress dashboard and navigate to the ‘eCommerce’ addon. Simply click the ‘Install’ button, and the addon will automatically activate.

Install the eCommerce addon

Enable Enhanced Ecommerce Tracking in Google Analytics

The next step is to enable eCommerce tracking in Google Analytics. E-commerce tracking is not enabled by default in your Google Analytics account, and you will have to manually enable it.

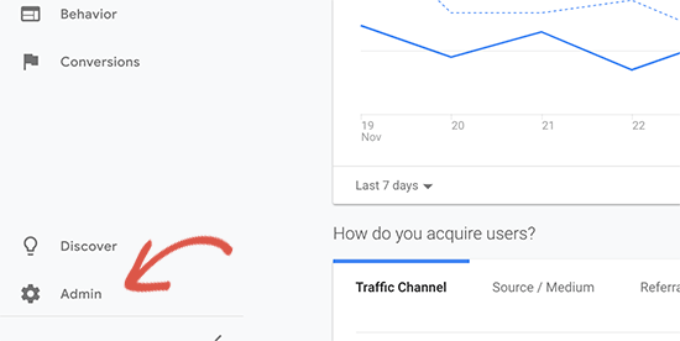
First, you’ll need to head over to your Google Analytics account dashboard and click the Admin option.

Click the admin settings button

Next, you need to click on the ‘Ecommerce Settings’ option.

It is located under the View column.

Ecommerce settings

On the settings page, click the slider under Enable Ecommerce and Enable Enhanced Ecommerce Reporting to turn it on.

Don’t forget to click the ‘Save’ button when you’re done.

Enable ecommerce and enhanced ecommerce reporting

Now, your Google Analytics account will start showing enhanced eCommerce reports for your WooCommerce store.

For more details, please see our guide on how to set up WooCommerce conversion tracking.

Enabling User Journey Addon in MonsterInsights

Now that you’ve set up WooCommerce tracking in Google Analytics, the next step is to enable the MonsterInsights Customer Journey addon.

The addon will allow you to see the steps a customer takes before making a purchase in WooCommerce. Plus, it also shows the time it took at each step, the pages a user visited, and more.

First, you’ll need to go to Insights » Addons from your WordPress admin panel. Next, navigate to the User Journey addon and click the ‘Install’ button.

Install the user journey addon

The addon will automatically activate and start tracking your WooCommerce customer’s journey.

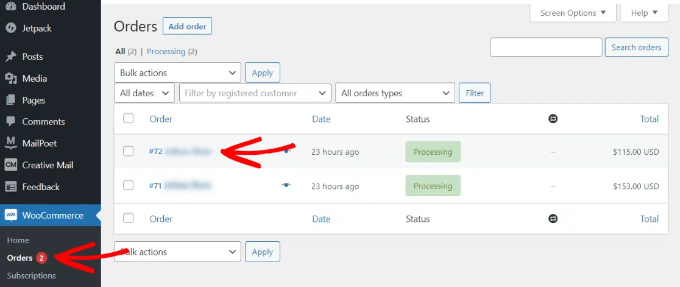
Next, you can go to WooCommerce » Orders from your WordPress dashboard to view the path your customers took when purchasing a product.

WooCommerce order select

After that, click on the order for which you’d like to see the user journey.

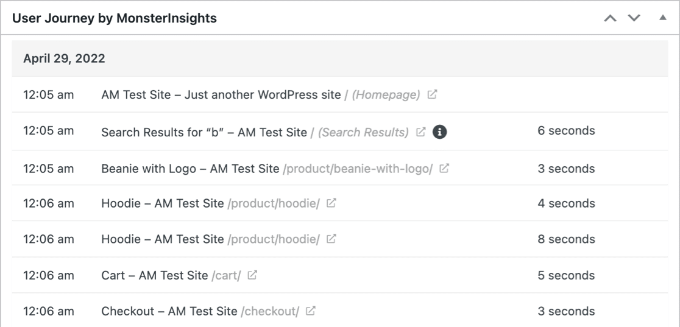
On the next screen, you’ll see the path a customer took before buying the product. You get to view the pages they visited, where they clicked, and how much time they spent on a page.

User journey in MonsterInsights

This is really useful information to better understand your customers. You can see which product categories are performing the best and where customers are exiting your store during the purchase process. Using the data, you can then fix these issues and optimize your site for more conversions.

Enabling User ID Tracking in Google Analytics

While MonsterInsights makes it very easy to track customers on your WooCommerce store, it also tracks WordPress ID tracking in Google Analytics.

WordPress ID is a unique ID to identify every user on your website. The user ID is called the ‘Client ID’ in Universal Analytics and the ‘App Instance ID’ in Google Analytics.

Do remember that enhanced eCommerce tracking will enable eCommerce reporting features for your WooCommerce store. However, it does not enable user tracking by default.

Let’s take a look at how you can enable user ID tracking in Universal Analytics and Google Analytics 4.

Enabling Customer Tracking in Universal Analytics

To enable individual customer tracking, you need to visit your Google Analytics account dashboard and open the Admin page.

Click the admin settings button

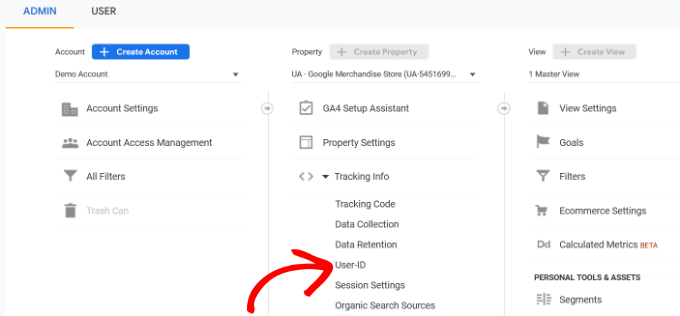
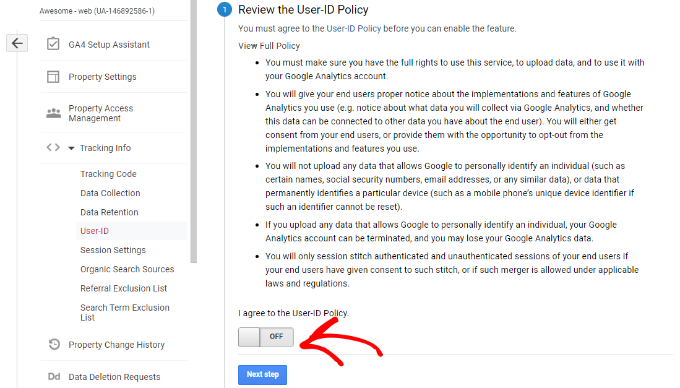
Now, click on the ‘Tracking info’ link under the Property column to expand the submenu.

After that, you can click the User-ID link that appears below.

Go to user ID settings

On the next page, you’ll have to review and agree to the User-ID policy.

Simply click the ‘I agree to the User-ID Policy’ toggle to turn it on.

Enable the user ID feature

From here, click on the ‘Next step’ button to continue.

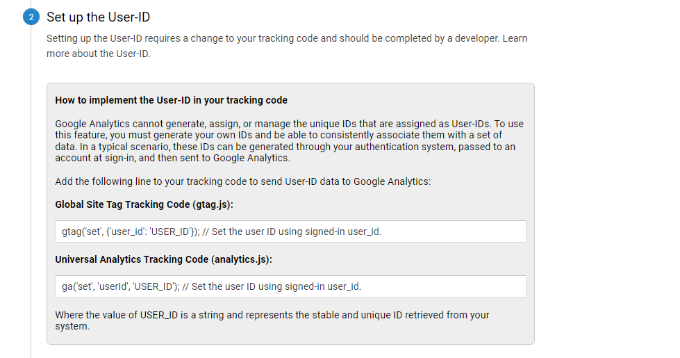
Google Analytics will now ask how you would like to configure the user-ID tracking.

Copy the user id code

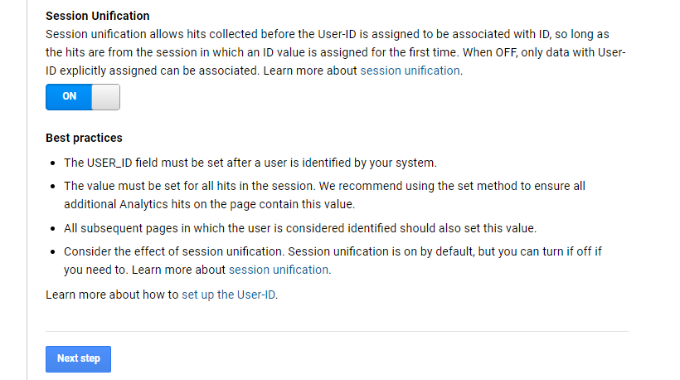
Since you’ll be using MonsterInsights, there’s no need to set up the user-ID tracking code. The plugin will take care of this for you.

Simply scroll down and click the ‘Next step’ button to continue.

Head to the next step

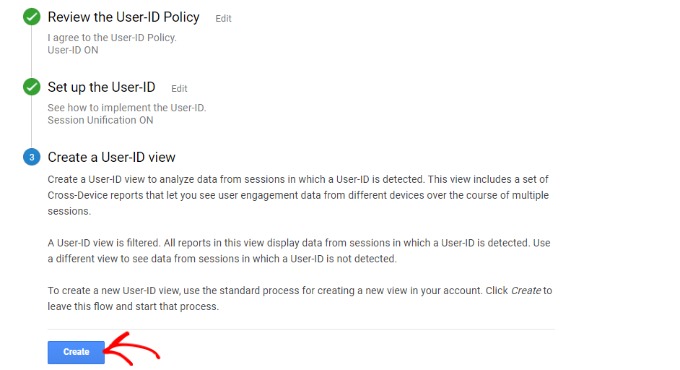
Next, you will see information about creating a user ID view in Google Analytics.

Go ahead and click the ‘Create’ button.

Create user-id view

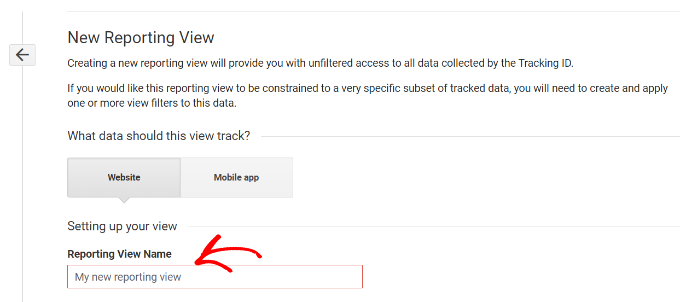
After that, you will be asked to enter a ‘Reporting View Name’, which will be used to display User ID reports.

We recommend including UserID in the name, so it is easy to remember which view has UserID tracking enabled.

Enter a reporting view name

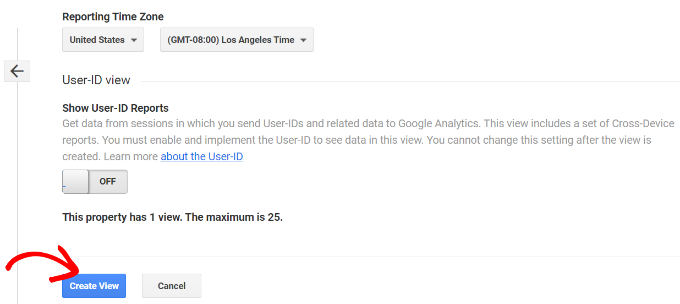
There is also an option to select the Reporting Time Zone.

Next, you just need to scroll down to the bottom and click on the ‘Create view’ button to save it.

Select timezone and create view

Enabling Customer Tracking in Google Analytics 4

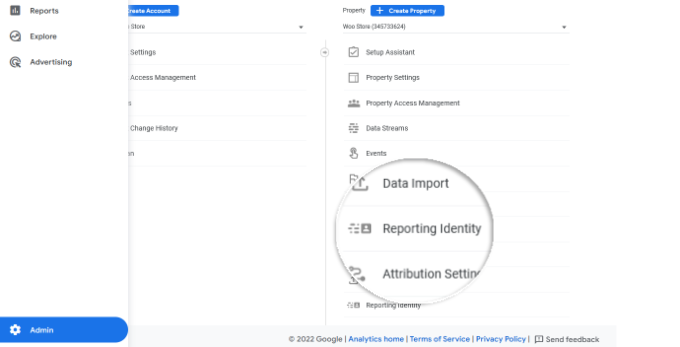
To start, you’ll need to go to the Admin settings from your GA4 dashboard and click the ‘Reporting Identity’ option.

Open reporting identity settings

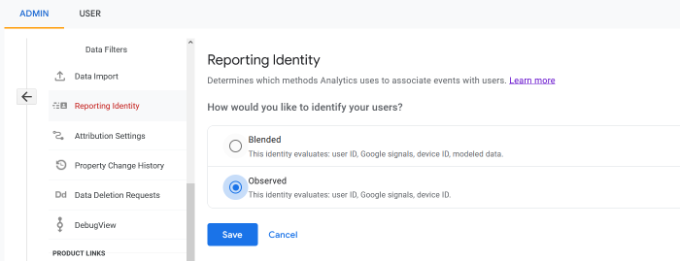
On the next screen, you will need to select a way to identify users on your online store.

GA4 uses multiple ways to identify customers. These include user ID, Google signals, device ID, and modeled data. For the sake of this tutorial, we’ll select the ‘Observed’ option and click the ‘Save’ button.

Select observed option in reporting identity

Viewing Customer Tracking Reports in Google Analytics

Now that everything is set up, Google Analytics will now track all your website customers. It will also be able to track logged-in users with their unique WordPress user ID.

View User ID Data in Universal Analytics

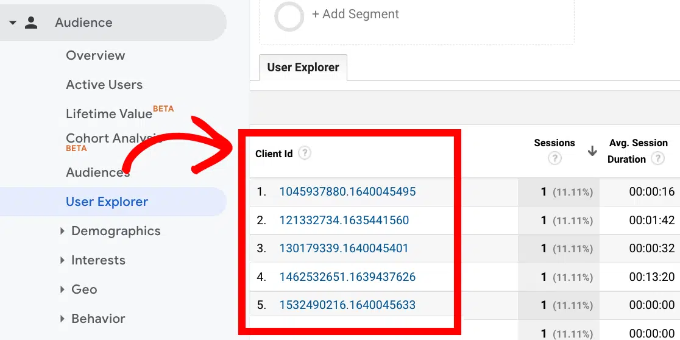
To view all your individual customer activity, you can go to your Universal Analytics account and click on the Audience » User Explorer menu.

View user explorer client ID in UA

You will see individual customer reports with a unique ID assigned to all non-logged-in users.

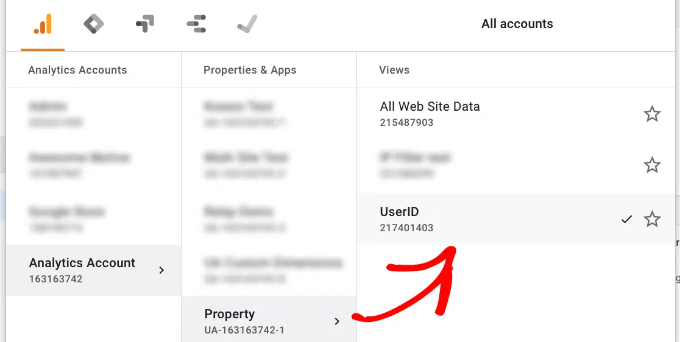
To view customer tracking reports for logged-in users in WooCommerce, you need to click on the Google Analytics logo on the top left corner of the screen.

This will show all your Google Analytics profiles. You will see your website profile and under ‘All website data’ you will see the UserID reporting view you created earlier.

Select UA User ID view

Go ahead and click on the UserID reporting view to load it.

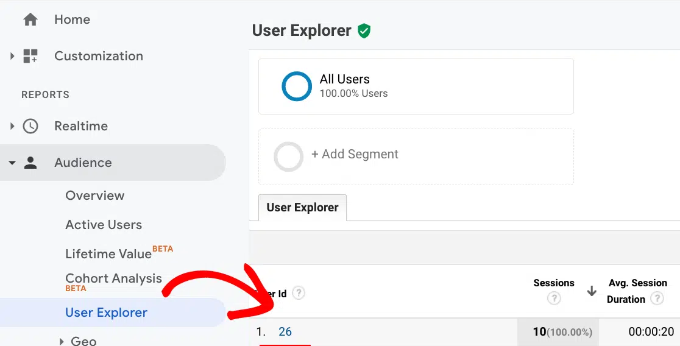
Once it’s loaded, you need to click on the Audience » User Explorer menu. This way, you will see a logged-in customer tracking report where each user is represented by their WordPress user ID on your website.

UA user explorer user ID report

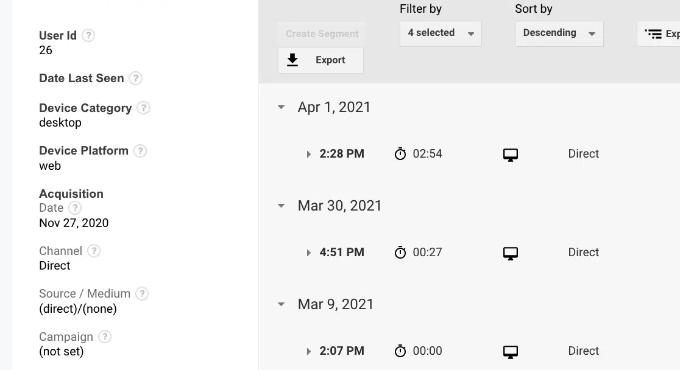
You can click on the user ID to view a customer’s individual tracking data.

For instance, the device category they use, acquisition date, the channel they used to arrive on the online store, and more.

UA user explorer user id details

View User ID Data in Google Analytics 4

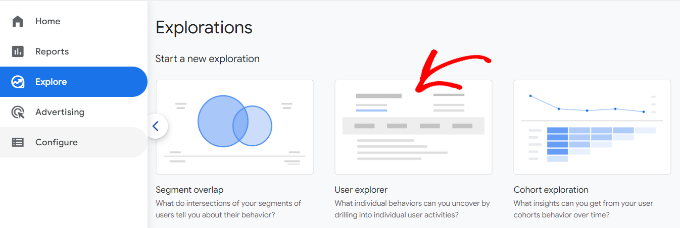
In Google Analytics 4, you’ll need to head to the ‘Explore’ tab from the menu on your left.

Under Explorations, you’ll see different report templates. Simply click the existing ‘User explorer’ report.

Select user explorer report

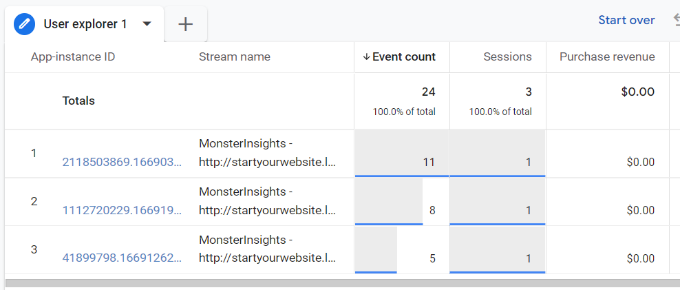
Next, you’ll see the User explorer report in Google Analytics 4.

One thing you can notice is the Client ID will be replaced with the App instance ID.

See user explorer report in ga4

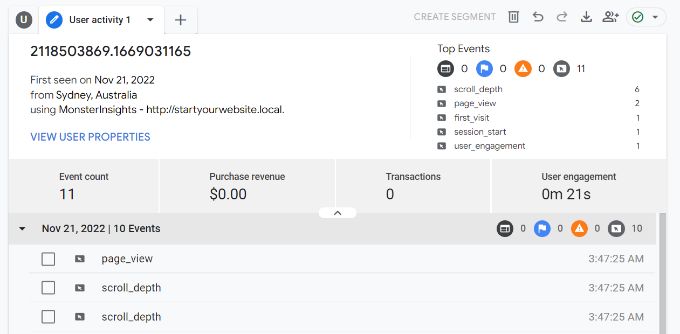
You can click on any of the app instance IDs to view more details.

For example, the report shows the total events that were triggered, the location of the user, the time stamp for each event, and more.

View details of app instance ID

Matching Customer Tracking with Their WordPress Accounts

Now that you’ve identified users in Google Analytics, you can match them with WordPress accounts. This will help you know who this customer is, and how you can create personalized offers, emails, or shopping experiences for them.

First, you need to note down the customer ID you see in your Google Analytics User-ID reporting view.

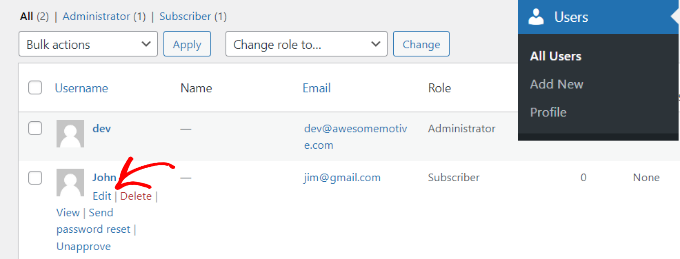
After that, go to your WordPress website’s admin area and click on the ‘Users’ menu. It will show you a list of all users on your WordPress site.

Next, you can click the ‘Edit’ link below any username in the list.

Edit any user profile

WordPress will now open the user profile for you.

If you look in your browser’s address bar you will ‘user_id’ parameter in the URL.

User ID in URL

Next, you need to replace the value next to user_id with the one you copied from your Google Analytics report and press enter key on your keyboard.

WordPress will now load the user profile associated with that particular User ID. You now have the customer’s name, username, email address, and social media information. You can also track their orders, product views, cart activity, and more.

We hope this article helped you learn how to enable customer tracking in WooCommerce with Google Analytics. You may also want to see our expert pick of the best free WooCommerce plugins for your online store and how to get a free email domain.

If you liked this article, then please subscribe to our YouTube Channel for WordPress video tutorials. You can also find us on Twitter and Facebook.

The post How to Enable Customer Tracking in WooCommerce with Google Analytics first appeared on WPBeginner.

How to Add Your WordPress Site in Yandex Webmaster Tools

Do you want to connect your website to Yandex webmaster tools? Webmaster tools like search engine console from Google and Bing webmaster help you optimize your site, monitor the traffic, manage robot.txt, check site errors and more. In this article, we will share how to add your WordPress site in Yandex webmaster tools to monitor your search engine traffic.

Add Your Site to Yandex Webmaster Tools

What is Yandex?

Yandex is a popular search engine like Google and Bing based in Russia. You can optimize your site for SEO in Yandex to get more visitors from Russia.

Yandex has a range of tools like generalized search engine, image search, email, videos, maps and more. It also has webmaster tools to help you rank your site, monitor traffic stats, search queries, keywords, and more.

You can connect your WordPress site with Yandex using the Yoast SEO plugin. It works similar to Google search console and Bing Webmaster tools.

Adding WordPress Site in Yandex Webmaster Tools

Before we start, you would need a Yandex Webmaster tools account to connect your site. Once you have created your account, you can login to your WordPress site to configure Yandex webmaster tools with Yoast SEO plugin.

Let’s take a look on how you can add your site in Yandex webmaster tools and start optimizing it right away.

Step 1: Create an Account at Yandex

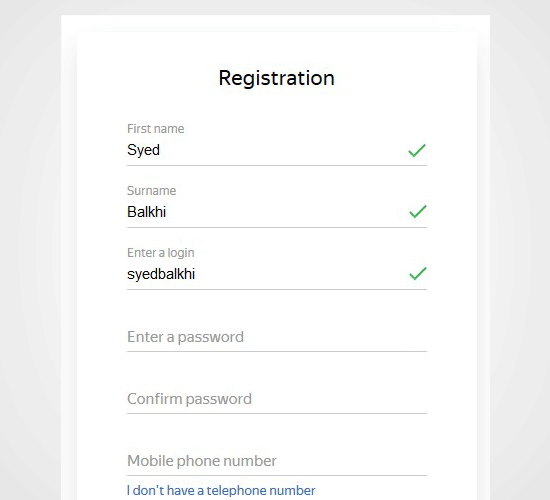
First thing you need to do is login to your Yandex webmaster tools account. If you don’t have a Yandex account, then you can create one using this link.

Register Yandex

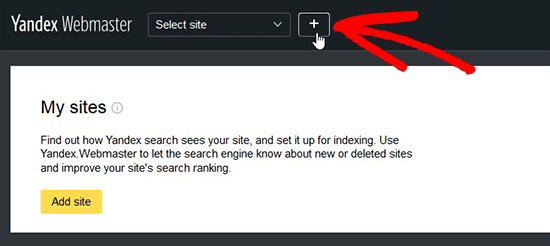
After creating the account, you’ll see the Yandex Webmaster page. On this page, you need to click on the ‘+‘ button in top bar to add your site in Yandex.

Add Site

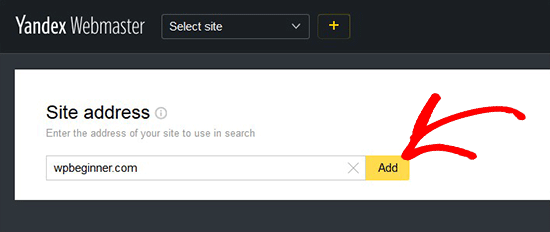
In the site address field, you need to add your website’s full domain name and click on the Add button.

Add URL

Note: If your main domain uses ‘www’ in the URL, then you need to add it before the domain (for example www.wpbeginner.com)

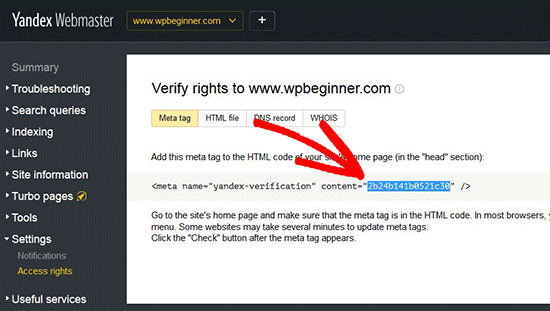
On the next page, you will be asked to verify website ownership by adding meta content in your WordPress site. Go ahead and copy the content code from this page because you will need it in Step 2.

Copy Code

Step 2: Login to WordPress Admin Area and Add the Code

Now you need to login to your WordPress admin area and add the verification code in the Yoast SEO webmaster settings.

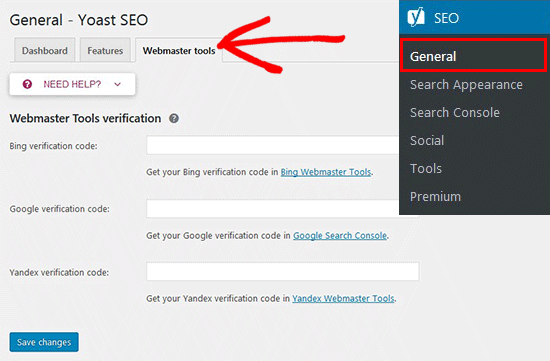
Simply head over to the SEO » General area and click on the Webmaster tools tab.

Yoast General SEO Settings

Next, you need to paste the code in the Yandex verification code field and click on the Save Changes button.

Paste Code and Save

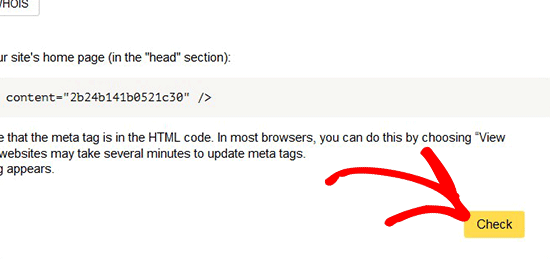
After adding the code in your WordPress site, you need to go back to the Yandex Webmaster tools page where you copied the code from and click on the Check button to verify ownership.

Check and Verify Rights

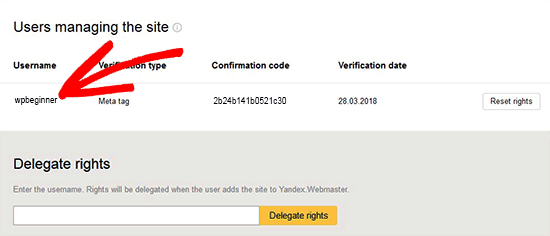
After successful verification, it will show your username that has the rights to manage your site in Yandex Webmaster tools. You can also delegate the rights to other users by adding their username and clicking on the Delegate rights button.

Username and Deligate Rights

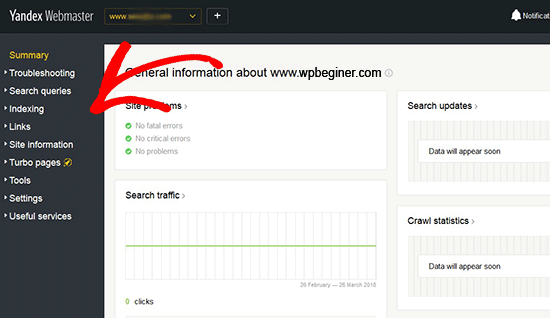
Now that your site is verified and added in Yandex Webmaster tools, you can see traffic stats, search errors, search queries, internal and external links, site information, robot.txt analysis, audit pages for mobile, and more on the Yandex dashboard. You can use the menu on left side of the screen to find any information that you may need.

Yandex Dashboard

Yandex Webmaster tools have options for site optimization that are filtered from troubleshooting to important settings like robot.txt and .htaccess. You can further optimize your robot.txt for SEO separately and regularly perform WordPress maintenance tasks to keep your site up to date.

We hope this article helped you learn how to add your WordPress site in Yandex webmaster tools. You may also want to see our list of best WordPress SEO plugins and tools that you should use to rank your site in search engines.

If you liked this article, then please subscribe to our YouTube Channel for WordPress video tutorials. You can also find us on Twitter and Facebook.

The post How to Add Your WordPress Site in Yandex Webmaster Tools appeared first on WPBeginner.

5 Best WordPress Survey Plugins (Compared)

Are you looking for the best WordPress survey plugin for your website? Surveys allow you to collect user feedback, so you can use it to improve your business. In this article, we will compare the best WordPress survey plugins in the market.

Best WordPress survey plugins

What to Look for in a WordPress Survey Plugin?

There are many ways you can collect user feedback on your website. You can add a contact form, create polls, ask users to leave comments, and more.

Adding a survey is a little bit more involved than that. You need to make it engaging, fun, and easy to get maximum user participation.

A good survey plugin makes your form look great, and it’s easy to use. Reporting is crucial for surveys. That’s why you need to make sure that you can store user submitted data with an option to export it, so you can use it in a spreadsheet or a CRM software.

You also need to consider how you want to share the survey results. If you want to display the results on your website, then you will need a plugin that lets you embed survey results in a beautiful format.

That being said, let’s take a look at some of the best WordPress survey plugins and how they handle all these features.

1. WPForms

WPForms

WPForms is the best WordPress contact form plugin on the market. It comes with a powerful surveys and polls addon which allows you to quickly create highly engaging survey forms.

You can combine the surveys and polls addon with other powerful WPForms features like conditional logic, multi-page forms, custom notifications, email integration, and more.

You can convert any form into a survey by simply clicking a checkbox. You can add any form field to your survey with a click including text, checkboxes, radio buttons, ratings, and the Likert scale field.

The best part about WPForms surveys is the reporting section. WPForms automatically creates beautiful reports with graphs and charts based on survey responses. You can show survey results on any WordPress page with a shortcode or redirect your users to the results page after they fill the survey.

You have the ability to export beautiful survey graphs as images to share on social media or your powerpoint presentations. You can also print the reports to include in your proposals or pitches.

For detailed instructions, see our article on how to create a survey in WordPress with beautiful reports.

2. Polldaddy

Polldaddy

Polldaddy is a famous WordPress polls and survey plugin. It is not a contact form plugin and unlike some other plugins in the list will not be suitable for purposes other than polls and surveys.

It is available as a free plugin, but you’ll need a WordPress.com account to get the API key. The free version is limited in terms of features and will also add Polldaddy logo to your survey form.

Polldaddy is easy to use with a drag and drop tool to create your survey and polls. You can change survey sharing settings, results sharing, and styling options for each survey you create. It also includes captcha to block spam and some basic IP filtering to prevent multiple responses.

3. Gravity Forms

Gravity Forms

Gravity Forms is one of the oldest WordPress form plugins which comes with many add-ons including one to create surveys. It is easy to use, and you can create any kind of form using the form builder with many common form fields including a survey field.

However, the survey results can only be viewed inside the admin area, and there are no charts / graphs. You can export survey results to a CSV file and display the results on your website using a WordPress tables plugin.

Note: You will need at least the Elite plan to access the survey addon.

4. Quiz and Survey Master

Quiz and Survey Master

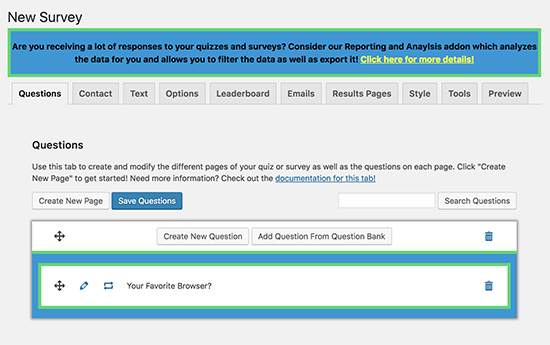
As the name suggests, Quiz and Survey Master is designed to help you add quizzes and surveys to your WordPress site. It doesn’t have the friendliest user interface, but it is well documented and comes with many useful features.

The base free plugin allows you to create surveys with all common form fields, and you can even create multi-page surveys. You can also use it to add quizzes in WordPress with interactive answers, leaderboards, and scoring.

The plugin can also send emails after completion of the survey to thank users or redirect them to any page on your WordPress website. For reporting and analysis, you will need to separately purchase a premium add-on.

5. WP-Polls

WP-Polls

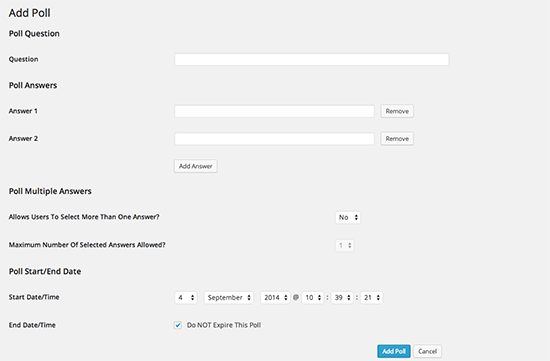
If you are looking for a simple poll solution for your users to participate, then WP-Polls is an easy free option. Unlike other plugins on this list, it doesn’t have a form builder, and you can only use radio buttons or checkboxes to collect responses which makes it quite limited.

Users are automatically shown poll results after they cast their vote. It saves user responses in the logs where you can see how registered users voted. For non-registered users, you can see IP addresses to filter out duplicate votes.

We hope this article helped you find the best WordPress survey plugin for your website. You may also want to see our guide on how to track user engagement in WordPress using Google Analytics.

If you liked this article, then please subscribe to our YouTube Channel for WordPress video tutorials. You can also find us on Twitter and Facebook.

The post 5 Best WordPress Survey Plugins (Compared) appeared first on WPBeginner.

How to Use Antispam Bee to Block Spam Comments in WordPress

Are you getting a lot of spam comments on your WordPress blog? Spam comments can become a big issue as your website grows. In this article, we will share how to use the Antispam Bee plugin to block spam comments in WordPress.

How to Block Spam Comments in WordPress

Why You Should Block or Delete Spam Comments?

Spam comments take up unnecessary space in your WordPress hosting database. What’s worst is if you accidentally approve a spam comment, then it makes your brand look bad.

There are multiple ways to block spam comments in WordPress. You can do it manually by reading and deleting them one by one, but that could take hours.

Mark Spam Comments

Alternatively, you can use the free Antispam Bee plugin to automatically block the spam comments based on the rules that you set.

Let’s take a look at how to block spam comments in WordPress with Antispam Bee plugin.

Using Antispam Bee to Block Spam Comments

First thing you need to do is install and activate the Antispam Bee plugin. For more details, see our step by step guide on how to install a WordPress plugin.

Once activated, you need to go to the Settings » Antispam Bee page in your WordPress admin area.

Settings Page

On this screen, you will see the Antispam Bee settings divided in three sections: Antispam Filter, Advanced tools and More options.

Antispam Filter

Antispam Filter settings are the basic settings that help you detect spam comments. This allows you to filter and review the comments before they show on your blog posts or website.

These settings are organized in an order which they execute. We have explained each setting in the descriptions below.

Antispam Filters

Trust approved commenters

You can enable this option to automatically approve comments from regular and trustworthy commenters. These commenters may post valid comments and generate conversations on your blog posts, so the plugin remembers them and approve their comments right away.

Trust commenters with a Gravatar

This setting will allow you to approve comments from users with a specific Gravatar image and posting valid comments. It is the same technique as approved commenters, but with this setting the plugin will remember the Gravatar of the trustworthy comment makers.

Consider the comment time

If enabled, the filter will considers the comment time. This setting is not recommended by the plugin author for blogs or websites using page caching.

BBCode is spam

It is a recommended setting to check comments with BBCode (Bulletin Board Code) links and mark them as spam. These links format are widely used by spammers to highlight words and links.

Validate the IP address of commenters

The plugin allows you to validate the IP addresses used by the commenters to check their network information like hostname. This helps in finding the online background of the commenter to decide if the comment is useful or spam.

Use regular expressions

If enabled, it helps in finding the unwanted comments with a set of predefined patterns that are useful to detect spam.

Look in the local spam database

If you check this option, it will look for the spam content on your site’s database and then treat it as you define further settings for the spam.

Use a public antispam database

This setting is linked with the Stop Forum Spam to detect IP addresses of active spammers and quickly check the history of the commenters. It works with the complete IP addresses of the senders, so the commenters from EU countries will be avoided.

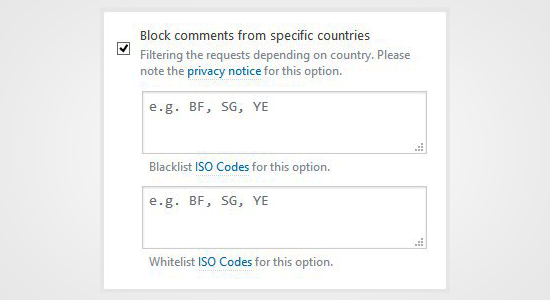
Block comments from specific countries

You can add the list of specific countries to filter spam comments. The Blacklist and Whitelist ISO codes are given with this setting, so you can easily declare the country codes in the respective sections.

Block Comments from Countries

Allow comments only in certain language

This setting allows you to specify a language for the commenters, so comments in all other languages will be blocked or deleted as you define later.

Allow Comments of a Language

Advanced Tools

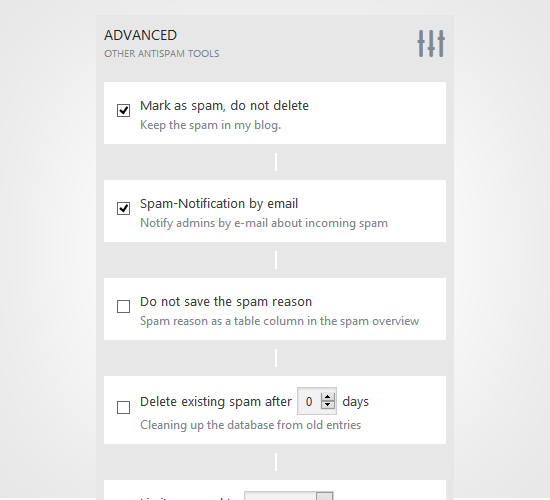
In the advanced settings, you can further set the options to manage, block and delete the unwanted comments. There are few settings that are enabled by default however you can make changes to these settings as needed.

Advanced Tools

Mark as spam, do not delete

If you enable this setting, it will keep the spam comments and won’t delete them until you enable the settings below.

Spam-Notification by email

If you enable this option, then you will receive an email notification for every spam comment. We do not recommend this setting because it’ll become extremely annoying really fast.

Do not save the spam reason

If enabled, this setting will not store the suspicious values of a comment in a separate column. These suspicious values can be the formatted links, comment time and more.

Delete existing spam after X days

This is an important option because it allows you to define the number of days after which the spam comments are automatically deleted. It is linked with many other settings that we discussed above about deleting the comments.

Limit approval to Comments/Pings

This option will define whether you want to approve comments or trackbacks. If you limit approval to comments, then trackbacks will be automatically deleted. Similarly, if you limit approval to trackbacks, then the spam comments will be automatically deleted from your blog or website.

In case this option is not enabled, it follows the previous settings.

Delete comments by spam reasons

You can delete comments with predefined spam reasons. You can select multiple reasons from the options to delete the unwanted comments automatically.

Delete Comments by Spam Reason

These advanced settings will make your life easy while reviewing comments on your site.

More Options

After the advanced settings, you can take a look in the reporting options to display your daily spam updates on WordPress admin dashboard area.

These reports will help you monitor the spam comments easily, and you can also analyze between the numbers of useful and unwanted comments.

More Settings

Generate statistics as a dashboard widget

If enabled, this setting will create a spam report in an interactive widget for your WordPress admin dashboard area. These statistics will give you an overview about the spam comments on your blog.

Spam counter on the dashboard

If enabled, it will display the number of total comments marked as spam in a prominent style. If you are deleting the spam comments, then it will also show the number of deleted comments in an additional column. Some new bloggers find it fun to look at this number after they first start their blog.

Do not check trackbacks / pingbacks

By default, the plugin put a check on all the comments, trackbacks and pings. You can avoid checking the trackbacks with this setting. If enabled, the trackbacks / pingbacks from any site will be automatically approved.

Comment form used outside of posts

This option will monitor comments on your archive pages.

Once you are done, click on the Save Changes button to apply these settings on your blog.

That’s all. We hope this article helped you block spam comments in WordPress. You may also want to check out our guide on how to stop spam registrations on your WordPress membership site.

If you liked this article, then please subscribe to our YouTube Channel for WordPress video tutorials. You can also find us on Twitter and Facebook.

The post How to Use Antispam Bee to Block Spam Comments in WordPress appeared first on WPBeginner.

Why You Must Avoid Nulled WordPress Themes & Plugins (9 Reasons)

Recently, one of our readers asked us if it’s ok to use nulled WordPress themes and plugins? Nulled themes and plugins are pirated copies of premium WordPress products. In this article, we will explain why you must avoid nulled WordPress themes and plugins, specially if you’re serious about your website.

Why you must avoid nulled WordPress themes and plugins

What are Nulled WordPress Themes & Plugins?

Nulled WordPress themes and plugins are pirated copies of paid WordPress themes and plugins distributed unethically on the internet.

The folks redistributing nulled items argue that because WordPress and any derivative works (like plugins and themes) are licensed under GPL, it’s completely ok to copy and distribute it.

While that’s true, often this comes with big cost. Not only does it cause good WordPress companies to lose money, but most importantly it compromises the security and integrity of websites using these nulled WordPress themes and plugins.

Yes often these nulled themes and plugins are the reason why your websites get hacked.

Here are some of the top reasons why you must avoid using nulled WordPress plugins and themes on your website.

1. Security

WordPress security

Nulled WordPress plugins and themes are extremely dangerous for WordPress security. They are known to carry malware.

The malicious code can spread across different files to disguise itself which makes it hard to detect and fix when your website is hacked.

You could also lose your site data in the hack process. Last but not least, your site may get de-indexed from search engines for distributing malware.

2. Privacy

Privacy

Nulled WordPress themes and plugins can have different kind of malicious code hidden inside. This can include code that steals information from your WordPress site and makes it available to hackers on the dark web.

This information may include your username, email address, and passwords. If you run an online store or membership website, then the personal information of your customers can also be at risk.

These kind of hacks are hard to detect and may go unnoticed as your WordPress site keeps functioning normally.

3. Bad for SEO

Bad for SEO

Pirated WordPress themes and plugins can destroy your WordPress SEO completely. Nulled WordPress themes and plugins can add spam links to your website or hijack your users and redirect them to bad websites.

These activities are hard to detect by human eyes as the links are well hidden in the code. You will likely not be redirected when you are logged in to your WordPress account. However, search engines will be quick to notice that and penalize your website by dropping your search rankings or de-indexing your website completely.

You will have to spend months to recover your website’s SEO rankings and sometimes you may even have to make a new website from scratch.

4. Legal Issues

Legal issues

Many WordPress themes and plugins are open source, but some of them are sold with mixed licenses. This means that some parts of the code are protected by copyright laws and if you are using a nulled WordPress theme or plugin, then you don’t have legal permission to do so.

Pirated WordPress themes can result in data theft, data loss, or distribution of illegal material. All of these can lead to legal proceedings where you may end up paying huge sums to lawyers.

5. No Access to Updates

No access to updates

Most WordPress themes and plugins regularly release updates to fix bugs, add new features, and close security issues. Nulled WordPress themes and plugins cannot receive those updates because they don’t have a valid license key.

This leaves your WordPress site with an outdated version which may be buggy and insecure. WordPress itself regularly releases new versions and sometimes themes and plugins need to be updated to remain compatible with the latest changes. Since nulled theme or plugin can’t be updated, your website may start misbehaving or become inaccessible.

For details on WordPress updates, see our article on why you should always use the latest WordPress version and how to manage WordPress updates.

6. Support & Documentation

No access to support

Even the most experienced WordPress users need support and documentation to properly use premium WordPress themes and plugins.

Developers of these products spend a lot of their time on providing support and creating documentation for their users. They even hire support specialists to answer questions and regularly add new tutorials.

If you are using a nulled WordPress theme or plugin, then you are on your own. You cannot ask the developers to help you out when you need help. You also don’t get access to documentation and tutorials because those are only available to paid customers.

7. Access to New Features

No new features

As we mentioned earlier, WordPress themes and plugins are updated regularly and often these updates include new features. If you are using a pirated WordPress product, then you cannot get automatic updates, and you wouldn’t even know that there are new features available.

These new features can significantly improve your website and help you make more money online. However, you will be totally unaware of these changes and will be stuck with an outdated version.

8. Unethical use Discourages Innovation

No innovation

Now some may argue that it is a tiny piece of software, and I am doing this because I cannot afford to pay for it at the moment. However, this tiny piece of code is the result of someone’s skill, talent, and hard work. By using a nulled software, you are taking away money from those developers.

Developers not only spend their time on writing code, they also have to provide support, create documentation, make a website, hire support staff, and spend a lot of money to run their business. Using nulled software hurts their business, and they end up losing money.

These unethical practices may discourage developers from creating new innovative products that can benefit millions of users.

9. The Abundance of Free Alternatives

Plenty of free WordPress themes and plugins

There is no reason for anyone to use nulled WordPress themes and plugins. No matter which WordPress theme or plugin you choose, there is always more than one suitable free alternative available for them.

In fact, many premium WordPress plugins have limited free versions to help you get started. Need a contact form? Get started with the free version of WPForms Lite. Need Google Analytics? Try the free version of MonsterInsights.

For WordPress themes, take a look at our expert-pick of the best free WordPress themes that are just as good as a premium theme.

WordPress.org has thousands of free plugins and themes. Some of them are even better than many premium products. Most importantly, you can use them legally with no burden on your conscience and without affecting WordPress community negatively.

We hope this article helped you learn why you must avoid nulled WordPress plugins and themes. You may also want to see our article on the cost of building a WordPress website with tips on how to save money.

If you liked this article, then please subscribe to our YouTube Channel for WordPress video tutorials. You can also find us on Twitter and Facebook.

The post Why You Must Avoid Nulled WordPress Themes & Plugins (9 Reasons) appeared first on WPBeginner.

Revealed: Which are the Most Popular Types of Blogs?

When starting a blog, one of the most common questions you might think of is which are the most popular types of blog? There are many different types of blogs covering a wide range of topics, interests, and audiences. For a successful blog, you need to plan ahead and choose the niche that works for you. In this article, we will share the most popular types of blogs that you can start right away.

Most Popular Types of Blog

What Should You Blog About?

To decide the niche of your blog, you need to know about your passion. Every niche has its own audience who search for content related to their interests. Writing about your passion helps you continuously come up with great content ideas as your blog grows.

You don’t just need to plan for content. You also need to choose a WordPress theme, optimize for SEO, and improve performance of your site. These are the tasks that are not directly related to writing but equally important for the success of your blog.

Let’s take a look at the most popular types of blogs that exist:

1. Fashion Blogs

Fashion blogs are one of the most popular types of blogs on the internet. It’s a big industry with a huge global audience. Fashion bloggers get invited to major events, receive special perks, merchandise, and even business deals by top fashion brands.

Fashion Blogs

These types of blogs are good for creative people with a keen eye for style and fashion. You can start a fashion blog and start making money online by following our guide.

2. Food Blogs

Food blogs are another popular blog type. It attracts a lot of readers who are interested in recipes, ingredients, healthy eating, fine dining, and other food related stories.

Food Blogs

Many food bloggers just start with something as simple as their local restaurant reviews. However, as their blog grows so does their interests and target audience. They start covering other food related topics as well. Take a look at our guide on how to start a food blog.

3. Travel Blogs

Travel blogs are becoming more popular each day. Due to cheap air travel, people are traveling more than ever, and they are always looking for travel tips, advice, and destination guides.

Travel Blogs

These blogs make it easy for other travelers to learn about a destination they have never been to. If you are a traveler, then we recommend you to create your travel blog.

4. Music Blogs

Music blogs has a wide audience who search for critiques on the best and trending music. Music lovers enjoy songs from different languages, cultures and norms.

Music Blogs

The music industry has big potential for bloggers to write about different types of music like jazz, pop, heavy metal, famous singers, and more.

5. Lifestyle Blogs

Lifestyle blogs are the most popular type of blogs you can find online. They have a variety of readers, interested in topics ranging from culture, arts, local news, and politics. This gives the blogger a wide range of topics to cover, making it easier to plan their content strategy.

Lifestyle Blogs

Lifestyle bloggers get opportunities to be an influencer, write for other publications, become a speaker, and partner with businesses who are working to make a difference in the society.

6. Fitness Blogs

Fitness blogs has been a hot trend since they cover important topics like health and general fitness. People all over the world rely on the internet to seek advice on how to stay fit. It’s a great opportunity for fitness instructors to start a fitness blog and get clients online.

Fitness Blogs

These types of bloggers/instructors write about diets, diet plans, workouts, supplements, and more. Fitness bloggers can also create video content to explain different exercises to their audience. They can monetize their website and videos using Google AdSense and affiliate marketing.

7. DIY Blogs

DIY blogs are very interesting and have a huge audience. It has multiple sub-types like arts and crafts, construction, wood-work, metal-work and more.

DIY Blogs

These interesting DIY activities would encourage visitors to try new stuff and share it with the trainer/blogger. DIY blogs may involve a lot of communication which is great for blogging.

8. Sports Blogs

Sports blogs are another interesting type of blogs online. Every country in the world has different sports and every sport has its own stars. Sports blogging may also include bloggers who are writing paid content for teams, athletes, and other organizations.

Sports Blogs

The other format in sports blogging is to write about latest events all over the world. Furthermore, bloggers share live status of multiple sports on their Twitter accounts automatically linked to the blogs.

9. Finance Blogs

A lot of us need help and advice to manage our finances efficiently. This gives finance blogs a wide audience ranging from serious investors to families trying to save for a better future.

Finance Blogs

Personal finance blogs share advice for businesses, investors, startups, individuals and families. It’s a good blog niche for the people interested in the complex world of managing money and generating wealth.

10. Political Blogs

Political blogs have perhaps the most passionate audience of all. They cover news on politics, analysis of political news, and can quickly build a very large engaging audience.

Political Blogs

It has become common for the big political affiliates to hire their own blogging team. These bloggers share the agenda of the political party and write about their policies / plans to attract more people towards the representatives.

11. Parenting Blogs

Parenting blogs have a huge, passionate, and highly engaged audience. New parents worry a lot and are always willing to improve their parenting skills.

Parenting Blogs

Mom blogs and dad blogs have different styles of writing. These blogs may involve activities with kids, guidance on food, techniques for early home education and more.

12. Business Blogs

Business blogs are the professional blogs related to the corporate agencies, industries and others. They offer a casual way to communicate with customers and educate them about a businesses product or service.

Business Blogs

OptinMonster’s conversion rate optimization blog is a great example of a business blog. It educates users about converting website visitors into customers using the best conversion optimization software in the world.

13. Personal Blogs

Personal blogs belong to individual writers who share their experiences, adventures, and daily life with their audience. The purpose of personal blogging can be anything like making a difference through positive stories or influencing readers with own views.

Personal Blogs

Personal bloggers also include photographers who share photos online to get more work, vloggers who create videos on their daily life routine, chef/cook who share recipes on the blog, and more.

14. Movie Blogs

Movie blogs share news and reviews of new movies and the film industry in general. They have a large audience on the internet. Bloggers are invited to watch premium shows before the public release of movies, so they can write reviews and generate buzz about an upcoming movie.

Movie Blogs

15. Car Blogs

Car blogs are usually about luxury and sports cars. They cover a wide range of topics including latest car models, their features, engineering, and more. They can even partner up with local car dealerships for business opportunities. These blogs have all the information about modern cars, vintage cars, safety tips for drivers, and more.

Car Blogs

Many people get attracted to good cars and spend a lot of time in reading about features of their favorite cars online. It’s a great niche to adopt as a blog type for car lovers.

Some bloggers also write about car financing tips, financing calculators, corporate and banks offers, and finance schedules. It helps the reader find cars in their budget without visiting showrooms.

16. News Blogs

News blogs cover local news and are a great way for journalism students to build up their resume and sharpen their skills. They can cover a wide range of topics or limit to a particular news section. News blogs are not just about sharing news. They also include opinion pieces to share blogger’s own perspective of the news.

News Blogs

The news blogs are updated more frequently to cover latest happenings. News can be about anything like climate change, scientific innovations, technology, politics, religion, and more. Big media outlets have several bloggers to work on each of these sub-types in news blogging.

17. Pet Blogs

Pet blogs have a great readership online that includes pet owners, animal lovers, animal shelters, and people looking for pets. Pet bloggers share tips on keeping pets healthy, pet grooming, pet food, and training.

Pet Blogs

Animal foster homes also write about their efforts to protect and save animals. Pet bloggers can partner up with businesses selling pet care products to generate revenue.

18. Gaming Blogs

Gaming blogs cater to a large community of gamers looking for articles about latest games, gaming hardware, events, game cheats, and more. This community has grown significantly in the recent years.

Gaming Blogs

Most gaming blogs belong to gamers, reviewers, and official communities of big game developing agencies. They have international events for gamers and reward plans for the winners. It’s a popular blog type and growing everyday.

Once you have chosen your blog’s niche, the next step is to find blog post ideas that you can use on your blog. You can check out this massive list of blog post ideas that you can use right away.

That’s all. We hope this article helped you find the most popular types of blogs. You may also want to check out our guide on how to track user engagement and increase your blog traffic.

If you liked this article, then please subscribe to our YouTube Channel for WordPress video tutorials. You can also find us on Twitter and Facebook.

The post Revealed: Which are the Most Popular Types of Blogs? appeared first on WPBeginner.

How to Use FOMO on Your WordPress Site to Increase Conversions

Are you looking to use FOMO and social proof notifications on your WordPress site?

FOMO, short for fear of missing out, is basically a marketing technique used to create anticipation and excitement for a product. It uses a basic psychology principle to help customers make a buying decision faster.

In this article, we will show you how to properly use FOMO on your WordPress website to increase conversions and sales.

How to use FOMO on your WordPress site to increase conversions

What is FOMO and How Does it help with Conversions?

FOMO or ‘fear of missing out’ is a psychological term that describes anxiety about missing out on something exciting and trendy.

As a WordPress website owner, you can take advantage of this human behavior in your marketing strategy and improve your conversions.

The concept of FOMO is not new. It’s actually been used by marketers even before the arrival of the internet. However, with online marketing, FOMO has become far easier to implement and much more effective.

For example, if you run an online store, then you can create anticipation about an upcoming sale and limited-time offers by adding social proof to your landing pages.

You can also use it to build your email list, run affiliate marketing campaigns, boost app downloads, and more.

With that said, let’s take a look at how to easily add FOMO to your WordPress site. We will show you two techniques that we have successfully used on our own websites with incredible results.

Method 1: Adding FOMO with Social Proof by Using TrustPulse

People feel more comfortable with their buying decision when they know others have also bought the same product or service and had a good experience with it.

This is why smart business owners use social proof in their marketing.

The best way to add social proof to your website is by using TrustPulse. It is one of the best social proof plugins for WordPress on the market.

TrustPulse allows you to display real-time user activity notifications on your website, such as products purchased, forms submitted, etc.

TrustPulse

To get started, you’ll need to install and activate the TrustPulse plugin on your website. For more details, see our step-by-step guide on how to install a WordPress plugin.

The plugin helps you connect your WordPress site to the TrustPulse app.

Upon activation, click on the TrustPulse menu from the WordPress admin sidebar and click the ‘Get started for free’ button to continue.

Connect TrustPulse with your site

This will take you to the TrustPulse website, where you can sign up for a free account. The free plan is good for up to 500 sessions per month.

Once you sign up, you are ready to create your first campaign. Simply click on the ‘Create Campaign’ button to start your first FOMO campaign.

Create a new campaign

Next, you will need to provide a title for your campaign and select your website.

If you scroll down, then you can choose a campaign type.

Enter name for campaign and select site

TrustPulse offers 4 different campaign types to choose from.

These include showing recent activities, the number of people taking action, visitor analytics, or a static notification with helpful information.

Select campaign type for fomo

After selecting a campaign type, don’t forget to click the ‘Next Step’ button.

You can now head to the ‘Appearance & Design’ tab and choose language and appearance options for your campaign. You can change the position, badge image, style, and more.

Change the appearance of notification

Once done, click on the next step to continue.

Next, you need to choose how you want to capture the activity.

We recommend using ‘AutoMagic,’ which allows you to select the activity that matches different conditions. For example, you can select your checkout page to automatically capture eCommerce activity.

Capture activity settings

You can also use Zapier to capture activities from 1000+ integrations.

Once done, click on the next step button to continue.

Next, you need to set up the display rules. You can display the badge on all pages or specific pages on your site. You can also choose the delay between notifications, run them as a loop, and enable mobile notifications.

Change the display rules

After that, click on the ‘Publish’ tab at the top.

In the next step, simply click the ‘Launch your TrustPulse campaigns’ button.

Launch your TrustPulse campaign

Don’t forget to click the ‘Save’ button to store your changes and then exit the campaign builder.
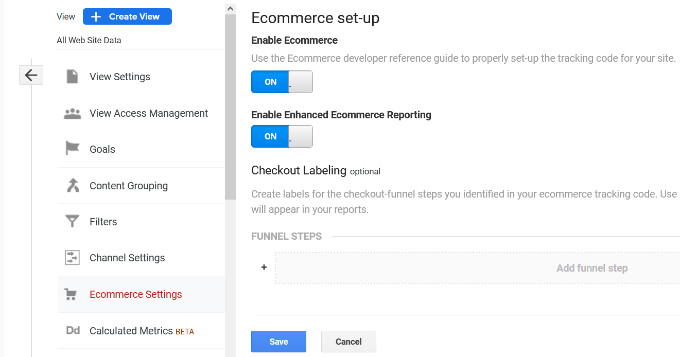
You can now visit your website to see your FOMO campaign in action.
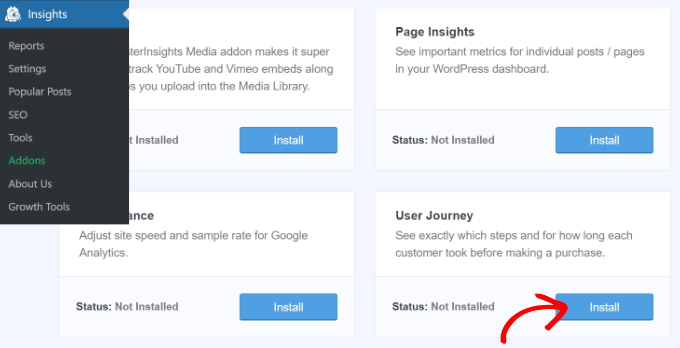
Fomo notification preview

Method 2: Adding FOMO Countdown Timers with OptinMonster

We have all seen marketers using ‘Urgency’ to get customers’ attention. Whether it is your local grocery store or a big name-brand website, it is one of the oldest marketing techniques, which works just as effectively online.

Basically, you show users an offer with a sense of urgency, which triggers the fear of missing out on a valuable deal and helps users make a purchasing decision.

Urgency hacks can be used with limited-time offers, seasonal sale campaigns, one-time discounts, and more. To learn more, see this article on using urgency to hack conversion rates with proven methods.

The best way to add urgency timers in WordPress or WooCommerce is by using OptinMonster. It is the most popular conversion optimization and lead generation software that helps businesses turn potentially abandoning website visitors into subscribers and customers.

First, you will need to sign up for an OptinMonster account. It is a paid tool, and you will need at least the ‘Basic’ plan to use their Floating bar campaigns.

OptinMonster

After signing up for an account, you will need to install and activate the OptinMonster plugin. For more details, see our step-by-step guide on how to install a WordPress plugin.

This plugin is a connector between your WordPress site and the OptinMonster application.

Upon activation, click on the ‘Connect Your Existing Account’ button on the OptinMonster welcome screen.

Connect your existing account

Next, you should see a new window open where you’ll be asked to connect your website.

Go ahead and click the ‘Connect to WordPress’ button.

Connect OptinMonster to WordPress

After connecting your website, you will need to go to OptinMonster » Campaigns from your WordPress dashboard.

From here, click on the ‘Create Your First Campaign’ button to continue.

Create your first campaign

This will launch the OptinMonster campaign builder.

First, you will need to select an optin type and then select a theme. We will use a ‘Floating bar’ campaign with the ‘Countdown’ theme.

Select floating bar campaign type

Next, you will be asked to choose a name for your campaign.

Once that’s done, simply click the ‘Start Building’ button.

Enter a name for your campaign

On the next screen, you’ll see the drag-and-drop tool, where you can simply point and click to design your campaign.

You’ll see a live preview of your campaign in the right panel and a bunch of customization blocks and options in the left panel.

With the floating bar countdown campaign, the preview will appear near the bottom of the screen for you, just as it does for the users.

Edit the floating bar campaign

Go ahead and click on the countdown timer in the live preview to set the countdown style and end date. You can use two types of countdown timers: Static and Dynamic.

The static timer remains the same for all your users, while the Dynamic timer changes based on user behavior on your website.

Edit countdown timer settings

For this tutorial, we will be using the static timer. Since we are using a floating bar with a countdown theme, we can move the floating bar to the bottom or the top.

You can just point and click to edit the text in your floating bar. You can add a coupon code, add links to special offers, and style it any way you want.

Next, you can go to the ‘Display Rule’ tab at the top. Here, you’ll see different options for showing your campaign.

Select display rules

For instance, you can select the ‘Time on Page’ option and show the floating bar after a user spends at least 5 seconds on your website.

Below that, you also get to select the location for your campaign. We’ll use the default setting where the countdown timer floating bar will appear on all the pages on your website.

Set up display rules

Once you are satisfied, don’t forget to click on the ‘Save’ button at the top.

After that, head to the ‘Publish’ tab. Now, change the Publish Status from Draft to Publish.

Publish your floating bar campaign

Don’t forget to click the ‘Save’ button and close the campaign builder.

You will now see the WordPress Output settings for your recently created campaign.

Change status to publish

By default, your campaign will be disabled, and you just have to click on the Status dropdown menu to change it from Pending to Published.

Once that’s done, click the ‘Save Changes’ button.

You can now visit your website to see your countdown timer FOMO campaign in action.

Countdown timer preview

Tracking Your Conversions in WordPress

FOMO techniques work really well for conversions, but how do you keep track of their performance? Without tracking, you wouldn’t know how many sales or leads were generated because of these campaigns.

All expert marketers use Google Analytics. It not only helps you see where your users are coming from but also allows you to track user engagement on your website.

The easiest way to use Google Analytics in WordPress is through MonsterInsights. It is the best Google Analytics plugin for WordPress and makes it super easy to track conversions on your website.

For instance, it has an eCommerce addon, which helps you track your eCommerce performance without leaving the WordPress dashboard. Plus, you can also track form conversions, link clicks, and more with MonsterInsights.

Ecommerce report in MonsterInsights

For more details, please see our guide on WordPress conversion tracking make simple.

We hope this article helped you learn how to add FOMO to your WordPress website and boost conversions. You may also want to see our list of must-have WordPress plugins for business websites and how to start a WordPress blog.

If you liked this article, then please subscribe to our YouTube Channel for WordPress video tutorials. You can also find us on Twitter and Facebook.

The post How to Use FOMO on Your WordPress Site to Increase Conversions first appeared on WPBeginner.