Do you want to create and manage an ads.txt files in WordPress? Ads.txt file protects publishers from ad fraud, and it can potentially increase your ad revenue. In this article, we will show you how to easily create and manage ads.txt file in WordPress.
What is Ads.txt File?
Ads.txt file allows publishers to declare who can sell ads on their website. It is an initiative created by IAB Tech Lab, a non-profit focused on improving digital advertising standards.
The initiative is supported by Google’s advertising platforms like Google Adsense, Doubleclick, and Ad Exchange. It is also supported by many other leading digital advertising platforms.
Why is Ads.txt file important?
Ad fraud cost millions of dollars in damages to online advertisers and publishers each year. People with malicious intent continuously try to trick ad platforms with domain spoofing, fake clicks, fake impressions, and more.
Ads.txt file improves transparency in online advertisement by allowing publishers to declare who can sell their ad inventory. Here is how it works:
If you are an advertiser and someone tells you that they can display your ad on a particular website, then you can go and checkout that website’s ads.txt file. It will show you if the company you are dealing with has the permission to sell advertising space on that particular website or not.
Since this data is publicly available, it can be crawled, stored, and searched by advertisers, publishers, and resellers.
If you are displaying ads on your website using Google Adsense, DoubleClick, or Ad Exchange, then adding Ads.txt file is recommended.
Many other advertising platform and software also support or require ads.txt file to be declared.
How to Create and Manage Ads.txt Files in WordPress?
Upon activation, you need to visit the Settings » Ads.txt page to configure plugin settings.
The plugin provides a simple text area where you can add lines to declare each individual platform or reseller. For example, you can add the following line to declare Google Adsense.
Don’t forget to replace pub-0000000000000000 with your own publisher ID.
As you can see, this line has four fields separated by comma. The first field is the domain of the company allowed to sell or resell your ad inventory. After that it has your publisher ID which corresponds to your account ID in the advertising platform.
The third field declares relationship type DIRECT or RESELLER. The last field is optional, and it represents an ID of the advertising platform. For all Google advertising programs, you’ll use the same unique ID.
Troubleshooting Earnings at risk Error in Adsense
A missing declaration in your ads.txt file may result in the following warning message in your Google Adsense account.
Earnings at risk – One or more of your ads.txt files doesn’t contain your AdSense publisher ID. Fix this now to avoid severe impact to your revenue.
This message indicates that your ads.txt file doesn’t have your publisher ID. To fix this message, simply go to Settings » Ads.txt page to make sure that you have correct publisher ID in plugin settings.
Note: Since ads.txt file is supposed to be in the root directory of a domain name, this plugin currently only works for root level domain like example.com. It does not work for WordPress installed in subdomain, subdirectory, or a single site in a multi-site network.
Are you looking for the best WordPress themes for lawyers? A lawyer website requires a serious business and professional layout which is not commonly found in blogging themes. In this article, we have hand-picked some of the best WordPress theme for lawyers that you can use on your website.
Making a Website for Lawyers and Legal Firms
WordPress is used by many top brand names for their websites. It is one of the most popular website builders in the world and perfect to build a website for lawyers or legal firms.
Ultra is a beautifully designed all-purpose WordPress theme. It comes with several ready-made websites complete with content. One of these ready made designs is for lawyers and legal firms. You can install it with 1-click and then replace the content and images with your own.
It is packed with features like a drag and drop page builder, multiple sliders, photo galleries, contact form support, multiple layouts, and more. It is very easy to use even for absolute beginners.
Potenza is a powerful one-page WordPress theme for business websites including lawyers and legal organizations. It includes a beautiful vertical navigation flow with ready-made sections.
It has a fully widgetized homepage layout, just drag and drop widgets to build your website. It includes contact form, multiple colors, social media icons, Google Maps and support for popular page builders. All theme features are easy to customize and simple to use.
If you are looking for a minimalist style WordPress theme, then you’ll love Monochrome. This elegant WordPress theme is built on top of Genesis framework, which is highly optimized for speed and performance.
It includes landing page template, blog, and homepage template, custom widget areas, and a custom theme settings page. It works out of the box and it is quite easy to set up using live theme customizer.
Factum is a clean and simple one page WordPress theme for lawyers and legal firms. It comes with built-in sections to easily add clients, testimonials, staff profiles, and services. It can be used as a one-page theme and it will display all those sections on a single page.
It has multiple color schemes, custom widgets for social media, and a separate blog page. Theme setup is quite straightforward very easy to follow.
Indigo is an all-in-one kind of WordPress theme suitable for any kind of business website including legal firms and lawyers. It comes with ready-made websites that you can install with 1-click.
All website designs are fully editable using the theme’s drag and drop modules. You can also create your own custom page layouts with simple click and edit. It includes contact form support, social media, Google maps, Typekit fonts, and more.
As the name suggests, LegalPress is a specifically designed WordPress theme for lawyers and law firms. It features a beautiful design with slider on top followed by your most important sections.
It has easy to use sections to add client testimonials, staff profiles, call to action, office hours, and more.
Atmosphere is a modern WordPress business theme suitable for lawyers, law firms, and legal organizations. It features a large header image on the homepage with clear call to action button. Followed by your services and other sections.
It has a fully-widgetized homepage layout allowing you to drag and drop widgets to add different sections. It is built on Genesis theme framework and includes a custom theme settings page with support for live theme customization.
Law and Justice is a beautiful WordPress theme for attorneys, lawyers, and law firms. It includes a super-easy 1-click demo installer to setup your website instantly. After that you can just replace content with your own and you are good to go.
It also includes a drag and drop page builder, Google fonts, contact form, and translation support. It has a custom theme options panel to easily change theme settings.
Spencer is a multi-purpose WordPress business theme suitable for attorneys, and law firms. Its homepage features a full-width background image with a welcome message and call to action button. After that you can add your articles, client testimonials, and other sections.
It has unlimited colors, multiple layouts, full-width page, and page builder support. It is super easy to use and has lots of customization options neatly organized under live theme customizer.
Presence is a beautifully designed WordPress theme for business websites including lawyers and legal firms. It includes 10 beautiful website designs that you can install with 1-click. Each design is fully editable using live theme customizer.
It comes in multiple color schemes, custom widgets, multiple blog layouts, and eCommerce support. It is compatible with all top WordPress plugins and includes a simpler page builder to edit page layouts.
Elite is a beautiful WordPress theme for business and ecommerce websites. It features a full screen background image with your call to action button prominently displayed.
It includes custom logo support, unlimited colors, Google fonts, and multiple page layouts for blog posts and pages. It is easy to use with a widgetized homepage, customizer support, and custom theme options page.
Atomic is a beautifully designed WordPress business theme that can be easily used for a law firm. It features beautiful typography and spacious layout that makes your content stand out.
Its homepage features sections to add your staff profiles, services, and articles. It works out of the box and all theme settings are neatly organized. It also comes with a getting started guide to help you set up your website/
Neilmink is a modern and elegant WordPress theme for lawyers and legal firms. Its homepage uses bold colors, parallax background effects, and crisp typography for a unique look.
It includes easy color selection, shortcodes, team members, clients, and services sections. All theme options are easily customizable using live customizer and a custom theme settings page.
If you are looking for a free WordPress theme for lawyers, then take a look at Decree. It features a modern layout featuring a large slider with call to action, followed by your services, staff profiles, and contact information.
It works with all popular WordPress plugins and can also be used with multilingual websites. It is simple to use and comes with free detailed documentation to set up your website like the demo.
Legal is a WordPress theme made specifically for lawyers, attorneys, and law firms. It features a modern homepage layout with customizable slider on top with your welcome message.
It includes a contact form, multiple layout choices, Google fonts, social media icons, and more. It comes with a custom theme dashboard for set up and also supports live customizer.
Pinnacle is a beautifully designed free WordPress theme for business websites. It features a bold design with versatile options and multiple style choices.
It comes with tons of customization options including color choices, multiple layouts, multiple sidebars, custom widgets and more. It is highly customizable yet quite easy to use.
Executive Pro is a WordPress theme designed specifically for business websites. Suitable for lawyers and legal firms looking for a corporate look for their website. Its homepage displays a featured slider on top, followed by a call to action banner and then your most important content.
It is built on Genesis theme framework and includes a widgetized homepage layout, custom widgets, custom theme options panel, and live customizer support. It can also be used to add an online store functionality if you need it.
Leader is another excellent WordPress theme for lawyers and law firm websites. It comes with 1-click demo import with multiple homepage designs that you can install and make your own.
It includes 10 header styles, 8 blog layouts, unlimited sidebars, mega menu, and premium page builder and slider plugins. It can also be used to build multilingual websites.
Roxima is a modern and stylish WordPress business theme that can be used by lawyers and law firm websites. Its homepage displays a full screen background image with your call to action. The homepage is fully widgetized allowing you to drag and drop sections to build your website.
It comes with full color control, custom widgets for content discovery and social media, multiple layouts, advanced typography options, and more. All theme options are easy to setup and most just work out of the box.
Creativo is a multi-purpose WordPress theme designed for all types of business websites. It includes multiple 1-click demos that allows you to quickly setup a lawyer website. Simply replace the content with your own and you will be ready to launch.
It comes with 7 color schemes, 3 design layouts, multiple header styles, and unlimited color choices. It ships with freebies like a page builder, slider, and a live chat plugin.
Koehn is an elegant WordPress business theme suitable for legal firms and lawyers looking for a corporate look. it includes a widgetized drag and drop homepage with built-in content sections and a powerful fullscreen slider.
Koehn comes with custom post type to add your staff members. It also includes custom widgets for content discovery and social media like Instagram, Flickr, Twitter, and more.
We hope this article helped you find the best WordPress themes for lawyers and legal firms. You may also want to see our complete step by step WordPress SEO guide for beginners.
If you liked this article, then please subscribe to our YouTube Channel for WordPress video tutorials. You can also find us on Twitter and Facebook.
Do you want to create a private post in WordPress? Unlike regular WordPress posts, a private post is not visible to your website visitors. Only logged in users with specific permissions can see them. In this article, we will show you how to easily create a private post in WordPress.
What is a Private Post in WordPress? How Does it Work?
A private post in WordPress is not visible to the public. Only logged in users with right permissions can see it among your blog posts.
WordPress comes with a built-in user role system that assigns permissions and capabilities to different user roles. Each WordPress user has a role assigned to them which gives them permissions to do specific tasks on a website.
Any user who has the permission to publish a post can write a private post and publish it. The post will be visible to the user and following user roles.
Administrator – Can create, edit, and delete any private post created by any user on a WordPress site.
Editor – Can create, edit, and delete any private posts created by any user.
Author – Can create, publish, edit, view and delete their own private posts. They cannot see private posts created by other users.
That being said, let’s take a look at how to create a private post in WordPress.
Creating a Private Post or Private Page in WordPress
First you need to create a new post or page. You can also edit an existing post that you want to make private.
On the post edit screen, you need to click on the ‘Edit’ link next to the ‘Visibility’ option in ‘Publish’ meta box.
You will now see options to make a post sticky, password protected, or private. Go ahead and select private and then click the OK button to continue.
You can now continue editing the post or you can save/publish it.
If you visit your website, then you will see your Private blog post marked like this:
Users who don’t have permission to see private posts will not see it.
Note: Images you add to a private post are not private and can be viewed in media library by other authors. Images can also be viewed by anyone who has the image URL.
We hope this article helped you learn how to create a private post in WordPress. If you are looking to create a full-feature membership website with private content and courses, then you may want to check out our ultimate guide on how to create a membership site in WordPress.
If you liked this article, then please subscribe to our YouTube Channel for WordPress video tutorials. You can also find us on Twitter and Facebook.
Are you looking for the best WooCommerce hosting to create your online store? Choosing the best hosting provider is one of the most important decision you’ll make for your eCommerce business.
A typical shared hosting provider may not always be a good choice for WooCommerce. That’s because you will need more resources, SSL certificate, and WooCommerce-centric support platform. In this guide, we will help you choose the best WooCommerce hosting for your online store.
At WPBeginner, we have helped more than 100,000+ users start their websites. As the largest unofficial WordPress resource site and years of experience with hosting services, we know the importance of choosing the best WooCommerce hosting for an eCommerce startup. Our goal is to offer insights on things you need to consider when choosing a WooCommerce hosting company.
Do you want to improve your WordPress comment notification emails? Comments drive discussion and user engagement on many blogs. However, WordPress doesn’t do such a great job when it comes to notifying users about comment activity. In this article, we will show you how to better manage WordPress comment notification emails and boost user activity on your website.
Why Improve WordPress Comment Notification Emails
Comments are an important activity on many WordPress websites, particularly news sites and blogs. More comments mean a more engaged audience which results in more page views and ultimately more revenue.
However, default WordPress comment system is fairly limited. It sends comment notifications only to site administrators and article authors. Apart from that, there isn’t a default option for other users to be notified of new comments.
Wouldn’t it be nice if users were able to get comment notifications for the posts they like? or when someone replies to their comment?
In this article, we will show you how you can extend the default WordPress comment notification emails for a more engaged user experience on your website.
The Default Comment Notification Options in WordPress
By default, WordPress does not have an option to send notifications to commenters. However, it does have an option to send email notifications to you when a new comment is published and when a comment is held for moderation.
Both these notifications are sent to the site administrators. WordPress also sends an email notification to post author about new comments.
If you don’t want to receive notifications for comments held for moderation, then you can simply uncheck the box here. This is particularly helpful if you get a lot of comments on your website.
Let Users Know When Their Comment is Approved
Users have no idea whether you approved their comment or not. They do see that their comment is awaiting moderation when they leave a comment. Many of these users never return to your website, and they don’t even know that you approved their comment or replied to it.
Comment Approved allow users to be notified when their comment is approved. Users can check the option when leaving a comment. You can also customize the email message sent to users after their comment is approved.
Your commenters have no way of knowing whether you or others replied to their comment. Once they leave a comment, they will have to manually visit your website again to see if someone replied.
It allows your users to subscribe to comments on any article with or without leaving comments. It also makes it easier for users to unsubscribe at any time.
Allow Users to Subscribe to Only their own Comments in WordPress
Many users may not want to receive notifications for all comments on an article. However, they may want to know if someone replied only to their own comments.
You can add this feature as well using the same Subscribe to Comments Reloaded plugin. Simply visit the plugin’s settings page and click on yes next to ‘Advanced Subscription’ option.
Allow Authors to Subscribe To Other Author’s Posts
If you run a multi-author blog, then other authors may want to keep up with discussions across your website. If you already have comment subscriptions enabled, then each author can manually go and subscribe to comments.
After installing and activating the plugin, you need to visit Settings » Discussion page to configure plugin settings.
It allows you to select the user roles that you want to be notified of new comments. You can also add email addresses of individual users you want to notify.
This is particularly useful if you have registered users who are responsible for comment engagement and moderation.
Creating Custom Comment Notification in WordPress
Want to create your own custom comment notifications in WordPress? Custom notifications can allow you to change the notification sent by WordPress and replace them with your own.
Upon activation, you need to visit Notifications » Add New page to create your custom comment notifications.
You can modify the new comment, comment awaiting moderation, and comment reply notifications. You can send notifications to any user role, individual users, or add email addresses manually.
It also allows you to completely customize the email sent by WordPress. You can use shortcodes inside the email text to add custom tags.
Improve Deliverability of WordPress Email Notifications
All above tips will fail if your WordPress site fails to send email notifications, or if those emails are marked spam by email providers.
To fix WordPress email issues and improve email deliverability, you need to install and activate WP Mail SMTP plugin. For more details, see our step by step guide on how to install a WordPress plugin.
Upon activation, visit Settings » WP Mail SMTP page to configure plugin settings.
This plugin allows you to use SMTP (Simple Mail Transfer Protocol) to send emails. SMTP is a much better and reliable method than the default mail function used by WordPress.
It works with any email service that supports SMTP. This includes your free Gmail account as well as Gsuite or Google Apps for Work, Mailgun, and Sendgrid.
We hope this article helped you learn how to efficiently manage WordPress comment notifications for more user engagement and pageviews. You may also want to see our ultimate step by step guide on improving WordPress speed and performance for beginners.
If you liked this article, then please subscribe to our YouTube Channel for WordPress video tutorials. You can also find us on Twitter and Facebook.
We are often asked by our readers to explain what is the difference between a domain name and web hosting? Many beginners don’t know that these are two separate things. In this beginner’s guide, we will explain the difference between a domain name and web hosting.
What is a Domain Name?
Domain name is the address of your website that people type in the browser’s URL bar to visit your website.
In other words, if your website was a house, then your domain name will be its address.
Now let’s get into the detailed explanation.
Internet is basically a giant network of computers connected to each other through cables. To easily identify them, each computer is assigned a series of numbers called IP Address.
This IP address is a combination of numbers separated with dots. Typically, IP addresses look like this:
66.249.66.1
Computers have no problem identifying and remembering these numbers. However, it is impossible for humans to remember and use these numbers to connect to websites on the internet.
To solve this problem, domain names were invented.
A domain name can have words which makes it easy to remember website addresses.
Now if you wanted to visit a website on the internet, you don’t need to type a string of numbers. Instead, you can type in an easy to remember domain name, for example, wpbeginner.com.
Web hosting is the place where all the files of your website live. It is like the home of your website where it actually lives.
A good way to think about this is if the domain name was the address of your house, then web hosting is the actual house that address points to. All websites on the internet, need web hosting.
When someone enters your domain name in a browser, the domain name is translated into the IP address of your web hosting company’s computer. This computer contains your website’s files, and it sends those files back to the users’ browsers.
Web hosting companies specialize in storing and serving websites. They offer different types of hosting plans to their customers. See our article on WordPress hosting to learn more about choosing the right hosting for your website.
How Domain Names and Web Hosting are Related?
Domain names and web hosting are two different services. However, they work together to make websites possible.
Basically domain name system is like a massive address book that is constantly updated. Behind each domain name, there is an address of the web hosting service storing the website’s files.
Without domain names, it will not be possible for people to find your website and without web hosting you cannot build a website.
What do I need to Build a Website? Domain Name or Web Hosting?
To build a website you will need both a domain name and web hosting account.
Buying a domain name alone only gives you right to use that particular domain name for a specific period (usually 1 year).
You need web hosting to store your website’s files. After you get hosting, you need to update your domain name settings and point it to your web hosting service provider.
You can also buy both the domain and hosting from the same company. Typically a domain name costs $14.99 / year, and web hosting normally costs $7.99 / month.
If you are starting your first website, then this may sound like a lot.
Thankfully, Bluehost, an official WordPress recommended hosting provider, has agreed to offer our users a free domain name and over 60% off on web hosting.
Once you have purchased hosting and registered your domain name, you can start building your website. For complete step by step instructions, see our guide on how to make a website.
Do I have to buy them together? Or can I buy them separately?
You can buy domain name and web hosting from two different companies. However, in that case you will have to point your domain name to your web hosting company by editing its DNS settings.
On the other hand, if you purchase your domain name and web hosting from the same company, then you will not have to change domain name settings.
It is also much easier to manage and renew both services under the same dashboard.
If you want to buy domain names separately, then you can do so from top providers like: Godaddy and NameCheap.
Can I Move My Domain Name to a Different Company?
Yes, you can. Normally when you register the domain name, you own the right to use it and transfer it anywhere you want.
For example, let’s say you purchased your domain name from Godaddy and bought your hosting from Bluehost. Now you want to move your domain name to Bluehost, so that it is easier to manage and renew.
You can easily do that. Both companies have detailed step by step instructions that you can follow to transfer your domain name.
Note: We recommend you to wait at least 45 days after the registration or renewal to initiate the transfer. ICANN the international organization that oversees domain names, requires one year renewal whenever a transfer is initiated. By transferring your domain name before that period you could lose that year’s renewal fee.
Can I Move My Website to Another Web Hosting Company Without Changing Domain?
Yes, you can do that as well. You own the domain name and can change its settings to point it to any web hosting company.
For example, you purchased your domain name and hosting from Godaddy, and now you want to move your web hosting to Bluehost. You can move your site from one host to another by simply transferring files and data. After that you need to edit your domain name settings and point them to your new web hosting provider.
Another example, you purchased your domain name from WordPress.com (See our guide on the difference between WordPress.com vs WordPress.org). Later you wanted to move to self hosted WordPress.org website.
First, you will need to sign up for a WordPress hosting account. After that you can move your site from WordPress.com to WordPress.org. Lastly, you will just edit your domain name settings on WordPress.com and point them to your new WordPress hosting provider.
We hope this article helped you learn the difference between a domain name and web hosting. You may also want to see our comparison of popular website builders for beginners with pros and cons.
If you liked this article, then please subscribe to our YouTube Channel for WordPress video tutorials. You can also find us on Twitter and Facebook.
Are you looking for the best WordPress themes for fashion blogs? Traditional WordPress themes are often designed for businesses and traditional blogs which lack the style you want to see from a fashion website. In this article, we have hand-picked some of the best WordPress themes for fashion blogs, websites, and online magazines.
Building a Fashion Blog with WordPress
WordPress is already used by many top brands including some big names in the fashion industry. Mainly, because it is so easy to use and customize.
There are two types of WordPress websites. WordPress.com, which is a hosted WordPress solution and WordPress.org also known as self-hosted WordPress. See the difference in our guide on WordPress.com vs WordPress.org.
We recommend WordPress.org because it gives you access to all WordPress features out of the box.
You will need a domain name and a WordPress hosting account to start your self-hosted WordPress website.
We recommend using Bluehost. They are one of the largest hosting companies in the world and an officially recommended WordPress hosting provider.
After purchasing hosting, you can follow the step by step instructions in our how to start a blog guide.
That being said, now let’s take a look at some of the best WordPress themes for fashion blogs that you can use on your website.
Shoppe is a highly customizable WordPress theme for fashion websites and building an online store.
It ships with an integrated drag and drop page builder and multiple ready-made designs that you can use as an starting point. It includes beautiful photo galleries, sliders, multiple navigation menu styles, and more.
Løge is a stunningly beautiful eCommerce WordPress theme designed particularly for fashion and style related websites. It features a gorgeous shop front, customizable blog and archive pages, and flexible design options.
It supports all page builder plugins which allows you to create your own landing pages as well. It has beautiful templates for photo galleries, contact form, and full width pages.
Stack is a uniquely designed WordPress theme with bold colors, grid layout, and beautiful animations. It is well suited for all kind of content and its design make it highly suitable for fashion and lifestyle websites.
On top of that, it has a portfolio section, beautiful image galleries, and complete WooCommerce support. It has a custom theme options panel with 1-click demo data importer for quicker set up.
Built on top of Genesis framework, Gallery Pro is an elegant WordPress theme for photography and fashion blogs. It features your logo on top followed by a navigation menu, header image, and then your most important content with minimalist design distractions.
It includes custom page templates, multiple widget ready areas, theme customizer support, and more. It is highly optimized for speed and performance.
The Styler is a WordPress theme for fashion, beauty, health and fitness websites. It features a unique homepage design with a sticky navigation menu and a full screen header image on top.
It has templates to use for your blog page, full width page template, and landing pages. It includes support for multiple colors, custom widgets, social media icons, and WooCommerce.
Pepper+ is an all-purpose WordPress theme with a modular approach to design. You just need to drag and drop modules to create stunning page layouts on your own. It also includes several ready-made website designs that you can import with 1-click.
It includes features like contact form support, Google fonts, Google Maps, WooCommerce support, pricing tables, and more. It is flexible enough to be used as a simple traditional blog as well as a full-fledged online store or a membership website.
Peak is an elegant WordPress theme for photographers, fashion designers, artists, and other creative professionals. Its homepage has a beautiful masonry tiles layout, which can automatically populate tiles from your posts.
It comes with a built-in portfolio post type, mega menus, slide out widgets, page title banner, custom 404 error page, and full WooCommerce support.
Salon is a beautifully designed WordPress theme suitable for fashion blogs, spas, and beauty salons. It has an elegant layout for the homepage with a fullscreen slider on top.
It comes in multiple color schemes and allows you to use a different color scheme for each page. Inside you will also find custom widgets for social media, contact information, and content discovery. It is eCommerce ready and can be used with all the top WordPress page builders.
Elegant is a minimalist style WordPress theme suitable for fashion and lifestyle blogs. It uses elegant typography with beautiful photo galleries that makes your content stand out.
It has built-in portfolio section with beautiful masonry grid layout to display portfolio items. It comes with multiple header styles, templates, layout choices, team members, and 1-click demo installer for quicker setup.
Meteor is a WordPress photography, portfolio, and resume theme. It features a beautiful grid layout on the homepage to showcase the best of your work. It supports photos, designs, videos, services and more.
Each portfolio items gets its own detailed page with multiple styles and layouts. It comes with a unique resume template to create your online cv.
Zarya is a personal blog theme for fashion blogs and portfolios. It features soft pastel colors, crisp typography, and a spacious layout. It is designed to be functional out of the box with a focus on performance and speed.
It is available in boxed and full width layouts. It also includes custom background and header support, custom widgets for about us, Instagram blocks, and built-in social sharing buttons.
Neto is a WooCommerce ready WordPress theme suitable for all kind of fashion blogs, boutiques, and fashion accessories. It features a clean design with a uniquely engaging homepage. It comes with built-in support for all popular page builder plugins.
It has a custom theme options panel for easier setup. You can also customize it using live customizer which gives you full control on colors, layouts, widgets, and more.
If you are looking for a stylish and free WordPress theme for your fashion blog, then take a look at Envy. This beautifully designed WordPress theme features a beautiful three column grid layout to display your content.
It also includes social media buttons, full screen search overlay, page templates for blog, archives, and full-width pages, multiple sidebars, and more. It is quite easy to use and requires very little time to setup.
Aquarella is a bright and beautiful WordPress blog theme using bold colors and traditional blog layout. It comes in multiple color schemes so you can switch to more subtle color schemes if you like.
It includes custom background, header, social widgets, author profile widget, Google Fonts, and more. It is translation ready and easy to set up.
Balance is a well crafted WordPress theme for any kind of business or professional website. This ecommerce ready theme, features a full width slider on top with your call to action on the homepage, which is followed by different sections of your website.
Its well balanced design allows it to be styled any way imaginable. It ships with multiple color schemes and you can also create your own colors if needed. Theme setup is quite simple and beginner friendly.
Lavelle is a free magazine style WordPress theme suitable for fashion blogs. It uses beautiful colors and featured images to create a highly engaging user experience for your audiences.
It has two column layout for blog posts and a single column layout for pages. It has multiple widget ready areas in footer as well. This simple theme is easy to customize and quick to set up.
Paperbag features a very clean minimalist layout for a fashion blog or magazine website. Behind this simplicity there are tons of options (80+ options in theme customizer alone) to fine tune every aspect of your website.
It includes multiple layouts, several sidebars, custom widgets, and a flexible homepage layout. It is tested with all essential WordPress plugins and works effortlessly with popular page builders.
Zennor is a flexible WordPress theme for fashion blogs with a feminine touch. Designed for blogs and online shops, this WooCommerce ready theme features a unique modern homepage available in different layout combinations.
It comes with a beautiful featured post slider, grid layout for blog posts, product carousel for WooCommerce, and custom plugins for Instagram and Facebook integration. Theme setup and customization is quite simple and uses live theme customizer so that you can see live preview of your changes.
Ultra is a multi-purpose mega theme for WordPress. It has multiple ready-made website designs that can be installed with 1-click, including demo data. You can use its intuitive drag and drop page editor.
It comes with Google Maps, contact forms, pricing tables, timeline, animated counters, progress bars, and more. It has multiple layout choices that you can use with your own colors and custom widgets.
Indigo is an excellent well crafted WordPress theme suitable for fashion blogs, boutiques, and fashion magazines. This super flexible WordPress theme comes with 15 ready-made website designs that can be installed with 1-click.
It uses modules to build layouts so you can just drag and drop a module to add it or remove any existing module that you don’t want. It is easy to set up and use and you will love its attention to details.
Latest is a WordPress theme for online stores using WooCommerce. This beautiful WordPress theme features a unique shop front with a header that you can use to announce products. For a fashion blog this area can be used to display your featured content.
It includes, 5 blog layouts, multiple ecommerce layouts, and a detailed single product page. All theme features work out of the box and it takes very little time to set up.
We hope this article helped you find the best WordPress themes for fashion blogs. You may also want to see our ultimate step by step WordPress SEO guide for beginners.
If you liked this article, then please subscribe to our YouTube Channel for WordPress video tutorials. You can also find us on Twitter and Facebook.
Do you want to force logout all users in WordPress? If you suspect that your WordPress may be hacked or just need users to login again, then there is no default option to do that in WordPress. In this article, we will show you how to easily force logout all users in WordPress.
Why and When You May Want to Force Log out All Users in WordPress?
You may want to do this for different reasons. For example, if you suspect that your WordPress site is hacked, then forcing logout will allow you to properly clean up your hacked WordPress site.
Next, if you are using a membership or pay per view site and fear that users may be sharing their passwords to access content, then this method will come in handy. After logging them out, you can stop them from sharing passwords.
Another scenario is that when you use a public computer or WiFi without using a VPN service. If you are not sure that you properly logged out, then this method will end all logged in sessions.
That being said, let’s take a look at how to easily logout all users in WordPress.
Force Log Out All WordPress Users
For this tutorial, you will be editing WP Config file called wp-config.php. We highly recommend that you backup your wp-config.php file before making any changes to it.
First you will need to connect to your website using FTP or via File Manager in cPanel. Once connected, you will find the wp-config.php file in your site’s root folder.
You can right click and select edit to open the file in a text editor.
Inside your wp-config.php file you will find a code block that would look like this:
It is also possible that each of these lines just have ‘put your unique phrase here’ as the second parameter.
These lines are called authentication keys and salts. To learn more about them see our guide on WordPress security keys.
Next, you need to visit the WordPress Salts generator page. This page randomly creates new key strings that you can use in your wp-config.php file.
You need to replace your existing keys with the new ones that you just generated. Once done, make sure to save your changes and upload your wp-config.php file back to the server.
Changing the salts will automatically log everyone out of your website, forcing them to relogin.
Improving Password Security for All Users on Your WordPress Site
If you run a membership website or allow users to register on your site, then users are likely to use easy to remember and weak passwords.
Weak passwords are easy to crack and pose a security challenge for your website.
If you suspect that your website is hacked, then you may want to safely reset passwords for all users on your WordPress site. This will allow them to generate new passwords for their accounts.
However, users can still use the same password that they had before. To avoid this from happening again, you can enforce strong passwords for all users on your WordPress site.
One of the most common question we get whenever we recommend using strong passwords is how to remember all those difficult passwords?
The answer is simple, you don’t need to. There are apps available that can manage passwords for you. See our guide on how to manage WordPress passwords for more on this topic.
We hope this article helped you learn how to force logout all users in WordPress. You may also want to see our complete step by step WordPress security guide for beginners.
If you liked this article, then please subscribe to our YouTube Channel for WordPress video tutorials. You can also find us on Twitter and Facebook.
2017 is about to come to an end and what a great year it has been. We want to thank all of your for your continued support of WPBeginner over the past 8 years of our existence. To continue our tradition, in this article we will look back at 2017 to highlight the best of best WordPress tutorials on WPBeginner and share the success that our team had in 2017.
WPBeginner Recap 2017 by Syed Balkhi
2017 has been an amazing year for me both personally and professionally. WPBeginner website set new traffic records, our team grew to over 40 people, and our revenue from our premium WordPress plugins saw significant growth as well.
In last year’s recap, I set a goal that I wanted to reach 100,000 subscribers on YouTube by the end of 2017. We didn’t quite reach that milestone. At the time of writing this article, we have over 79,000 subscribers and over 10 million video views. I am proud that our videos have improved significantly, and we will be putting even more focus on videos in 2018. If you haven’t done so already, I would really appreciate it if you subscribe to our YouTube channel, so we can reach the 100,000 subscriber mark in 2018.
As for personal life, I’m really enjoying fatherhood. Solomon is 1 year old now, and he learned how to walk earlier this year. It’s been an amazing journey watching him grow and learn all sorts of new things. He has already been to two WordCamps. I think he was the youngest attendee at WordCamp U.S this year. Below is a picture of our family, since I know many of you often ask for it.
I took a complete break from writing on my personal blog, so I can spend maximum time with family. I have been clearing my tasks, so I can start blogging there again next year.
2017 was a great year for WPBeginner’s family of products.
Thanks to your support, WPForms has taken the market by storm. It’s being used on over 800,000 websites now and has a 4.9 out of 5 star rating.
We completed the phase 1 revamp of MonsterInsights, the Google analytics plugin we acquired from Yoast last year. In phase 1, our goal was to add proper tracking to every area of your WordPress site and send that data to your Google Analytics. Our phase 2 update will be going out soon which will significantly improve the reporting dashboard. Our goal is to bring back helpful data inside WordPress dashboard to help you make data-driven decision.
Our flagship product, OptinMonster, continued to push the limits in 2017. We launched version 4.0 which came with powerful features like sub-accounts, user permission control, activity logs, custom branding and a new campaign creation workflow. We also added powerful targeting features like InactivitySensor, shareable MonsterLinks, campaign sound effects, and our native Shopify app. We also did a complete redesign of our website.
If you’re not using OptinMonster, then you’re losing subscribers every day. It is the one plugin that every website should have.
We also completely redesigned our corporate, Awesome Motive website. It’s really cool, you should check it out. We’re hiring for a lot of different positions, so don’t forget to browse our career page.
If you want to keep up with more than just WPBeginner, then you can always follow me on Twitter (@syedbalkhi) where I tweet about our other projects, marketing tips, and tons of other cool things.
Now let’s take a look at the best of WPBeginner in 2017.
Best of WPBeginner in 2017
We wrote many helpful WordPress tutorials through out 2017. Here are some of our favorites.
What are WordPress plugins? And how do they work? – In this beginner’s guide, we talked a bit about WordPress plugins. Targeted at absolute beginners, this article explains the concept of WordPress plugins as apps for your website and how they work by hooking into your WordPress.
How to properly move from Weebly to WordPress – Before this article, it was quite painful to move a website from Weebly to WordPress. We decided to develop a handy tool that will allow you to easily export and import your Weebly site into WordPress. This article has step by step instructions on how to do it.
How to merge two WordPress sites together without losing SEO – Did you buy a new website or just want to merge two of your sites together to better focus? This step by step guide shows you how to properly merge two WordPress sites without losing SEO.
5 Best WordPress LMS plugins compared (pros and cons) – WordPress is widely used by people and organizations who want to sell courses or use WordPress as their Learning Management System or LMS. In this article, we compared the top WordPress LMS plugins with pros and cons.
How much does it really cost to build a WordPress website – We are often asked by users about how much would it cost them to build a WordPress site. In this detailed article, we break down the prices and tell you how much it would cost to build different types of WordPress sites and how to reduce your costs.
25 legit ways to make money online blogging with WordPress – Another one of the most requested tutorials of 2017. It’s not a get rich quick schemes type article. But if you’re willing to work hard, then this article shares some of the ways to make money blogging.
5 Best WordPress membership plugins compared – There are many WordPress membership plugins in the market with similar features. In this article, we compared the top WordPress membership plugins to figure out how they stack up against each other.
28 most frequently asked questions by WordPress beginners – As the largest free WordPress resource site, we get a lot of questions from beginners. In this article, we answered some of the most frequently asked questions by WordPress beginners.
How to add an author’s photo in WordPress – Want to add author bio and photo at the end of each post? This is the tutorial that you need. It’s simple and easy (no coding needed).
May
55+ Most Wanted WordPress Tips, Tricks, and Hacks – The best thing about WordPress is that it can be easily customized into doing different things. We compiled a mega list of the most useful WordPress tips, tricks, and hacks that you can try.
5 best WordPress firewall plugins compared – Firewall plugins for WordPress block bad bots, malware, and malicious attacks on your website. In this article, we compared the top 5 WordPress firewall plugins with their pros and cons.
25 Interesting facts about WordPress (infographic) – In this article, we researched and compiled a list of the most interesting facts about WordPress. We then created a beautiful infographic so that you can easily share them.
How to optimize your WordPress database with one click – Optimizing your database cleans up unwanted data which reduces database size and can improve overall website performance. This is a handy tutorial that you should use at least once a year.
June
How to track outbound links in WordPress – Many of our users wanted to know how to track outbound links on their websites. These are the links that take users away from your site. In this article, we showed you how to easily track outbound links in WordPress using Google Analytics.
How WordPress actually works behind the scenes (infographic) – Curious about what goes on inside WordPress core when someone visits your website? In this article, we gave you a behind the scene tour of how WordPress works with a beautiful infographic.
13 crucial WordPress maintenance tasks to perform regularly – As a self-hosted WordPress site owner, you are responsible for the maintenance of your website. In this article, we created a handy checklist of crucial maintenance tasks that you need to perform regularly.
10 best WordPress plugins for podcasters – WordPress is used by the top podcasters. In this article, we shared the best WordPress plugins for podcasters that will help you easily manage and grow your podcast.
12 signs that your WordPress site is hacked – We are often asked about what are some signs that indicate a WordPress site has been hacked. Here are 12 that you should watch out for.
August
How much does a custom WordPress theme cost? – Another one of the most often asked questions is how to get a custom WordPress theme and how much it would actually cost. In this article, we talk about the cost of getting a custom WordPress theme made specifically for your website.
How to manually update WordPress plugins via FTP – Sometimes you may not be able to update a WordPress plugin from the admin area, in that case you will need to use FTP to update it. In this step by step guide, we show you how to manually update WordPress plugins via FTP.
Best WordPress landing page plugins compared – Want to build custom landing pages for your marketing campaigns? In this article, we compared the top WordPress landing page plugins and their pros and cons.
How to add a slide out contact form in WordPress – Slide out contact forms divert user’s attention to the contact with the slide in animation. It helps you generate more leads and sales. In this step by step guide, we showed you how to easily add a slide out contact form in WordPress.
7 Best WordPress CDN services (Compared) – Content delivery network or CDN help you serve static cache from different servers and locations. This boosts your site’s speed and decreases page load time. In this article, we have hand-picked the best CDN services that you can use with your WordPress site.
How to create a pay-per-view site with WordPress – Want to build a pay-per-view site to earn money from your content? In this guide, we show you how to easily create a pay per view site with WordPress.
How to find which WordPress theme a site is using – Often we get emails from readers asking us for help in finding the exact theme that a specific website is using. This article shows you how to easily find out which WordPress a specific website is using.
Ultimate guide to creating a WordPress membership site – Want to a build a membership website but dont know where to start? In this step by step guide, we showed how to easily create a fully-functional WordPress membership website.
7 best WordPress ad management plugins and solutions – Many WordPress powered websites rely on advertising for revenue. In this article, we shared the top WordPress ad management plugins and solutions that will help you maximize your ad revenue.
How to appear in Google Answer boxes with your WordPress site – Google Answer boxes highlight the best answer to question in search results by putting it at top in an answer box. In this article, we talked about how you can improve your content to easily appear in Google answer boxes with your WordPress posts.
How to accept Bitcoin payments in WordPress – More and more ecommerce websites are now accepting Bitcoin payments along with traditional payment methods. In this article, we show you how to easily accept Bitcoin payments in WordPress.
How to use SMTP server to send WordPress emails – Many shared WordPress hosting providers don’t have their servers properly configured to send out WordPress emails. This troublesome as you may not be able to get important notifications or even password recovery emails. In this article, we show you how to use SMTP server to send WordPress emails.
How and why you should leave reviews on WordPress – Many WordPress plugins and themes need your encouragement to continue the project, particularly the free ones. In this article, we discussed how and why you should leave reviews on WordPress projects like plugins and themes.
These were some of the best WordPress tutorials on WPBeginner in 2017. We hope that you liked them.
We would like to thank all WPBeginner users, who visited our website, gave feedback, left comments, and shared it with others. We are truly very thankful. We look forward to add more useful WordPress tutorials in 2018.
If you liked this article, then please subscribe to our YouTube Channel for WordPress video tutorials. You can also find us on Twitter and Facebook.
Do you want to add a mega menu on your WordPress site?
Mega Menus allow you to arrange dozens or even hundreds of links into user-friendly columns and rows. You can then add rich content like images and videos, to make your mega menus even more helpful.
In this article, we will show you how you can add a mega menu to your WordPress website, step-by-step.
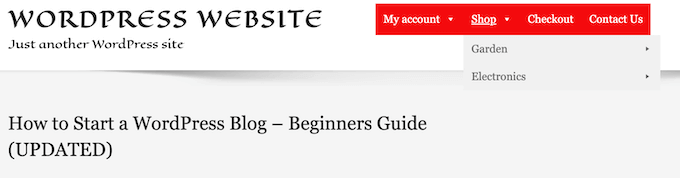
If your site has lots of content then you may need to create a mega menu instead. These mega menus allow you to add multi-column dropdowns to the WordPress navigation.
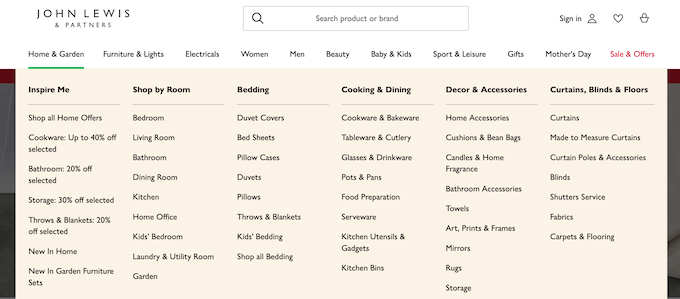
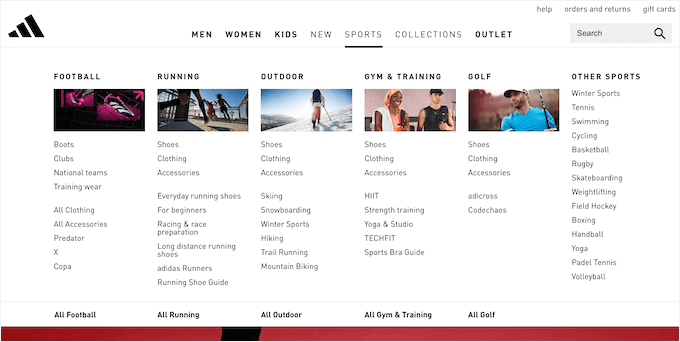
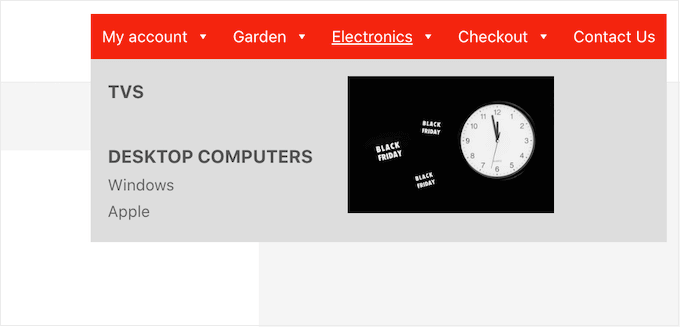
You can use mega menus to organize your content under different headings and subheadings, so visitors can find exactly the page they’re looking for. For example, if you create an online marketplace then you might arrange all your product categories and subcategories in a mega menu.
This helps shoppers find the exact product category they want, and make a purchase.
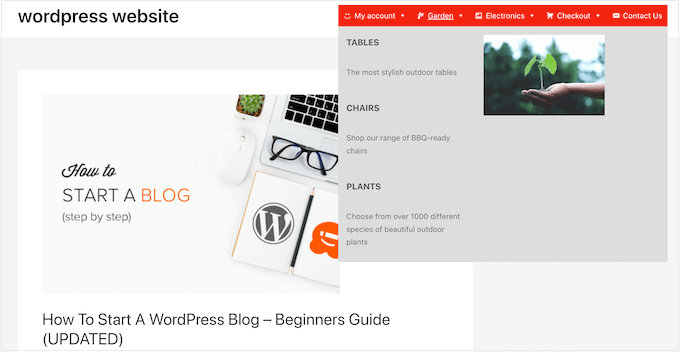
Mega menus can also show rich content to your visitors, such as videos, text, search, and recent posts.
Many websites use images, too, because they make mega menus easier to scan. Even if you’re showing dozens of menu items, dividing them into columns and then adding a relevant image can help visitors find exactly the content they’re looking for in seconds.
That said, let’s see how you can easily add a mega menu to your WordPress website.
The easiest way to add a mega menu on your WordPress site is by using Max Mega Menu. This plugin allows you to add rich content to your mega menus, including images, text, galleries, and more.
In this way, you can create more engaging and helpful menus.
You can also style every part of the mega menu by adding different colors, changing the font size, and using different icons.
First, you’ll need to install and activate the plugin. If you need help, then please see our guide on how to install a WordPress plugin.
Enable Mega Menus on Your WordPress Website
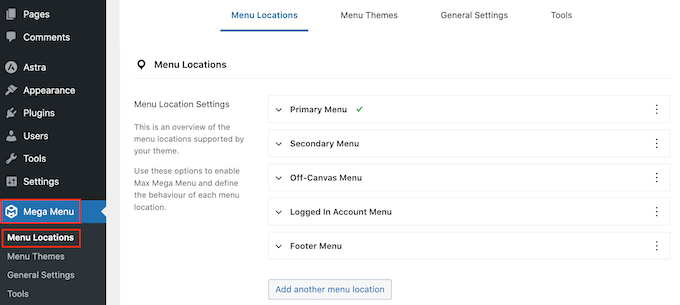
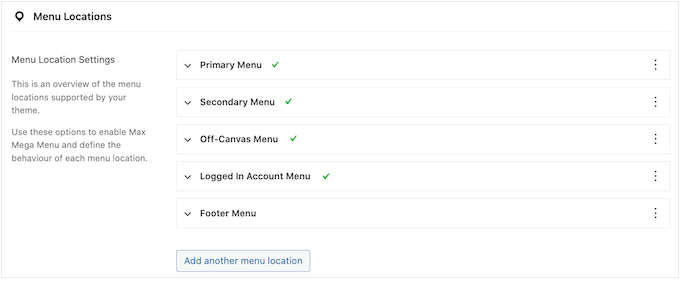
Upon activation, go to Mega Menu » Menu Locations to see all the different areas where you can add a mega menu.
You may see different options depending on your WordPress theme.
To start, you’ll need to enable mega menus in every location where you want to use them.
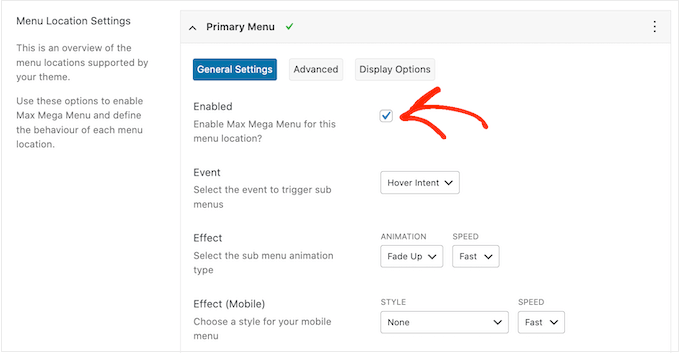
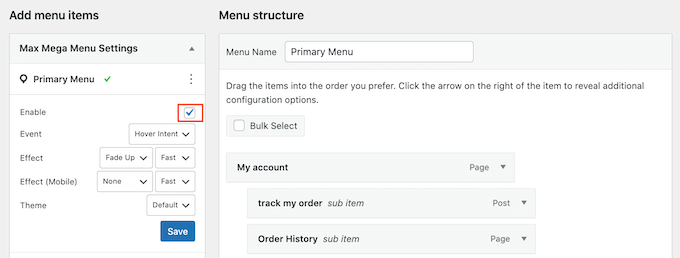
To do this, simply click to expand a location and then check its ‘Enabled’ box.
After that, you can change the ‘Event’ that’ll open the mega menu.
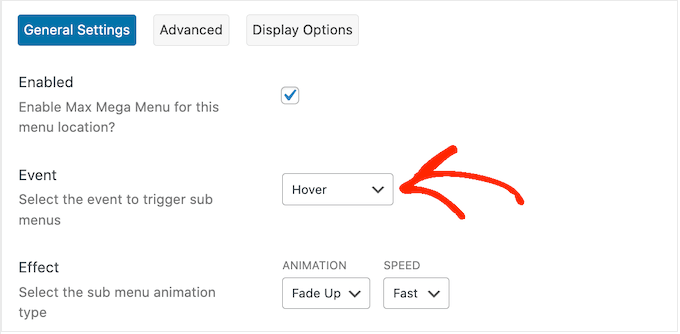
The default setting is ‘Hover intent,’ which means the visitor must hover their mouse over the mega menu for a few seconds. This works well for most WordPress websites, but you can also open the ‘Effect’ dropdown and choose ‘Hover’ or ‘Click’ instead.
If you choose ‘Click’ then the visitor will need to click to explore the mega menu. This can be useful if you’re worried visitors might trigger the menu by accident, which can be frustrating.
Meanwhile, ‘Hover’ will open your mega menu as soon as the visitor moves their mouse over it. This can encourage visitors to explore different areas of your site, so you may want to use ‘Hover’ on landing pages or your website’s homepage.
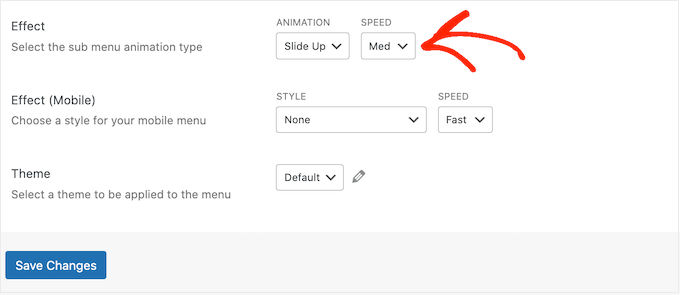
After making this decision, you can change how the menu opens using the ‘Effect’ settings.
Max Mega Menu has different animations you can try, including fade and slide up. You can also change the animation’s speed. By trying different animations, you can create a mega menu that grabs the visitor’s attention.
If you don’t want to use any animations, simply open the first dropdown and select ‘None.’
By default, Mega Menu doesn’t use animations on mobile devices to prevent performance issues. If you want to create a unique animation for mobile visitors, then you can use the settings in the ‘Effect (Mobile)’ area.
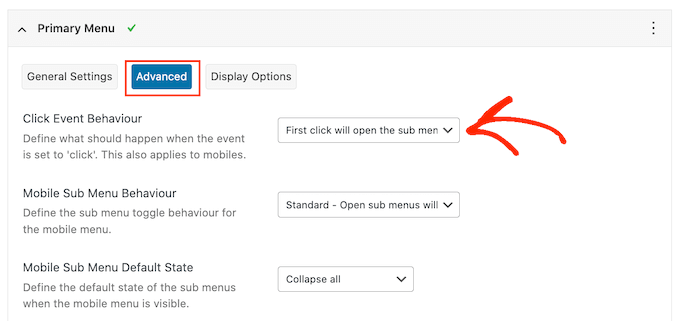
Also, if you set the ‘Event’ dropdown to ‘click,’ then make sure you select the ‘Advanced’ tab next.
Here, you can use ‘Click Event Behavior’ to define what happens when the visitor clicks your mega menu. For example, the second click might close the menu or open a new link.
There are more settings you can look through, but this should be enough for most WordPress blogs and websites.
When you’re happy with how the plugin is configured, click on ‘Save Changes.’
To enable mega menus for more locations, simply follow the same process described above.
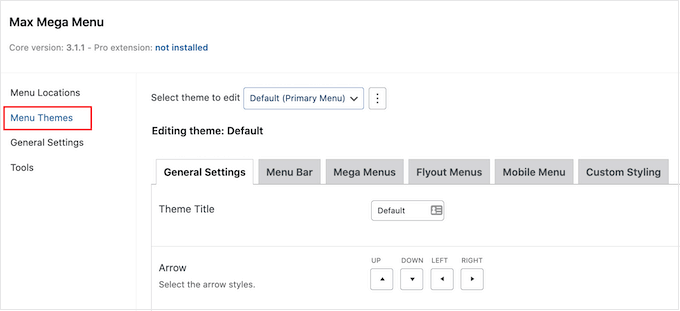
Customize How the Mega Menus Looks on Your Website
The next step is configuring how the mega menus will look on your website.
You can do this by selecting the ‘Menu Themes’ tab to the left of the screen.
On this screen, you can change the direction of the arrow icons, use a different line height, and add a shadow.
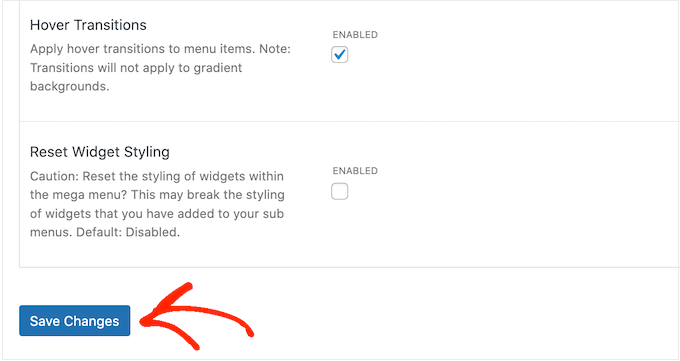
When you’re happy with your settings, don’t forget to click on ‘Save Changes.’
If you want to remove these changes at any point, then simply check the ‘Reset Widget Styling’ box and then click on ‘Save Changes.’
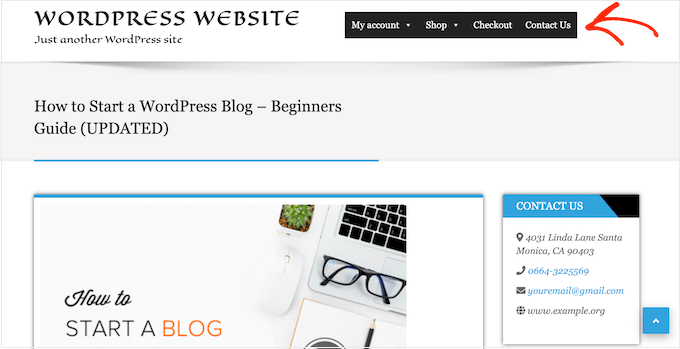
Next, you can customize the menu bar, which is the bar visitors see when the menu is in its default, collapsed state.
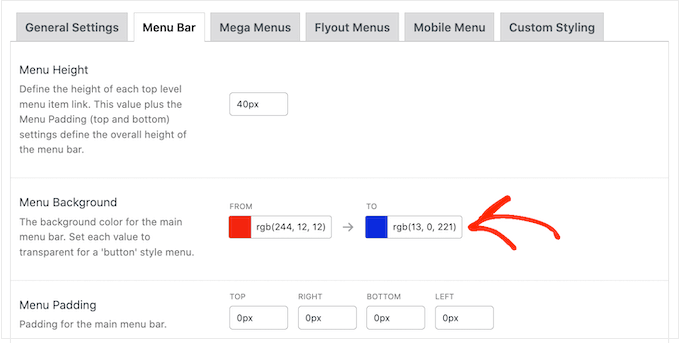
To make these changes, click on the ‘Menu Bar’ tab and then use the settings to change its background color, padding, border radius, and more.
You can even create a color gradient by selecting two different colors in the ‘Menu Background’ section.
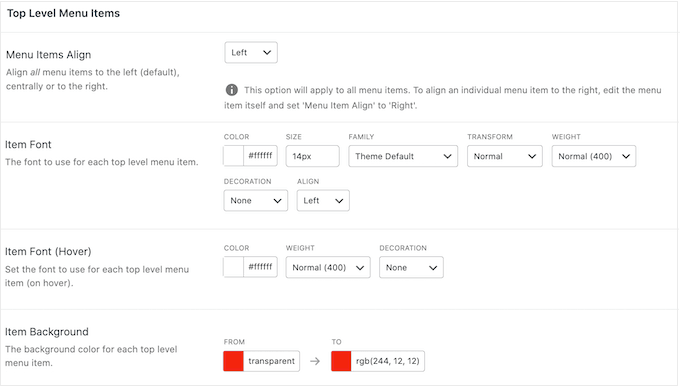
If you scroll down, then you can change how the top-level menu looks.
This is the first row of items, which is visible when the mega menu is in its collapsed state.
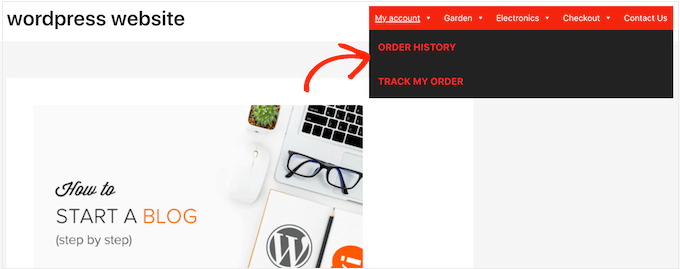
Since they’re so important, you might want to make the top-level menu items stand out.
For example, in the following image, we’re using a different background color.
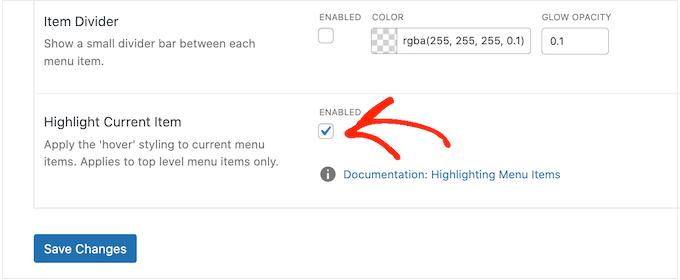
In the ‘Hover State’ section you can highlight the currently-selected top-level menu item.
For example, in the following image, we’re using an underline effect.
This can help the visitor see where they are in the menu, which makes it particularly useful for sites that need to have large mega menus.
If you do add a hover state, then scroll to the bottom of the screen and check the ‘Highlight Current Item’ box.
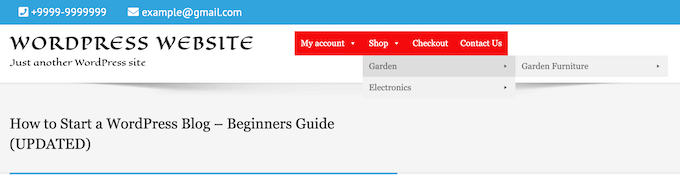
After that, you can change how the submenu looks.
This is the menu that appears under a top-level parent, as you can see in the following image.
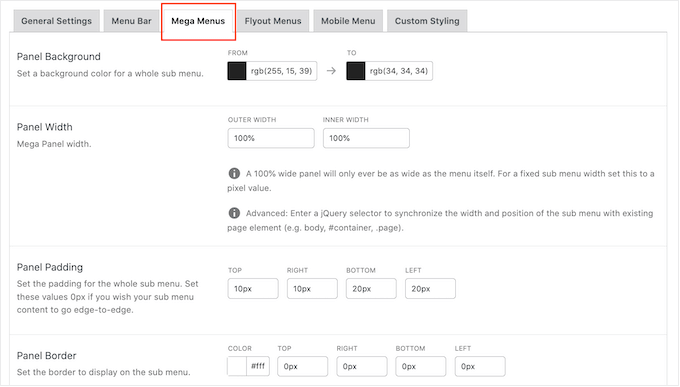
To customize the submenu, click on the ‘Mega Menus’ tab.
You can now use these settings to change the submenu’s background color, increase the radius to create curved corners, add padding, and more.
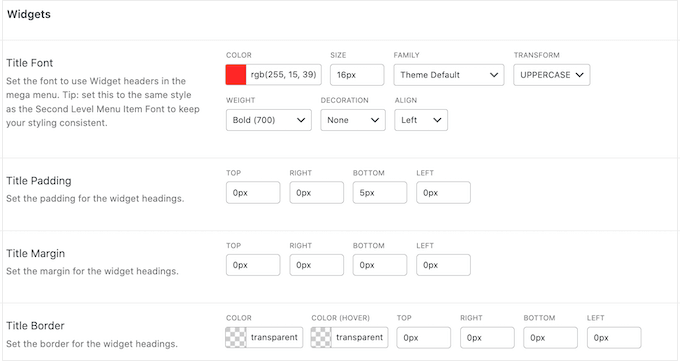
You add content to your mega menus using widgets. For example, you might add a Gallery widget and display your most popular WooCommerce products, or embed a tag cloud inside the mega menu. These widgets can provide extra information, or encourage visitors to click on certain menu items.
You can customize how these widgets will look by scrolling to the ‘Widgets’ section. For example, you might change the color of the widget’s title, increase the font size, add padding, and adjust the alignment.
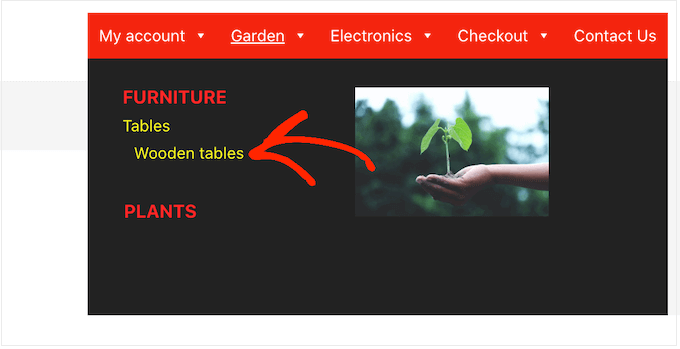
On this screen, you can also customize how the second-level menu items and third-level menu items will look on your website. These are the children of the top-level menu items.
When building your menus, it’s possible to add four or even more levels to create a nested mega menu. If you do this, then WordPress will simply use the third-level styling for all the subsequent levels.
You can see this in action in the following image. The second level has red text, and both the third and fourth levels use the same yellow text.
When you’re happy with how the menu is set up, don’t forget to click on ‘Save Changes.’
How to Add a Mega Menu on Your WordPress Site
Once you’ve finished customizing the mega menu using Max Mega Menu, it’s time to add it to your website.
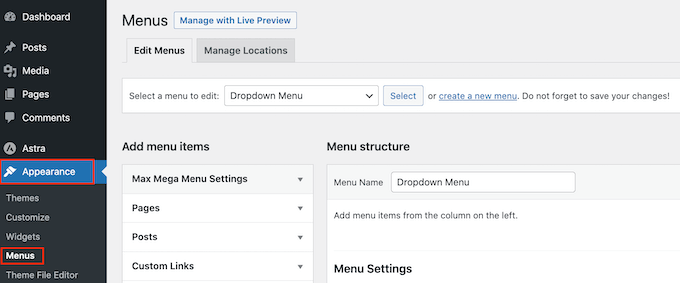
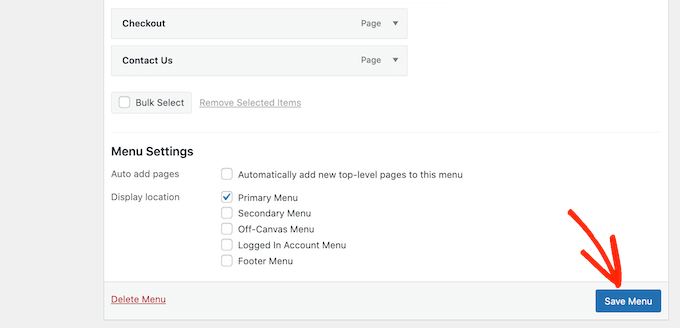
Simply head over to Appearance » Menus.
If you want to turn an existing menu into a mega menu, then open the ‘Select a menu to edit’ dropdown and choose it from the list. Just be aware the menu you choose must be assigned to a location where you’ve enabled the mega menu feature.
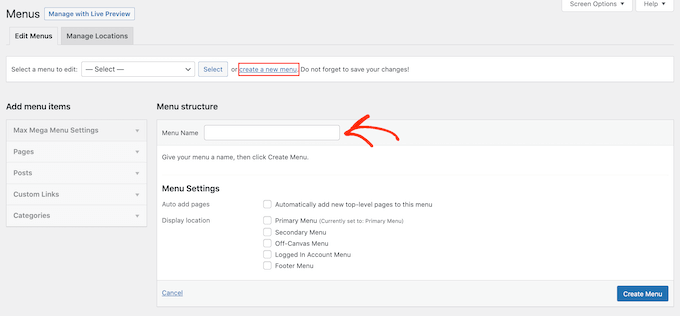
If you want to start from scratch, then click on ‘Create a new menu’ and then type in a title for your new mega menu.
You can then select the location you want to use, and click on ‘Create Menu.’ Once again, this must be a location where you’ve enabled mega menus.
Add Content to Your WordPress Menu
After that, add all the pages, posts, and any other content you want to include in the menu. For step-by-step instructions, please see our beginner’s guide on how to add a navigation menu in WordPress.
Next, you’ll need to arrange your items into parents and submenus. To create a submenu, drag an item below the parent, and then drag it slightly to the right before releasing it.
To create multiple levels, simply keep dragging items to the right so they appear indented below one another. This is similar to creating a dropdown menu in WordPress.
No matter whether you’re creating a new menu or updating an old one, at this point you’ll have all the items you want to include in the mega menu.
Enable the Mega Menu Feature
With that done, click to expand the ‘Max Mega Menu Settings’ and check the box next to ‘Enable.’
In this box, you can also override the default mega menu settings. This allows you to create unique mega menus for different areas of your site, so go ahead and make any changes.
After that, click on ‘Save.’
Create the Mega Menu Layout
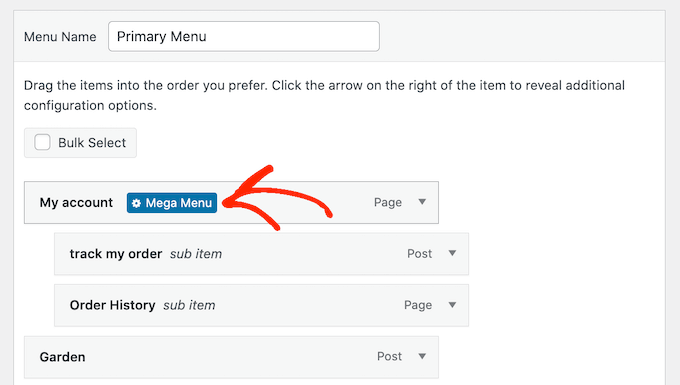
Now, hover your mouse over the first top-level item and you’ll see a new ‘Mega Menu’ button. Go ahead and give the button a click.
You will now see all the settings for this top-level item.
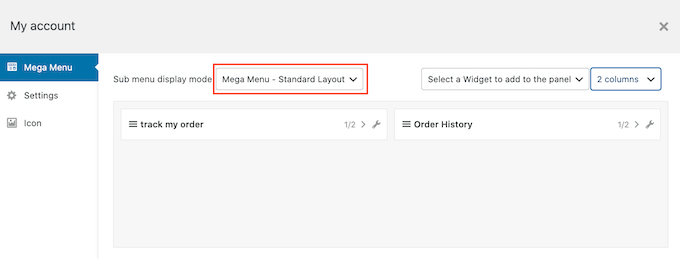
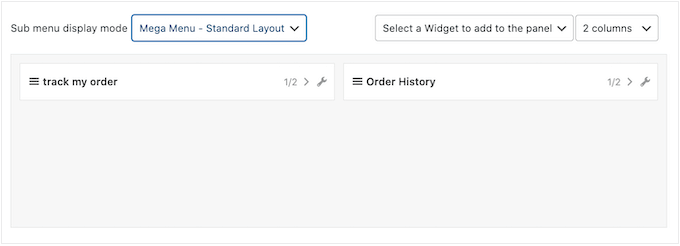
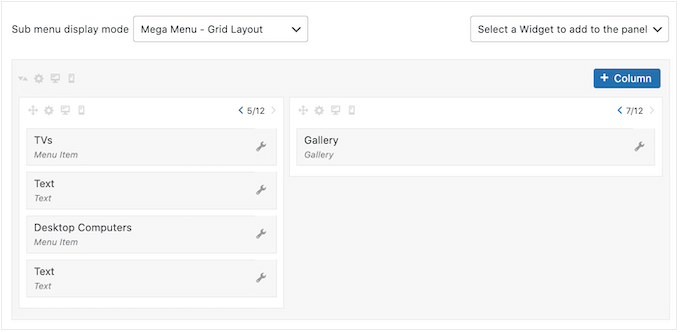
By default, Max Mega Menu will use the flyout style, where the submenus ‘flyout’ from the side. To create a mega menu instead, open the ‘Sub menu display mode’ dropdown and choose either ‘Standard Layout’ or ‘Grid Layout.’
Standard layout shows all the submenus in columns.
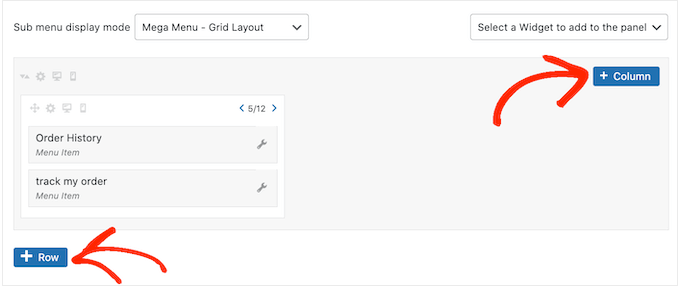
Meanwhile, grid layout allows you to organize submenu items into columns and rows.
This is ideal if you want to show lots of content, or have a very specific layout in mind.
After selecting the standard or grid layout, you’ll see all the submenus assigned to this parent.
Now, you can go ahead and change how these items are arranged in the mega menu.
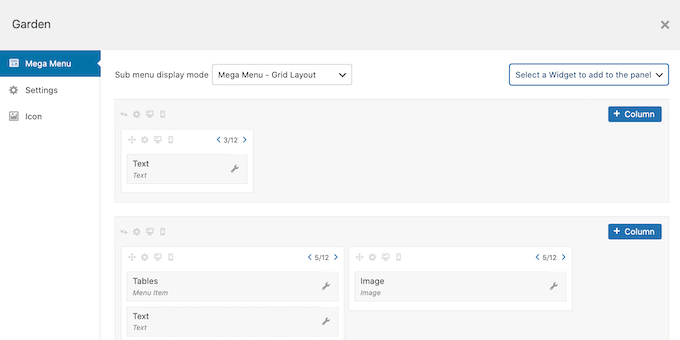
If you’re using the standard layout, then you can change the number of columns using the dropdown menu in the top right corner.
If you’re using a grid layout, then you can add columns and rows using the ‘+Column’ and ‘+Row’ buttons.
When you’re happy with the layout, you can arrange the submenu items into different columns and rows using drag and drop.
After that, it’s time to change how much space each item takes up in the column. Max Mega Menu shows the current size as a fraction of the total available width.
For example, in the following image, both columns take up half the available space.
To make an item bigger or smaller, simply click on its arrow buttons to increase or decrease the fraction.
Create a Mobile-Friendly Mega Menu (Grid Layout Only)
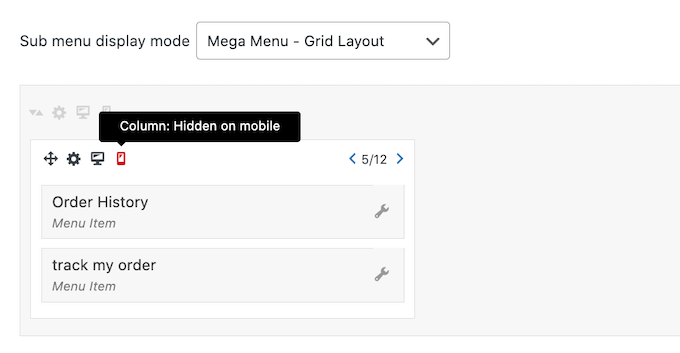
By default, Max Mega Menu will show the same content on desktop and mobile devices. This can be a problem with grid layouts, as smartphones and tablets typically have smaller screens, and scrolling horizontally can be difficult.
If you’re using the grid layout, then you can create different mega menus for mobile devices. For example, you might use fewer columns so users don’t have to scroll horizontally.
You can hide entire columns or rows using the ‘Hidden on mobile’ icon, which looks like a small mobile phone.
Simply toggle the icon on and off, to hide and show different content on desktop and mobile.
Add Rich Content with Mega Menu Widgets
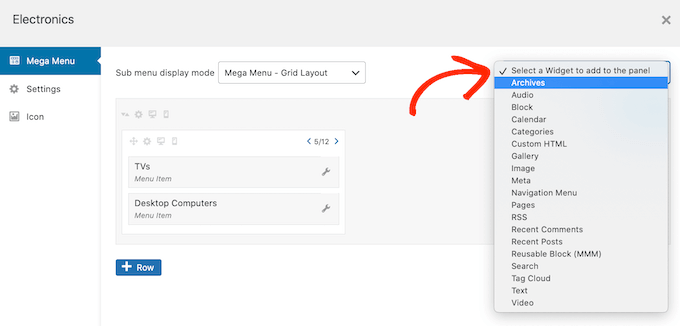
With that done, you can start adding widgets to the mega menu. This allows you to show extra content in the submenu, such as WordPress galleries, text, videos, recent comments, and more.
For example, you might use images to promote a sale on your online store, or highlight your latest products.
To add a widget, simply click to open the ‘Select a widget….’ dropdown.
You can now choose a widget from the list.
WordPress will add the widget to a column or row automatically, but you can move it to a new location using drag and drop.
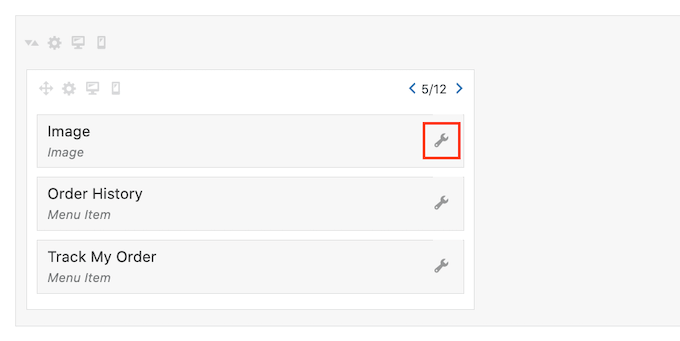
To configure the widget, go ahead and click on its little wrench icon.
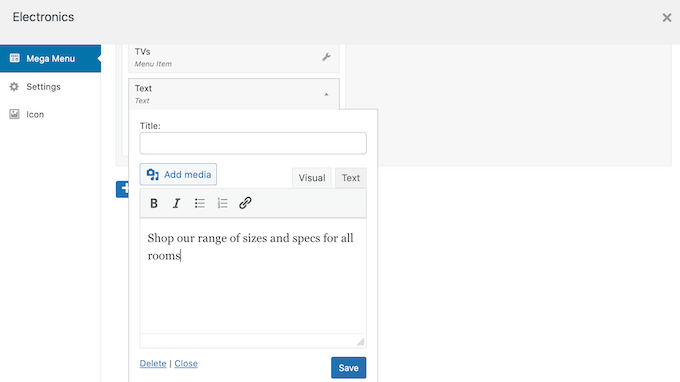
This opens a popup where you can add content to the widget and change its settings.
You’ll see different options depending on the kind of widget you’re creating.
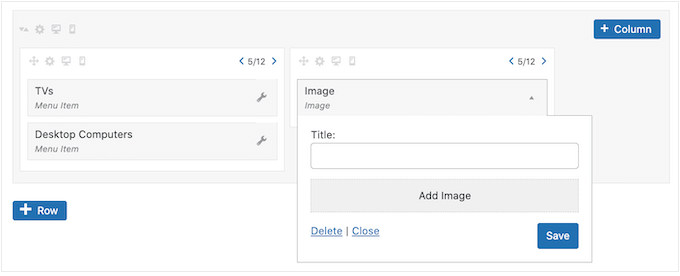
For example, if you added an Image widget, then you can click on ‘Add Image’ and either choose a picture from the media library or upload a file from your computer.
If you add a ‘Text’ widget then you’ll see a small editor where you can type in your text.
All widgets have a ‘Title’ field where you can add text that will be displayed above the widget.
When you’re finished, click on ‘Save’ to store your changes and then select ‘Close.’ To add more widgets to the mega menu, simply follow the same process described above.
Review the Default Mega Menu Settings
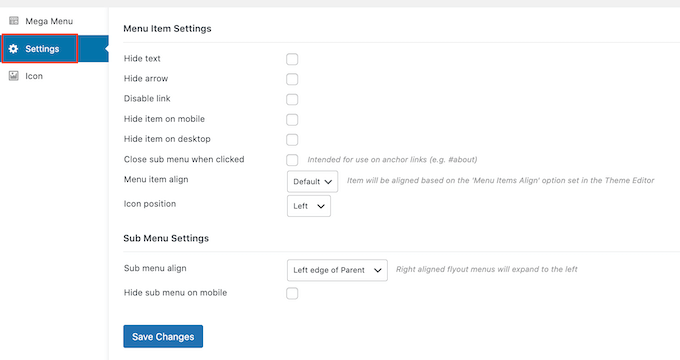
Next, just click on the ‘Settings’ tab.
Here, you can use checkboxes to hide or show different content in the submenu.
You can also hide or show the submenu on mobile devices and desktop, and change the alignment so the submenu opens to the left or right of the top-level parent.
If you make any changes to the default settings, then don’t forget to click on ‘Save Changes.’
Add Image Icons to the WordPress Mega Menu
Image icons help visitors understand what a menu item is about, without even having to read the navigation label. This is particularly useful for large menus where a visitor may prefer to scan the content quickly rather than reading each navigation label.
You can use icons to make the most important content stand out. For example, you might encourage visitors to complete their purchase by adding a cart icon to the ‘Checkout’ menu.
You can now choose any dashicon from the built-in library. If you upgrade to Max Mega Menu pro, then you’ll also have access to other icon fonts, Genericons and FontAwesome, or you can choose a file from your WordPress media library.
Finish Configuring the Mega Menu on Your WordPress Site
After working your way through all these settings, you can close the popup window to return to the main Appearance » Menus page.
You can now repeat this process for each top-level parent.
When you’re happy with how the mega menu is set up, click on the Save Menu button to make it live.
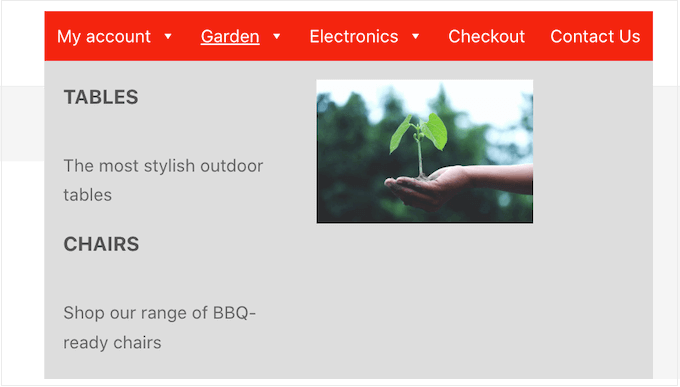
Now, simply visit your website to see the mega menu in action.