Picking a WooCommerce theme for WordPress can be tricky! There are a lot of factors to consider when choosing a theme, especially if you want to offer a seamless shopping experience for your customers. If you’re trying to keep costs down, there are free WooCommerce themes that work well if you’re willing to put in [...]
Creating a mobile-friendly WooCommerce WordPress theme can be tricky. There are a lot of factors to consider when it comes to mobile performance, from loading speed to plugins to image optimization. A WooCommerce theme must work well on mobile for obvious reasons; eCommerce shoppers will click away if a website could be more appealing to [...]
Launching an eCommerce store is becoming more and more accessible. However, finding the best eCommerce platform for your business can take time and effort: how can you figure out which works best for you? WooCommerce and Shopify are two of the most popular eCommerce platforms. They have one fundamental difference: WooCommerce works specifically with WordPress, [...]
There is a vast range of WooCommerce-compatible themes for WordPress. However, with thousands of them to sift through, finding a theme that will impact customer experience and conversion rates is challenging. It’s also essential to find a theme that works well on mobile; according to a Pew Research study, roughly three-quarters of US adults (76%) [...]
By selling your books as downloadable audio files, you can make money without having to pay for shipping or printing. You can also sell the same audio file an unlimited number of times.
In this article, we will show you how to easily sell audiobooks online using WordPress.
Another option is recording that information as an audiobook. This is a great way to collect everything you want to say into a single, downloadable file that’s easy to distribute and sell to other people.
Unlike traditional printed books, you don’t have to pay printing or shipping fees for your audiobooks. You also don’t have to worry about physical storage, supplies, or managing your inventory. All of this means lower costs and bigger profits, which makes audiobooks the perfect way to make money online with WordPress.
If you have an ebook, then there are plenty of services that can help you turn it into an audiobook including ACX. Every audiobook you make on ACX will be available on Audible.com, Amazon.com, and iTunes, but it’s also a good idea to add the audiobook to your own website.
With that in mind, let’s see how you can sell audiobooks online. Simply use the quick links below to jump straight to the method you want to use.
Unlike general eCommerce plugins, Easy Digital Downloads has the specific features you need to promote, sell, and distribute digital products with ease. This means you don’t have to waste time and effort with unnecessary settings, such as configuring your store’s shipping.
Even better, if you’re using SiteGround then Easy Digital Downloads already comes pre-installed on their EDD plan, so you can start using it straight away.
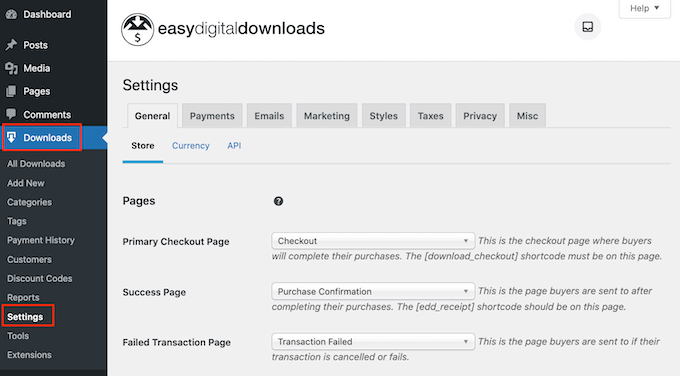
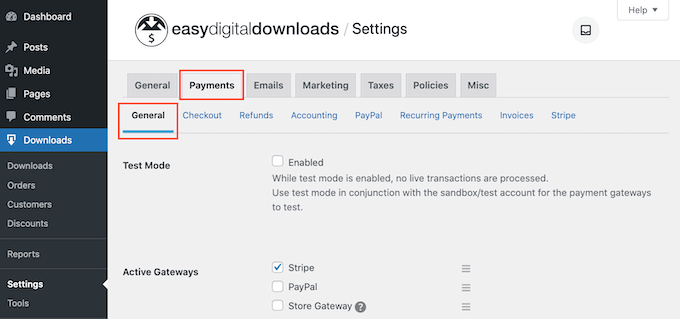
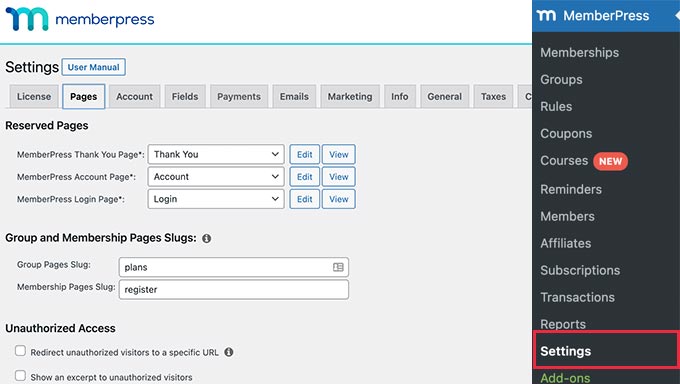
Upon activation, go to Downloads » Settings in the WordPress dashboard.
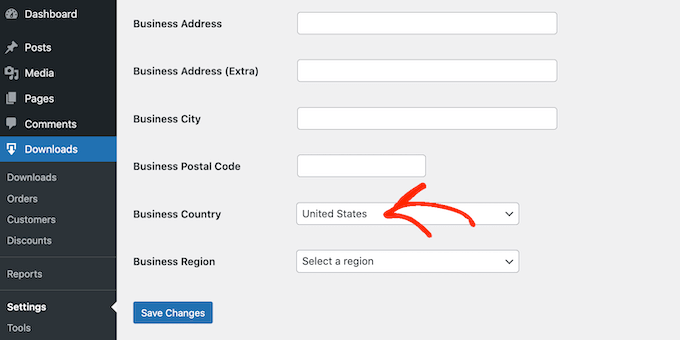
Even though you’re selling audiobooks, you’ll need to set your store’s location. This allows Easy Digital Downloads to auto-fill some fields in the order form, which will help improve the customer experience.
Easy Digital Downloads also uses your location to calculate sales tax.
To add your location, simply open the ‘Business Country’ dropdown menu. You can then choose where your business is based.
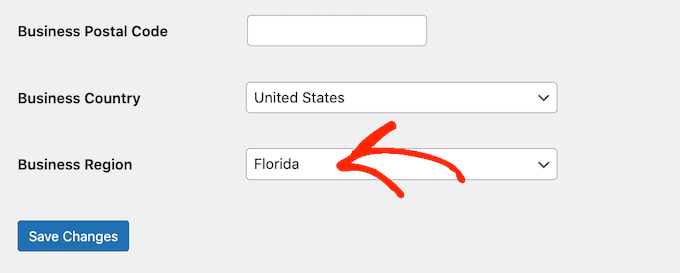
Next, find the ‘Business Region’ field.
Here you can open the dropdown and choose the region where your store operates from.
After making these changes, go ahead and click on Save Changes to store your settings.
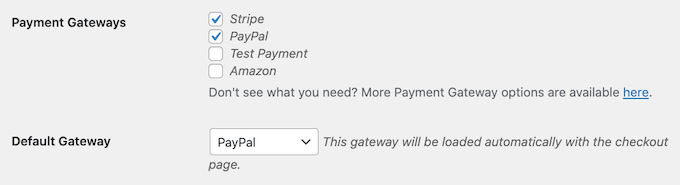
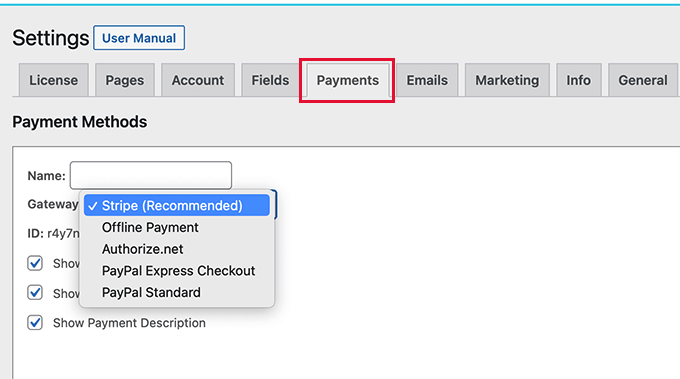
In the Payment Gateways section, check the box next to each gateway that you want to add to your WordPress blog or website.
If you add more than one payment method, then you’ll need to choose a default gateway.
You can use any gateway you want, but Stripe can accept credit cards as well as Apple Pay and Google Pay. This is why we recommend using Stripe as the default payment gateway.
With that done, click on the ‘Save Changes’ button.
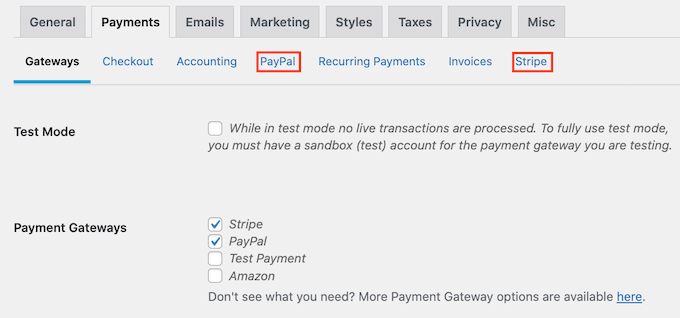
You’ll now see some new tabs where you can configure each payment method.
Configuring the payment gateway will be slightly different depending on which gateway you’re using, but Easy Digital Downloads will walk you through the process.
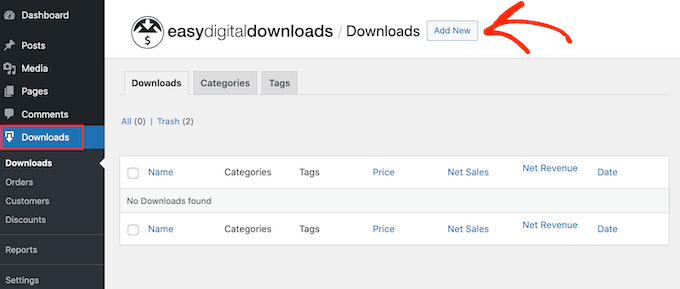
Once you’ve set up at least one payment gateway, you’re ready to start uploading audiobooks to your WordPress website.
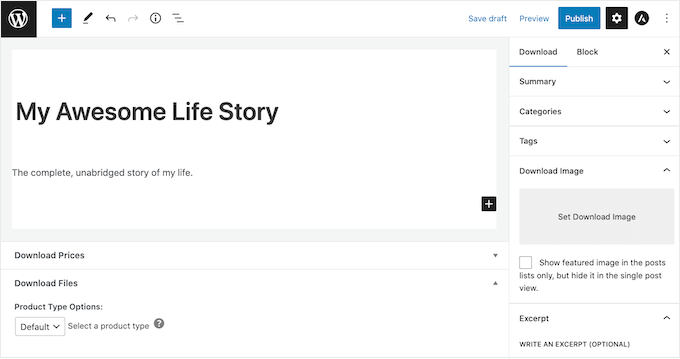
To create a digital product, select Downloads from the left-hand menu. Then, click on the ‘Add New’ button.
You can now type a name for the product into the ‘Enter download name here’ field. This will appear on the audiobook’s page, so you’ll want to use something that catches the visitor’s attention and accurately describes the book.
Next, type out the description that will appear on the ebook’s product page. You’ll want to give visitors all the information they need to decide whether this book is right for them.
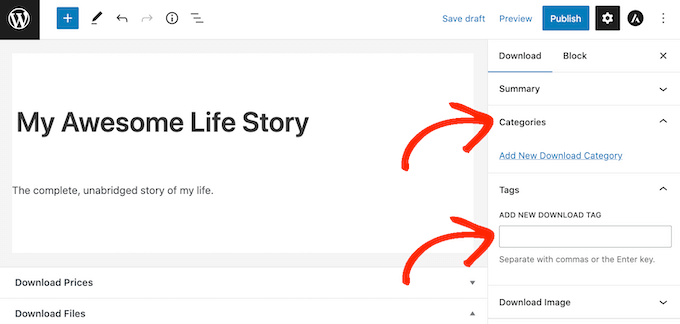
Many online stores use product categories and tags to help shoppers find what they’re looking for. If you’re selling lots of audiobooks, then these categories and tags help visitors find related audiobooks, which can get you more sales.
You can create new categories and tags in the Categories and Tags boxes.
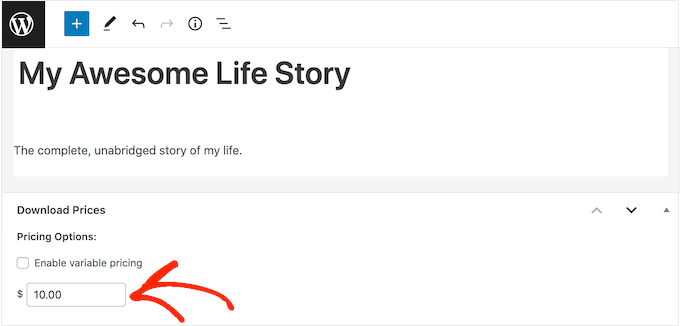
Next, you’ll want to set a price by scrolling to the Download Prices section. Here, type in how much visitors will pay to download the audiobook.
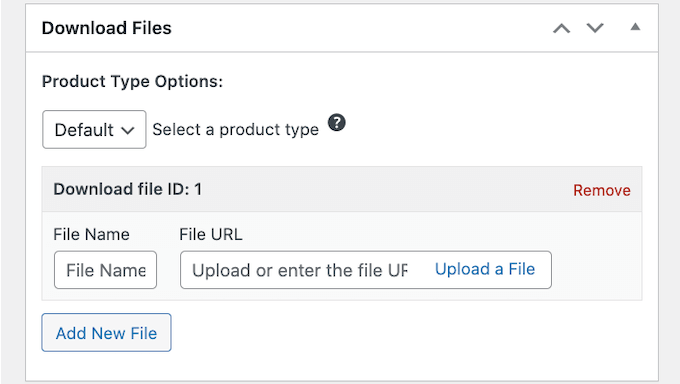
You’re now ready to upload the audio file that you want to sell. When it comes to audio, WordPress supports mp3, ogg, and wav. It also supports m4a, although this format may not work on all browsers.
In the File Name field, type a name for the file that shoppers will get when they buy the audiobook. Then, simply click on ‘Upload a File.’
You can now choose any audio file from the WordPress media library, or you can upload a new audiobook from your computer.
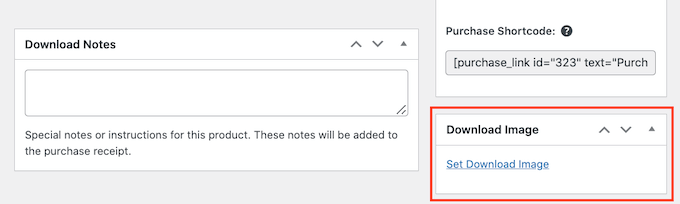
Finally, you’ll need to add a product image, which will usually be your audiobook’s front cover. Simply scroll to the Download Image section and then click on the ‘Set Download Image’ link.
This launches the WordPress media library where you can choose an image or upload a new file from your computer.
When you’re happy with your digital download, click on the Publish button to make it live.
Easy Digital Downloads will now create the audiobook as a downloadable product, but visitors still need a way to access the product page.
This might mean adding the page to your website’s menu, creating a sales page where you advertise all your audiobooks, or even adding the book to a custom home page.
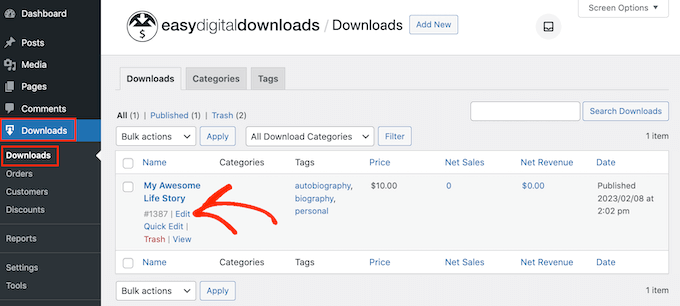
No matter what method you choose, you’ll need to know the audiobook’s URL.
To get this link, simply go to Downloads » Downloads. Then, find the audiobook you just created, and click on its ‘Edit’ link.
You will then find the URL directly below the product title.
Now, you can link to this product page from any area of your website, simply by using its URL. To learn more, see our step-by-step guide on how to add a link in WordPress.
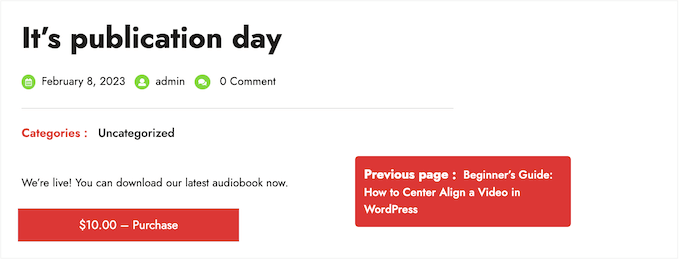
Easy Digital Downloads also creates a ‘Purchase’ button for this particular audiobook. Visitors can click this button to add the audiobook to their cart.
You can add the button for this book to any page, post, or widget-ready area. This allows visitors to start the purchasing process without even Needing to visit the individual product’s page.
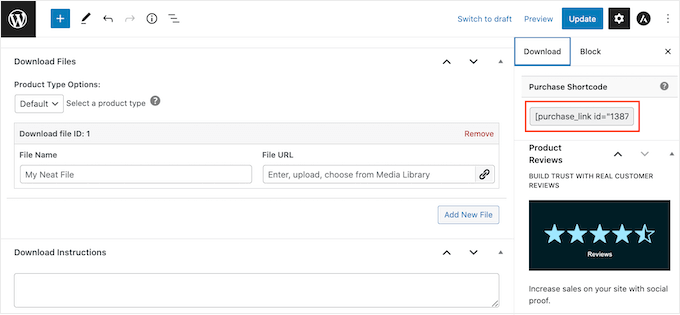
To get the audiobook’s shortcode, simply scroll to its Download Settings section. You can then copy the text in the ‘Purchase Shortcode’ field.
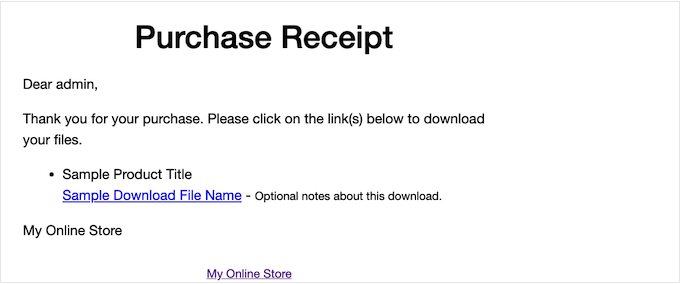
Every time someone buys an audiobook from your website, Easy Digital Downloads will send them an email and download link.
While this email has everything the customer needs to access their download, it’s a good idea to customize it. For example, we recommend adding your own logo and branding.
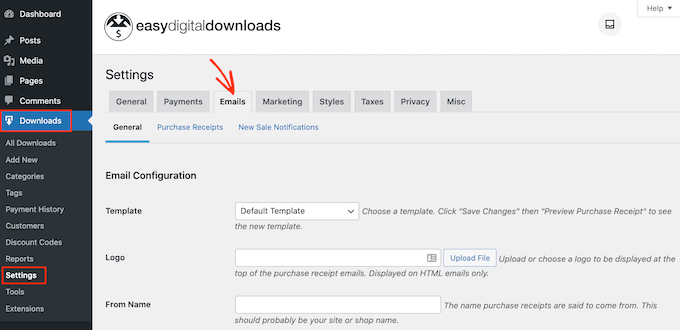
To customize the default email, simply go to Downloads » Settings. Then click on the ‘Emails’ tab.
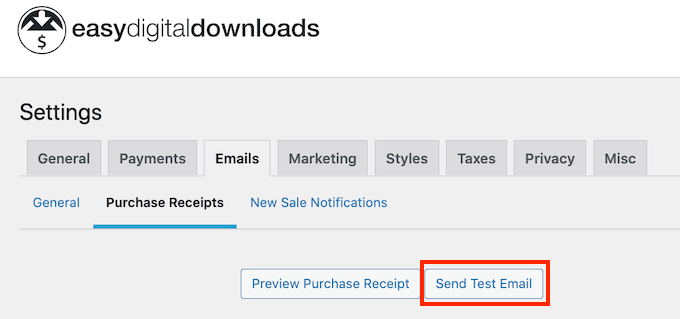
When you’ve finished making changes, you may want to send a test email so you can see how the message will look to your customers.
To do this, simply click on the ‘Send Test Email’ button and Easy Digital Downloads will send an email to your admin email address.
Have you clicked on the ‘Send Test Email’ button, but haven’t got a test email? If your site isn’t sending emails correctly, then customers won’t be able to download your audiobook.
When you’re happy with how the email looks, you can go ahead and click on the ‘Save Changes’ button.
This is all you need to start selling audiobooks online. However, Easy Digital Downloads has lots more advanced features that can help you sell audiobooks.
Method 2. How to Sell Audiobook Memberships (Best for Recurring Revenue)
Another option is using your audiobooks to create recurring revenue streams.
For example, you might offer members unlimited monthly or annual access to all your audiobooks for a membership fee. In this way, you can get reliable recurring revenue over a longer period of time.
A membership site is also a great choice if you’re releasing your audiobooks as a series.
If you want to get recurring revenue, then MemberPress is the best WordPress membership plugin. It allows you to accept payments, create an unlimited number of membership levels, restrict access to audiobook pages based on membership subscription, and more.
Upon activation, go to the MemberPress » Settings page to configure the plugin settings.
To start, you’ll need to set up a payment gateway.
Out of the box, MemberPress supports PayPal (Standard, Express, and Pro), Stripe, and Authorize.net. You simply need to select the payment method you want to use and then type in the required credentials, such as your PayPal email address.
You may want to add multiple methods, so members can use their preferred gateway. When that’s done, don’t forget to click on the Update Options button to save your settings.
With the setup out of the way, it’s time to create one or more membership levels. These are the subscriptions that visitors will buy to access your audiobooks, or other content.
MemberPress allows you to offer different content for different membership levels. For example, you might create Bronze, Silver, and Gold memberships and then give members access to different audiobooks.
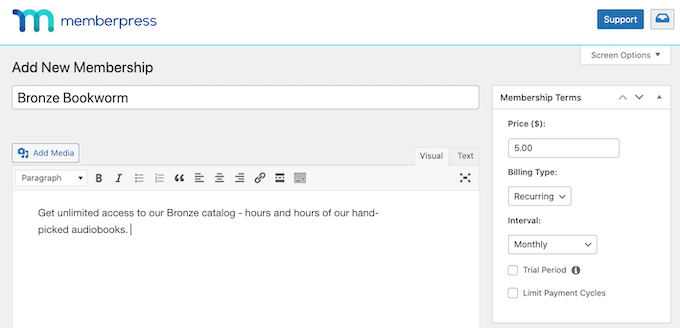
To create the first membership plan, go to the MemberPress » Memberships page and then click on the ‘Add New’ button.
On the next screen, you’ll need to provide a title for the membership plan and then add details in the post editor.
After that, you can set the pricing, billing type, interval, and expiration under the ‘Membership Terms’ section.
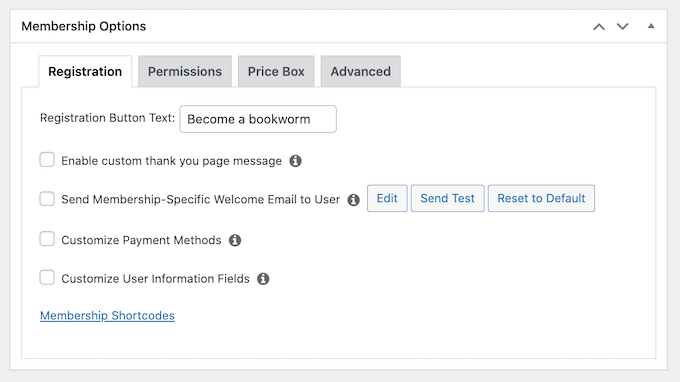
Next, scroll to the Membership Options box below the editor.
Here, you can customize the plan permissions and membership options.
When you’re happy with how the plan is set up, go ahead and click on ‘Publish.’ To create more membership levels, simply repeat the same process described above.
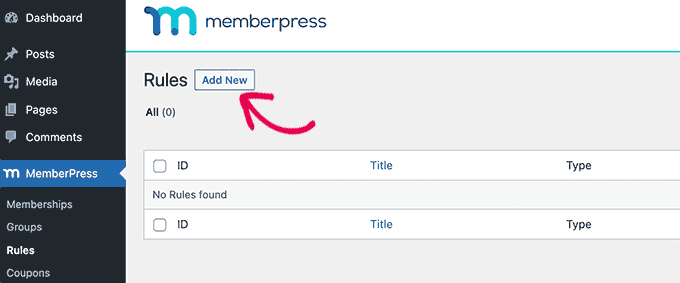
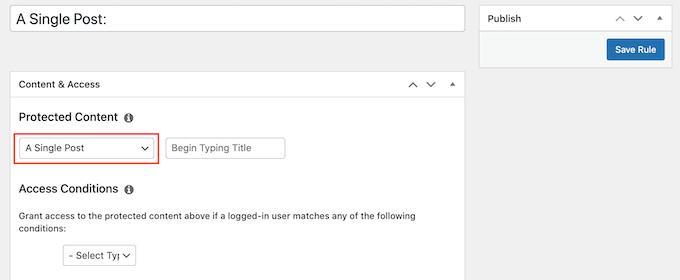
Once you’ve created all the membership levels, it’s time to add some access rules. These allow you to restrict access to your audiobooks based on the user’s membership plan.
Just go to MemberPress » Rules and then click on the Add New button.
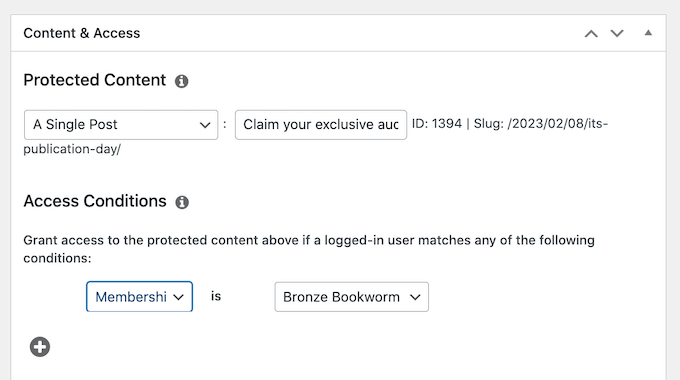
Here, you can create all kinds of access rules, but you’ll typically start by selecting the audiobook that you want to restrict access to.
Under ‘Protected Content,’ open the dropdown menu and choose an option from the list. This might be the specific page where you embedded the audio file, content that has a particular tag, or any other option from the list.
After that, open the ‘Access Conditions’ dropdown and choose ‘Membership.’
In the second dropdown menu, select the membership level people will need in order to access this content.
There are more settings that you can configure, but this is all you need to create a simple access rule.
When you’re happy with how the rule is set up, click on ‘Save Rule.’ To create more access rules, simply follow the same process described above.
Now that everything is set up, you’ll need to make sure visitors can buy memberships and log into their accounts. Thankfully, MemberPress comes with ready-made forms that you can add to your site.
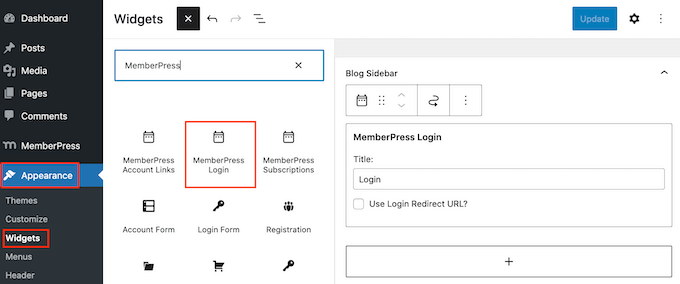
We recommend adding the MemberPress login widget to a widget-ready area, so members can log in from any page.
Simply head over to Appearance » Widgets and add the ‘MemberPress login’ widget to the sidebar or similar section.
Don’t forget to click on the ‘Update’ button to save your widget settings.
There are a few different ways to add a signup page to your website, but MemberPress automatically creates a registration page for each membership level. This means you can simply add these pages to your main navigation menu.
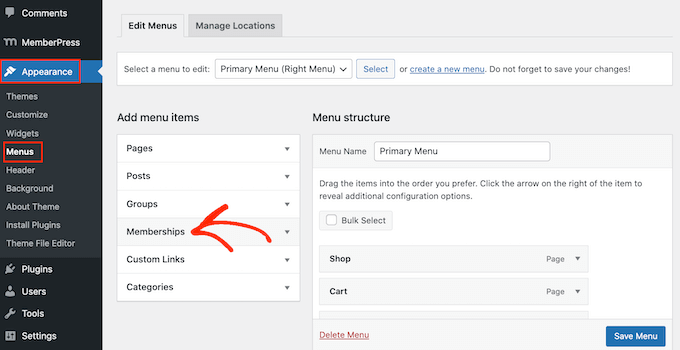
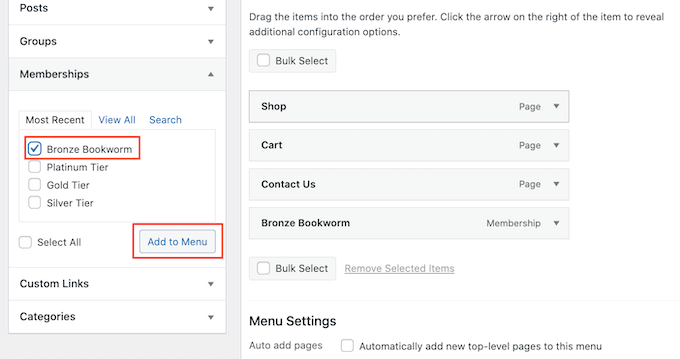
In your WordPress dashboard, go to Appearance »Menus. In the left-hand menu, simply click to expand the ‘Memberships’ section.
You’ll now see a list of all the different MemberPress levels.
To add a membership to the navigation menu, simply check the box next to it and then select ‘Add to menu.’
When you’re happy with how the menu is set up, click on ‘Save Menu.’
At this point, you’ve created a website where visitors can buy audiobook subscriptions. However, MemberPress has lots more settings you can use to sell audiobooks, grow your brand, and get more members.
Method 3. How to Sell Audiobooks With WooCommerce (Best For Online Stores)
Easy Digital Downloads makes it easy to sell audiobooks on any WordPress blog or website, without you having to configure lots of unnecessary settings like shipping and handling.
However, if you’ve already created a WooCommerce store, then you can sell digital products like audiobooks using this popular eCommerce plugin.
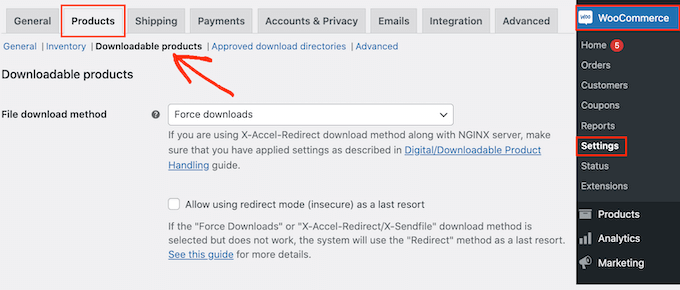
Although it’s mostly used to sell physical products, you can add support for digital products by going to WooCommerce »Settings and then clicking on the ‘Products’ tab.
Here, click on the ‘Downloadable products’ link.
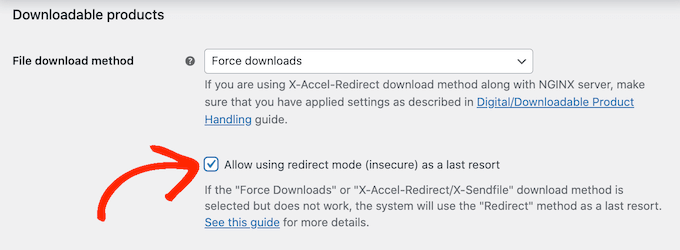
You can now open the ‘File download method’ dropdown and choose an option from the list.
When you’re selling digital downloads, there is a risk that customers may share the direct link with other people. This allows people to download your audiobook without paying.
‘Force Downloads’ helps to protect your site from direct linking, so it’s the recommended method. However, just be aware that very large files may result in a timeout, especially if your server has limited resources.
If this happens, then you may need to change your WordPress hosting plan or select a different file download method.
You may also want to enable the checkbox next to ‘Allow using redirect mode (insecure) as a last resort.’ If WooCommerce encounters any problems, then this setting will deliver the audiobook via an unsecured redirect link rather than showing an error.
This is a much better customer experience.
The second option is ‘X-Accel-Redirect/X-Sendfile,’ which serves the file directly to the customer. This protects the audiobook from unauthorized downloads without impacting your site’s performance.
However, this method requires you to install and enable the X-Accel-Redirect/X-Sendfile module on your server, so it’s not very beginner-friendly. Depending on your plan, you may also need to speak to your WooCommerce hosting provider.
The final option is ‘Redirect only,’ which uses a direct link to the file. This means your audiobook isn’t protected and anyone can access it using the URL. That said, we don’t recommend the ‘Redirect only’ method.
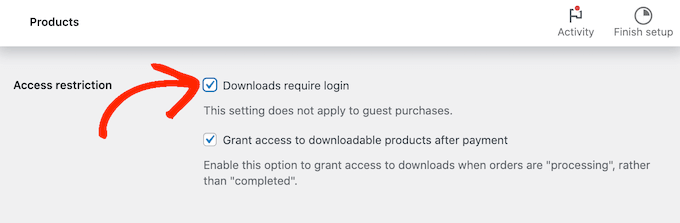
After selecting a download method, you can choose whether visitors must be logged into an account in order to download the audiobook.
To make this decision, either enable or disable the ‘Downloads require login’ checkbox.
By default, customers can download the audiobook while their order is processing.
If you want to wait until the order is complete, then uncheck the following box: ‘Grant access to downloadable products after payment.’
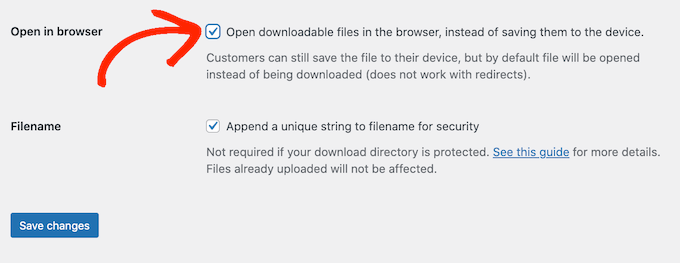
By default, WooCommerce will download the audiobook to the customer’s computer.
Most of the time this is the best customer experience, but you can set the file to open in a new tab instead. The customer can then decide whether they want to save the file.
There are some use cases where this may be the better option. For example, if you’re showing the customer a free sample, or your audiobooks are short enough to enjoy in one sitting.
In this case, you may want to check the box next to ‘Open downloadable files in the browser.’
When you’re happy with the settings you’ve entered, click on ‘Save Changes.’
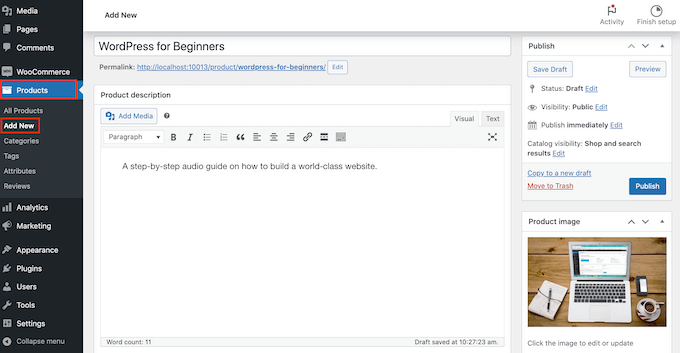
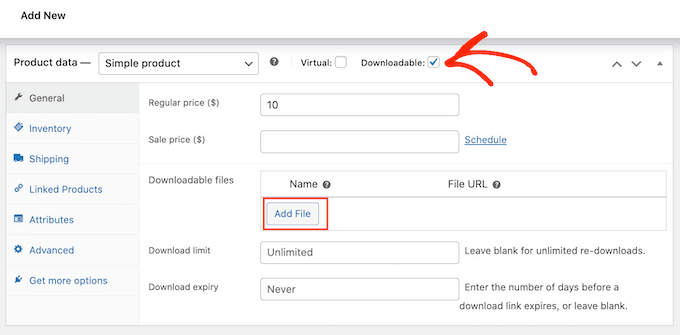
With that done, you’re ready to add the audiobook as a downloadable product by going to Products »Add New. Here, you can type in a title, add a description, upload a product image, and set the price as normal.
Then, scroll to ‘Product Data’ and check the box next to ‘Downloadable,’ which adds some new settings.
To start, click on ‘Add File.’
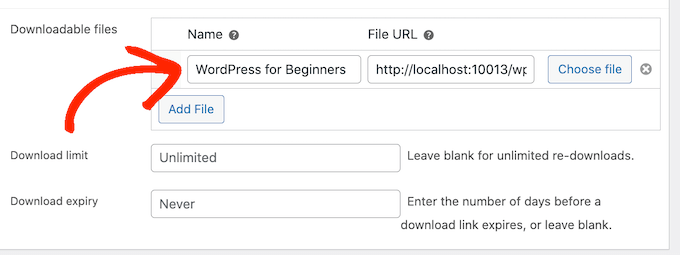
You can now either choose the audiobook from your media library or upload a new file from your computer.
After that, type in a filename for the audiobook.
By default, customers can download the audiobook as many times as they want, for as long as they want.
If you want to limit the number of downloads per customer, then type a number into the ‘Download limit’ field.
If you want the download link to expire after a certain number of days has passed, then type a number into the ‘Download expiry’ field.
When you’re happy with how the audiobook is set up, click on the ‘Publish’ button. The audiobook will now appear as a downloadable product on your online store.
Do you want to add your WordPress products to Google Shopping?
Adding your online store products to Google Shopping can help you increase traffic, reach more customers, and generate greater revenue.
In this article, we’ll show you how to easily add WordPress products to Google Shopping.
Why Should You Add WordPress Products to Google Shopping
Google Shopping is a virtual marketplace like Amazon and Etsy, where users can search, view, and compare products from different online stores that have paid to advertise their products.
If you have a WooCommerce store, then adding your products to Google Shopping can prove to be extremely beneficial for your business.
Your products will be shown to all users browsing through Google shopping which will increase traffic on your WordPress website, generate more revenue and bring in more customers.
That being said, let’s see how you can add WordPress products to Google Shopping.
How to Add WordPress Products in Google Shopping
Step 1: Creating a Google Merchant Account
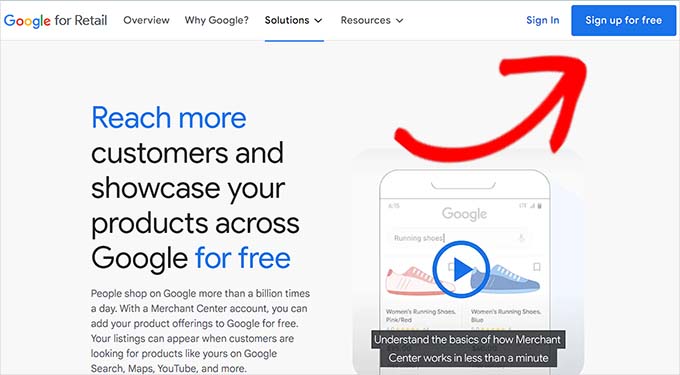
To add your products to Google Shopping, you have to start by creating an account in the Google Merchant Center. This is the place where your product information will be stored for viewing by Google Shopping.
First, go to the Google Merchant Center page and click the ‘Sign up for free’ button.
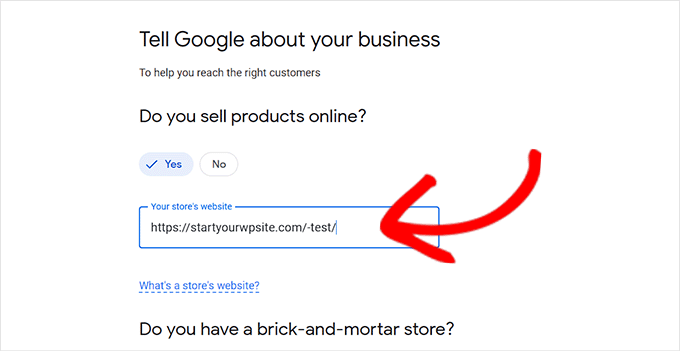
After that, Google will ask you about your online business.
Just check the answers that apply to you, and then provide your website’s URL.
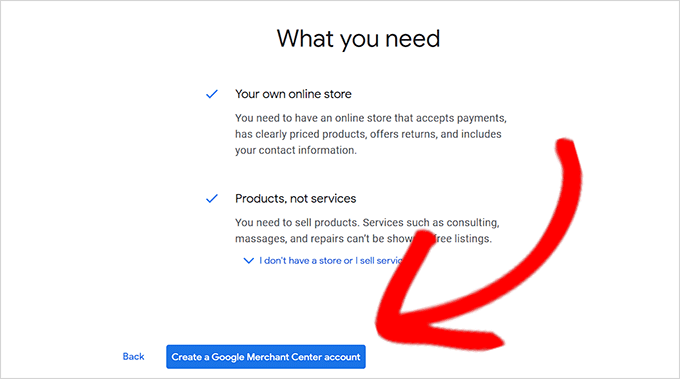
After you’ve provided the details, you’ll be redirected to another page.
Here, you simply have to click the ‘Create a Google Merchant Account’ button at the bottom of the page.
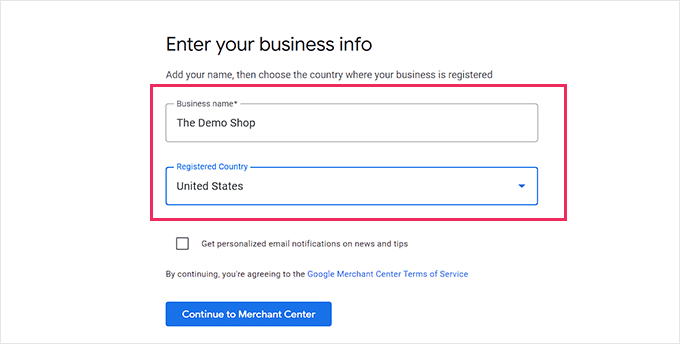
Now, you will be asked to provide your business details. You can start by writing your business name.
Next, select the country where your business is based from the dropdown menu below the ‘Registered Country’ option.
After that, click the ‘Continue to Merchant Center’ button.
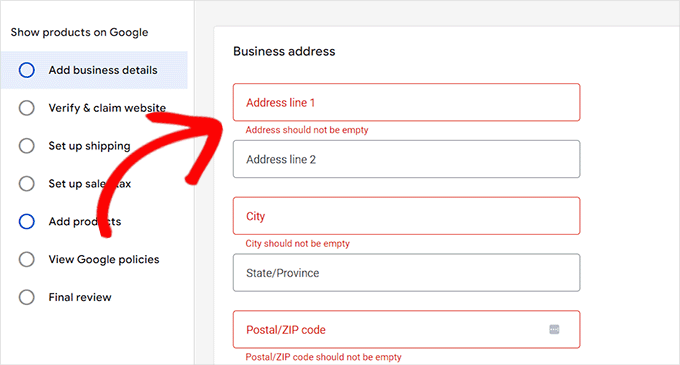
You’ve successfully created your Google Merchant Account. Now all you have to do is provide your business info and shipping details.
Once you’ve filled in those details, simply click the ‘Save’ button at the bottom to store your settings.
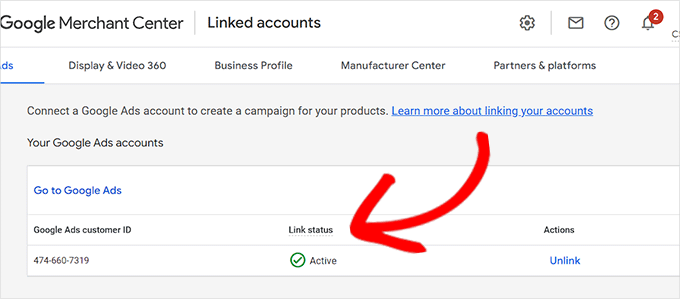
Step 2: Linking Your Google AdWords Account
Now you’ll have to link your Google AdWords account to your Google Merchant Center account so that you can show your products via Google Shopping.
To link your account, simply go to the Google Merchant Center dashboard and click the gear icon at the top of the page.
Clicking it will open up a ‘Tools and Settings’ prompt. Here you simply have to choose the ‘Linked Account’ option present.
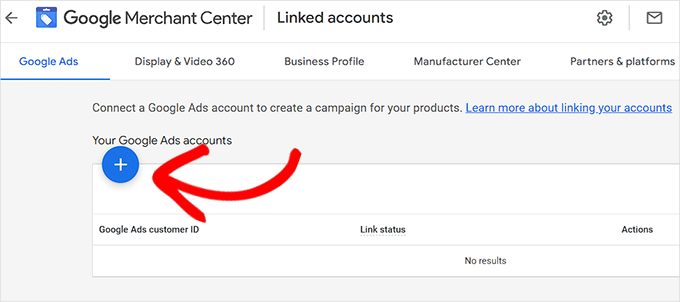
This will take you to the ‘Linked Accounts’ page.
Now you simply have to click the ‘+’ button to create your Google Ads account.
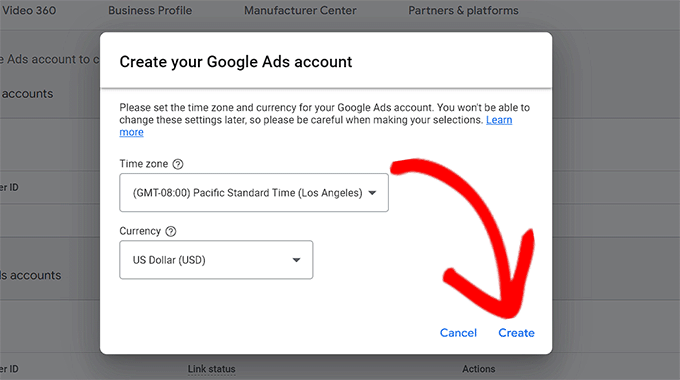
This will open up a ‘Create Your Google Ads Account’ prompt.
Simply choose your preferred time zone and currency and then click the ‘Create’ button.
You have now successfully created your Google Ads account.
This is how it will look once your account has been created.
Step 3: Adding WordPress Products to Google Shopping
To add your WordPress products to Google Shopping, we will be using the ELEX Google Shopping plugin to display your WooCommerce products in Google Shopping.
Upon activation, head over to the Google Shopping Feed » Create Feeds page from the WordPress admin sidebar.
From here, simply fill in your business details and click the ‘Continue’ button at the bottom.
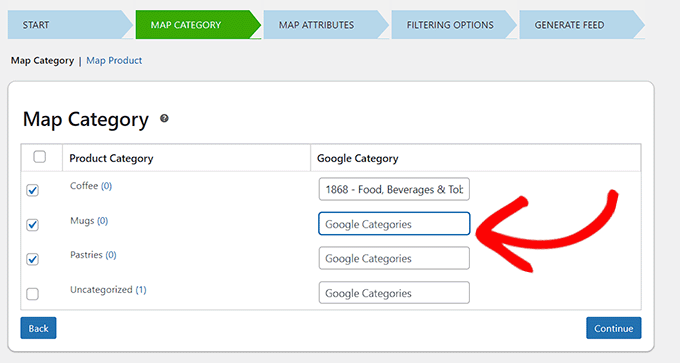
Next, you’ll be taken to the ‘Map Category’ page. Here you simply have to select your product categories.
Simply type your product categories in the ‘Google Categories’ tab and click ‘Continue’
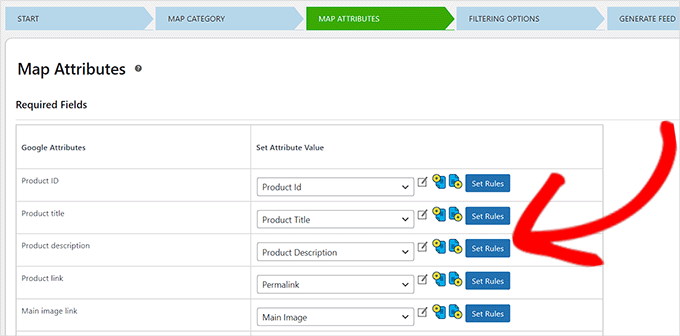
After that, you’ll be directed to the ‘Map Attributes’ page.
This is where you’ll have to fill in your product details including product id, product description, product link, pricing, image, and more.
Here select and fill in as many attributes as possible for more visibility in Google Shopping and click the ‘Continue’ button.
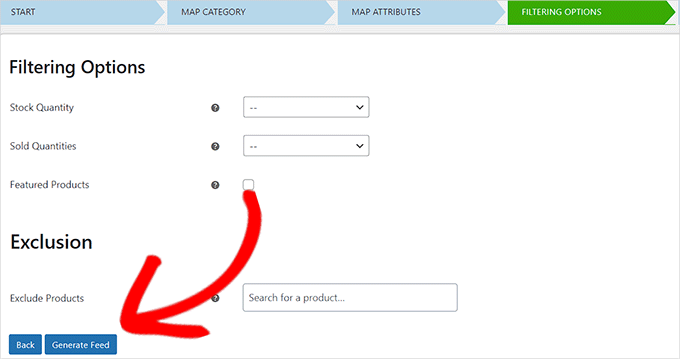
Now that you’re on the ‘Filtering Options’ page, simply fill in the details as required for your online store.
For example, you can include how many items you have in stock or note how many have sold already.
Next, simply click the ‘Generate Feed’ button at the bottom.
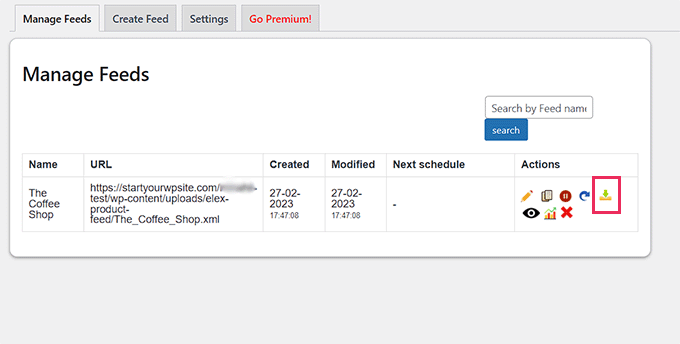
After you’ve created your Google Shopping feed, go to the Google Shopping Feed » Manage Feeds page from the admin sidebar.
Here you will be able to view your Google Shopping Feed. Now you have to simply click the ‘Download’ button beside it.
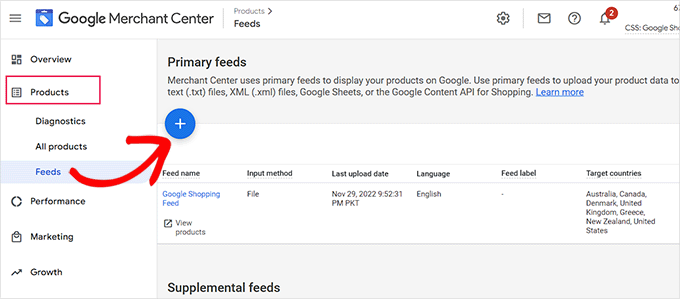
Once you’ve downloaded your feed as an XML file, go back to the ‘Google Merchant Center’ dashboard and click the Products » Feeds option from the sidebar.
This will open up the ‘Primary Feeds’ page where you have to click the ‘+’ button to add a new feed.
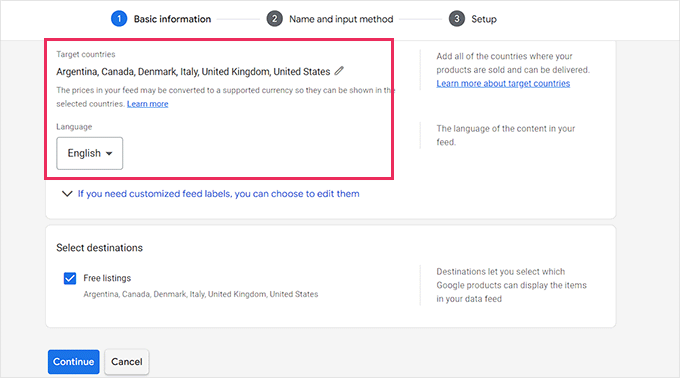
This will take you to the ‘New Primary Feed’ page where you can start by filling in basic details. First, start by adding all your target countries.
Next, select your preferred language and then click the ‘Continue’ button.
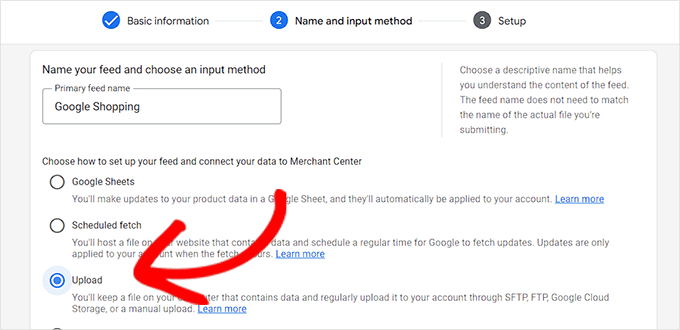
Then, you have to choose a name for your feed and select a method to connect your data to the Merchant center.
For this tutorial, we will be uploading the feed XML from WordPress.
After that, just click on the ‘Continue’ button.
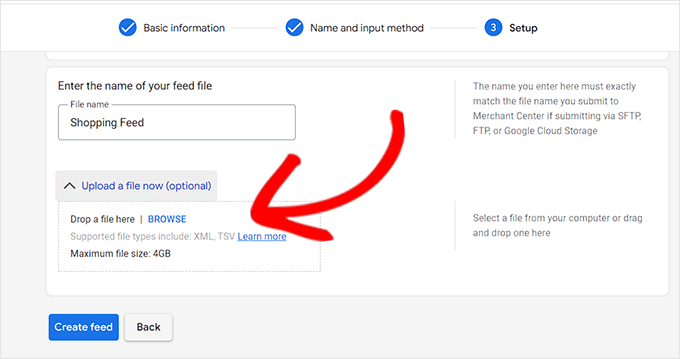
Now that you’re on the ‘Setup’ page, simply type the name for your Google Shopping Feed.
Next, just upload the Feed file you got from WordPress and click the ‘Create Feed’ button.
You have now successfully added your WordPress products to Google Shopping.
Bonus: How to Add Google Merchant Center Schema in WordPress
To improve your product search visibility in Google Shopping and increase conversion rates, you should add a Google Merchant schema in WordPress.
Schema markup is an HTML code that provides more details about your products to search engines.
A GMC listing schema will make your search snippets more prominent and will allow your products to be featured as popular products for the relevant search terms.
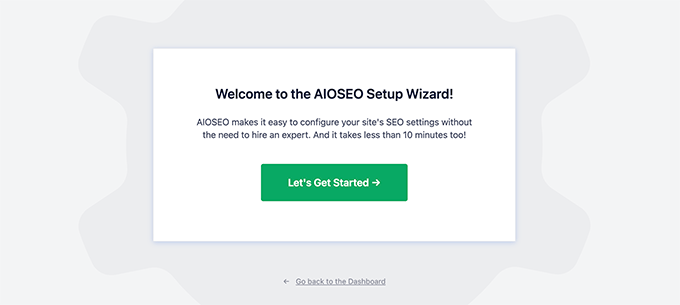
The easiest way to add a Google Merchant Center listing schema to WordPress is by using the All in One SEO for WordPress.
Upon activation, a setup wizard will open up. Simply go ahead and click the ‘Get Started’ button.
After that, you need to follow the onscreen instructions in the setup wizard to configure the plugin. If you need help, please see our guide on how to properly set up AIOSEO in WordPress.
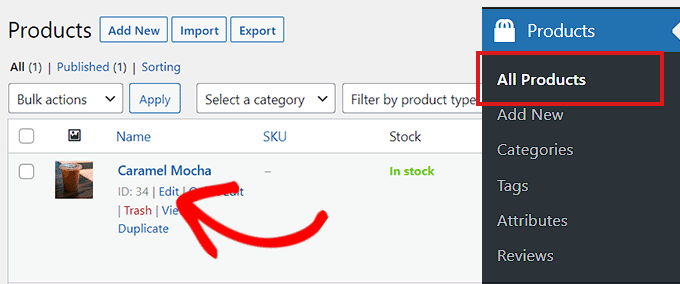
After the AIOSEO plugin has been set up, you need to visit the Products » All Products page from the admin sidebar.
From here, simply click on the ‘Edit’ link below a product to open up the ‘Edit Product’ page.
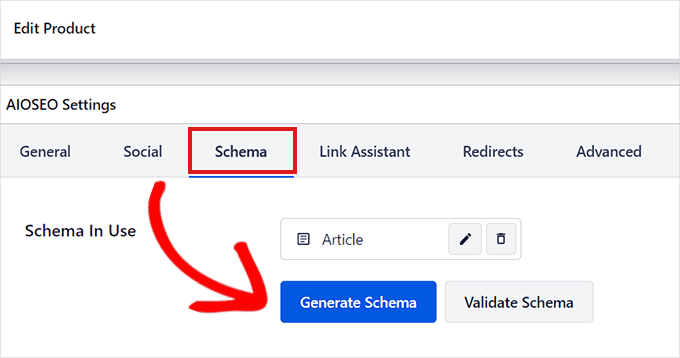
Once there, you need to scroll down to the ‘AIOSEO Settings’ section and click on the ‘Schema’ tab.
Now, you need to make sure that the schema type is set to ‘Product’ by default.
If that is not the case, then simply click on the ‘Generate Schema’ button.
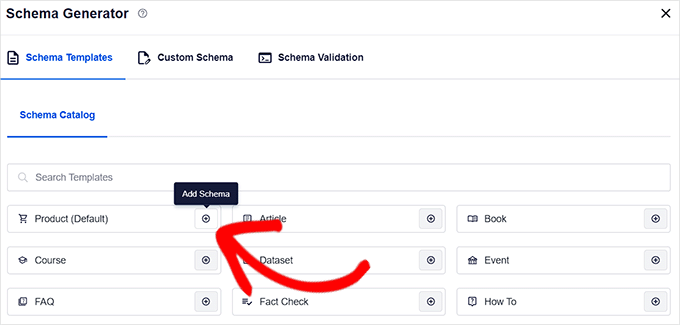
It will open up the Schema Catalog which will list all the available schema templates.
From here, you need to click the ‘Add Schema’ (+) button beside the Product option to set it as your primary schema.
Note: You may see the ‘Article’ schema already applied. If so, you can remove it as you add the new one because this particular page isn’t an article or blog post in Google’s eyes.
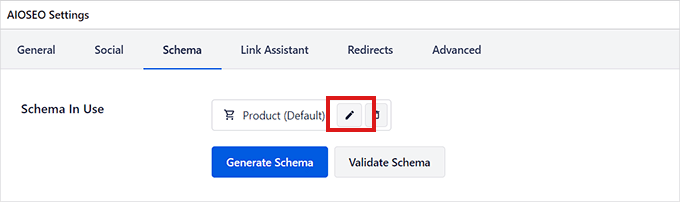
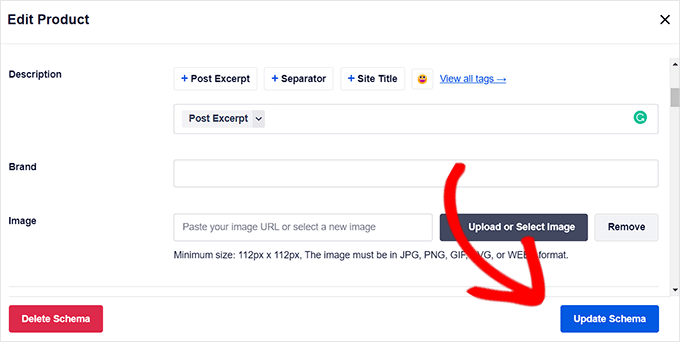
Next, you will need to fill in the product information to add the GMC listing schema.
For that, you need to click the ‘Edit Schema’ button next to the ‘Schema in Use’ option.
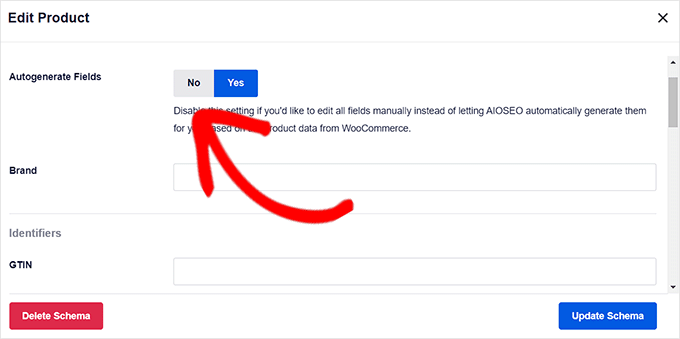
This will open up the ‘Edit Product’ modal where you will need to fill in the product details.
If you’re using WooCommerce, then AIOSEO will automatically pull most of the product data from your product information.
However, if you want to fill in the information manually, you need to simply toggle the ‘Autogenerate Fields’ switch to ‘No.’
The product attributes that you will need to add include the product name, description, image, ISBN, price, material, color, shipping details, and more.
We recommend that you provide all the details so that the schema markup can make your product snippets more engaging.
Once you’re done, simply click the ‘Update Schema’ or ‘Add Schema’ button to store your settings.
You have now successfully added the Google Merchant Center listing schema to WordPress, and your products can now be featured on the platform and hopefully earn you more sales.
Wondering how to choose the best WooCommerce WordPress theme for your business? With thousands of FREE & PREMIUM WordPress theme options, picking the best theme for your eCommerce website is daunting. Worry not! We’ve got you covered. In this article, we’ll share a detailed guide on choosing WooCommerce WordPress themes for your business, so you [...]
Do you want users to easily change the currency on your WordPress website?
A multi-currency WordPress plugin lets you show different currencies on your website and automatically apply the exchange rate. This way, customers can switch their local currency when purchasing a product.
In this article, we’ll share the best multi-currency WordPress plugins that you can use on your site.
Why Use a Multi Currency WordPress Plugin?
A multi currency plugin allows you to offer multiple currencies on your WordPress website. Your customers can switch currencies from the US dollar to their native currency with a click of a button.
If you’re running an online store, then having a currency switcher plugin can come in handy.
You can reach a wider audience and target users from around the world. Customers from other countries can easily convert the product prices into their local currency without leaving your website.
It also improves the overall shopping experience for customers. The plugin removes any pricing confusion that people may have. As a result, you get to keep customers on your website and boost sales.
That said, let’s look at the best multi-currency plugins for WordPress.
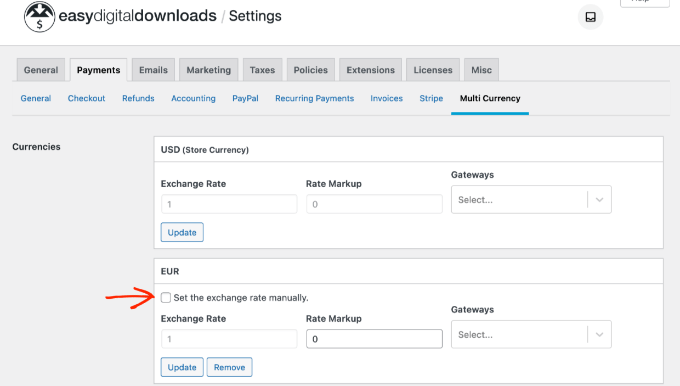
It offers multi-currency support and lets you show prices in different currencies. You can select from over 200 currencies and have complete control over the exchange rate.
There is an automatic option where the plugin will auto-update the exchange rate and convert the price from USD to the customer’s local currency. On the other hand, you can also manually set the exchange rate.
Besides that, Easy Digital Downloads lets you sell digital downloads with ease. It offers unlimited file downloads, full data reporting, a shopping cart, and more. It also easily integrates with payment gateways like Stripe, PayPal and third-party tools like AWeber, ConvertKit and Slack.
Pricing: Easy Digital Downloads is a premium plugin with prices starting from $99.50 per year.
It is super easy to use and lets you add unlimited currencies to your WooCommerce store. You can show a currency switcher anywhere on your website and let customers choose their local currency.
Besides that, the plugin also automatically detects users’ geolocation and displays prices in their native currency. It integrates with APIs of the European Central Bank, Google Finance, and other providers to automatically update exchange rates.
You can also control the frequency of exchange rate updates. For example, the plugin can check it daily, twice daily, weekly, monthly, or every 15 days.
Other than that, you get options to customize the currency switcher, display different payment methods for specific countries, and more.
Pricing: YITH Multi Currency Switcher for WooCommerce is a premium plugin that will cost you $99.99 annually.
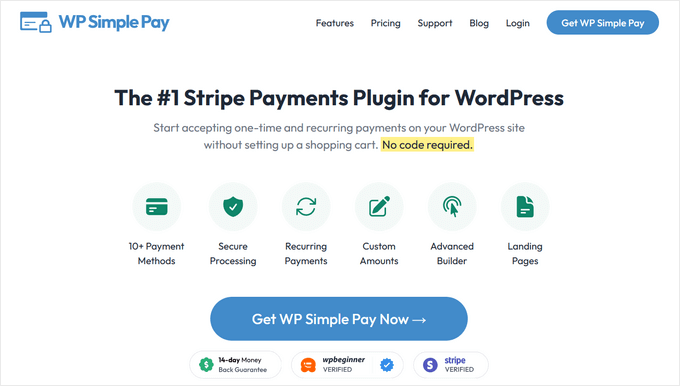
WP Simple Pay is the best Stripe plugin for WordPress that lets you accept one-time or recurring payments on your website. The best part, you don’t have to set up a shopping cart to collect payments.
WP Simple Pay lets you select from 135+ different currencies supported by Stripe. It also lets you choose your site’s region’s default currency, format, and tax rate. This way, you can charge customers in their native currency and receive funds in your preferred currency.
With WP Simple Pay, you get a drag-and-drop payment form builder and over 10 different payment methods. For example, you can collect payments through credit and debit cards, Apple Pay, Google Pay, ACH direct debit, and more.
Pricing: WP Simple Pay prices start from $49.50 per year. There is also a free version you can use to get started.
CURCY is a free WooCommerce multi currency plugin. It lets you accept payments in different currencies and helps customers to switch to their preferred currency.
The plugin is easy to use and set up. It automatically detects users’ location on your WooCommerce store and displays products in the native currency.
You can also allow the plugin to set the exchange rate automatically. However, there are different options for controlling the exchange rate. For example, you can manually set the rate, keep the product prices fixed in other currencies, and manage the exchange rate fee.
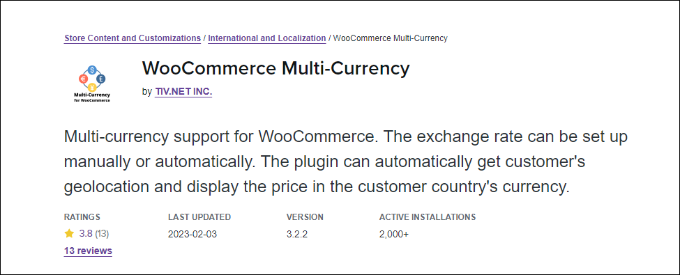
WooCommerce Multi-Currency is a premium WooCommerce extension that allows you to show product prices in the customer’s country’s currency.
Like many other plugins on our list, you can choose between automatic or manual exchange rate settings. The plugin supports different exchange rate providers’ APIs, such as Open Exchange Rate, Abstract, Exchange Rate API, and more.
Using a shortcode, you can display the currency switcher anywhere on your WooCommerce store. It also has a sidebar widget and helps customers quickly convert prices into their local currency.
Pricing: WooCommerce Multi-Currency prices start from $99 per year.
Currency Switcher for WordPress is another free and beginner-friendly plugin you can use to show different currencies on your website.
It works with Open Exchange Rate API and allows you to automatically convert the prices into different currencies depending on the exchange rate. There is also an option to manually control the exchange rate.
Currency Switcher for WordPress supports currency conversion for visitors from the United States, Australia, Europe, and India.
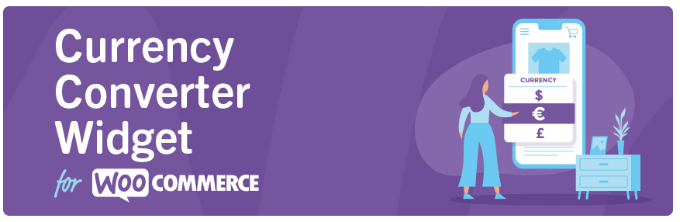
Currency Converter Widget is a premium WooCommerce plugin that you can use on your store. The multi-currency plugin offers a dynamic widget that converts product prices in real-time.
It automatically grabs the latest exchange rate and applies it to the products. You can add and convert as many currencies as you want.
The best part is that the plugin saves the converted total at checkout. This way, you can see the prices customers saw on your WooCommerce store.
Pricing: Currency Converter Widget will cost you $49 per year.
Which is the Best Multi Currency WordPress Plugin?
Based on our research, the best WordPress multi-currency plugin are Easy Digital Downloads, YITH multi currency switcher for WooCommerce, and WP Simple Pay.
The choice of picking the best multi-currency plugin depends on the type of website you’re running.
For instance, if you’re selling digital products, then Easy Digital Downloads is the best choice. It is super easy to use and lets you select from over 200 different currencies. You get full control over the exchange rate and can add as many currencies as you want.
On the other hand, YITH Multi Currency Switcher for WooCommerce is the best multi-currency plugin to use if you have a WooCommerce store. It automatically detects the user’s location and converts product prices. Plus, you can choose from different providers to set the exchange rate.
Lastly, you can also use WP Simple Pay to collect online payments without setting up a shopping cart. It is the best Stripe plugin and supports over 135 currencies.
Do you want to create a loyalty program in WooCommerce?
A loyalty program can keep customers coming back to your online store, and keep them away from your competitors. It can also be a great way to reward your best customers and make them feel valued.
In this guide, we’ll show you how to create a loyalty program for your WooCommerce store.
Why Create a Loyalty Program in WooCommerce?
Creating a loyalty program can be a great way to get more sales on your online store.
A loyalty program encourages customers to keep coming back to your WordPress website, which is the key to running a successful business over the long term. It can even boost average spend per customer by giving shoppers a reason to add more items to their basket.
Most stores give customers points for buying products and services. However, you can also reward customers for other actions like creating an account, placing their first order, signing up to your email newsletter, or spending over a certain account.
You might even give customer extra points for returning to an abandoned shopping cart and completing their purchase. In this way, a loyalty program can help you recover WooCommerce abandoned cart sales.
With that said, let’s take a look at how to add a loyalty program in WooCommerce.
After creating a loyalty program, Advanced Coupons will show the customer how many points they’ll get for each action, including buying a specific product.
After that, go ahead and click on the ‘Settings’ tab. This brings you to a screen where you can build the loyalty program.
To start, let’s reward members with points when they take certain actions on your website, like leaving a product review, posting a comment, or buying a product.
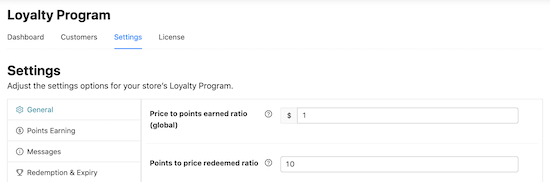
In the ‘Price to points earned ratio,’ we can see that the Loyalty Program plugin gives customers 1 point for every $1 spent.
If you want your WooCommerce loyalty program to look more impressive, then you give customers more points. For example, members might earn 2 points or 10 points for every $1 they spend.
‘Points to price redeemed ratio’ is how many points it takes to earn a dollar as part of your loyalty program.
By default, customers earn $1 for every 10 points. That means the customer needs to redeem 10 points to get a $1 discount coupon. You can change these values to anything you want.
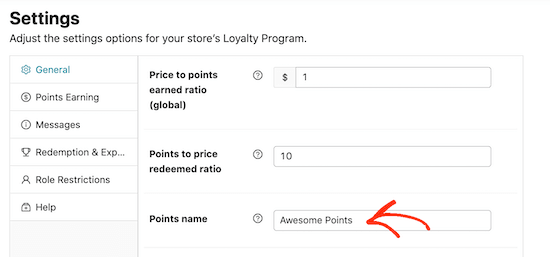
You can also change the name of your loyalty scheme by typing into the ‘Points name’ field. We’ve gone with ‘Awesome Points’ for our loyalty program, but you might want to use something more branded, like Starbucks does with their ‘Stars’.
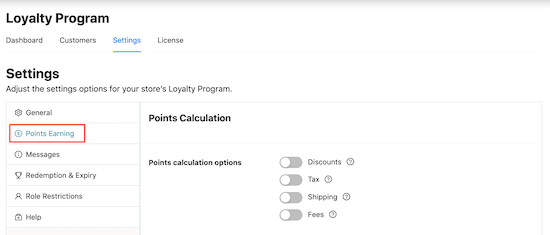
Next, you’ll need to decide how your points are calculated. For instance, you may want to give a customer less points if they use a coupon code, compared to a customer who didn’t use a coupon. In this way, you can give the best rewards to your best customers.
To do this, click on the ‘Points Earning’ tab. Here, you can check the boxes to take any discounts, tax, shipping costs, and any fee amounts into account when awarding points.
Many online marketplaces and digital stores only reward customers for spending money. However, there may be other actions that benefit you, so it’s a good idea to reward customers for taking these actions.
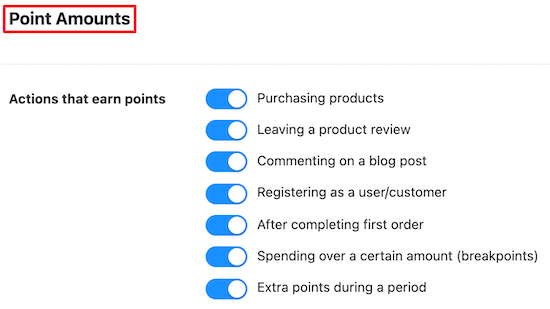
For example, you might want to reward visitors for registering with your membership site, posting a product review, or even commenting on a blog post.
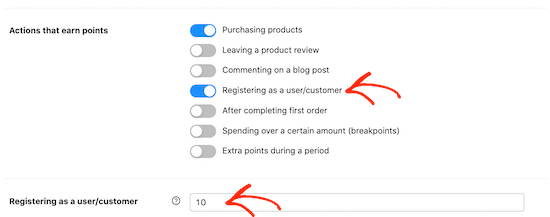
Simply scroll to the ‘Point Amounts’ section and then click the switch for any action that will earn the customer points.
After activating these toggles, check whether there are any new settings to configure.
For example, you’ll need to type in how many points customers will get for registering as a new user.
You can also encourage shoppers to spend more by awarding extra points for orders over a certain amount.
To do this, enable the ‘Spending over a certain amount’ switch and then type a value into the ‘Spending over a threshold’ field.
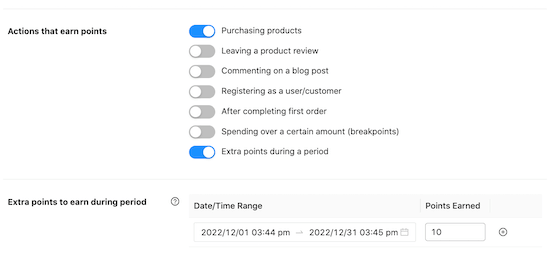
During busy shopping periods you may want to give customers an extra reason to buy from your store. For example you might award extra points during Black Friday, so customers aren’t tempted to shop with a competitor.
You can give customers extra points during a specific period by enabling the ‘Extra Points To Earn During Period’ slider. Then, enter a date and time range into the ‘Extra points to earn during period’ section and type in how many points customers will earn.
There are some more settings you may want to look at, but this is enough to create a loyalty program in WooCommerce. When you’re happy with how the program is set up, scroll to the bottom of the page and click the ‘Save changes’ button.
Your new WooCommerce loyalty program is now live.
Automatically Creating Accounts for Your Customers
Your customers will need to create an account in order to collect loyalty points.
Already, this encourages people to sign up to your online store. However, you can also create an account automatically when a visitor makes their first purchase. This can improve the shopping experience, and may get you some extra members.
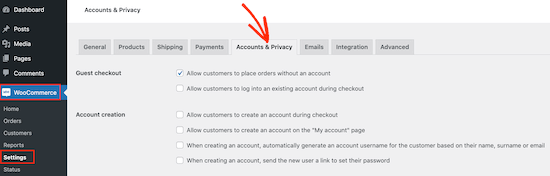
To automatically create an account for a new customer, go to WooCommerce » Settings. Then, click on the ‘Accounts and Privacy’ tab.
To start, you may want to uncheck ‘Allow customers to place orders without an account’, so that customers can’t checkout as a guest. This will encourage more people to register with your site, but it may cause more shoppers to give up on a purchase and abandon their shopping carts.
Next, check the ‘Allow customers to log into an existing account during checkout’ box.
Once you’ve done that, you’ll want to make it as easy as possible for customers to create an account. With that in mind, we recommend checking all the boxes in the ‘Account creation’ section, as you can see in the following image.
Now, WooCommerce will automatically send an email to first-time customers with information on how to access their new account.
The WooCommerce Loyalty Program in Action
Your loyalty program is up and running! Once a customer has earned loyalty points, they can turn them into coupons by going to My Account » My Reward Points.
The customer can then simply type in how many points they want to use, and your WordPress blog or website will show how much the coupon is worth.
The customer can go ahead and click ‘Redeem’ to create that coupon.
In the following image, the customer has created a $5 coupon by converting 500 of their points. They still have 550 points left to redeem.
Are you looking to add a product question and answer section in WooCommerce?
Adding a Q&A section enables customers to ask questions about the product before buying it, and see the questions and answers of other customers. This helps recover abandoned cart sales and improve customer engagement in your store, and reduce support requests.
In this article, we’ll show you how to easily add product questions and answers in WooCommerce.
Why Should You Add Product Q&A in WooCommerce
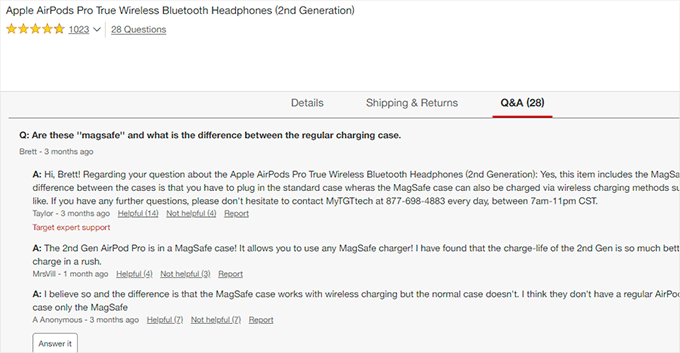
You may have noticed the product question-and-answer section on popular eCommerce websites like Amazon, Target, Best Buy, and more.
Adding a product questions and answers section allows customers to ask questions about a product right there on the product page.
You or your customers can then answer that question and it becomes visible to all other new customers who may have the same question in mind.
Over a period of time, your product page will have its own frequently asked questions section, which will help increase sales and reduce abandoned cart rates.
Adding a question and answers section to your online store also allows you to curate user-generated content which improves your WooCommerce product search rankings.
That being said, let’s see how you can easily add product questions and answers to WooCommerce.
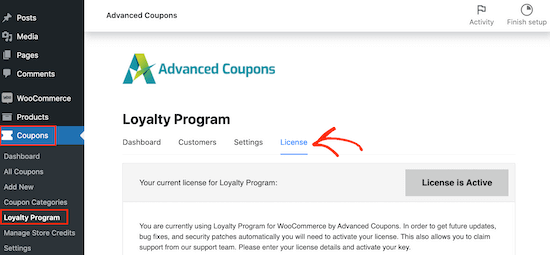
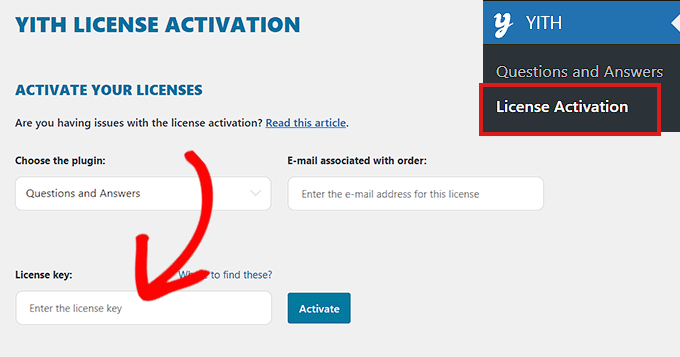
Upon activation, go to the YITH » License Activation page and enter your license key. You can find this information under your account on the plugin website.
Don’t forget to click on the Activate button after entering your license key.
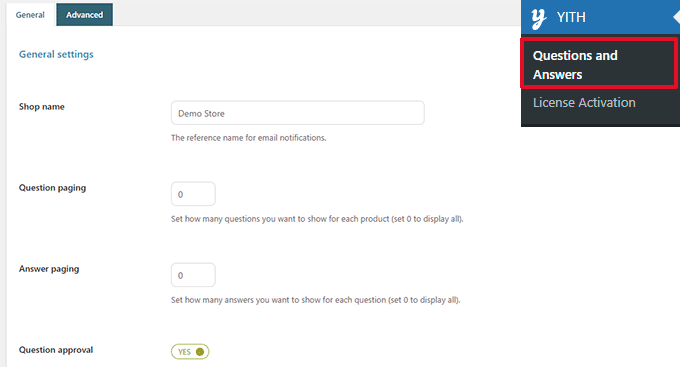
Next, you need to go to the YITH » Questions and Answers page to configure plugin settings.
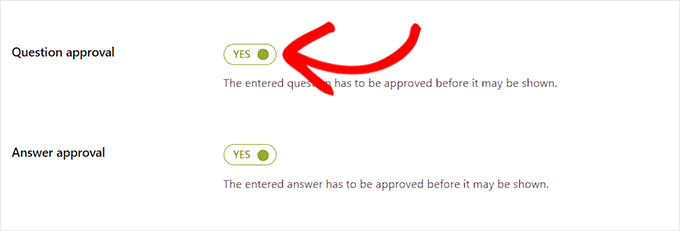
From here you need to scroll down to the ‘Question Approval’ option and simply toggle the switch to ‘Yes’.
Once you do that, the questions on the product pages will have to be approved by an administrator before they are displayed on your WooCommerce store.
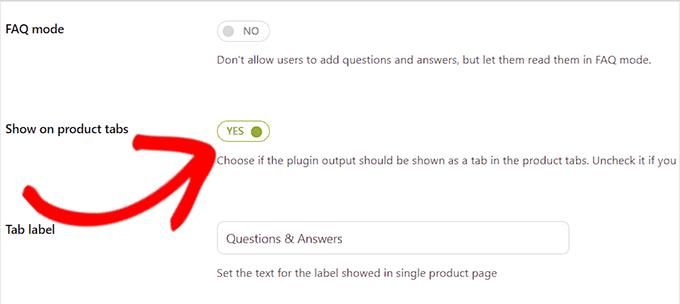
Next, you need to scroll to the ‘Show on Product Tabs’ option.
Here, you need to toggle the switch to ‘Yes’ so that the plugin will automatically add a ‘Questions and Answers’ section to product pages.
After that, don’t forget to click the ‘Save Options’ button to store your changes.
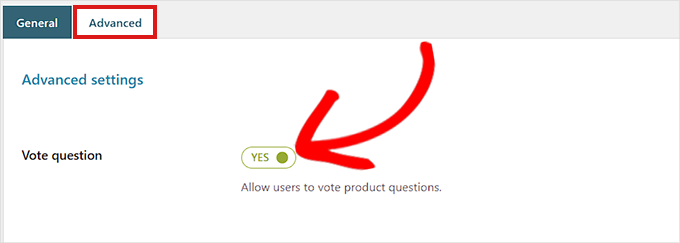
Now, you need to switch to the ‘Advanced Settings’ tab.
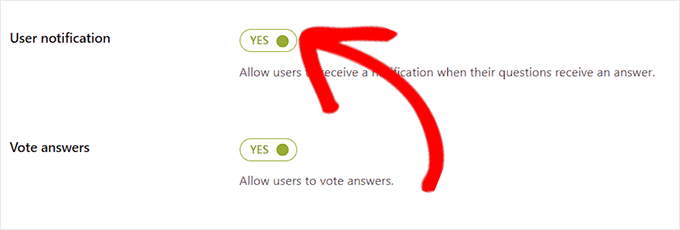
From here, simply toggle the ‘Vote Question’ switch to ‘Yes’ if you want to allow users to vote on product questions.
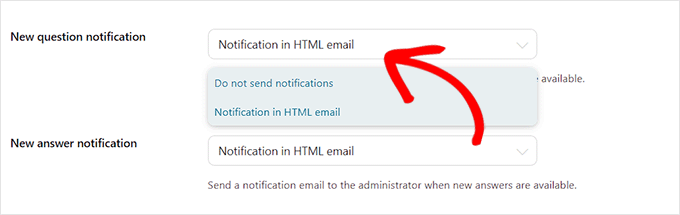
Next, you can choose if you want to get an email notification once a question is submitted on your website.
Simply select the ‘Notification in HTML Email’ option from the dropdown menu next to the ‘New question notification’ field.
Similarly, you can also choose the ‘Notification in HTML Email’ option in the ‘New answer notification’ field if you want to receive an email once a question is answered on your site.
Your user can also receive a notification once the question submitted by them is answered.
To enable this, you need to toggle the switch next to the ‘User Notification’ option to ‘Yes’.
After that, you can review other settings. The default options would work for most websites but you can change them if needed.
Finally, don’t forget to click on the ‘Save Options’ button to save your changes.
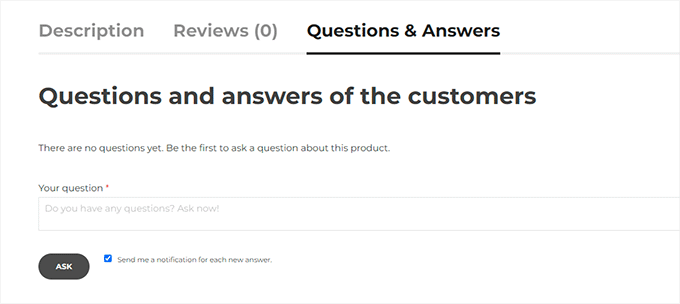
You can now visit your website to see the Questions & Answers section appear on your product pages.
From here, your customers can submit their questions.
Moderating Questions and Adding Answers
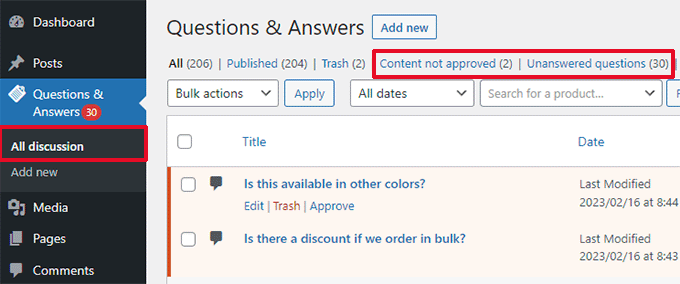
You will receive an email notification for new questions submitted by the users. You can also view them by visiting the Questions & Answers » All discussion page.
You can sort entries here by ‘Content not approved’ or ‘Unanswered Questions’.
You can also take your mouse over a question and click ‘Approve’ to make it live.
To add an answer to a question, you can simply click on the ‘Edit’ link below that question. On the edit screen, scroll down to the ‘Your Answer’ section to answer the question.
Repeat the process if you have more unanswered questions.
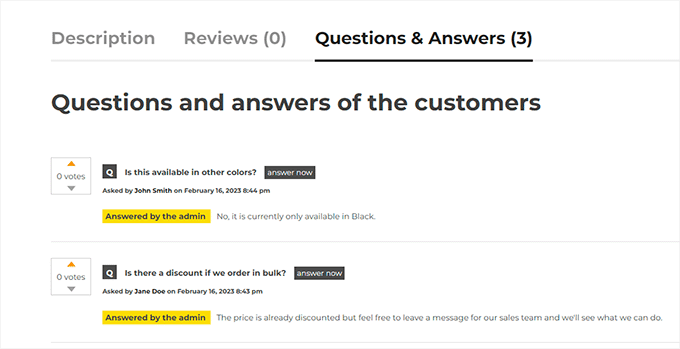
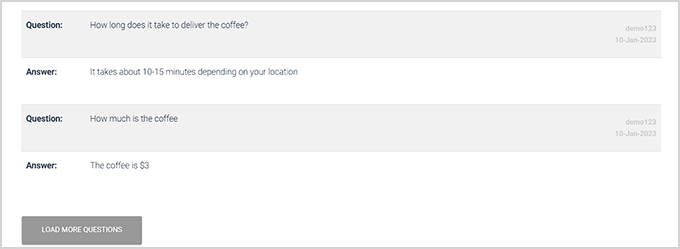
This is how the product questions and answers section looked on our demo store.
2. Adding a Product Q&A Section Using a Free Plugin
If you want to use a free plugin to add a product Q&A section to your WooCommerce store, then this method is for you.
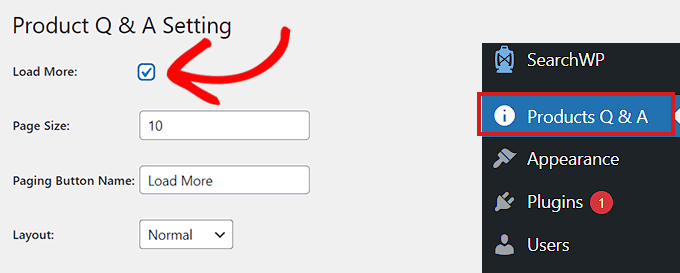
Upon activation, click the Product Q&A menu from the WordPress admin sidebar which will direct you to the ‘Product Q&A Settings’ page.
From here, simply check the ‘Load More’ option if you want to add a ‘load More’ button to your product Q&A section.
Adding this button will allow customers to load older questions and reduces the page load time if a product gets a ton of questions.
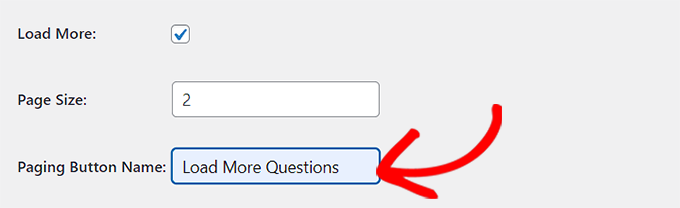
Next, you need to choose a page size.
This means that you need to select a default number of questions that are shown in your Q&A section.
All the other questions will be hidden from view. Users will be able to access those questions after clicking the ‘Load More’ button.
You can also change the text used for the ‘Load More’ button to anything you like. For instance, you can call it ‘Load more questions’.
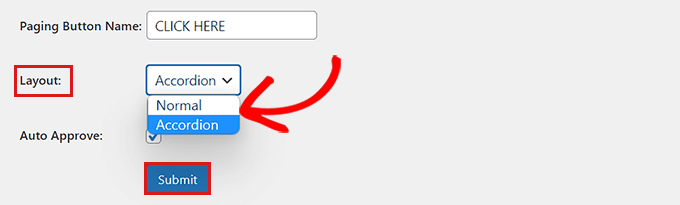
Next, you need to choose a layout for your product Q&A section from the dropdown menu next to the ‘Layout’ option.
You can choose the ‘Normal’ option if you want to display the Q&A section in paragraphs.
On the other hand, you can also display your questions as an Accordion menu. This means users will need to click on a question to view the answer.
Once finished, don’t forget to click the Submit button at the bottom to save your settings.
Managing Product Question and Answers
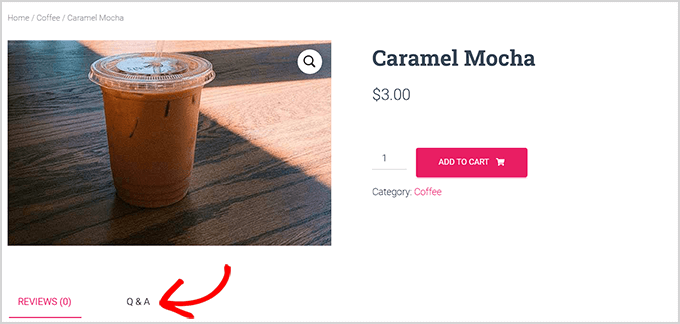
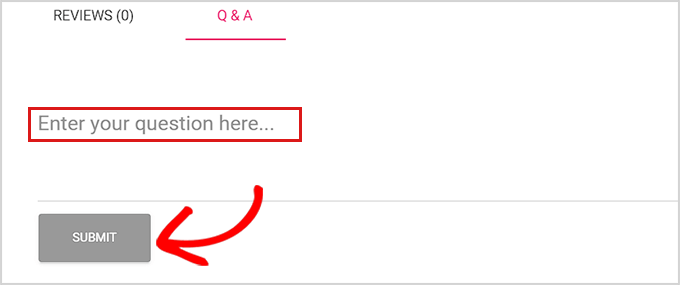
After plugin configuration, simply visit any product page on your store. You’ll notice a new Q&A tab added there.
Clicking on it will display the ‘Q&A’ section where customers can submit their questions.
You will receive an email notification when a user submits a question.
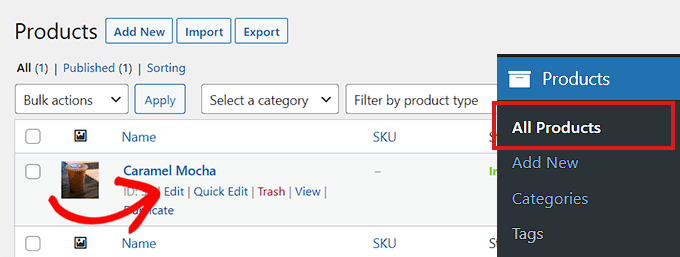
Now, to answer customer questions, you need to go to the Products » All Products page from the WordPress admin dashboard.
From here, simply click the ‘Edit’ button under a product to open up its’ ‘Edit Product’ page.
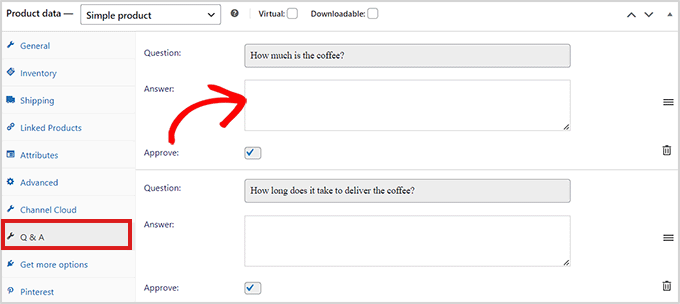
Next, you need to scroll down to the ‘Product Data’ section and click the ‘Q&A’ tab from the left column.
Here, all the questions submitted on that specific product’s page will be displayed.
Now, you need to simply type the answer to a customer query in the ‘Answer’ field.
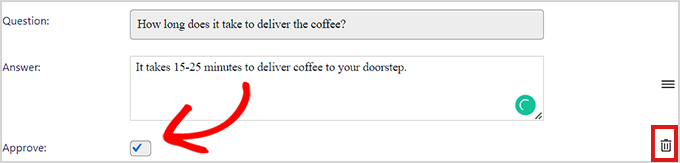
If you want to delete a question because it’s inappropriate or irrelevant to your product, then you can also do that by clicking the Delete icon on the right corner of each question.
You can also uncheck the ‘Approve’ option if you don’t want to display the question on the product page.
After you have answered the product questions, go to the top of the page and click the ‘Update’ button to save your changes.
Now, you can visit the product page to see the Questions and Answer section in action.
We hope this article helped you learn how to add product questions and answers in WooCommerce. You can also check out our top picks for the best WooCommerce plugins to grow your store, and our beginner’s guide on how to add web push notification to boost sales.
If you liked this article, then please subscribe to our YouTube Channel for WordPress video tutorials. You can also find us on Twitter and Facebook.