Want an easier way to launch your next WordPress site? If you’re a regular reader of WPLift, you know that we’re big fans of the Elementor page builder. Since we originally reviewed Elementor, we’ve seen the Elementor team add awesome features like inline editing, maintenance mode, and lots more. All that’s why we put our ... Read moreEasyThemePacks Review: Premium Elementor Templates To Replace Your Theme
WordPress has long been a popular blogging tool. It is currently the world’s most popular CMS. While WP can be used to create a wide genre of websites, it is still a very versatile and nifty solution for anyone looking to create a blog. There are lot of sellers out there providing turnkey WordPress theme ... Read morePixelgrade Club: The Netflix of WordPress Themes?
Affiliate marketing is one of the most popular ways to make money online from your blog. It allows you to add a steady income stream to your blog’s monetization strategy. In this affiliate marketing guide for beginners, we will explain how affiliate marketing works, and how to get started right away.
What is Affiliate Marketing?
By definition, affiliate marketing is a referral arrangement in which an online retailer (advertiser) pays you a commission when users purchase their product from your referral link.
Unlike other ad types which pays based on clicks or views, affiliate marketing works on a CPA (cost-per-acquisition), or CPL (cost-per-lead) basis. In other words, you only earn a commission when someone takes an action (i.e buys the product or signup for a free trial).
Because there is less risk for the advertiser, affiliate programs pay out much higher commissions to publishers compared to Google AdSense or other types of ads.
Affiliate marketing requires a more hands-on approach. You have to find a product or service that you believe will be helpful to your users. After that you have to strategically add it in your blog posts and other areas of your site, so users can purchase the product using your referral link.
How Does Affiliate Marketing / Tracking Work?
First, you have to find a company or product that you want to promote. You need to select a product or service that you believe will be relevant to your blog’s topic and useful for your audience. The product or company you choose will be called a ‘Merchant’.
Next, you have to partner up with the company by joining their partner program. This makes you their ‘Affiliate’. Some companies also use the terms associates, partners, etc.
Once you have joined their partner program (also called Affiliate Program), you will get a unique affiliate ID. You will need to use this affiliate ID in all affiliate links that you add in your website to promote the product.
You can promote the product by adding an in-depth product reviews, recommend it in your articles, display banner ads, sending an email newsletter, and more. All traffic you send to the merchant website with your unique ID will be tracked.
Once a user makes a purchase, you will earn a commission. Your payment is issued once your earnings reach a particular threshold typically 45 – 60 days.
How to Get Started with Affiliate Marketing
First, you need to make sure that you are using the right blogging platform, and you are allowed to run affiliate marketing campaigns on your website.
For example, if you are using WordPress.com, then there are some restrictions regarding the products and services you can link to. For more details see our comparison of WordPress.com vs WordPress.org.
On the other hand if you are on self-hosted WordPress.org website, then you can add any affiliate link you want and efficiently manage your affiliate campaigns.
If you haven’t created a website already, then you can get started right away. Simply follow the instructions in our step by step guide on how to start a blog, and you’ll be up and running in less than 30 minutes.
Next, you need to let your users know how you make money from your website by adding a disclosure page. See WPBeginner’s disclosure page and feel free to use it as a template.
You will also need to add a privacy policy and terms of service page to your blog.
These are amongst the must have pages for every WordPress blog. They not only save you from legal issues in the future, but they also help you build trust with your audience.
Finding Affiliate Products and Services to Promote
There are many ways to find products and companies that you can partner up with as an affiliate. Here are some of the easiest ways to find the products you can promote.
1. Become an affiliate for products you already use
First, you need to look at the products and services that you already use and find useful. This makes it easy for you to convince your users about the product since you already know the pros and cons.
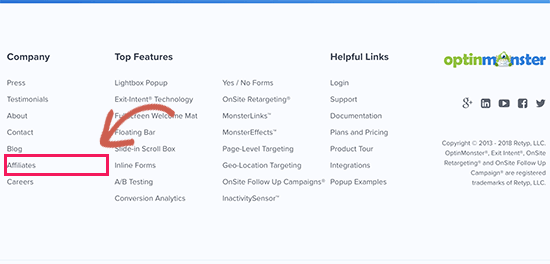
Next, you need to go to the product’s website and search for terms like ‘Affiliate program’, ‘Partners’, or ‘Affiliates’. Many companies are actively looking for affiliate marketers to promote their products that’s why they add a link to their affiliate page in their website’s footer.
2. Look for products other blogs are recommending
Another way to find products is by looking at other blogs similar to yours. You will be able to find many similar blogs that are using affiliate marketing to make money.
But how do you know that they are promoting affiliate products?
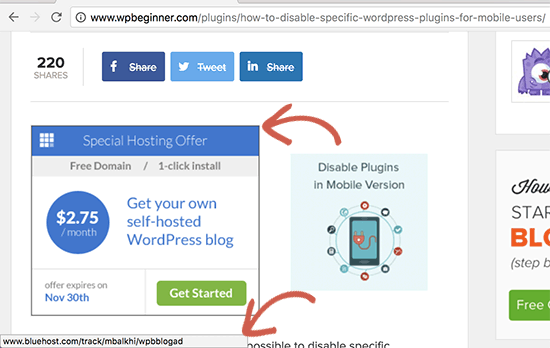
First, look for the obvious and easily noticeable banner ads on their website. Take your mouse to the banner ad, and you will see a link in your browser’s status bar.
This link will usually have an affiliate ID. Affiliate ID helps merchants track which affiliate partner is sending them traffic / sales.
Sometimes these links may look like internal links, but when you click on them they will take you to a product website with affiliate marketer’s ID in the link. You will also find similar affiliate links through-out their content.
3. Join Bigger Affiliate Networks
Another way to find products to promote is by joining affiliate networks. These websites act as a middleman between affiliate marketers and merchants.
You will notice that many products and companies that you want to partner with already use an affiliate network. This helps you quickly find a lot of products that you can start promoting on your website.
4. Reach out to Companies
If you really want to promote a product but can’t find any information about their affiliate program, then you can simply ask them via email.
Some companies may not be actively promoting their affiliate program. If they have an affiliate program, then they can invite you to join.
What are Affiliate Networks? Why You Should Join Them?
Affiliate networks act as a middleman between you (the affiliate marketer) and merchants (companies that want to sell their products).
For merchants, they provide their platform as a service to list their products, track affiliate traffic, manage affiliates, and send payments.
For affiliate marketers, they offer an easy to use platform to search for products, sign up as an affiliate, track your campaign performance and earnings.
Following are some of the most popular affiliate networks that you can join.
ShareaSale – One of the largest affiliate networks with many high-paying affiliate products for almost every category imaginable. Popular WordPress hosting company, WPEngine, uses ShareASale to manage their affiliates. WPEngine’s Affiliate program offers a very generous payout to their affiliate partners.
CJ Affiliate (Formerly, Comission Junction) – Another top affiliate network with a huge number of merchants and products neatly organized in categories and easily searchable. Companies like GoDaddy, Expedia, and many others use CJ.
ClickBank – This is a large online marketplace for selling digital products in various categories from different vendors. It is easy to use and has tons of learning resources for new affiliate marketers.
Amazon Associates – Amazon is world’s largest ecommerce store with millions of products. You can sign up for their affiliate program and start earning by sending people to a website they already use for their online shopping.
Which affiliate networks should you join?
You should join affiliate networks that have the products you want to promote. You can join multiple affiliate networks for different products. We use all the above networks and few others.
Make sure that you always check the network program policies. You also need to review program policies of individual products and merchants. This will give you a clear idea about your earnings, payments, additional incentives, and more.
Affiliate Marketing Tips to Increase Earnings
Now that we have covered the basics, let’s dive into some more tips on how to actually make money from affiliate marketing.
1. Choose good products and companies to promote
As an affiliate marketer, you don’t have control over the future of products that you are recommending. That’s why you need to make sure that you are recommending the best products from reputable companies.
The best way to do this is by recommending the products and services that you have actually used. If you want to recommend a product that looks useful, then feel free to contact them to learn more.
If you ask nicely, most companies will gladly offer you a free account or copy to review / test their product or service.
2. Offer highly useful and valuable content
You can add affiliate links and banners anywhere on your WordPress site. However, simply adding links will not result in convincing your users to actually buy those products.
You need to convince your users by offering useful and valuable information about the product. Many affiliate marketers do that by writing in-depth product reviews, video reviews, product comparisons with pros and cons, and more.
3. Keep your audience in mind
Keep your website’s audience and their interests in mind when choosing the product. For example, if you run a fashion blog, then you would want to promote fashion accessories, clothing, and similar products that your audience would want to buy.
You also need to make sure that you are not just recommending products because they are offering higher commissions. If a user buys a product based on your recommendation, and it doesn’t turn out useful, then they will never trust your recommendations again.
Affiliate Marketing Plugins and Tools for WordPress
As your blog grows, you will be recommending a lot of different products. This will make it difficult for you to manage all the affiliate links, banners, and ads spread all over your website.
Luckily, there are excellent affiliate marketing tools and plugins for WordPress that you can use to help with management.
Manually adding links to your content becomes quite difficult as your site grows. You will have to copy the URL with your affiliate ID every time you mention the product and paste it into WordPress.
It also lets you change lengthy affiliate links into cloaked pretty links which are more user-friendly.
ThirstyAffiliates also has the option to automatically replace keywords with affiliate links which can significantly help you boost your affiliate revenue.
AdSanity is the best WordPress ad management plugin and a must-have for every affiliate marketer’s toolbox. It allows you to create banner ads from your WordPress site and manage them from a single dashboard.
AdSanity also makes it easy to insert ads into your WordPress posts, pages, and sidebar widgets. You can use it to manage your third-party ads like Google AdSense ads and banners as well. For detailed instructions, see our guide on how to manage ads in WordPress with AdSanity.
MonsterInsights is the best Google Analytics plugin for WordPress. It allows you to see where your users are coming from and what they do when they are on your website.
We hope this ultimate affiliate marketing guide for beginners helped you learn how to become an affiliate marketer. You may also want to see our ultimate WordPress SEO guide to bring more visitors to your website.
If you liked this article, then please subscribe to our YouTube Channel for WordPress video tutorials. You can also find us on Twitter and Facebook.
Remember how organized your WordPress admin dashboard was when you first installed WordPress? It looked so clean. So sleek…until you started adding content and installing plugins. Then, things can start to get a little messy, right? Admin Columns brings some order and flexibility back to your WordPress admin screens by letting you manage the exact ... Read moreAdmin Columns Review: Manage Columns In WordPress Admin Screens
Do you want to enable customer tracking in WooCommerce?
Customer tracking allows you to offer a personalized shopping experience based on customer behavior in your eCommerce store.
In this article, we will show you how to easily enable customer tracking in WooCommerce with Google Analytics.
Why Enable Customer Tracking in WooCommerce with Google Analytics?
Google Analytics allows you to see where your visitors are coming from and what they do on your website. In other words, it helps you track your traffic sources as well as user engagement on your website.
For eCommerce platforms, Google Analytics offers an enhanced eCommerce tracking feature. This allows you to better understand users’ shopping and checkout behavior. Plus, you can see which products perform the best and track your WooCommerce store’s sales performance.
By default, a WooCommerce store allows your customers to create an account or checkout as guest users. Creating an account helps the user save their shipping and billing information for faster checkout next time. It also helps you offer customers a personalized shopping experience based on their browsing and shopping history.
Wouldn’t it be great if you could track logged-in users with their user IDs in Google Analytics and also see the path customers took before making a purchase?
This will give you access to a treasure trove of information and insights on customer behavior. You can use it to offer a better on-site experience and boost your sales.
Let’s take a look at how to easily enable customer tracking in WooCommerce. Here are quick links that you can use to jump ahead to any section:
Set up Ecommerce Tracking in WordPress with Google Analytics
The best way to set up WooCommerce customer tracking in Google Analytics is using Monsterinsights. It is the best Analytics solution for WordPress and helps you set up tracking without editing code.
The plugin offers an eCommerce addon, which automatically detects WooCommerces and starts tracking customer behavior in Google Analytics. It also comes with a Customer Journey addon that allows you to see users’ behavior before they make a purchase.
First, you will need to install and activate the MonsterInsights plugin. For more details, see our step-by-step guide on how to install a WordPress plugin.
You will need to be on the ‘Pro’ plan to access the eCommerce and User Journey addon, which we will use for this tutorial. However, there is also a MonsterInsights Lite version you can use for free.
Upon activation, you will see the welcome screen and the setup wizard. Simply click the ‘Launch the Wizard’ button and follow the on-screen instructions.
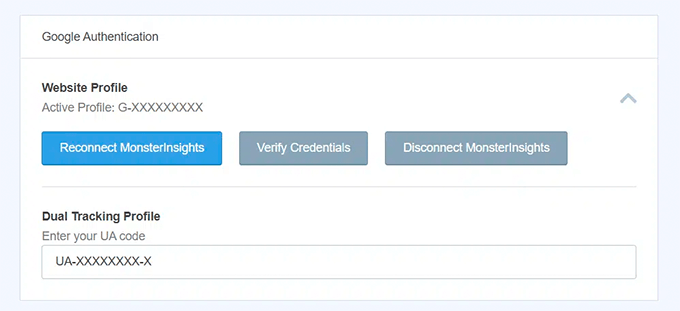
MonsterInsights also helps you set up Google Analytics 4 (GA4) property through its Dual Tracking feature. GA4 is the latest Analytics version, and it will soon replace Universal Analytics.
If you haven’t created a Google Analytics 4 property, then now is the best time. That’s because, after July 1, 2023, Universal Analytics will sunset and won’t track your website data. Setting up GA4 after the sunset date will mean you’ll have to start from scratch and won’t have any historical data for comparison.
Once you’ve configured Google Analytics on your website, the next step is to install the eCommerce addon.
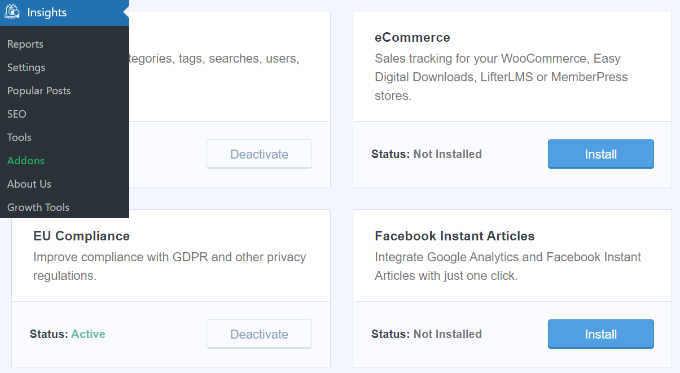
You need to visit the Insights » Addons page from your WordPress dashboard and navigate to the ‘eCommerce’ addon. Simply click the ‘Install’ button, and the addon will automatically activate.
Enable Enhanced Ecommerce Tracking in Google Analytics
The next step is to enable eCommerce tracking in Google Analytics. E-commerce tracking is not enabled by default in your Google Analytics account, and you will have to manually enable it.
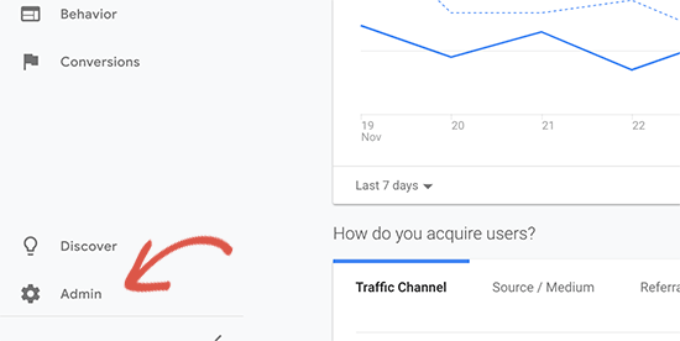
First, you’ll need to head over to your Google Analytics account dashboard and click the Admin option.
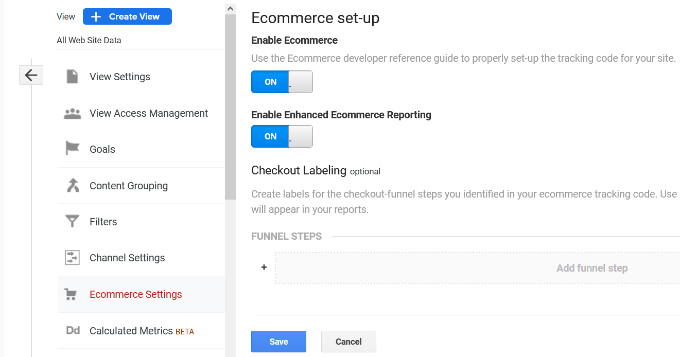
Next, you need to click on the ‘Ecommerce Settings’ option.
It is located under the View column.
On the settings page, click the slider under Enable Ecommerce and Enable Enhanced Ecommerce Reporting to turn it on.
Don’t forget to click the ‘Save’ button when you’re done.
Now, your Google Analytics account will start showing enhanced eCommerce reports for your WooCommerce store.
Now that you’ve set up WooCommerce tracking in Google Analytics, the next step is to enable the MonsterInsights Customer Journey addon.
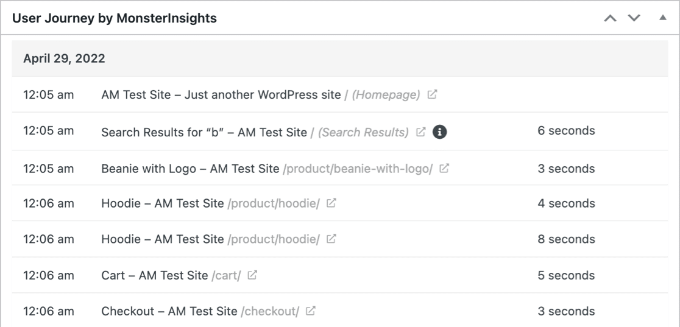
The addon will allow you to see the steps a customer takes before making a purchase in WooCommerce. Plus, it also shows the time it took at each step, the pages a user visited, and more.
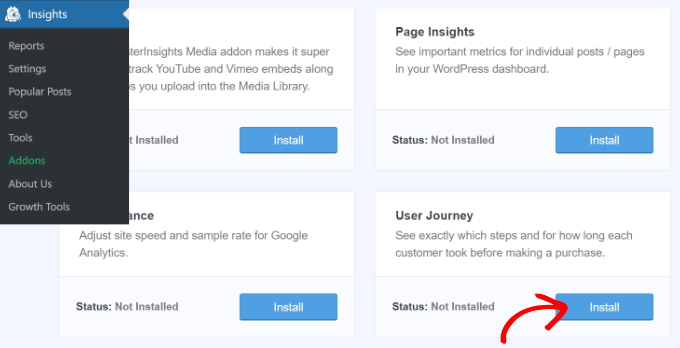
First, you’ll need to go to Insights » Addons from your WordPress admin panel. Next, navigate to the User Journey addon and click the ‘Install’ button.
The addon will automatically activate and start tracking your WooCommerce customer’s journey.
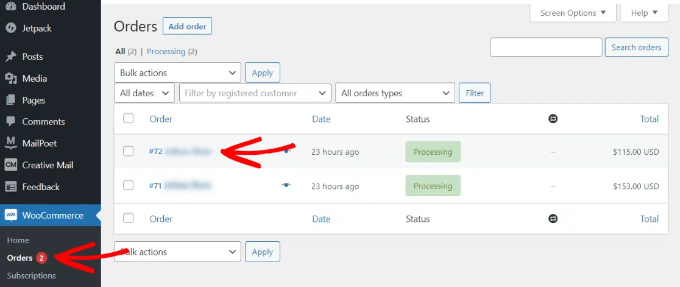
Next, you can go to WooCommerce » Orders from your WordPress dashboard to view the path your customers took when purchasing a product.
After that, click on the order for which you’d like to see the user journey.
On the next screen, you’ll see the path a customer took before buying the product. You get to view the pages they visited, where they clicked, and how much time they spent on a page.
This is really useful information to better understand your customers. You can see which product categories are performing the best and where customers are exiting your store during the purchase process. Using the data, you can then fix these issues and optimize your site for more conversions.
Enabling User ID Tracking in Google Analytics
While MonsterInsights makes it very easy to track customers on your WooCommerce store, it also tracks WordPress ID tracking in Google Analytics.
WordPress ID is a unique ID to identify every user on your website. The user ID is called the ‘Client ID’ in Universal Analytics and the ‘App Instance ID’ in Google Analytics.
Do remember that enhanced eCommerce tracking will enable eCommerce reporting features for your WooCommerce store. However, it does not enable user tracking by default.
Let’s take a look at how you can enable user ID tracking in Universal Analytics and Google Analytics 4.
Enabling Customer Tracking in Universal Analytics
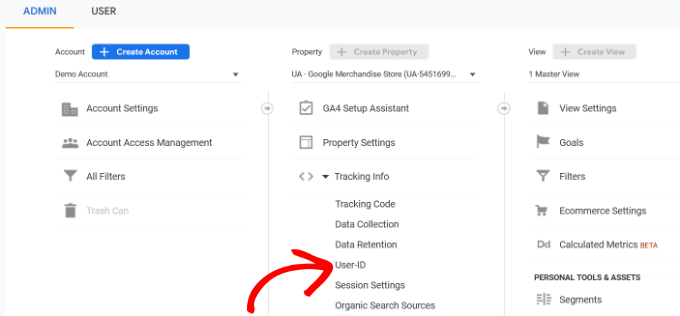
To enable individual customer tracking, you need to visit your Google Analytics account dashboard and open the Admin page.
Now, click on the ‘Tracking info’ link under the Property column to expand the submenu.
After that, you can click the User-ID link that appears below.
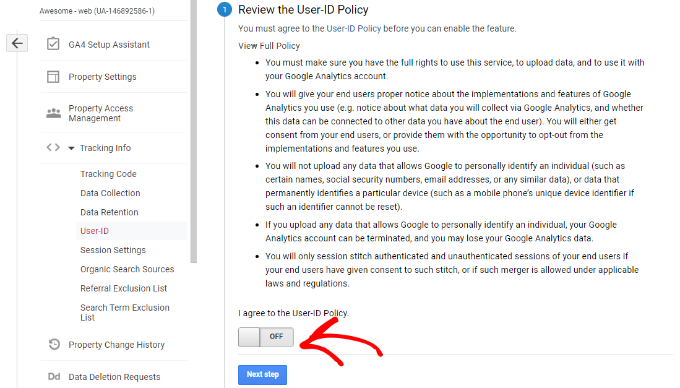
On the next page, you’ll have to review and agree to the User-ID policy.
Simply click the ‘I agree to the User-ID Policy’ toggle to turn it on.
From here, click on the ‘Next step’ button to continue.
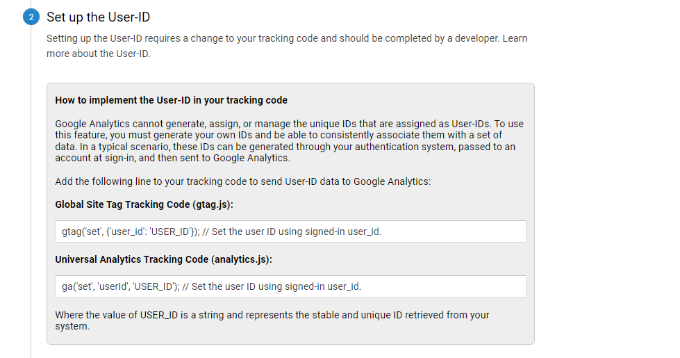
Google Analytics will now ask how you would like to configure the user-ID tracking.
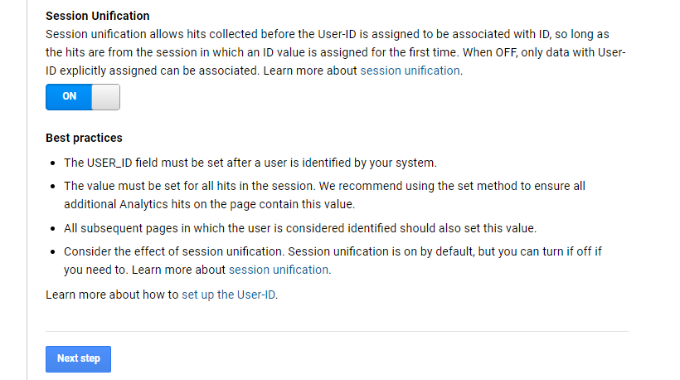
Since you’ll be using MonsterInsights, there’s no need to set up the user-ID tracking code. The plugin will take care of this for you.
Simply scroll down and click the ‘Next step’ button to continue.
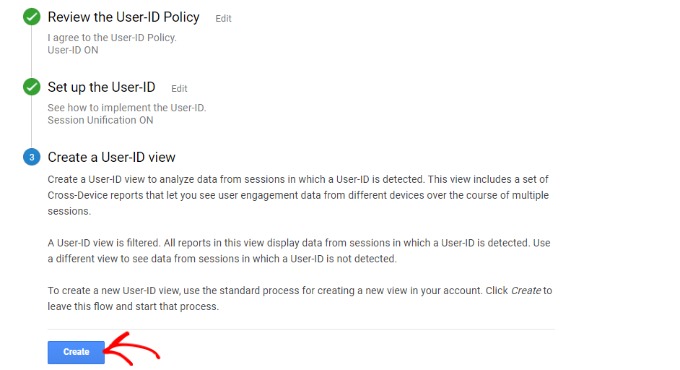
Next, you will see information about creating a user ID view in Google Analytics.
Go ahead and click the ‘Create’ button.
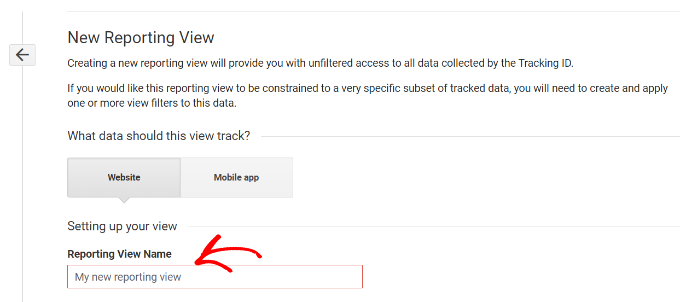
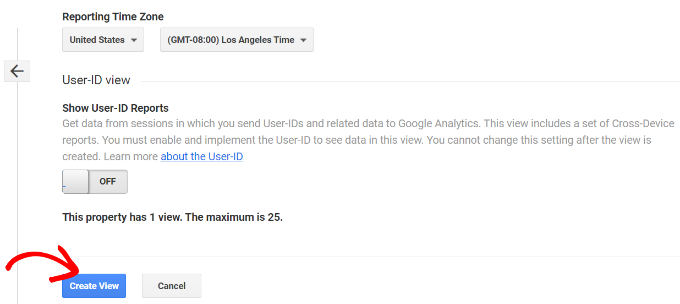
After that, you will be asked to enter a ‘Reporting View Name’, which will be used to display User ID reports.
We recommend including UserID in the name, so it is easy to remember which view has UserID tracking enabled.
There is also an option to select the Reporting Time Zone.
Next, you just need to scroll down to the bottom and click on the ‘Create view’ button to save it.
Enabling Customer Tracking in Google Analytics 4
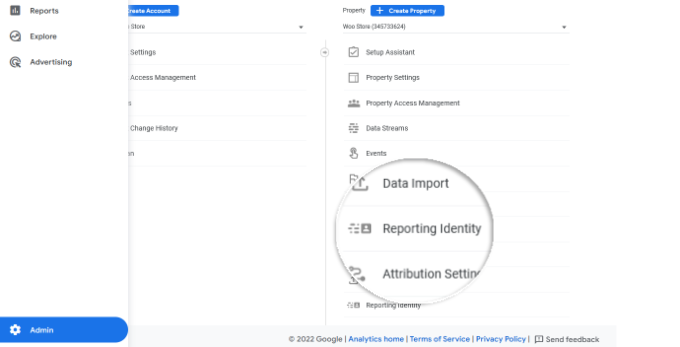
To start, you’ll need to go to the Admin settings from your GA4 dashboard and click the ‘Reporting Identity’ option.
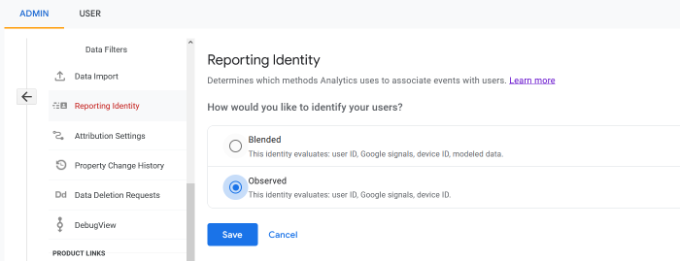
On the next screen, you will need to select a way to identify users on your online store.
GA4 uses multiple ways to identify customers. These include user ID, Google signals, device ID, and modeled data. For the sake of this tutorial, we’ll select the ‘Observed’ option and click the ‘Save’ button.
Viewing Customer Tracking Reports in Google Analytics
Now that everything is set up, Google Analytics will now track all your website customers. It will also be able to track logged-in users with their unique WordPress user ID.
View User ID Data in Universal Analytics
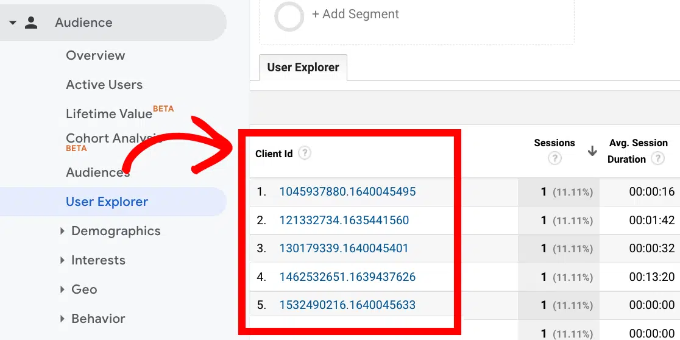
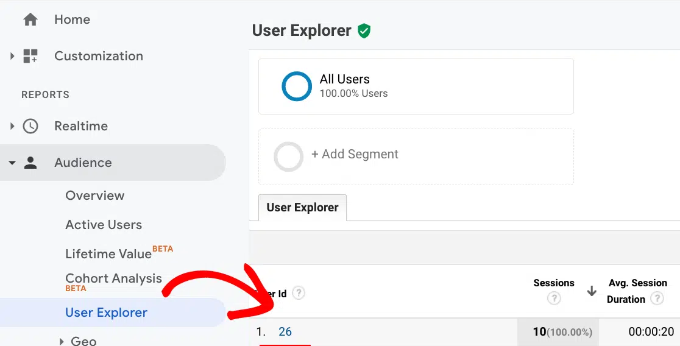
To view all your individual customer activity, you can go to your Universal Analytics account and click on the Audience » User Explorer menu.
You will see individual customer reports with a unique ID assigned to all non-logged-in users.
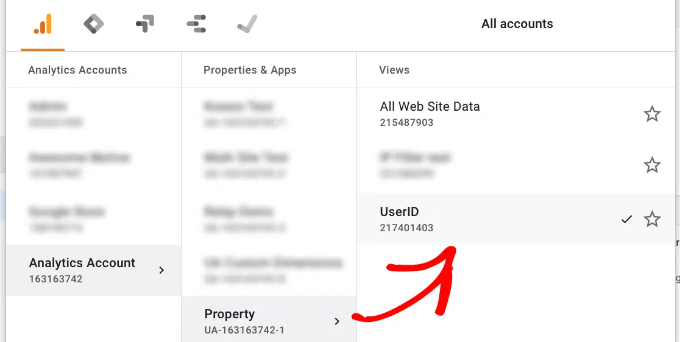
To view customer tracking reports for logged-in users in WooCommerce, you need to click on the Google Analytics logo on the top left corner of the screen.
This will show all your Google Analytics profiles. You will see your website profile and under ‘All website data’ you will see the UserID reporting view you created earlier.
Go ahead and click on the UserID reporting view to load it.
Once it’s loaded, you need to click on the Audience » User Explorer menu. This way, you will see a logged-in customer tracking report where each user is represented by their WordPress user ID on your website.
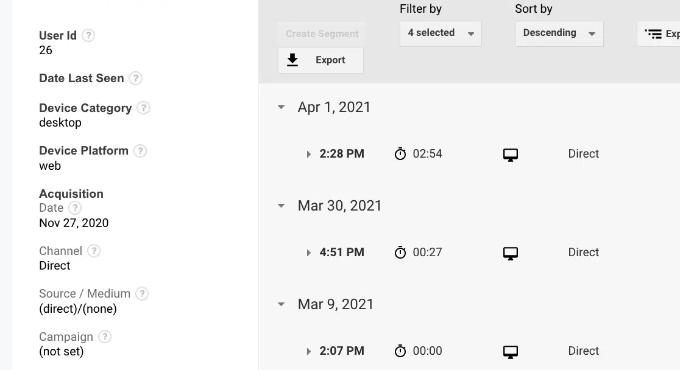
You can click on the user ID to view a customer’s individual tracking data.
For instance, the device category they use, acquisition date, the channel they used to arrive on the online store, and more.
View User ID Data in Google Analytics 4
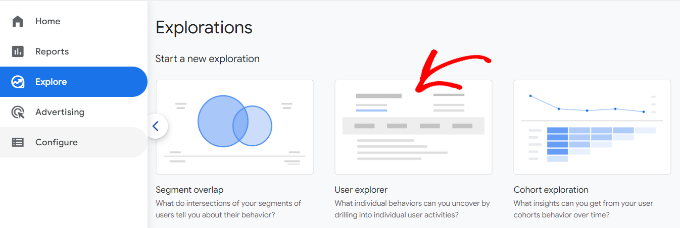
In Google Analytics 4, you’ll need to head to the ‘Explore’ tab from the menu on your left.
Under Explorations, you’ll see different report templates. Simply click the existing ‘User explorer’ report.
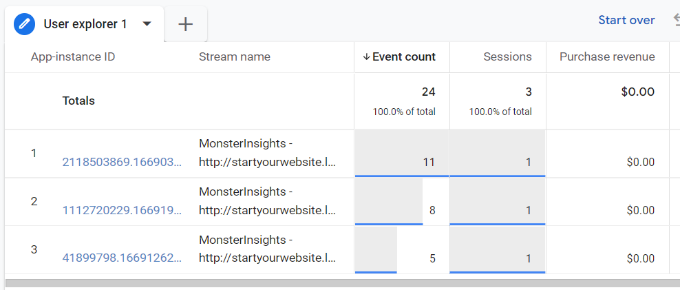
Next, you’ll see the User explorer report in Google Analytics 4.
One thing you can notice is the Client ID will be replaced with the App instance ID.
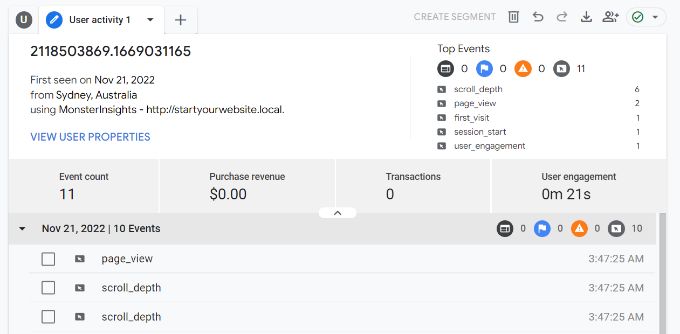
You can click on any of the app instance IDs to view more details.
For example, the report shows the total events that were triggered, the location of the user, the time stamp for each event, and more.
Matching Customer Tracking with Their WordPress Accounts
Now that you’ve identified users in Google Analytics, you can match them with WordPress accounts. This will help you know who this customer is, and how you can create personalized offers, emails, or shopping experiences for them.
First, you need to note down the customer ID you see in your Google Analytics User-ID reporting view.
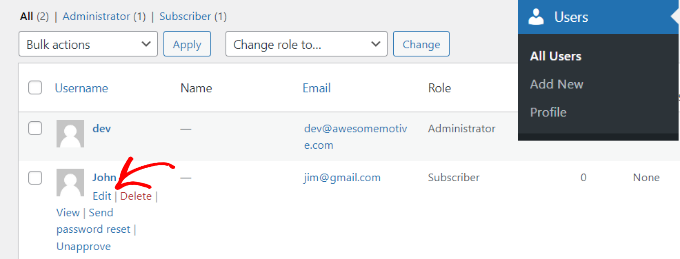
After that, go to your WordPress website’s admin area and click on the ‘Users’ menu. It will show you a list of all users on your WordPress site.
Next, you can click the ‘Edit’ link below any username in the list.
WordPress will now open the user profile for you.
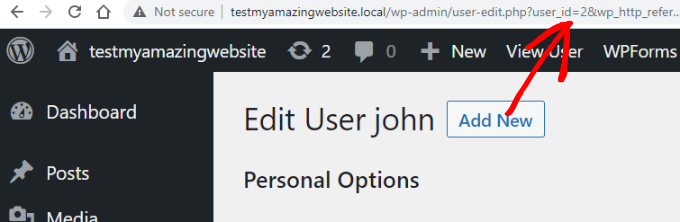
If you look in your browser’s address bar you will ‘user_id’ parameter in the URL.
Next, you need to replace the value next to user_id with the one you copied from your Google Analytics report and press enter key on your keyboard.
WordPress will now load the user profile associated with that particular User ID. You now have the customer’s name, username, email address, and social media information. You can also track their orders, product views, cart activity, and more.
We hope this article helped you learn how to enable customer tracking in WooCommerce with Google Analytics. You may also want to see our expert pick of the best free WooCommerce plugins for your online store and how to get a free email domain.
If you liked this article, then please subscribe to our YouTube Channel for WordPress video tutorials. You can also find us on Twitter and Facebook.
Do you want to connect your website to Yandex webmaster tools? Webmaster tools like search engine console from Google and Bing webmaster help you optimize your site, monitor the traffic, manage robot.txt, check site errors and more. In this article, we will share how to add your WordPress site in Yandex webmaster tools to monitor your search engine traffic.
What is Yandex?
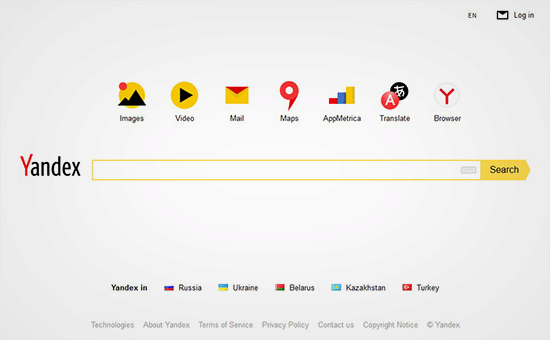
Yandex is a popular search engine like Google and Bing based in Russia. You can optimize your site for SEO in Yandex to get more visitors from Russia.
Yandex has a range of tools like generalized search engine, image search, email, videos, maps and more. It also has webmaster tools to help you rank your site, monitor traffic stats, search queries, keywords, and more.
Before we start, you would need a Yandex Webmaster tools account to connect your site. Once you have created your account, you can login to your WordPress site to configure Yandex webmaster tools with Yoast SEO plugin.
Let’s take a look on how you can add your site in Yandex webmaster tools and start optimizing it right away.
Step 1: Create an Account at Yandex
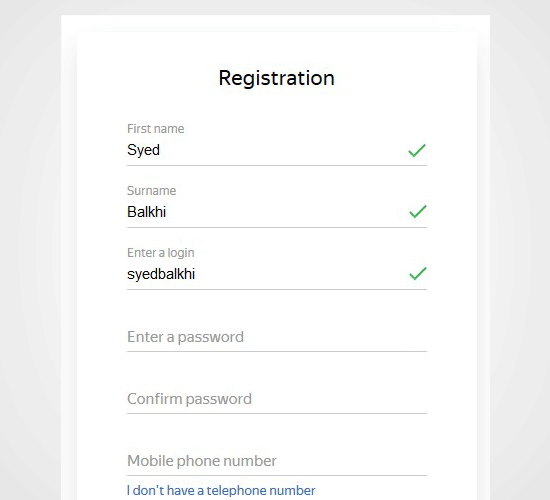
First thing you need to do is login to your Yandex webmaster tools account. If you don’t have a Yandex account, then you can create one using this link.
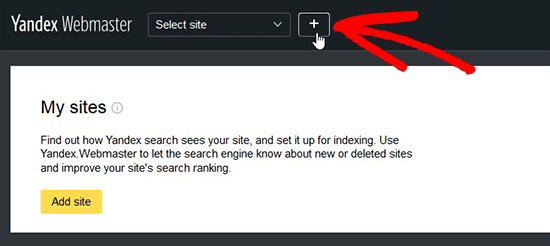
After creating the account, you’ll see the Yandex Webmaster page. On this page, you need to click on the ‘+‘ button in top bar to add your site in Yandex.
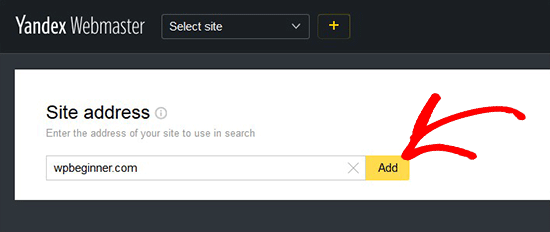
In the site address field, you need to add your website’s full domain name and click on the Add button.
Note: If your main domain uses ‘www’ in the URL, then you need to add it before the domain (for example www.wpbeginner.com)
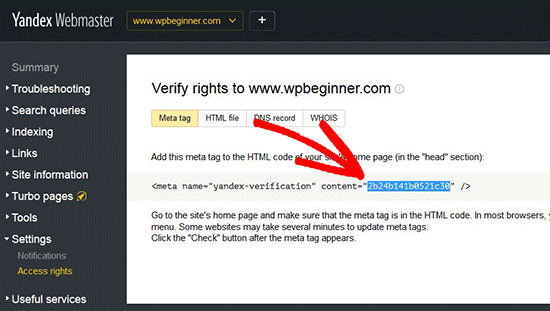
On the next page, you will be asked to verify website ownership by adding meta content in your WordPress site. Go ahead and copy the content code from this page because you will need it in Step 2.
Step 2: Login to WordPress Admin Area and Add the Code
Now you need to login to your WordPress admin area and add the verification code in the Yoast SEO webmaster settings.
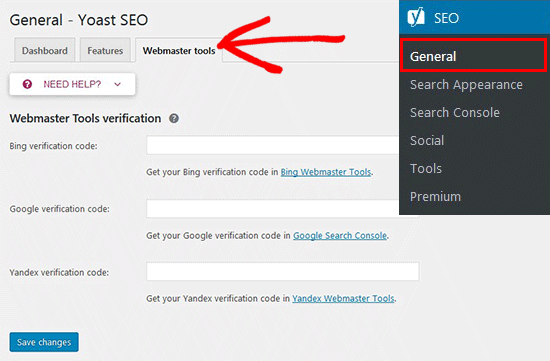
Simply head over to the SEO » General area and click on the Webmaster tools tab.
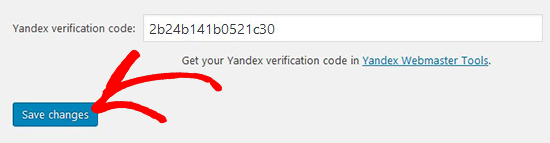
Next, you need to paste the code in the Yandex verification code field and click on the Save Changes button.
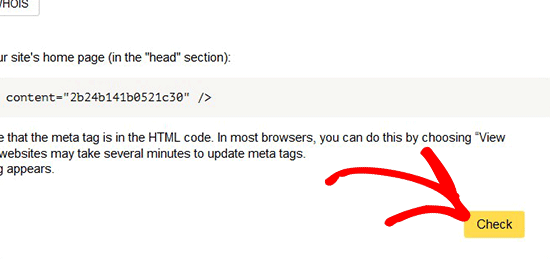
After adding the code in your WordPress site, you need to go back to the Yandex Webmaster tools page where you copied the code from and click on the Check button to verify ownership.
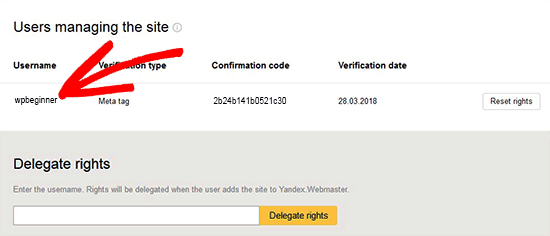
After successful verification, it will show your username that has the rights to manage your site in Yandex Webmaster tools. You can also delegate the rights to other users by adding their username and clicking on the Delegate rights button.
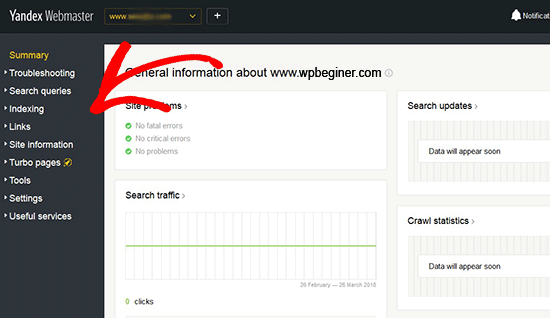
Now that your site is verified and added in Yandex Webmaster tools, you can see traffic stats, search errors, search queries, internal and external links, site information, robot.txt analysis, audit pages for mobile, and more on the Yandex dashboard. You can use the menu on left side of the screen to find any information that you may need.
Yandex Webmaster tools have options for site optimization that are filtered from troubleshooting to important settings like robot.txt and .htaccess. You can further optimize your robot.txt for SEO separately and regularly perform WordPress maintenance tasks to keep your site up to date.
We hope this article helped you learn how to add your WordPress site in Yandex webmaster tools. You may also want to see our list of best WordPress SEO plugins and tools that you should use to rank your site in search engines.
If you liked this article, then please subscribe to our YouTube Channel for WordPress video tutorials. You can also find us on Twitter and Facebook.
In last week’s news, we shared that WordPress 4.9.5 was going to bring a new prompt for users to install Gutenberg. Well…that prompt got pushed back. But we still saw WordPress 4.9.5 drop this week to take out 25 different bugs. Delicious Brains also released news about an awesome new Blockchain project on April 1st ... Read moreWeekly WordPress News: WordPress 4.9.5 Is Here!
Are you looking for the best WordPress survey plugin for your website? Surveys allow you to collect user feedback, so you can use it to improve your business. In this article, we will compare the best WordPress survey plugins in the market.
What to Look for in a WordPress Survey Plugin?
There are many ways you can collect user feedback on your website. You can add a contact form, create polls, ask users to leave comments, and more.
Adding a survey is a little bit more involved than that. You need to make it engaging, fun, and easy to get maximum user participation.
A good survey plugin makes your form look great, and it’s easy to use. Reporting is crucial for surveys. That’s why you need to make sure that you can store user submitted data with an option to export it, so you can use it in a spreadsheet or a CRM software.
You also need to consider how you want to share the survey results. If you want to display the results on your website, then you will need a plugin that lets you embed survey results in a beautiful format.
That being said, let’s take a look at some of the best WordPress survey plugins and how they handle all these features.
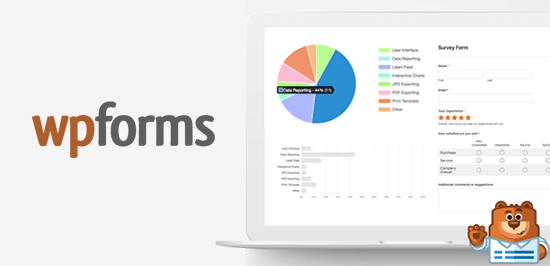
WPForms is the best WordPress contact form plugin on the market. It comes with a powerful surveys and polls addon which allows you to quickly create highly engaging survey forms.
You can combine the surveys and polls addon with other powerful WPForms features like conditional logic, multi-page forms, custom notifications, email integration, and more.
You can convert any form into a survey by simply clicking a checkbox. You can add any form field to your survey with a click including text, checkboxes, radio buttons, ratings, and the Likert scale field.
The best part about WPForms surveys is the reporting section. WPForms automatically creates beautiful reports with graphs and charts based on survey responses. You can show survey results on any WordPress page with a shortcode or redirect your users to the results page after they fill the survey.
You have the ability to export beautiful survey graphs as images to share on social media or your powerpoint presentations. You can also print the reports to include in your proposals or pitches.
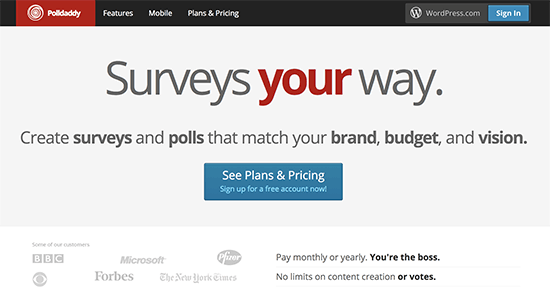
Polldaddy is a famous WordPress polls and survey plugin. It is not a contact form plugin and unlike some other plugins in the list will not be suitable for purposes other than polls and surveys.
It is available as a free plugin, but you’ll need a WordPress.com account to get the API key. The free version is limited in terms of features and will also add Polldaddy logo to your survey form.
Polldaddy is easy to use with a drag and drop tool to create your survey and polls. You can change survey sharing settings, results sharing, and styling options for each survey you create. It also includes captcha to block spam and some basic IP filtering to prevent multiple responses.
Gravity Forms is one of the oldest WordPress form plugins which comes with many add-ons including one to create surveys. It is easy to use, and you can create any kind of form using the form builder with many common form fields including a survey field.
However, the survey results can only be viewed inside the admin area, and there are no charts / graphs. You can export survey results to a CSV file and display the results on your website using a WordPress tables plugin.
Note: You will need at least the Elite plan to access the survey addon.
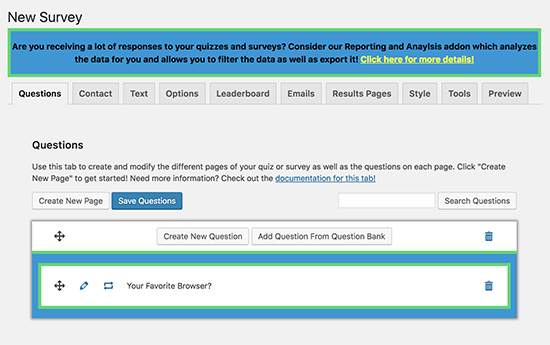
As the name suggests, Quiz and Survey Master is designed to help you add quizzes and surveys to your WordPress site. It doesn’t have the friendliest user interface, but it is well documented and comes with many useful features.
The base free plugin allows you to create surveys with all common form fields, and you can even create multi-page surveys. You can also use it to add quizzes in WordPress with interactive answers, leaderboards, and scoring.
The plugin can also send emails after completion of the survey to thank users or redirect them to any page on your WordPress website. For reporting and analysis, you will need to separately purchase a premium add-on.
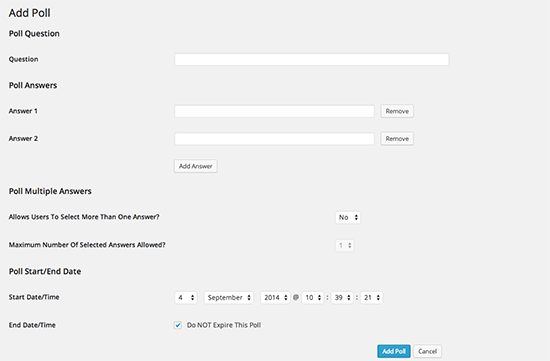
If you are looking for a simple poll solution for your users to participate, then WP-Polls is an easy free option. Unlike other plugins on this list, it doesn’t have a form builder, and you can only use radio buttons or checkboxes to collect responses which makes it quite limited.
Users are automatically shown poll results after they cast their vote. It saves user responses in the logs where you can see how registered users voted. For non-registered users, you can see IP addresses to filter out duplicate votes.
We hope this article helped you find the best WordPress survey plugin for your website. You may also want to see our guide on how to track user engagement in WordPress using Google Analytics.
If you liked this article, then please subscribe to our YouTube Channel for WordPress video tutorials. You can also find us on Twitter and Facebook.
Need to create a restaurant website? If so, WordPress is an awesome solution that can do everything you need it to do, while still giving you the flexibility to make the exact changes that you want (that’s not always the case with Squarespace!). In this post, I’m going to lay out everything that you need ... Read moreHow To Create A Restaurant Website With WordPress: What You Need
Are you getting a lot of spam comments on your WordPress blog? Spam comments can become a big issue as your website grows. In this article, we will share how to use the Antispam Bee plugin to block spam comments in WordPress.
Why You Should Block or Delete Spam Comments?
Spam comments take up unnecessary space in your WordPress hosting database. What’s worst is if you accidentally approve a spam comment, then it makes your brand look bad.
There are multiple ways to block spam comments in WordPress. You can do it manually by reading and deleting them one by one, but that could take hours.
Alternatively, you can use the free Antispam Bee plugin to automatically block the spam comments based on the rules that you set.
Let’s take a look at how to block spam comments in WordPress with Antispam Bee plugin.
Once activated, you need to go to the Settings » Antispam Bee page in your WordPress admin area.
On this screen, you will see the Antispam Bee settings divided in three sections: Antispam Filter, Advanced tools and More options.
Antispam Filter
Antispam Filter settings are the basic settings that help you detect spam comments. This allows you to filter and review the comments before they show on your blog posts or website.
These settings are organized in an order which they execute. We have explained each setting in the descriptions below.
Trust approved commenters
You can enable this option to automatically approve comments from regular and trustworthy commenters. These commenters may post valid comments and generate conversations on your blog posts, so the plugin remembers them and approve their comments right away.
Trust commenters with a Gravatar
This setting will allow you to approve comments from users with a specific Gravatar image and posting valid comments. It is the same technique as approved commenters, but with this setting the plugin will remember the Gravatar of the trustworthy comment makers.
Consider the comment time
If enabled, the filter will considers the comment time. This setting is not recommended by the plugin author for blogs or websites using page caching.
BBCode is spam
It is a recommended setting to check comments with BBCode (Bulletin Board Code) links and mark them as spam. These links format are widely used by spammers to highlight words and links.
Validate the IP address of commenters
The plugin allows you to validate the IP addresses used by the commenters to check their network information like hostname. This helps in finding the online background of the commenter to decide if the comment is useful or spam.
Use regular expressions
If enabled, it helps in finding the unwanted comments with a set of predefined patterns that are useful to detect spam.
Look in the local spam database
If you check this option, it will look for the spam content on your site’s database and then treat it as you define further settings for the spam.
Use a public antispam database
This setting is linked with the Stop Forum Spam to detect IP addresses of active spammers and quickly check the history of the commenters. It works with the complete IP addresses of the senders, so the commenters from EU countries will be avoided.
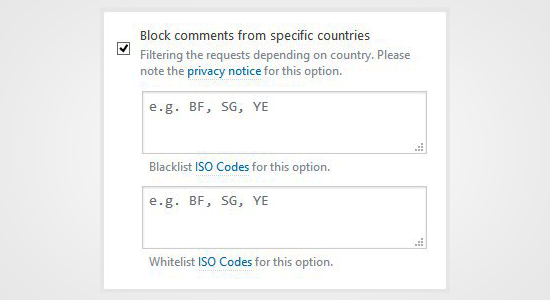
Block comments from specific countries
You can add the list of specific countries to filter spam comments. The Blacklist and Whitelist ISO codes are given with this setting, so you can easily declare the country codes in the respective sections.
Allow comments only in certain language
This setting allows you to specify a language for the commenters, so comments in all other languages will be blocked or deleted as you define later.
Advanced Tools
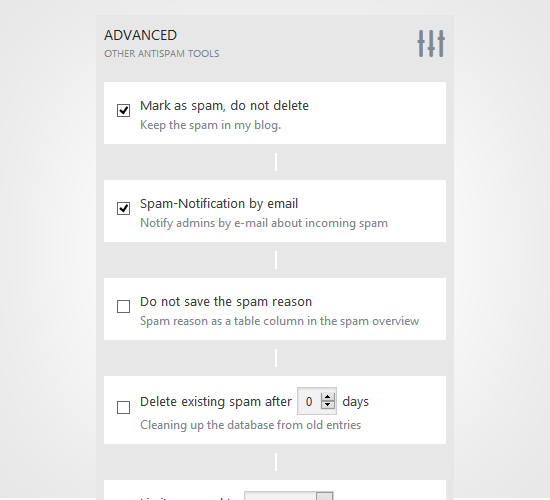
In the advanced settings, you can further set the options to manage, block and delete the unwanted comments. There are few settings that are enabled by default however you can make changes to these settings as needed.
Mark as spam, do not delete
If you enable this setting, it will keep the spam comments and won’t delete them until you enable the settings below.
Spam-Notification by email
If you enable this option, then you will receive an email notification for every spam comment. We do not recommend this setting because it’ll become extremely annoying really fast.
Do not save the spam reason
If enabled, this setting will not store the suspicious values of a comment in a separate column. These suspicious values can be the formatted links, comment time and more.
Delete existing spam after X days
This is an important option because it allows you to define the number of days after which the spam comments are automatically deleted. It is linked with many other settings that we discussed above about deleting the comments.
Limit approval to Comments/Pings
This option will define whether you want to approve comments or trackbacks. If you limit approval to comments, then trackbacks will be automatically deleted. Similarly, if you limit approval to trackbacks, then the spam comments will be automatically deleted from your blog or website.
In case this option is not enabled, it follows the previous settings.
Delete comments by spam reasons
You can delete comments with predefined spam reasons. You can select multiple reasons from the options to delete the unwanted comments automatically.
These advanced settings will make your life easy while reviewing comments on your site.
More Options
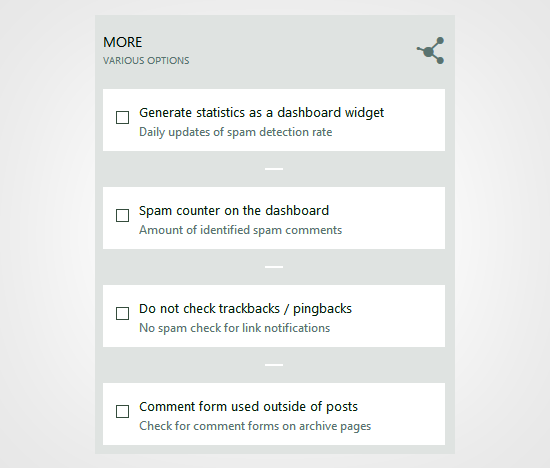
After the advanced settings, you can take a look in the reporting options to display your daily spam updates on WordPress admin dashboard area.
These reports will help you monitor the spam comments easily, and you can also analyze between the numbers of useful and unwanted comments.
Generate statistics as a dashboard widget
If enabled, this setting will create a spam report in an interactive widget for your WordPress admin dashboard area. These statistics will give you an overview about the spam comments on your blog.
Spam counter on the dashboard
If enabled, it will display the number of total comments marked as spam in a prominent style. If you are deleting the spam comments, then it will also show the number of deleted comments in an additional column. Some new bloggers find it fun to look at this number after they first start their blog.
Do not check trackbacks / pingbacks
By default, the plugin put a check on all the comments, trackbacks and pings. You can avoid checking the trackbacks with this setting. If enabled, the trackbacks / pingbacks from any site will be automatically approved.
Comment form used outside of posts
This option will monitor comments on your archive pages.
Once you are done, click on the Save Changes button to apply these settings on your blog.