There are few things more frustrating to a website owner than missing pages and broken links. Not only is this an issue that negatively affects the user experience you provide, but identifying the common causes of 404 errors you’re getting and fixing the problem can be a chore that takes time away from growing your [...]
Do you want to change the background color of the WordPress block editor for admins?
Sometimes when working on a custom client project, you may want to change the Gutenberg editor background color in WordPress to match their brand colors.
In this article, we’ll show you how to easily customize the background color of the WordPress block editor for admin area.
Note: This guide covers changing the editor color in WordPress admin. If you’re looking to change the background color in WordPress front-end, then please see our tutorial on how to change background color in WordPress.
Why Change the Background Color of the Block Editor in WordPress?
You may want to change the background color of the WordPress block editor for a number of reasons.
However, if your WordPress theme doesn’t use the same colors, then the appearance of your post inside the editor will look quite different from what your users will see on the live website.
Another reason for changing the background color could be personal preference.
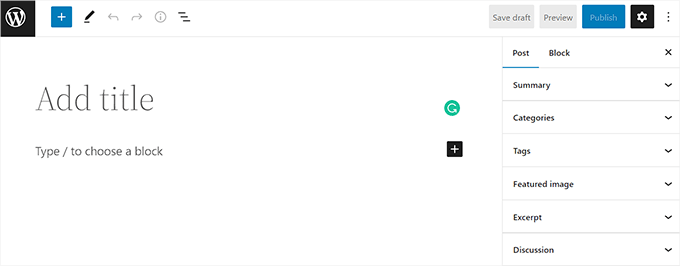
For instance, by default, the block editor uses a plain white background. Some users may find it a bit stressful to look at the white screen for long hours. Eye strain can be a real issue for many people, and the default white background is not easy on the eyes.
That being said, let’s see how you can easily change the WordPress editor background color.
How to Change the WordPress Editor Background Color
You can easily change the WordPress editor background color by adding custom code to your theme’s functions.php file.
However, keep in mind that even the smallest error in the code can break your website and make it inaccessible. That’s why we recommend using the WPCode plugin. It’s the best WordPress code snippets plugin on the market and is the easiest and safest way to add custom code to your WordPress website.
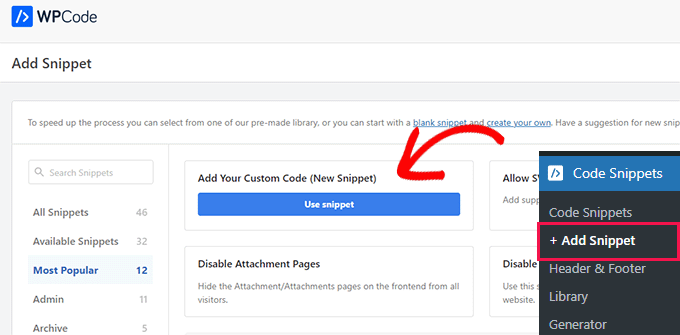
Upon activation, you need to visit the Code Snippets » + Add Snippets page from the admin sidebar.
From here, you have to click on the ‘Use Snippet’ button under the ‘Add Your Custom Code (New Snippet)’ option.
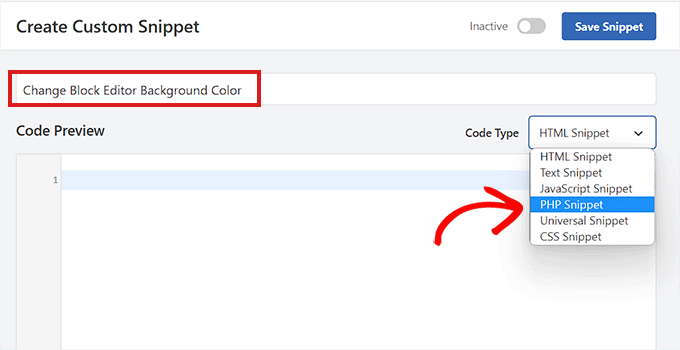
This will take you to the ‘Create Custom Snippet’ page where you can start by typing a name for your code snippet. This is just for you and can be anything that will help you identify the code.
Next, you need to choose ‘PHP Snippet’ as the ‘Code Type’ from the dropdown menu on the right.
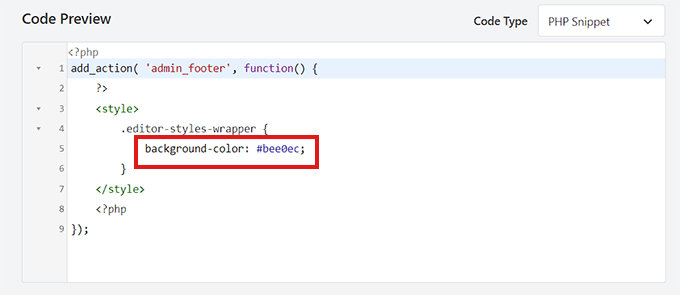
After that, you need to copy and paste the following code into the ‘Code Preview’ box.
Next, you need to look for the following code in the PHP snippet you just pasted.
background-color: #bee0ec;
Then, you have to add the hex code of your preferred color next to the background color option. If you don’t want to use a hex code, you can use some basic color names such as ‘white’ or ‘blue’ instead.
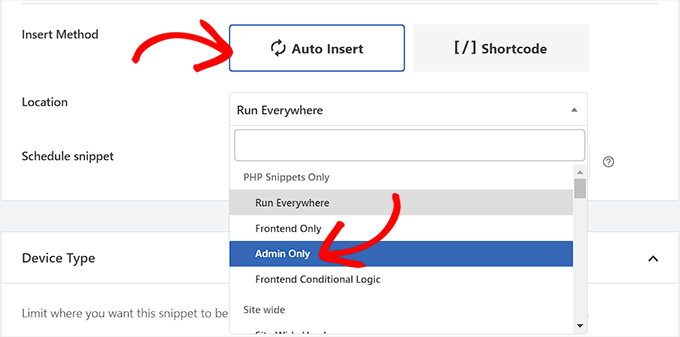
After that, you need to scroll down to the ‘Insertion’ section and choose the ‘Auto Insert’ option.
Next, you need to select the ‘Location’ of the code snippet as ‘Admin Only’ from the dropdown menu.
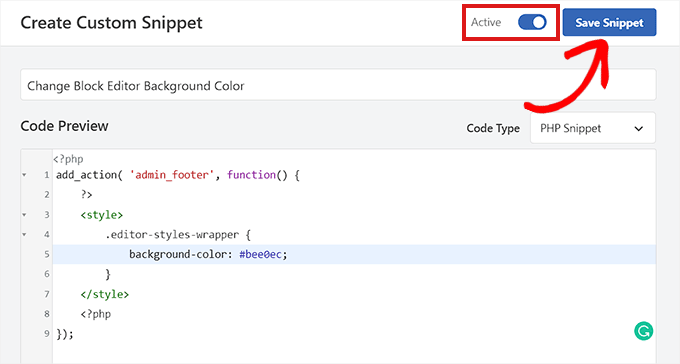
After that, you need to scroll back to the top of the page and toggle the ‘Inactive’ switch to ‘Active.’
Finally, don’t forget to click on the ‘Save Snippet’ button to save your changes.
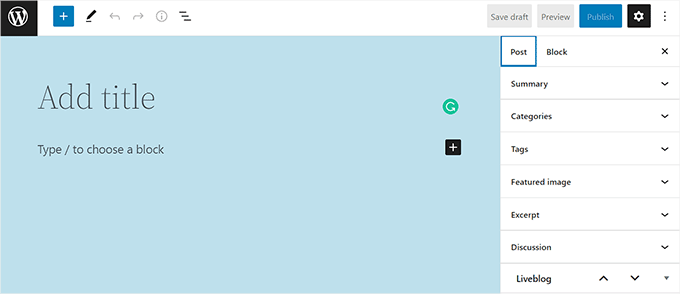
Now, go visit the block editor from the admin sidebar.
This is how the block editor looked on our site after adding the CSS code snippet.
Are you looking for an easy way to show a contact form popup on your WordPress website?
Contact forms are great for communicating with your visitors. Placing them in a popup makes it even easier for your customers to contact you about your products and services.
In this article, we will show you how to add a contact form popup in WordPress.
Why Use a Contact Form Popup?
Every WordPress website or blog needs a contact form so users can reach out with questions, feedback, or problems.
However, if your contact form is only on a single page, then it’s hard for people to find it.
As a result, your users may end up leaving your site before contacting you, and you could lose potential leads and conversions.
A contact form popup helps solve this issue by allowing your visitors to quickly view the form by clicking a button, so they can get in touch with you from whatever page they’re on.
It helps keep people on your website, as they don’t have to exit the page they are viewing. You can also grow your email list using a contact form popup.
That said, you will first need to create a contact form and then place it in a popup to display on your web pages. Don’t worry, we will guide you on creating a contact form and adding it to a popup in WordPress.
There are many free and paid options you can choose from, but we recommend using WPForms as it’s the best option.
WPForms is a beginner-friendly form plugin and offers a drag & drop builder that allows you to create a contact form in WordPress in just a few clicks. It also offers prebuilt form templates and lots of customization options.
For this tutorial, we will use the WPForms Lite version because it is free and offers a contact form template.
However, you can also use its premium version to unlock more features. For instance, WPForms Pro offers multiple form templates, more customization options, powerful addons, and lets you collect online payments.
To start, you will first need to install and activate the WPForms Lite plugin. If you need help, then see our step-by-step guide on how to install a WordPress plugin.
Once the plugin is active, you are now ready to create your contact form. All you have to do is go to WPForms » Add New from your WordPress dashboard.
After that, WPForms will ask you to enter a name for your form and select a template.
Go ahead and select the ‘Simple Contact Form’ template.
Next, you can add fields in the form using the drag-and-drop builder.
Simply drag the fields you want to add to the form from the options given in the menu on your left. You can also reorder the positions of each field in the form.
WPForms also lets you customize each field in the contact form.
For example, if you click on the Name field, then you’ll get different options, such as changing its label and format. You can even add a description or mark any field as required.
Once you are done, go ahead and click the ‘Settings’ option to configure the form notification and confirmation.
In the General settings, you can rename the form, change the submit button text, enable anti-spam protection, and more.
Next, you can go to the Notifications settings option. By default, the notifications are sent to the admin email that is set up on your WordPress website.
However, you can send your contact form notification to any email address you want. If you wish to receive notifications on multiple emails, then separate each email with a comma.
For the email subject line, WPForms uses the form name you entered earlier. However, you can edit the text of the subject line to whatever you wish.
After that, go ahead and click the Confirmations option.
WPForms will use ‘Message’ as the default confirmation type, where your visitors will see a thank you message upon submitting a form.
However, you can change the message type and redirect users to a specific page on your website when they complete a form.
Once you are done creating a contact form, make sure to click the ‘Save’ button at the top right corner to save your changes.
Next, click the ‘Embed’ option in the top corner next to the Save button.
When a new window appears, select the ‘use a shortcode’ option.
WPForms will display a shortcode for your contact form as soon as you click the link. We suggest that you keep this tab/window open as you will need it in the next step, where we’ll show you how to add your contact form in a popup.
We recommend using OptinMonster as it is the best lead generation and conversion optimization plugin for WordPress. Over 1.2 million websites use the powerful tool.
For this tutorial, we will use the OptinMonster Pro version, which includes a clutter-free template and advanced display rules to show the popup.
You will first need to sign up for an account by going to the OptinMonster website. Simply visit the website and click the ‘Get OptinMonster Now’ button.
After the plugin is active, you will see the setup wizard. Go ahead and click the ‘Connect Your Existing Account’ button.
A popup window will now appear, and OptinMonster will ask to connect to your account.
Simply click the ‘Connect To WordPress’ button.
Now that your account is connected, the next thing is to create a new campaign for your contact form popup.
You can start by going to OptinMonster » Campaigns and then clicking the ‘Create Your First Campaign’ button.
On the next screen, you will have to select a campaign type.
Since we will create a contact form popup, select ‘Popup’ as your Campaign Type.
After that, scroll down to choose a template for your popup. OptinMonster offers over 75 attractive and highly converting designs for your popups.
You can select any template that you like. Next, enter a name for your campaign and click the ‘Start Building’ button.
Now using the drag-and-drop builder in OptinMonster, you can edit your popup template.
You will now see different Blocks appear in the menu on your left. Simply head over to the ‘WPForms’ block and drag and drop it on your template.
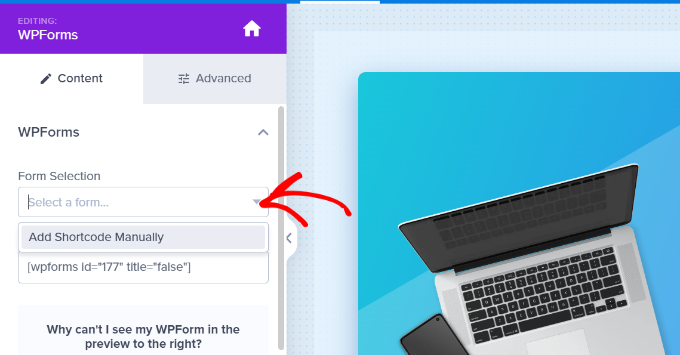
After that, you’ll need to click the ‘Form Selection’ dropdown menu from the block settings in the left menu and select the ‘Add Shortcode Manually’ option.
From here, enter your WPForms contact form shortcode in the block. To find the code, go back to your WPForms embed settings and copy the shortcode.
An important thing to note is that you won’t see a preview of the contact form in the template when you add the shortcode.
This is normal, as your contact form will appear when the campaign is published.
Next, you can go to the Display Rules tab at the top to choose when the popup should appear on your website.
By default, OptinMonster will set it to when the time on the page is 5 seconds, and the popup will appear on any page.
However, you can change the display rule settings and select different triggers and targeting options.
We suggest using the MonsterLink (On Click) targeting. This way, your popup will appear when a visitor clicks a link or a button.
After that, you can click the ‘Copy MonsterLink Code’ button and add it to any text, image, or button on your website.
For example, let’s say you want to add a contact us button on your site. You can start by editing any page or post and go to your WordPress editor. Next, click the (+) plus sign at the top and add a ‘Buttons’ block.
After that, you can enter a text for your button and then click the link icon.
Now add the MonsterLink URL to your button.
Once you have done that, publish your WordPress post or page. The MonsterLink will now be added to your contact us button.
Next, head back to your OptinMonster campaign to complete the configuration.
After selecting MonsterLink as your target and showing it on any page, you can click the ‘Next’ button at the bottom.
On the next screen, you will see options to change the campaign view type, add a MonsterEffect animation, and play a sound when the popup appears.
Go ahead and click the ‘Next’ button when you are satisfied with the settings.
After that, OptinMonster will show a summary of your Display Rule settings.
This helps to ensure you have correctly set up when your campaigns will appear on your website.
Now, you are ready to take your campaign live and publish your contact form popup. To do that, go to the ‘Publish’ tab at the top.
Next, you can click the ‘Preview’ button before publishing your campaign. This will show you a live preview of how your popup will look on your website.
When you are happy with the appearance of your campaign, change the ‘Publish Status’ from Draft to Publish.
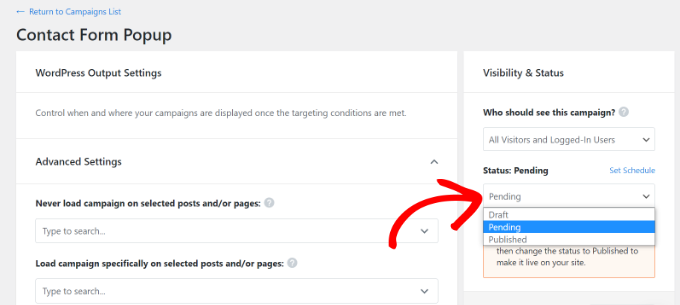
You can exit the OptinMonster campaign builder and check the status of your campaign from your WordPress dashboard as well.
Simply click the ‘Status’ dropdown menu on your right and change the status from Pending to Published.
Don’t forget to save the changes.
Next, go to the contact us button you created earlier with MonsterLink and see the contact form popup in action.
Airtable and WordPress are two of the most popular tools used by businesses and individuals for managing data and creating websites. Now, imagine being able to seamlessly integrate the two for even more efficient and powerful data management. With Air WP Sync, you can do just that. Air WP Sync is a WordPress plugin that [...]
Are you wondering how to use OpenAI and ChatGPT on your WordPress website?
OpenAI can help with everything from generating meta descriptions for your posts to writing email sales copy. You can use OpenAI on your WordPress site to save time, cut costs, improve your SEO and workflows, and grow your business!
In this article, we will show you 14 of the best ways to use OpenAI on your WordPress website.
A (Brief) Introduction to OpenAI
You have probably heard the terms “OpenAI” and “ChatGPT” used interchangeably, but they’re not exactly the same.
OpenAI is the research laboratory (read: a group of very smart people) behind the chatbot ChatGPT and the deep-learning, image-generating model DALL-E 2, among other AI-powered products.
The team over at OpenAI created ChatGPT which is an AI assistant to help streamline your workflows and save you time.
It can write email newsletters for you, suggest blog post ideas, do keyword research, automate your workflows, and so much more.
To improve your WordPress website workflows with artificial intelligence, you will first need to create an account with OpenAI. Getting signed up is FREE. All you will need is an email and a password.
1. Generate Titles and Meta Descriptions with AIOSEO
All in One SEO (AIOSEO) is the best SEO plugin for WordPress, and it just got an AI-powered boost. After adding your keywords to your blog posts, let AIOSEO and OpenAI further optimize your content for search engines.
Then, from within the WordPress post editor, you can tell OpenAI to generate titles and meta descriptions that best fit your content with the click of a button.
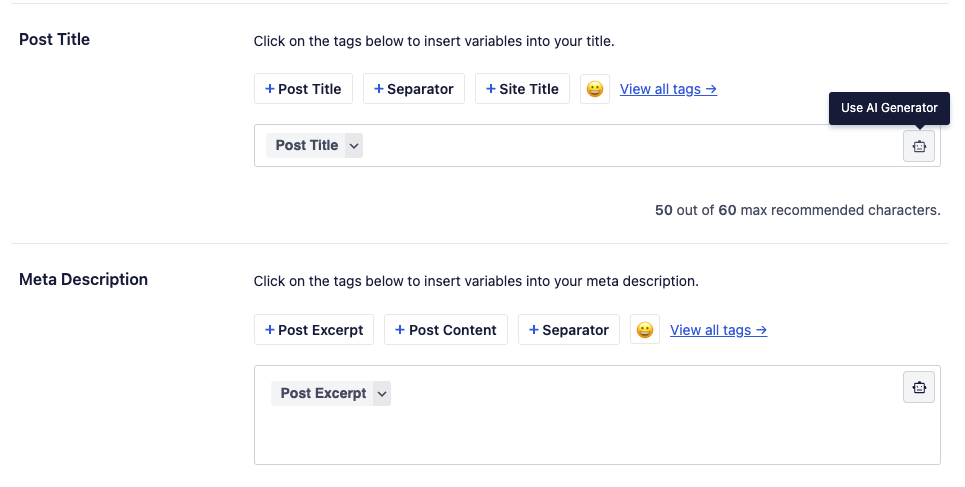
Simply go to the ‘AIOSEO Settings’ at the bottom of your page and find the ‘Post Title’ box.
Next, you need to click on the robot icon. If you hover your mouse over it, you will be able to see a ‘Use AI Generator’ message.
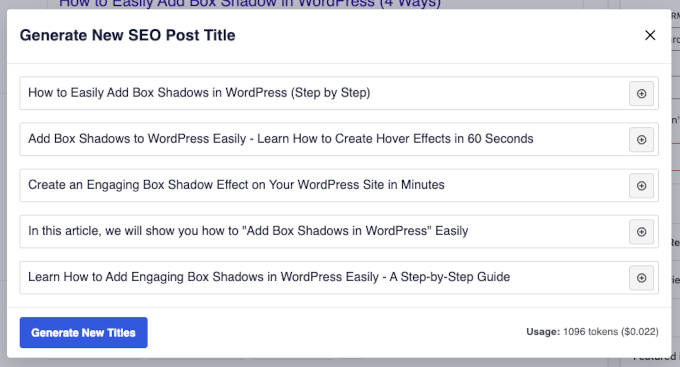
Now, you can see 5 post title suggestions. Simply click on the ‘+’ icon next to one to use it for your post.
If you don’t like any of the suggestions, you can also click ‘Generate New Titles’ to see new ones.
Then, simply repeat the same steps by clicking on the robot icon in the ‘Meta Description’ box. AIOSEO will then suggest a few meta descriptions for your post.
Plus, connecting your OpenAI account to your AIOSEO account is as easy as copying and pasting an API key. You can check out AIOSEO’s documentation for more details.
2. Generate Ad Copy and Product Descriptions
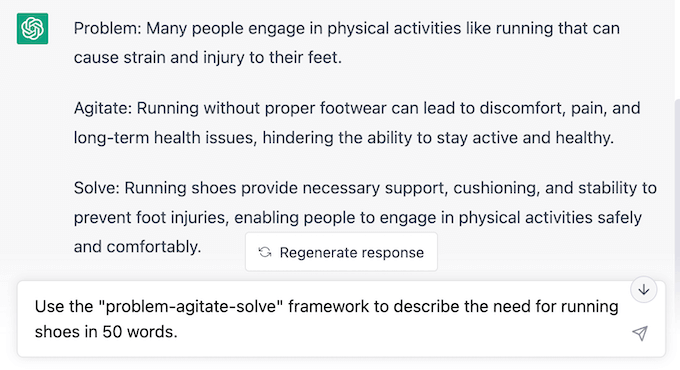
Due to GPT-3’s talent for SEO, it is probably no surprise that it can handle more of your content creation needs. You can use OpenAI to create short, effective ad copy that matches your brand or long-form product descriptions for your WooCommerce store.
For example, we prompted ChatGPT to describe the need for running shoes using the “problem-agitate-solve” framework.
Simply edit the text to match your preferred sentence structure, include your keywords, throw in some on-brand and product-specific language, and then watch your sales increase!
3. Generate Blog Post Ideas
If you are anything like us, then coming up with content ideas for your WordPress blog can be time consuming. Fortunately, OpenAI runs on one of the world’s most powerful supercomputers.
So, you can ask it to come up with ideas for new content on your blog.
In our previous examples, we used OpenAI to help with tasks by inputting prompts directly into ChatGPT.
In our next few examples, we will look at how to integrate OpenAI directly into your WordPress workflow, truly leveraging the power of automation and AI to save time and resources.
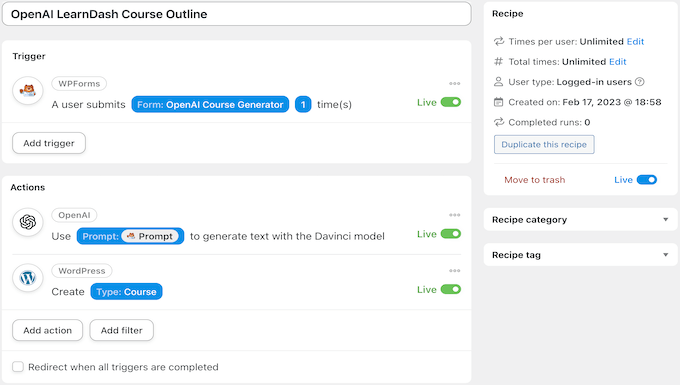
For this example, we will use OpenAI with Uncanny Automator to generate ideas for new content based on a user’s form submission. Then, we will automatically send OpenAI’s response to your content management spreadsheet or database, like Google Sheets or Airtable, for the whole team to access.
If you don’t already have Uncanny Automator, you can download the Automator plugin for FREE to try on your WordPress site.
Once you have downloaded Automator, you will need to connect Automator to OpenAI. Then we will build the automation recipe below.
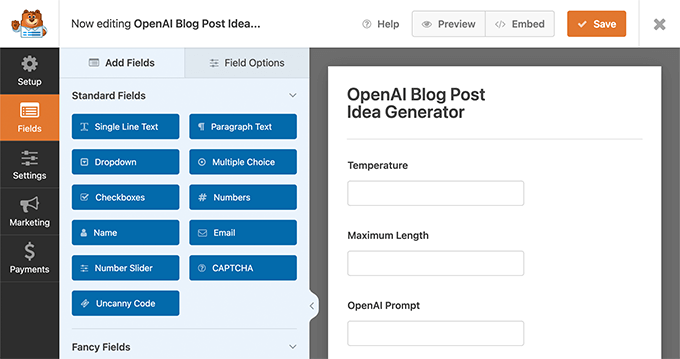
First, you need to create a new form using a contact form plugin like WPForms. From your WordPress admin sidebar, navigate to WPForms » Add New.
Then, create a new contact form and make sure to add two number fields labeled ‘Temperature’ and ‘Maximum length’, and one single line text field labeled ‘Open AI Prompt’.
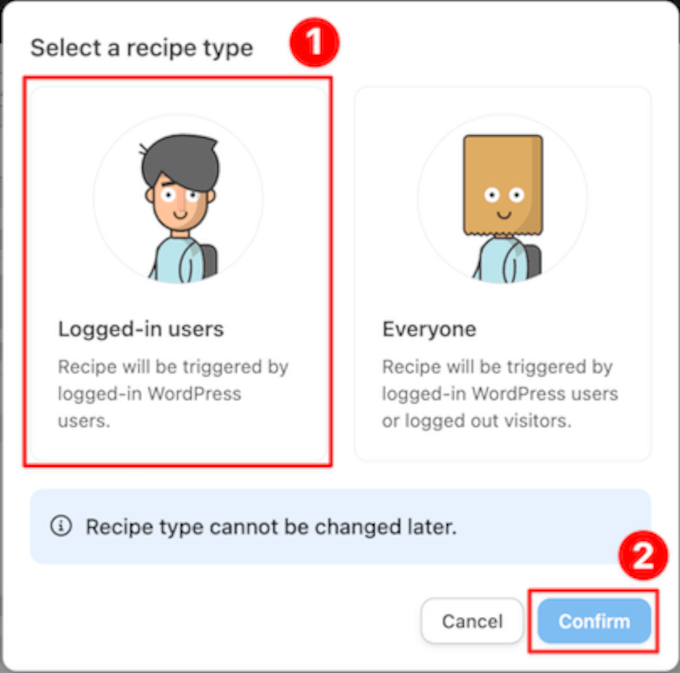
Now, you must head to Automator » Add New. In the pop-up window that appears, simply select ‘Logged-in users’, followed by ‘Confirm’.
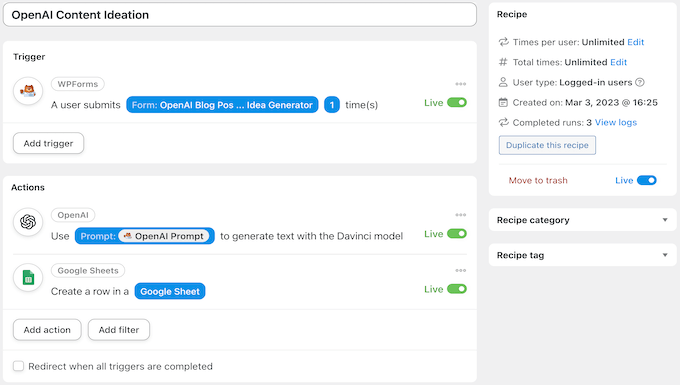
Next, give your new recipe a title that makes it easy to recognize. For example, we have named our recipe ‘OpenAI Content Ideation’.
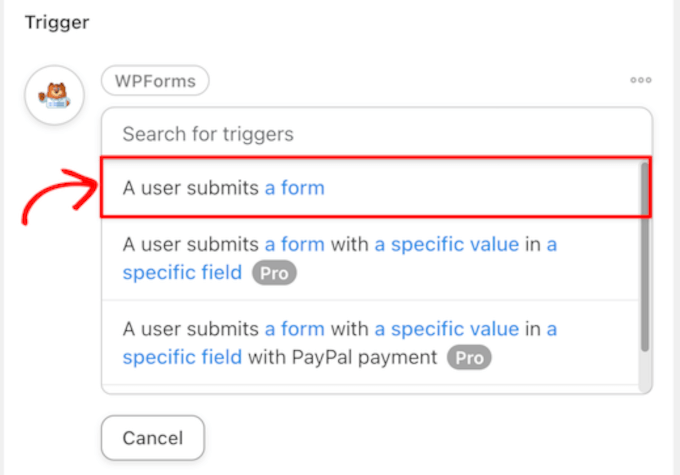
In the ‘Triggers’ panel, you need to select ‘WPForms’. From the drop-down list that appears, select ‘A user submits a form’ and choose the WPForms form that you just made. When you are finished, just click ‘Save’.
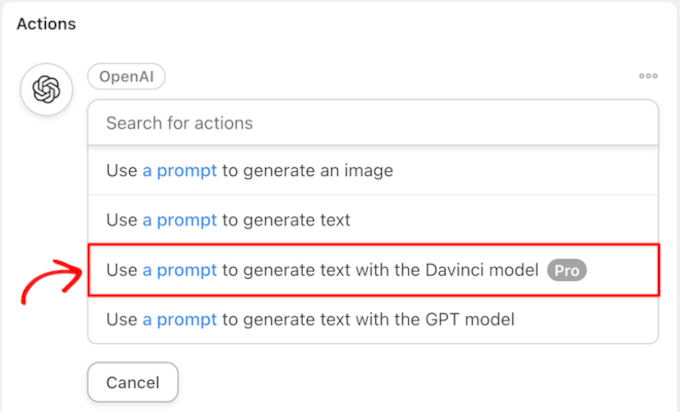
After that, in the ‘Actions’ panel, you have to select ‘OpenAI’.
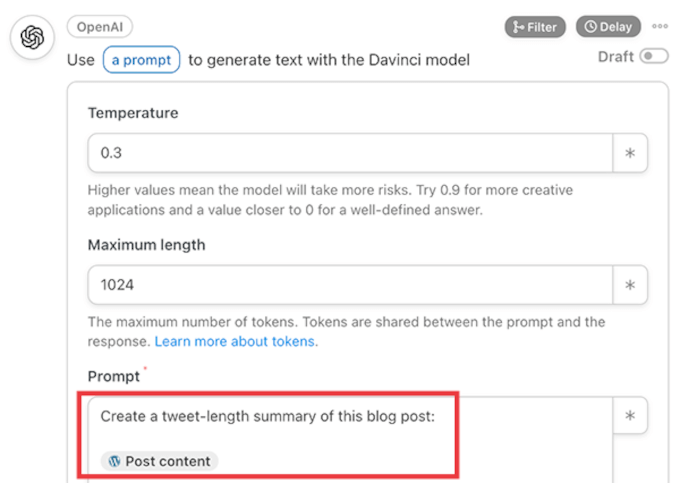
From the drop-down list that appears, choose ‘Use a prompt to generate text with the Davinci model’.
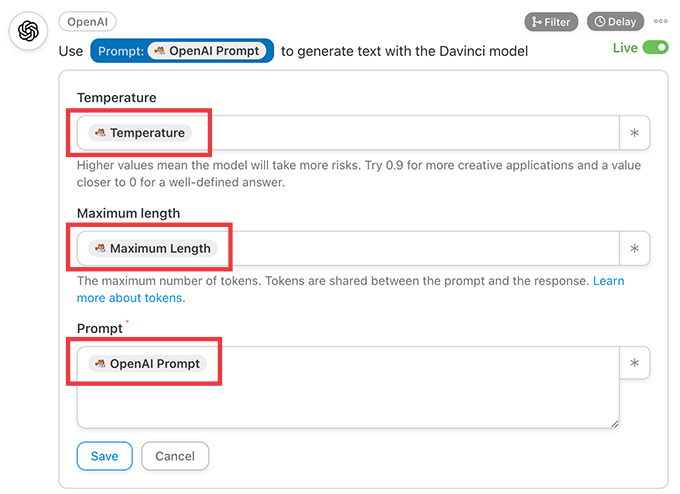
In the Actions section, map the fields from the WPForms form to the Temperature, Length, and Prompt fields in the OpenAI action.
To do this, click the ‘*’ icon to the right of each field to choose the correct token associated with the trigger.
When you are finished, simply click Save.
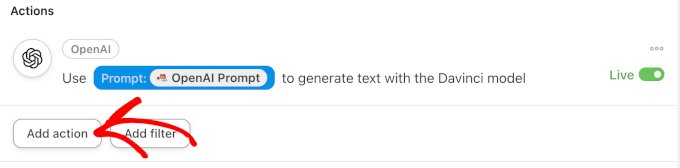
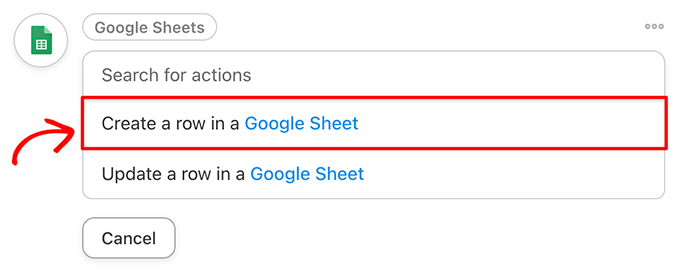
To send the blog post ideas to an external spreadsheet, you will need to add a second Action. To do this, click ‘Add action’ in the ‘Actions’ panel.
From the menu of available integrations, simply choose Google Sheets.
Then, from the drop-down list, select ‘Create a row in a Google Sheet’.
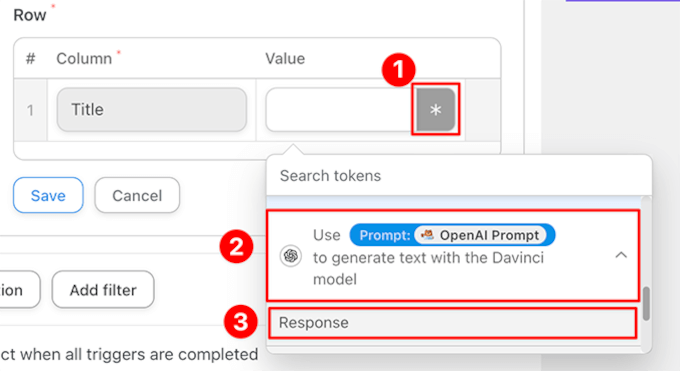
In the editor, you must select your content management spreadsheet. Then, click ‘Get columns’ and add the OpenAI Response token to the appropriate column(s).
Make sure to click ‘Save’ when you are done.
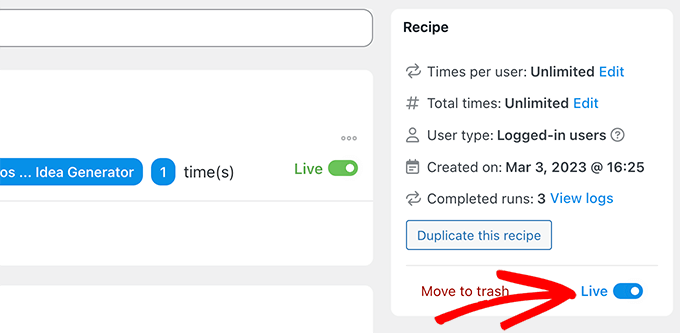
Finally, in the top right corner, toggle your recipe from ‘Draft’ to ‘Live.’
Now, whenever you enter information into your blog post idea generator form, Automator will tell OpenAI to suggest new content ideas and send them to your Google Sheets spreadsheet.
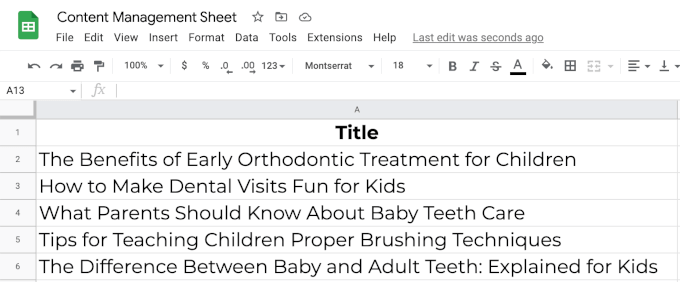
In our example, we entered “Give me 5 fun blog posts on pediatric dentistry” into the WPForms form.
Then, OpenAI generated a response, and Automator added it to the worksheet in the recipe.
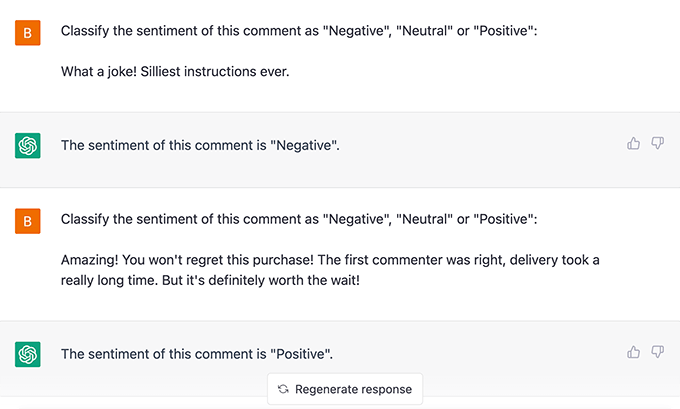
4. Perform Sentiment Analysis
There is no way of knowing if AI has any feelings of its own. If we had to guess, we would say that it probably doesn’t. At least, not yet. But that doesn’t mean that it cannot understand human emotions.
You can use OpenAI to perform sentiment analysis by asking it to interpret the mood of your customers’ feedback.
But how can you use this with your WordPress website?
Maybe your contact forms are connected to a help desk plugin, and you want to assign priority based on the message urgency.
Alternatively, maybe you want to automatically approve positive blog comments. You could even quickly identify negative feedback in surveys powered by your favorite WordPress form plugin.
In both cases, you will be able to address negative feedback quicker, keep your customers happier, and improve your online reputation.
5. Automate Customer Support with Intelligent Sentiment Analysis
Now that you know how to use OpenAI to perform sentiment analysis, you can easily add it to your workflows. By combining OpenAI’s emotional intelligence with Uncanny Automator’s efficiency, you will be able to create a seamless customer support system.
Let’s put together an Automator recipe that creates tickets in our customer support plugin whenever a customer reviews a product.
First, we have OpenAI perform sentiment analysis on the reviews as they come in.
Then, using Automator’s Filters feature, we create tasks with different priority levels based on OpenAI’s assessment of the customer’s sentiment.
In this recipe, if OpenAI decides that a new WooCommerce product review is negative, then it creates a new help desk ticket in FluentCRM and adds an Urgent tag.
If you are ready to take things to the next level, you could even use the submission to create a draft reply for the ticket.
Just add an extra OpenAI action to generate a draft reply, then include that response as the ticket draft.
This works best with the GPT-3.5-Turbo model because you can use Automator to also send context. For example, you can tell it to answer the prompt as a helpful support agent from your website.
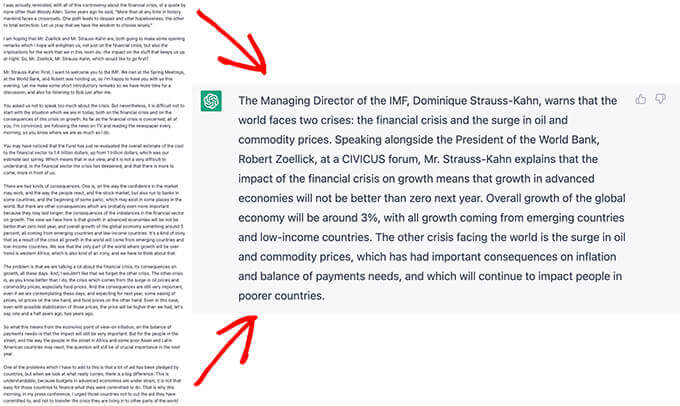
6. Create Event Summaries, Recap Podcast Episodes, and Take Meeting Minutes
Running special events on your WordPress website is easy with WordPress calendar plugins. Unfortunately, not every customer of yours can save the date.
After all, we cannot do everything and be everywhere all at once, but OpenAI can.
If your customers missed the big day, OpenAI can create event summaries for you. You can even choose the length and format of the summary you want OpenAI to make.
For example, we asked ChatGPT to create a 100-word summary of an October 2008 IMF town hall. In less than one minute, ChatGPT turned the 1,500-word opening remarks into a 100-word summary.
Alternatively, maybe you are trying to grow your podcast audience. To help your listeners who don’t have two hours a day to consume media, you can use OpenAI to recap your podcast episodes, hitting all of the highlights.
Using transcripts, we asked ChatGPT to summarize the first 15 minutes of a popular podcast.
Finally, some conference call tools, like Zoom and Google Meet, allow users to record their meetings with audio transcripts. You can then feed those transcripts into OpenAI and create meeting summaries in just a few seconds.
7. Draft Blog Posts (and Seamlessly Integrate Them Into Your Workflows)
For content writers (including us), few things are more stressful than a blank page. Thankfully, artificial intelligence is the sledgehammer that can break through any writer’s block.
Using one of our blog post ideas from our previous recipe, we told OpenAI to draft a blog post for us.
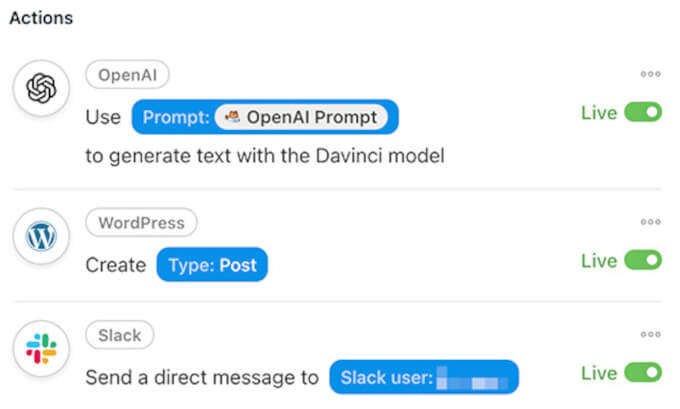
In this Automator recipe, a form submission (the trigger) tells OpenAI to draft a new blog post. Then, it messages the writer in Slack to let them know the draft is ready for them.
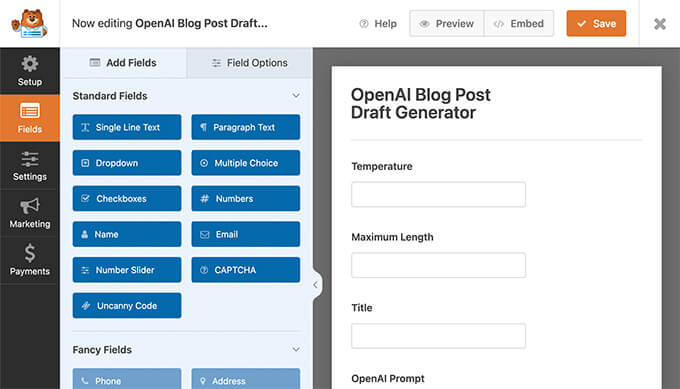
From your WordPress admin sidebar, simply go to WPForms » Add New.
Then, create a new form with at least two number fields labeled ‘Temperature’ and ‘Maximum length.’ You will also need two single-line text fields labeled ‘Title’ and ‘Open AI Prompt’.
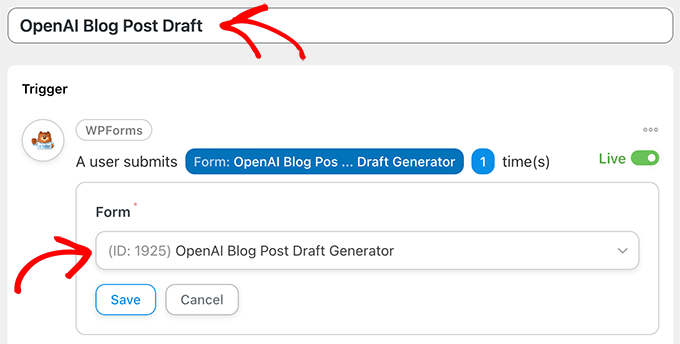
Next, you must go to Automator » Add New. In the pop-up window that appears, select ‘Logged-in users’. Then, simply give your new recipe a title like ‘OpenAI Blog Post Draft’.
In the ‘Triggers’ panel, you need to select ‘WPForms’ From the drop-down list that appears, you must choose ‘A user submits a form’ and pick the form you just created.
When you are finished, make sure to click ‘Save’.
Moving on, in the ‘Actions’ panel, you must select ‘OpenAI’. From the drop-down list that appears, choose ‘Use a prompt to generate text with the Davinci model’.
In the editor, fill in the fields using the tokens from your form’s fields that match the fields in the editor. When you are finished, just click ‘Save.’
Now, it is time to set up an automatic blog post that will be created with the OpenAI content.
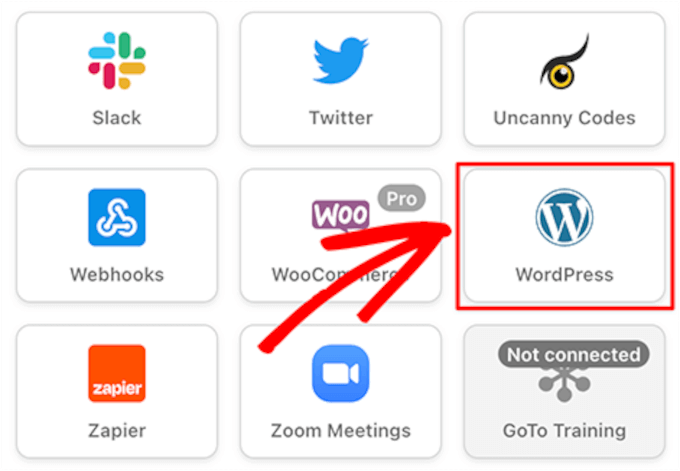
In the ‘Actions’ panel, simply click ‘Add action’. Then, from the menu of available integrations, select ‘WordPress’.
Next, from the drop-down list, hit ‘Create a post’. In the editor, you must fill in the ‘Title’ field with the Title token from your form and enter the OpenAI Response token into the ‘Content’ field.
Then, make sure to click ‘Save’.
Optional: You can also add a ClickUp action to your recipe to create a task with the post URL in the description.
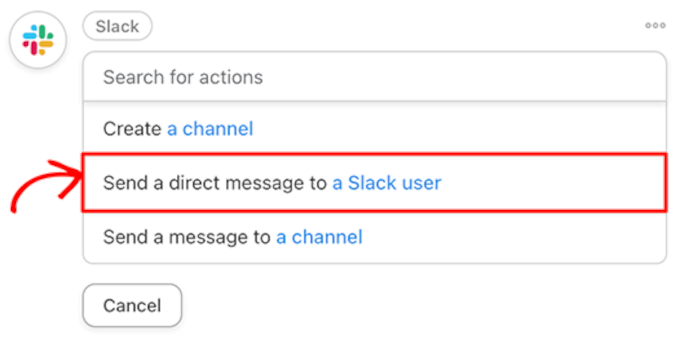
Additionally, you can include a Slack action to notify your content writer that a new task and draft post is waiting for their review.
Finally, in the top right corner, toggle your recipe from ‘Draft’ to ‘Live’.
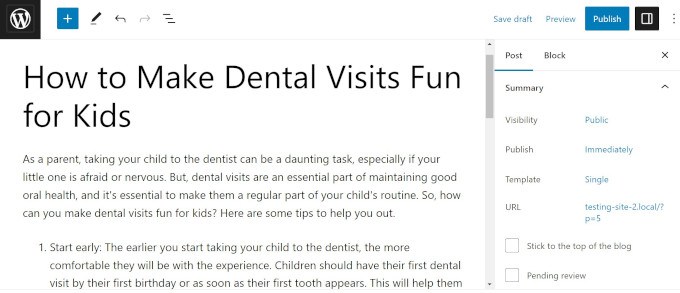
In our WPForms form, we then asked OpenAI to ‘Write a casual blog post on three ways to make dental visits fun for kids.’
And here is the draft that Automator created with OpenAI’s response.
We call that the anti- writer’s block recipe! You can also use AI to generate your SEO title, write a meta description, and even set up a featured image.
8. Draft Emails in Minutes
Writing carefully-worded emails takes time. Unless, of course, OpenAI is writing them for you.
Whether you are sending out an internal notice, responding to a customer’s questions, or reaching out to prospective clients, OpenAI can draft your email in seconds. After that, it is just a matter of proofreading and including specific information.
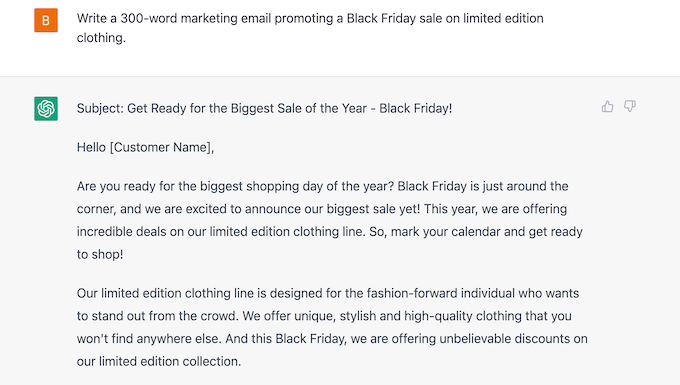
We prompted ChatGPT to “write a 300-word marketing email promoting a Black Friday sale on limited edition clothing.” Less than 30 seconds later, we had an email that we could easily customize to suit our branding and needs.
Promoting your blog posts on social media is important. However, sometimes, writing the appropriate character-length tweets and captions can be even more challenging than creating a whole article.
With OpenAI and Automator, you won’t have to stress about the perfect hashtags.
Here is an example of an action that takes a new blog post and sends it to OpenAI to generate a summary that can be shared on Twitter:
Automator will send that summary, complete with hashtags, to our WhatsApp account. There, we can review, edit, copy, and then paste the content into our social media accounts when we are ready to publish it.
For a post on connecting ChatGPT to LearnDash, OpenAI wrote this summary:
Embrace the robot revolution and use OpenAI and LearnDash to create the e-learning platform of your dreams. #AI revolution is here! Harness the power of AI for your #elearning platform w/ OpenAI & ChatGPT models. Automate content creation, create course outlines & answer students’ questions. Save time & money w/ Uncanny Automator! #LearnDash #NolejAI #RobotRevolution.
You could even extend your recipe to make Automator post the summary straight to Twitter, Facebook, LinkedIn, and more.
10. Generate AI Images for Your Posts or Landing Pages
Are you tired of scrolling through stock photography databases trying to find the perfect image for your blog post? Or finding a picture and then realizing that every other article with your keywords is using the same image?
Fortunately, OpenAI’s image generator DALL-E 2 can create original images from descriptive plain text.
OpenAI’s Content Policy and Terms give you all of the rights to the images that you create with DALL-E 2, “including the right to reprint, sell, and merchandise.”
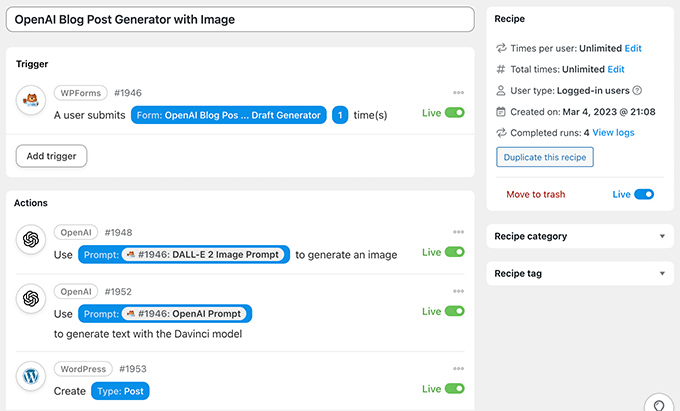
Using our original WPForms form with an added field for an image prompt, we used Automator to create a draft blog post complete with a featured image.
Here is that same blog post about dental visits with a featured image created by DALL-E.
As you can see, it has a fun graphic with a tooth, toothpaste, and different toothbrushes.
To make the process even easier, whenever you tell DALL-E to create an image using Uncanny Automator, Automator will add the image to your WordPress media library, with no hotlinking necessary.
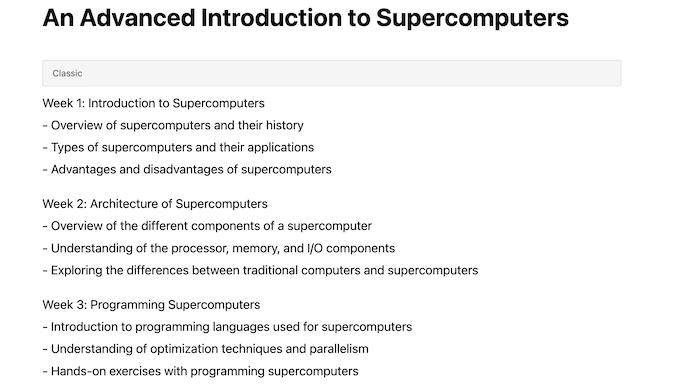
11. Create Course Outlines in Your LMS
OpenAI is smart. After all, “intelligence” is in the name.
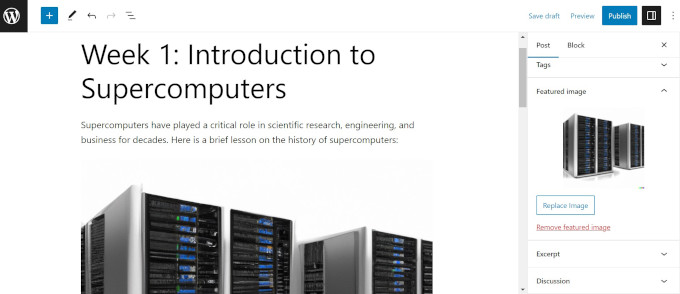
We asked OpenAI to create an advanced 8-week course outline on supercomputers, which, funnily enough, is kind of like an OpenAI autobiography.
Once you have your course outline, don’t forget to use AIOSEO’s OpenAI integration to write your meta description.
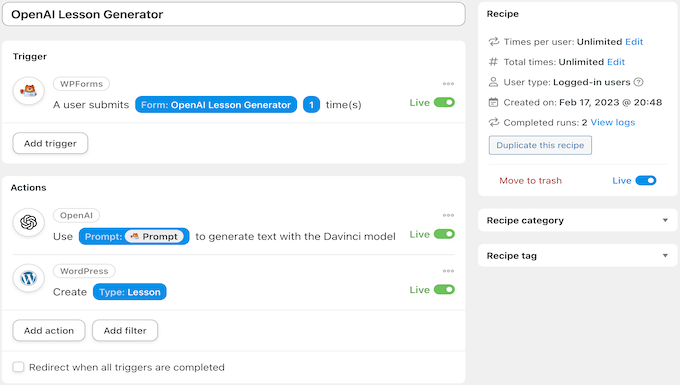
12. Create Lessons in Your LMS
Using a similar Uncanny Automator recipe to the previous one, you can easily fill in the course outline that you created with OpenAI-generated content.
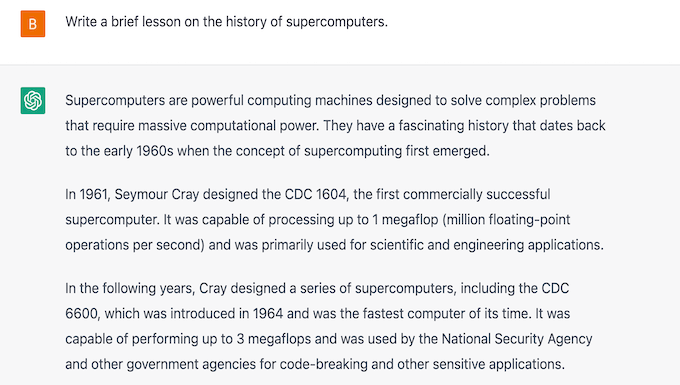
We used OpenAI’s response from our previous recipe to help us create this lesson.
Here is the first part of it.
With the right prompts, you can also create a recipe that generates unique images for your lessons and uploads them automatically to your WordPress media library.
Using Automator tokens, you can also set your new DALL-E 2 generated image as the featured image for your lesson or include it somewhere in the lesson itself.
13. Create a Chatbot
As a natural language processor, OpenAI loves to talk. You can use this feature to communicate with customers in your online store or business website.
This can help you target users who are having problems on your site or want to learn more about your products and services.
14. Have Fun! Write Short Stories, Poems or Cook Up Recipes
Once you have fully integrated OpenAI and Uncanny Automator into your workflows, you will have enough time to do the things that really matter like growing your business or spending more quality time with family.
Playing around with OpenAI and trying out new things is a great way to learn how to create better prompts that get the results you are looking for, so you can continue to save time and optimize your workflows.
OpenAI and WordPress plugin development are in the super early stages right now, and there is so much more in the works. We will be sharing more details and updates in this guide in the coming months.
With a redesigned interface and integration with Openverse, WordPress 6.2 “Dolphy” simplifies site editing.On March 29, 2023, WordPress released version 6.2 “Dolphy,” which included a revamped Site Editor interface and enhanced menu administration. A distraction-free writing mode, better media access, and a new Block Inserter design that interfaces with Openverse allow users to explore and [...]
Do you want to add a sliding side cart in WooCommerce?
This allows shoppers to see their shopping cart from any page on your online store. Customers can then add items to their basket, remove products, and add coupons without ever having to visit a separate cart page.
In this article, we will show you how you can easily add a sliding cart in WooCommerce.
Why Add a Sliding Side Cart in WooCommerce?
A sliding side cart is a panel that appears when a customer adds an item to their basket.
Customers can also open the cart at any time by clicking on the cart icon. This allows them to check their shopping basket without having to visit a separate WooCommerce cart page.
Depending on how the cart is set up, shoppers may also be able to add and remove items as well as apply coupons directly from the sliding panel. You can even add call to action buttons such as a link to your WooCommerce checkout page.
Sliding carts can improve the customer experience by removing friction from the shopping process, and help shoppers keep track of how much they’ll pay at checkout. This can reduce cart abandonment rates, while also possibly increasing the average order value.
With that being said, let’s see how you can add a sliding side cart in WooCommerce. Simply use the quick links below to jump straight to the method you want to use.
Method 1. How to Add a Sliding Side Cart in WooCommerce Using a Free Plugin
The quickest and easiest way to create a sliding side cart is by using Cart For WooCommerce By FunnelKit. This free plugin allows you to add a cart icon to your online store.
Shoppers can click the button to open the sliding side cart.
You can change the cart’s colors, borders, buttons, messaging, and more.
There are a ton of options to make it perfectly fit your WordPress theme.
You can show the cart button across your entire site, limit it to WooCommerce pages only, or add the button to specific pages and posts using a shortcode.
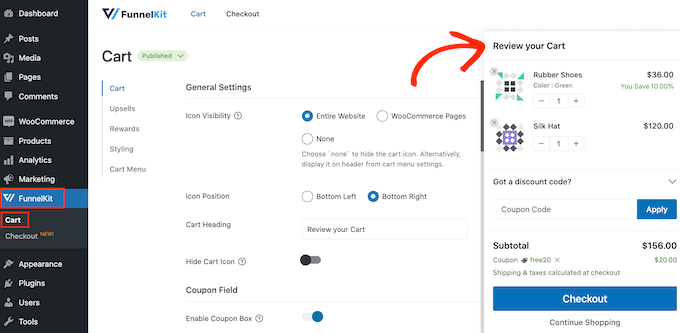
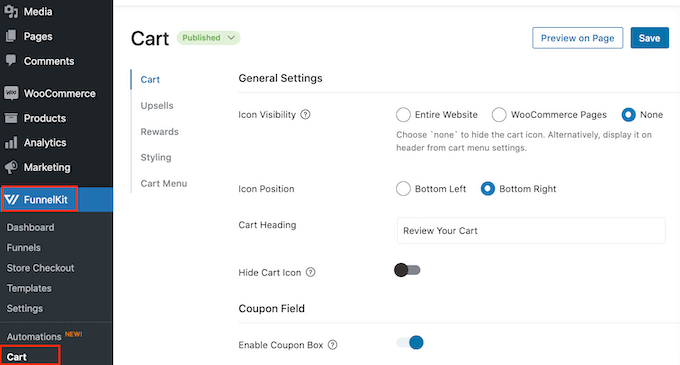
Upon activation, go to FunnelKit » Cart. You’ll see a preview of the sliding slide cart towards the right of the screen.
You can now customize the cart to better suit your needs.
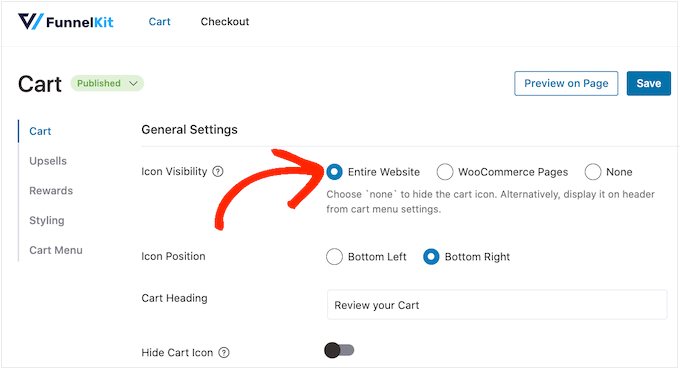
To start, you can decide whether to show the cart icon across your entire website or on WooCommerce pages only.
If you select ‘Entire Site’, then shoppers can open the sliding cart from any page, so this is a good choice for online marketplaces and stores.
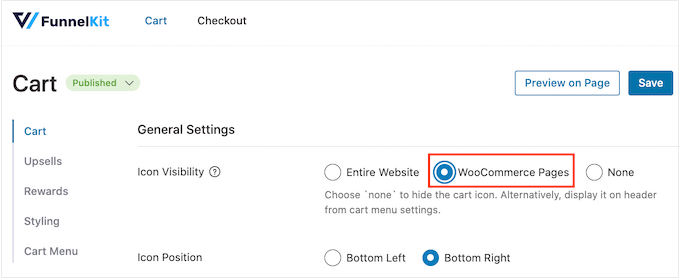
However, some WooCommerce sites have lots of non-ecommerce content. For example, you might run a popular WordPress blog, but use WooCommerce to sell merchandise to your fans.
Showing a cart button on every single blog post may become annoying. In that case, you can check the ‘WooCommerce Pages’ radio button.
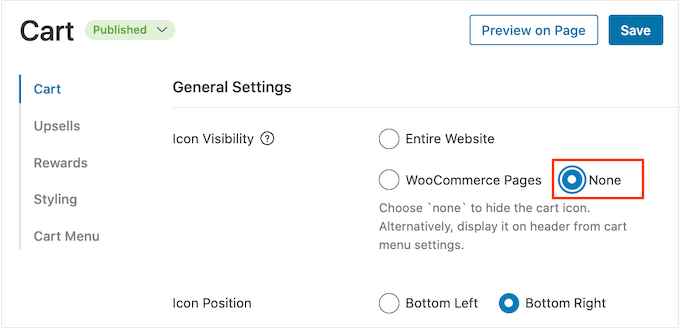
Another option is ‘None,’ which hides the cart icon completely.
If you select the ‘None’ option, then you can add the icon to any page, post, or widget-ready area using a shortcode. You can also add the icon to your navigation menu.
We’ll show you how to do this later in the post, but for now, select ‘None’ if you plan to add the cart icon manually.
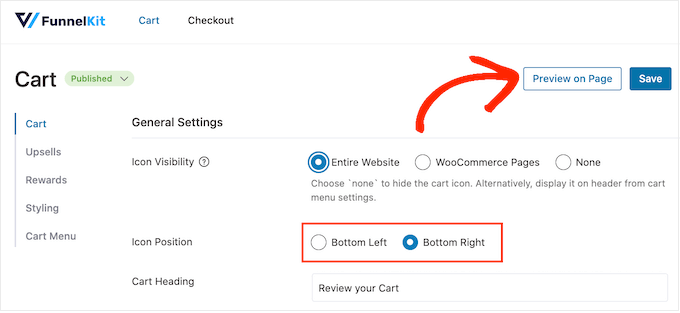
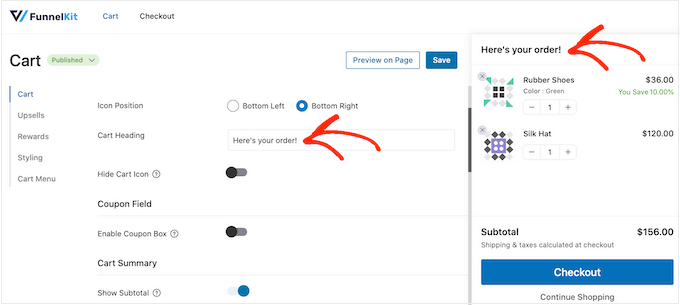
After making this decision, select ‘Bottom Left’ or ‘Bottom Right’ depending on where you want to show the cart button. Here, it may help to check how the button will look on your online store by selecting ‘Preview on Page.’
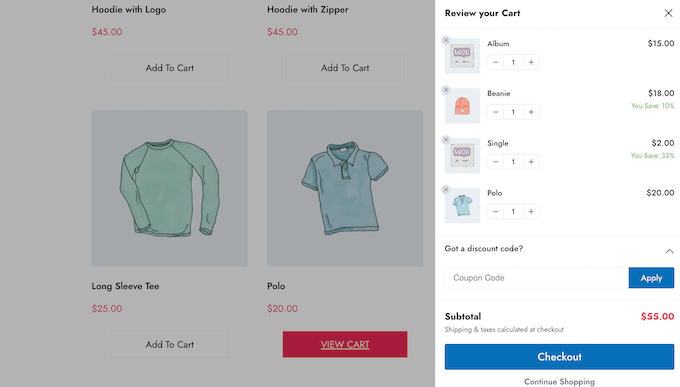
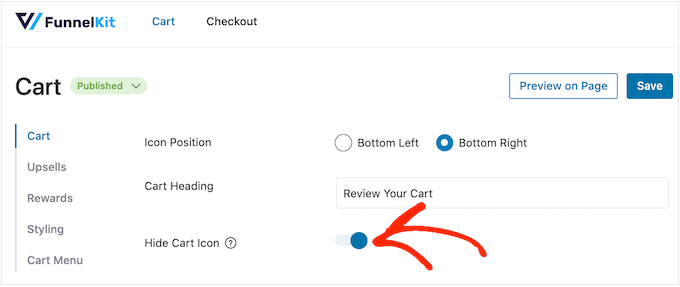
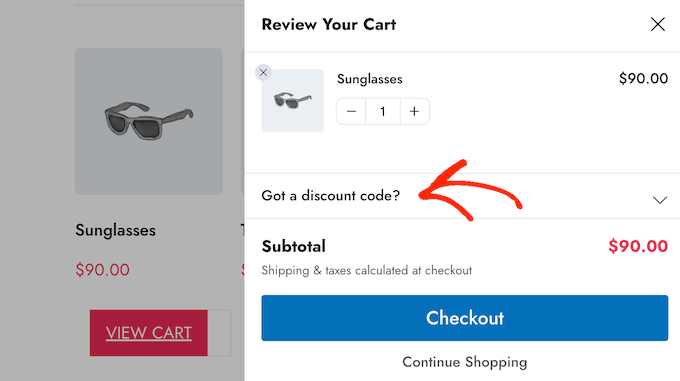
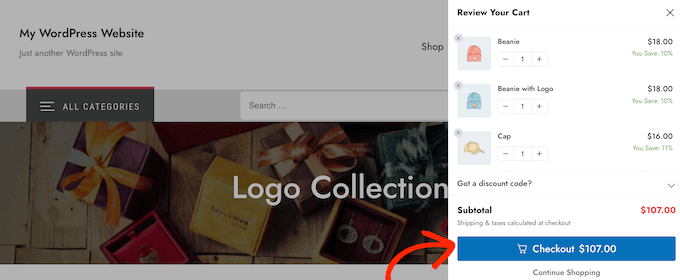
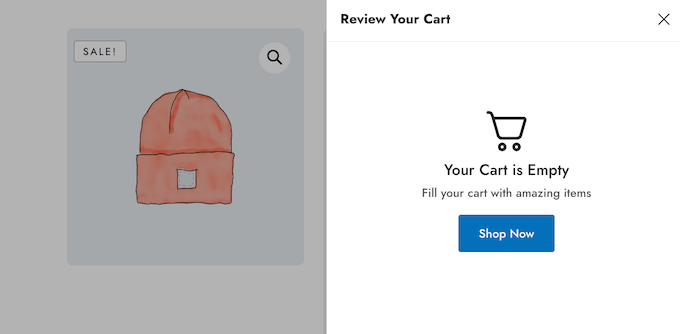
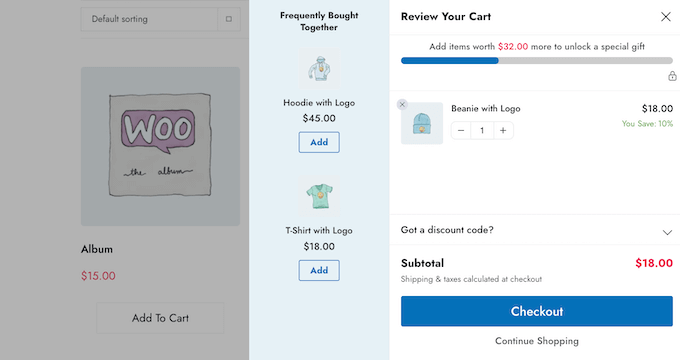
By default, the plugin shows ‘Review Your Cart’ at the top of the sliding side cart.
You can replace this with your own messaging by typing into the ‘Cart Heading’ field.
If you don’t want to show a heading, then simply leave the field empty.
By default, FunnelKit shows the cart icon before the shopper adds any items to their basket.
If you prefer, then you can hide the icon until the visitor starts adding items. Simply click on the ‘Hide Cart Icon’ toggle so that it turns blue.
This is all you need to create a basic sliding side cart, but there are settings that can get you even more sales. With that in mind, let’s take a look at FunnelKit’s more advanced features.
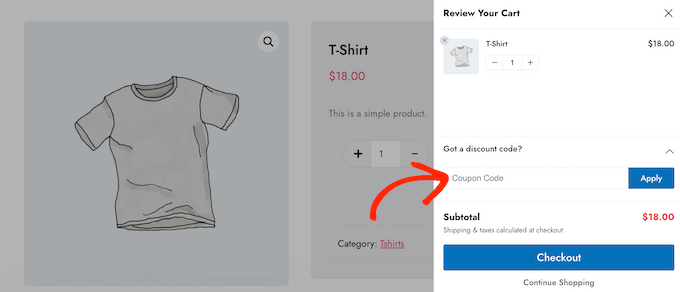
Accept Coupons in the WooCommerce Sliding Side Cart
When the customer clicks on ‘Apply,’ the sliding cart will show how much they’ve saved.
Since customers can see the discount straight away, this will encourage them to add more items to their basket and may reduce your cart abandonment rates.
You can create these codes using the built-in WooCommerce coupon feature or by using a coupon code plugin.
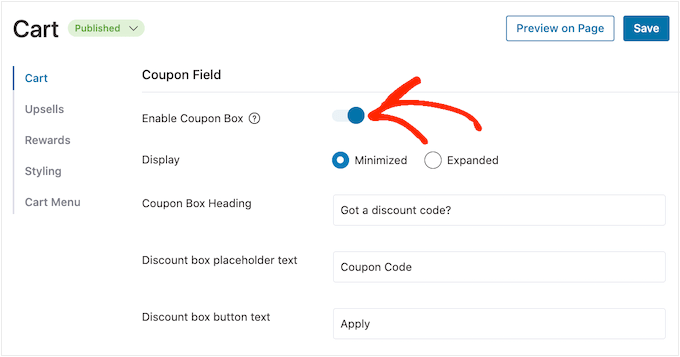
To add the coupon field, click on the ‘Enable Coupon Box’ toggle, which turns it from grey (disabled) to blue (enabled).
After that, you can switch between ‘Minimized’ and ‘Expanded’ layouts. Minimized takes up less space so it’s less distracting, but shoppers will need to expand the coupon section before they can type in any codes.
In the following image, you can see the minimized layout.
After choosing a layout, you can change the text that FunnelKit uses for the coupon box heading, discount placeholder text, and button text.
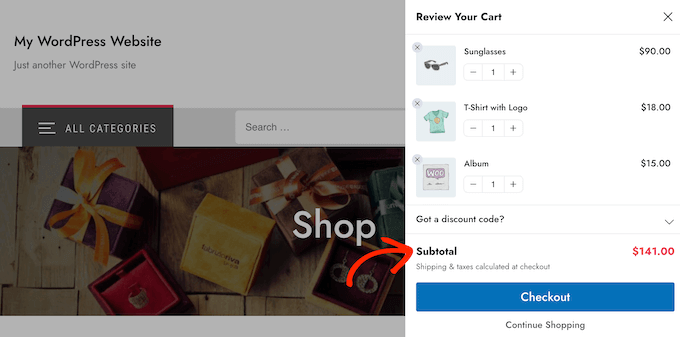
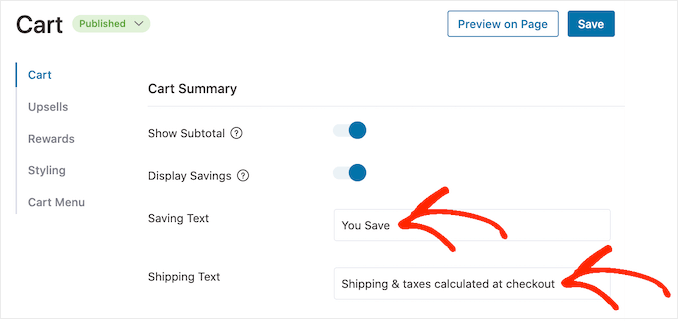
Customize the Cart Summary
The cart summary shows customers how much their purchase will cost. This helps reduce cart abandonment rates since there are no nasty surprises at checkout.
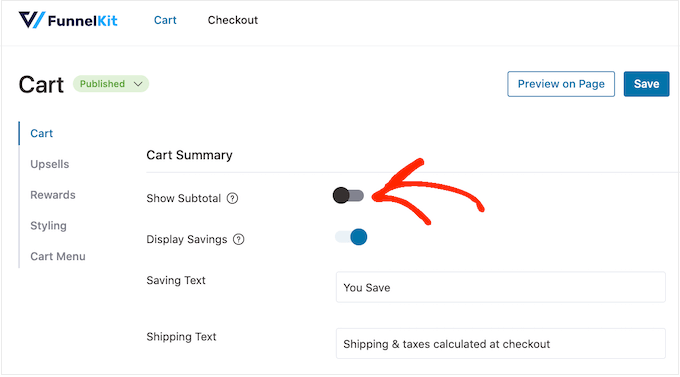
For that reason, we recommend leaving the ‘Show Subtotal’ toggle enabled.
However, if you want to simplify the side cart, then you can click to disable the ‘Show Subtotal’ toggle.
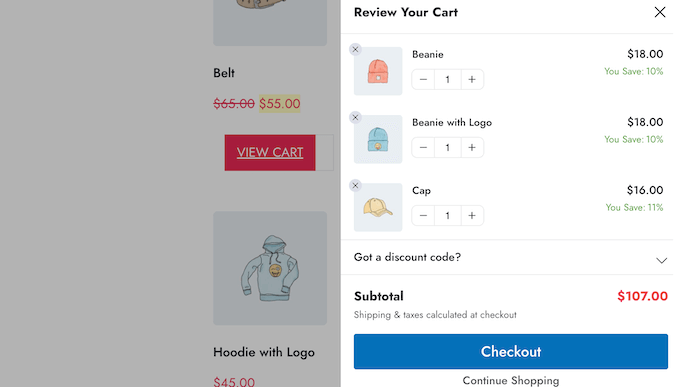
You can also show any savings the customer has qualified for, including discounts from any coupons they’ve applied.
If you prefer to hide this information from the sliding side cart, then you can disable the ‘Display Savings’ toggle.
You can also replace the ‘Saving Text’ and ‘Shipping Text’ with your own custom messaging.
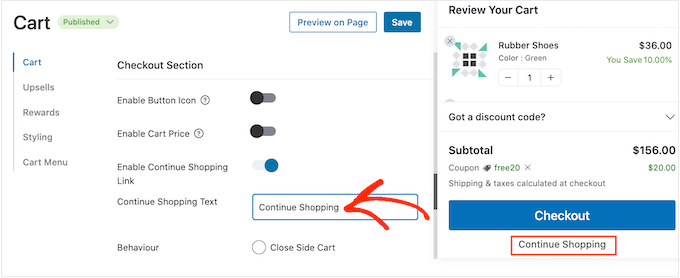
Customize the WooCommerce Cart’s Call To Action
The sliding side cart has a default checkout button, but you can customize this call to action button to get more conversions. To start, you can add a checkout icon using the ‘Enable Button Icon’ toggle.
You can also add the cart price to the checkout button using the ‘Enable Cart Price’ toggle.
This may help shoppers keep track of how much the cart will cost, especially if you’ve removed the subtotal from the cart summary section.
By default, FunnelKit adds a ‘Continue Shopping’ link at the bottom of the sliding side cart. You can replace this text with your own messaging by typing into the ‘Continue Shopping Text’ field.
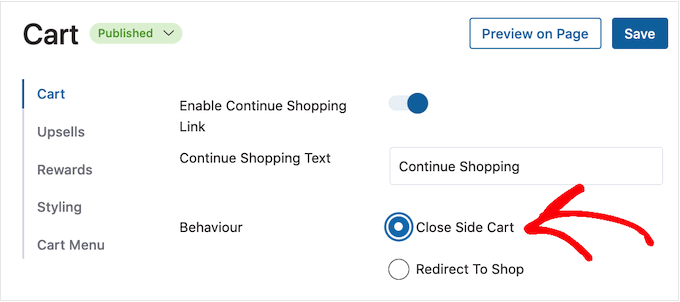
After that, choose whether this link will simply close the side cart panel or redirect the shopper to your WooCommerce store page.
Most shoppers will expect to exit the sliding cart, so we recommend selecting the ‘Close Side Cart’ button.
If you select ‘Redirect to Shop,’ then you may want to change the ‘Continue Shopping Text’ text so it’s clear what will happen when customers click the link.
Create a Custom Empty Cart Screen
It is possible to hide the cart button until the shopper adds at least one item to their basket, following the process described above.
However, if you don’t hide the button then customers may sometimes see an empty cart screen.
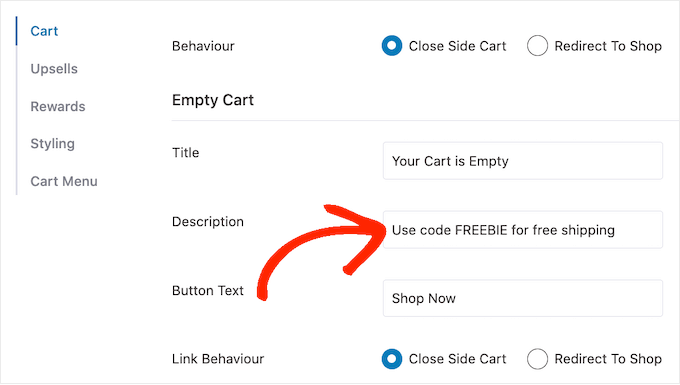
You can change the title, description, and button text using the settings in the ‘Empty Cart’ section. Typically, you’ll want to encourage customers to start shopping. For example, you might talk about things you offer such as free shipping or a money-back guarantee.
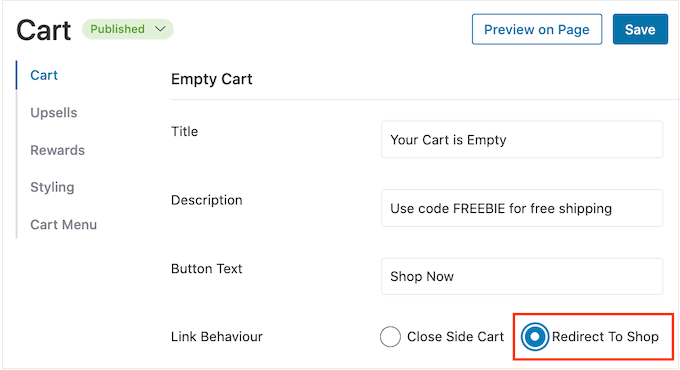
You can also choose whether clicking on the ‘Shop Now’ button will take the customer to the WooCommerce store page, or simply close the side panel.
We recommend selecting ‘Redirect To Shop’ as this will make it easier for shoppers to start adding items to their carts.
Add The Cart Icon Anywhere on your Site
If you want more control over where the cart icon appears, then you can add it to any page, post, or widget-ready area using a shortcode. You can also add it to your site’s menu.
This is a great choice if you selected ‘None’ in the ‘Icon Visibility’ settings following the process described above.
However, if you selected ‘WooCommerce Pages’ then this method allows you to add the cart icon to other important areas of your site. For example, you might add the icon to your custom home page or contact form.
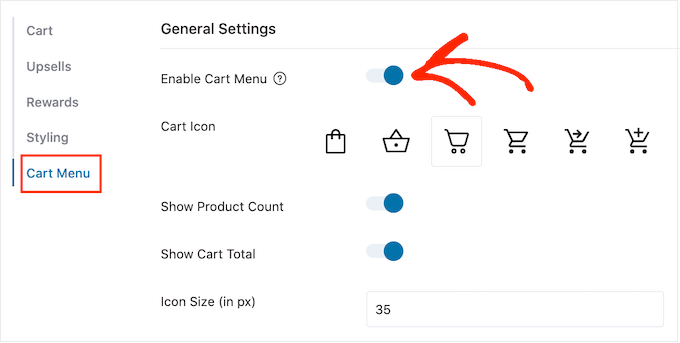
To start, select ‘Cart Menu’ and then click on the ‘Enable Cart Menu’ toggle.
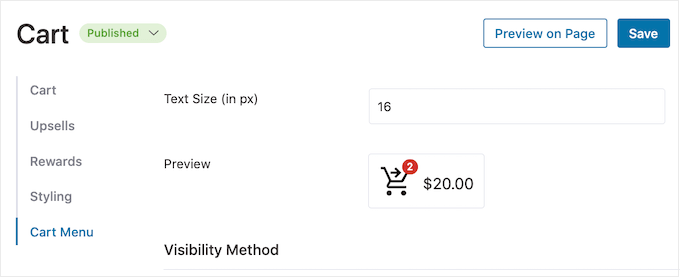
You can now change how the icon looks by selecting one of the icon templates, and choosing whether to show the product count and cart total as part of the icon. This information can help visitors keep track of their carts.
You can also change the icon size and text size. As you make changes, the small preview will update automatically so you can try different settings to see what looks the best.
When you’re happy with how the sliding side cart icon looks, click on the ‘Save’ button.
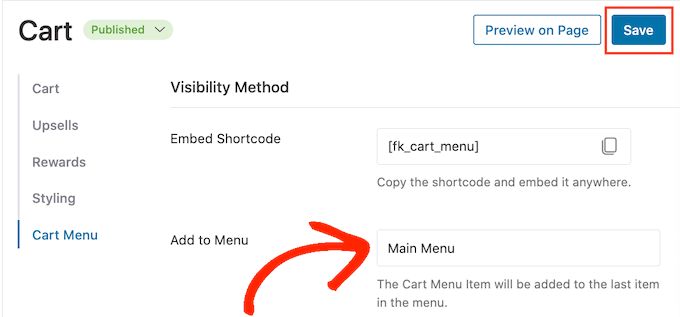
You can now add the icon to any page, post, or widget-ready area using the code next to ‘Embed Shortcode.’
Another option is to add the icon to your site’s navigation menu. In this way, the sliding side cart is always within easy reach, without distracting from the main page content.
To do this, open the ‘Add to Menu’ dropdown and choose the menu you want to use.
After that, click on the ‘Save’ button.
Now if you visit your WordPress website, you’ll see the cart icon in the navigation menu.
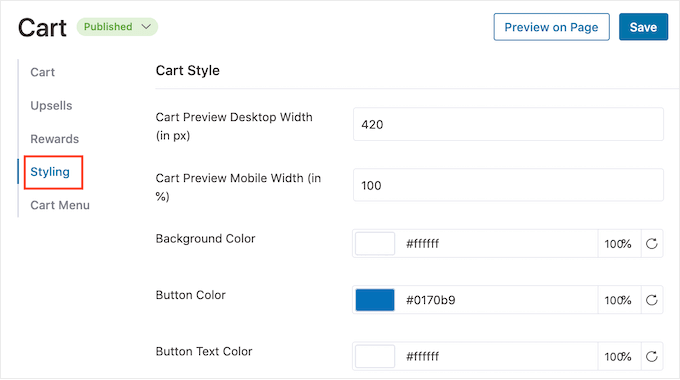
Add Your Own Colors and Branding
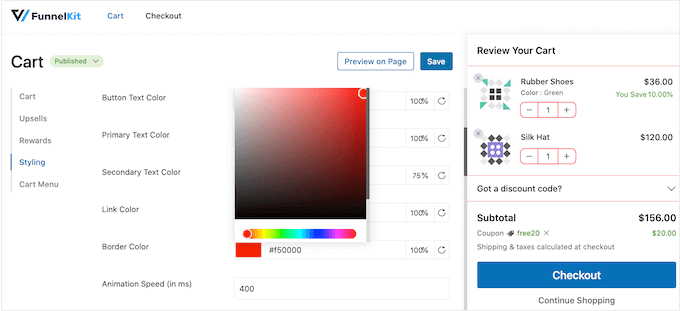
You may want to change the sliding side cart’s colors to better match your WooCommerce theme or branding. To change the text color, button color, link color, and more, go ahead and click on ‘Styling.’
To change any of the default colors, simply give it a click. This opens a popup where you can try out different colors.
For example, in the following image, we’re customizing the border.
Another option is to type a hex code into the ‘Hex’ field. This is perfect if you already have a specific shade in mind.
If you don’t know what hex code to use, then it may help to use a site like HTML Color Codes. Here, you can explore different colors and then get a code that you can simply paste into the FunnelKit plugin.
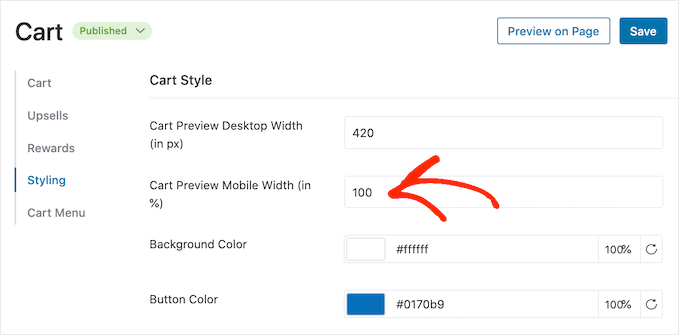
How to Create a Responsive Sliding Side Cart
Many people buy products and services using a mobile device. With that in mind, you’ll want to make sure the sliding side cart looks just as good on smartphones and tablets, as it does on desktop computers.
Here, it may help to change the cart’s width so it doesn’t completely fill the small screen of a mobile device. To do this, click on ‘Styling’ and then look at the ‘Cart Preview Mobile Width.’
While you’re on this screen, you can also change the width of the sliding side cart on desktop. To do this, simply change the number in the ‘Cart Preview Desktop Width’ field.
How To Publish Your Sliding Side Cart
When you’re happy with how the sliding side cart is set up, it’s time to make it live. Simply click on the ‘Draft’ button next to ‘Cart’ and then choose ‘Publish.’
Now if you visit your online store, you’ll see the sliding cart live.
If you want to remove the sliding side cart at any point, then just head back to FunnelKit » Cart in the WordPress dashboard. Then, click on the ‘Publish’ button and select ‘Draft.’
Method 2. Add an Advanced Sliding Side Cart (With Upsells, Cross-Sells, and Rewards)
If you want to increase the average order value on your store, then you can upgrade to FunnelKit Cart Pro. This advanced sliding side cart plugin adds powerful upsell, cross-selling, and reward features to the FunnelKit sliding side cart.
With this plugin, you can recommend related products every time a customer adds an item to their cart.
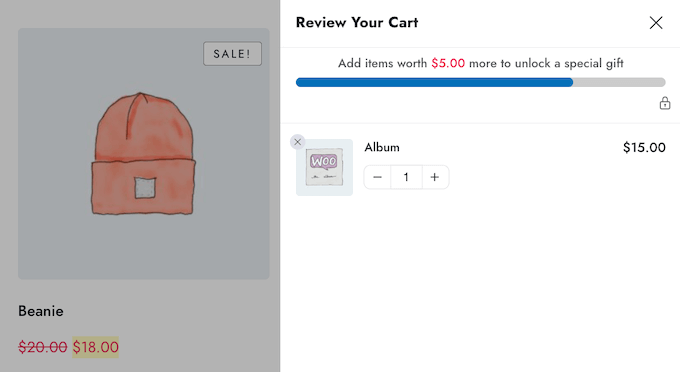
You can also create unique rewards such as coupon codes and free gifts, and then promote them inside the sliding cart.
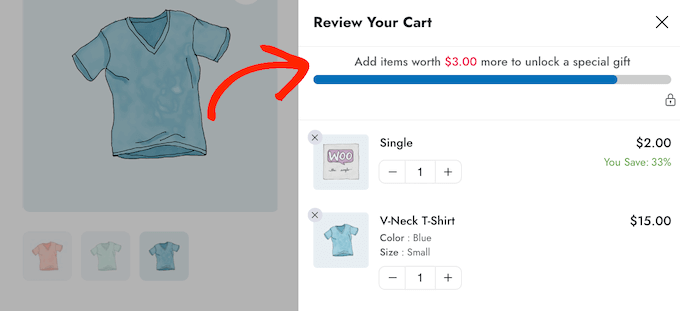
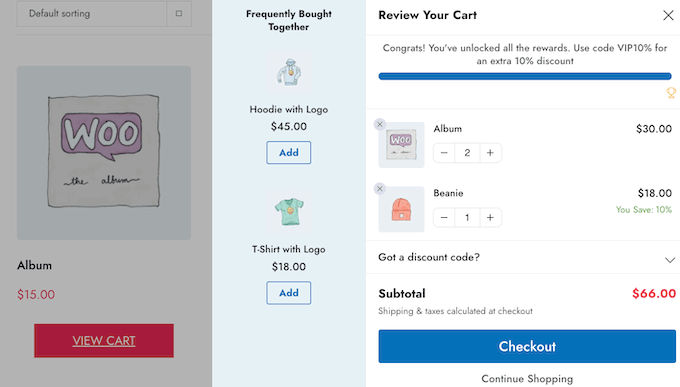
FunnelKit can even track how much more the customer needs to spend, in order to unlock the next reward.
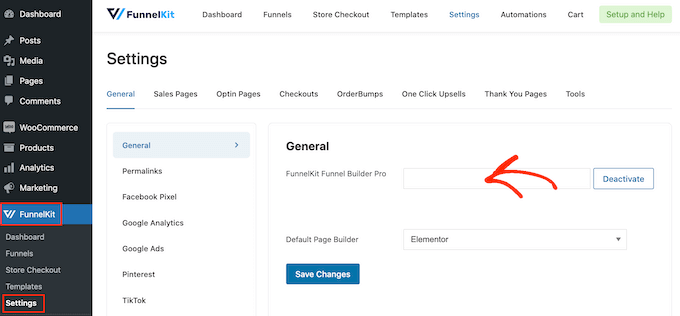
To add these powerful features, you’ll need to upgrade to FunnelKit Funnel Builder Pro. Just be aware that you’ll need the Plus or higher plan.
After buying a plan, log into your FunnelKit account. Here, you’ll find the FunnelKit Funnel Builder Pro plugin, plus FunnelKit Funnel Builder and FunnelKit Cart. You’ll need to install all three plugins to unlock the advanced sliding cart features.
First, you’ll need to install and activate the three plugins. If you need help, then please see our guide on how to install a WordPress plugin.
Upon activation, go to FunnelKit » Settings and add your license key to the ‘FunnelKit Funnel Builder Pro’ field.
You can find this information by logging into your account on the FunnelKit website. With that done, click on ‘Activate.’
After that, simply go to FunnelKit » Cart.
You can now configure and customize the side cart by following the same process described in method 1. When you’re happy with how the sliding side cart is set up, you’re ready to add upsells, cross-sells, and rewards.
Get More Sales By Upselling and Cross-Selling WooCommerce Products
When a customer opens the sliding side cart, you can show them unique upsell and cross-sell promotions based on the items in their shopping basket.
Upselling is where you encourage shoppers to buy a higher-priced product instead of the one they already have in their shopping cart.
For example, imagine a customer adding a waterproof jacket to their cart. You might suggest a higher-quality jacket that’s more durable, versatile, and comes in different colors.
Cross-selling is where you promote a product that’s related to something the customer is already buying. For example, if they add a greeting card to their cart, then you might encourage them to buy chocolates or flowers too.
WooCommerce has a linked product feature that allows you to create upsells and cross-sells. For more information, please see our guide on how to upsell products in WooCommerce.
However, you can also create upsells and cross-sells directly from the FunnelKit dashboard. This is the quickest option, so it’s the one we’ll be using in this guide.
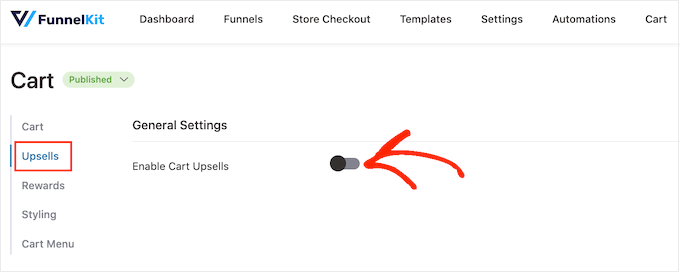
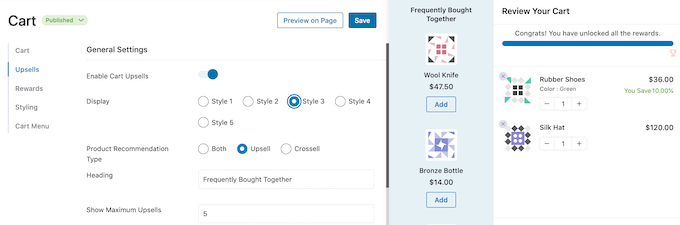
To start, click on the ‘Upsells’ option and then select ‘Enable Cart Upsells.’
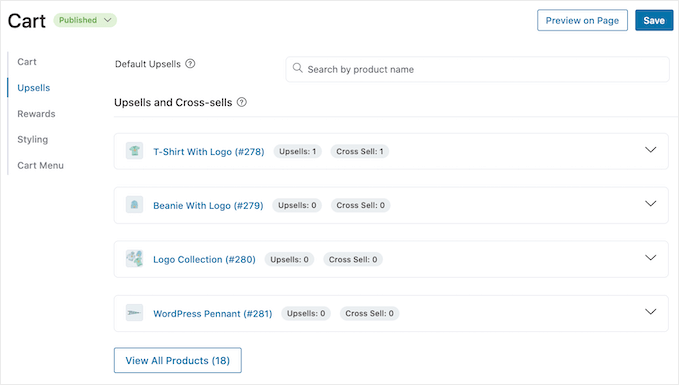
After that, scroll to the ‘Upsells and Cross-Sells’ section.
Here, you’ll see all the products on your online store.
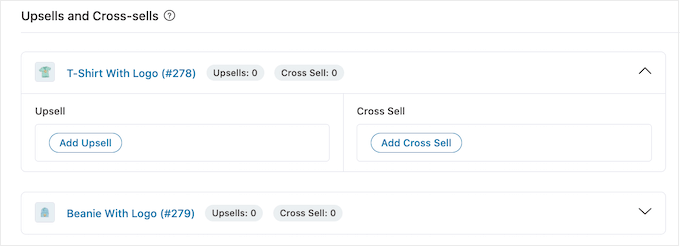
Simply click on the item where you want to add one or more linked products.
Then, click on either ‘Add Upsell’ or ‘Add Cross Sell’ depending on the kind of promotion you want to create.
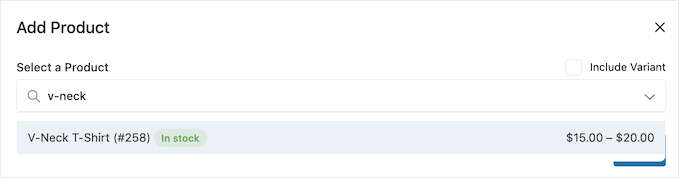
In the popup, start typing the product that you want to use as the upsell or cross-sell. When the right product appears, give it a click.
To offer multiple products, simply follow the same process described above.
With that done, simply click on the ‘Add’ button.
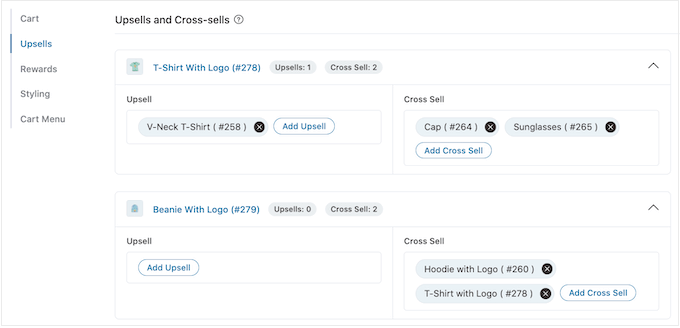
You can now create unique cross-sell and upsell campaigns for every product in your store, simply by following the same process described above.
Now, you’re ready to customize how the upsell and cross-sell promotions will look on your sliding side cart.
To start, try switching between different styles by clicking the radio buttons next to ‘Display.’
The live preview will update automatically so you can try different styles to see which one you like the best.
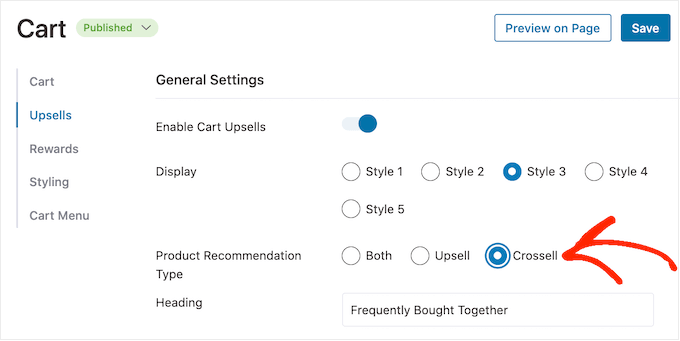
By default, FunnelKit will show both upsells and cross-sells in the sliding side cart. If you prefer then you can show only upsells, or only cross-sells using the radio buttons in ‘Product Recommendation Type.’
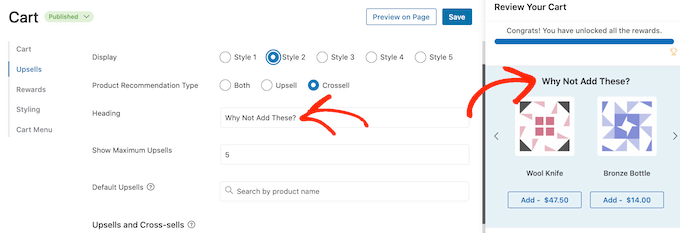
Next, you can change the heading that FunnelKit shows above the upsell or cross-sell promotion by typing it into the ‘Heading’ field.
Just be aware that FunnelKit will use the same heading for both types of promotion.
After that, you can set the maximum number of suggested products that FunnelKit will show, by typing into the ‘Show Maximum Upsells’ field.
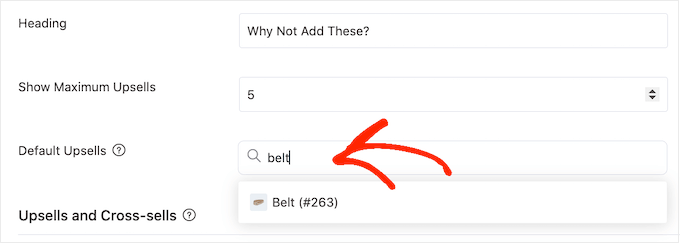
Wherever possible, it’s a good idea to create unique upsell and cross-sell promotions for every product. However, if your online store has lots of items then this might not be possible.
With that in mind, you can set a default upsell product that FunnelKit will promote when no linked products are available. To do this, simply type the name of a product into the ‘Default Upsells’ field. When the right product appears, give it a click.
When you’re happy with the upsell and cross-sell promotions you’ve created, don’t forget to click on ‘Save’ to store your changes.
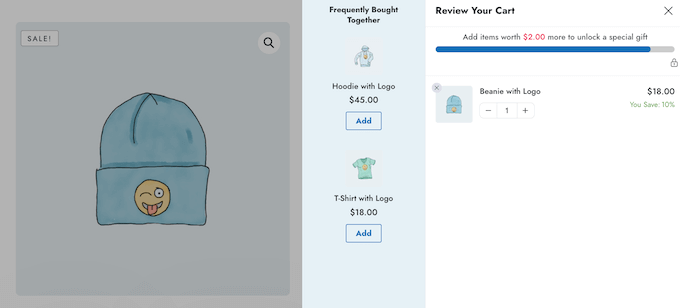
Offer Free Shipping, Discounts, and Free Gifts
You can often increase the average order value by giving customers a reason to spend more. With that in mind, FunnelKit allows you to create various rewards and then promote them as unlockable bonuses in the sliding side cart.
For example, you might offer free shipping if the customer exceeds a minimum spend. FunnelKit will even show customers how much more they need to spend to unlock their prize.
FunnelKit allows you to offer three different rewards: free shipping, a discount, and a free gift.
To offer free shipping, you’ll need to have already set up shipping in your WooCommerce store. For step-by-step instructions, please see our complete WooCommerce made simple guide.
Meanwhile, the ‘discount’ reward auto-applies a coupon when the customer reaches the minimum spend. If you want to offer this reward, then you’ll need to create a percentage discount coupon using either the built-in WooCommerce coupon feature or a WordPress coupon plugin.
After that, you’re ready to create a reward by selecting ‘Rewards’ in the FunnelKit settings and then clicking on ‘Create Reward.’
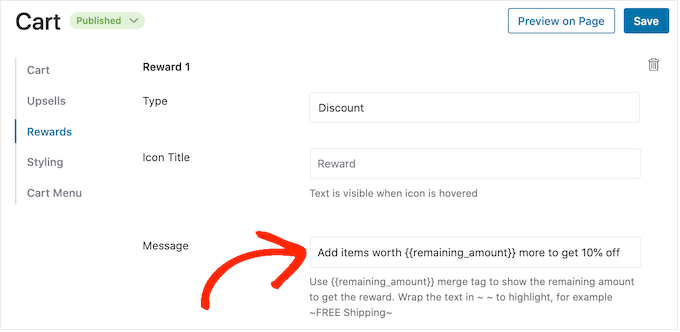
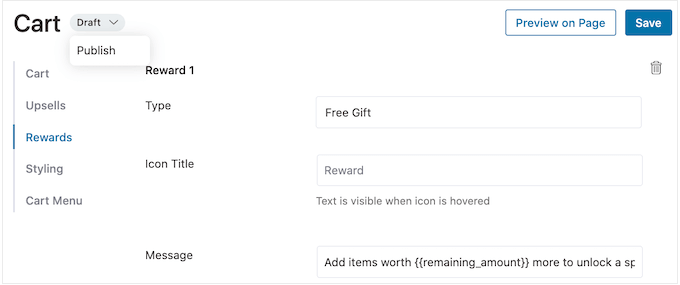
You can now open the ‘Type’ dropdown and choose the kind of reward you want to create.
No matter whether you choose free gift, free shipping, or discount, you can change the text that FunnelKit shows to customers by typing into the ‘Message’ field.
If you do make any changes, then be careful not to edit {{remaining_amount}} as this allows FunnelKit to show how much more the customer needs to spend.
If you’re offering a discount, then make sure you change the message to show how much the customer will save.
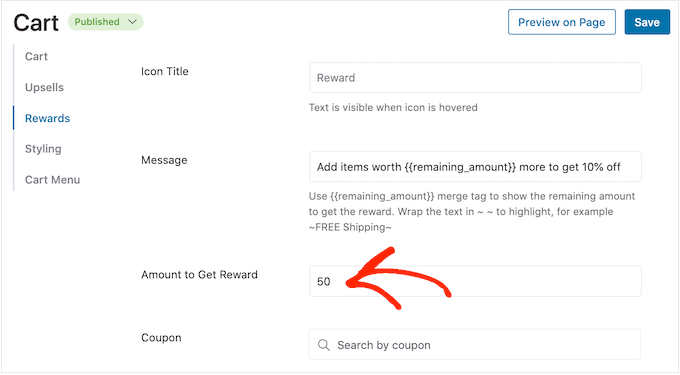
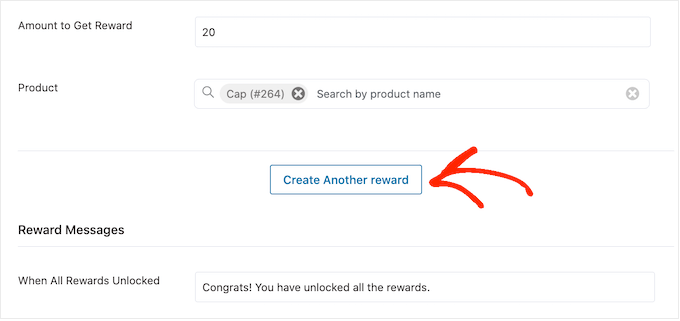
With that done, type a number into the ‘Amount to Get Reward’ field. This is how much shoppers must spend, in order to unlock the reward.
If you’re offering a percentage discount, then you need to specify which coupon FunnelKit should auto-apply.
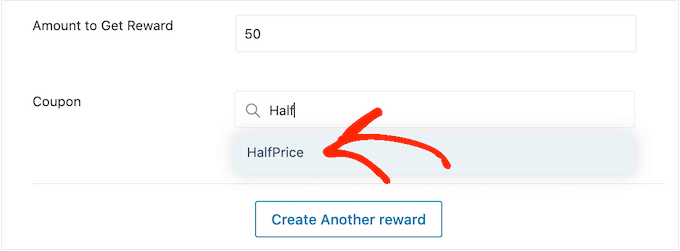
In the ‘Coupon’ field, start typing the coupon that you want to use. When the right code shows up, give it a click.
Now, FunnelKit will auto-apply the coupon when someone meets the minimum spend.
Offering a free gift instead? Then start typing the name of the gift into the ‘Product’ field.
When the right product shows up, give it a click.
Now, FunnelKit will add this item to the customer’s shopping cart as soon as they meet the minimum spend.
To add more rewards, simply click on ‘Create Another Reward.’
You can now configure the discount, free gift, or free shipping reward by following the same process described above.
By default, FunnelKit will show the following message once a customer qualifies for all the awards: ‘Congrats! You have unlocked all the rewards.’
To show a different message instead, simply type into the ‘When All Rewards Unlocked’ field. You might even offer the customer a special bonus for unlocking all your rewards, such as an exclusive coupon code to use on their next purchase.
When you’re happy with how your rewards are set up, click on the ‘Save’ button.
How To Publish Your Sliding Side Cart
When you’re ready to make the sliding side cart live, simply select the ‘Draft’ button next to ‘Cart.’ You can then click on ‘Publish.’
If you want to remove the sliding side cart at any point, then simply head back to FunnelKit » Cart in the WordPress dashboard. Then, click on the ‘Publish’ button and select ‘Draft.’
“404 Page Not Found”: This error message has probably appeared on your screen while browsing the internet at some point. 404 Errors are the common web error types & can be a real headache for site visitors and owners. If you need help fixing the 404 Page Not Found error on WordPress. We’ve got you [...]
Are you looking for a comparison between WPForms, Gravity Forms, and Formidable Forms?
These three are the best WordPress form plugins in the market. However, picking the right form builder can be challenging for many website owners.
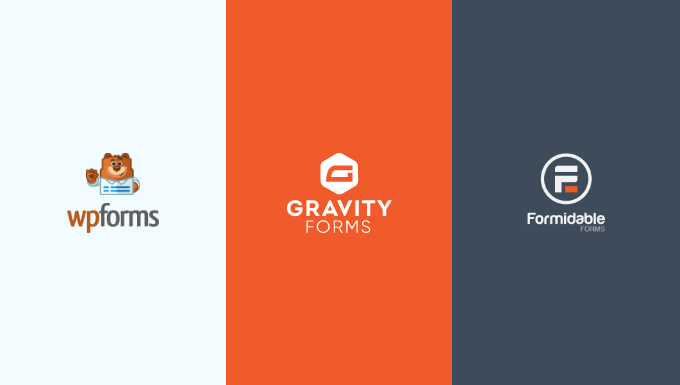
In this article, we’ll compare WPForms vs Gravity Forms vs Formidable Forms and show which is the best.
Introduction to WordPress Form Plugins
WPForms, Gravity Forms, and Formidable Forms are among the most popular WordPress form plugins that you can use. Each of them offers unique features and allows you to add different forms to your website.
WPForms was launched in 2016 by Syed Balkhi (founder of WPBeginner) and Jared Atchison. Since its launch, over 5 million WordPress sites have been using the plugin. The goal of creating WPForms was to offer an easy and powerful form plugin. It takes the pain out of creating online forms by making the process beginner friendly.
Gravity Forms is created by the team at Rocketgenius. It is a WordPress plugin that lets you add forms to your WordPress site. The plugin also specializes in helping developers build complex form-related solutions.
Formidable Forms is another powerful WordPress form builder created by Steph Wells and Steve Wells. You can use it to create a wide range of forms from simple contact forms to advanced solutions-focused forms like mortgage calculators, directories, listing forms, and more. Formidable Forms is part of WPBeginner Growth Fund companies.
That being said, let’s compare these WordPress form plugins and find out which is the best for your use case. In our research, we tried dozens of WordPress form plugins, and have decided to compare these top 3 form plugins in the following criteria:
When it comes to picking a WordPress form plugin, it is essential to choose a tool that is easy to use. The form builder should allow users to easily customize their forms without the need to edit code or hire a developer.
Let’s see how the 3 plugins compare to each other for ease of use.
WPForms – Ease of Use
WPForms is a beginner-friendly form plugin for WordPress. It offers a drag-and-drop form builder that is very super simple to use.
You can easily customize any form by adding multiple form fields from the menu on your left. All you have to do is drag the field and drop it onto the form template.
WPForms also makes it very easy to add your forms anywhere on the WordPress website. The best part, you can do all this within the form builder. You can click the embed button, and WPForms will show you options for adding your form.
For instance, you can create a new page or select an existing one to embed your forms.
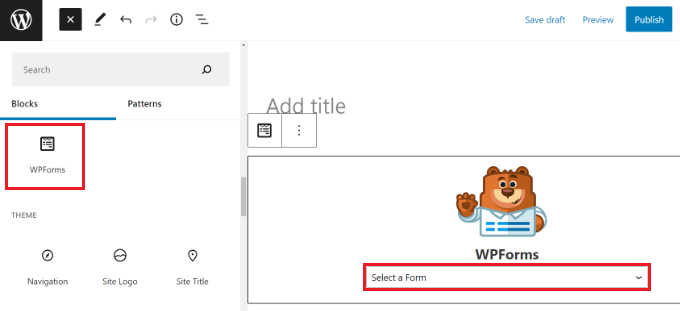
You can also manually add your form to any page or post using the WordPress block. Besides that, the plugin lets you use shortcodes to add a form to your WordPress website.
Gravity Forms – Ease of Use
Gravity Forms also offers a drag-and-drop form builder, and it lets you create all types of forms without editing code.
You can quickly rework your form from inside the WordPress dashboard. The form builder offers different form fields that you can add by simply placing them onto the template.
After creating a form, Gravity Forms also lets you easily embed it on your website. Just like WPForms and Formidable Forms, you get an option inside the drag-and-drop builder to add your form.
Gravity Forms also offers a WordPress block to easily embed your forms on any page or post. Plus, you can use shortcodes or add the forms manually anywhere on your site.
Formidable Forms – Ease of Use
Formidable Forms is a user-friendly plugin that to lets you customize your forms using a drag-and-drop form builder, just like WPForms and Gravity Forms.
You can simply drag any form field from the options on your left and place them on the template. The plugin also lets you rearrange the order of the fields by simply moving them up or down or side to side.
Formidable Forms makes it very easy to embed your forms anywhere on your website. You can use the Formidable Forms block to add the form to any post or page. Or click the embed button in the form builder to embed your forms.
Winner – Tie
When it comes to ease, all 3 plugins perform equally well. Each of them offers a drag-and-drop functionality, which lets you edit and customize forms with editing code easily. Plus, each plugin makes it very easy to embed the forms anywhere on the website.
WPForms has a slight edge because it leans on decisions over options by giving you over 600+ form templates and easy-to-use choices whereas Gravity Forms and Formidable Forms are built more for developers.
Form Templates
Form templates are another important factor to consider when choosing a form plugin for WordPress.
Templates help save time as you don’t have to create a form from scratch. You can quickly edit it according to your requirements or simply use the default template to add a form to your website.
Let’s see how WPForms vs Gravity Forms vs Formidable Forms stack up in terms of form templates.
WPForms – Form Templates
With WPForms, you get over 600 prebuilt form templates. Whether you’re looking to create a simple contact form, feedback form, request a quote form, payment form, or registration form, WPForms has you covered.
The plugin categorizes form templates into different categories in the form builder. For instance, you can find different templates for business operations, customer service, education, entertainment, event planning, feedback, health and wellness, and more.
Even in the free version of WPForms, you get a lot of form templates to get started.
Gravity Forms – Form Templates
Gravity Forms offers limited prebuilt form templates compared to WPForms and Formidable Forms.
You only get 15 form templates in the form builder. Some of these include a simple contact form, advanced contact form, donation form, eCommerce form, event registration form, survey, newsletter signup form, and more.
Formidable Forms – Form Templates
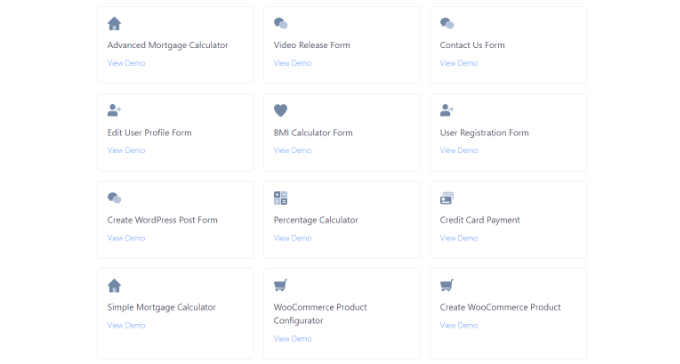
Formidable Forms offers over 175 WordPress form templates and examples you can use for your website.
What makes it different is that you get templates for advanced forms. For instance, you can create an advanced mortgage calculator form, net promoter score (NPS) survey form, car payment calculator form, life insurance calculator form, doctor visit form, signature forms, and more.
Besides that, you can find forms for payment collection, health and wellness, customer service, education, donations, event planning, and more.
Winner – WPForms
WPForms is a standout winner compared to Gravity Forms and Formidable Forms. You get the largest form template library in WPForms, with over 600 choices available. There are prebuilt templates for just about any type of form you want to create for your website.
Customization Options
A WordPress form plugin should allow you to edit and customize your form with ease. When selecting the right tool, you should look at the customization options the plugin offers.
Here’s a look at the different features offered by WPForms, Gravity Forms, and Formidable Forms.
WPForms – Customization Options
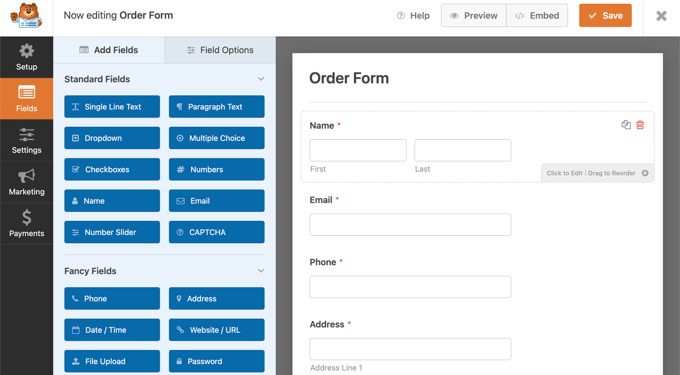
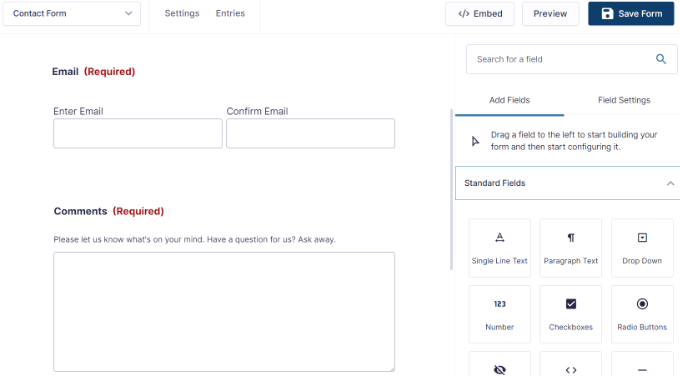
WPForms offers lots of customization options for your form. For starters, it offers different form fields that you can simply drag and drop from the menu on your left onto the template.
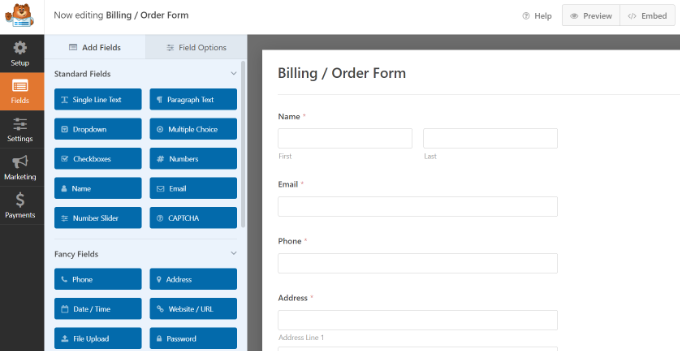
For instance, it offers standard fields like paragraph text, multiple choice, checkboxes, and more. Plus, you can add fancier fields like phone number, address, file upload, date/time, website, and more.
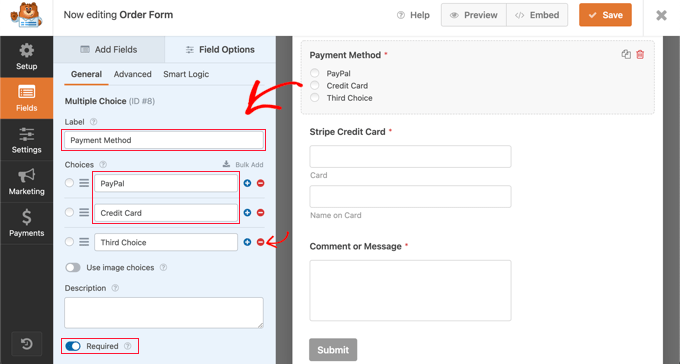
If you click on an existing form field, then you’ll see more options for customization.
You can edit the label of the field, make it a mandatory field, add smart logic, and more. For example, you can choose which payment methods to show in an order form and rearrange their order.
Instead of asking multiple questions at once, you can take the one-question-at-a-time approach. It will look like having a conversation face to face with a human, and boost form conversions.
Similarly, you can also use the lead forms addon to increase form conversions. It basically allows you to embed conversational forms on any page on your WordPress site.
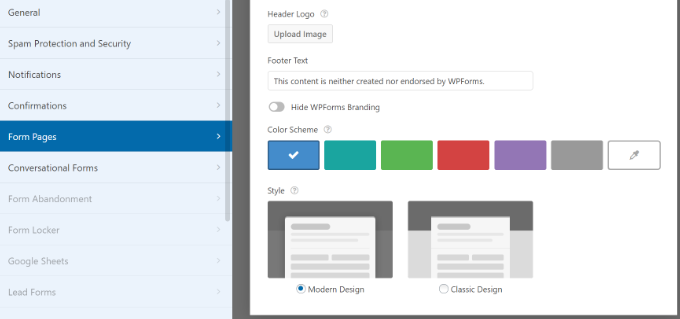
WPForms offers more customization features like custom form landing pages similar to Google forms. You can create a distraction-free landing page for your form and get more conversions.
The plugin lets you add a title and description for the page, a header logo, and edit the page URL. You also get to change the background color of the page and choose a style to make your forms more appealing.
Other customization options offered by WPForms include a save and continue feature. This lets your users save the progress while filling out a form and continue later to complete it. You can allow users to sign your online forms using their mouse or touchscreen.
If you have lengthy forms, then you can use the multi-page feature to split them into different pages. Or you can use conditional logic to show different form fields based on the user’s responses.
Besides that, you can also customize the notification and confirmation settings for your form. In the notification settings, you can edit details like email addresses, subject lines, names, messages, and more.
Similarly, you can also edit the confirmation message a user will see when they submit a form. You can show a thank you message, show a page, or redirect people to a specific URL.
Gravity Forms – Customization Options
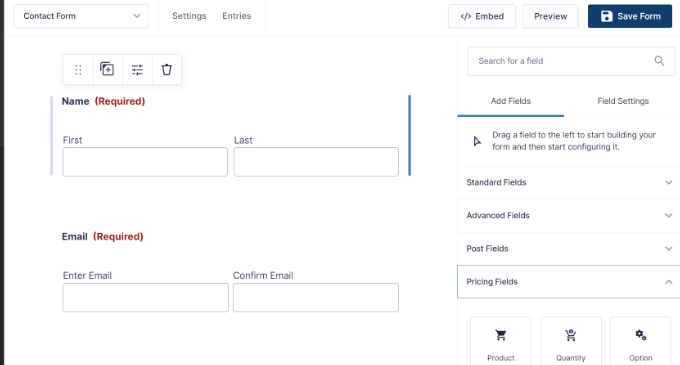
Gravity Forms offers different form fields to customize your form template.
These include standard fields, advanced fields, post fields, and pricing fields.
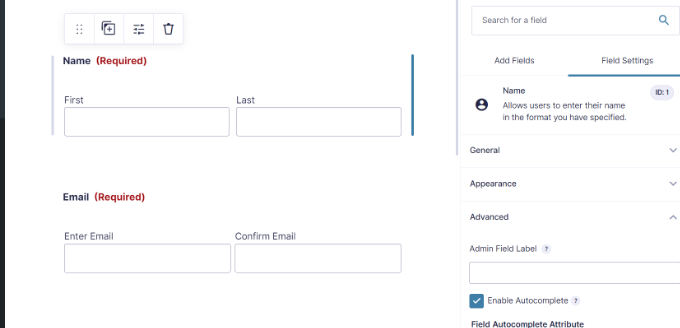
Just like WPForms and Formidable Forms, you can click on existing form fields to edit them further.
However, you’ll see a slight difference in the customization options. There are general settings for a field where you can change its label and add a description.
Other than that, you can edit the appearance of the field, change advanced settings like enabling field autocomplete, and add conditional logic.
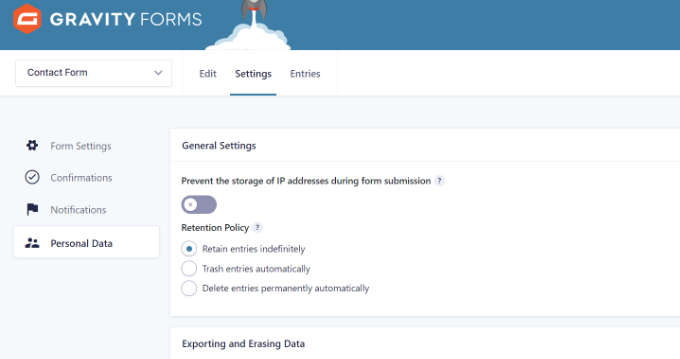
Other than that, you also get control over different form settings. For example, you can edit the notifications and confirmations settings in the form builder.
You can also configure ‘Personal Data’ settings similar to WPForms. These allow you to prevent the storage of IP addresses during form submission. Plus, you can enable integration with other tools for exporting and erasing personal data, which is helpful in complying with data regulations like GDPR.
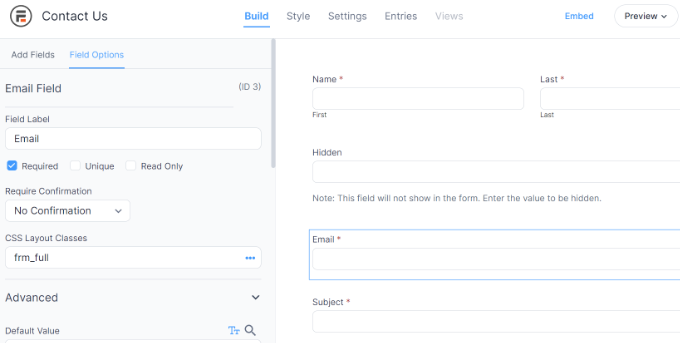
Formidable Forms – Customization Options
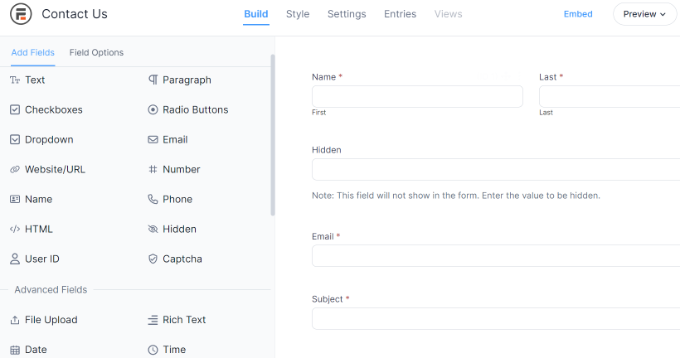
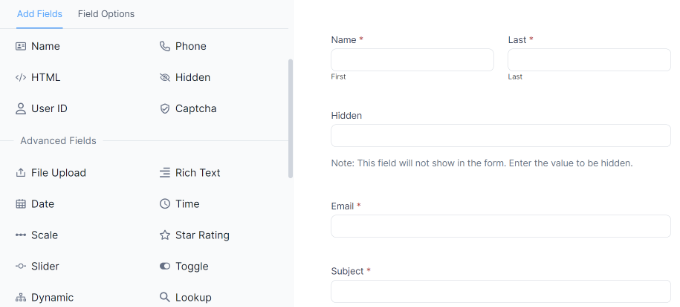
With the Formidable Forms drag-and-drop builder, you can easily customize your form with options such as prebuilt form fields that you add to your template.
What makes the plugin different from others is that it offers multiple form fields that will help you create advanced forms. For instance, you can add a user ID field, captcha, hidden field, appointments, lookup field, and more.
Besides that, you can easily edit each existing field in the template.
There are general options to change the label, add a CSS class, and more. Or you can view the advanced options to add a placeholder text, and description, edit the field size and allow maximum characters.
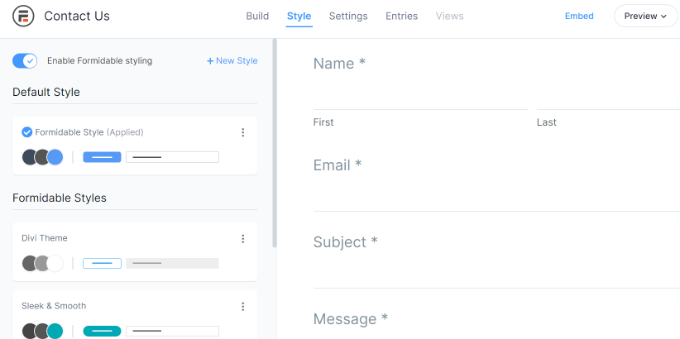
What’s different about Formidable Forms compared to WPForms and Gravity Forms is that it also offers different styles for your forms.
You can use the default style or choose from various options. This way, you can change the appearance of your forms without having to enter CSS code.
Other than that, you can also customize the form settings. For instance, the plugin lets you change the notification settings, and form permissions, and also allows form scheduling.
Winner – WPForms
After comparing all 3 plugins, we found WPForms to be the clear winner. It offers more customization features compared to Formidable Forms and Gravity Forms.
You can add different form fields, change their settings, rearrange them, and more using the drag-and-drop builder. Besides that, WPForms offers tons of features to make your form more appealing and boost conversions.
Additional Features and Integrations
Now that we’ve covered ease of use, templates, and customization options, let’s see how WPForms, Formidable Forms, and Gravity Forms compare in terms of additional features and integrations.
As a website owner, you’d want a WordPress plugin that easily works with third-party tools, payment services, and email marketing services. Here’s what each plugin has to offer.
WPForms – Additional Features and Integrations
WPForms offers lots of premium addons and integrations that extend its functionality and benefits.
For instance, you can accept file uploads with its post-submission addon. This way, users can easily submit content on the front end of your site without requiring access to the WordPress dashboard.
Similarly, you get addons for geolocation data and see where your form users are from. The user journey addon can show you the pages and posts people visited before submitting a form.
The plugin also offers a form abandonment addon that captures partial entries for a form. You can then recover those entries and encourage users to complete a form.
Aside from this, WPForms provides more addons for creating custom Captcha, allowing digital signatures, locking WordPress forms, creating interactive form layouts, and more.
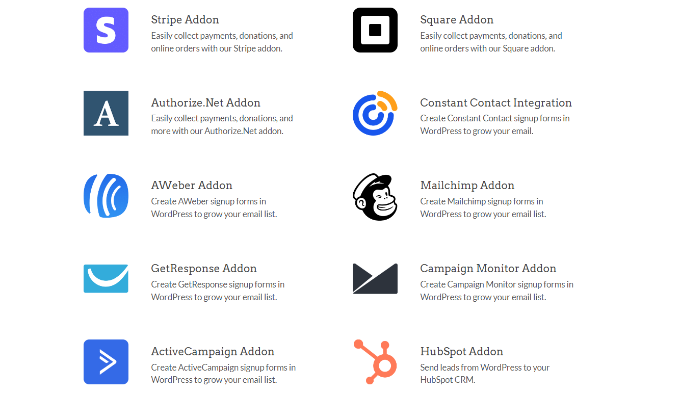
Another advantage of using WPForms compared to other plugins is that it easily integrates with different tools and plugins. For example, you can use it with popular email marketing tools like Drip, Mailchimp, and Constant Contact.
The plugin also supports payment gateways like Stripe, PayPal, Square, and Authorize.Net. You can also integrate WPForms with CRMs such as Salesforce and HubSpot.
Gravity Forms – Additional Features and Integrations
Gravity Forms also offers different addons that can help you get the most out of the plugin. However, the list is not as expansive as WPForms, and you’d have to pay extra to use third-party extensions.
You get additional features for setting up user registrations, creating surveys and polls, tracking users’ geolocation, collecting partial form entries, allowing signatures, and more.
Besides that, Gravity Forms also offers integrations with different tools and plugins.
You can easily integrate email marketing tools like AWeber, Constant Contact, Mailgun, and more. Plus, you can add anti-spam solutions like Akismet and reCAPTCHA.
Other integrations include Google Analytics, Dropbox, Zapier, Trello, ActiveCampaign, HelpScout, PayPal Checkout, 2Checkout, and Stripe.
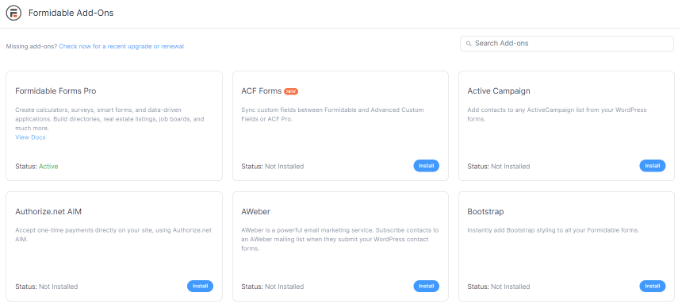
Formidable Forms – Additional Features and Integrations
Formidable Forms offers different addons and integration features. Most of the additional features are similar to WPForms and Gravity Forms.
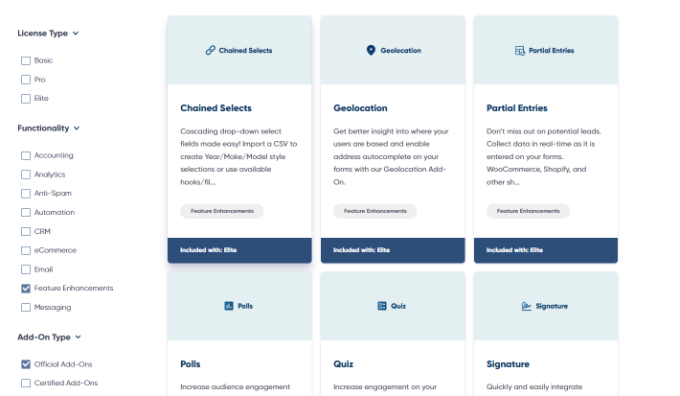
However, what makes Formidable Forms different is that you get several powerful features to create advanced forms, set up web applications, show stats on the front end, and more.
For instance, the plugin offers a form action automation feature to schedule email notifications, SMS messages, and other actions. It also offers API webhooks that let you send submissions to REST APIs.
It also offers a visual views addon that lets you display data from form entries on the front end of your website. You can create web apps to display form submissions in tables, grids, calendars, and other views.
This is great for showing testimonials and product reviews, adding a user-submitted events calendar, and displaying useful statistics.
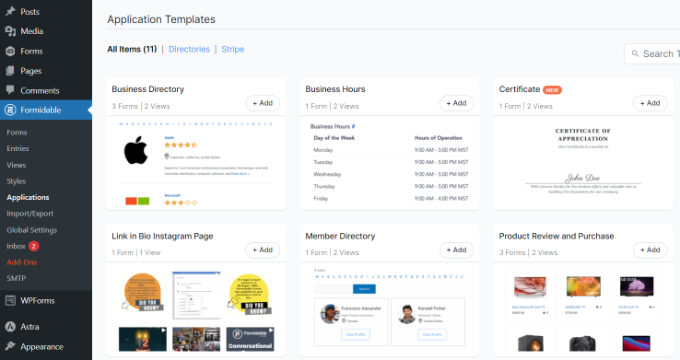
Besides that, Formidable Forms also lets you create applications for your website. It offers prebuilt templates that include different forms, views, and pages for your application. Simply select a template, and the plugin will take care of the rest.
You can create different applications, such as product reviews, real estate listings, testimonials, restaurant menus, certificates, and more.
For example, you can offer professional certificates in just a few clicks. Simply choose the certificate application template, and Formidable Forms will automatically add a form with a certificate generator on your website.
It will also add views for the certificate and certificate of completion, which users can see on the front end.
Other advanced features offered by Formidable Forms include converting WordPress forms to PDF, mapping form fields to PDF form fields, quizzes, repeater fields, SMS voting, front-end editing, and more.
Other than that, you can also integrate Formidable Forms with different payment services, email marketing tools, CRMs, and third-party plugins. It even works with Uncanny Automator and Zapier, so you can connect Formidable Forms to services like Asana, Slack, and Dropbox.
The best part about using Formidable Forms is that you get all the advanced features in one place, with everything included in a single pricing plan. If you were to use Gravity Forms, then you’d need to subscribe to multiple third-party addons.
For example, you’d need the basic Gravity Forms plan along with other extensions like Gravity PDF, File Upload Pro, Gravity View, Gravity Math, and so on. This can add to your overall cost and make it very expensive to use Gravity Forms.
Winner – Formidable Forms
While each plugin offers multiple additional features and integrations, Formidable Forms is the standout winner. It offers more advanced features that you can use to display form results on the front end, create complex forms, convert forms to PDF, create web applications, and use various addons to help users create form solutions for any scenario.
WPForms gets an honorary mention for marketing-related features, like form abandonment and digital signatures. It also integrates with popular email services, CRM software, tracking tools, payment gateways, and other plugins.
Pricing Plans
The next parameter we will compare WPForms vs Gravity Forms vs Formidable Forms is that of pricing. Let’s see which plugin offers the most value for money.
WPForms – Pricing
WPForms offers 4 different pricing plans suitable for all types of businesses. These include a Basic plan, which costs $49.50 per year, and you can use it for 1 website. It also offers all the essential features like premium templates, entry management, and file uploads.
If you want to use the plugin on more websites and require marketing integrations, then WPForms offers a Plus plan for $99.50 per year.
On the other hand, there is a Pro plan that includes everything from the Basic and Plus plans. It includes payment addons, conversion tools, and other advanced form features. This will close you $199.50 per year.
Lastly, there is an Elite plan for $299.50 per year, which has everything. You get to use it on unlimited websites and get all the features and integrations WPForms has to offer. Each premium plan comes with 14-day money back guarantee.
The best part, there is also a WPForms Lite version you can use for free. You get multiple form templates, standard fields for customization, spam protection, and other features.
Gravity Forms – Pricing Plans
Gravity Forms offer 3 premium plans, which include the Basic License, Pro License, and Elite License.
With the Basic License plan, you can use the plugin on 1 website. You also get addons for email marketing tools and spam protection services. This plan will cost you $59 per year.
Next, there is a Pro License plan that offers more addons. For instance, you get to integrate more email marketing services, CRMs, payment gateways, and third-party services. This plan will cost $159 per year.
Lastly, Gravity Forms offers an Elite License plan that includes all the features from the Basic and Pro plans. In addition to that, Elite plan users also get access to features like polls, quizzes, digital signatures, surveys, geolocation, and more. The Elite plan is available for $259 per year.
That said, Gravity Forms doesn’t offer a free version, like WPForms or Formidable Forms. You’d also need to pay extra to use different third-party addons and extensions.
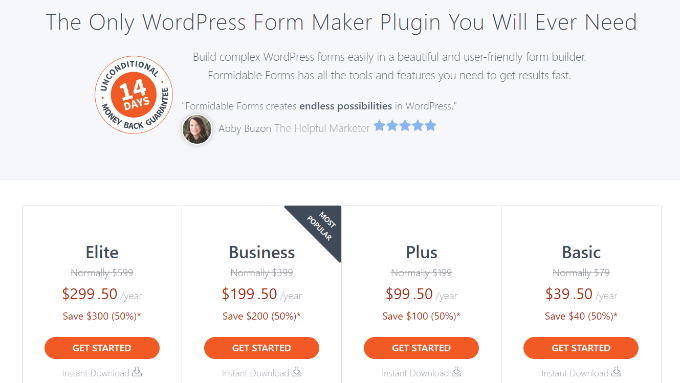
Formidable Forms – Pricing Plans
Formidable Forms lets you choose from 4 pricing plans. It starts with a Basic plan, costing $39.50 per year. You get 50+ form templates and basic features like conditional logic and file uploads.
Besides that, there is a Plus plan for $99.50 per year, and it offers more form templates and features. For instance, you get the Formidable Views feature, landing pages, and integration with Mailchimp, MailPoet Newsletters, and AWeber.
Next, it offers a Business plan that includes over 150 form templates, premium addons, more integrations, and additional features. This plan will cost you $199.50 per year.
Lastly, there is an Elite plan for $299.50 per year, and it includes all the features and integrations. You get all the templates and support for third-party tools like Salesforce, ActiveCampaign, and HubSpot.
Formidable Forms also offers a free version. You can get started for free and get features like drag and drop form builder, basic form templates, and standard form fields for customization.
Winner – WPForms and Formidable Forms
When it comes to offering the most value for money, both WPForms and Formidable Forms clearly stand out when compared to Gravity Forms.
Both of them offer 4 different pricing plans for businesses of all sizes. Plus, you get a free version, which helps small website owners, bloggers, and others to create WordPress forms without a considerable investment. You also don’t have to pay more to use multiple addons and advanced features.
Which is the Best WordPress Form Plugin?
WPForms, Gravity Forms, and Formidable Forms are some of the best WordPress form plugins you can get your hands on today.
However, we believe that WPForms is the best plugin for creating forms for your WordPress website. It is super easy to use and offers tons of features.
You get over 600 form templates, a drag-and-drop form builder, multiple form fields for customization, and additional settings to edit your form. Plus, there are different premium addons that allow you to expand the functionality of WPForms.
Not to mention, there is a WPForms Lite version available for free. It also includes lots of form templates and customization features. You can quickly create forms for your website using the free plugin.
On the other hand, if you’re a developer looking to save time on developing complex and advanced WordPress forms, then Formidable Forms is the perfect solution. You can create calculators and web applications, convert forms to PDF, and much more without editing code.
From compelling copy to efficient checkout processes, effective marketing, and more, there are a whole host of factors that combine to make a successful eCommerce site, but of them all, few make a bigger impact than performance. Poorly performing websites upset users, drive away potential customers and damage your SEO efforts. But why? How? And [...]