Research: The Truth Behind Make Money Online Videos on YouTube and TikTok (We Analyzed 344 Videos)

Have you ever wondered whether those YouTube and TikTok influencers teaching how to make money online are telling the truth?

We analyzed 354 videos from YouTube and TikTok to see whether the business model or earning potential they share is realistic for an average person.

Here’s what we found out.

While a lot of these make money online influencer videos paint a rosier picture than the truth of online entrepreneurship, there are still a lot of options to earn consistent income through the internet.

Below are our findings on online business statistics along with the original research data that we collected from YouTube and TikTok.

How online entrepreneurs make money according to YouTube and TikTok

The Trend of Online Work: An Overview

The COVID-19 pandemic showed millions of people that they could work from anywhere and at any time. As offices closed and all but the most essential services shut down, many jobs moved onto the internet.

This trend towards flexibility has persisted: even as most of the world has returned to normal, people still like working remotely. In fact, 45% of employees said they were likely to look for a new job if their employer required them to report to work in person.

Online work can also open up new opportunities for people who lost their jobs during the financial crises spurred on by the pandemic, said Haiyi Zhu, a professor at Carnegie Mellon University’s Human-Computer Interaction Institute who studies gig work. These workers might “turn to online, virtual work as either a transitional job or to find additional income sources” as they look for new full-time employment, she explained.

At the same time, social media platforms like YouTube and TikTok have made it easier than ever for people to learn about online work opportunities. Searches for online gig work or investment opportunities can lead a user to hours upon hours of content, explaining potential business ideas and suggesting how much an aspiring worker could earn.

At WPBeginner, we’ve summarized the money-making advice from hundreds of top videos, exploring the trends in business options and earning potential.

Of course, some videos might paint a rosier picture than the truth of online entrepreneurship. But, there are still a lot of options for earning consistent income through the internet.

For this report, our team used 177 videos from YouTube and 177 videos from TikTok, available in this repository.

On YouTube, we selected videos that came up at the top of a search for “how to make money online.” While on TikTok, we used hashtags like #makemoneyonline and #entrepreneurship to select videos with this theme. We analyzed the videos based on the business options, potential earnings, and required skillsets they advertised.

The potential earnings we discuss in this article were taken directly from the YouTube and TikTok creators whose videos we analyzed.

These numbers do not necessarily reflect accurate trends. Rather, we are presenting them as a reflection of how online creators advertise work opportunities.

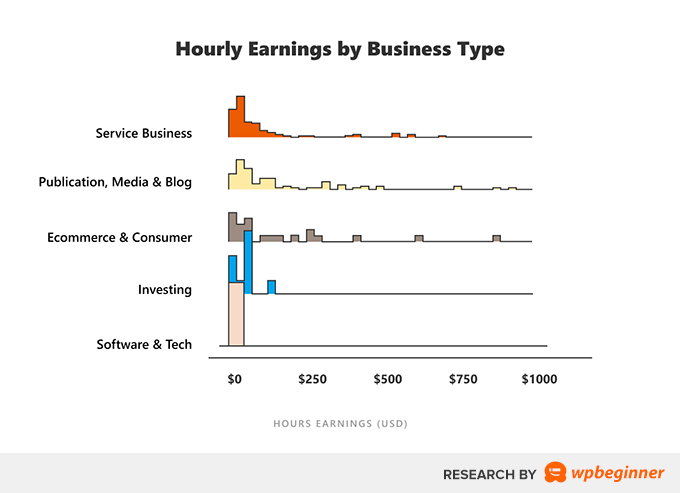
Wide Range of Earning Potential

After analyzing all of the videos from YouTube and TikTok, we found that the median pay these influencers advertised was about $50 per hour.

Distribution of Hourly Earnings by Platform - YouTube and TikTok Case Study

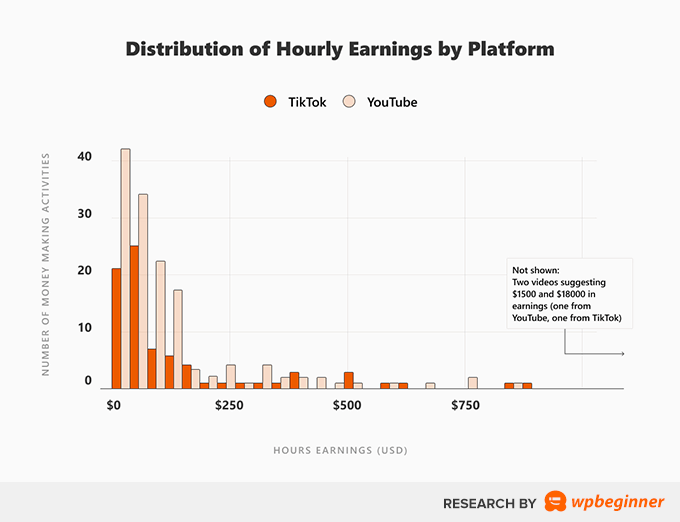
At the lowest end of the range, creators advertised microwork tasks, or series of small tasks (such as answering survey questions) that can be completed asynchronously over the internet. Microwork can lead to earnings as low as $1 per hour, according to the videos.

At the highest end of the range, video creators suggested that entrepreneurs can earn over $1,000 per hour for more skilled work like running a popular blog. In our expert opinion, this number is exaggerated and very rarely do individual bloggers get to such income level.

Overall, though, the earning potential mentioned in the videos skewed lower: 90% of the videos on both platforms advertised that workers would get under $300 per hour.

This statistic again should be taken with a grain of salt because it doesn’t factor in true-working hours because it’s unlikely to have a 40 hour work-week at that hourly rate.

Income instability is one of the most common challenges that online gig workers face, Zhu said. Her team has a paper currently undergoing peer review that names key issues across online gig workers and those that use online platforms to coordinate physical work, like driving for Uber or DoorDash. Other major challenges include a lack of employment benefits, health and safety (both physical and online), and a lack of power in the workplace, she said.

Some YouTube and TikTok creators advertise more lucrative career paths by talking about their own experiences getting rich, though their videos may be misleading.

For example, Adam Enfroy, a popular creator on both platforms, claims to make $300,000 a month through blogs and affiliate marketing, but this income is unrealistic for new marketers just starting out. According to statistics, the average earnings for professional, freelance marketers is $50 per hour or $100,000 per year only if you’re absolutely at the top of your game.

Making Money with Online Publishing

Business Types Mentioned by Platform on YouTube and TikTok

Online publishing Statistics, according to YouTube

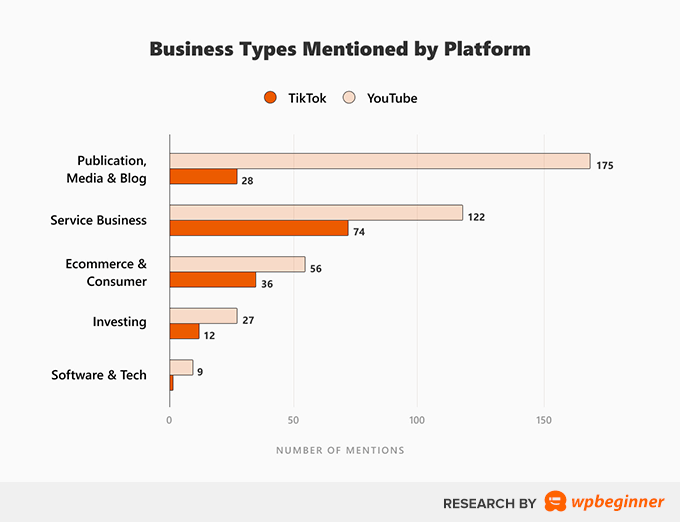
Online publishing was the most popular type of online business advertised on YouTube, clocking in at 45% of the videos we analyzed.

Business Types Mentioned on YouTube Videos

This is a broad category of online work which might include setting up a blog that earns revenue through affiliate links, writing a newsletter, making videos on YouTube, or creating content as an influencer.

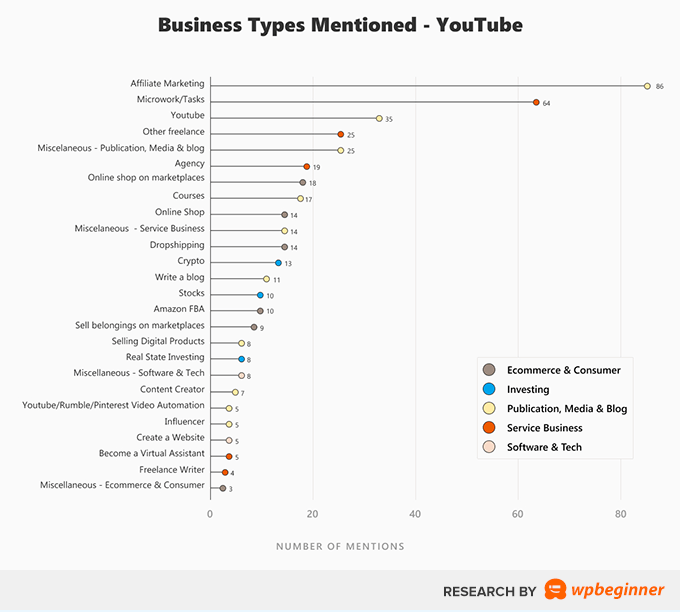
YouTube creators pushing online publishing advertised that workers could earn a median of:

  • $925 per hour writing a blog
  • $312 per hour writing a newsletter or similar periodic articles
  • $230 per hour for YouTube sponsorships
  • $106 per hour with affiliate marketing

Note: these rates shared in videos may not reflect actual earnings.

Affiliate marketing is one of the simpler options for a new writer with less experience. In this model, companies pay you to send customers to their products. Google a simple question like “best laptop for college,” and you’ll find hundreds of lists on sites ranging from independent blogs to the New York Times, taking advantage of the search engine to drive affiliate revenue.

Online publishing Statistics, according to TikTok

Creators on TikTok similarly advertised blogs and marketing as a high-earning strategy. The videos we analyzed claimed that writing a blog could net a median of $1,500 per year. Digging into this further, we analyzed the skills that TikTok creators claimed would be most lucrative for different online businesses.

Business Types Mentioned on TikTok Videos

According to the TikTok creators, marketing could lead to the highest (advertised) earnings at a median of $62.50 per hour, followed by investing at $56 per hour and video editing at $50 per hour.

As on YouTube, TikTok creators tend to provide fairly limited evidence for their earning estimates. Video creators also tend to advertise business ideas that are easier to sell to a broad audience as “easy money-making strategies”. In reality, getting extremely rich off of a blog is harder than video creators make it sound.

Instead, experts suggested that selling writing or another type of service as a freelancer might be more successful for online workers with prior talents under their belts.

Making Money with a Service Business

Service businesses can include a range of skillsets.

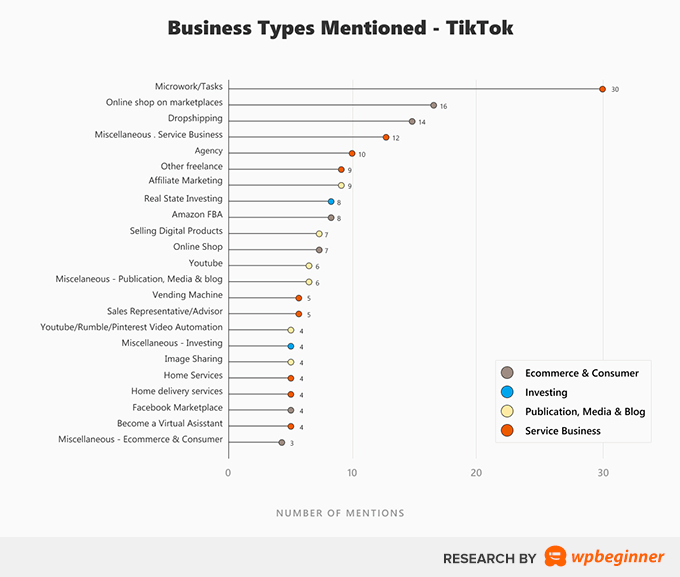
On TikTok, we found that services businesses were the most popular type of online work advertised by creators.

Hourly Earnings by Online Business Type

These businesses include a range of skills and activities such as: starting your own agency to provide a service like tech support to other companies, selling goods through an online store, making content for clients on platforms like Upwork and Fiverr, and performing microwork tasks like filling out surveys or tagging content.

Microwork can be particularly appealing for people who are not currently employed full-time and looking to make extra cash, said Melissa Keith, a psychology professor at Bowling Green State University whose research focuses on the platform Mechanical Turk. Mechanical Turk, run by Amazon, allows remote workers to make money by doing small tasks that can’t be completed by computers.

Microwork rates are low, but improving.

“It’s pretty unrealistic to think you’re going to make a full-time salary on most of these platforms,” Keith said. But the all-remote, fully flexible nature of the platform allows workers to earn money on their own terms — potentially even while working at another job. While TikTok videos advertise that workers might be able to earn over $50 per hour while on platforms like Mechanical Turk, Keith found this number is unrealistic compared to her research. “A good rate is closer to $10 an hour,” she said.

In recent years, workers on microwork platforms have pushed the companies posting jobs to improve their hourly rates, Keith noted. Tasks that might once have paid under $1 an hour will now earn a worker the U.S. minimum wage, if not more. These rates can be particularly attractive to workers in other countries where the cost of living is lower.

Related: 11 Best WordPress Developer Jobs Sites (+ Example Job Templates)

Balancing Expectations and Reality

Online videos paint a rosy picture of entrepreneurship opportunities. This is especially true for financial and investment advice, as creators advertise buying into cryptocurrency and other risky assets. As CNET contributor Ana Staples points out, anyone can claim to be an expert on TikTok. Short, punchy videos can make getting rich online look much easier than it really is.

It’s also important to consider the gap between who makes videos about earning money online and who actually comprises the online gig workforce.

Our analysis found that the creators of YouTube and TikTok videos skew towards men in their 20s; the user bases of platforms like Mechanical Turk tend to be pretty evenly split on gender, Keith said.

YouTube TikTok Case Study Presenter Demographic

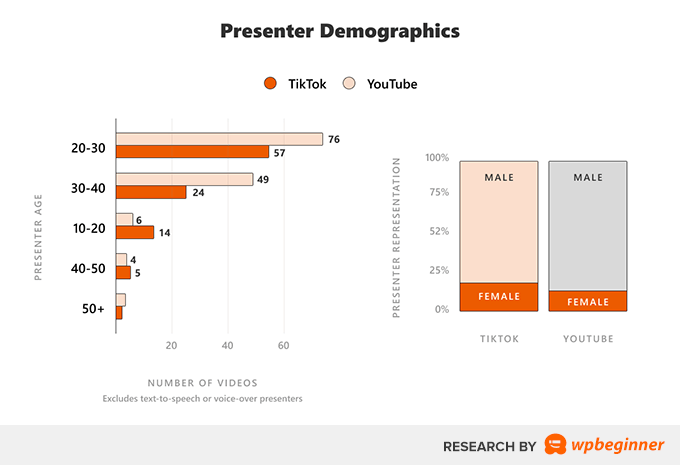
Younger men might be “more willing to share their success stories,” said Zhu, the Carnegie Mellon researcher. Meanwhile, low-income immigrants who are doing more low-paid gig work might “not necessarily want to brag about their work, and also don’t have the time to create videos,” she added.

As online work remains popular in the wake of the pandemic, Zhu and Keith both anticipate that workers will continue to push for higher wages, flexibility on the job, and benefits that better align with those of typical full-time employment. “If people move towards these more flexible work arrangements, we’re going to have to have systems in place to protect workers,” Keith said.

List of Sources

Federal Reserve Board, Haiyi Zhu, Upwork, CNET, Melissa Keith, YouTube and TikTok

That’s a wrap! We hope this original research gave you an idea of what to expect if you’re looking to start an online business or become a freelancer.

If you’re looking to start earning online, you may found the following resources helpful:

If you liked this article, then please subscribe to our YouTube Channel for WordPress video tutorials. You can also find us on Twitter and Facebook.

The post Research: The Truth Behind Make Money Online Videos on YouTube and TikTok (We Analyzed 344 Videos) first appeared on WPBeginner.

How to Enable / Activate WordPress Plugins from the Database

Are you looking to enable or activate plugins from the WordPress database?

If you are unable to access your WordPress admin area and need to activate a plugin to restore your access, then you can do that from the WordPress database.

In this article, we will show you how to easily activate your WordPress plugins using the database.

How to enable/activate WordPress plugins from the database

When Should You Activate WordPress Plugins Using Database

A number of common WordPress errors can prevent a website owner from accessing the WordPress admin area. In most of those situations, the user is looking to deactivate WordPress plugins without admin access.

However in some situations, a website owner may need to activate certain plugins to restore access to their WordPress website.

For example, let’s assume an error is stopping you from accessing your WordPress dashboard, and you have found a plugin that can fix that error.

Luckily, WordPress stores the active plugins information in your WordPress database. This means you can manually enter this information directly in the database and tell WordPress to activate a plugin.

The only condition is that the plugin must be installed on your WordPress site. Which means that it should be present in the plugins folder on your WordPress website.

With that being said, let’s see how you can easily enable/activate a plugin using the database.

Step 1. Find Your Database Name Using the Hosting Control Panel

To activate your WordPress plugins using phpMyAdmin, first, you need to find out your WordPress database’s name.

Now, to find the name of your database, you need to log in to your web hosting dashboard. For this tutorial, we will be using Bluehost.

If you are using a different hosting company, then your WordPress hosting dashboard may look slightly different.

Once you are on the cPanel, scroll down to the ‘Files’ section and click the ‘File Manager’ option.

Click at the file manager

This will open up the File Manager in a new window. Here you simply need to locate and click the public_html folder from the left column.

This will open up all the files that are stored in the public_html folder. Now, you simply need to locate and click the folder with your site’s name on it present under the ‘Name’ column.

Go to the publich_html file and find your site name

Some users may instead see their WordPress files and folders installed inside public_html folder.

After you have opened up your WordPress site’s file, locate the wp-config.php file under the ‘Name’ section and right-click on it.

This will open up a menu where you need to select the ‘View’ option.

Click View

This will open up the wp-config.php file in a new window where you can locate your database details.

We recommend that you copy and paste your database details including username and password into a notepad on your computer.

Database details

Now you’ve successfully found your database’s name, let’s move to our next step.

Step 2. Locate Active Plugins Option via PhpMyAdmin

After you have found out the name of your database, you need to go back to your WordPress hosting control panel.

Once there, scroll down to the ‘Databases’ section and click the ‘phpMyAdmin’ option.

Click the phpMyAdmin option in the cPanel

This will launch the phpMyAdmin app in a new browser tab.

Note: Before you make any kind of changes, please make sure to create a complete backup of your database. It will come in handy if anything goes wrong with the process.

Next, you simply need to click the ‘Database’ tab from the navigation menu present at the top of the page.

Now, simply locate your WordPress database and click on the browse button to expand it.

Click the Database tab from the navigation menu

This will show your WordPress database tables.

Here, you will simply need to locate wp_options table and click browse next to it.

Note: By default, WordPress uses wp_ as the prefix for table names. Your WordPress database table may have a different table prefix.

Click at wp-options

Inside the wp_options table, you’ll need to find the row where option_name is set toactive_plugins.

After that, click on the Edit link next to it.

Click the Activate_Plugins option

This will open up a box where you can manually enter details to activate a plugin.

Step 3. Activate a Plugin Using phpMyAdmin

WordPress stores the active plugins information in a special format so that it can be programatically accessed by the software.

In order to tell WordPress which plugins to activate, we’ll need to use that same format.

First, we’ll start by entering the option_value as a:1: and then open up the curly bracket ({).

We are entering this value as 1 because we only want to activate one plugin. You have to change the value to the number of plugins you plan on activating.

Add option value

Next, we will be entering i:0; after the curly bracket. Here we are essentially assigning a serial number to our plugin.

Remember to always assign numbers starting from 0 instead of 1.

Add serial number

Next, we will be entering the number of characters present in the plugin’s name and the php file name of the plugin that we’re about to activate.

For that, we will type s:24: in the box. Keep in mind that the number of characters will differ for each plugin based on the characters in the plugin directory and file name.

For instance, we are activating WPForms in this tutorial which has 24 characters in its name including the file name of the plugin as stored in our file manager.

Add character number

Next, you just need to type the plugin’s directory name. You can find it by visiting the /wp-content/plugins/ folder using the File Manager app.

Don’t forget to add quotation marks before typing the plugin’s directory name.

Type the plugins' name

After the /, you need to enter the plugin’s file name. This is usually the file with similar name inside the plugin folder.

Plugin file and folder name

Now, go back to phpMyAdmin and type the name of the plugin and then close the quotation marks.

After that, simply add a semi-colon (;) and close the curly brackets (}). The final value in this example would look like this:

a:1:{i:0;s:24:"wpforms-lite/wpforms.php";}

This is how it will look once you’re done.

Activating a single plugin

Next, simply click the ‘Go’ button to execute the command.

Now go visit your WordPress dashboard and head over to Plugins » Installed Plugins.

Your plugin has been successfully activated.

activated-plugin

Now let’s say you want to activate two more plugins.

First you will need to change the number of plugins. After you will adjust each entry for the plugin that you want to activate.

Here is an example:

a:3:{
i:0;s:47:"all-in-one-seo-pack-pro/all_in_one_seo_pack.php";
i:1;s:35:"insert-headers-and-footers/ihaf.php";
i:2;s:24:"wpforms-lite/wpforms.php";
}

Note: We have added line breaks here to make the code look more readable. You need to make sure that there are no line breaks or spaces in your code. Otherwise, it wouldn’t work.

We hope you learned how to activate a plugin using the database. You may also want to see our guide on how to add social media feeds to WordPress, and our comparison of the best domain registrars in the world.

If you liked this article, then please subscribe to our YouTube Channel for WordPress video tutorials. You can also find us on Twitter and Facebook.

The post How to Enable / Activate WordPress Plugins from the Database first appeared on WPBeginner.

How to Use the SEO Writing Assistant in WordPress to Improve SEO

Many of our readers ask us how to write better content for SEO. Some ask whether or not they should focus on Yoast SEO’s green light.

Well, when it comes to SEO content optimization, we use a different SEO writing assistant. It helps us optimize our content for SEO, so we can rank higher in search engines.

In this article, we will show you how to use the SEO Writing Assistant in WordPress to improve SEO and create better content for your website.

How to Use the SEO Writing Assistant in WordPress to Improve SEO

What is SEO Writing Assistant?

The SEO Writing Assistant is a content optimization tool created by Semrush, one of the best SEO tools on the market. It allows you to check your content in real-time for SEO suggestions and improve the overall SEO score of the content on your WordPress website.

Here is how it works:

  • You enter your focus keywords to generate content templates based on the top 10 results for that phrase.
  • You instantly get semantically-related keywords to include in your article.
  • You improve your content with a readability score based on rival results.
  • You optimize your article headline for SEO.
  • You adjust the article length based on the average length of top results.
  • You check for plagiarism without leaving your website.
  • You check the content’s tone to make it sure sounds natural and casual.

It is an extremely useful tool and can help you improve the SEO as well as writing style across your website. If you manage a multi-author site, then it allows authors to follow the same SEO best practices across all content.

Having said that, let’s take a look at how to use the SEO Writing Assistant to improve your SEO and get more search traffic to your website.

Setting Up Semrush’s SEO Writing Assistant in WordPress

The first thing you need to do is visit the Semrush SEO Writing Assistant website and click on ‘Create new template’ button.

Semrush Analyze My Text

You will be now asked to log in or create a free account.

Semrush offers a basic free account with just 1 free content recommendation.

You will need to sign up for or upgrade to a paid Semrush subscription to get all features. This is totally worth it, and a free 7-day trial is available for paid plans.

Create a Free Semrush Account

Once you log in, you will be able to use the SEO Writing Assistant from Semrush’s website.

You can type your content or import it from the web, provide target keywords, and select the language and location of your target audience.

Using Writing Assistant From the Semrush Website

When you press the ‘Get recommendations’ button, Semrush will analyze the content and make suggestions.

However, you can also use the SEO Writing Assistant inside your WordPress dashboard. You simply need to connect the SEO Writing Assistant tool to your WordPress site.

First, you’ll need to install and activate the Semrush SEO Writing Assistant plugin. For more details, see our step-by-step guide on how to install a WordPress plugin.

Upon activation, you need to edit an article that you want to optimize for SEO. On the post edit screen, scroll down until you see the new ‘Semrush SEO Writing Assistant’ section below the content editor.

Using the SEO Writing Assistant in the WordPress Content Editor

It will show you basic readability and SEO score. To get the full picture, you need to click the ‘Log in’ link and sign in to your Semrush account.

Once signed in, you’ll be asked to give permission. Click the ‘Approve’ button to continue.

Give Permission for WordPress to Use Your Semrush Login

Now that you have connected the plugin to your Semrush account, you can generate SEO recommendations for our article.

You can enter your target keywords by typing them into the ‘Keywords’ field or by clicking the ‘Extract from text’ button. If you need help finding the right keywords, then see our beginner’s guide on how to do keyword research for your WordPress site.

Using the SEO Writing Assistant in WordPress

After that, you should click the ‘Get recommendations’ button and Semrush will analyze your content.

It will start by giving the post an overall score.

SEO Writing Assistant Switch Layout

By default, the following sections offer simple summaries. You can switch to a more detailed report by clicking the hamburger icon at the top right of the Semrush SEO Writing Assistant, and then selecting ‘Switch layout’ from the menu.

Checking Target Keywords Using Semrush SEO Writing Assistant

You can now scroll down to the SEO report. Semrush will check the top 10 results for the given keywords to generate a list of semantically related keywords that you can include in your content.

SEO Writing Assistant SEO Keyword Details

Keywords already included in your article will appear with a green background. You can go ahead and start adding missing keywords to your existing content where applicable or expanding your content to add new sections when necessary.

As you write, the tool will also adjust the readability and article length scores to match the average scores of top results.

Checking Tone of Voice Using Semrush SEO Writing Assistant

All SEO experts and marketers advise using a casual tone for all your articles. Search engines consider this conversational tone to be more engaging and useful for most audiences.

Now the problem is that sometimes it becomes harder to maintain a casual tone throughout the article.

SEO Writing Assistant comes with a ‘Tone of Voice’ checker. This AI-powered tool checks your content’s tone and gives it a score ranging from formal to casual.

SEO Writing Assistant Tone of Voice Details

Most articles fall somewhere in between, so don’t worry if it says your article has a neutral tone.

You will also see a list of your most casual sentences. You can consider rewriting these so they are less casual.

Links play a crucial role in SEO and the SEO Writing Assistant helps you keep track of links inside your article.

It will let you know if your article does not have an optimal number of internal links. It will also check for external links and links to your homepage.

SEO Reporting Assistant Reports Issues With Links

This tool comes in handy if you have other authors working on articles. Editors can quickly see if the article includes internal links to other posts on your website.

Checking Plagiarism in WordPress with SEO Writing Assistant

If you are hiring writers to contribute articles to your blog, then you’ll need to make sure that the articles they are submitting are original content.

Normally, editors and website owners use plagiarism checkers like Grammarly, CopyScape, or Google to see if an article is original.

The SEO Writing Assistant makes this easier with a built-in Plagiarism Checker tool.

Using the SEO Writing Assistant Plagiarism Checker

The downside is that even with the paid plans, you can only perform a limited number of checks.

If you need more, then you can buy additional checks from your subscription page on the Semrush dashboard.

Getting a Perfect SEO Score for Your Article

As you implement suggestions provided by the SEO Writing Assistant tool, your overall score will improve as well.

SEO Writing Assistant Overall Score

The overall score bar takes into account all the parameters and suggestions shown by the plugin. You need to make sure that each line on the chart turns green for better SEO rankings.

However, sometimes the plugin may suggest LSI keywords that may not fit in your content. You can safely ignore them instead of stuffing them into your article.

Remember that while these SEO tools provide recommendations, you know your audience better than these tools ever can. Keep your users in mind and make sure that they find your content useful and engaging.

Tracking Your SEO Performance in WordPress

Once you have started using SEO Writing Assistant for a while, you may want to track how it is affecting your website’s positions in search.

We have a detailed guide on how to track your website’s keyword rankings with Semrush and other tools.

You may also want to keep an eye on your top content using Google Analytics. The best way to do this is by using MonsterInsights. It brings your Google Analytics reports into WordPress and displays them in a human-readable format.

We hope this article helped you learn how to use SEO Writing Assistant in WordPress to improve SEO. You may also want to learn how to create automated workflows in WordPress, or see our list of the best social media plugins.

If you liked this article, then please subscribe to our YouTube Channel for WordPress video tutorials. You can also find us on Twitter and Facebook.

The post How to Use the SEO Writing Assistant in WordPress to Improve SEO first appeared on WPBeginner.

Weekly WordPress News: WPLift Officially Joins the UnlimitedWP Family

UnlimitedWP has announced the acquisition of WPLift, a popular WordPress media site renowned for its news, reviews, and tutorials related to WordPress, which attracts thousands of daily visitors. This move is aimed at allowing the brand to give back to the WordPress community, which has been instrumental in establishing UnlimitedWP as a leader in white-label WordPress [...]

Read More...

The post Weekly WordPress News: WPLift Officially Joins the UnlimitedWP Family appeared first on Learn WordPress with WPLift.

YaySMTP Review: Get More Emails into Your Customers’ Inbox

Are you tired of your WordPress site’s automated emails ending up in users’ spam folders or not being delivered at all? Have you experienced issues with sending and receiving emails from your site? If so, you’re not alone. Many website owners struggle with these problems, which can be frustrating and time-consuming to resolve. But what [...]

Read More...

The post YaySMTP Review: Get More Emails into Your Customers’ Inbox appeared first on Learn WordPress with WPLift.

36 Best WordPress Blogs You Should Read & Follow (in 2023)

Are you looking for the best WordPress blogs to follow, so you can get fresh WordPress tutorials, news, and latest community updates?

WordPress is the most popular content management system (CMS) in the world and powers over 43% of sites on the internet. Following different WordPress blogs can help you learn how to better use WordPress, get website growth tips, stay up to date with WordPress updates, and receive latest community news.

In this article, we will share the list of some of the best WordPress blogs that you should follow. We’re following these WordPress blogs in our own RSS reader.

Best WordPress blogs to follow

Why Should You Follow WordPress Blogs?

If you have a WordPress website or plan to create one, then you definitely want to follow top WordPress blogs.

You can get in-depth knowledge about WordPress and how it works. Plus, you get to see step-by-step tutorials on how to get started. Aside from that, they also have tips on choosing the best WordPress hosting services, themes, and plugins to operate your site.

Many WordPress blogs will also share tips and tricks to optimize your website for search engines, make it load faster, strengthen your website security, make money online, and more.

That being said, let’s look at some of the best WordPress blogs you should read and follow. We’ve broken down the list of blogs into different sections, so you can jump ahead by clicking the links below:

Top WordPress Blogs to Follow

If you are looking for blogs that help you learn about WordPress, then here are our top picks. Each of them covers detailed tutorials, plugin reviews, comparison posts, guides, the latest WordPress news, and more.

1. WPBeginner

WPBeginner

WPBeginner is the largest free WordPress resource site for beginners. Our goal is to provide helpful tutorials on WordPress for small business owners, bloggers, and non-techy WordPress users.

WPBeginner was launched in 2009 by founder Syed Balkhi. Since then, it has become one of the best WordPress blogs in the world. There are over 320,000 subscribers from across 190 countries.

You can find a variety of topics on WPBeignner. There are WordPress beginner guides, showcases, step-by-step tutorials, articles on themes and plugins, comparison posts, and the latest news about WordPress.

To help you get started with WordPress, here are some helpful tutorials on WPBeginner:

You can visit the WPBeginner blog section to find more helpful content on WordPress.

Besides that, you can also join the free WPBeginner Facebook group and connect with a large community of WordPress users and experts (over 90,000 members). It is an excellent place for beginners and non-tech users to get help and support about WordPress, plugin suggestions, learn tips and tricks, and more.

If you like video content, then you can subscribe to WPBeginner’s YouTube channel. There are detailed videos on WordPress that will guide you every step of the way.

2. IsItWP

IsItWP

IsItWP is another free online resource that offers WordPress tutorials, product reviews, guides, how-to articles, and showcases. It is a great place to get started with WordPress and learn about different things.

You can learn about creating a WordPress blog, online store, membership site, and more. Plus, you’ll get to know about WordPress security, performance, email marketing, lead generation, plugins, and themes. It also offers detailed guides on marketing hacks, like 30 ways to make money online blogging.

The best part about using IsItWP is that you get to use multiple free tools. Some tools include a domain name generator, WordPress speed test, website uptime checker, headline analyzer, and more.

3. Blog Tyrant

Blog Tyrant

Blog Tyrant is the next WordPress blog on our list. If you’re looking to start a WordPress blog and learn strategies to grow your business, this is the right website for you to follow.

Blog Tyrant was started in 2010 to help bloggers make a living online. It covers extensive guides, how-to tutorials, product reviews, and other resources to help you create a successful blog and make money online.

The website also lists valuable tools for blogging and helps pick the right plugins for your website.

For instance, you can use tools like a password generator to secure your website, a security scanner to check for vulnerabilities, or a site speed test to see how fast your website loads.

4. WP Tavern

WP Tavern

WP Tavern is another famous WordPress blog that covers the latest news and events about WordPress. You can follow the blog to learn about new WordPress releases, and industry news.

It also covers the latest news about different WordPress plugins and themes. You can learn about product acquisitions, feature releases in themes, and new features coming in WordPress, and more.

5. WPForms

The WPForms form builder plugin for WordPress

WPForms is the best WordPress form builder plugin in the market used by over 5 million websites.

With the WPForms blog, you can learn how to create all types of forms for your WordPress site. From simple contact forms to complex multistep forms, the WPForms blog has detailed guides and tutorials to help you out.

Plus, you get to stay informed about the latest updates and releases in the plugin. Other than that, you’ll find more helpful blog posts, how-to guides, and showcases on WordPress. For example, there are step-by-step tutorials like how to create an NPS survey form in WordPress or thought-leadership pieces like 7 benefits of conversational marketing.

6. Elegant Themes

Elegant Themes

Elegant Themes offers a high-quality premium WordPress theme collection. It is also the company behind Divi, a popular WordPress theme and page builder.

The Elegant Themes blog offers a lot of content focused on using Divi. For instance, you can learn how to use the website builder, use its features, and customize your site.

Aside from content on Divi, Elegant Themes also publishes general content about WordPress. There are WordPress tutorials, plugin suggestions, reviews, comparisons, and other marketing guides. For example, you can read articles like how to customize your WordPress header.

7. CodeinWP

CodeinWP

CodeinWP is the next WordPress blog on our list. It covers extensive topics about WordPress and offers tutorials, lists, comparison posts, and other detailed guides.

What makes CodeinWP different is that it offers various resources and tools besides blog posts and guides. For instance, there are free code snippets you can use to customize your WordPress site.

They also offers free illustrations from designers that you can use for your site among other helpful resources.

8. OptinMonster

OptinMonster

OptinMonster is the best WordPress popup and lead generation software. It helps you grow your email list, get more leads, increase sales, and optimize your site for conversions.

With the OptinMonster blog, you can learn how to use the plugin and get the most out of it. There are detailed tutorials on setting up different marketing campaigns, configuring targeting rules to show popups at the right place and time, and more.

Besides that, you can get knowledge about content marketing, email marketing, and lead generation in WordPress by following the blog.

What makes OptinMonster blog different is its case studies. You can learn how other companies are using the plugin to get more email subscribers, which display rules they’re using to target new audiences, how they’re converting traffic into leads, and more.

9. Post Status

Post Status

Post Status is a membership community for people looking to work and grow in the WordPress ecosystem. It offers premium memberships and access to different content about WordPress.

You can get the latest news about WordPress, learn about new plugin features and acquisitions, and read blogs about different Post Status members. For example, there are blog posts called Membership Spotlight, where you get to know about Post Status members, their experience in working in WordPress, and more.

It is also an excellent resource for anyone who wants to connect with founders of WordPress plugins, developers, and other WordPress enthusiasts. There are plans for individuals, agency owners, product founders, and partners.

With Post Status premium memberships, you get important WordPress news and events in the weekly newsletter, access to the Slack community, members-only content, and a weekly members hurdle.

The website also has a podcast and videos to get insights about WordPress. As a partner, you can also post WordPress job openings for your company on the Post Status website.

10. Torque Magazine

Torque Magazine

Torque Magazine is another top WordPress blog you should follow. It is a publication by WP Engine but maintains complete editorial independence.

The website covers extensive articles on WordPress. It has divided its content into different categories: development, tools, business, community, videos, and ebooks.

For example, you can find useful guides like CSS best practices and troubleshooting WordPress issues under the development section. You’ll also find interviews with industry experts, step-by-step tutorials, plugin suggestions, marketing and SEO tips and tricks, and more in Torque Magazine.

Best WordPress Plugin Blogs

There are many WordPress plugins that have a great blog section. They cover extensive topics on WordPress and share useful tips and resources.

You can follow these blogs to get more information about WordPress and learn how to use a specific plugin.

  1. MonsterInsights Blog – MonsterInsights is a popular WordPress analytics plugin used by over 3 million websites. Their blog contains helpful marketing tips like how to setup website tracking, and make data-driven decisions to grow your business.
  2. All in One SEO Blog – AIOSEO is the best WordPress SEO plugin used by over 3 million websites. Their blog covers SEO tips and WordPress tutorials to help you improve your SEO rankings.
  3. WooCommerce Blog – WooCommerce is a popular eCommerce plugin for WordPress. Their blog covers eCommerce tutorials to help boost your online sales.
  4. Yoast SEO Blog – Yoast SEO is a popular WordPress SEO plugin. They also have a blog focused on SEO optimization tips to help you boost your SEO rankings.
  5. Smash Balloon Blog – Smash Balloon is a leading WordPress social media plugin used by over 1.4 million websites. Their blog has tips on how to improve your social media engagement.
  6. PushEngage Blog – PushEngage is the best web push notification software to help you boost your traffic. Their blog has tips on how to grow your traffic, conversions, and user engagement.
  7. Easy Digital Downloads Blog – EDD is the best plugin for selling digital downloads in WordPress. Their blog covers tips for online creators to help you increase your sales & revenue.
  8. SeedProd Blog – SeedProd is a popular page builder for WordPress. Their blog covers tips on how to improve your website design and tips to improve your website customization workflow.
  9. AffiliateWP Blog – AffiliateWP is the best WordPress affiliate plugin for WordPress and WooCommerce. Their blog covers tips on how to create and grow your affiliate program.
  10. WP Simple Pay Blog – WP Simple Pay is a leading payments plugin for WordPress. Their blog cover tips on securely accepting payments as well as other WordPress tutorials.
  11. RafflePress Blog – RafflePress is the best WordPress giveaway plugin. Their blog cover tips on how to unlock viral traffic growth for your website to get more traffic, subscribers, and sales.
  12. ThriveThemes Blog – ThriveThemes is a popular conversion optimization suite for WordPress. Their blog covers marketing tutorials and tips to improve your converisions.
  13. WP Mail SMTP Blog – WP Mail SMTP is one of the must have plugins for WordPress used by over 3 million websites. Their blog covers tips on how to improve your email deliverability along with other WordPress tutorials.
  14. WPMU Dev Blog – WPMU Dev offers a suite of WordPress plugins and tools. Their blog covers a vast number of topics from how-to posts, product reviews, news, and more.

Blogs by WordPress Founders and Influencers

You can also learn a lot about WordPress from different founders and influencers. You get to read about their journey, experiences, and how they’re growing their business in the WordPress space.

  1. Syed Balkhi – Syed Balkhi is the founder of WPBeginner and a well-known entrepreneur. His blog shares tips on his entrepreneurship journey.
  2. Matt Mullenweg – Matt Mullenweg is the co-founder of WordPress. His blog is always full of his latest experiences and entrepreneurship journey.
  3. Chris Lema – Chris Lema is a well-known speaker and blogger who writes about various topics from communication, eCommerce, LMS, and more.
  4. Tom McFarlin – Tom McFarlin is a WordPress developer who loves writing, building, and sharing WordPress-based projects. You can follow his blog to learn about WordPress, PHP, databases, and other backend technology.
  5. Joost de Valk – Jost is the founder of Yoast and now serves as the head of WordPress strategy for Newfold Digital (parent company of Bluehost).

There are other great resources out there that help not only help you learn about WordPress but also allow you to grow your website.

You can learn tips on growing your traffic, boosting search engine rankings, uncovering different marketing techniques, and more from marketing and SEO blogs. These blogs also cover WordPress’s latest news and guides, which is really useful.

  1. Neil Patel Blog – Neil Patel is a top SEO influencer who regularly creates detailed SEO tutorials, guides, case studies, and more to help you learn SEO.
  2. Search Engine Roundtable – Search Engine Roundtable is the go-to WordPress blog for staying up to date with SEO news, Google algorithm changes, and more.
  3. Search Engine Journal – Search Engine Journal is another popular SEO blog although their coverage on WordPress topics are generally extremely biased and misinformed. We only recommend following their SEO tips but for WordPress related news, you should avoid them.
  4. Digital Marketer – Digital Marketer provides marketing tutorials, guides, and best practices on how to grow your online traffic and sales.
  5. ShoutMeLoud – ShoutMeLoud is a blog created by Harsh Agrawal. He’s a well-known blogger who shares his blogging journey, WordPress tips, and more to help you grow your online presence.
  6. Blogging Wizard – Blogging Wizard is a popular resource that you can use to learn proven strategies for growing your WordPress blog.
  7. Ahrefs Blog – Ahrefs is a popular SEO tool. Their blog is full of useful guides to improve your website’s SEO ranking.

Which is the Best WordPress Blog to Follow?

The best WordPress blogs to follow are WPBeginner, IsItWP, Blog Tyrant, and WP Tavern.

After being in the WordPress industry for the last 16+ years, we recommend you follow multiple WordPress blogs. Each of the top 10 blogs listed in our post will help you expand your knowledge about WordPress and pick up new ways to grow your business.

The easiest way to follow these WordPress blogs is by either adding them to your RSS feed reader or joining their free email newsletter.

We hope this article helped you pick the best WordPress blog to follow. You may also want to see our guide on how to create your email newsletter, and our expert pick of the best WordPress plugins for all websites.

If you liked this article, then please subscribe to our YouTube Channel for WordPress video tutorials. You can also find us on Twitter and Facebook.

The post 36 Best WordPress Blogs You Should Read & Follow (in 2023) first appeared on WPBeginner.

How to Fix the Facebook and Instagram oEmbed Issue in WordPress

Do you want to learn how to fix the Facebook and Instagram oEmbed issue in WordPress?

If you’ve previously added Facebook or Instagram content to WordPress using the default oEmbed or Embed block, then this feature no longer works. This can cause errors and missing content on your WordPress website.

In this guide, we’ll show you how to fix the Facebook and Instagram embed issue, so visitors can enjoy social content on your WordPress website.

How to fix the Facebook and Instagram oEmbed issue in WordPress

What is the Facebook and Instagram oEmbed Issue in WordPress?

In the past, you could easily embed Instagram and Facebook posts in WordPress using a protocol known as oEmbed.

However, Facebook changed the way that oEmbed works so you can no longer easily embed videos, pictures, updates, and other content from Facebook or Instagram.

Instead, you now need to register an app and use a client token to get data from the Facebook Graph API, before you can embed Facebook or Instagram content on your WordPress blog.

This would take a lot of time and effort, especially if you want to show lots of different social posts across your website. With that in mind, the people behind WordPress decided to remove the Facebook and Instagram embed feature.

If you previously added any Facebook content to your website using oEmbed, it’ll now look something like the following image.

An example of an oEmbed error in WordPress

If you embedded any Instagram posts using oEmbed, then you’ll get a similar error.

This is a bad user experience, and some visitors may assume that your website is broken, no longer maintained, or that you’re not a trustworthy or reliable business.

There are ways to fix the problem manually. For example, you might go through each page and post and delete the embedded content. However, this would take a lot of time and effort, and there’s no guarantee you’ll manage to find every broken embed.

With that being said, let’s see how you can easily fix the Facebook and Instagram oEmbed issue on WordPress.

How to Fix the Facebook & Instagram oEmbed Issue

The easiest way to fix the oEmbed issue is by using one of the free Smash Balloon plugins.

If you want to embed Instagram posts in WordPress, then you’ll need the Smash Balloon Social Photo Feed plugin.

An instagram post, embedded in a WordPress website

Want to embed a Facebook post in WordPress? Then you can use the free Smash Balloon Social Post Feed plugin instead.

First, you need to install and activate the plugin. For more details, see our step by step guide on how to install a WordPress plugin.

After installing either plugin, simply head over to Instagram Feed » oEmbeds or Facebook Feed » oEmbeds, depending on the plugin you’re using.

We’re using the Social Photo Feed plugin in all our images, but the steps will be exactly the same no matter what plugin you’re using.

Enabling the oEmbed feature for Instagram and Facebook

On this screen, simply click on the ‘Enable’ button.

That’s it. You can now embed Facebook and Instagram posts on your WordPress website.

How to Embed Instagram or Facebook Posts in WordPress

Whether you’re using Facebook or Instagram, you can embed a specific post in any page, post, or widget-ready area, such as the sidebar.

One option is to open the page or post where you want to show the social content. Then, click on the ‘+’ icon and type in ‘Embed.’

When the right block appears, click to add it to the page or post.

Adding the Embed block to a WordPress page or post

In the ‘Embed’ field, simply paste the URL of the Instagram or Facebook post that you want to show on your website.

Then, click on ‘Embed.’

Embedding an Instagram post in WordPress

WordPress will now show that specific post. When you’re ready to make the post live, simply click on ‘Update’ or ‘Publish.’

Now when you visit the page, you’ll see the social media post live.

An example of an Instagram post in WordPress

Another option is adding the Instagram or Facebook post to a widget-ready area such as the sidebar. That way, you can promote the same post across every page of your website.

For example, you might embed your most popular Instagram post or a post promoting a sale or social media contest you’re using to grow your site.

Adding an Instagram post to a widget-ready area such as the WordPress sidebar

To add a Facebook or Instagram post to a widget-ready area, simply go to Appearance » Widgets and click on the blue ‘+’ button.

In the search bar, type in ‘Embed’ to find the right block.

Embedding an Embed block in WordPress

When the ‘Embed’ block appears, drag it onto the area where you want to show the Facebook or Instagram post.

In the ‘Embed’ field, simply paste the URL of the Instagram or Facebook post that you want to show on your website. Then, click on ‘Embed.’

Embedding Instagram photo in Instagram

WordPress will now show that specific post.

If you’re happy with how it looks, then click on ‘Update’ to make it live.

Embedding Instagram post in WordPress

Now, when you visit your website, you’ll see the Instagram or Facebook post live.

How to Add an Instagram or Facebook Feed to WordPress

With the free Smash Balloon plugins, it’s easy to fix the oEmbed issue so you can add Facebook and Instagram posts to your website.

This is great if you only want to embed a small number of posts or you want to control exactly where each social post appears on WordPress. However, you may also want to embed a Facebook or Instagram feed on your website.

By creating a feed, you can show all your latest posts in a nice layout. Even better, the feed will update automatically so visitors will always see the newest posts without you having to update your site manually.

This can keep your site fresh and interesting, even for regular visitors.

If you want to embed Instagram content in WordPress, then you can use the Smash Balloon Instagram Feed plugin.

An Instagram feed, created using Smash Balloon

Want to create a feed showing your latest Facebook status posts, videos, reviews, and more?

Then you can use the Smash Balloon Facebook Feed plugin.

Facebook reviews, embedded using Smash Balloon

Want to add both Facebook and Instagram feeds to your WordPress website? Then you may want to look at Smash Balloon Social Wall.

This powerful plugin lets you combine any feeds you’ve created using the Smash Balloon plugins, including Facebook, Twitter, YouTube feeds, and more.

Creating a social media wall using Facebook and Instagram

For example, if you’ve set up the Facebook Feed and Instagram Feed plugins, then you can simply go to Social Feeds » Create a Social Wall in your WordPress dashboard.

Here, you’ll see all the different feeds you’ve created so far.

How to create a social media wall using multiple feeds

Simply select each feed that you want to add to the social wall.

For example, you can combine posts from your Instagram and Facebook accounts.

Combining Facebook and Instagram into a social wall

Small Balloon Social Wall will then create a shortcode that allows you to add the social wall to any page, post, or widget-ready area.

For more information about working with shortcodes, please see our guide on how to add a shortcode in WordPress.

Social media shortcode, created using the Smash Balloon plugin

After placing the shortcode, simply save or publish your changes to make them live.

Now, if you visit your website, you’ll see a social wall featuring all the latest posts from your different accounts and platforms.

We hope this article helped you learn how to fix the Facebook and Instagram oEmbed issue in WordPress. You may also want to see our expert pick of the best social media plugins for WordPress, and our guide on how to create an email newsletter.

If you liked this article, then please subscribe to our YouTube Channel for WordPress video tutorials. You can also find us on Twitter and Facebook.

The post How to Fix the Facebook and Instagram oEmbed Issue in WordPress first appeared on WPBeginner.

How to Properly Disable Lazy Load in WordPress (Step by Step)

Do you want to disable lazy loading in WordPress?

By default, WordPress comes with a lazy load feature, which delays downloads for images and other media to improve page load speed.

However, for some websites, it may affect user experience by not displaying images and media right away.

In this article, we’ll show you how to easily disable lazy load in WordPress both using a code method as well as a plugin method.

How to properly disable lazy load in WordPress

What is Lazy Loading?

WordPress first introduced lazy loading images in WordPress 5.5. Later it extended the lazy load feature to iframes embeds (e.g. YouTube videos, Spotify, and other embeds).

This practice helps improve your website’s speed and performance by quickly loading content and the visible area first.

A faster website is not just good for users, but it is also good for SEO. Search engines like Google consider speed as an important ranking factor.

Apart from images and embeds, you can also easily lazy load comments and Gravatars to further improve page load speed.

Lazy loading can be seen in action by right-clicking on an image and selecting the Inspect tool in your browser.

Lazy loading images in WordPress

This will split your browser screen and show you the HTML source code. From here, you’ll be able to see the “loading=lazy” attribute added to the image.

Now normally, we don’t recommend disabling lazy load due to its overall benefits for your WordPress website. Turning it off can result in slower website speed, lower conversion rates, and lower SEO rankings.

However, sometimes lazy loading can affect the user experience for some websites.

For instance, if you run a photography website where images are the most significant aspect of your content, then lazy loading them may ruin the user experience for your customers.

In other cases, you might be using a different lazy loading solution and just want to turn off the default WordPress lazy load.

That being said, let’s see how you can easily disable lazy load in WordPress.

You can simply disable the lazy load feature in WordPress by adding a custom code snippet to your theme’s functions.php file.

However, keep in mind that the smallest error while adding the code can result in breaking your website and making it inaccessible to your users.

This is why we recommend using the WPCode plugin to add custom code to your site.

It is the best custom code snippets plugin that makes it super easy for beginners to safely add custom code to their website.

First, you need to install and activate the WPCode plugin. See our guide on how to install a WordPress plugin for more instructions.

Upon activation, go to the Code Snippets » + Add Snippet page.

Add new snippet

This will take you to the ‘Add Snippets’ screen where you’ll see a bunch of ready-to-use code snippets that you can add to your website.

From here, you need to click the ‘Use Snippet’ button under the ‘Add Your Custom Code (New Snippet)’ option.

Once you’re on the ‘Create Custom Snippet’ page, you can start by typing a name for your code snippet.

It can be anything that will help you identify the code snippet and what it does.

Snippet title and type

After that, select ‘PHP Snippet’ from the dropdown menu next to the ‘Code Type’ option.

Now, copy and paste the following PHP code in the ‘Code Preview’ box.

add_filter( 'wp_lazy_loading_enabled', '__return_false' );

This is how the code will look after it is pasted in the ‘Code Preview’ box.

Add code snippet

After adding the code, scroll down to the ‘Insertion’ section.

Here, simply choose ‘Auto Insert’ as the insertion mode. This will ensure that your custom code is automatically executed everywhere on your website once you activate the snippet.

Choose an insertion method

Next, you need to scroll to the top of the page and simply toggle the ‘Inactive’ switch to ‘Active’.

After that, don’t forget to click the ‘Save Snippet’ button to save and execute your custom snippet.

Save your code snippet

Once activated, this custom code snippet will disable the lazy loading feature on your WordPress website.

You can test by right-clicking on an image and selecting Inspect from the browser menu.

In the HTML code for the image, the loading=lazy attribute will now disappear.

Lazy loading disabled

Method 2. Disable Lazy Load in WordPress Using a Plugin

If you don’t want to add code to your site, then you can use the Disable Lazy Load plugin.

The only thing you need to do is install and activate the Disable Lazy Load plugin. For more instructions, check our guide on how to install a WordPress plugin.

Activate plugin to disable lazy load

The plugin works out of the box and does not require any configuration. Once activated, it will automatically disable the lazy load feature on your site.

We hope this article helped you learn how to properly disable lazy load in WordPress. You may also want to see our guide on how to optimize WordPress images for better page load times, or see our pick of the best WordPress image compression plugins.

If you liked this article, then please subscribe to our YouTube Channel for WordPress video tutorials. You can also find us on Twitter and Facebook.

The post How to Properly Disable Lazy Load in WordPress (Step by Step) first appeared on WPBeginner.

9 Best YouTube Video Gallery Plugins for WordPress

Do you want to add a YouTube video gallery on your WordPress website?

You can add YouTube videos to WordPress blog posts using the built-in Embed block. However, you can’t easily arrange these videos in a nice gallery layout.

In this article, we will share the best YouTube video gallery plugins for WordPress so you can show your videos in an organized and eye-catching way.

Best YouTube video gallery plugins for WordPress

1. Smash Balloon YouTube Feed Pro

The Smash Balloon YouTube gallery plugin

Smash Balloon YouTube Feed Pro is the best YouTube gallery plugin on the market.

This plugin allows you to hand-pick specific videos from your account, or automatically show all the latest videos from your YouTube channel. You can even combine multiple YouTube channels into a single feed.

A YouTube gallery, created using Smash Balloon

Smash Balloon has a ready-made gallery layout so you can organize your videos with the click of a button. After creating a gallery, you can control exactly how the videos look by choosing whether to show the YouTube description, title, comments, the total number of likes, and much more.

You can even encourage visitors to join your YouTube channel, by adding a ‘Subscribe’ button to the gallery.

By default, the gallery layout also has a ‘Load More’ button so visitors can scroll through your entire YouTube channel without leaving your website.

Customizing the YouTube gallery 'Load More' button

When a visitor clicks on a video, Smash Balloon will start playing it in an embedded video player. In this way, you can get more YouTube views and engagement without driving visitors away from your website.

By default, the player shows related videos when the playback finishes, or the visitor pauses the video. Smash Balloon lets you replace these suggested videos with a custom call to action, so you can promote a specific post, page, or even the most popular WooCommerce products from your online store.

You can also use Smash Balloon to embed YouTube playlists, favorites, and livestreams on your WordPress website.

The best part about Smash Balloon is that it doesn’t slow down your site. The plugin’s built-in YouTube caching feature will make sure your site always loads fast, which is great for SEO.

The other nice thing about Smash Balloon is that you can combine social content from Instagram, Facebook, Twitter, and YouTube into a single social wall. If you’re serious about growing your online presence, then we highly recommend the Smash Balloon All Access Bundle, which gives you access to the social wall feature.

A social wall, created using Smash Balloon

Note: If you’re just getting started or have a limited budget, then there’s also a free version of the YouTube feed plugin. Although this plugin is missing the more advanced features, it still has everything you need to embed YouTube videos on your WordPress website.

Pricing: Smash Balloon YouTube Feed Pro licenses start at $49 per year. If you want to embed Facebook, Twitter, Instagram, and YouTube content on your WordPress website, then you can grab the All Access Bundle for $299 per year.

2. Envira Gallery

The Envira Gallery YouTube plugin

Envira Gallery is generally known as the best WordPress photo gallery plugin.

However, there’s also an Envira Gallery Videos Addon that allows you to create a YouTube gallery. Simply enter the URL for each YouTube video and then specify the thumbnail that you want to show in the gallery. The Videos Addon will then fetch the video automatically.

After adding all your videos, Envira Gallery lets you fine-tune the playback experience. You can make the video autoplay, open it fullscreen by default, hide the playback controls, and much more.

Envira Gallery can also embed entire YouTube playlists, although you’ll need to get a YouTube API from the Google Cloud Console and then add it to the plugin’s settings first.

As well as YouTube, Envira Gallery supports other popular video hosting services such as Vimeo, Wistia, Twitch, VideoPress, and Dailymotion.

You can also embed Facebook videos in WordPress.

One major drawback is that Envira Gallery won’t automatically fetch new YouTube videos from your channel. If you want to update the gallery, then you’ll need to add each new video manually using its URL.

Pricing: To get Envira with the Video Gallery addon, you’ll need to either buy a Pro license ($89 per year) or a Lifetime license ($209).

3. YouTube Showcase

The YouTube Showcase gallery plugin

With the YouTube Showcase plugin, you can add a YouTube video gallery or grid to your WordPress website.

After activating the plugin, you can add any YouTube video to your site using the 11-digit alphanumeric video key shown at the end of the video’s URL.

To help visitors find what they’re looking for, YouTube Showcase lets you add categories and tags to your videos. These work in exactly the same way as the built-in WordPress categories and tags, so they’re very easy to use.

Once you’ve done that, you just need to add the plugin’s shortcode to any page, post, or widget-ready area. YouTube Showcase will then show all your videos in a nice gallery layout.

YouTube Showcase automatically adds a row of video thumbnails below the gallery, so visitors can easily move between the different videos. For visitors who are using a smartphone or tablet, YouTube Showcase replaces these thumbnails with more mobile-friendly ‘Prev’ and ‘Next’ icons.

The plugin uses pagination by default, so your gallery should load quickly no matter how many videos you add.

The default gallery layout should be a good fit for most websites. However, if you want to make changes then the plugin has a straightforward settings page.

While it isn’t as customizable as some of the other gallery plugins, YouTube Showcase does have a section where more advanced users can add custom CSS and custom JavaScript.

If you don’t like the gallery layout, then YouTube Showcase also has a video grid shortcode. This shows all your YouTube videos in a 4-column grid layout.

Pricing: You can download YouTube Showcase for free from the official WordPress repository.

4. YourChannel

The YourChannel WordPress gallery plugin for YouTube

YourChannel is one of the easiest ways to create a YouTube gallery. It allows visitors to look through your entire YouTube channel feed and watch any video without leaving your website.

YourChannel also comes with a built-in WordPress caching system, to help keep your website running smoothly.

To set up YourChannel, simply enter your YouTube username or channel ID. After that, the plugin will automatically fetch banner images, video thumbnails, your subscriber count, and your total number of views.

The plugin’s settings are straightforward and user-friendly, so you can create a beautiful-looking gallery simply by checking a few boxes and typing some numbers.

You can change how many videos YourChannel shows when the gallery page first loads, and set a maximum number of videos that visitors can scroll through. This is particularly useful for creating a mobile-friendly video gallery.

YourChannel also helps you stay GDPR compliant by showing an ‘Allow Cookies’ message when a visitor first clicks the ‘Play’ button. This message includes a link to your privacy policy.

When you’re happy with how the gallery looks, you can add it to any page, post, or widget-ready area using a shortcode provided by the plugin.

Pricing: Simply visit the WordPress repository and download the YourChannel plugin for free.

5. Photo Gallery by 10Web

The Photo Gallery for 10Web plugin for WordPress

According to our marketing statistics research, 70% of people visit YouTube on a smartphone or tablet. If you run an online store using a plugin such as WooCommerce, then you’ll be interested to learn that 90% of consumers watch videos on a mobile device.

With that in mind, you’ll want to make sure your YouTube gallery looks just as good on mobile, as it does on desktop. With Photo Gallery by 10Web, you can create a mobile responsive image and video gallery within minutes.

Despite the name, Photo Gallery supports all the best video hosting sites including Vimeo, Dailymotion, and YouTube. Simply copy the video’s URL, and Photo Gallery will add that video to your website.

After that, you can fine-tune how the gallery looks by choosing different layouts, switching between dark and light themes, adding pagination, and more. You’ll also have complete control over the content that appears in your gallery, including adding or removing the video title, description, tag box, and more.

Visitors can watch each video directly on your website, using the Photo Gallery lightbox popup. The lightbox comes with built-in social share buttons, which make it easy for visitors to share your videos on Facebook and Twitter. This can help you create a buzz on social media, get more engagement, and grow your social media following.

Pricing: You can download Photo Gallery for free from the official WordPress repository. If you need more advanced features, then there’s also a premium version of Photo Gallery.

6. Embed Plus for YouTube

The EmbedPlus gallery plugin for YouTube

Embed Plus for YouTube allows you to create a YouTube gallery using videos, playlists, shorts, and livestreams.

This plugin has a few unusual features, such as ‘Modest Branding’ which reduces the amount of YouTube branding in your video gallery.

Another unique feature is ‘facade mode,’ which aims to make your WordPress website faster by loading a lighter version of the video player initially, and then downloading the rest of the player when the visitor clicks a video.

To make your pages load even faster, Embed Plus can defer JavaScript while serving minified CSS and JavaScript.

Embed Plus can even convert non-HTTPs videos to HTTPS. Since Google uses HTTPS/SSL as a ranking factor in its search results, this can improve your search engine rankings.

For more on this topic, please see our complete guide on how to move WordPress from HTTP to HTTPS.

To keep people on your website for longer, Embed Plus can automatically play the next video in the gallery, which is particularly useful if you’re adding playlists to your WordPress blog.

This plugin has in-depth and detailed settings that cover several tabs. This gives you complete control over how the YouTube gallery looks and acts, but it can be confusing when you first activate the plugin.

Thankfully, Embed Plus has a built-in setup wizard that asks questions about the kind of gallery you want to create and then changes the default settings based on your answers.

Pricing: You can download Embed Plus YouTube for free from the official WordPress repository. If you need more advanced features then there’s also a Pro YouTube plugin.

7. Automatic YouTube Gallery

The Automatic YouTube Gallery plugin for WordPress

Automatic YouTube Gallery lets you create unlimited video galleries on your site. As the name suggests, this plugin automates most of the setup process so you can create a YouTube video gallery in minutes.

With this plugin, you can create a YouTube gallery using a channel ID, username, playlist, search terms, or even by entering specific video URLs. You can also embed live streams on your WordPress website.

After choosing your videos, Automatic YouTube Gallery lets you fine-tune how the gallery looks. This includes changing the number of columns in the gallery layout, changing the ratio, adding or removing the video titles, and more.

Automatic YouTube Gallery also has some settings to help keep visitors on your website for longer, such as autoplaying the next video and looping a single video. To make your YouTube gallery more accessible, you can also activate closed captions by default or change the language used by the video player’s interface.

With Automatic YouTube Gallery, you don’t have to worry about videos slowing down your site. The plugin has a caching feature that can reduce page loading times and boost your WordPress speed and performance.

This plugin is also fully compatible with WordPress multisite.

Pricing: You can download the Automatic YouTube Gallery plugin for free from the official WordPress repository.

8. All-in-One Video Gallery

The All in One Video Gallery WordPress plugin

You can use All-in-One Video Gallery to show videos from YouTube, Vimeo, Dailymotion, Rumble, and more in an HTML5 video player.

Unlike other plugins that have their own editors, All-in-One Video Gallery integrates with the familiar WordPress page and post editor. It also has video categories and tags that work exactly the same as the built-in WordPress categories and tags.

With this in mind, it’s very easy to get started with the All-in-One Video Gallery.

After adding your videos, All-in-One Video Gallery lets you customize the player controls, playback options, and video quality levels. This plugin also aims to make your videos more accessible by supporting WebVTT subtitles and showing the subtitles automatically.

The plugin is GDPR compliant and will get the visitor’s consent before loading YouTube, Vimeo, or embedded videos from third-party websites. If you prefer, then you can also disable the plugin’s cookies for added privacy.

When you’re ready, you can either show all your videos in a single gallery or create different galleries using the plugin’s categories feature. This allows you to create lots of different galleries, with different content.

Another option is embedding the built-in All-in-One Video Gallery search form. This allows visitors to search through all your videos, to find exactly the content they’re looking for.

Pricing: You can download All-in-One Video Gallery for free from the WordPress repository.

9. Video Gallery – Total Soft

The Video Gallery WordPress plugin

Video Gallery by Total Soft can add an unlimited number of professionally-designed video galleries to your website. This plugin supports YouTube plus other major video platforms such as Vimeo and Wistia.

When building a gallery, you can choose between 16 different themes and 9 layouts. If your YouTube channel has lots of videos, then you can use pagination to spread the content across multiple pages.

This plugin puts a strong focus on gallery thumbnails. Every time you add a video to a gallery, you can replace the default YouTube thumbnail with an image of your choice.

After that, Video Gallery will play different hover effects when the visitor moves their mouse over the thumbnail. This includes some advanced hover effects that animate the video’s title, description, and other elements. In this way, your gallery can catch the visitor’s attention before it starts playing videos.

Video Gallery allows you to show videos from different online platforms, and even self-hosted videos, in the same gallery.

After building a gallery, you can add it to any page, post, or widget-ready area using a shortcode. Video Gallery also provides a code snippet that adds the gallery to your WordPress theme. For more information, please see our guide on how to easily add custom code in WordPress.

Pricing: You can download Video Gallery for free from the official WordPress repository.

What is the Best YouTube Video Gallery Plugin for WordPress?

If you’re looking for the easiest way to add a gallery to WordPress, then Smash Balloon Youtube Feed Pro is our top pick.

This plugin guides you through the process of connecting YouTube and WordPress and then makes it easy to build a professionally-designed gallery. It also lets you fine-tune every part of the gallery so it perfectly suits your WordPress theme.

When you’re happy with how the gallery looks, you can add it to any page, post, or widget-ready area using either a shortcode or the plugin’s Feeds for YouTube block.

Unlike some other plugins on the list, your Smash Balloon gallery will update automatically as you publish new videos to YouTube. This means visitors will always see the latest videos, and you don’t have to worry about updating your gallery manually.

While Smash Balloon YouTube Feed Pro is our top choice, it is a premium plugin. If you’re looking for a free YouTube gallery plugin, then you may want to take a look at Feeds for YouTube instead.

While this plugin is missing some of Smash Balloon’s advanced features, it still has everything you need to create a YouTube video gallery for your WordPress website.

This makes Feeds for YouTube our top pick for anyone who is just getting started, has a limited budget, or just wants to embed a small number of videos in their WordPress website.

We hope this article helped you choose the best YouTube gallery plugins for WordPress. You may also want to see our list of best drag-and-drop WordPress page builders to create custom designs and our tutorial on how to create an email newsletter to keep your visitors updated with your new videos.

If you liked this article, then please subscribe to our YouTube Channel for WordPress video tutorials. You can also find us on Twitter and Facebook.

The post 9 Best YouTube Video Gallery Plugins for WordPress first appeared on WPBeginner.

How to Fix DNS Server Not Responding Error in WordPress (5 Ways)

Are you looking for the easiest way to fix the ‘DNS server not responding’ error in WordPress?

You can get the DNS not responding error on your own WordPress website, or third-party sites for a large number of reasons.

In this article, we’ll show you how to easily troubleshoot and fix the ‘DNS server not responding’ error in WordPress.

How to fix the DNS server not responding error in WordPress

What is the ‘DNS Server Not Responding’ Error in WordPress?

The ‘DNS server not responding’ error is one of the most common WordPress errors that users can come across.

This error prevents you from visiting your own website which makes it difficult to troubleshoot. Many beginners aren’t sure if it is just them or everyone else seeing this error.

Preview of the DNS server not responding error

The ‘DNS server not responding’ error means that your browser was unable to establish a connection with the servers that are hosting the website.

This error usually occurs when there is an unavailable DNS provider, firewall issues, network connectivity problems, or when there is an issue in your internet modem or router.

That being said, let’s take a look at multiple ways to easily troubleshoot and fix the ‘DNS server not responding’ error on your website.

1. Check Your Internet Connection

You might get the ‘DNS server not responding’ error because your internet connection has been disconnected. So to start, you need to make sure that you’re currently connected to the internet.

If your internet is connected, but the error is still present, then you can restart your internet connection by switching your computer on and off.

Or you can simply disconnect your router from its power supply and then wait at least a minute before reconnecting it.

After that, try visiting your WordPress blog to see if the error’s gone.

2. Try Switching to Another Web Browser or Incognito Mode

Sometimes this error occurs because there is an issue in your default web browser.

You can simply try to solve the ‘DNS server not responding’ error by visiting your WordPress site using another browser like Mozilla Firefox or Microsoft Edge.

For example, if you use Google Chrome and the browser is showing the ‘DNS server not responding’ error, try accessing your website using Mozilla Firefox.

You could also try opening the page in a private tab, such as using Chrome’s Incognito mode.

If you are able to access the website in the other browser that means the problem is with your default web browser.

In that case, you can clear the browser cache to see if that fixes the issue. If that doesn’t solve the problem, then you can try reinstalling the browser.

3. Disable Your Firewall or Antivirus

Firewall and Antivirus programs protect your computer from malicious software.

However, sometimes these programs can also block trustworthy sites due to strict settings or an issue within the program itself.

To check if you’re getting the ‘DNS server not responding’ error due to these software, you need to temporarily deactivate your firewall and antivirus programs.

If you’re using Windows, then you can easily disable firewall and antivirus programs by selecting the Settings app from the Start menu.

Go to Settings from the Start menu

Once you’re on the ‘Settings’ app, click the ‘Privacy and Security’ option from the sidebar.

Now simply choose the ‘Windows Security’ option in the ‘Privacy and Security’ tab.

Go to Privacy and Security and select Windows Security

On the ‘Windows Security’ page, you need to select the ‘Virus and Threat Protection’ option from the list.

After that, you need to toggle the switch below the ‘Microsoft Defender Firewall’ option and set it to Off.

Switch the firewall toggle off

If you’re using a Mac, then simply go to System Preferences » Security and Privacy from the Apple toolbar.

This will take you to the ‘Security and Privacy’ window.

Go to System Preferences and select Privacy and Security

Here simply click the ‘Firewall’ tab and then turn off the firewall.

You have now disabled the antivirus and firewall programs.

Turn off Firewall in Mac

After disabling the firewall, visit your site to see if the error has been resolved.

4. Change the DNS Server Address

Sometimes the ‘DNS server not responding’ error is caused when the DNS server assigned to you by your internet service provider is unavailable or has incorrect information.

In that case, you can solve the problem by switching to a different public DNS server, such as Cloudflare or Google Public DNS which offer DNS address for free.

If you use Windows, go to the Windows Search Box from the taskbar and type ‘ncpa.cpl‘ to access the Network Connections page.

Go to ncpa.cpl for network connections

Once you’re on the ‘Network Connections’ page, right-click on the internet connection that you’re currently using.

Next, simply select the ‘Properties’ option from the prompt that opens up.

At this point, you may need to provide an administrator password. If you don’t have those permissions, contact your IT department or computer admin.

Select the Properties option after right clicking

After that, you will see the ‘Properties’ window.

Here you have to locate and double-click the ‘Internet Protocol Version 4 (TCP/IPv4)’ option from the list which will open up a new window.

Double click the Internet Protocol Version option

Once here, simply check the ‘Obtain an IP address automatically’ box and then check the ‘Use the following DNS server addresses’ box.

After that, you need to type the DNS address you obtained from the public DNS servers and click the ‘OK’ button at the bottom.

For example: Cloudflare public DNS is 1.1.1.1 vs Google public DNS is 8.8.8.8 and 8.8.4.4.

Type your preferred DNS

Now restart your computer and visit your site to see if the error is resolved.

If you’re a Mac user, simply select the Apple icon in the toolbar and click the ‘System Preferences option.

Go to System Preferences

In the popup that appears, select ‘Network’ and then click on the ‘Advanced’ button.

After that, simply open the ‘DNS’ tab. Here you will find a ‘+’ button at the bottom-left corner.

Choose DNS option and click the + button

Clicking it will add a new DNS server with the address 0.0.0.0.

Now go ahead and type the numbers for the public DNS server you want to use.

For example: Cloudflare public DNS is 1.1.1.1 vs Google public DNS is 8.8.8.8 and 8.8.4.4.

Write your DNS

After that, simply click on the ‘OK’ button which will take you back to the previous popup.

Here, simply click the ‘Apply’ button to save your changes.

Apply DNS change

Now, you need to visit your site to check if the error has been removed.

5. Flush Your DNS Cache

Just like your browser, the computer also stores all the IP addresses of the websites that you visit so it won’t have to look up the same IP address twice.

However, DNS cache information can get outdated which can cause the ‘DNS server not responding’ error on your site.

This can happen when you have moved your site to a new domain name or when you’ve moved your site to a new WordPress host.

Flushing your DNS cache can remove the ‘DNS server not responding’ error. All you need to do is check out our guide on how to clear your DNS cache on Mac, Windows, and Google Chrome for more instructions.

We hope this article helped you learn how to easily fix the ‘DNS server not responding error’ in WordPress. You may also want to check out our ultimate security guide for WordPress and the best email marketing for small businesses.

If you liked this article, then please subscribe to our YouTube Channel for WordPress video tutorials. You can also find us on Twitter and Facebook.

The post How to Fix DNS Server Not Responding Error in WordPress (5 Ways) first appeared on WPBeginner.