All posts by Editorial Staff

How to Easily Add a Sliding Side Cart in WooCommerce

Do you want to add a sliding side cart in WooCommerce?

This allows shoppers to see their shopping cart from any page on your online store. Customers can then add items to their basket, remove products, and add coupons without ever having to visit a separate cart page.

In this article, we will show you how you can easily add a sliding cart in WooCommerce.
How to add a sliding side cart in WooCommerce

Why Add a Sliding Side Cart in WooCommerce?

A sliding side cart is a panel that appears when a customer adds an item to their basket.

Customers can also open the cart at any time by clicking on the cart icon. This allows them to check their shopping basket without having to visit a separate WooCommerce cart page.

An example of a sliding cart in WooCommerce

Depending on how the cart is set up, shoppers may also be able to add and remove items as well as apply coupons directly from the sliding panel. You can even add call to action buttons such as a link to your WooCommerce checkout page.

Sliding carts can improve the customer experience by removing friction from the shopping process, and help shoppers keep track of how much they’ll pay at checkout. This can reduce cart abandonment rates, while also possibly increasing the average order value.

With that being said, let’s see how you can add a sliding side cart in WooCommerce. Simply use the quick links below to jump straight to the method you want to use.

Method 1. How to Add a Sliding Side Cart in WooCommerce Using a Free Plugin

The quickest and easiest way to create a sliding side cart is by using Cart For WooCommerce By FunnelKit. This free plugin allows you to add a cart icon to your online store.

Shoppers can click the button to open the sliding side cart.
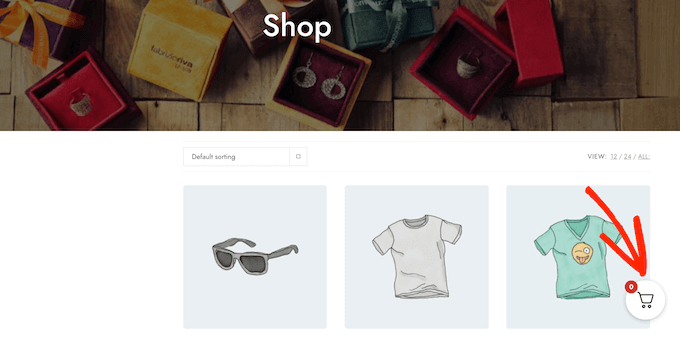
An example of a sliding side cart in WooCommerce

You can change the cart’s colors, borders, buttons, messaging, and more.

There are a ton of options to make it perfectly fit your WordPress theme.
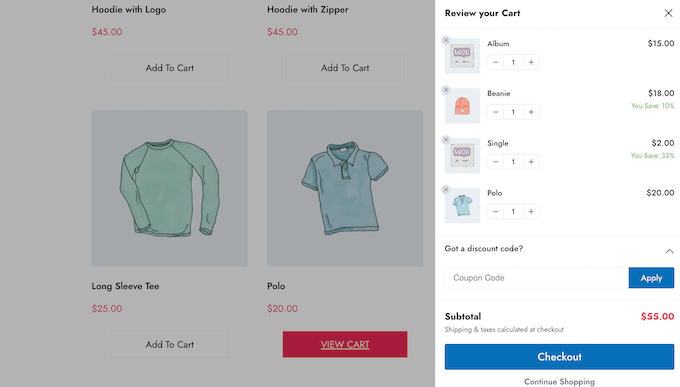
A WooCommerce sliding side cart

You can show the cart button across your entire site, limit it to WooCommerce pages only, or add the button to specific pages and posts using a shortcode.

How to Setup the Cart For WooCommerce Plugin

First, you’ll need to install and activate the FunnelKit Cart for WooCommerce plugin. If you need help, then please see our guide on how to install a WordPress plugin.

Upon activation, go to FunnelKit » Cart. You’ll see a preview of the sliding slide cart towards the right of the screen.
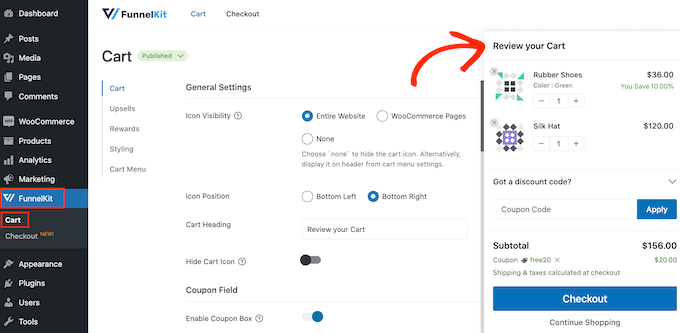
Previewing the FunnelKit cart

You can now customize the cart to better suit your needs.

To start, you can decide whether to show the cart icon across your entire website or on WooCommerce pages only.

If you select ‘Entire Site’, then shoppers can open the sliding cart from any page, so this is a good choice for online marketplaces and stores.
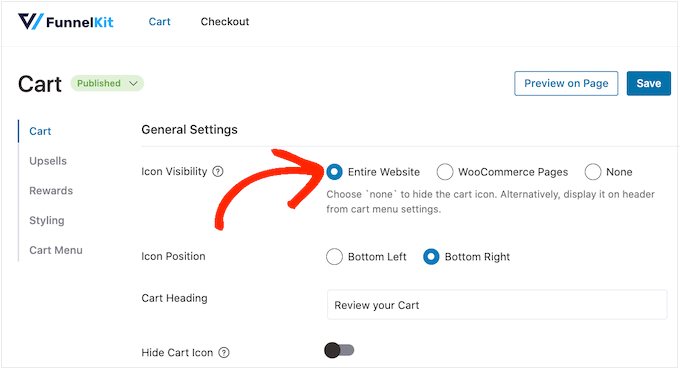
Adding a cart icon to your WordPress website

However, some WooCommerce sites have lots of non-ecommerce content. For example, you might run a popular WordPress blog, but use WooCommerce to sell merchandise to your fans.

Showing a cart button on every single blog post may become annoying. In that case, you can check the ‘WooCommerce Pages’ radio button.
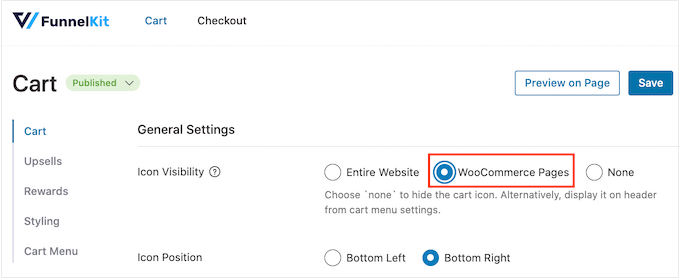
Adding a cart icon to your WooCommerce pages

Another option is ‘None,’ which hides the cart icon completely.

If you select the ‘None’ option, then you can add the icon to any page, post, or widget-ready area using a shortcode. You can also add the icon to your navigation menu.

We’ll show you how to do this later in the post, but for now, select ‘None’ if you plan to add the cart icon manually.

After making this decision, select ‘Bottom Left’ or ‘Bottom Right’ depending on where you want to show the cart button. Here, it may help to check how the button will look on your online store by selecting ‘Preview on Page.’
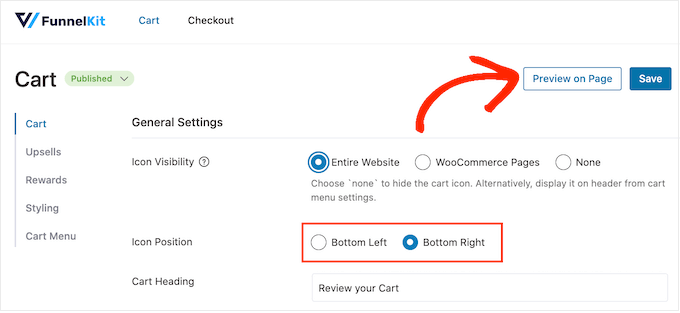
Previewing the FunnelKit sliding cart

By default, the plugin shows ‘Review Your Cart’ at the top of the sliding side cart.

You can replace this with your own messaging by typing into the ‘Cart Heading’ field.
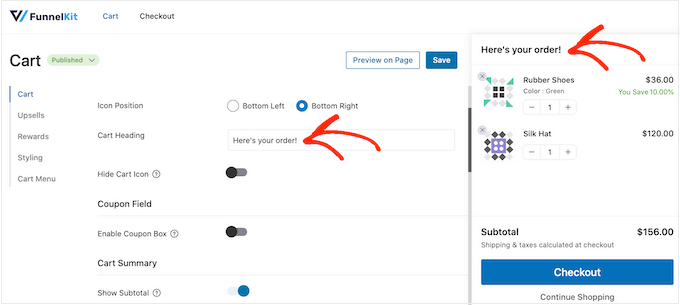
Adding a heading to your online store's cart

If you don’t want to show a heading, then simply leave the field empty.

By default, FunnelKit shows the cart icon before the shopper adds any items to their basket.

If you prefer, then you can hide the icon until the visitor starts adding items. Simply click on the ‘Hide Cart Icon’ toggle so that it turns blue.
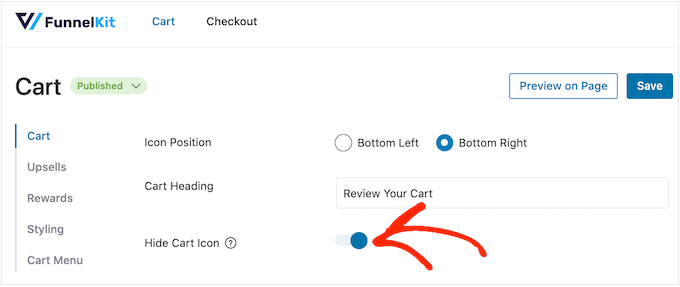
Hiding the WooCommerce cart

This is all you need to create a basic sliding side cart, but there are settings that can get you even more sales. With that in mind, let’s take a look at FunnelKit’s more advanced features.

Accept Coupons in the WooCommerce Sliding Side Cart

Coupons are a great way to get more sales and build customer loyalty.

If you’ve created any smart WooCommerce coupons using the Advanced Coupons plugin, then shoppers can type them directly into the sliding cart page.
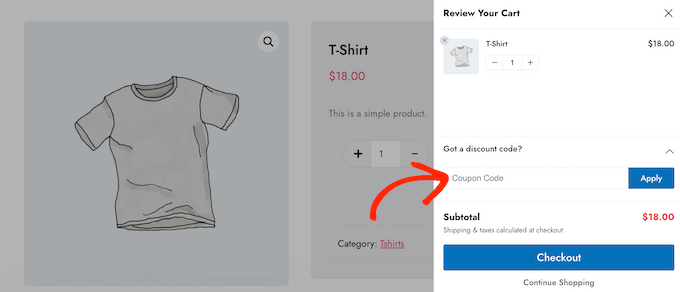
Adding coupon codes to a sliding side cart in WooCommerce

When the customer clicks on ‘Apply,’ the sliding cart will show how much they’ve saved.

Since customers can see the discount straight away, this will encourage them to add more items to their basket and may reduce your cart abandonment rates.
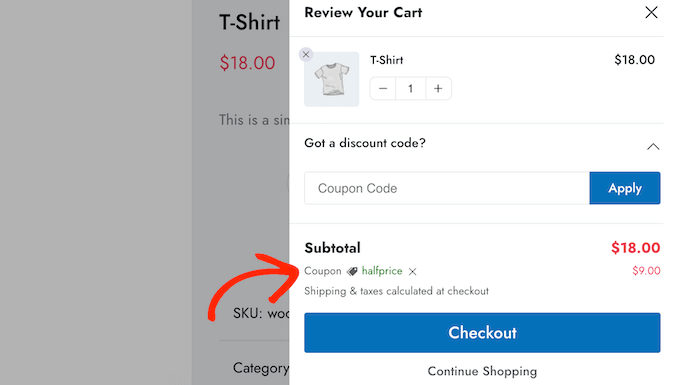
How to accept coupon codes in a sliding side cart

You can create these codes using the built-in WooCommerce coupon feature or by using a coupon code plugin.

To add the coupon field, click on the ‘Enable Coupon Box’ toggle, which turns it from grey (disabled) to blue (enabled).
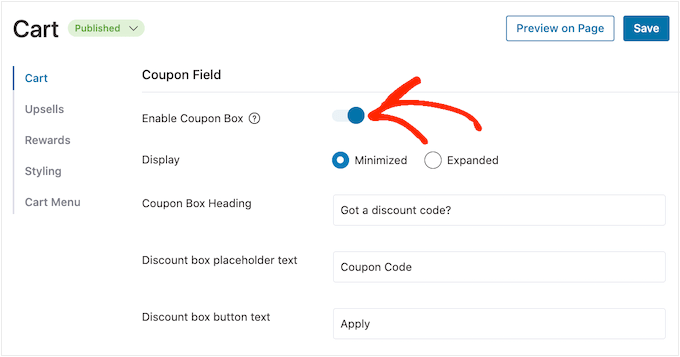
Accepting coupons on your online store

After that, you can switch between ‘Minimized’ and ‘Expanded’ layouts. Minimized takes up less space so it’s less distracting, but shoppers will need to expand the coupon section before they can type in any codes.

In the following image, you can see the minimized layout.
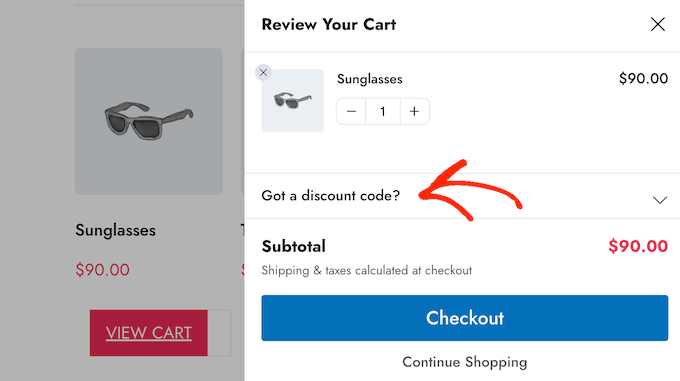
An example of a minimized layout for coupon codes and discounts

After choosing a layout, you can change the text that FunnelKit uses for the coupon box heading, discount placeholder text, and button text.

Customize the Cart Summary

The cart summary shows customers how much their purchase will cost. This helps reduce cart abandonment rates since there are no nasty surprises at checkout.
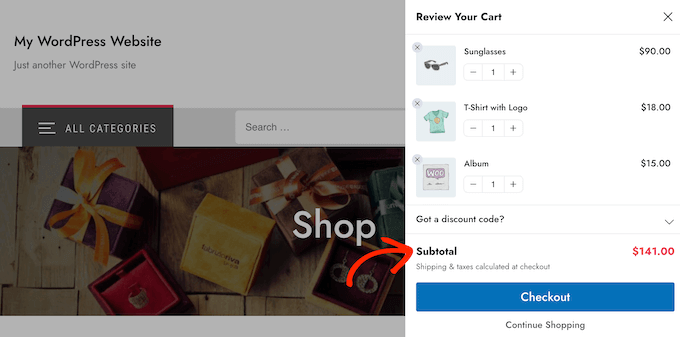
Customizing the WooCommerce cart summary

For that reason, we recommend leaving the ‘Show Subtotal’ toggle enabled.

However, if you want to simplify the side cart, then you can click to disable the ‘Show Subtotal’ toggle.
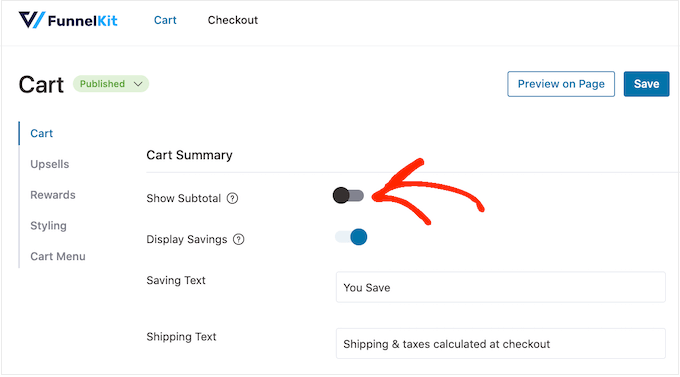
Showing the subtotal on your eCommerce cart page

You can also show any savings the customer has qualified for, including discounts from any coupons they’ve applied.

In this way, you can use FOMO to increase conversions, especially if the savings are time-sensitive. For example, you might schedule coupons in WooCommerce so the customer can only use them for a limited time.

Showing savings and discounts on your e-Commerce site

If you prefer to hide this information from the sliding side cart, then you can disable the ‘Display Savings’ toggle.

You can also replace the ‘Saving Text’ and ‘Shipping Text’ with your own custom messaging.
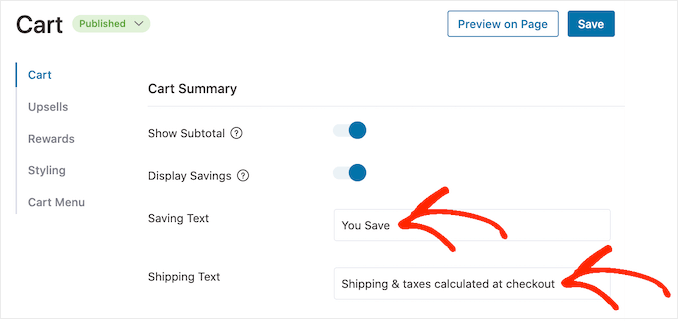
Customizing the message on a sliding side cart screen

Customize the WooCommerce Cart’s Call To Action

The sliding side cart has a default checkout button, but you can customize this call to action button to get more conversions. To start, you can add a checkout icon using the ‘Enable Button Icon’ toggle.
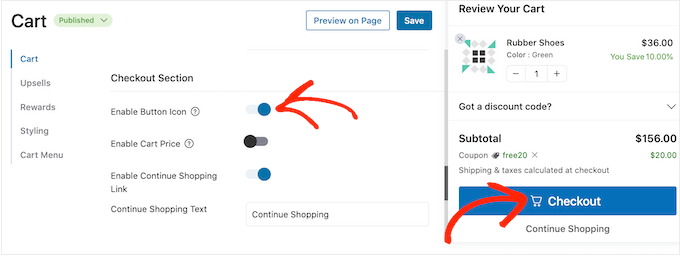
FunnelKit's checkout settings

This can be particularly useful if you’re creating a multilingual WordPress site.

You can also add the cart price to the checkout button using the ‘Enable Cart Price’ toggle.
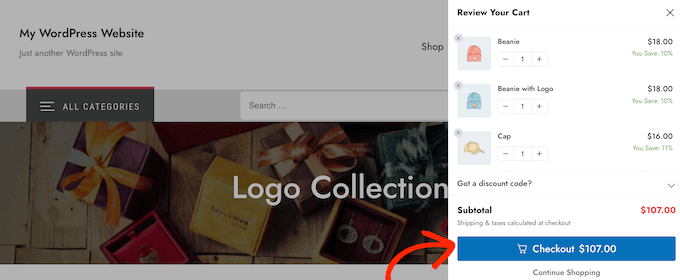
Customizing the WooCommerce checkout button

This may help shoppers keep track of how much the cart will cost, especially if you’ve removed the subtotal from the cart summary section.

By default, FunnelKit adds a ‘Continue Shopping’ link at the bottom of the sliding side cart. You can replace this text with your own messaging by typing into the ‘Continue Shopping Text’ field.
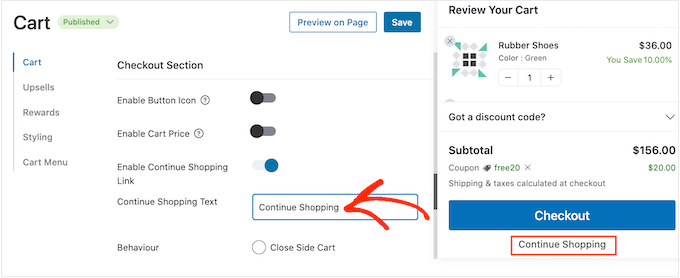
Customizing the 'Continue shopping' text

After that, choose whether this link will simply close the side cart panel or redirect the shopper to your WooCommerce store page.

Most shoppers will expect to exit the sliding cart, so we recommend selecting the ‘Close Side Cart’ button.
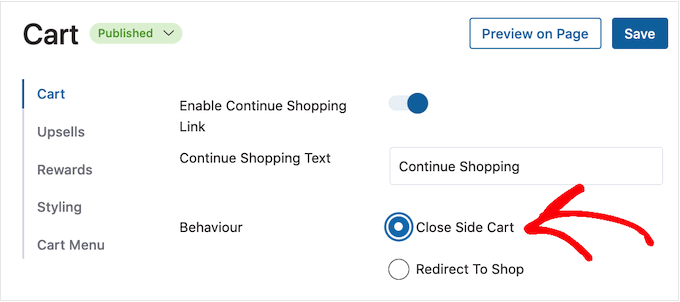
Closing the sliding side cart in WooCommerce

If you select ‘Redirect to Shop,’ then you may want to change the ‘Continue Shopping Text’ text so it’s clear what will happen when customers click the link.

Create a Custom Empty Cart Screen

It is possible to hide the cart button until the shopper adds at least one item to their basket, following the process described above.

However, if you don’t hide the button then customers may sometimes see an empty cart screen.
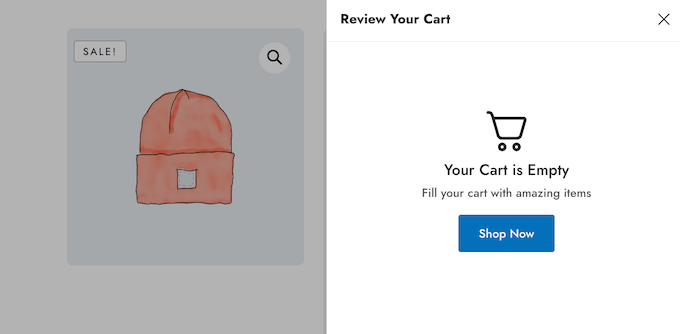
The 'Empty Cart' screen

You can change the title, description, and button text using the settings in the ‘Empty Cart’ section. Typically, you’ll want to encourage customers to start shopping. For example, you might talk about things you offer such as free shipping or a money-back guarantee.

You might even give the shopper a coupon code such as a buy one get one free (BOGO) discount.
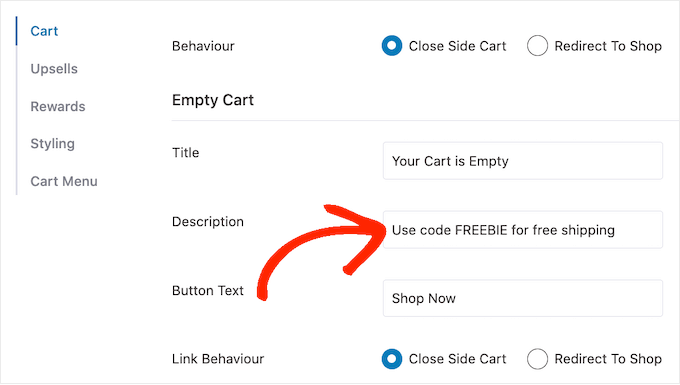
Adding a CTA to the 'empty cart' screen

You can also choose whether clicking on the ‘Shop Now’ button will take the customer to the WooCommerce store page, or simply close the side panel.

We recommend selecting ‘Redirect To Shop’ as this will make it easier for shoppers to start adding items to their carts.
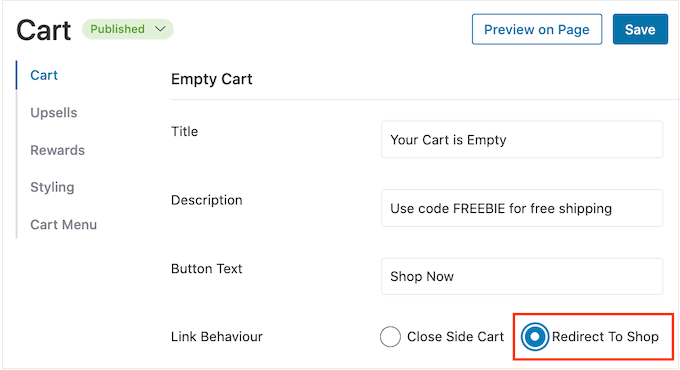
Enabling 'redirect to shop' in the FunnelKit WordPress plugin

Add The Cart Icon Anywhere on your Site

If you want more control over where the cart icon appears, then you can add it to any page, post, or widget-ready area using a shortcode. You can also add it to your site’s menu.

This is a great choice if you selected ‘None’ in the ‘Icon Visibility’ settings following the process described above.
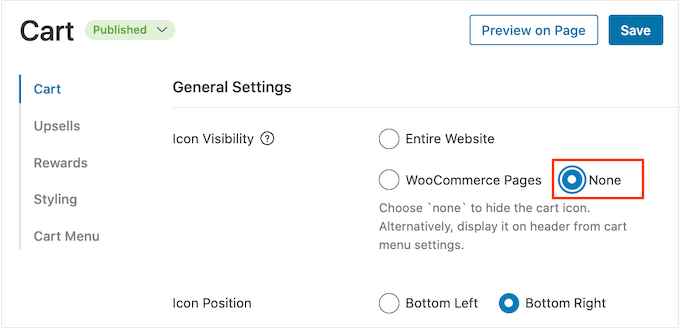
FunnelKit's 'icon visibility' settings

However, if you selected ‘WooCommerce Pages’ then this method allows you to add the cart icon to other important areas of your site. For example, you might add the icon to your custom home page or contact form.

To start, select ‘Cart Menu’ and then click on the ‘Enable Cart Menu’ toggle.
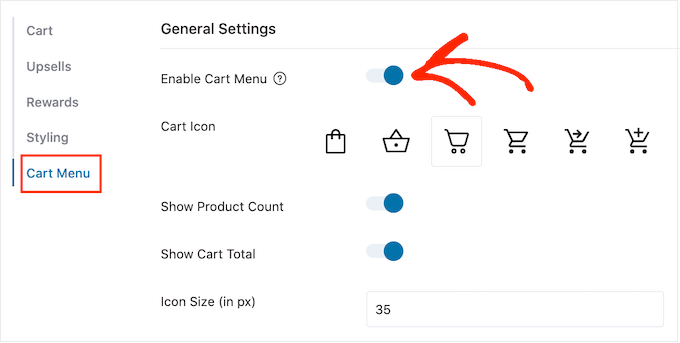
Enabling the cart icon on WordPress

You can now change how the icon looks by selecting one of the icon templates, and choosing whether to show the product count and cart total as part of the icon. This information can help visitors keep track of their carts.

You can also change the icon size and text size. As you make changes, the small preview will update automatically so you can try different settings to see what looks the best.
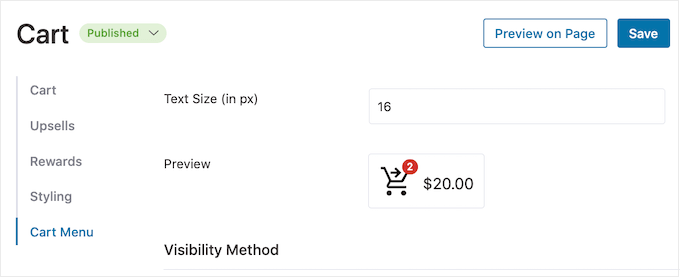
How to create a custom cart icon for WordPress

When you’re happy with how the sliding side cart icon looks, click on the ‘Save’ button.

You can now add the icon to any page, post, or widget-ready area using the code next to ‘Embed Shortcode.’
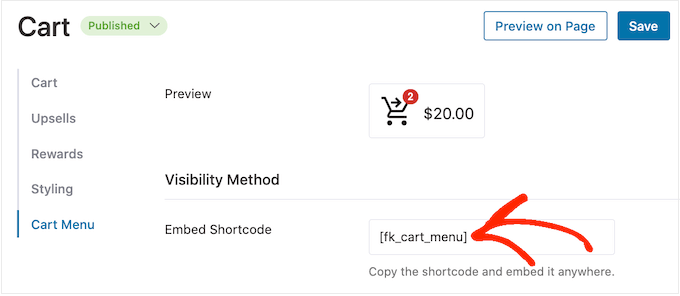
How to add a cart icon using shortcode

For more information on how to place the shortcode, please see our guide on how to add a shortcode in WordPress.

Another option is to add the icon to your site’s navigation menu. In this way, the sliding side cart is always within easy reach, without distracting from the main page content.
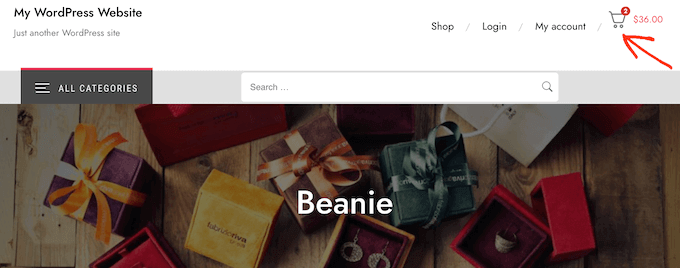
How to add a cart icon to a navigation menu

To do this, open the ‘Add to Menu’ dropdown and choose the menu you want to use.

After that, click on the ‘Save’ button.
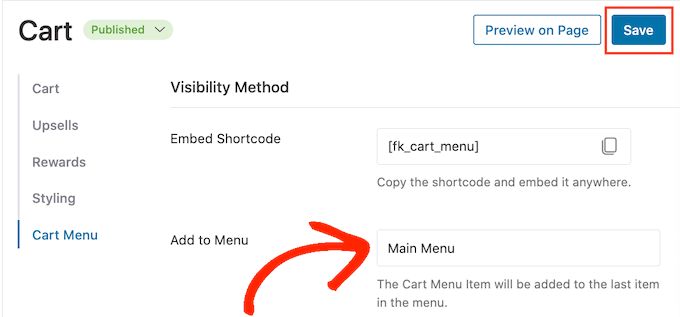
Adding a cart icon to the WordPress menu

Now if you visit your WordPress website, you’ll see the cart icon in the navigation menu.

Add Your Own Colors and Branding

You may want to change the sliding side cart’s colors to better match your WooCommerce theme or branding. To change the text color, button color, link color, and more, go ahead and click on ‘Styling.’
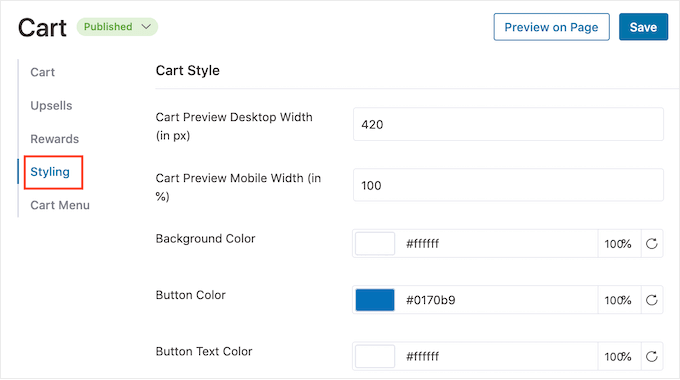
Adding your own branding to a WooCommerce cart

To change any of the default colors, simply give it a click. This opens a popup where you can try out different colors.

For example, in the following image, we’re customizing the border.
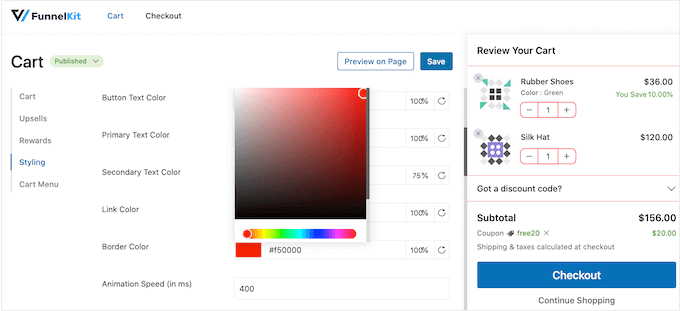
How to add custom colors to a WooCommerce store

Another option is to type a hex code into the ‘Hex’ field. This is perfect if you already have a specific shade in mind.

If you don’t know what hex code to use, then it may help to use a site like HTML Color Codes. Here, you can explore different colors and then get a code that you can simply paste into the FunnelKit plugin.

How to Create a Responsive Sliding Side Cart

Many people buy products and services using a mobile device. With that in mind, you’ll want to make sure the sliding side cart looks just as good on smartphones and tablets, as it does on desktop computers.

Here, it may help to change the cart’s width so it doesn’t completely fill the small screen of a mobile device. To do this, click on ‘Styling’ and then look at the ‘Cart Preview Mobile Width.’
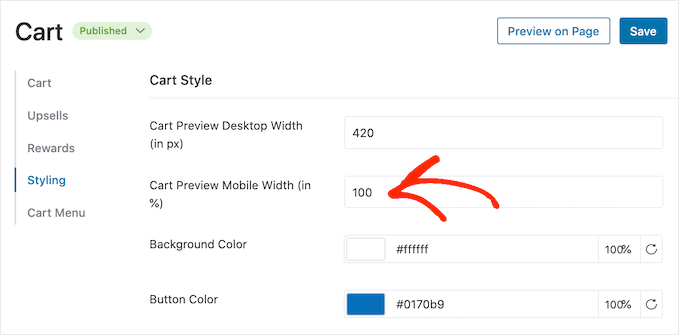
Create a mobile responsive cart page

You may want to try typing different values into this field. If you do change the default settings, then it’s a good idea to check the mobile version of your WordPress site from the desktop to make sure you’re happy with the results.

While you’re on this screen, you can also change the width of the sliding side cart on desktop. To do this, simply change the number in the ‘Cart Preview Desktop Width’ field.

How To Publish Your Sliding Side Cart

When you’re happy with how the sliding side cart is set up, it’s time to make it live. Simply click on the ‘Draft’ button next to ‘Cart’ and then choose ‘Publish.’
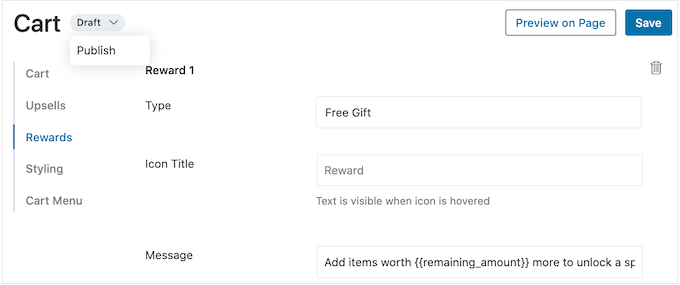
Adding a sliding side cart in WooCommerce

Now if you visit your online store, you’ll see the sliding cart live.

If you want to remove the sliding side cart at any point, then just head back to FunnelKit » Cart in the WordPress dashboard. Then, click on the ‘Publish’ button and select ‘Draft.’

Method 2. Add an Advanced Sliding Side Cart (With Upsells, Cross-Sells, and Rewards)

If you want to increase the average order value on your store, then you can upgrade to FunnelKit Cart Pro. This advanced sliding side cart plugin adds powerful upsell, cross-selling, and reward features to the FunnelKit sliding side cart.

With this plugin, you can recommend related products every time a customer adds an item to their cart.
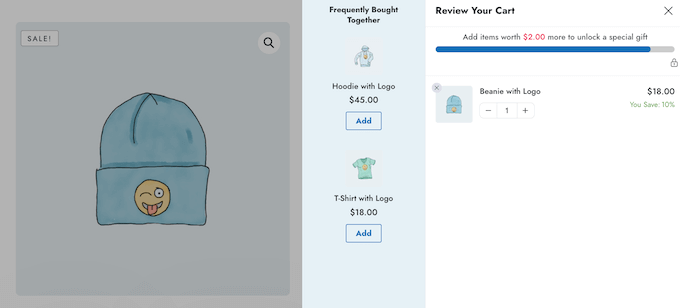
Get more sales with upselling and cross-selling promotions

You can also create unique rewards such as coupon codes and free gifts, and then promote them inside the sliding cart.

FunnelKit can even track how much more the customer needs to spend, in order to unlock the next reward.
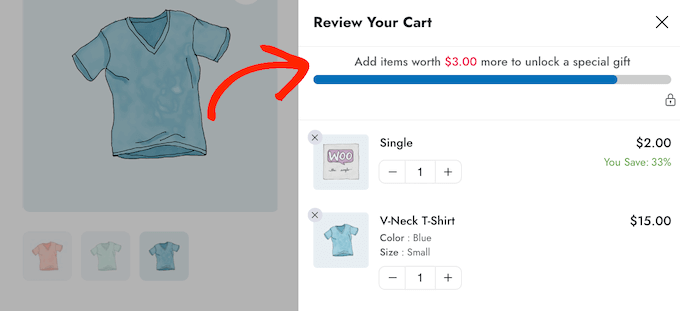
Offering extra rewards to shoppers

To add these powerful features, you’ll need to upgrade to FunnelKit Funnel Builder Pro. Just be aware that you’ll need the Plus or higher plan.

After buying a plan, log into your FunnelKit account. Here, you’ll find the FunnelKit Funnel Builder Pro plugin, plus FunnelKit Funnel Builder and FunnelKit Cart. You’ll need to install all three plugins to unlock the advanced sliding cart features.

First, you’ll need to install and activate the three plugins. If you need help, then please see our guide on how to install a WordPress plugin.

Upon activation, go to FunnelKit » Settings and add your license key to the ‘FunnelKit Funnel Builder Pro’ field.
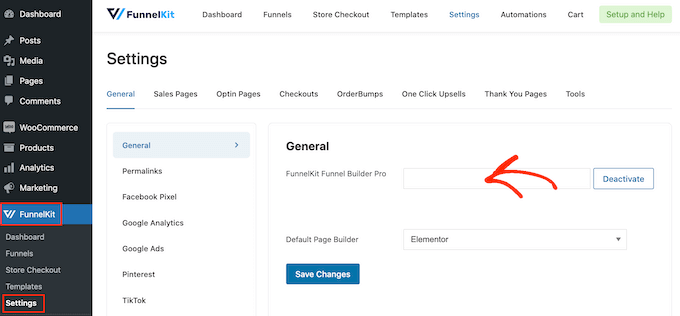
Adding the FunnelKit license

You can find this information by logging into your account on the FunnelKit website. With that done, click on ‘Activate.’

After that, simply go to FunnelKit » Cart.
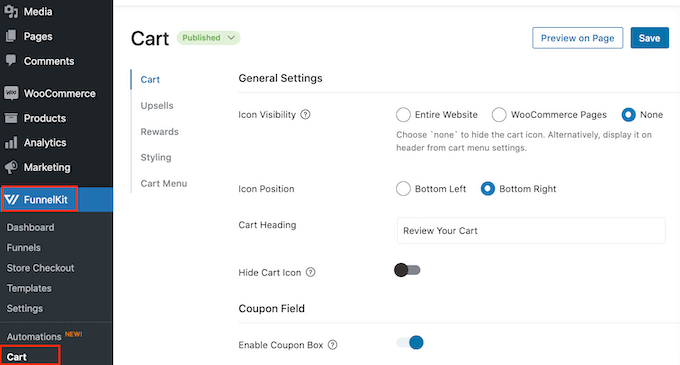
Adding an advanced sliding side cart to an online store

You can now configure and customize the side cart by following the same process described in method 1. When you’re happy with how the sliding side cart is set up, you’re ready to add upsells, cross-sells, and rewards.

Get More Sales By Upselling and Cross-Selling WooCommerce Products

When a customer opens the sliding side cart, you can show them unique upsell and cross-sell promotions based on the items in their shopping basket.
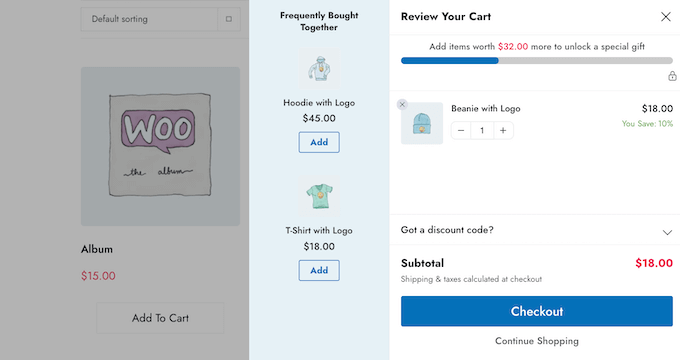
Adding upsell and cross-sell promotions to WooCommerce

Upselling is where you encourage shoppers to buy a higher-priced product instead of the one they already have in their shopping cart.

For example, imagine a customer adding a waterproof jacket to their cart. You might suggest a higher-quality jacket that’s more durable, versatile, and comes in different colors.

Cross-selling is where you promote a product that’s related to something the customer is already buying. For example, if they add a greeting card to their cart, then you might encourage them to buy chocolates or flowers too.

WooCommerce has a linked product feature that allows you to create upsells and cross-sells. For more information, please see our guide on how to upsell products in WooCommerce.

However, you can also create upsells and cross-sells directly from the FunnelKit dashboard. This is the quickest option, so it’s the one we’ll be using in this guide.

To start, click on the ‘Upsells’ option and then select ‘Enable Cart Upsells.’
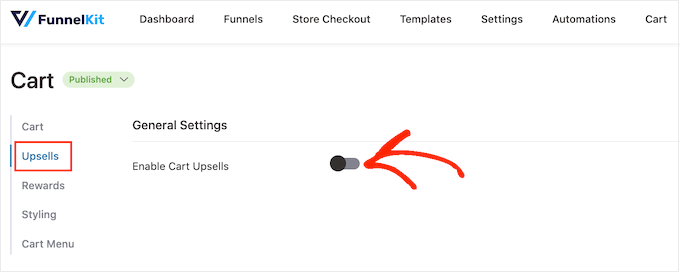
How to add upsells and cross-sells to WooCommerce

After that, scroll to the ‘Upsells and Cross-Sells’ section.

Here, you’ll see all the products on your online store.
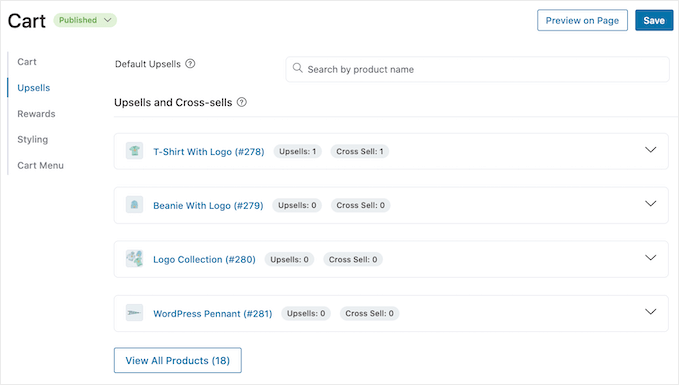
How to create WooCommerce linked products

Simply click on the item where you want to add one or more linked products.

Then, click on either ‘Add Upsell’ or ‘Add Cross Sell’ depending on the kind of promotion you want to create.
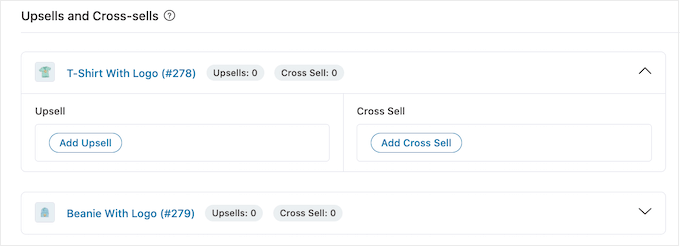
FunnelKit's advanced conversion features

In the popup, start typing the product that you want to use as the upsell or cross-sell. When the right product appears, give it a click.

To offer multiple products, simply follow the same process described above.

Adding a linked product on your online store

With that done, simply click on the ‘Add’ button.

You can now create unique cross-sell and upsell campaigns for every product in your store, simply by following the same process described above.
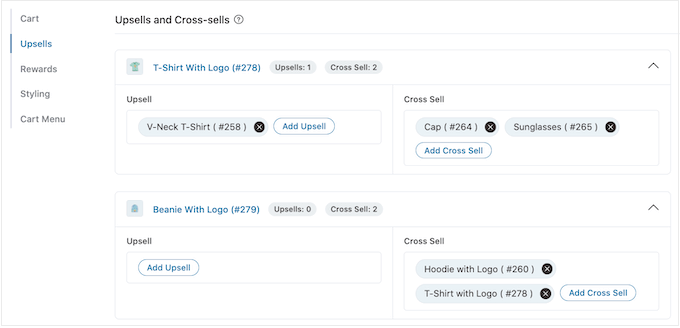
An example of a high-converting eCommerce sliding cart

Now, you’re ready to customize how the upsell and cross-sell promotions will look on your sliding side cart.

To start, try switching between different styles by clicking the radio buttons next to ‘Display.’

Customizing the upsell and cross-sell promotions in WooCommerce

The live preview will update automatically so you can try different styles to see which one you like the best.

By default, FunnelKit will show both upsells and cross-sells in the sliding side cart. If you prefer then you can show only upsells, or only cross-sells using the radio buttons in ‘Product Recommendation Type.’
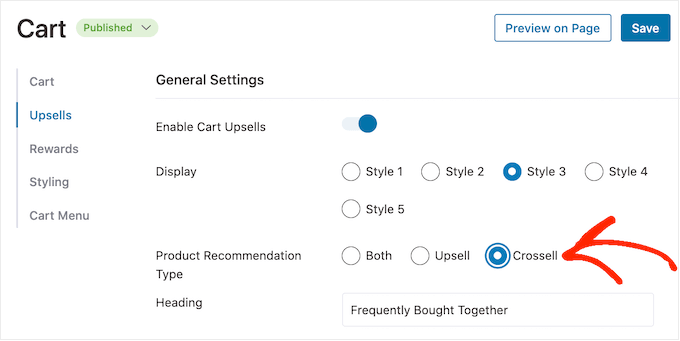
FunnelKit's product recommendation settings

Next, you can change the heading that FunnelKit shows above the upsell or cross-sell promotion by typing it into the ‘Heading’ field.

Just be aware that FunnelKit will use the same heading for both types of promotion.
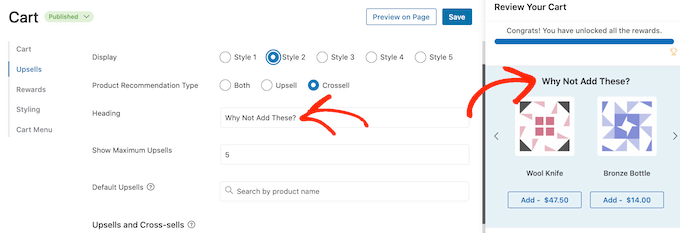
Adding promotions to your sliding side cart

After that, you can set the maximum number of suggested products that FunnelKit will show, by typing into the ‘Show Maximum Upsells’ field.

Wherever possible, it’s a good idea to create unique upsell and cross-sell promotions for every product. However, if your online store has lots of items then this might not be possible.

With that in mind, you can set a default upsell product that FunnelKit will promote when no linked products are available. To do this, simply type the name of a product into the ‘Default Upsells’ field. When the right product appears, give it a click.
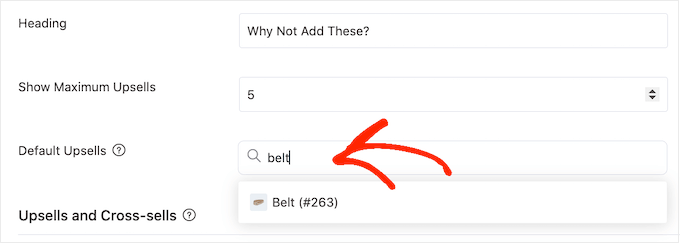
Setting a default linked product

When you’re happy with the upsell and cross-sell promotions you’ve created, don’t forget to click on ‘Save’ to store your changes.

Offer Free Shipping, Discounts, and Free Gifts

You can often increase the average order value by giving customers a reason to spend more. With that in mind, FunnelKit allows you to create various rewards and then promote them as unlockable bonuses in the sliding side cart.

For example, you might offer free shipping if the customer exceeds a minimum spend. FunnelKit will even show customers how much more they need to spend to unlock their prize.

This is an easy way to get more sales and build customer loyalty with gamification.

FunnelKit allows you to offer three different rewards: free shipping, a discount, and a free gift.

To offer free shipping, you’ll need to have already set up shipping in your WooCommerce store. For step-by-step instructions, please see our complete WooCommerce made simple guide.

Meanwhile, the ‘discount’ reward auto-applies a coupon when the customer reaches the minimum spend. If you want to offer this reward, then you’ll need to create a percentage discount coupon using either the built-in WooCommerce coupon feature or a WordPress coupon plugin.

For step-by-step instructions, please see our guide on how to create smart coupons.

After that, you’re ready to create a reward by selecting ‘Rewards’ in the FunnelKit settings and then clicking on ‘Create Reward.’
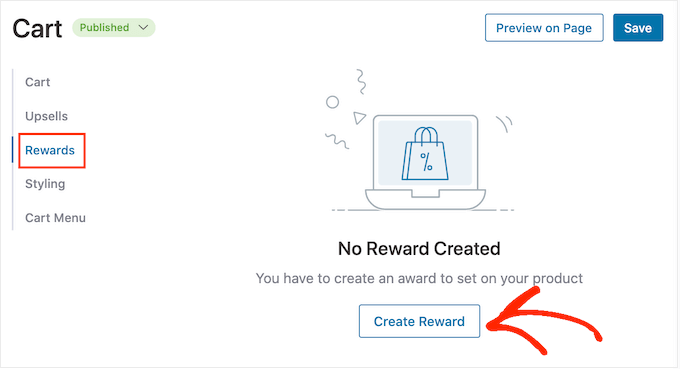
How to get more sales with rewards

You can now open the ‘Type’ dropdown and choose the kind of reward you want to create.

No matter whether you choose free gift, free shipping, or discount, you can change the text that FunnelKit shows to customers by typing into the ‘Message’ field.

If you do make any changes, then be careful not to edit {{remaining_amount}} as this allows FunnelKit to show how much more the customer needs to spend.
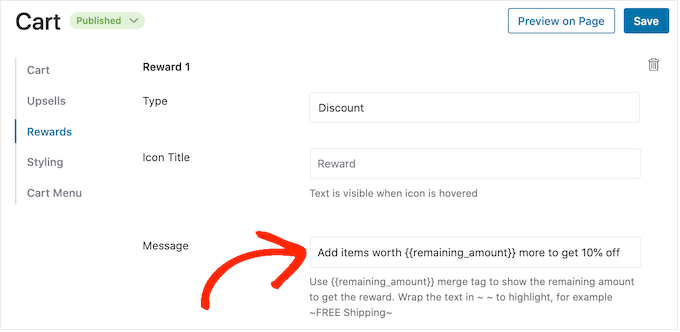
Adding incentives to your WooCommerce store

If you’re offering a discount, then make sure you change the message to show how much the customer will save.

With that done, type a number into the ‘Amount to Get Reward’ field. This is how much shoppers must spend, in order to unlock the reward.
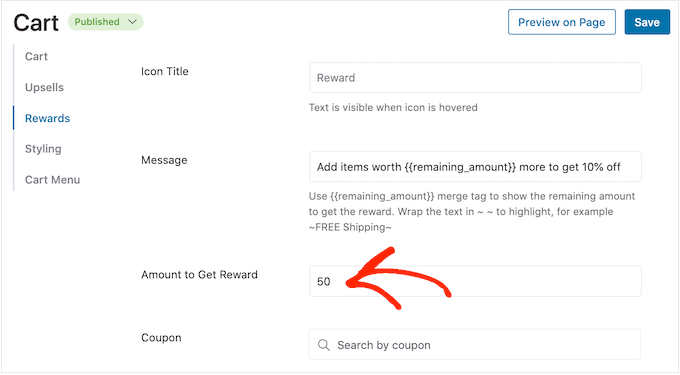
Offering your customers rewards and incentives

If you’re offering a percentage discount, then you need to specify which coupon FunnelKit should auto-apply.

In the ‘Coupon’ field, start typing the coupon that you want to use. When the right code shows up, give it a click.
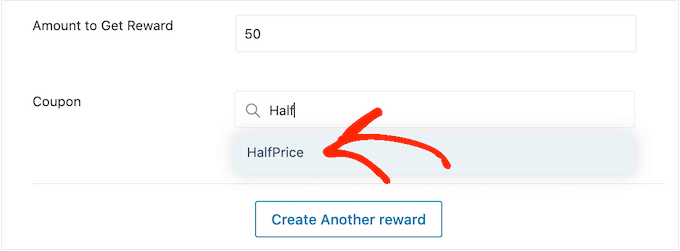
Adding a discount offer to your eCommerce site

Now, FunnelKit will auto-apply the coupon when someone meets the minimum spend.

Offering a free gift instead? Then start typing the name of the gift into the ‘Product’ field.
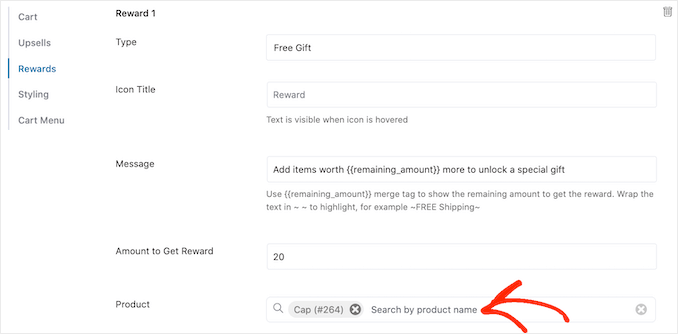
Offering shoppers a free gift

When the right product shows up, give it a click.

Now, FunnelKit will add this item to the customer’s shopping cart as soon as they meet the minimum spend.
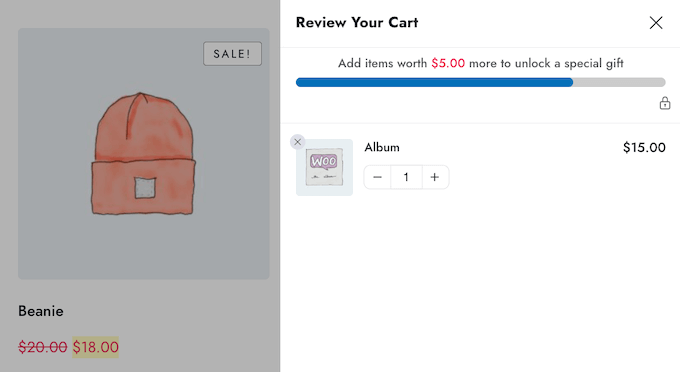
How to offer shoppers a free gift

To add more rewards, simply click on ‘Create Another Reward.’

You can now configure the discount, free gift, or free shipping reward by following the same process described above.
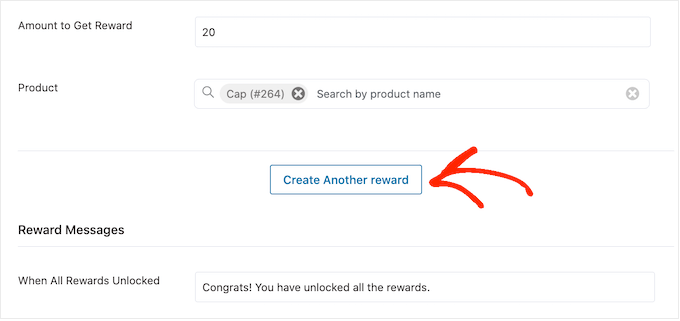
Get more sales by offering shoppers a reward

By default, FunnelKit will show the following message once a customer qualifies for all the awards: ‘Congrats! You have unlocked all the rewards.’

To show a different message instead, simply type into the ‘When All Rewards Unlocked’ field. You might even offer the customer a special bonus for unlocking all your rewards, such as an exclusive coupon code to use on their next purchase.
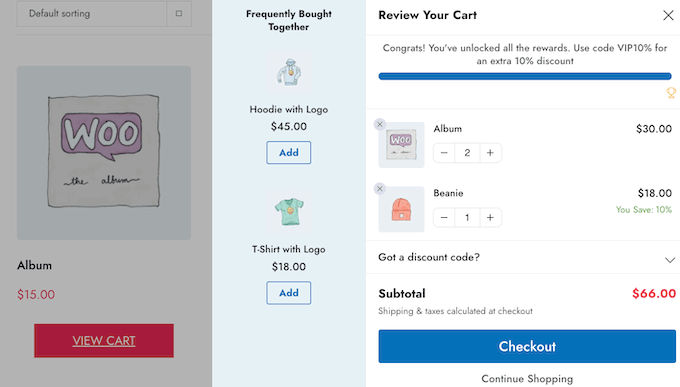
Offering visitors a reward

When you’re happy with how your rewards are set up, click on the ‘Save’ button.

How To Publish Your Sliding Side Cart

When you’re ready to make the sliding side cart live, simply select the ‘Draft’ button next to ‘Cart.’ You can then click on ‘Publish.’
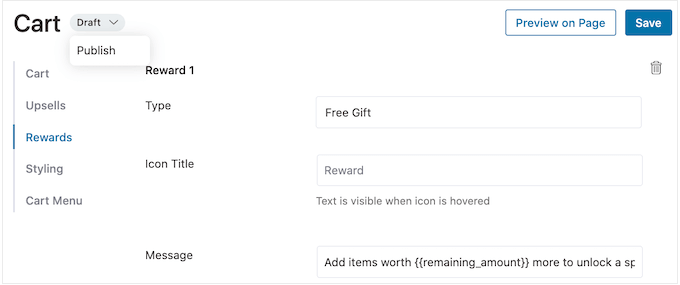
Adding a sliding side cart in WooCommerce

If you want to remove the sliding side cart at any point, then simply head back to FunnelKit » Cart in the WordPress dashboard. Then, click on the ‘Publish’ button and select ‘Draft.’

We hope this article helped you add a sliding side cart in WooCommerce. You may also want to check out our guide on how to create a WooCommerce popup to increase sales and the best WooCommerce plugins for your store.

If you liked this article, then please subscribe to our YouTube Channel for WordPress video tutorials. You can also find us on Twitter and Facebook.

The post How to Easily Add a Sliding Side Cart in WooCommerce first appeared on WPBeginner.
WPForms vs Gravity Forms vs Formidable Forms: Which is Best?

Are you looking for a comparison between WPForms, Gravity Forms, and Formidable Forms?

These three are the best WordPress form plugins in the market. However, picking the right form builder can be challenging for many website owners.

In this article, we’ll compare WPForms vs Gravity Forms vs Formidable Forms and show which is the best.

WPForms vs Gravity Forms vs Formidable Forms

Introduction to WordPress Form Plugins

WPForms, Gravity Forms, and Formidable Forms are among the most popular WordPress form plugins that you can use. Each of them offers unique features and allows you to add different forms to your website.

WPForms was launched in 2016 by Syed Balkhi (founder of WPBeginner) and Jared Atchison. Since its launch, over 5 million WordPress sites have been using the plugin. The goal of creating WPForms was to offer an easy and powerful form plugin. It takes the pain out of creating online forms by making the process beginner friendly.

Gravity Forms is created by the team at Rocketgenius. It is a WordPress plugin that lets you add forms to your WordPress site. The plugin also specializes in helping developers build complex form-related solutions.

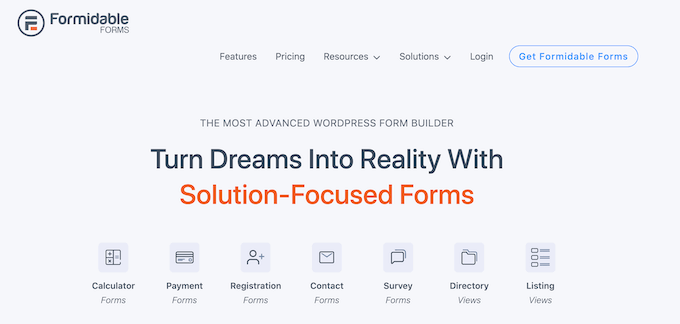
Formidable Forms is another powerful WordPress form builder created by Steph Wells and Steve Wells. You can use it to create a wide range of forms from simple contact forms to advanced solutions-focused forms like mortgage calculators, directories, listing forms, and more. Formidable Forms is part of WPBeginner Growth Fund companies.

That being said, let’s compare these WordPress form plugins and find out which is the best for your use case. In our research, we tried dozens of WordPress form plugins, and have decided to compare these top 3 form plugins in the following criteria:

Ease of Use

When it comes to picking a WordPress form plugin, it is essential to choose a tool that is easy to use. The form builder should allow users to easily customize their forms without the need to edit code or hire a developer.

Let’s see how the 3 plugins compare to each other for ease of use.

WPForms – Ease of Use

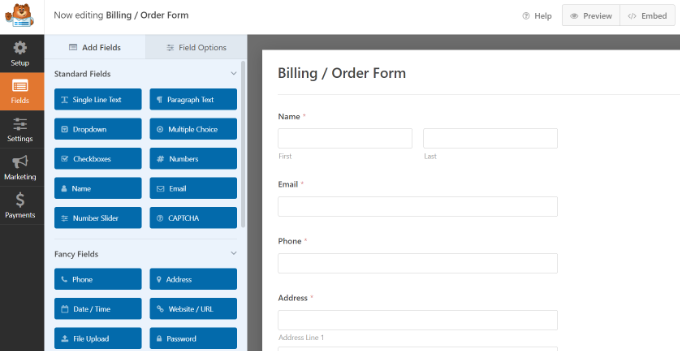
WPForms is a beginner-friendly form plugin for WordPress. It offers a drag-and-drop form builder that is very super simple to use.

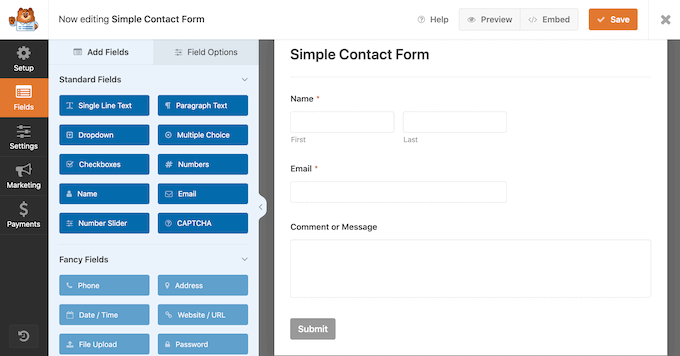
You can easily customize any form by adding multiple form fields from the menu on your left. All you have to do is drag the field and drop it onto the form template.

Customize your billing form

WPForms also makes it very easy to add your forms anywhere on the WordPress website. The best part, you can do all this within the form builder. You can click the embed button, and WPForms will show you options for adding your form.

For instance, you can create a new page or select an existing one to embed your forms.

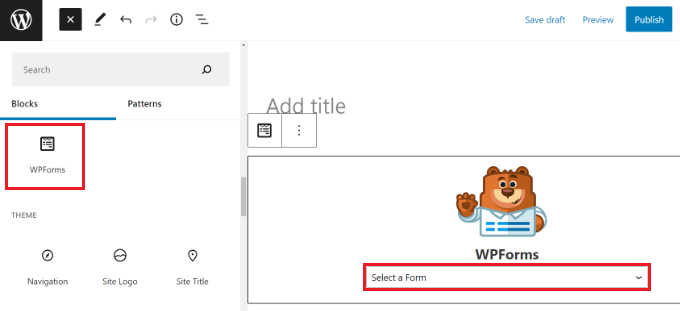
You can also manually add your form to any page or post using the WordPress block. Besides that, the plugin lets you use shortcodes to add a form to your WordPress website.

Add a WPForms block in wordpress

Gravity Forms – Ease of Use

Gravity Forms also offers a drag-and-drop form builder, and it lets you create all types of forms without editing code.

You can quickly rework your form from inside the WordPress dashboard. The form builder offers different form fields that you can add by simply placing them onto the template.

Gravity forms builder

After creating a form, Gravity Forms also lets you easily embed it on your website. Just like WPForms and Formidable Forms, you get an option inside the drag-and-drop builder to add your form.

Gravity Forms also offers a WordPress block to easily embed your forms on any page or post. Plus, you can use shortcodes or add the forms manually anywhere on your site.

Formidable Forms – Ease of Use

Formidable Forms is a user-friendly plugin that to lets you customize your forms using a drag-and-drop form builder, just like WPForms and Gravity Forms.

You can simply drag any form field from the options on your left and place them on the template. The plugin also lets you rearrange the order of the fields by simply moving them up or down or side to side.

Formidable Forms builder

Formidable Forms makes it very easy to embed your forms anywhere on your website. You can use the Formidable Forms block to add the form to any post or page. Or click the embed button in the form builder to embed your forms.

Winner – Tie

When it comes to ease, all 3 plugins perform equally well. Each of them offers a drag-and-drop functionality, which lets you edit and customize forms with editing code easily. Plus, each plugin makes it very easy to embed the forms anywhere on the website.

WPForms has a slight edge because it leans on decisions over options by giving you over 600+ form templates and easy-to-use choices whereas Gravity Forms and Formidable Forms are built more for developers.

Form Templates

Form templates are another important factor to consider when choosing a form plugin for WordPress.

Templates help save time as you don’t have to create a form from scratch. You can quickly edit it according to your requirements or simply use the default template to add a form to your website.

Let’s see how WPForms vs Gravity Forms vs Formidable Forms stack up in terms of form templates.

WPForms – Form Templates

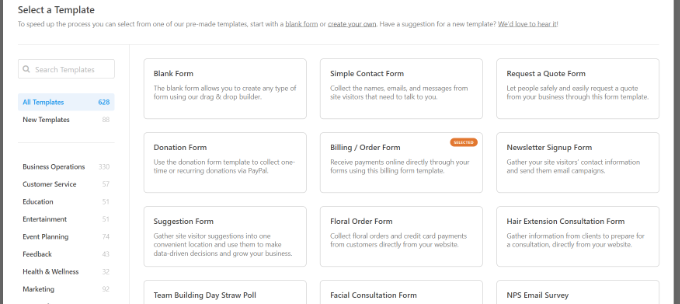
With WPForms, you get over 600 prebuilt form templates. Whether you’re looking to create a simple contact form, feedback form, request a quote form, payment form, or registration form, WPForms has you covered.

The plugin categorizes form templates into different categories in the form builder. For instance, you can find different templates for business operations, customer service, education, entertainment, event planning, feedback, health and wellness, and more.

WPForms form templates

Even in the free version of WPForms, you get a lot of form templates to get started.

Gravity Forms – Form Templates

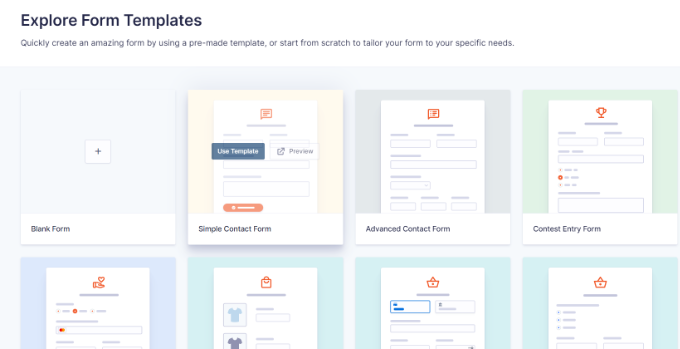
Gravity Forms offers limited prebuilt form templates compared to WPForms and Formidable Forms.

You only get 15 form templates in the form builder. Some of these include a simple contact form, advanced contact form, donation form, eCommerce form, event registration form, survey, newsletter signup form, and more.

Gravity Forms templates

Formidable Forms – Form Templates

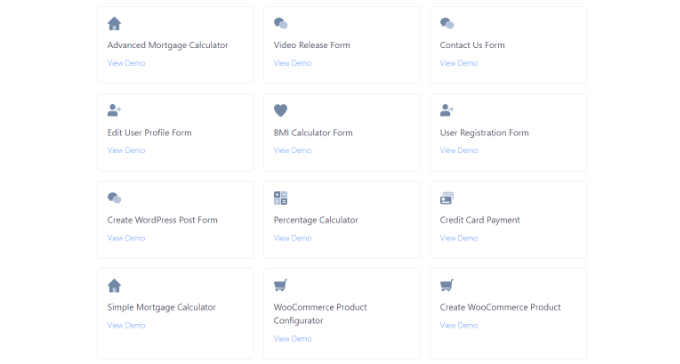
Formidable Forms offers over 175 WordPress form templates and examples you can use for your website.

What makes it different is that you get templates for advanced forms. For instance, you can create an advanced mortgage calculator form, net promoter score (NPS) survey form, car payment calculator form, life insurance calculator form, doctor visit form, signature forms, and more.

Formidable Forms templates

Besides that, you can find forms for payment collection, health and wellness, customer service, education, donations, event planning, and more.

Winner – WPForms

WPForms is a standout winner compared to Gravity Forms and Formidable Forms. You get the largest form template library in WPForms, with over 600 choices available. There are prebuilt templates for just about any type of form you want to create for your website.

Customization Options

A WordPress form plugin should allow you to edit and customize your form with ease. When selecting the right tool, you should look at the customization options the plugin offers.

Here’s a look at the different features offered by WPForms, Gravity Forms, and Formidable Forms.

WPForms – Customization Options

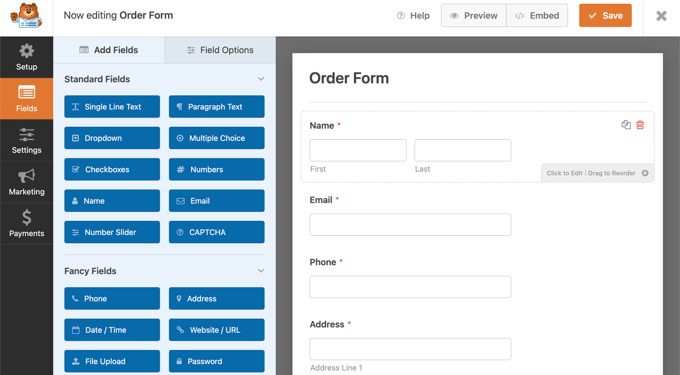
WPForms offers lots of customization options for your form. For starters, it offers different form fields that you can simply drag and drop from the menu on your left onto the template.

For instance, it offers standard fields like paragraph text, multiple choice, checkboxes, and more. Plus, you can add fancier fields like phone number, address, file upload, date/time, website, and more.

WPForms Will Pre-load the Form Builder with a Simple Order Form

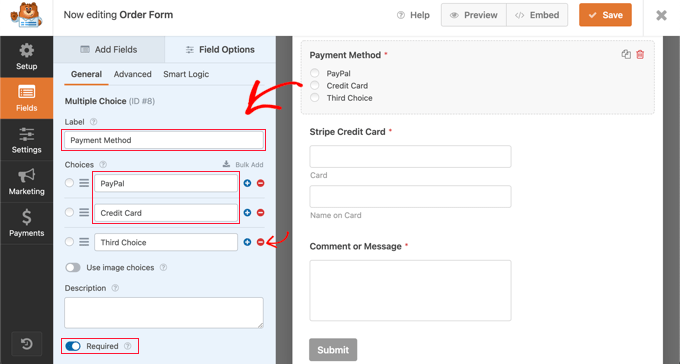
If you click on an existing form field, then you’ll see more options for customization.

You can edit the label of the field, make it a mandatory field, add smart logic, and more. For example, you can choose which payment methods to show in an order form and rearrange their order.

Multiple Choice Field Options

Other than that, WPForms also lets you create conversational forms. This makes your forms more interactive.

Instead of asking multiple questions at once, you can take the one-question-at-a-time approach. It will look like having a conversation face to face with a human, and boost form conversions.

Conversational form preview

Similarly, you can also use the lead forms addon to increase form conversions. It basically allows you to embed conversational forms on any page on your WordPress site.

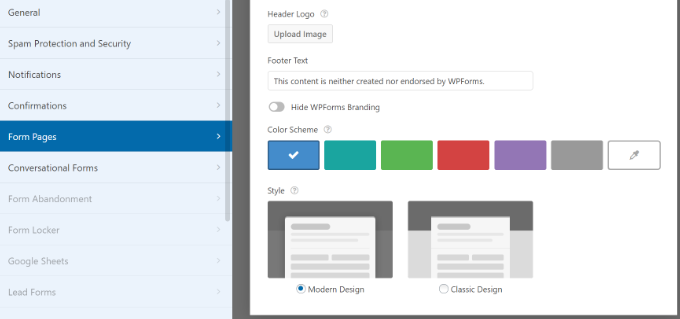
WPForms offers more customization features like custom form landing pages similar to Google forms. You can create a distraction-free landing page for your form and get more conversions.

The plugin lets you add a title and description for the page, a header logo, and edit the page URL. You also get to change the background color of the page and choose a style to make your forms more appealing.

Form pages settings WPForms

Other customization options offered by WPForms include a save and continue feature. This lets your users save the progress while filling out a form and continue later to complete it. You can allow users to sign your online forms using their mouse or touchscreen.

If you have lengthy forms, then you can use the multi-page feature to split them into different pages. Or you can use conditional logic to show different form fields based on the user’s responses.

Besides that, you can also customize the notification and confirmation settings for your form. In the notification settings, you can edit details like email addresses, subject lines, names, messages, and more.

Similarly, you can also edit the confirmation message a user will see when they submit a form. You can show a thank you message, show a page, or redirect people to a specific URL.

Edit form confirmation settings

Gravity Forms – Customization Options

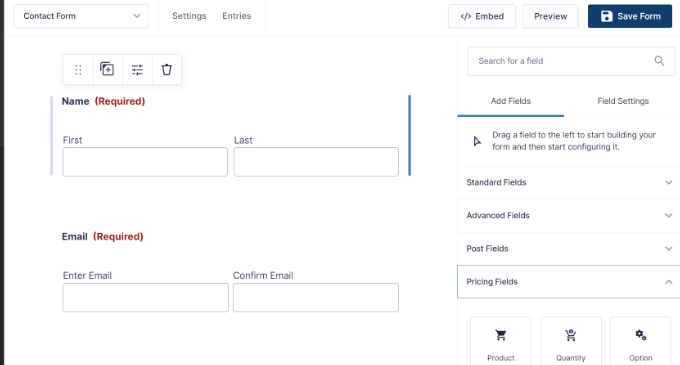
Gravity Forms offers different form fields to customize your form template.

These include standard fields, advanced fields, post fields, and pricing fields.

Add fields to Gravity Forms template

Just like WPForms and Formidable Forms, you can click on existing form fields to edit them further.

However, you’ll see a slight difference in the customization options. There are general settings for a field where you can change its label and add a description.

Other than that, you can edit the appearance of the field, change advanced settings like enabling field autocomplete, and add conditional logic.

Edit existing fields in gravity forms

Other than that, you also get control over different form settings. For example, you can edit the notifications and confirmations settings in the form builder.

You can also configure ‘Personal Data’ settings similar to WPForms. These allow you to prevent the storage of IP addresses during form submission. Plus, you can enable integration with other tools for exporting and erasing personal data, which is helpful in complying with data regulations like GDPR.

Personal data settings Gravity Forms

Formidable Forms – Customization Options

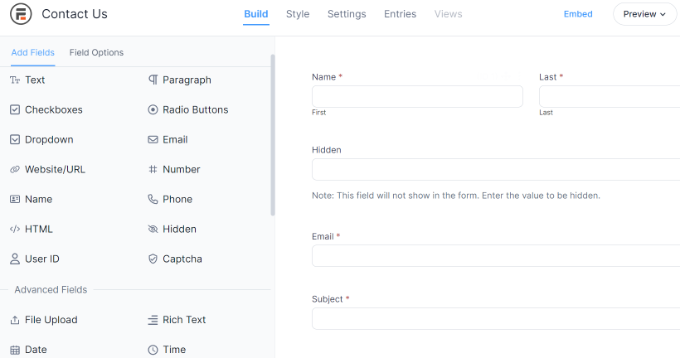
With the Formidable Forms drag-and-drop builder, you can easily customize your form with options such as prebuilt form fields that you add to your template.

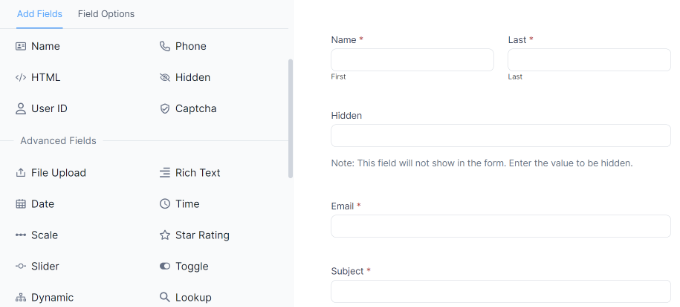
What makes the plugin different from others is that it offers multiple form fields that will help you create advanced forms. For instance, you can add a user ID field, captcha, hidden field, appointments, lookup field, and more.

Advanced form fields

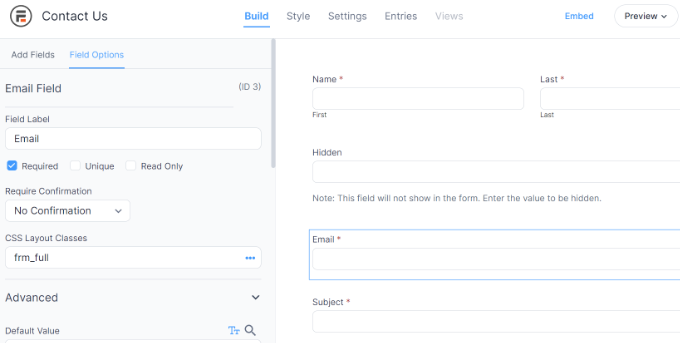
Besides that, you can easily edit each existing field in the template.

There are general options to change the label, add a CSS class, and more. Or you can view the advanced options to add a placeholder text, and description, edit the field size and allow maximum characters.

Edit existing fields in Formidable Forms

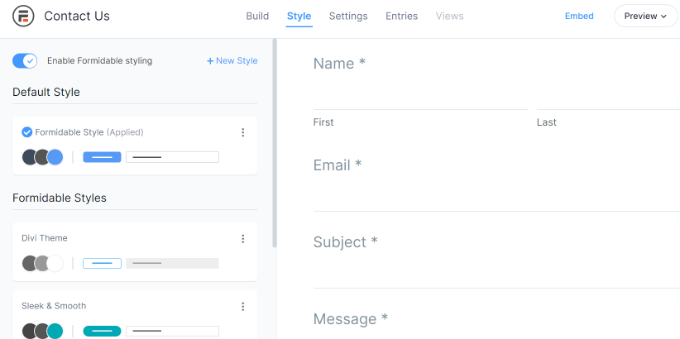
What’s different about Formidable Forms compared to WPForms and Gravity Forms is that it also offers different styles for your forms.

You can use the default style or choose from various options. This way, you can change the appearance of your forms without having to enter CSS code.

Edit the form style

Other than that, you can also customize the form settings. For instance, the plugin lets you change the notification settings, and form permissions, and also allows form scheduling.

Winner – WPForms

After comparing all 3 plugins, we found WPForms to be the clear winner. It offers more customization features compared to Formidable Forms and Gravity Forms.

You can add different form fields, change their settings, rearrange them, and more using the drag-and-drop builder. Besides that, WPForms offers tons of features to make your form more appealing and boost conversions.

Additional Features and Integrations

Now that we’ve covered ease of use, templates, and customization options, let’s see how WPForms, Formidable Forms, and Gravity Forms compare in terms of additional features and integrations.

As a website owner, you’d want a WordPress plugin that easily works with third-party tools, payment services, and email marketing services. Here’s what each plugin has to offer.

WPForms – Additional Features and Integrations

WPForms offers lots of premium addons and integrations that extend its functionality and benefits.

For instance, you can accept file uploads with its post-submission addon. This way, users can easily submit content on the front end of your site without requiring access to the WordPress dashboard.

Similarly, you get addons for geolocation data and see where your form users are from. The user journey addon can show you the pages and posts people visited before submitting a form.

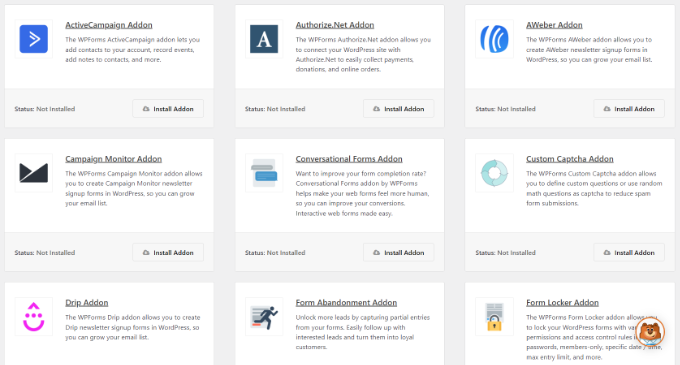
WPForms addons

The plugin also offers a form abandonment addon that captures partial entries for a form. You can then recover those entries and encourage users to complete a form.

Aside from this, WPForms provides more addons for creating custom Captcha, allowing digital signatures, locking WordPress forms, creating interactive form layouts, and more.

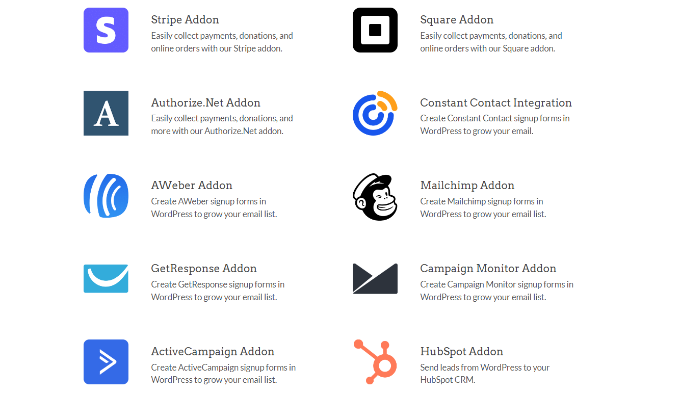
Another advantage of using WPForms compared to other plugins is that it easily integrates with different tools and plugins. For example, you can use it with popular email marketing tools like Drip, Mailchimp, and Constant Contact.

WPForms integrations

The plugin also supports payment gateways like Stripe, PayPal, Square, and Authorize.Net. You can also integrate WPForms with CRMs such as Salesforce and HubSpot.

Gravity Forms – Additional Features and Integrations

Gravity Forms also offers different addons that can help you get the most out of the plugin. However, the list is not as expansive as WPForms, and you’d have to pay extra to use third-party extensions.

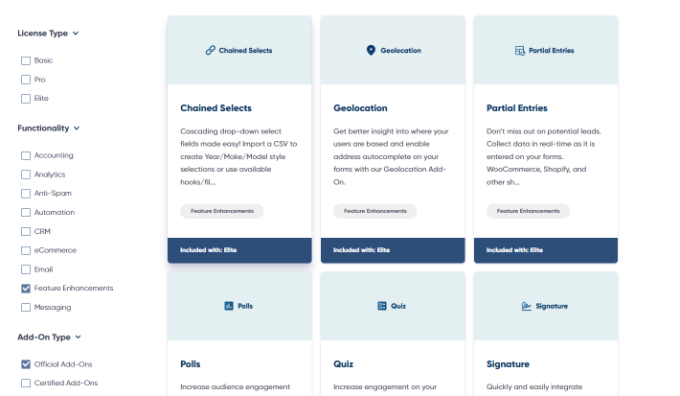
You get additional features for setting up user registrations, creating surveys and polls, tracking users’ geolocation, collecting partial form entries, allowing signatures, and more.

Feature enhancement addons

Besides that, Gravity Forms also offers integrations with different tools and plugins.

You can easily integrate email marketing tools like AWeber, Constant Contact, Mailgun, and more. Plus, you can add anti-spam solutions like Akismet and reCAPTCHA.

Other integrations include Google Analytics, Dropbox, Zapier, Trello, ActiveCampaign, HelpScout, PayPal Checkout, 2Checkout, and Stripe.

Formidable Forms – Additional Features and Integrations

Formidable Forms offers different addons and integration features. Most of the additional features are similar to WPForms and Gravity Forms.

However, what makes Formidable Forms different is that you get several powerful features to create advanced forms, set up web applications, show stats on the front end, and more.

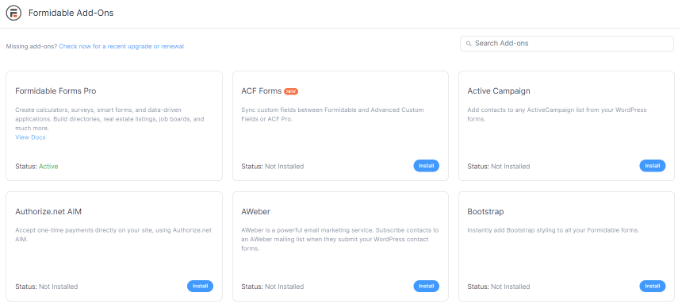
For instance, the plugin offers a form action automation feature to schedule email notifications, SMS messages, and other actions. It also offers API webhooks that let you send submissions to REST APIs.

Formidable forms addons

It also offers a visual views addon that lets you display data from form entries on the front end of your website. You can create web apps to display form submissions in tables, grids, calendars, and other views.

This is great for showing testimonials and product reviews, adding a user-submitted events calendar, and displaying useful statistics.

Create view calendar in Formidable

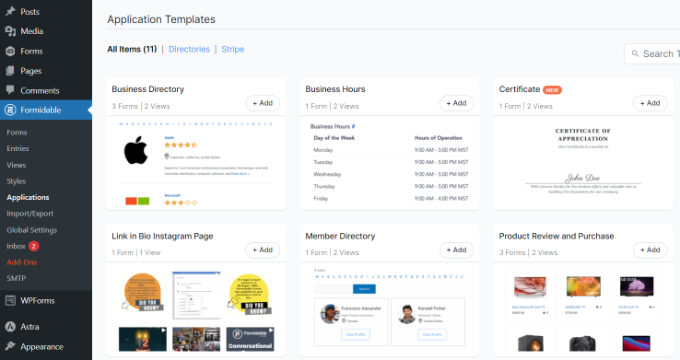
Besides that, Formidable Forms also lets you create applications for your website. It offers prebuilt templates that include different forms, views, and pages for your application. Simply select a template, and the plugin will take care of the rest.

You can create different applications, such as product reviews, real estate listings, testimonials, restaurant menus, certificates, and more.

For example, you can offer professional certificates in just a few clicks. Simply choose the certificate application template, and Formidable Forms will automatically add a form with a certificate generator on your website.

It will also add views for the certificate and certificate of completion, which users can see on the front end.

Application templates

Other advanced features offered by Formidable Forms include converting WordPress forms to PDF, mapping form fields to PDF form fields, quizzes, repeater fields, SMS voting, front-end editing, and more.

Other than that, you can also integrate Formidable Forms with different payment services, email marketing tools, CRMs, and third-party plugins. It even works with Uncanny Automator and Zapier, so you can connect Formidable Forms to services like Asana, Slack, and Dropbox.

The best part about using Formidable Forms is that you get all the advanced features in one place, with everything included in a single pricing plan. If you were to use Gravity Forms, then you’d need to subscribe to multiple third-party addons.

For example, you’d need the basic Gravity Forms plan along with other extensions like Gravity PDF, File Upload Pro, Gravity View, Gravity Math, and so on. This can add to your overall cost and make it very expensive to use Gravity Forms.

Winner – Formidable Forms

While each plugin offers multiple additional features and integrations, Formidable Forms is the standout winner. It offers more advanced features that you can use to display form results on the front end, create complex forms, convert forms to PDF, create web applications, and use various addons to help users create form solutions for any scenario.

WPForms gets an honorary mention for marketing-related features, like form abandonment and digital signatures. It also integrates with popular email services, CRM software, tracking tools, payment gateways, and other plugins.

Pricing Plans

The next parameter we will compare WPForms vs Gravity Forms vs Formidable Forms is that of pricing. Let’s see which plugin offers the most value for money.

WPForms – Pricing

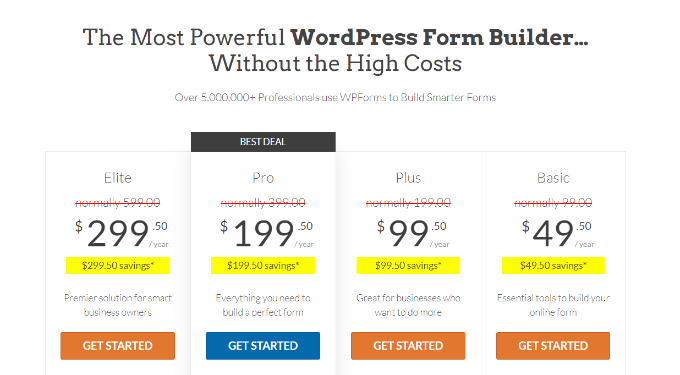
WPForms offers 4 different pricing plans suitable for all types of businesses. These include a Basic plan, which costs $49.50 per year, and you can use it for 1 website. It also offers all the essential features like premium templates, entry management, and file uploads.

If you want to use the plugin on more websites and require marketing integrations, then WPForms offers a Plus plan for $99.50 per year.

WPForms pricing plans

On the other hand, there is a Pro plan that includes everything from the Basic and Plus plans. It includes payment addons, conversion tools, and other advanced form features. This will close you $199.50 per year.

Lastly, there is an Elite plan for $299.50 per year, which has everything. You get to use it on unlimited websites and get all the features and integrations WPForms has to offer. Each premium plan comes with 14-day money back guarantee.

The best part, there is also a WPForms Lite version you can use for free. You get multiple form templates, standard fields for customization, spam protection, and other features.

Gravity Forms – Pricing Plans

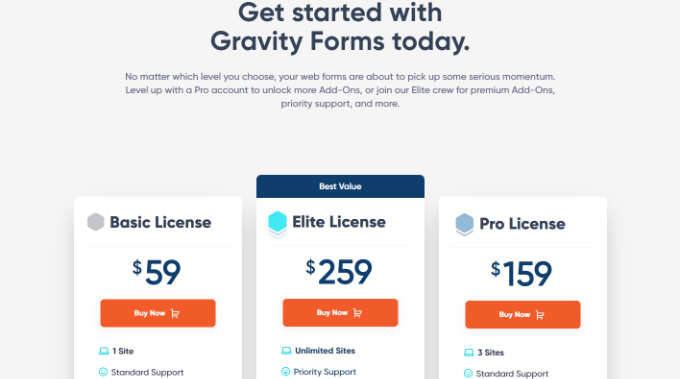
Gravity Forms offer 3 premium plans, which include the Basic License, Pro License, and Elite License.

With the Basic License plan, you can use the plugin on 1 website. You also get addons for email marketing tools and spam protection services. This plan will cost you $59 per year.

Gravity Forms pricing plans

Next, there is a Pro License plan that offers more addons. For instance, you get to integrate more email marketing services, CRMs, payment gateways, and third-party services. This plan will cost $159 per year.

Lastly, Gravity Forms offers an Elite License plan that includes all the features from the Basic and Pro plans. In addition to that, Elite plan users also get access to features like polls, quizzes, digital signatures, surveys, geolocation, and more. The Elite plan is available for $259 per year.

That said, Gravity Forms doesn’t offer a free version, like WPForms or Formidable Forms. You’d also need to pay extra to use different third-party addons and extensions.

Formidable Forms – Pricing Plans

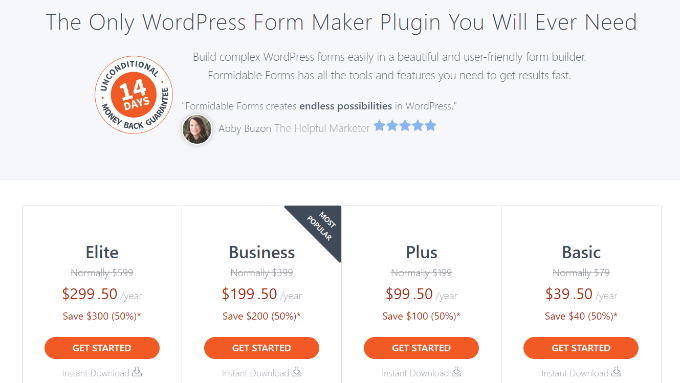
Formidable Forms lets you choose from 4 pricing plans. It starts with a Basic plan, costing $39.50 per year. You get 50+ form templates and basic features like conditional logic and file uploads.

Besides that, there is a Plus plan for $99.50 per year, and it offers more form templates and features. For instance, you get the Formidable Views feature, landing pages, and integration with Mailchimp, MailPoet Newsletters, and AWeber.

Formidable Forms pricing plans

Next, it offers a Business plan that includes over 150 form templates, premium addons, more integrations, and additional features. This plan will cost you $199.50 per year.

Lastly, there is an Elite plan for $299.50 per year, and it includes all the features and integrations. You get all the templates and support for third-party tools like Salesforce, ActiveCampaign, and HubSpot.

Formidable Forms also offers a free version. You can get started for free and get features like drag and drop form builder, basic form templates, and standard form fields for customization.

Winner – WPForms and Formidable Forms

When it comes to offering the most value for money, both WPForms and Formidable Forms clearly stand out when compared to Gravity Forms.

Both of them offer 4 different pricing plans for businesses of all sizes. Plus, you get a free version, which helps small website owners, bloggers, and others to create WordPress forms without a considerable investment. You also don’t have to pay more to use multiple addons and advanced features.

Which is the Best WordPress Form Plugin?

WPForms, Gravity Forms, and Formidable Forms are some of the best WordPress form plugins you can get your hands on today.

However, we believe that WPForms is the best plugin for creating forms for your WordPress website. It is super easy to use and offers tons of features.

You get over 600 form templates, a drag-and-drop form builder, multiple form fields for customization, and additional settings to edit your form. Plus, there are different premium addons that allow you to expand the functionality of WPForms.

Not to mention, there is a WPForms Lite version available for free. It also includes lots of form templates and customization features. You can quickly create forms for your website using the free plugin.

On the other hand, if you’re a developer looking to save time on developing complex and advanced WordPress forms, then Formidable Forms is the perfect solution. You can create calculators and web applications, convert forms to PDF, and much more without editing code.

We hope the comparison between WPForms vs Gravity Forms vs Formidable Forms helped you pick the right form plugin for WordPress. You may also want to see our list of best WordPress SEO plugins and tools, and how to get a free email domain.

If you liked this article, then please subscribe to our YouTube Channel for WordPress video tutorials. You can also find us on Twitter and Facebook.

The post WPForms vs Gravity Forms vs Formidable Forms: Which is Best? first appeared on WPBeginner.
How to Use Icon Fonts in WordPress Post Editor (No Code)

Do you want to use icon fonts in the WordPress post editor?

Icon fonts allow you to easily use images and symbols in text. They are lightweight and won’t slow down your site, and they can be easily scaled to any size and styled like any other text font.

In this article, we’ll show you how to easily use icon fonts in the WordPress post editor without writing any HTML code.

Using icon fonts in the WordPress editor

We’ll show you multiple methods, each one using a slightly different approach than the other. You can choose one that works best for you.

Method 1. Adding Icon Fonts in WordPress Post Editor using JVM Rich Text Icons

This method is recommended to use on any kind of WordPress website. It is easy to use and works seamlessly with the block editor.

First, you need to install and activate the JVM Rich Text Icons plugin. For more details, see our step-by-step guide on how to install a WordPress plugin.

Upon activation, you can simply edit a WordPress post or page or create a new one. Inside the post editor, add a new paragraph block, and you’ll see a new Flag icon in the block toolbar.

Icon font button in the block toolbar

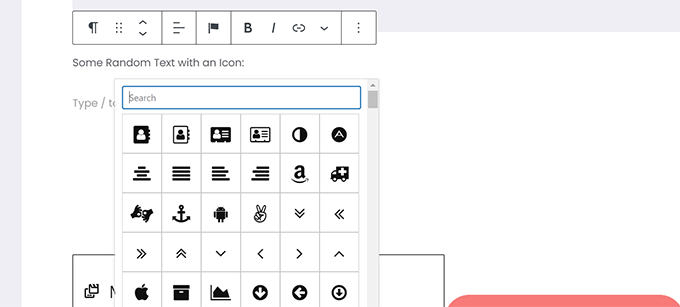
Clicking on it will show a popup of icons to choose from. It uses the popular Font Awesome icon fonts by default.

You can use the search to look for an icon or simply scroll down to find the icon you want, and then click to add it.

Choose icons to insert

One advantage of using icon fonts is that you can use CSS to style them.

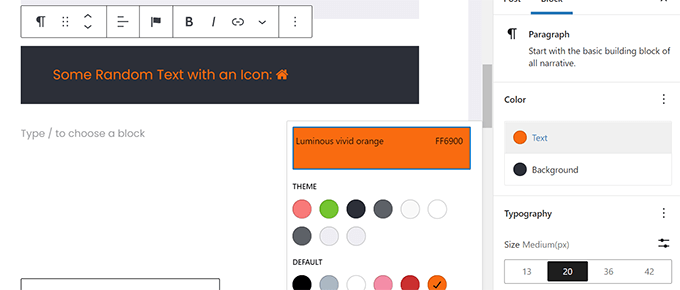
However, since you are already using the block editor, you can simply use the built-in color tools to style the icons.

Style icon fonts using block editor tools

The plugin allows you to use icon fonts in most text blocks such as Paragraph, List, Button, Columns, Cover, and more.

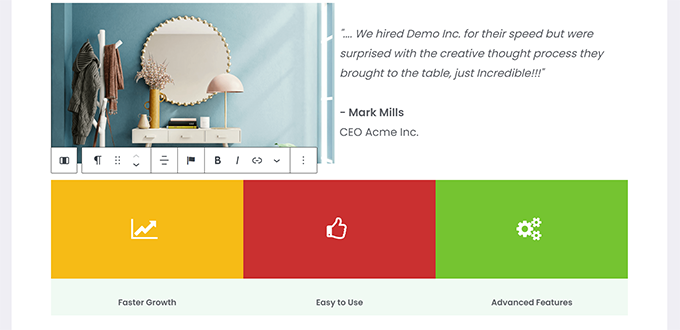
Here is an example of using icon fonts and block options to style three columns.

Icon fonts in columns

Another useful example of using icon fonts is with buttons.

This time we are using inline icon fonts alongside some text for the two buttons.

Using icon fonts in buttons and lists

Feel free to use the block editor tools like text alignment, colors, spacing, and more to get the most out of the icon fonts.

Method 2. Add Icon Fonts in WordPress Post Editor with Font Awesome

This method requires you to add shortcodes in the post editor to display icon fonts. You can use this method if you don’t need to regularly use icon fonts in your WordPress posts and pages.

First, you need to install and activate the Font Awesome plugin. For more details, see our step-by-step guide on how to install a WordPress plugin.

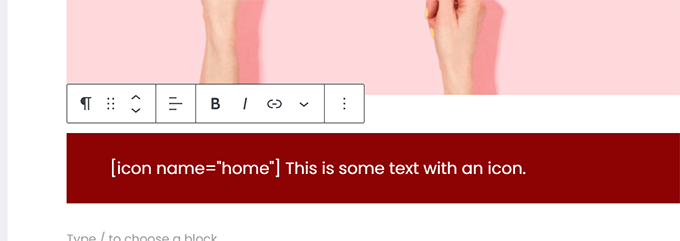
Upon activation, you can edit a post or page in WordPress and use the following shortcode to add a font icon.

[icon name="home"]
Adding icon fonts using shortcode

The name parameter here is the name of the font used by Font Awesome. You can find the entire list on the Font Awesome cheatsheet page.

Once added, you can preview your post or page to see how the icon will look on the live site since it will not display as an icon in the block editor.

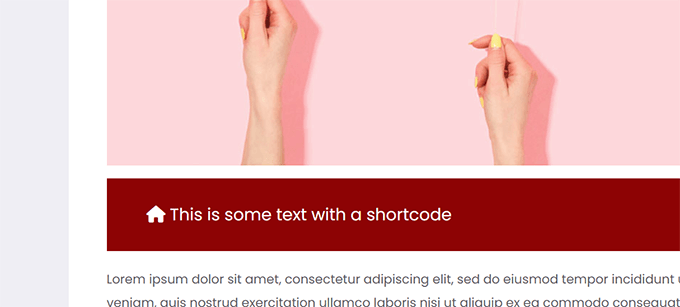
This is how it looked on our test site.

Font icon preview

You can use the shortcode inside a paragraph and inline with other text. You can also add it on its own using the ‘Shortcode’ block.

However, using the ‘Shortcode’ block will not give you the styling options you’ll get with other text blocks.

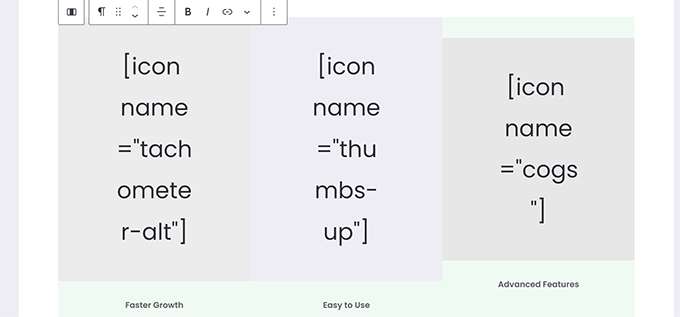
You can also add the shortcode inside columns to create a features row.

Shortcode in columns

It would be a bit trickier as you will not be able to see the actual images, and the column heights will keep changing within the editor.

Here is how it looked on our test website. The columns are the same height, even though they are not in the editor.

Icon fonts preview using Font Awesome

You’ll probably have to preview your work in a new browser tab many times to see how it will look to users.

Method 3. Using Icon Fonts with WordPress Page Builders

This method is great if you are creating a landing page or designing your website using a WordPress page builder like SeedProd.

SeedProd is the best WordPress page builder on the market. It allows you to easily create beautiful landing pages or design your complete website.

SeedProd WordPress Website Builder

First, you need to install and activate the SeedProd plugin. For more details, see our step-by-step guide on how to install a WordPress plugin.

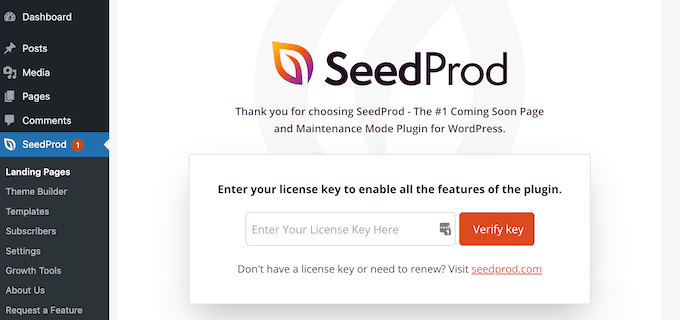
Upon activation, you’ll be asked to enter your plugin license key. You can find this information under your account on the SeedProd website.

SeedProd license key

After entering your license key and clicking ‘Verify Key,’ you can start working on your landing page.

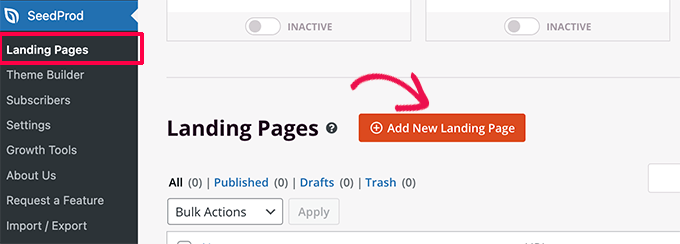
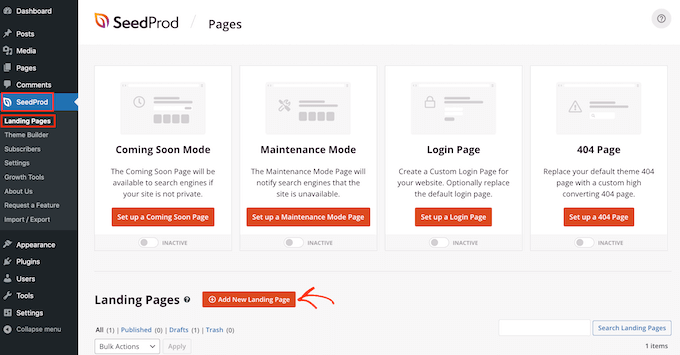
Simply go to the SeedProd » Landing Pages page and click on the ‘Add New Landing Page’ button.

Add new landing page

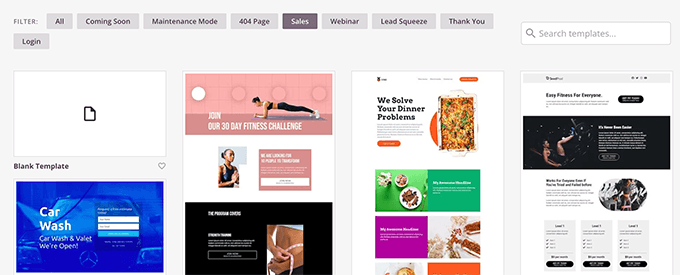
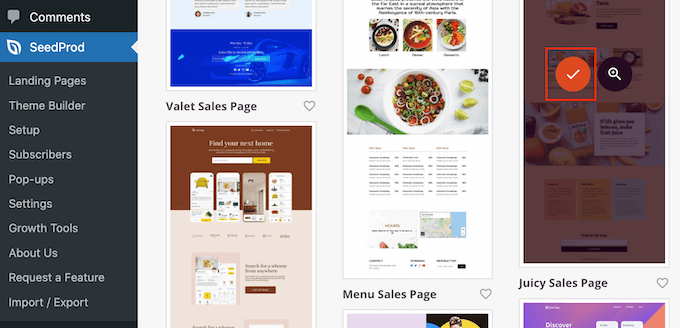
After that, you will be asked to choose a template for your landing page.

SeedProd comes with a bunch of beautiful designs that you can use as a starting point, or you can start with a blank template and design the whole thing yourself.

Choose landing page template

For this tutorial, we will be using a pre-designed template. Simply click on a template to select it and continue.

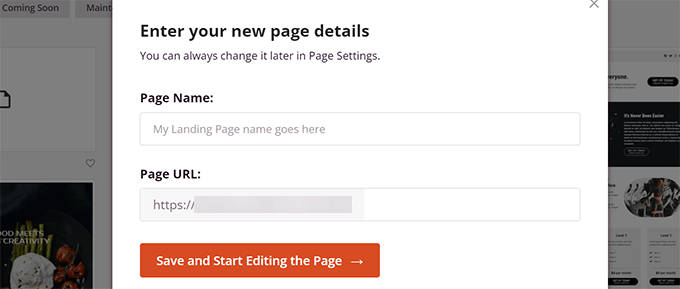
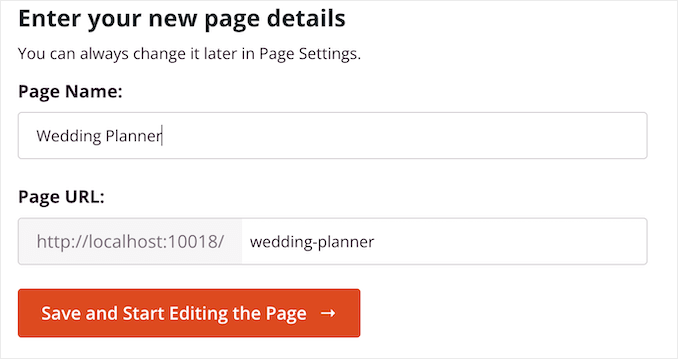
Next, you will be asked to provide a title for your landing page and choose a URL.

Provide page title and URL

After entering them, click on the ‘Save and Start Editing the Page’ button to continue.

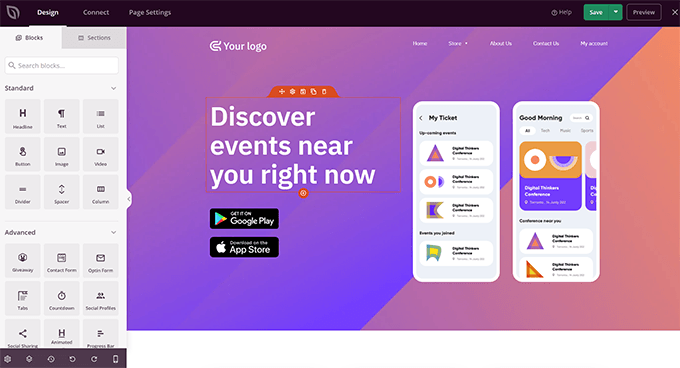
SeedProd will now launch the page builder interface. It is a drag-and-drop design tool where you can simply point and click on any item to edit it.

SeedProd page builder interface

You can also drag and drop blocks from the left column to add new elements to your design.

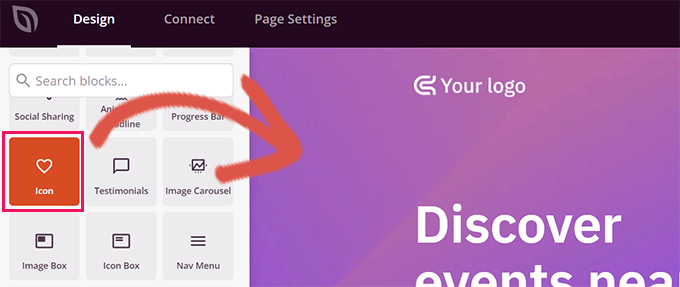
For the sake of this tutorial, we are going to add the Icon block.

Add icon block

After you add the block, you can simply click to edit its properties.

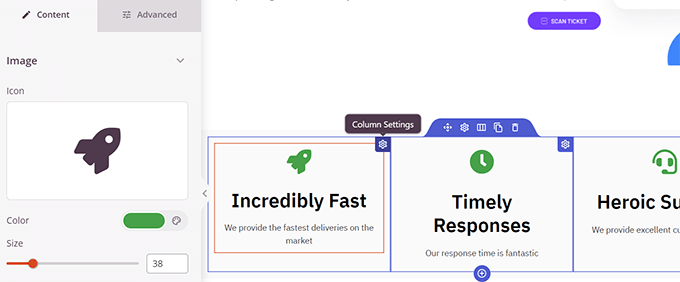
The left column will change to show the options for the Icon block. You can click into the ‘Icon’ section to the left and choose a different icon image or change the color and style.

Icon block settings

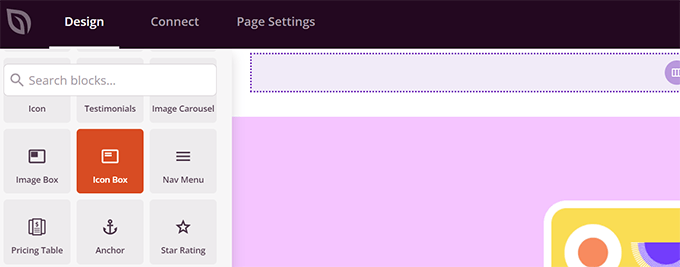
Another way to use icons in SeedProd is by adding the ‘Icon Box’ block.

The difference between this and the ‘Icon’ block we used previously is that ‘Icon Box’ allows you to add text along with your chosen icon.

This is one of the most common ways to use icons when displaying product features, services, and other items.

Icon box block

You can place your icon box inside columns, choose colors, and adjust the icon size to your liking.

Additionally, you can also format the accompanying text using SeedProd’s formatting toolbar.

Icon box inside columns

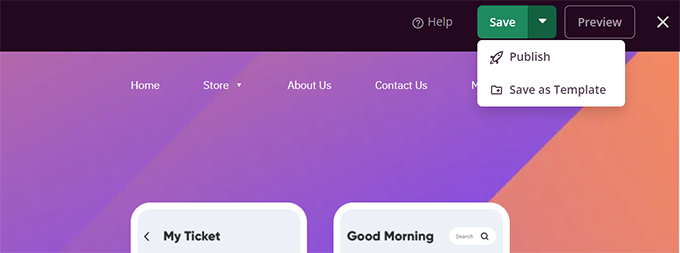
Once you are finished editing your page, don’t forget to click on the ‘Save’ button at the top right corner of the screen.

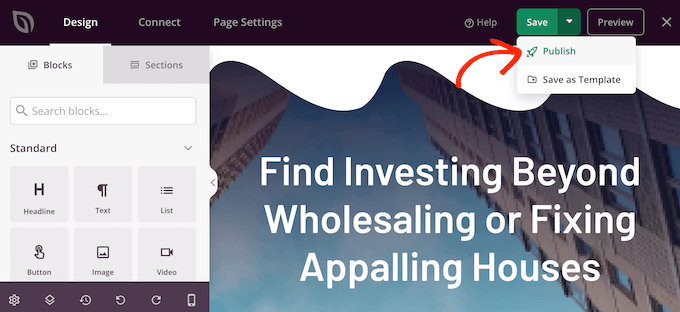
If you’re ready, you can click ‘Publish’ for the page to go live, or you can click on ‘Preview’ to make sure it looks like you want it to.

Save and publish your landing page

You can also click on ‘Save as Template’ so you can reuse this design with SeedProd on other parts of your website.

Here is how the icon fonts looked on our test website.

Icon fonts preview

We hope this article helped you learn how to use icon fonts in WordPress post editor without writing HTML code. You may also want to see our WordPress performance guide to optimize your website speed or the best landing page plugins for WordPress.

If you liked this article, then please subscribe to our YouTube Channel for WordPress video tutorials. You can also find us on Twitter and Facebook.

The post How to Use Icon Fonts in WordPress Post Editor (No Code) first appeared on WPBeginner.

How to Create a Custom Shape Divider in WordPress

Do you want to add custom shape dividers to your WordPress website?

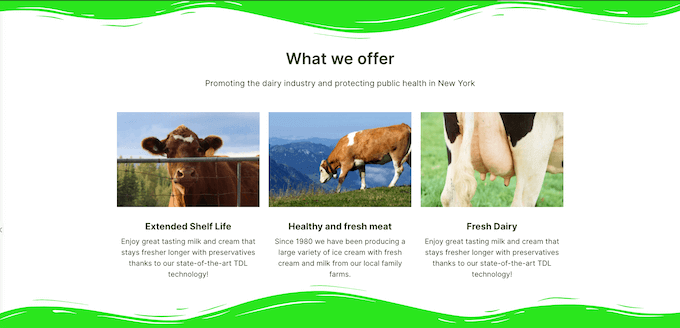
Shape dividers can organize your content in an engaging and eye-catching way. They can also highlight your site’s most important content, so visitors and customers don’t miss out on crucial information.

In this article, we will show you how to create a custom shape divider in WordPress.

How to create a custom shape divider in WordPress

Why Create a Custom Shape Divider in WordPress?

A shape divider is a type of section divider that you add between blocks of content.

These dividers can be simple, such as a horizontal line created with built-in WordPress blocks.

A custom shape divider, created using the built-in WordPress tools

You can use these basic dividers to organize and separate content, which is particularly useful on pages that cover lots of different topics.

You can also create more advanced shape dividers using page builder plugins and other web design software. These can highlight your site’s most important content so it stands out to visitors and customers.

A custom shape divider, created using SeedProd

A professional-looking shape divider can also make a page more interesting and engaging.

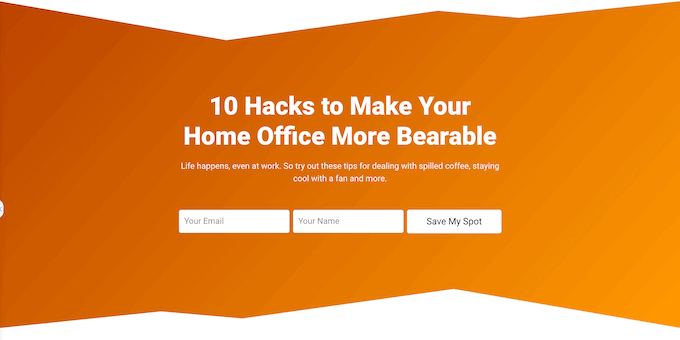
For example, you might use them to create a unique background for your email newsletter signup form.

How to create a custom shape divider using SeedProd

With that being said, let’s see how you can create a custom shape divider in WordPress. Simply use the quick links below to jump straight to the method you want to use.

Method 1. Create a Simple Shape Divider (No Plugin Required)

The easiest way to add a custom shape divider to WordPress is by using the built-in Separator block.

This method allows you to add a horizontal line separator in between any WordPress blocks, and then customize the line’s color and style.

A custom divider created using the WordPress block editor

This method doesn’t let you add different shapes to WordPress and has limited customization settings. However, you won’t need to install an extra WordPress plugin, so this is the easiest way to add a simple shape divider to your website.

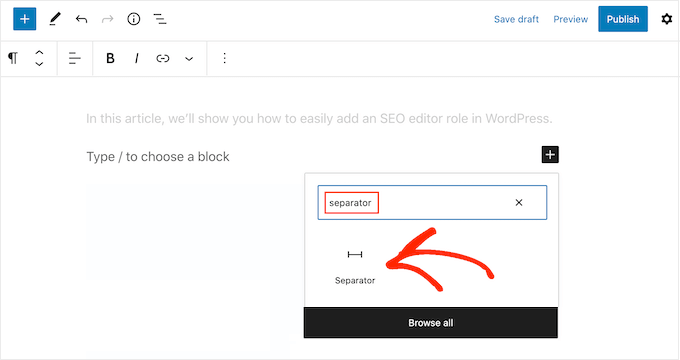
To get started, simply open the post or page where you want to add an horizontal divider in the content editor. Then, click on the ‘+’ button where you want to place that divider.

Adding a Separator block to WordPress

In the popup, type in ‘Separator.’

When the right block appears, click to add it to the page or post.

Add a custom shape divider to a WordPress website

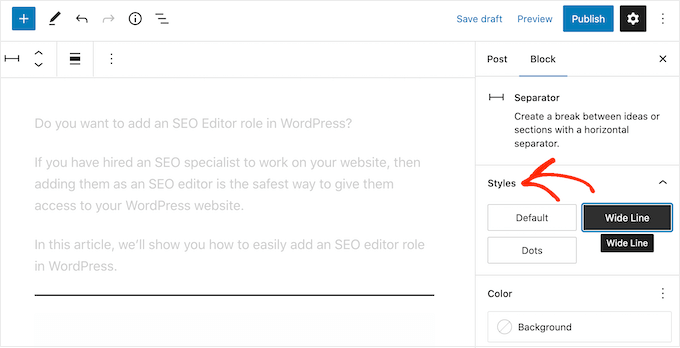
To customize the default Separator block, give it a click and then use the settings in the right-hand menu.

You can switch between default, wide line, and dots using the buttons in the ‘Styles’ section.

Adding different line styles in WordPress

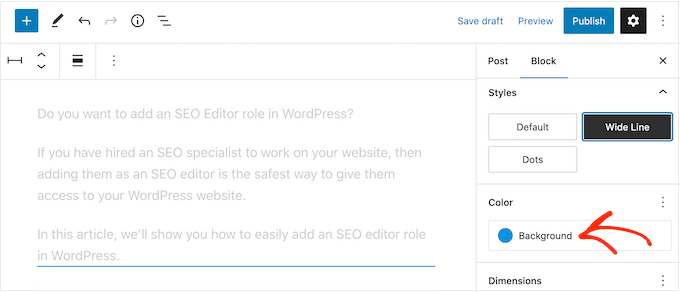
You can also change the line’s color so that it matches the rest of your theme or branding.

To do this, click on ‘Background’ and then choose a color from the popup that appears.

How to style the Separator block in WordPress

When you’re happy with how the divider looks, you can either click on the ‘Publish’ or ‘Update’ button to make the shape divider live.

If you are looking to use different shape and customize every part of your dividers, then we recommend using the SeedProd plugin.

SeedProd is the best WordPress page builder plugin on the market, and it allows you to add a custom shape divider to any section, row, or column using a simple drag-and-drop editor.

Creating a custom shape divider in WordPress

It also comes with over 180 professionally-designed templates and more than 90 blocks that you can use to create beautiful custom home pages, landing pages, and more.

Note: There is a free version of SeedProd on available on WordPress.org, but we’ll be using the Pro version since it comes with a wide range of shape dividers.

The first thing you need to do is install and activate the SeedProd plugin. For more details, see our step-by-step guide on how to install a WordPress plugin.

Upon activation, you need to enter your license key.

Adding a license key to the SeedProd page builder

You can find this information under your account on the SeedProd website. After entering the license key, click on the ‘Verify Key’ button.

With that done, go to SeedProd » Pages and click on the ‘Add New Landing Page’ button.

How to create a new landing page design using SeedProd

After that, it’s time to choose a page design template. SeedProd has a ton of professionally-designed templates that you can fine-tune to perfectly suit your WordPress website.

To select a template, simply hover your mouse over it and then click the ‘Checkmark’ icon.

Choosing a page design template for your WordPress website

Next, go ahead and type in a name for the page. SeedProd will automatically create a URL based on the page’s title, but you can change the URL to anything you want.

For example, you may want to add some relevant keywords, which will help search engines understand what the page is about and may improve your WordPress SEO.

When you’re happy with the information you’ve entered, click on the ‘Save and Start Editing the Page’ button.

Creating a custom landing page using SeedProd

Next, you’ll be taken to the drag-and-drop page builder, ready to customize the template.

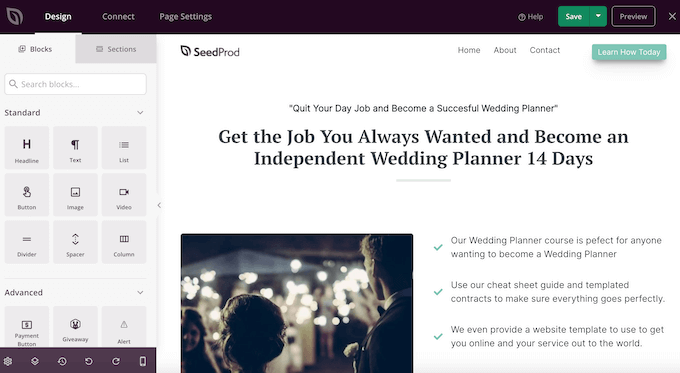
The SeedProd editor shows a live preview of your design to the right and some block settings on the left.

The SeedProd drag and drop page builder

The left-hand menu also has blocks that you can drag onto your layout.

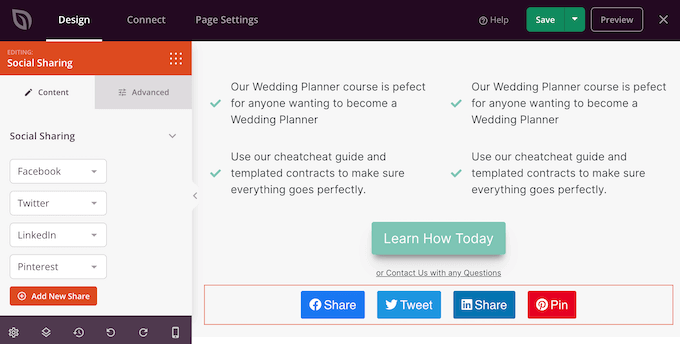
For example, you can drag and drop standard blocks like buttons and images or use advanced blocks such as the countdown timer, contact form, social sharing buttons, and more.

Adding blocks to a WordPress page builder

To customize a block, just click to select it in your layout.

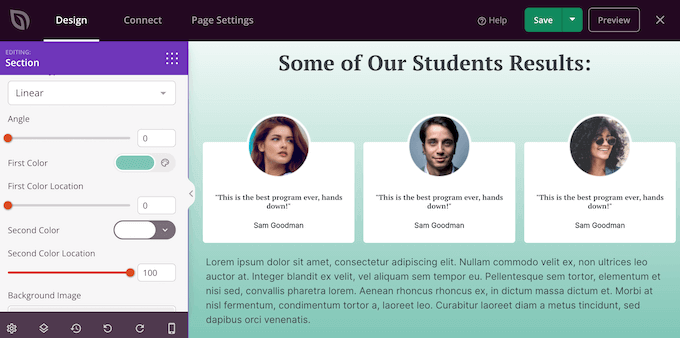
The left-hand menu will then show all the settings you can use to configure that block. You can also change the page’s background colors, add background images, or change the color scheme and fonts to better match your brand.

Customizing the background color in WordPress

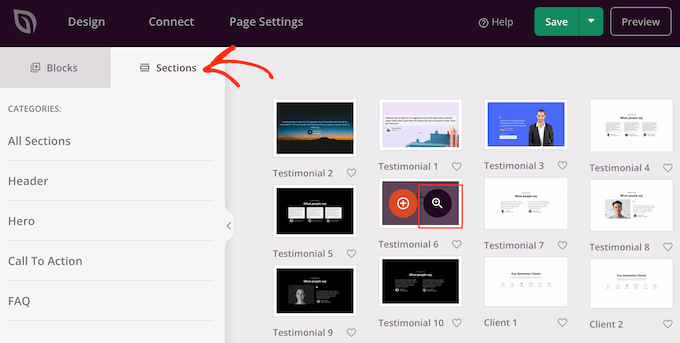
SeedProd also comes with ‘Sections,’ which are collections of blocks that are often used together. For example, SeedProd has a header section, hero image, call to action, customer testimonialsFAQs, features, footer sections, and more.

To look through the different sections, simply click on the ‘Sections’ tab.

Adding a Section to a custom page template

You can move sections and blocks around your layout using drag and drop.

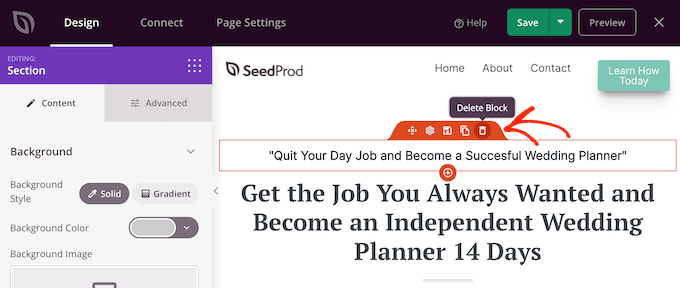
If you want to delete a block, then simply hover over it and then click on the trash can icon when it appears.

Deleting blocks from a custom page design

Whether or not you choose to use a SeedProd section, you can now create a custom shape divider. Simply click to select the section, row, or column where you want to add the divider.

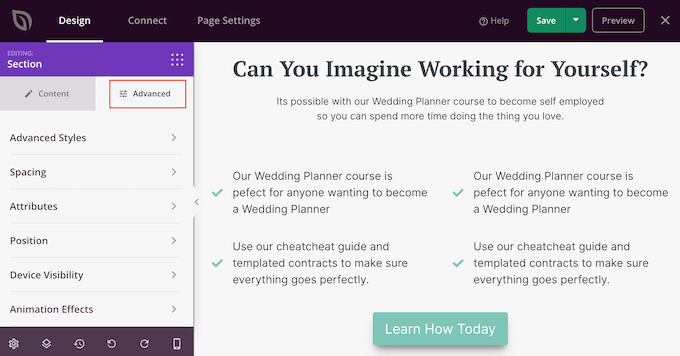
Then, click on the ‘Advanced’ tab in the left-hand menu.

SeedProd's 'Advanced' settings

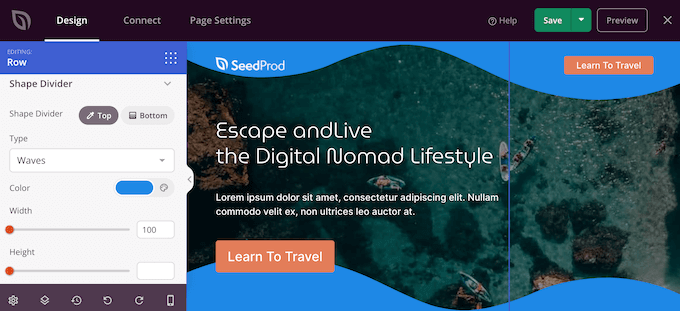
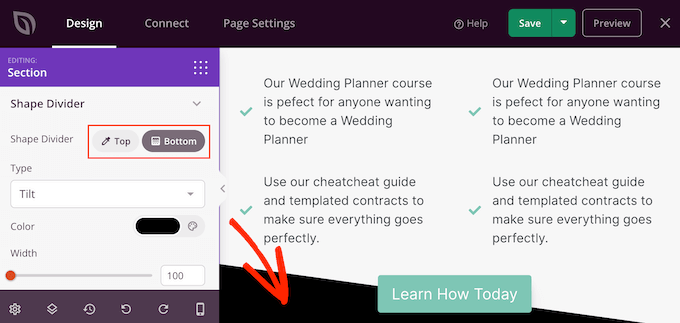
Now, click to expand the ‘Shape Divider’ section.

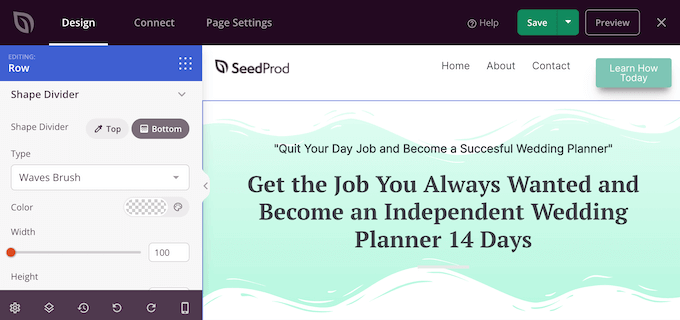
To start, you can choose where to show the shape divider by selecting either the ‘Top’ or ‘Bottom’ button.

Adding a custom divider to the bottom of a WordPress block

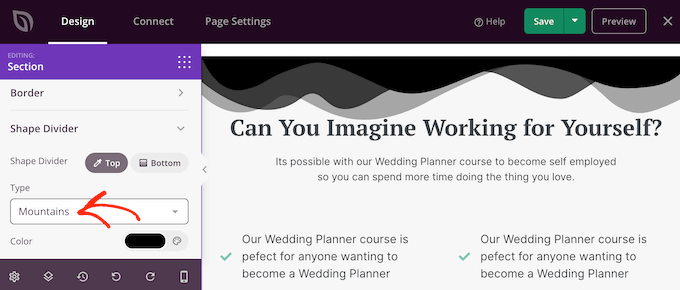
You can now open the ‘Type’ menu and choose the shape divider that you want to use.

As you select different shapes, the live preview will update automatically so you can try different styles to see what looks the best.

Adding custom shape dividers to a custom landing page

After choosing a shape divider, you can style it using the new settings.

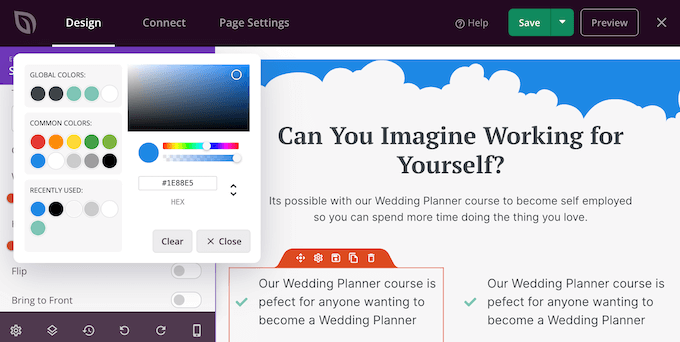
To start, you can click on ‘Color’ and then choose a new color from the popup that appears.

Adding a color to a custom shape divider in WordPress

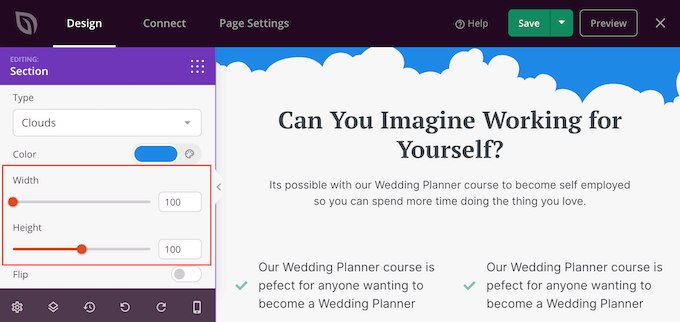
With that done, you can make the divider bigger or smaller by dragging the ‘Width’ and ‘Height’ sliders.

If you already have a specific size in mind, then you can type those numbers into the boxes.

Create a custom shape divider in WordPress

You can also try flipping the divider by clicking to enable or disable the ‘Flip’ switch.

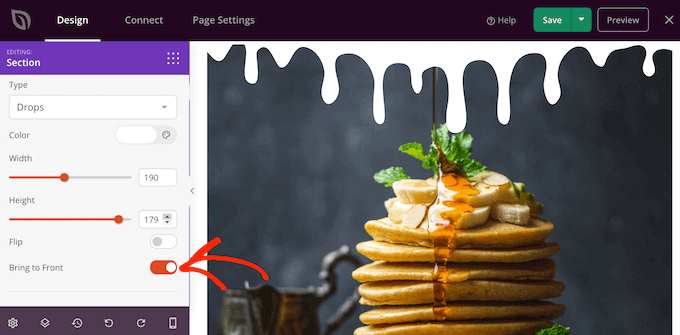
By default, the divider will appear behind the rest of the content, so users can clearly see any text, images, or other content that overlaps the divider.

However, moving the shape to the front can create some interesting effects. If you want to see how this looks, then simply click to enable the ‘Bring to Front’ switch.

Bringing the custom shape divider to the front

To add more dividers simply follow the same process described above.

You can even add a shape divider to the top and bottom of an area, which often creates some impressive and eye-catching results.

Adding multiple custom shape dividers to a single section

You can continue working on the page by adding more blocks and customizing those blocks in the left-hand menu.

When you’re happy with how the page looks, click the ‘Save’ button. You can then select ‘Publish’ to make that page live.

Publishing a custom shape divider

How to Add Shape Dividers to a WordPress Theme

SeedProd’s drag-and-drop editor gives you the freedom to add a unique shape divider to any page. However, sometimes you may want to use the same shape dividers on multiple pages, or even across your entire WordPress blog or website.

This will help you create a consistent design and can also save you a ton of time. In this case, we recommend adding a shape divider to your theme using the SeedProd theme builder.

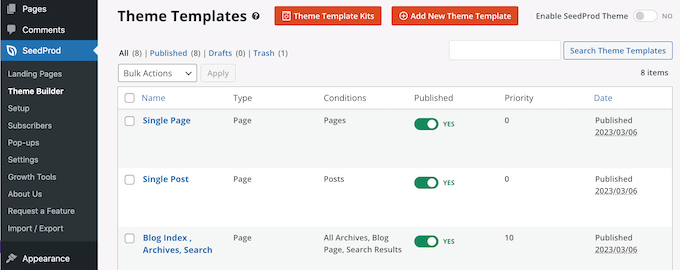
With SeedProd, you can create a custom WordPress theme without writing any code. It creates all the files that make up your theme, including the sidebar, header, footer, single posts, and more.

The SeedProd theme builder

You can then customize these files using the familiar drag-and-drop builder. This includes adding shape dividers by following the same process described above.

When you activate the new theme using SeedProd, it will overwrite your existing WordPress theme, so you should only use this method if you want to replace your current theme.

For detailed step-by-step instructions, please see our guide on how to easily create a custom WordPress theme.

We hope this tutorial helped you learn how to create a custom shape divider in WordPress. You may also want to learn how to increase your blog traffic, or see our expert pick of the best social proof plugins for WordPress.

If you liked this article, then please subscribe to our YouTube Channel for WordPress video tutorials. You can also find us on Twitter and Facebook.

The post How to Create a Custom Shape Divider in WordPress first appeared on WPBeginner.
How Does WordPress Search Work (+ Tips to Make It Better)

Do you want to learn how WordPress search works, and how you can make it better?

By understanding and improving the built-in WordPress search, you can help visitors find what they’re looking for. This can get you more conversions while keeping people on your site for longer.

In this article, we’ll look at how the default WordPress search works, and share tips on how to make it better.

How does WordPress search work + tips to make It better

How Does WordPress Search Work?

WordPress comes with a search system that will look for content within your website.

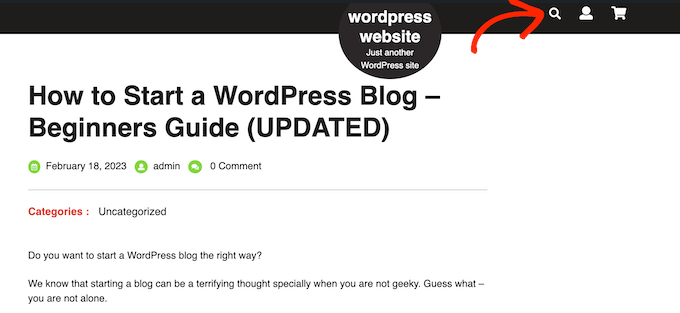
How the search bar looks and where it appears will vary depending on your WordPress theme, but most themes show the search bar in the top right corner.

The built-in WordPress search bar

Note: If your theme doesn’t show the WordPress search bar by default, then skip ahead to our FAQs, where we’ll show you how to add it.

Visitors can type a search query into this field, and WordPress will search:

  • Page titles
  • Page content
  • Single-image titles and captions
  • Image alt text
  • File names

As you can see, it doesn’t search widgets, user comments, categories, tags, WooCommerce products, or PDF documents. It also doesn’t search image gallery titles, captions, or alt text, although you can search this content using a search engine plugin like SearchWP.

WordPress performs this search using the WP_Query class. It will start by displaying any posts that have the search term in the post title, arranged in reverse-chronological order, meaning that the newest entries will be displayed at the top of the results.

After that, it’ll show any posts that have the matching term in the post content.

For example, imagine you’ve just published a post about cats titled ‘My Favorite Pet’, and you also have an older post titled ‘Best Cat Photos.’ In this case, searching for ‘Cat’ will display the older ‘Best Cat Photos’ post first, since it has the search term in the title.

This may not a problem for WordPress blogs or websites that only have small amounts of content. However, this ordering logic will often show inaccurate or confusing results for bigger blogs, online stores, or business websites.

The built-in system is also missing some of the features that people expect from modern search engines. This includes autocomplete, live Ajax search, filtering, and spellcheck.

Why Improve the Default WordPress Search?

An advanced, fast, and accurate on-site search can help visitors find interesting and relevant content, which will keep them on your website for longer. This can increase pageviews and reduce bounce rate in WordPress.

Since visitors are spending more time on your site, this will send positive signals to the search engines. This can improve your WordPress SEO, which means search engines like Google will show your content to more people and drive more visitors to your website.

For more information, please see our guide on how to increase your blog traffic.

People who are using your site’s internal search are already highly engaged. They’re actively looking for specific content, which may mean they’re ready to take actions such as buying a product, signing up to your WordPress membership site, or booking an appointment.

If these people can’t find what they’re looking for, they may give up and go to a different website. This means you’re losing out on visitors who were ready to convert.

A search results page is also an example of personalized content since you’re showing the visitor results that match their unique search query. By providing personalized content that’s accurate and helpful, you can improve the visitor experience. Once again, this can encourage them to convert.

Performance is another reason why it’s a good idea to replace the default WordPress search with a better alternative.

The larger your WordPress website gets, the longer it’ll take WP_Query to scan your database and get the results. This means your site’s search will get slower, as your website gets bigger.

How to Make the WordPress Native Search Better

On-site search helps visitors find what they’re looking for, including products to buy and interesting blogs to read. Since it’s such an important part of your site, it’s a bad idea to rely on the limited built-in WordPress search.

With that being said, let’s see how you can improve the native WordPress search.

Show Instant Results With Live Ajax Search

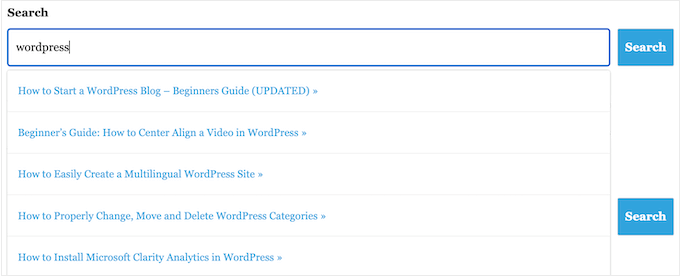
Live Ajax search adds a dropdown and autocomplete feature that’s common in search engines like Google.

As the user types, live search guesses what they want to search for and then shows them results without even reloading the page.

How to improve WordPress search with live ajax results

This can help visitors find the right content, without having to manually press the ‘Search’ button or wait for the page to reload.

The easiest way to add Ajax live search to WordPress is using the free SearchWP Live Ajax Lite Search plugin. It enables instant search automatically and there are no settings for you to configure, so it’s very easy to set up.

The first thing you need to do is install and activate the plugin. For more details, see our step-by-step guide on how to install a WordPress plugin.

Upon activation, the default WordPress search form will automatically use the Ajax live search feature. If you visit your site and start typing into the search bar, then you’ll see the instant search in action.

Change the Default Search URL Slug

By default, WordPress search URLs typically look something like this:

http://example.com/?s=search-term

The extra ?s= characters make this URL more difficult to read and understand, which can confuse visitors who are trying to find their way around your site.

Even worse, these URLs aren’t optimized for search engines which can stop them from correctly indexing your site’s contents.

The easiest way to change these URLs is by adding custom code to WordPress using a plugin such as WPCode.

You can go ahead and use the following custom code to replace the ‘/?s=search-term’ characters with ‘search.’ Your slug will look something like this when finished: http://example.com/search/wordpress

To use something other than ‘search’ in your URL, simply customize the code snippet below.

function wpb_change_search_url() {
    if ( is_search() && ! empty( $_GET['s'] ) ) {
        wp_redirect( home_url( "/search/" ) . urlencode( get_query_var( 's' ) ) );
        exit();
    }
}
add_action( 'template_redirect', 'wpb_change_search_url' );

For detailed instructions on how to insert this code to your WordPress website, please see our guide on how to change the default search URL slug in WordPress.

Make PDF Files Searchable in WordPress

By uploading PDFs to your WordPress website, you can share information about your services and products in a format that works on all devices. They’re also perfect for offering your visitors ebooks, user manuals, menus, and more.

However, WordPress only searches the contents of its database by default, so it will only look at the title and description of your PDF files, and not their contents. As a result, your visitors may struggle to find the best PDF for their search query.

The good news is that you can use a custom search plugin to improve the default WordPress search experience. If your PDFs are unencrypted, then the right search plugin will index the contents and metadata of your PDFs and add them to the search results.

For step-by-step instructions, please see our guide on how to add PDF indexing and searching in WordPress.

Add a Search By Category Feature to WordPress

If you have multiple categories of content on your website, then you might want to let users restrict their search to a specific category. This can help visitors find the right content, faster.

An example of search by category on a WordPress website

For example, if you have an online store then it often makes sense to let customers search within a particular product category.

If you run a membership site, then you might use search by category to help visitors find other members, groups, forums, online courses, and other specific kinds of content. For more information, please see our guide on how to add search by category in WordPress.

Make a Smart WooCommerce Product Search

WooCommerce has its own built-in search, but it doesn’t look for matches in product attributes, reviews, or product descriptions. This omission can stop shoppers from finding products they want to buy on your online store, so you get fewer sales.

The built-in WooCommerce search feature

Luckily, there are some excellent WooCommerce plugins that can show more helpful search results, and fetch them faster. To learn more, please see our guide on how to make a smart WooCommerce product search.

To get even more sales, you may want to fine-tune the kind of products WooCommerce includes in its search results. For example, you might only show products that are on sale or come with free shipping.

To learn more, please see our guide on how to customize WooCommerce product search results page.

Create a Search Form for Custom Post Types

Custom post types allow you to go beyond posts and pages and create different content types for your website. Custom post types can have different custom fields and their own custom category structure.

For example, if you run a movie review website, then you would probably want to create a ‘movie reviews’ post type that has fields for the director, release date, and more.

At WPBeginner, we use custom post types for our Glossary section to keep it separate from our blog posts.

How to improve your WordPress search with searchable categories

If you use custom post types, then you may want to create a form that allows visitors to search only that content.

For example, we also have a form that only searches WPBeginner’s coupon codes.

Searching coupons and deals on the WPBeginner website

This can help visitors find the right content faster, even when you have lots of different content types. For step-by-step instructions, check out our guide on how to create advanced search forms in WordPress for custom post types.

You can also make custom fields searchable in WordPress, which is ideal if you’ve added extra metadata to your pages and posts.

Exclude Content From WordPress search

By default, the built-in WordPress search will include all posts and pages in its search results.

However, you may want to exclude certain pages and posts from the search results. For example, if you’re running a WordPress membership website or selling online courses, then you’ll typically want to exclude your premium content from public search results.

If you’re running an online store, then you may want to hide content like your account page, checkout page, and thank you page. To help you out, we’ve created a guide on how to exclude pages from the WordPress search results.

Do you want to exclude posts, authors, custom post types, categories, tags, or even custom taxonomies? Then you can take a look at our guide on how to exclude specific pages, authors, and more from WordPress search.

WordPress Search FAQs

In this guide, we’ve explored how the default WordPress search works and shared lots of tips on how to improve it.

However, you may still have some questions about this important feature. That said, here are some of the most frequently asked questions about WordPress search.

How Do I Improve WordPress Search?

The best way to improve the built-in WordPress search is by using SearchWP.

SearchWP is the best custom search plugin for WordPress and allows visitors to search any content on your site including documents, WooCommerce products, custom fields, tags, comments, and more.

It also lets you customize the WordPress search algorithm, so you can control exactly where the content appears in the search results.

For more information, please see our guide on how to improve WordPress search.

Does WordPress Search Include Tags?

By default, WordPress search doesn’t include tags. The easiest way to make tags searchable is by using a custom search plugin like SearchWP.

SearchWP also has a relevancy slider, so you can control exactly how much tags influence where an item appears in the search results.

How Do I Add Search to My WordPress Theme?

If your theme doesn’t have a built-in search form, then we recommend adding a search bar to the WordPress navigation menu.

Since the main navigation menu typically appears across your entire site, visitors will be able to search for pages, posts, products, and more, from any page of your website.

An example of a search bar, in a navigation menu

If you’re using a block-based theme such as ThemeIsle’s Hestia Pro or Twenty Twenty-Three, then you can add a search bar to your theme using the full-site editor (FSE).

To do this, go to Appearance » Editor in the WordPress dashboard.

Opening the WordPress full site editor (FSE)

By default, the editor will show your theme’s home template. If you want to add the search bar to a different template, then click on the small arrow icon in the toolbar.

Then, select ‘Browse all templates.’

How to browse all FSE templates in WordPress

You’ll now see all the templates that make up your WordPress theme. Simply find the template where you want to add the search bar, and then click on its title.

For example, if you wanted to add a search form in your WordPress posts then you’d select the ‘Single’ template.

How to add the search bar to a single template in WordPress

You will now see this template in the full-site editor.

To go ahead and add a search bar, click on the blue ‘+’ icon.

Adding widgets to a single template in WordPress

In the popup that appears, type in ‘Search’ to find the right block.

You can then drag the block to the location where you want to show the search bar.

Adding a search block to a block-enabled theme template

To customize the block title or placeholder text, simply type it into the search block where it says ‘search’ or ‘optional placeholder.’

When you’re happy with how the block looks, click on ‘Save’ to make the search bar live.

Publishing a block-enabled template with a search bar

How Do I Add Search to a WordPress Page or Post?

You can add a search bar to a specific page or post using the built-in Search block.

This is a good choice if you want to control exactly where the search bar appears on every page and post, or you only need to offer search on specific areas of your website.

How to improve the default WordPress search

To get started, simply open the page where you want to add a search form and then click on the + icon.

In the popup that appears, type ‘Search’ to find the right block. Once you click on the Search block, it will add the block to your page.

Adding the Search block to a WordPress page or post

By default, the block uses ‘Search’ for both its label and the button text.

This will be visible to visitors, so you may want to replace it with something more descriptive by typing into the text fields.

Customizing the WordPress search block

You can also add some placeholder text to the search bar. This text will disappear automatically when the visitor starts typing.

To add a placeholder, simply click on ‘Optional placeholder…’ and then start typing.

How to improve the WordPress search

When you’re happy with how the Search block looks, you can go ahead and either publish or update the post.

We hope this tutorial helped you learn how WordPress search works, and how to make it better. You may also want to learn how to make money online blogging with WordPress, or check out our list of the best email marketing services for small businesses.

If you liked this article, then please subscribe to our YouTube Channel for WordPress video tutorials. You can also find us on Twitter and Facebook.

The post How Does WordPress Search Work (+ Tips to Make It Better) first appeared on WPBeginner.
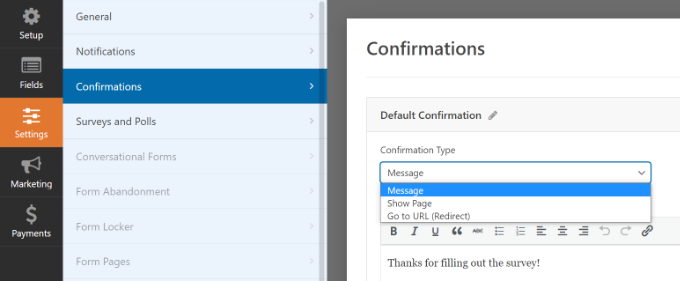
How to Add No Right Click on WordPress Images

Do you want to add no right-click to your WordPress images?

If you’re a photographer, artist, or content creator, then you’re probably worried about people stealing your images. While it’s difficult to completely stop image theft, you can make it more difficult for people to steal pictures from your website.

In this article, we’ll show you how to add no right-click on WordPress images and galleries.

How to add no right click on WordPress images

Why Add No Right-Click on WordPress Images?

The Internet has made it easier to share your work with the world, but it’s also made it easier for people to steal your images.

These people might use your content to promote scams or fraudulent products. They might even sell your digital art and graphics online, making money from your hard work while you make none.

If you’re an online influencer or have a big social media following, then people might even steal your photos and impersonate you online. For example, they might pretend you’re an affiliate marketing partner.

Even if you simply write a WordPress blog, people might still use your personal photos as part of online scams like fake ads or reviews.

Scammers could even scrape your WordPress blog content and images, and then republish it on other websites. This duplicate content can damage your WordPress SEO.

While there’s no single solution that can completely prevent image theft, you can make your site a less attractive target.

With that being said, let’s see how you can add no right-click on WordPress images and galleries. Simply use the quick links below to jump straight to the method you want to use.

Method 1. How to Add No Right Click to All Your WordPress Images

The easiest way to protect your images is by using No Right Click Images. This free plugin allows you to disable right-clicking for images only, so users can still right-click on your other content including links.

You can also enable and disable right-click based on whether the visitor is logged into their account. This is perfect if you run a subscribers-only stock photo website or some other form of membership site.

First, you’ll need to install and activate the plugin. If you need help, then please see our guide on how to install a WordPress plugin.

Upon activation, go to Settings » No Right Click Images to configure the plugin settings.

How to add no right-click on WordPress images

The default options should work for most users, but it’s still worth checking whether you need to make any changes. In particular, these settings can help you close any loopholes that people might use to get around the no right-click protection.

Out of the box, the plugin disables dragging images so users can’t copy an image by dragging it onto their desktop or another tab. With that in mind, we always recommend leaving ‘Disable Dragging of images’ checked.

No Right Click Images also disables touch and gesture events, which can stop people from stealing images on devices that make use of those sorts of actions. However, this can cause problems if you use images as links or buttons, or if your visitors interact with your pictures using gestures, such as before-and-after images.

If you do encounter problems, then you can re-enable support for touch events and gestures by unchecking the following boxes: ‘Disable Touch events’ and ‘Disable Gesture events.’

How to disable touch events and gestures on your WordPress website

By default, visitors can still open a context menu and save your images on Apple devices.

That said, you may want to check the box next to ‘Disable context menu on Apple devices.’ This adds a style to images on iPhones and iPads, which stops users from opening the Apple context menu and stealing your images.

How to disable the Apple context menu on your WordPress blog or website

When you’re happy with how the plugin is set up, don’t forget to click on ‘Save Changes’ to store your settings.

You can now log out of your WordPress admin account and visit your website. Then, simply right-click on any image to check the plugin is working.

Method 2. How to Add No Right Click to Image Galleries

If you want to protect individual images across your website, then the first method is a good choice. However, sometimes you may want to create an image gallery in WordPress, and then disable right-clicking for the entire gallery. For example, you might build a photography portfolio or display your most popular products in a nice gallery layout.

This is where Envira Gallery comes in.

It is one of the best WordPress gallery plugins on the market and comes with a protection addon that disables the ability to right-click on any galleries you create using the plugin.

How to disable right-click for a WordPress gallery

The first thing you need to do is install and activate the Envira Gallery plugin. For more details, see our step-by-step guide on how to install a WordPress plugin.

Upon activation, go to Envira Gallery » Settings and enter your license key.

Activating the Envira Gallery WordPress plugin

You can find this information under your account on the Envira Gallery website.

With that done, click on ‘Verify Key.’

Next, head over to the Envira Gallery » Addons page. Here, find the Protection addon and click on its ‘Install’ button.

Activating the Protection addon for Envira Gallery

When you see the ‘Inactive’ slider, give it a click so it shows ‘Active’ instead.

After that, you’re ready to start creating protected image galleries.

How to protect your galleries using the Protection addon

To get started, go to the Envira Gallery » Add New page and type in a name for your gallery.

This is just for your reference so you can use anything that helps you identify the gallery in your WordPress dashboard.

Creating a new gallery using a WordPress plugin

You’re now ready to add images to the gallery. You can click on ‘Select Files from Your Computer,’ or ‘Select Files from Other Sources’ and then choose images from the WordPress media library.

After that, scroll to the ‘Currently in your Gallery’ section and click on the ‘Misc’ tab.

How to disable no right-click for your image gallery

Under ‘Image Protection Settings,’ check the box next to ‘Enable Image Protection.’

This disables the right-click action for all your Envira galleries.

Enabling image protection for your image galleries

If a visitor tries to right-click a gallery, you may want to show a popup on your WordPress website. For example, you might let this person know your images are copyrighted, and can’t be downloaded without your permission.

If you’re selling your digital artwork or photos, then you can even use the popup to get more sales on your online store.

Showing a popup on right-click

To create a popup, check the box next to ‘Enable Popup Alert.’

You can then type in a title and message.

Show a popup when a visitor right-clicks an image

By default, visitors will click an ‘OK’ button to close the popup.

You can replace ‘OK’ with your own custom messaging by typing into the ‘Button Text’ field.

Adding a custom message to an image protection popup

When you’re happy with how the gallery is set up, click on ‘Publish’ to save your settings.

To add the gallery to your website, simply edit the post or page where you want to show the images and then click on the ‘+’ icon.

In the popup, type in ‘Envira Gallery’ and then click on the right block when it appears.

Add the Envira Gallery block to WordPress

This adds the Envira Gallery block to the page.

You can now open the dropdown menu and select the gallery you just created.

Publishing an image gallery to your website or blog

When you’re happy with how the page looks, either click on ‘Publish’ or ‘Update’ to make the protected gallery live.

Pros and Cons of Disabling Right-Click on WordPress Images

Disabling the right-click action makes it more difficult for people to steal your images. It also reminds users that they can’t simply download files without the owner’s permission.

Sometimes, this will be enough to stop people from stealing your photos. This is particularly true for scammers, who tend to look for easy ways to download as many images as possible. It can also discourage genuine visitors, who may assume they can download and use any online content.

However, there are still ways to get around a website’s no right-click protection. For example, users can still download an entire page.

How to download images using the browser tools

This will copy the page’s content into a file, including all the images.

People can even use their browser’s view source or inspect tool to directly access an image file without right-clicking.

Inspecting an image using the built-in browser tool

With that in mind, you shouldn’t assume that disabling right-click is enough to keep your images safe.

On the other hand, some visitors may have a genuine reason why they need to download your images. For example, they may want to share your work with a potential future customer or post it on social media.

You might even allow people to reuse your images in specific ways, such as using your digital artwork on a non-profit website. In this case, disabling right-click can stop genuine users from accessing your images, which is a poor visitor experience.

If you do add no right-click to your website, then we recommend giving people an easy way to request access to your images. You can do this by adding a contact form to WordPress using a plugin such as WPForms.

How to create a contact form using WPForms

If there’s a chance your visitors may need immediate access, then you can also add live chat to your site. This allows people to send their requests and get a response in real time, which is a great user experience.

Alternative Ways to Discourage Image Theft on Your Website

When it comes to protecting your images, disabling right-click is a good first step. However, if you really want to stop thieves then we recommend taking some extra measures.

With that in mind, here are some additional ways to stop people from downloading, reusing, and selling images without your consent.

1. Add a Copyright Notice Below Your Images

If you haven’t already, then you should add a copyright notice to your website. We recommend adding a dynamic copyright date to the WordPress footer so it appears on every page and always shows the current date.

An example of a copyright notice, in a website footer

This is a great start, but it’s also a good idea to add a copyright notice below each image in plain text. This discourages people from stealing your photos, without affecting how that image looks on your website.

Some visitors simply assume they can download and re-use any images they see online. By adding a copyright notice, you can clear up any confusion and stop people from making this innocent mistake.

How to protect your photos with a copyright disclaimer

2. Add Watermarks to Your Images

Another option is adding a watermark to your images. This works great for stock photography websites where visitors expect to see a watermark, but your images might not look their best.

An example of a stock photography website with watermarks

This can be a problem for some websites, particularly if you’re a photographer or digital artist who’s promoting their work.

For that reason, we recommend positioning your watermarks carefully so they discourage people from stealing the image, without ruining how that image looks on your website.

To learn more, please see our guide on how to automatically add watermarks to images.

3. Set Up Automatic Content Theft Notifications

Sometimes, websites will mention your business or brand name next to the stolen images, particularly if they’ve scraped an entire page from your site.

With that in mind, it’s a good idea to set up brand name notifications using a service such as Google Alerts. Simply head over to the Google Alerts page and type in the name of your site, brand, products, or any other important text.

If there’s a specific phrase or call to action that you add to every post, then you may also want to type this into Google Alerts.

Set up content theft notifications using Google Alerts

After that, use the dropdown menus to configure the alert and type in the email address where you want to get the notifications.

When you’re happy with how the alert is set up, go ahead and click on ‘Create Alert.’

Now, when someone publishes scraped content of yours, you will get an email letting you know about it.

4. Reverse Image Search with Google

You can use Google image search to find all the places where a particular image is used online. Simply head over to the Google Images page and click on the small camera icon.

Protect your site against content theft

This will add a section where you can paste a direct link to the image or upload a copy from your computer.

After that, click on ‘Search.’

How to do a Google Reverse Image Search

Google will now show all the images that are similar to your picture. If you find the exact image on another website, then you can click through to see how that picture is being used.

If you have lots of photos, then checking each one manually can take a lot of time and effort. However, Google reverse image is a great way to uncover sites that re-using your images, so it’s smart to do a search from time to time.

Alternatively, you can use an advanced reverse image service such as Pixsy.

5. Contact the Website’s Host or Registrar

If someone has stolen and re-published your images, then we recommend contacting that person. There’s a chance they may be unaware they’re using copyrighted images illegally.

However, if it’s a spam website then you may struggle to find contact information. Instead, you can use the IsItWP lookup tool to find out where the domain and website are hosted.

The IsItWP lookup tool

The tool will pull up any available information, including the web hosting company.

Stealing content is an illegal activity and most web hosting companies don’t want to host sites that are breaking the law. With that in mind, you can contact the host and registrar directly to try and get the site taken down.

Most reputable web hosting companies take DMCA (Digital Millennium Copyright Act) complaints seriously, so this method usually gets good results.

We hope this article helped you add no right-click on WordPress images. You may also want to see our ultimate WordPress security guide or check out our expert pick of the best Instagram WordPress plugins.

If you liked this article, then please subscribe to our YouTube Channel for WordPress video tutorials. You can also find us on Twitter and Facebook.

The post How to Add No Right Click on WordPress Images first appeared on WPBeginner.
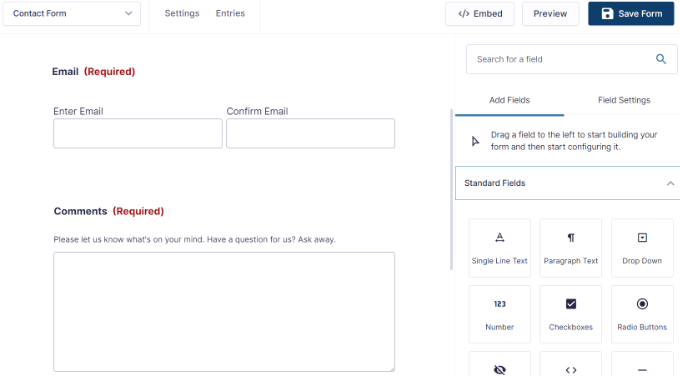
Ultimate WordPress Migration Guide for Beginners (Step by Step)

Are you looking to move your website to WordPress, or thinking about migrating an existing WordPress site to a new domain or host?

WordPress is the most popular website builder powering over 43% of all websites on the internet. That’s because it’s easy to use and gives you control over every aspect of your website.

In this article, we’ll show you how to migrate your blog or website to WordPress with little downtime and without losing SEO. We’ll also show you how to move your WordPress site to a new server or domain.

Ultimate WordPress Migration Guide for Beginners (Step by Step)

Why Migrate Your Website to WordPress?

Small businesses and individuals are starting websites all the time. They realize that having an online blog or website have significant benefits that help them grow their brand and keep in touch with clients.

However, many beginners choose a blogging platform other than WordPress. These platforms help them get started quickly, but as their websites grow, they begin to run into limitations.

For example, they may not be able to install plugins that add the features they need, there may be limited options in customizing the appearance of their site, or the platform may become too expensive as their requirements grow.

We believe that self-hosted WordPress outperforms all other blogging and website platforms. It is powerful, easy to use, affordable, and the most flexible of all available blogging platforms. Here are all the reasons why you should use WordPress.

Note: When we speak of self-hosted WordPress, we mean WordPress.org. This is different from WordPress.com, which is a hosting service. We show you how to migrate from WordPress.com to self-hosted WordPress at the end of this article.

The good news is, that you can migrate your blog to WordPress and begin to take advantage of its power and flexibility.

How to Migrate Your Blog to WordPress Yourself

Migrating a blog isn’t as simple as just moving information from one platform to another. However, that’s definitely something you need to get right, otherwise, you may lose content.

It’s also essential to choose a reputable WordPress hosting company that’s fast and reliable. Luckily, most hosting services will install WordPress for you automatically and free of charge.

You also need to make sure you don’t lose SEO so that your posts rank lower on Google. You should also set up an SEO-friendly URL structure for your future posts.

Now you don’t want your visitors or search engines to lose track of your posts because the old URLs stop working. You need to take care of this by creating redirects.

Besides these, there may be some additional steps you need to take to migrate everything over and improve your blog.

That’s a lot to keep track of, so we created specific step-by-step guides on how to migrate from your specific blogging platform to WordPress:

1. Migrating Self-Hosted WordPress to a New Server or Domain

You may already be using a self-hosted WordPress website and decide to migrate it to a new hosting service or domain. For example, you may decide to upgrade to a more reliable web hosting company.

You will need to move your WordPress files and databases from the old provider to the new one. If you’re not careful, then you may lose data, or take your website down and lose sales.

That’s why we created a step-by-step tutorial that shows you how to safely migrate WordPress to a new host or server without any downtime.

However, if you are moving your website to a new domain name, then you have a little more work to do. This would be if you are changing the URL of your website from, say, johnsmith.com to smithconsultingservices.com.

In that case, you simply need to follow our detailed guide on how to easily move WordPress to a new domain.

Tip: Some hosting providers, such as SiteGroundHostingerWP Engine, and GreenGeeks offer a free migration service for WPBeginner users. It might not be listed on their website, so all you have to do is ask.

2. Migrating From Blogger to WordPress

Blogger is a free blogging service by Google. It offers a quick and easy way to create a blog for non-tech-savvy users. All you need is a Google account to start a free blog on Blogger.

However, as your website grows, you will be limited to basic blogging tools and won’t be able to add new features. There are also not many ways to customize the appearance of your blog.

WordPress, on the other hand, gives you complete ownership of your website and allows you to add the necessary features to grow and monetize your blog. We have created a detailed side-by-side comparison of WordPress vs Blogger.

The good news is that WordPress is set up to natively import your Blogger posts. However, you will need to follow our instructions carefully, or your new blog’s URLs might not match.

If you have a free Blogger account, then you will have a website address that looks like myblog.blogspot.com. In that case, you should follow our guide on how to switch from Blogger to WordPress without losing Google rankings.

However, Blogger also allows users to connect custom domain names to their blogs such as myblog.com. If you have a custom domain Blogger blog, then you will need to follow our guide on how to move a custom domain Blogger blog to WordPress.

3. Migrating From Ghost to WordPress

Ghost is a minimalist blogging platform with features entirely focused on writing blog posts. It is available as a hosted platform, and also as software that you can install, though many users find installing it difficult.

While a simplified user interface can be a good thing, it also means your options for customizing Ghost’s features and appearance are very limited. This can become frustrating.

On the other hand, WordPress allows you to customize your site by installing plugins and themes. It is also much easier to install yourself. You can learn more about the differences between these platforms in our side-by-side comparison of Ghost vs. WordPress.

Unfortunately, migrating from Ghost is difficult because the default Ghost export file does not use a format supported by WordPress. So we decided to fix this issue and created the Ghost to WordPress Importer tool.

We show you how to use this free tool to migrate your blog in our guide on how to properly move from Ghost to WordPress.

4. Migrating From GoDaddy Website Builder to WordPress

GoDaddy is one of the biggest hosting and domain name companies in the world. To help their many users get started with building their website, they offer a basic website builder tool called GoDaddy Website Builder.

Many users choose this tool because it’s a convenient way to get started. However, it is missing many of the key features of more powerful blogging platforms, as you can see in our detailed comparison between GoDaddy Website Builder vs WordPress.

This means that users will quickly realize its many limitations and want to move their website to a more flexible and powerful platform like WordPress.

Unfortunately, there is no export tool to move your site from GoDaddy Website Builder to WordPress. That means that the process will be time-consuming and have a lot of manual steps, making it easy to make a mistake.

You’ll find every step clearly explained in our guide on how to move a GoDaddy Website Builder site to WordPress.

5. Migrating From Gumroad to WordPress

Gumroad

Gumroad is a popular eCommerce platform that allows users to sell digital goods online, such as games, music, courses, and videos. However, many users are looking to switch away from the platform because they have raised their fees to 10% for each transaction.

This fee does not include credit card processing or PayPal fees. Plus, an additional 10% fee is charged if a product is sold through the ‘Gumroad Discover’ feature or their ‘Global Affiliates’ program. That’s a lot of fees.

On the other hand, WordPress is free and doesn’t charge you any fee for the items you sell. Unlike Gumroad, it also lets you sell physical goods and you can use any payment gateway you want and promote your website freely.

You can easily install a plugin like Easy Digital Downloads to make WordPress the perfect platform for selling digital goods. We have even partnered with SiteGround, and they are offering special EDD hosting for our readers.

You can learn how to do this in around 30 minutes by following our guide on how to switch from Gumroad to WordPress.

6. Migrating From Joomla to WordPress

Joomla

Joomla is a good content management system that has a lot in common with WordPress. For example, they are both open-source software written in the PHP programming language and use a MySQL database.

They also have similar requirements, which means you won’t need to change hosting companies.

However, Joomla is more complicated to use. It is also not as powerful or flexible as WordPress because there are fewer extensions and designs available for you.

On the other hand, WordPress is easier to use and offers tons of extensions and design choices. See our comparison of Joomla vs WordPress for more details.

Luckily, there is a plugin you can use to easily import your Joomla content into WordPress. We carefully take you through every step you need in our guide on how to easily move your site from Joomla to WordPress.

7. Migrating From Medium to WordPress

Medium is a good blogging platform for new writers. It allows you to publish your posts with very little setup. But because you don’t own the platform, content from other authors often gets displayed below your own story.

The platform is quite limited compared to WordPress. When you switch from Medium to WordPress, you will own your own blog and can add all the features you need using plugins.

Simply follow our complete step-by-step guide to help you properly move all your content from Medium to WordPress.

You can retain the look of your old blog by installing a Medium-style theme or go for a new blog design using one of the best and most popular WordPress themes.

Tip: If you’re not ready to completely migrate away from Medium, then you can learn how to embed Medium blog posts in WordPress.

8. Migrating From Shopify to WordPress

Shopify is an all-in-one eCommerce solution that makes it easy for you to create an online store, accept payments, and manage your inventory, all from a single platform.

You don’t need to worry about the technical aspects of managing an eCommerce site, but it comes with slightly higher costs and limited control of your website.

On the other hand, you can turn WordPress into a full-featured online store by installing the WooCommerce plugin and customize every aspect of your store. You can compare the differences between the platforms in our comparison of Shopify vs WooCommerce.

Unfortunately, migrating away from Shopify is difficult because it doesn’t provide an easy way to export data to a WordPress-supported format. So we built an easy importer tool to help you do the Shopify to WooCommerce migration for free.

We take you through the entire migration process step-by-step in our guide on how to properly move from Shopify to WooCommerce.

Note: If you’re not ready to completely migrate away from Shopify, then you can learn how to easily integrate Shopify with WordPress.

9. Migrating From Squarespace to WordPress

Squarespace is a website-building service that focuses on small business owners. It allows you to create beautiful websites using easy drag-and-drop tools.

However, compared to WordPress, it costs more and offers less scope for design and flexibility. And while it does offer a limited set of extensions and integrations, they don’t compare with the power and breadth of the WordPress plugin ecosystem.

Unfortunately, it is difficult to migrate away from Squarespace because it offers limited export functionality. Depending on what content you have on your site, you may need to manually copy and paste some content from your Squarespace website.

In our guide on how to properly move from Squarespace to WordPress, we clearly list the content that can be automatically exported, and the content you will have to move manually to successfully migrate your site.

10. Migrating From Tumblr to WordPress

Tumblr is a little different than other blogging platforms. It is a microblogging platform with social networking features like following other blogs, reblogging, and built-in sharing tools.

The platform is easy to use and comes with its own audience. As a microblogging tool, Tumblr makes it easy to quickly blog videos, GIFs, images, and audio formats.

However, unlike WordPress, Tumblr’s features are limited and cannot be extended. To learn more about WordPress and what you can do with it, please see our complete WordPress review with pros and cons.

If you’re thinking about migrating from Tumblr to WordPress, then you will be glad to know that WordPress can natively import your Tumblr posts.

However, there is a lot involved in a website migration, and you’ll find all the steps in our comprehensive guide on how to properly move your blog from Tumblr to WordPress.

11. Migrating From Weebly to WordPress

Weebly is a well-known website builder platform owned by Square’s payment platform. It offers easy-to-use website-building tools for business websites and eCommerce stores along with free blog templates that you can add to your website.

However, that free plan has limited features and bandwidth, and upgrading to a paid subscription is expensive compared to top blogging websites. Besides that, Weebly’s blogging and SEO features are just not as powerful as other blogging platforms.

By contrast, WordPress can be hosted on any server and has all the features you can dream of like online stores, contact forms, galleries, portfolios, SEO, and more. When you compare Weebly vs WordPress you might start to think about switching.

The migration will take about an hour, and it’s worth it. Don’t worry, we’ve helped hundreds of people switch with the step-by-step directions in our guide on how to properly move from Weebly to WordPress.

12. Migrating From Wix to WordPress

Wix is a popular hosted platform that lets you quickly create simple websites using a drag-and-drop website builder. You can add a blog using the Wix Blog app.

However, when you compare Wix vs WordPress you see that Wix has incredibly limited options and adding extra features can become quite expensive.

For all but the simplest websites, WordPress is by far the better choice because it has a much larger range of themes and layouts, as well as a huge selection of plugins that add new features to your website.

Unfortunately, Wix makes it quite difficult to move your content away, but after reviewing various different ways to move from Wix to WordPress, we believe the easiest method is by importing your blog posts via RSS.

We show you how to do this step-by-step in our guide on how to properly switch from Wix to WordPress. On an average Wix blog, the migration takes around an hour.

13. Migrating From WordPress.com to Self-Hosted WordPress

WordPress.com is a blog hosting service offered by Automattic, a company created by WordPress.org co-founder Matt Mullenweg. Basic blog hosting is free and you can purchase additional options like a custom domain name, additional storage, and premium services.

This appeals to new users because no setup is required. However, compared with a self-hosted WordPress website, there are limited options to extend your blog. For example, you can’t use custom themes and plugins for customizing your blog.

You can learn more by viewing our comparison chart on WordPress.com vs WordPress.org.

If you’re ready to move from WordPress.com to a self-hosted WordPress blog, then see our guide on how to properly move your blog from WordPress.com to WordPress.org. Make sure you follow our steps carefully so you don’t lose data, visitors, or SEO.

After you migrate to a self-hosted WordPress blog, you may find you are missing some features you enjoyed on WordPress.com. Don’t worry, you can easily add those features by following our guide on how to get WordPress.com features on self-hosted WordPress blogs.

Special Offer: Our Team of Experts Can Move Your Blog for Free

Here’s a special offer. If you wish to migrate from Blogger, Medium, Weebly, or WordPress.com to a self-hosted WordPress website, then we can do it for you for free.

One of our expert team members will do the entire migration for you (100% free). Yes, you can literally switch from any of those specific platforms to WordPress without any risk.

There are just two conditions:

  • First, you need to sign up for your new web hosting service using our link. This will make sure you get the best price on hosting.
  • Second, your blog can’t have more than 1,000 posts. We can offer a migration service for larger blogs, but that will be a paid service.

Sound good? You can learn more on our Free WordPress Blog Setup page. We’ve already helped over 100,000 people, so get started now.

Free Blog Setup

We hope this tutorial helped you learn how to migrate your website to self-hosted WordPress. You may also want to see our guide on how to create an email newsletter the right way, or our expert pick on must have WordPress plugins to grow your site.

If you liked this article, then please subscribe to our YouTube Channel for WordPress video tutorials. You can also find us on Twitter and Facebook.

The post Ultimate WordPress Migration Guide for Beginners (Step by Step) first appeared on WPBeginner.
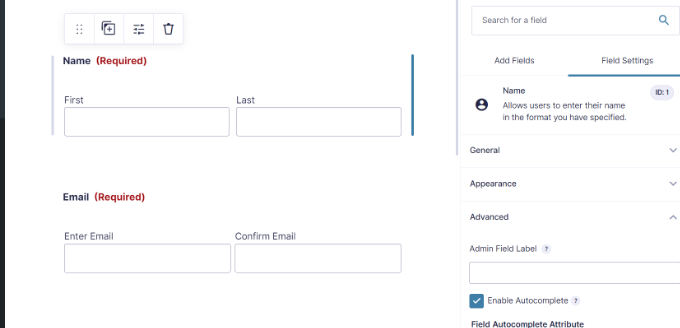
What’s New in WordPress 6.2 (Features and Screenshots)

WordPress 6.2 has just been released, and it is the first major WordPress release of 2023.

This new version is packed with significant improvements and new features. Many of them focused on the block editor and site editing in WordPress.

In this article, we’ll show you what’s new in WordPress 6.2 and which features you should try after the update.

An overview WordPerss 6.2 release with features and screenshots

Note: WordPress 6.2 is a major release, and unless you are on a managed WordPress hosting service, you’ll have to initiate the update manually. Here’s how to safely update WordPress.

Important: Don’t forget to create a complete WordPress backup before updating.

That being said, here’s all that’s new in WordPress 6.2.

WordPress Site Editor Comes out of Beta

The site editor comes out of the beta.

It has been around for the past few WordPress releases, the removal of the beta label is merely an invitation for more users to try it.

Site editor comes out of beta

This also indicates the completion of phase 2 of the WordPress development roadmap which started out with the release of the new block editor back in WordPress 5.0 (late 2018).

WordPress 6.2 includes several new features added to the site editor, including some brand-new tools which we’ll talk about later in this article.

Note: Full site editor is available with block themes that support this feature. You can try it out even if you are using the older classic editor with a block-enabled theme.

Improved Navigation Menu Block

Navigation menus help you define your website layout to your users. However, creating them in the full site editor had been a bit difficult for beginners.

WordPress 6.2 now comes with an improved ‘Navigation’ block.

You can now create and manage the Navigation block by editing items in the sidebar.

Managing menu items in block panel

To add a new menu item, simply click on the ‘add (+)’ button. You can also drag and drop menu items to rearrange them.

Want to use a different menu? You can now easily switch between menus you have created earlier by clicking on the Three-dot menu in the sidebar.

Manage menus

Overall, this is a significant improvement to the older Navigation block where you had to edit items inline which was not a good experience for beginners.

Improved Template Browsing Experience

WordPress 6.2 comes with a new template browsing experience.

This allows users to browse different templates to find out which one they need to edit if they want to make changes to a certain area of their website.

Template browser in WordPress 6.2

To edit a template or template part, simply click to load it inside the preview window. After that, just click on the preview window to start editing.

Want to exit the site editor?

Simply click on the WordPress or your site logo at the top left corner of the screen to enter the template browser. Then click again to exit and return to the WordPress dashboard.

Exit site editor

The template browser screen will now also show you that you have unsaved changes.

It also offers an improved saving experience showing what changes you are saving.

Unsaved changes in site editor

Template Parts Highlighted with Colors

A template in the site editor may include several template parts, like the header and footer.

These are global elements that can be used in multiple places on your WordPress website. If you edit a template part on one page, those changes will be reflected all over your site.

Previously when editing a template part, the only indication was the label at the top changed to show the template part name.

Template part editing before WordPress 6.2

Editing template parts affects all templates that include those elements. This makes it important to indicate that users are editing a global template part and not simply the page they are looking at.

WordPress 6.2 now makes this more noticeable by adding colors and an icon to indicate that you are editing a template part.

Template part edited in WordPress 6.2

Modify Your Theme With The Style Book

WordPress 6.2 comes with a style book feature in the site editor.

This is basically one convenient place to browse how your theme displays all the blocks. To access it you need to switch to the Styles panel and then click on the Style Book icon. It is the one that looks like an eye.

Style book shows all block styles at one place

This will show you all the blocks, and how they are styled in your theme. They are organized into different categories so that you can easily locate the block you want to edit.

Click to start editing a block and you will see all the tools that you can use in the sidebar panel. Changes you make here will apply globally to your theme.

Edit block directly from style book

Basically, you can change the appearance of your entire theme by editing individual blocks here and creating a completely new style of your own.

Want to edit block styles individually? Don’t worry there are even more design tools at your disposal to edit blocks.

Ability to Add Custom CSS to Your Theme or Blocks

By default, the site editor hides the legacy Theme Customizer interface. Many users added their custom CSS in the ‘Additional CSS’ panel available with the legacy customizer.

Until 6.2, it was a problem to add custom CSS using the default tools available.

WordPress 6.2, however, now allows you to add custom CSS that applies to your entire site. Simply click on the Styles panel and choose Custom CSS under the three-dot menu.

Custom CSS in site editor

You can also add custom CSS to individual blocks as well.

Switch to the Style panel and then click on Blocks.

Block styles

Now, you need to select the block that you want to modify.

After that, click on the ‘Additional Block CSS’ tab to enter your custom CSS code.

Block styles custom CSS

WordPress 6.2 makes it easier to add custom CSS if you need to. However, it comes with a ton of built-in design tools which are much easier to use than adding custom CSS.

Copy and Paste Block Styles

Another styling feature that reduces the need to add custom CSS is the ability to simply copy and paste block styles.

Let’s say that you just made some changes to a block and want to make the same changes on another block as well.

With WordPress 6.2 you can simply click on ‘Copy styles’ under the block options.

Copy styles

After that, click on the block options for the block where you want to paste the style and select ‘Paste styles.’

Note: Your browser will ask for permission to allow your website to view the contents of the clipboard. You need to click ‘Allow’ to continue.

Paste styles

Improved Pattern Insertion

WordPress block patterns are a collection of pre-made design elements that you can use for creating custom content layouts faster.

By default, WordPress comes with several built-in patterns. Your WordPress theme may also include its own pattern. Plus, you can find more patterns in WordPress Patterns Directory.

WordPress 6.2 comes with an improved pattern insertion interface.

Easier pattern insertion

Openverse Free Media Library Integration

WordPress 6.2 now adds a ‘Media’ tab in the inserter as well.

Here, you can choose media from your own WordPress media library or browse royalty-free images from Openverse.

Openverse Integration in WordPress 6.2

Openverse is a sister project of WordPress.org. It allows openly licensed and public domain works to be discovered and used by everyone.

Once you select an image it will be inserted into the editor and downloaded to your WordPress media library as well.

WordPress will also save the image caption which may include a link back to the original source. You can delete this caption if the image is in the public domain.

New Sub Panels for Block Settings & Styles

WordPress 6.2 now uses sub-panels to separate block settings and styles.

This helps users understand where they need to look if they want to change the appearance of a block.

Sub panels for block settings and styles

New Distraction-Free Mode

Historically, WordPress has always provided options to hide the formatting buttons and toolbars on the post editor screen.

Here is how it looked in WordPress 4.1 with the older classic editor.

Distraction free mode in older classic editor

However, the block editor had the option to be used in full-screen mode. WordPress 5.4 started using the full-screen mode as the default.

This allowed users to have a much cleaner writing interface, but there was no distraction-free mode.

Full-screen mode

WordPress 6.2 now comes with a completely clean and calm distraction-free mode.

Users will be able to choose it from the editor settings, and it removes all toolbars and editing panels from the screen.

Distraction free mode in WordPress 6.2

Import Classic Widgets as Template Parts in Block Themes

WordPress 6.2 provides a nice fallback for importing classic legacy widgets in block themes when switching themes.

Users with classic widget themes lost their legacy widgets when they switched to a block theme. Now, you can import them as template parts.

Simply create a new template part by clicking on the ‘Add New Block’ button (+).

Import classic widgets into template part

From the template part settings panel, click on the Advanced tab to expand it, and you’ll find the option to import a widget area from your previous theme.

Miscellaneous Enhancements

WordPress 6.2 contains a ton of enhancements. It merges 10 Gutenberg releases (‘Gutenberg’ is the codename for the original block editor project) into WordPress core so there are many refinements and new features to explore.

Here are some of the most useful enhancements.

1. Captions Button in Image Block Toolbar

Previously WordPress automatically added the caption area below the image and moved the cursor automatically to the caption.

This led many users to continue writing their text not realizing that they are writing it in the caption area.

WordPress 6.2 fixes this by adding a caption button to the toolbar. Users can now use it to add a caption if needed.

Add caption button

2. Improved Calendar Block

The calendar block now comes with more color options.

Improved color block

3. The List, Outline, and Info Panels are Merged

The list view, outline, and info panel are now merged into one convenient location.

List block now shows outline and information panel

4. Group Block Layout

The ‘Group’ block now lets you choose a layout.

Group block layout

5. The Download Link for Media Files

The media screen will now show a ‘Download File’ link in the list view.

Download link for media files

6. New Icon for Settings Panel

The icon to display the settings panel previously used a gear icon. It is now presented with a panels icon.

Settings icon

Under The Hood Changes

WordPress 6.2 also includes a ton of changes intended for developers. Following are some of these changes:

  • A new HTML API called WP_HTML_Tag_Processor is introduced. (Details)
  • A new client-side filter called blockEditor.useSetting.before is introduced. It allows developers to change block settings before the editor is rendered. (Details)
  • Patterns API extended to include template_types property. (Details)
  • Faster updates by moving directories instead of copying them. (Details)
  • A new switch_to_user_locale() function is introduced. (Details)
  • Create autosave revisions only when content is changed. (Details)
  • Add a style variation tag to themes that use style variations. (Details)

We hope this article helped you uncover what’s new in WordPress 6.2 and which new features to try out. We are particularly excited about all the changes to the site editor and performance improvements for block themes.

If you liked this article, then please subscribe to our YouTube Channel for WordPress video tutorials. You can also find us on Twitter and Facebook.

The post What’s New in WordPress 6.2 (Features and Screenshots) first appeared on WPBeginner.
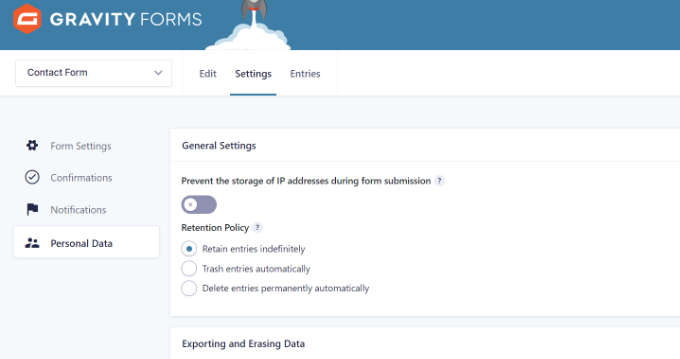
How to Add Fuzzy Search in WordPress to Improve Results

Do you want to add fuzzy search to your WordPress website?

Adding fuzzy search helps users easily find the information they are looking for, even if they misspell or otherwise incorrectly enter their query. This improves the overall search experience and user engagement on your website.

In this article, we’ll show you how to easily add fuzzy search to your WordPress website.

How to add fuzzy search to your WordPress website

What is Fuzzy Search And Why Should You Add it to Your Website?

Fuzzy search looks for partial matches for a search term, even if no exact matches are available, and shows users the most appropriate results.

This way, users can find the right content on your website even if they make typos in the search query.

By default, all WordPress websites come with a basic search feature that only shows results for exact matches.

For instance, if a user misspells a term, no results will be shown not even partial matches. This creates a bad search experience for users and often causes them to leave your site. You can see this in the image below.

No search results found

This is where SearchWP comes in. It is the best WordPress search plugin on the market that automatically replaces the default search with a much better search feature.

Unlike the default WordPress search, SearchWP can use fuzzy search as well as look for matches in titles, excerpts, post or page content, products, custom fields, categories, tags, PDF files, and more.

For instance, if a user searches for ‘vintage furniture’ on your WordPress blog but misspells a word, they’ll still be able to find your posts on this topic.

The image below shows the same misspelled search using the SearchWP plugin.

That being said, let’s see how you can easily add fuzzy search to your WordPress website.

How to Add Fuzzy Search to Your WordPress Website

First, you need to install and activate the SearchWP plugin. For more details, please see our guide on how to install a WordPress plugin.

Upon activation, you need to visit the SearchWP » Settings page from the admin sidebar and switch to the ‘License’ tab.

Next, you need to copy and paste your license key and click on the ‘Activate’ button. You can find the license key under your account on the SearchWP website.

SearcWP license

Fuzzy search is not enabled by default in SearchWP, but you can easily turn it on. First, you need to switch to the ‘Advanced’ tab in the plugin’s settings page.

Next, you need to simply check the ‘Partial matches (fuzzy when necessary)’ option under the ‘Actions & Settings’ section.

Check the Partial matches option in the Action & Settings section

Doing so will enable the fuzzy search feature for your site.

Once that is done, you should review the other SearchWP settings for your site. The plugin comes with a bunch of powerful options that allow you to customize the search feature on your website.

You can see them by simply switching to the ‘Engines’ tab under plugin settings.

SearchWP settings

From here, you can assign weight to different search results.

You can also click on the Sources & Settings button to select additional search areas. For instance, you can enable search for comments, products, and more instead of simply posts and pages.

Enable search for posts, comments, and pages

To learn more, see our complete guide on how to improve WordPress search with SearchWP.

Adding a Search Form to Your Website

SearchWP automatically replaces the default WordPress search.

This means that if you have already added the WordPress Search block or widget to your website, then it will start using SearchWP custom algorithm for results.

However, if you have not added the search form to your website, then you can do so by simply adding the Search block or widget to any post, page, or sidebar area.

Simply head over to the Appearance » Widgets page. Find the ‘Search’ block and simply add it to your sidebar.
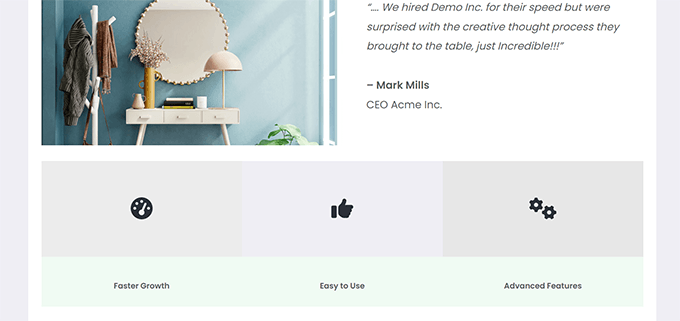
Don’t forget to click on the ‘Update’ button to store your settings.
Search widget

However, if you are using a block theme, then your theme may not have a widget-ready area. In that case, you won’t see the Widgets screen under the Appearance menu.

Instead, you can use the site editor to add the search block to your website. Simply go to the Appearance » Editor page to launch the editor.
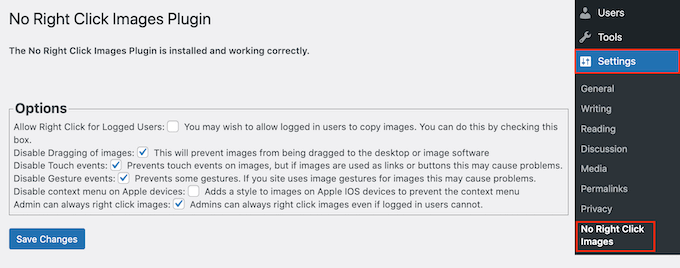
After that, add the search block to your website where you want to display the search form.

Adding search block in site editor

Don’t forget to click on the Update button to save your settings.

You can now visit your website and try out the new more powerful search feature.

You can see in the image below how fuzzy search returns multiple relevant results with a misspelled query.

Search results with fuzzy search

We hope this article helped you learn how to easily add fuzzy search to your WordPress website. You may also want to see our tutorial on how to add multilingual search in WordPress and our list of the most common WordPress errors and how to fix them.

If you liked this article, then please subscribe to our YouTube Channel for WordPress video tutorials. You can also find us on Twitter and Facebook.

The post How to Add Fuzzy Search in WordPress to Improve Results first appeared on WPBeginner.