Do you want to disable automatic update email notifications in WordPress?
By default, WordPress sends email notifications for automatic updates of WordPress plugins, themes, and the core itself. These notification emails can get annoying.
In this article, we will show you how to easily disable automatic update email notifications in WordPress.
Some of these updates are automatically installed, and you will receive an email notification that your site has been updated.
Similarly, WordPress also allows you to enable automatic updates for WordPress plugins and themes. This means that you can spend less time updating plugins and more time growing your business.
You can enable automatic updates for plugins that you trust by visiting the Plugins » All Plugins page in your WordPress admin dashboard.
Simply click on the ‘Enable auto-updates’ link next to the plugin that you want to update itself.
For WordPress themes, you can visit the Appearance » Themes page and click on a theme.
This will bring up a theme information popup where you must click on ‘Enable auto-updates’.
WordPress will send you an email notification when any of your plugins, theme, or WordPress core is updated.
This can get annoying, particularly for users who manage multiple WordPress websites. Wouldn’t it be nice if you could control and turn off these email notifications?
Let’s take a look at how to easily disable automatic update email notifications in WordPress. You can use the quick links below to jump to the method you want to use:
Method 1: Disable Automatic Update Email Notification Using Code (Recommended)
This method requires you to add code to your WordPress files. If you haven’t done this before, then take a look at our beginner’s guide on pasting snippets from the web into WordPress.
You can manually add the code below to your theme’s functions.php file. But this can be tricky since a mistake can bring down your whole website. Plus, if you update your theme, then any custom code snippets will be erased.
We will show you a better approach below, which is using a code snippets plugin.
1. Disable Auto Update Notification Emails for WordPress Core, Themes, and Plugins
Luckily, there is an easy and safe way to disable auto update notification emails in WordPress, and that’s using the WPCode plugin.
WPCode lets you easily add custom code snippets in WordPress without editing your theme’s functions.php file.
Plus, it has a full code library inside the plugin that includes ready-to-use, verified code snippets for popular feature requests like disabling automatic update emails, removing the WordPress version number, disabling comments, and more.
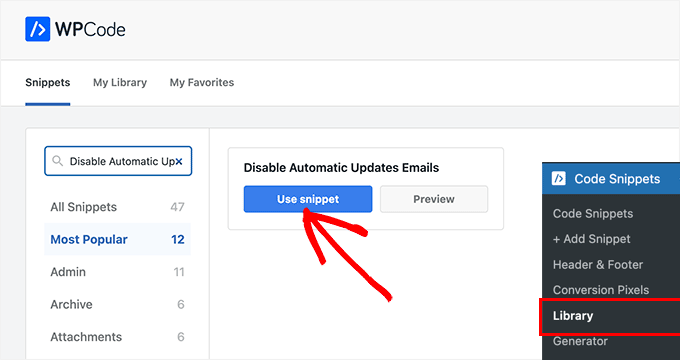
Once the plugin is activated, you need to go to Code Snippets » Library from your WordPress admin dashboard.
Then, search for the ‘Disable Automatic Updates Emails’ snippet and click on the ‘Use snippet’ button.
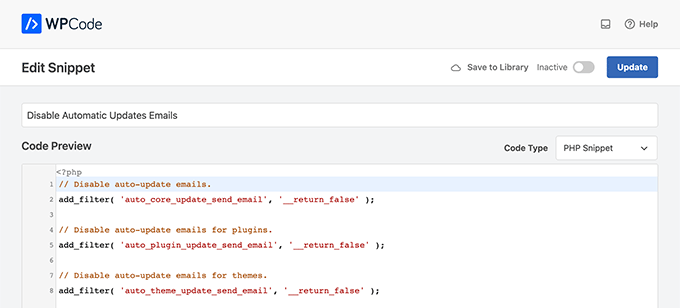
WPCode will then automatically add the code and set the proper insertion method.
The snippet has three filters, with one for each type of auto-update email: WordPress core, WordPress plugins, and WordPress themes.
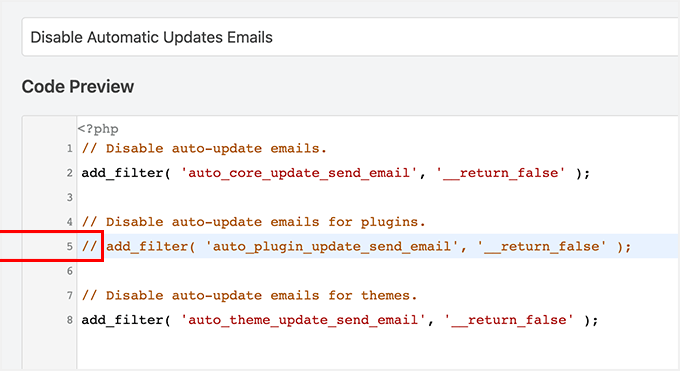
If you don’t want to use a particular filter, simply add a // at the beginning of the filter line.
For example, if you still want to get auto-update emails for WordPress plugins, add a // to the plugin, and the filter will stop it from executing.
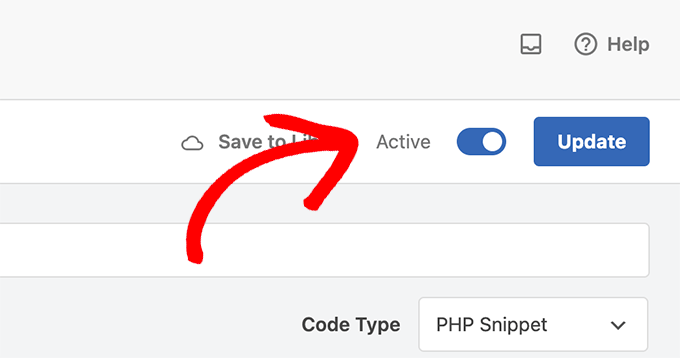
After that, all you have to do is toggle the switch from ‘Inactive’ to ‘Active’.
Then, click the ‘Update’ button.
Now you will no longer get automatic update emails from WordPress.
2. Disable Auto Update Notification Emails for Core Updates
You can also use WPCode to disable notification emails for automatic WordPress core updates. Instead of choosing an existing code snippet, you will need to add this code as a custom snippet:
Upon activation, you need to visit the Settings » Notification emails page. This is where the plugin allows you to manage all WordPress notification emails, including auto-update notifications.
Simply scroll down to the auto-update options and uncheck the box next to the notifications you want to disable.
Finally, don’t forget to click on the ‘Save Changes’ button to store your settings.
2. WP Mail SMTP
Another plugin you can use to disable automatic update email notifications is WP Mail SMTP. It’s the best SMTP service for WordPress and ensures your emails are delivered to your inbox.
WP Mail SMTP lets you easily manage the emails sent by WordPress through its Email Controls. However, you will need the WP Mail SMTP Pro license to unlock the Email Controls option.
Next, you will need to install and activate WP Mail SMTP Pro on your website. You can check out our guide on how to install a WordPress plugin for more details.
Once the plugin is active, navigate to WP Mail SMTP » Settings from your WordPress admin panel and click the ‘Email Controls’ tab.
After that, scroll down to the ‘Automatic Updates’ section and disable email notifications for plugins, themes, WP core status, and full log.
When you are done, don’t forget to click the ‘Save Settings’ button.
That’s all. You have successfully disabled WordPress auto-update email notifications for your website.
Rolling Back WordPress Updates if Something Goes Wrong
Because WordPress plugins run on many independent WordPress hosting and server configurations, sometimes a plugin update may break a feature on your website or make it inaccessible.
This is easy to troubleshoot and fix. First, you need to figure out which plugin has caused the issue by deactivating all WordPress plugins and reactivating them one by one.
Once you have isolated the plugin causing the issue, you can use the WP Rollback plugin. It allows you to switch to the previous version of a WordPress plugin or theme.
You will also want to make sure that emails sent to users are delivered, including forgotten password emails, payment receipt emails, and order confirmation notifications.
To send emails, WordPress uses the PHP mail function. This function is easily misused by spammers, and your emails may end up in the spam folder.
To make sure all your important WordPress notification emails reach your users’ inboxes, you will need a proper SMTP service to send emails.
This is where the WP Mail SMTP plugin comes in. It uses an SMTP service to send all your WordPress notification emails.
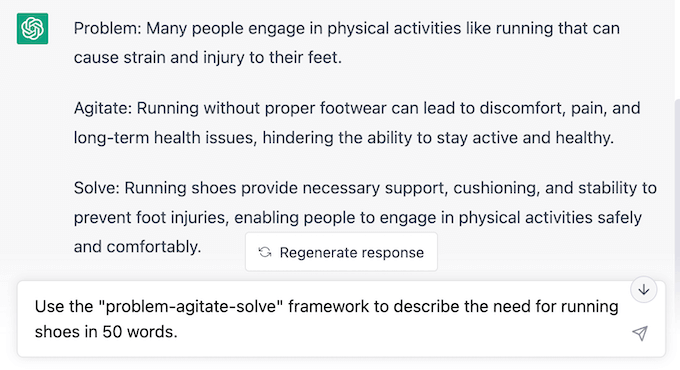
Are you looking to add a Mailchimp subscribe form to your WordPress website?
Mailchimp is a popular email marketing tool that offers a form builder. However, this builder has limited features and customization options. Adding a custom subscribe form gives you more flexibility and helps grow your email list.
In this article, we will show you how to create a Mailchimp subscribe form in WordPress with custom fields.
Why Add a Custom Mailchimp Subscribe Form in WordPress?
Adding a subscription form to your WordPress website is a great way of communicating with your users.
You can send newsletters, new product releases, announcements, and other information while creating a direct connection with your audience.
Mailchimp is one of the most popular email marketing services. It helps you build an email list, send emails, and set up automated email campaigns. Plus, it also offers a form builder that you can use to create a subscription form and embed it on your website.
However, Mailchimp’s form builder is very basic and doesn’t offer a lot of customization options. You get limited form fields to choose from, and there are no settings to change color, font, and more. It also adds Mailchimp branding at the bottom.
Creating a custom Mailchimp subscribe form gives you more flexibility and control. You can add all types of form fields, edit their appearance, add conditional logic to show fields based on the user’s responses, and more.
That being said, let’s look at how you can create a Mailchimp subscription form with custom fields.
How to Create a Mailchimp Subscribe Form in WordPress
The easiest way of adding a Mailchimp subscribe form in WordPress is by using WPForms. It is the best contact form plugin for WordPress that’s used by over 5 million professionals.
WPForms is a beginner-friendly plugin that offers a drag-and-drop form builder, prebuilt templates, and lots of customization options. The best part is it easily integrates with Mailchimp.
Note: For this tutorial, we will be using the WPForms Pro version because it includes the Mailchimp addon and custom form fields. There is also the WPForms Lite version that is available for free, but it doesn’t offer a Mailchimp integration.
Step 1: Connect Mailchimp With WPForms
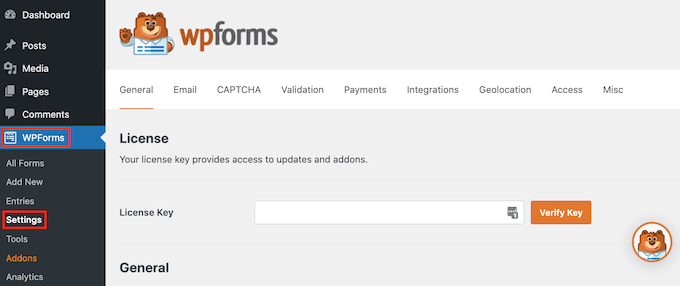
First, you will need to install and activate the WPForms plugin. If you need help, then please see our guide on how to install a WordPress plugin.
Upon activation, you will need to go to WPForms » Settings and add the license key. You can find the key in your WPForms account area.
After entering the license key, go ahead and click the ‘Verify Key’ button.
Next, you will need to install the Mailchimp addon.
You can do that by going to WPForms » Addons from the WordPress admin panel. From here, navigate to the Mailchimp addon and click the ‘Install Addon’ button.
The addon should now install and activate.
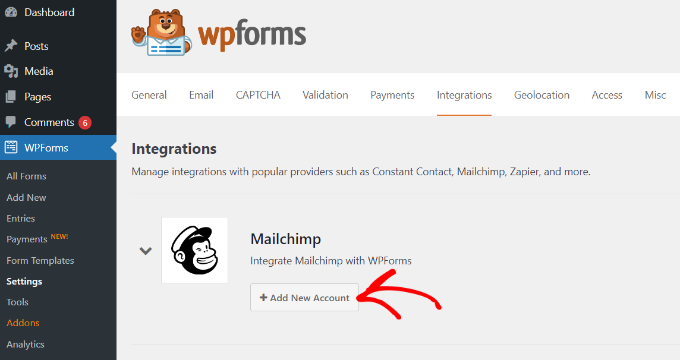
Once that’s done, simply go to WPForms » Settings from your WordPress dashboard and switch to the ‘Integrations’ tab.
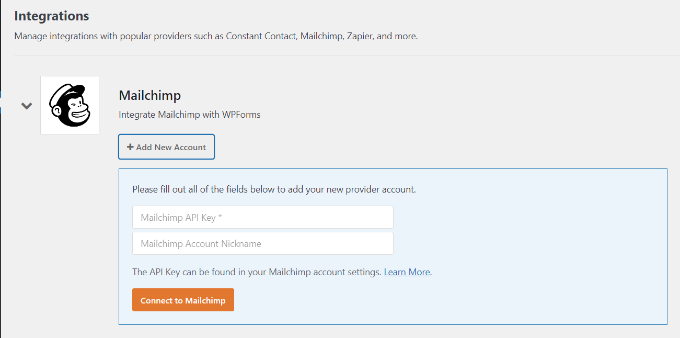
Next, you can expand the Mailchimp settings and then click the ‘+ Add New Account’ button under Mailchimp.
As soon as you do that, you will see more options. To integrate Mailchimp, you must enter the API key and account nickname. This will allow WPForms to communicate with your Mailchimp account.
Creating Mailchimp API Keys for WPForms Integration
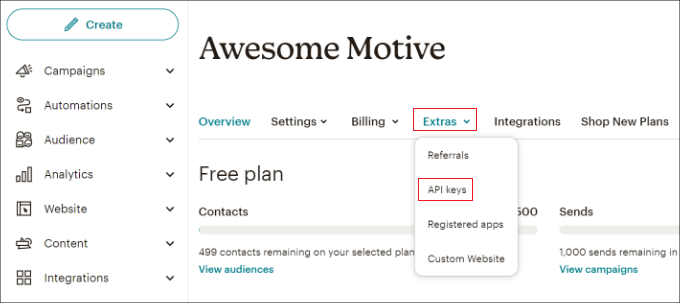
To create an API key to connect WPForms, you will first need to log in to your Mailchimp account.
Once you are logged in, simply click on your avatar in the top right corner and select the ‘Account & billing’ option.
On the next page, you will see different account settings.
Simply click the ‘Extras’ dropdown menu and then select the ‘API keys’ option.
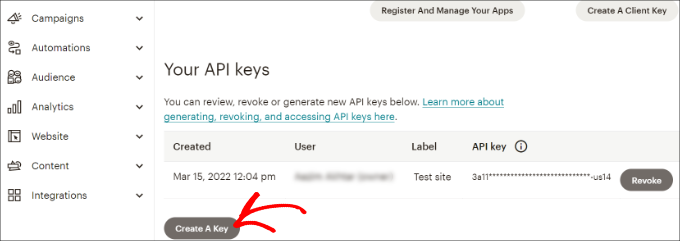
Next, you can copy an existing API key to use for your WPForms integration.
If you haven’t generated a key previously, then simply click the ‘Create A Key’ button.
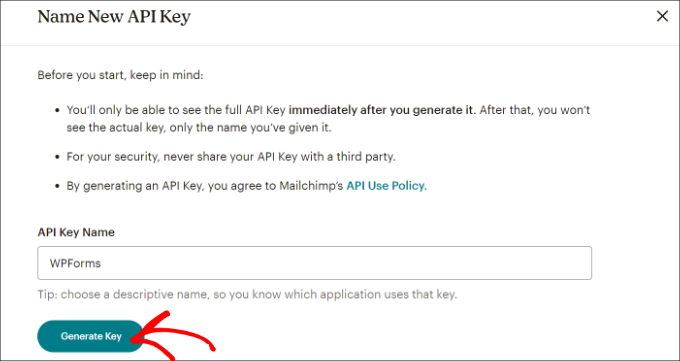
After that, you can enter a name for your new API key.
Once that’s done, just click the ‘Generate Key’ button.
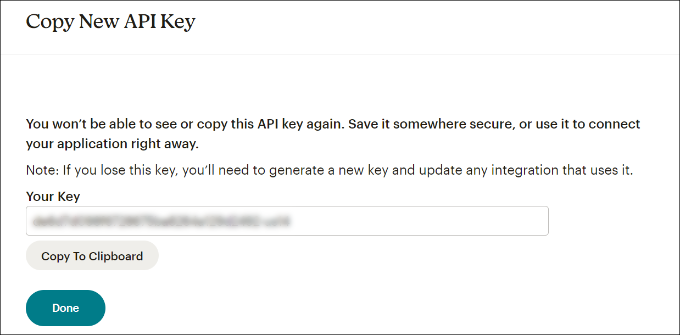
Next, you will see the new API key.
Go ahead and copy the key and click the ‘Done’ button.
You can now return to the browser tab or window with your WPFroms integration settings.
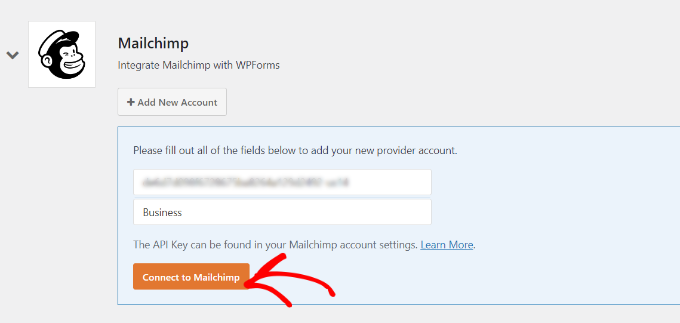
From here, simply paste the key into the ‘API Key’ field. You can also add a Mailchimp account nickname to remember which account you are connected to.
After entering the key, go ahead and click the ‘Connect to Mailchimp’ button.
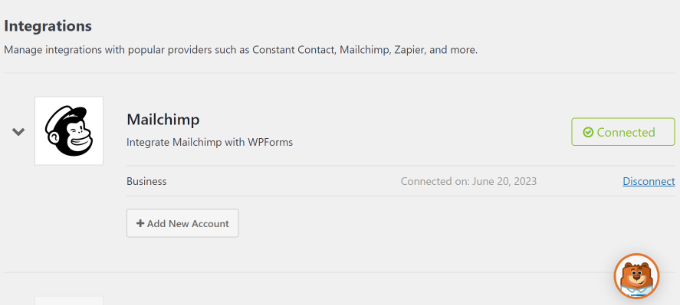
You should now see a green ‘Connected’ button next to the Mailchimp settings, showing that the email marketing tool is successfully integrated with WPForms.
Step 2: Design a Mailchimp Subscribe Form With Custom Fields
Now that you have integrated Mailchimp with WPForms, the next step is to create a subscription form with custom fields.
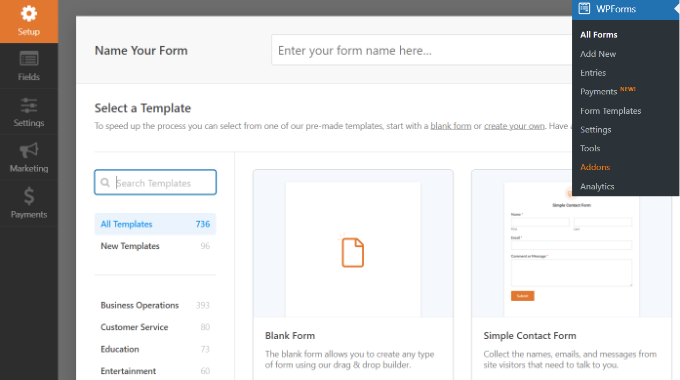
First, you will need to go to WPForms » Add New from the WordPress dashboard. Next, you can enter a name at the top and select a form template.
WPFomrs offers lots of prebuilt form templates, so you can quickly pick one and customize it.
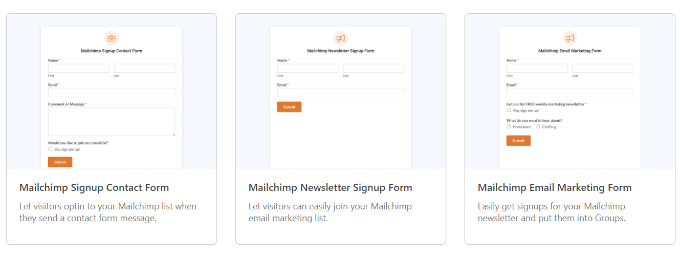
It even offers form templates for Mailchimp. For instance, you can create a signup contact form, newsletter signup form, or email marketing form.
For this tutorial, we will choose the Mailchimp Newsletter Signup Form template.
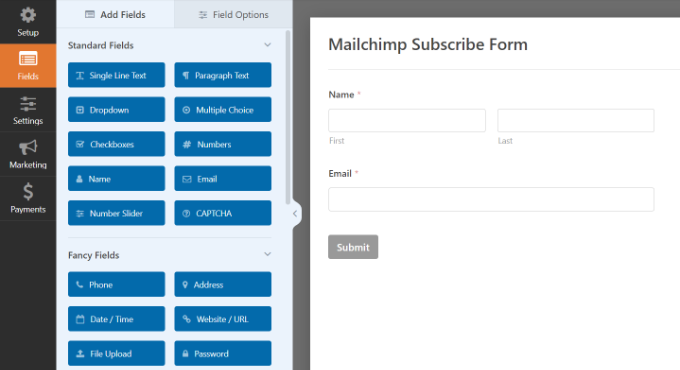
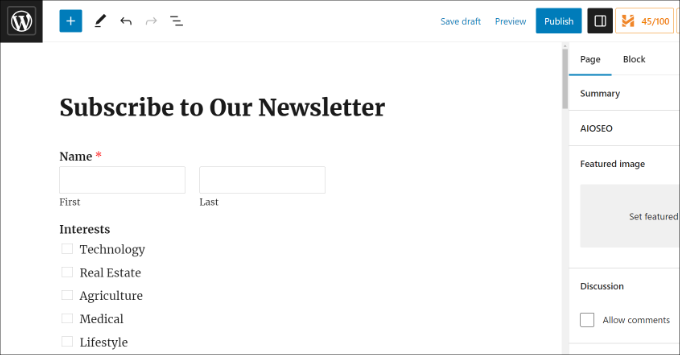
On the next screen, you will see the WPForms drag-and-drop form builder. Here, you can customize the form and add custom fields from the menu on the left.
The default form template will come with a Name and Email field.
However, you can simply drag any form field and drop it onto the template. There are fields to add text, dropdown options, multiple choice, phone number, address, date and time, website, password, and more.
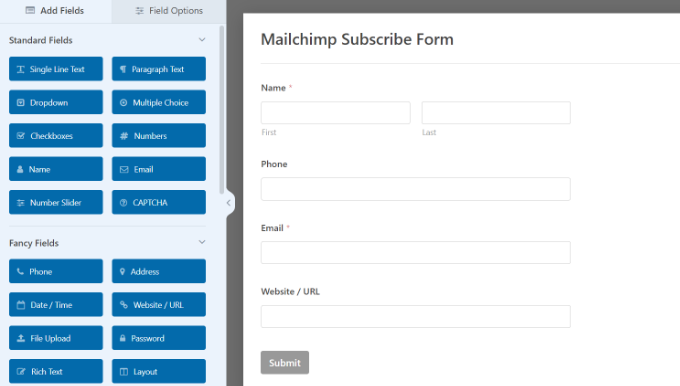
For instance, if you are using a business phone service, then you can add a Phone field. This will help you send SMS messages or reach out to subscribers via phone calls.
You can add a checkbox field and allow users to select their interests. This way, you can segment your subscribers and send them targeted emails.
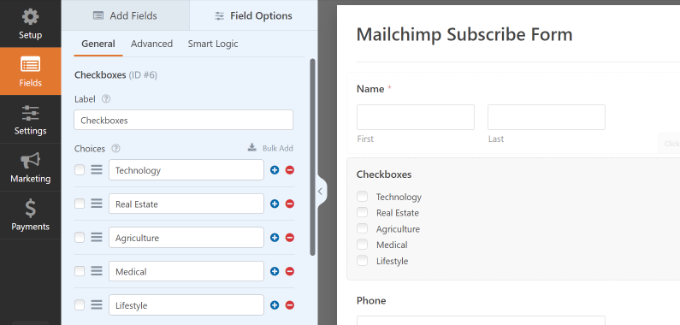
Next, you can further edit each form field in the template. Simply choose a field, and you will see more options in the left panel.
For example, we changed the options in the Checkboxes form field.
You can also edit the label of the form field, make it a required field, add images to the checkbox options, and more.
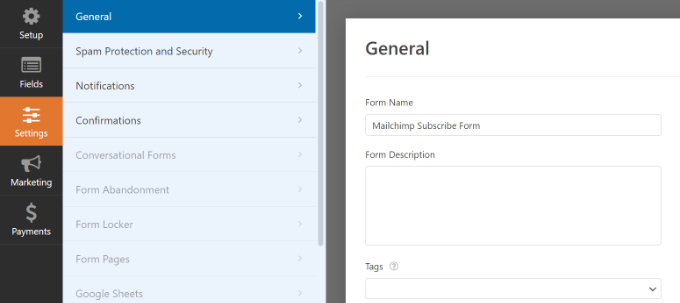
Once you have finished adding custom form fields, switch to the ‘Settings’ tab from the left menu. In the General settings, you can change the form’s name and description, add tags, edit the submit button text, and more.
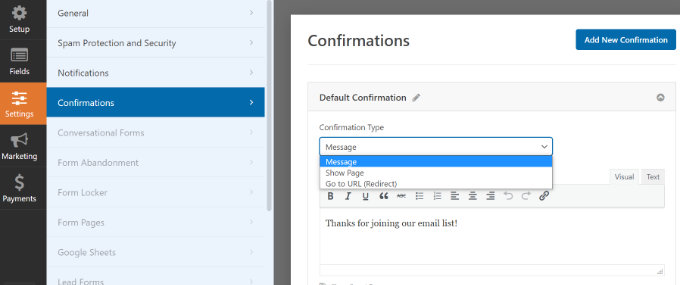
Next, you can switch to the ‘Confirmations’ tab and choose what subscribers will see once they submit a form.
WPForms lets you show a message, a specific page like a thank you page, or redirect users to a URL.
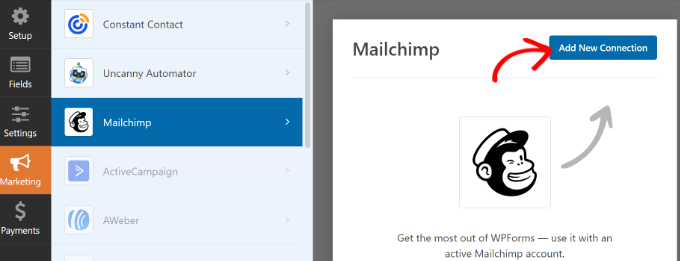
After that, you can go to the ‘Marketing’ tab from the left panel and then select Mailchimp.
From here, simply click the ‘Add New Connection’ button.
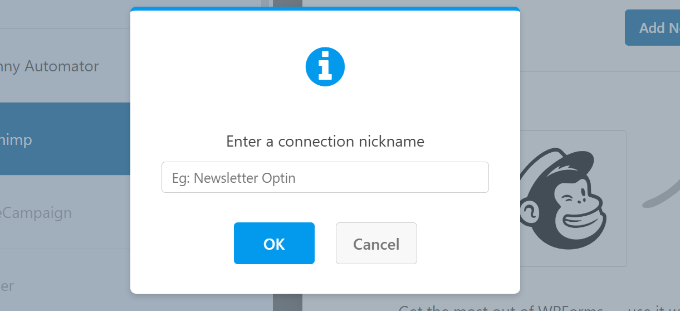
Next, a small popup will open where you will need to enter the Mailchimp nickname.
After entering it, go ahead and click the ‘OK’ button.
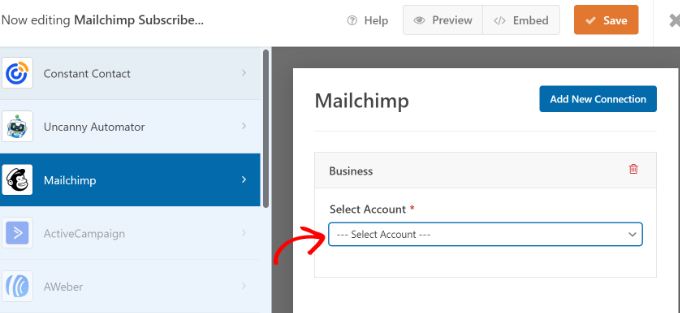
Next, you can pick the Mailchimp account that you connected to earlier.
Simply click the ‘Select Account’ dropdown menu and choose your account.
After that, more options will appear.
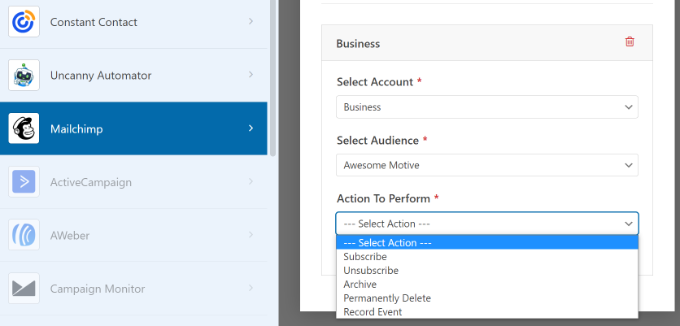
You can go ahead and select the audience from the dropdown menu to which the new subscribers will be added.
There are different actions to choose from, but we will select the ‘Subscribe’ option for this tutorial. This will add the user as a new contact to your Mailchimp account.
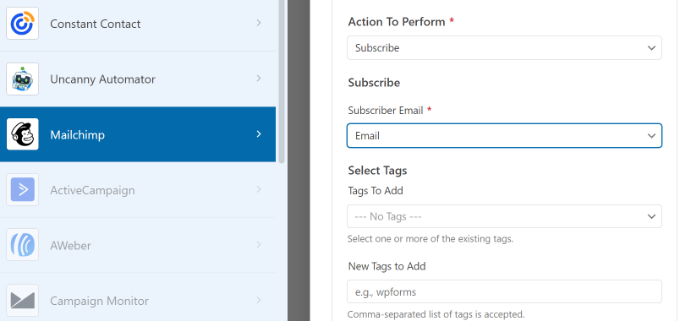
Next, you can scroll down to see additional settings. For instance, there is an option to choose the WPForms field where users can enter their email addresses.
You also have options to add tags to new subscribers and a note to the user’s profile.
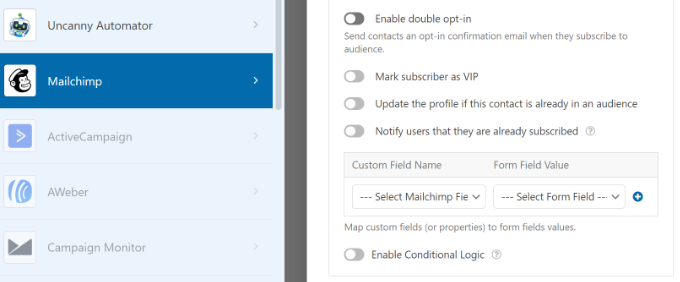
If you scroll down further, then you will see more optional settings. For instance, you can enable double opt-in, mark the subscriber as VIP, update their profile if the contact is already in an audience, and more.
Now, you are ready to add your Mailchimp subscribe form to your WordPress blog or website.
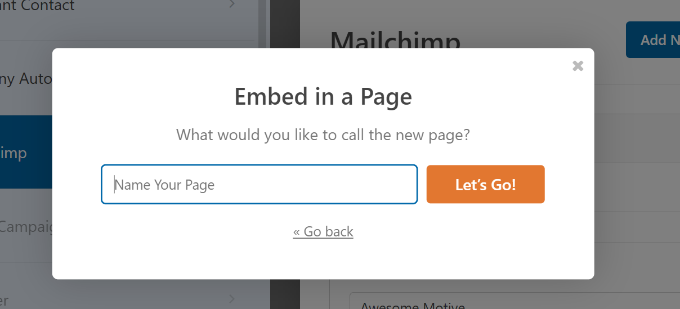
In the WPForms form builder, you will see an ‘Embed’ option at the top. Go ahead and click on the ‘Save’ button to store your changes, and then click the ‘Embed’ button.
Next, a popup will open where you will need to select an existing page or create a new page.
For this tutorial, we will use the ‘Create New Page’ option.
After that, you will need to enter a name for your new page.
Once that’s done, simply click the ‘Let’s Go!’ button.
You can then click the ‘Publish’ button at the top to make your Mailchimp subscribe form live.
You have now successfully created a Mailchimp subscribe form with custom fields.
You can go ahead and visit your website to see the form in action.
You can also do a lot more with Mailchimp and WordPress. For instance, you can integrate it with OptinMonster and show your subscribe forms in popup campaigns.
We hope this article helped you learn how to create a Mailchimp subscribe form in WordPress with custom fields. You may also want to see our guide on easy ways to grow your email list faster andour expert picks for the must have WordPress plugins to grow your website.
If you liked this article, then please subscribe to our YouTube Channel for WordPress video tutorials. You can also find us on Twitter and Facebook.
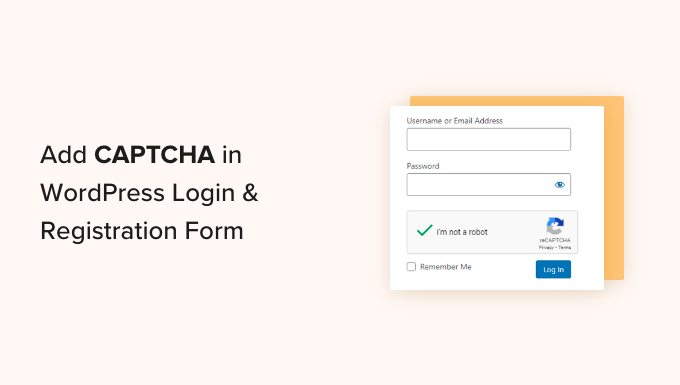
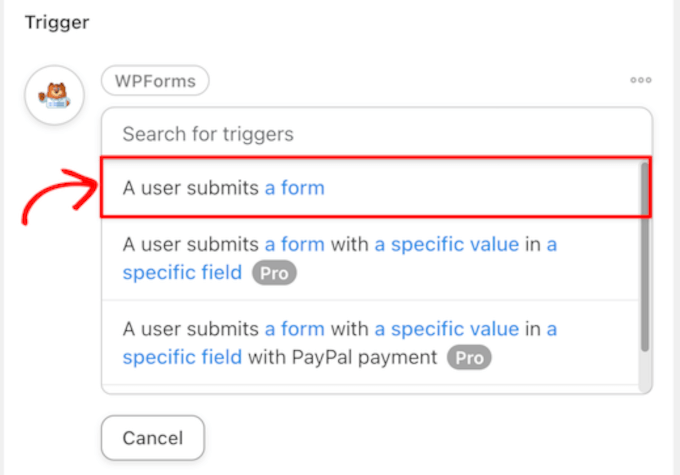
Do you want to add CAPTCHA to your WordPress site’s login and registration forms?
WordPress login and user registration pages are often prime targets for hackers, spammers, and brute force attacks. One way to avoid these attacks is by using CAPTCHA, which effectively blocks spambots and protects your site from being hacked.
In this article, we will show you how to add CAPTCHA to WordPress login and registration forms.
What Is CAPTCHA?
A CAPTCHA is a computer program that can tell whether someone is a human or an automated user. It does that by showing a test that would be quite easy for a human user to pass but almost impossible for automated scripts or bots to get right.
In the earlier days of CAPTCHA, users were asked to enter the text they saw in an image. This image displayed random letters, words, or numbers in a distorted style.
Later, a newer technology called reCAPTCHA was introduced.
It showed random words as a challenge and used user input to help digitalize books.
This technology was acquired by Google in 2009. Since then, it has helped digitalize thousands of books and complete New York Times archives.
However, these new CAPTCHAs were still annoying and often ruined the user experience on websites.
To fix this, Google introduced ‘No CAPTCHA reCAPTCHA’, which uses artificial intelligence (AI) and user interactions to catch spambots.
It shows an easier checkbox for human users to click on. For other suspicious traffic, it will show a more difficult CAPTCHA, like identifying objects in images.
That being said, let’s take a look at how WordPress websites can improve security with CAPTCHA.
Why Use CAPTCHA for WordPress Login and Registration?
WordPress login and registration pages are an easy target for spammers, wannabe hackers, and brute force attacks.
That’s because WordPress is the most popular website builder in the world, which makes it a common target for malicious attempts.
The attacker’s motivation is often to get unauthorized access to your WordPress admin area to distribute malware. In other cases, the attacker can crash the entire network of websites hosted with a specific web hosting company to collect a ransom.
The easiest solution to protect your WordPress site is using a WordPress firewall plugin like Sucuri. It will block bad traffic from reaching your website and prevent unauthorized access.
Another solution is to add a secondary layer of password protection on WordPress login and registration pages. However, the problem with this method is that you will have to share that second password with each user, and this simply doesn’t scale for large multi-author blogs or membership sites.
CAPTCHA provides an easier alternative to those solutions. It uses Google’s AI technologies to detect genuine visitors and present CAPTCHA challenges to suspicious users.
Default vs. Custom WordPress Login and Registration Form
The default WordPress login and registration form provides a basic set of features.
The login page allows users to access the back end of your website according to their respective user roles and permissions.
The default WordPress registration form lets visitors create an account on your site. Once they are registered, they can also log in to your website’s back end and perform specific tasks allowed by their user role.
A lot of website owners want to customize the default WordPress login and registration page with their own logos, styles, and more. They use one of the many plugins to create their own custom login and registration page to replace the default ones.
Whether you are using the default pages or custom ones, we have got you covered.
In this guide, we will show you how to set up reCAPTCHA for both default and custom login and registration pages in WordPress. You can click the links below to jump ahead to any section:
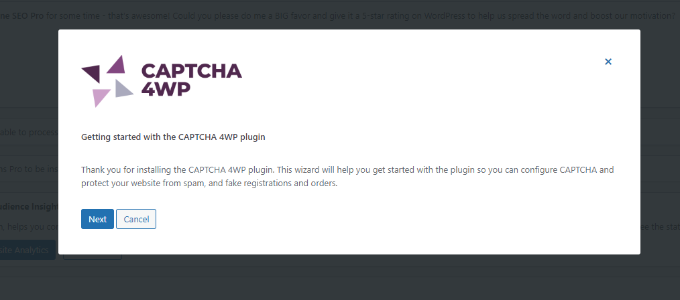
Once the plugin is activated, you need to visit theCAPTCHA 4WP » CAPTCHA Configuration page from your admin panel.
You will then see a setup wizard. Simply click the ‘Next’ button to continue.
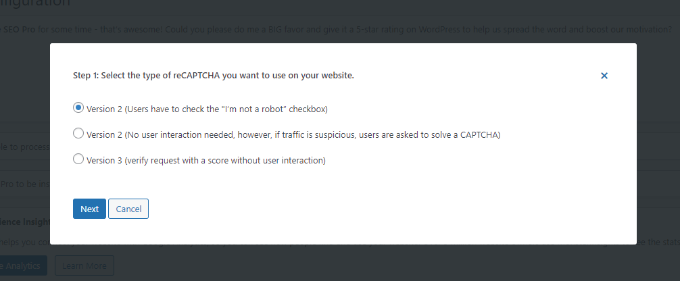
After that, you will need to select the type of reCAPTCHA you’d like to use.
There are 3 options to choose from, including Version 2, where users can check the ‘I am not a robot’ checkbox, or Version 2, where no user interaction is needed, but a CAPTCHA will appear for suspicious traffic. Finally, Version 3 verifies requests with a score without user interaction.
For this tutorial, we will select the ‘Version 2 (Users have to check the “I’m not a robot” checkbox)’ type.
Once that’s done, click the ‘Next’ button.
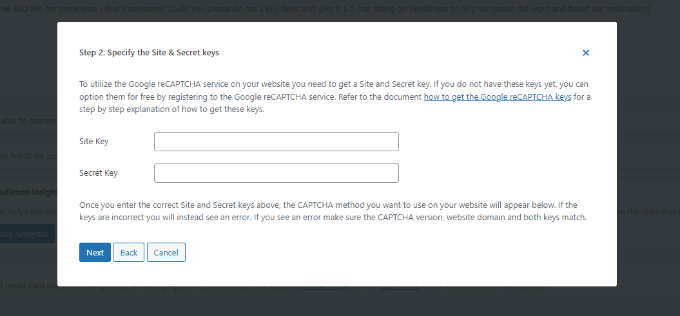
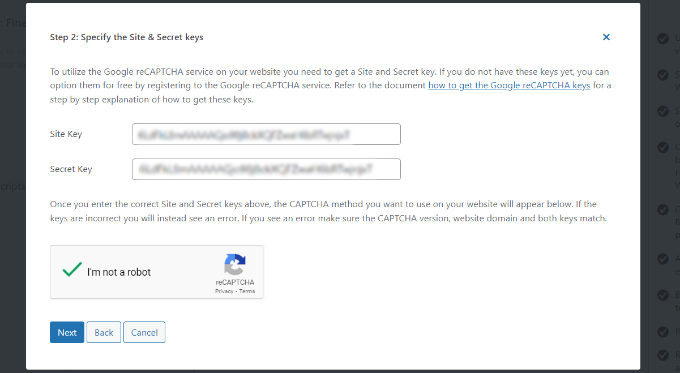
On the next screen, you will need to enter the Google reCAPTCHA site and secret key.
To get these Google reCAPTCHA API keys, you need to visit the reCAPTCHA website.
Then, click on the ‘v3 Admin Console’ option at the top.
On the next screen, Google will ask you to sign in to your account. Once you are logged in, you will see the Register a new site page.
First, you need to enter your website name in the ‘Label’ field. After that, you must select a reCAPTCHA type. For example, we will choose the reCAPTCHA v2 ‘I’m not a robot’ checkbox.
Next, you need to enter your domain name in the ‘Domains’ section.
Make sure to enter your domain name without the ‘https://www’ part.
Once done, just click on the ‘Submit’ button.
Next, you will see a success message along with the site key and secret key that you can use on your WordPress website.
You can copy the site and secret keys.
Next, you will need to return to the browser tab or window where the CAPTCHA 4WP setup wizard is open. From here, you can enter the Google CAPTCHA site key and secret key.
Once you are done, you will need to check the ‘I’m not a robot’ checkbox and click the ‘Next’ button.
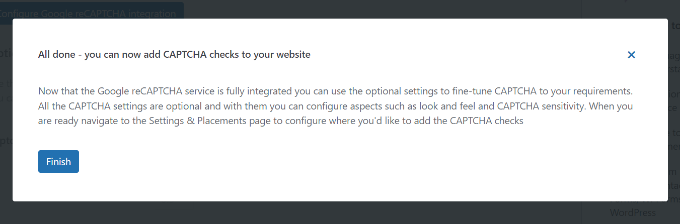
Then, you will see a success message. Simply click the ‘Finish’ button.
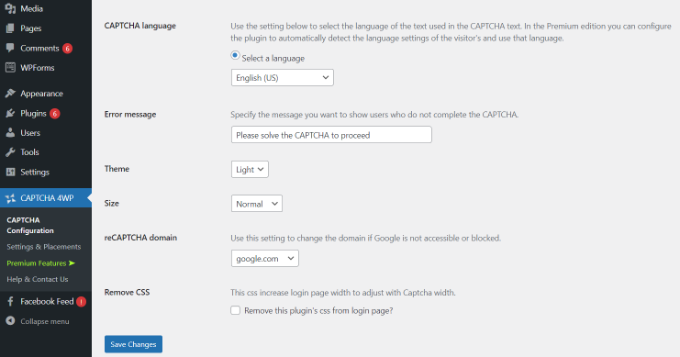
After that, you can configure additional CAPTCHA 4WP settings.
For instance, there are options to change the language, edit the error message, select a theme, and more.
When you are done, simply click the ‘Save Changes’ button.
That’s it! You have successfully added reCAPTCHA in the default WordPress login and registration form.
To preview it, you can open your WordPress login URL in your browser. For example, www.example.com/wp-login.php.
If you want to check the reCAPTCHA in the registration form, then just click on the ‘Register’ link below the login form. After that, the WordPress registration form will open, and you can see how reCAPTCHA works.
reCAPTCHA in Custom WordPress Login and Registration Forms
As we mentioned earlier, custom WordPress login and registration forms offer more user-friendly membership options to your website’s members and visitors.
First, these forms allow users to register or log in to your website from the front end. This improves the user experience and lets you keep the same overall design experience across your website.
Next, you can add your website logo and customize the login and registration pages in your style.
Plus, creating a custom WordPress login form and user registration form is easy with the most user-friendly WordPress form plugin, WPForms. It is the best contact form plugin for WordPress.
For this tutorial, we will use the WPForms Pro version because it includes the User Registration addon and more customization options. However, there is also a free WPForms Lite version you can use to get started.
To get started, you need to install and activate the WPForms plugin on your WordPress site. For more details, see our step-by-step guide on how to install a WordPress plugin.
Upon activation, head over to the WPForms » Settings page to enter your WPForms license key. You can get this key from your account area on the WPForms website.
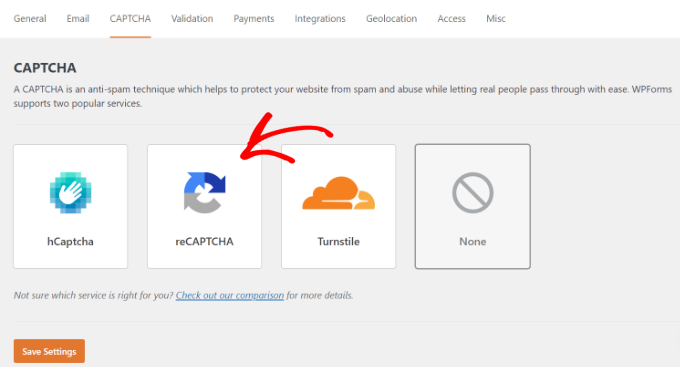
After that, click on the ‘CAPTCHA’ tab at the top to configure reCAPTCHA for your custom-made WordPress forms.
First, you need to choose a CAPTCHA type. Go ahead and click on the ‘reCAPTCHA’ option.
Since we chose v2 earlier, we will choose reCAPTCHA v3 in this example so that you can see the different options.
However, our recommendation is still v2.
After that, you will see the site key and secret key fields. To get these keys, you need to register your site on the Google reCAPTCHA website.
Just go to the Google reCAPTCHA website and then click on the ‘v3 Admin Console’ button in the top right corner.
After that, Google will ask you to sign in to your account. Once done, you will see the ‘Register a new site’ page.
Next, you can enter your website name and then select ‘Score based (v3)’ from the reCAPTCHA types.
Next, you need to enter your domain name (without https://www.), as shown in the screenshot below.
Once done, simply click on the ‘Submit’ button.
After that, Google will show a success message along with the site key and the secret key to add reCAPTCHA to your site.
Go ahead and copy these keys.
Now that you have the Google reCAPTCHA API keys, you need to return to the browser tab or window where the WPForms reCAPTCHA settings are open.
Next, simply go to the reCAPTCHA tab and enter the site key and secret key. Once that’s done, you can save your settings.
Now that you have successfully added reCAPTCHA to WPForms, you can easily enable reCAPTCHA in your custom login form, user registration form, or any form built with WPForms.
Now let’s go ahead and create a custom WordPress registration form.
First, you must visit the WPForms » Addons page and find the User Registration Addon. From here, click the ‘Install Addon’ button.
After that, WPForms will download and install the addon. Once you see the User Registration Addon’s status is ‘Active,’ you are ready to add a new user registration form.
Now you need to go to WPForms » Add New to launch the WPForms Builder. On the WPForms setup page, select the ‘User Registration Form’ template and enter a name for your form.
Once you select a template, it will launch the WPForms drag-and-drop form builder.
After that, WPForms will automatically build a custom user registration form and open the form setup page.
Now, you can customize your form by adding new fields or editing the field options. If you like the default form, then you can use it without making any changes.
Next, you need to go to the ‘Settings’ tab in the left menu to configure your form settings. Then switch to the ‘Spam Protection and Security’ settings and enable Google v3 reCAPTCHA.
Once that’s done, just click the ‘Save’ button in the top right corner.
That’s it! You have created a custom WordPress user registration form and also added reCAPTCHA to it.
The next thing you need to do is add the custom user registration form on your website. You can do that by clicking the ‘Embed’ button in the form builder.
Next, you will need to select an existing page or create a new one to embed your form.
For this tutorial, we will use the ‘Create New Page’ option.
After that, you can enter a name for your new page.
Once that’s done, simply click the ‘Let’s Go’ button.
Next, you will see a preview of your registration form in the content editor.
Alternatively, you can also use the WPForms block to add your form.
Now, you can publish the page and visit it in your web browser to see the custom user registration form with Google reCAPTCHA in action.
Since we chose reCAPTCHA v3 in this example, you won’t see a Google reCAPTCHA checkbox like ‘I’m not a robot.’ This is because reCAPTCHA v3 works in the background, but you will still see a small badge in the bottom right corner.
The process of creating a custom login form is almost the same.
The only difference is that you need to choose the User Login Form template from the WPForms setup page.
Do you want to restrict content on WordPress to Patreon members?
By adding patron-only content to your website, you can encourage visitors to join your Patreon and increase your profits. It’s also a great way to get Patreon users to visit your website, which will boost your traffic and can increase revenue further.
In this article, we will show you how to restrict content on WordPress to Patreon members.
Why Restrict Content on WordPress to Patreon Members?
If you are a content creator, then you may want to earn money from your writing, music, podcasts, stock photos, and other content.
Patreon allows you to sell memberships and then give those people access to different content based on their subscriptions.
Patreon is also a great way to build relationships with your fans. For example, you can automatically send a welcome note to new patrons.
You can also create private Discord servers or chat rooms where members can talk to each other and even message you directly.
After creating a Patreon, it’s a good idea to publish members-only content to your WordPress website. This encourages visitors to join your Patreon in order to unlock exclusive WordPress content.
This can also increase your blog traffic since patrons will need to visit your WordPress site to see the exclusive content.
That said, let’s see how you can restrict content on WordPress to Patreon members.
How to Create a Patreon Account for Your WordPress Website
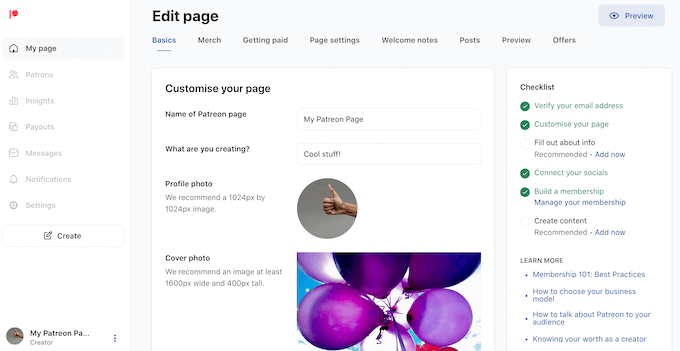
If you don’t already have an account, then head over to the Patreon website and click on the ‘Create on Patreon’ button.
You can now type in your email address and create a password. If you prefer, then you can also register using your existing Google or Facebook login.
After entering this information, the setup wizard will ask some questions about how you plan to use Patreon. Simply follow the onscreen instructions to build an engaging and informative Patreon page.
With that done, you can use the Patreon tools to customize your page, add membership tiers, set up billing, and more.
When you are happy with how your Patreon page looks, you are ready to add it to your WordPress website.
How to Connect WordPress to Your Patreon Account
The easiest way to create Patreon-only content is by using Patron Plugin Pro. This plugin allows you to restrict access to individual pages and posts or even lock all the content from a specific tag or category.
You can also automatically lock and unlock content based on a schedule. This allows you to create free trials, automatically drip content, and more.
First, you will need to install and activate Patron Plugin Pro. If you need help, then please see our guide on how to install a WordPress plugin.
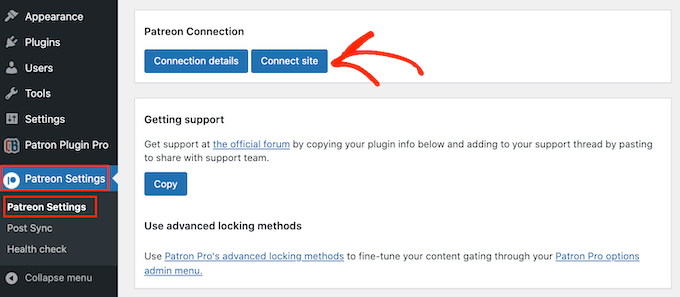
Upon activation, you will need to connect the plugin to your Patreon account. To do this, go to Patreon Settings » Patreon Settings, and then click on ‘Connect site’.
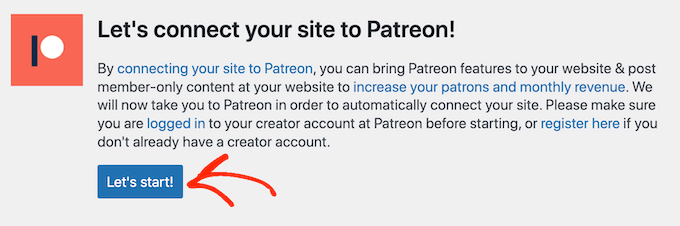
When you are ready, select ‘Start connection wizard’.
On the next screen, you need to click on ‘Let’s start!’
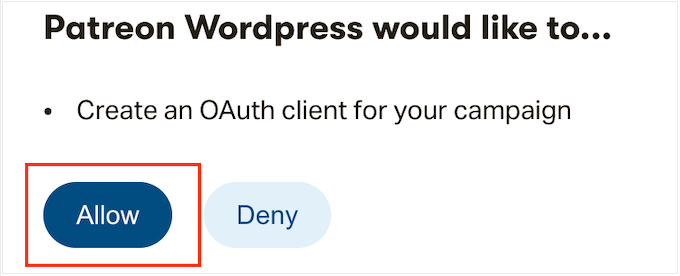
To connect Patreon to your WordPress website, you will need to create an OAuth client.
If you are happy to do this, then click on ‘Allow’.
If prompted, type in the login information for your Patreon account.
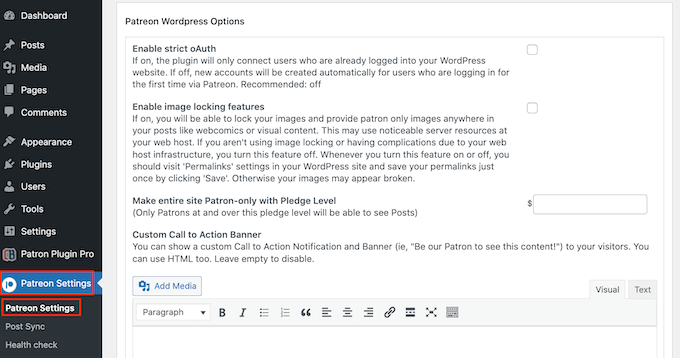
After a few moments, Patron Plugin Pro will take you back to the main WordPress dashboard. Your Patreon account is now connected to WordPress.
Before you restrict any content, it’s a good idea to look at the plugin’s settings by going to Patreon Settings » Patron Settings.
The default settings should work well for most websites, but it’s still worth checking whether you need to make any changes.
If you do customize the settings, then scroll to the bottom of the screen and click on the ‘Update Settings’ button.
How to Restrict Content to Patreon Members
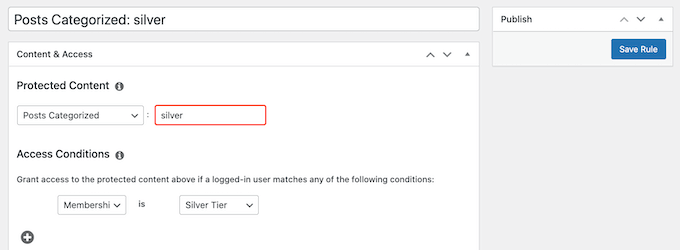
The easiest way to create patron-only content is by restricting access to entire content types, categories, or tags. For example, you might lock all content that has the ‘Patreon’ tag.
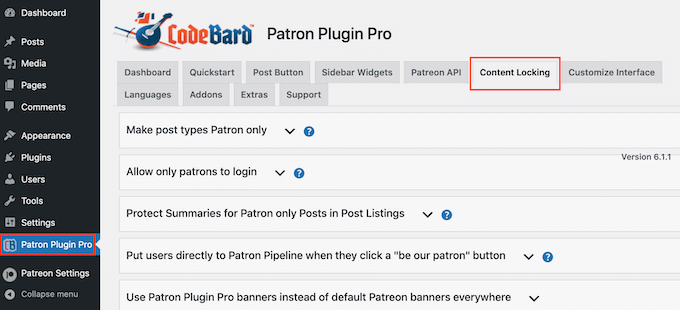
To do this, simply select ‘Patreon Plugin Pro’ from the left-hand menu and then click on the ‘Content Locking’ tab.
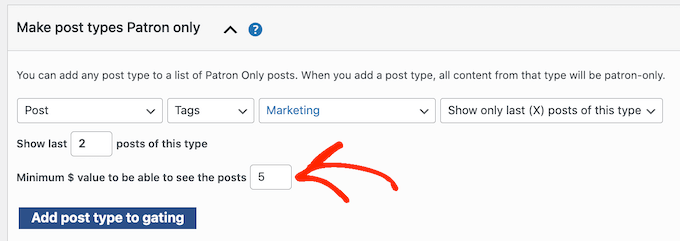
Here, you must click to expand the ‘Make post types Patron only’ section.
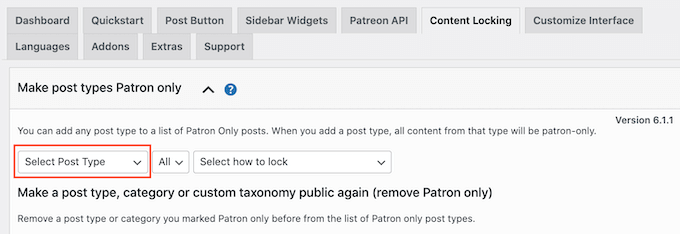
To start, open the ‘Select Post Type’ dropdown and choose the content you want to restrict, such as page, post, media, or some other content type.
Then, open the new ‘All’ dropdown and choose whether you want to restrict this content type based on format or categories and tags.
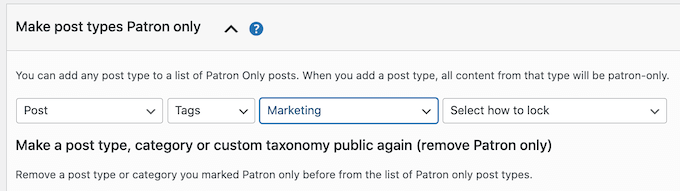
Depending on your selection, you will get access to some additional settings. For example, if you select ‘Tag’, then you will need to choose the tag you want to make Patreon-only.
Finally, open the ‘Select how to lock’ dropdown and choose how you want to lock and unlock the content.
The easiest option is ‘Lock all posts of this type’. However, you can also lock the most recent example of this content and use the older content as a preview for non-members.
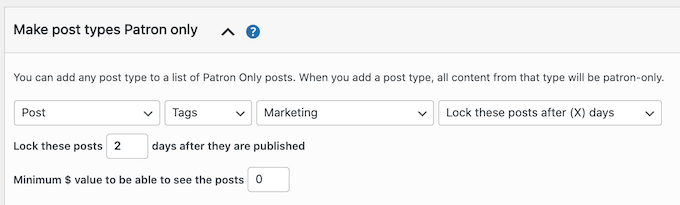
You can also unlock or lock content after a certain number of days has passed. This allows you to offer exclusive early access to Patreon members.
Similarly, you can use this feature to create a free trial. For example, you might make your latest online course available to non-patrons for the first 24 hours. This can create a buzz around the launch while also encouraging people to join your Patreon so that they don’t lose access after 24 hours.
Based on your selection, you will see some additional options.
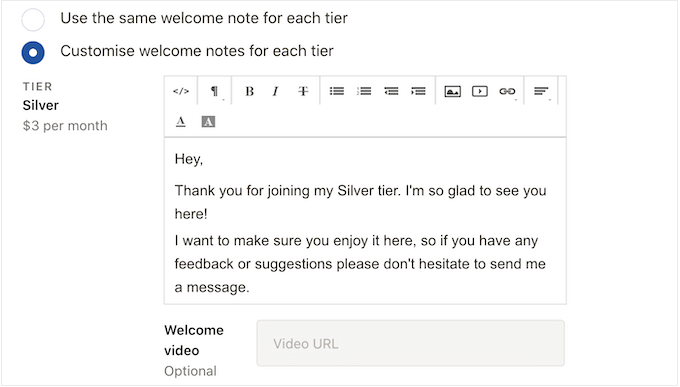
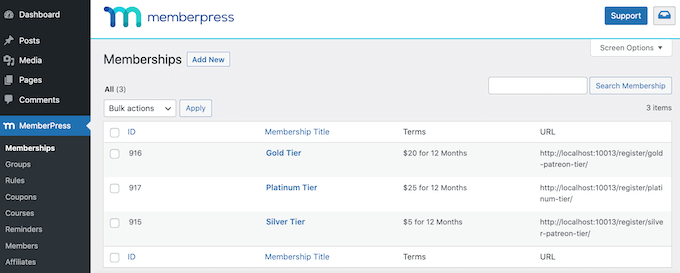
Most importantly, you will need to enter a minimum $ value membership tier.
This should be linked to the cost of your memberships. For example, if your Silver tier is $5, then typing ‘$5’ will unlock this content for everyone with a Silver or higher membership.
When you are happy with how the content locking is set up, click on ‘Add post type to gating.’
To lock more content, simply follow the same process described above. When you have finished, don’t forget to scroll to the bottom of the screen and click on ‘Save.’
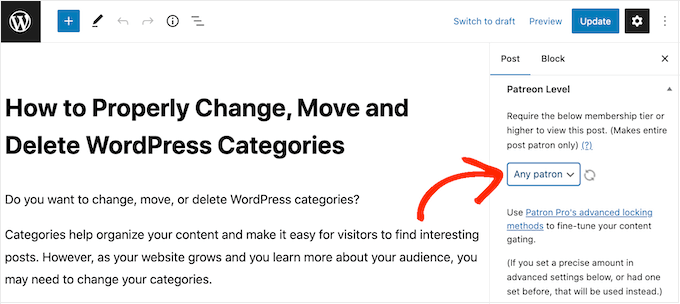
How to Restrict Specific Pages and Posts to Patreon Members
Another option is to mark individual pages and posts as Patreon-exclusive. This allows you to control exactly what content your patrons have access to.
Next, you will need to set some rules about who can access this content. In the right-hand menu, scroll to the ‘Patreon Level’ section and choose from the dropdown menu.
You can either select a Patreon level or choose ‘Any Patreon’. For example, you might select ‘Any Patreon’ if this is entry-level content that all members should have access to or if you have only created a single Patreon tier.
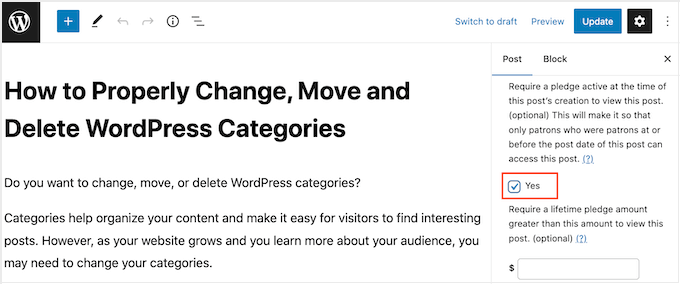
Often, you will want to give new patrons access to your entire back catalog of members-only content. Another option is to restrict access to people who were already patrons when the content was published.
This is useful for creating time-sensitive Patreon promotions, such as exclusive holiday content or a ‘limited edition’ video.
To add this restriction, find the ‘Require a pledge active at the time….’ section and check its ‘Yes’ box.
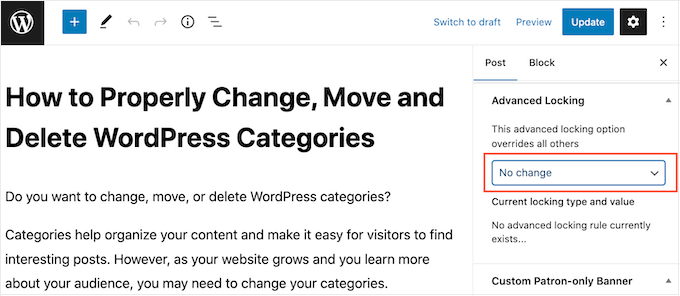
Another option is to show or lock the content automatically based on a schedule. This is perfect for offering exclusive early access to Patreon members.
To lock and unlock content automatically, find the ‘Advanced Locking’ section. Here, open the dropdown that shows ‘No change’ by default and choose an option from the list.
You can then use the new settings to configure the automatic locking and unlocking.
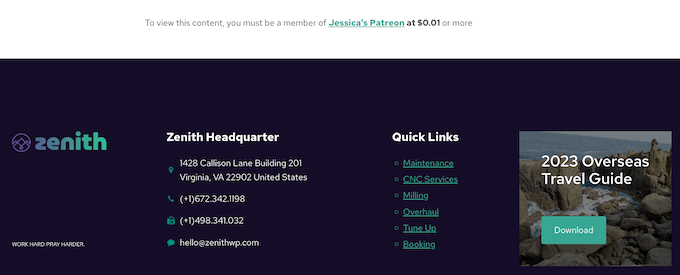
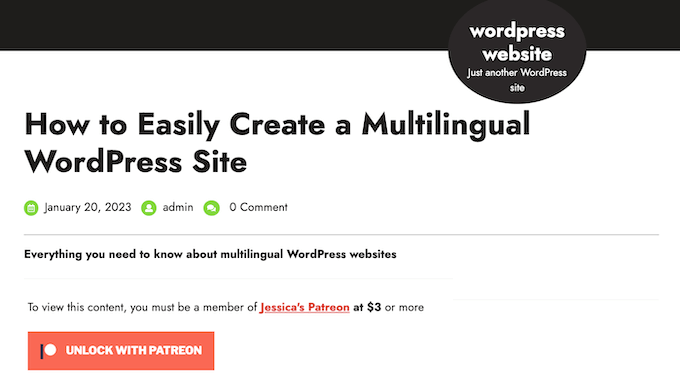
By default, the plugin will show the following message to all non-Patreon members: ‘To view this content, you must be a member of (name) content at (cost) or more.’
You may want to add your own message for non-Patreon members. For example, you might say why the content is restricted or why they should buy a Patreon subscription.
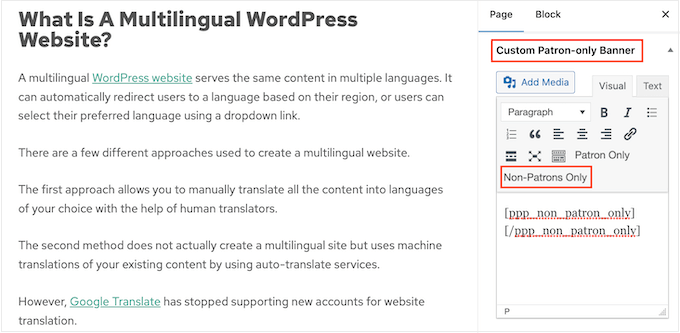
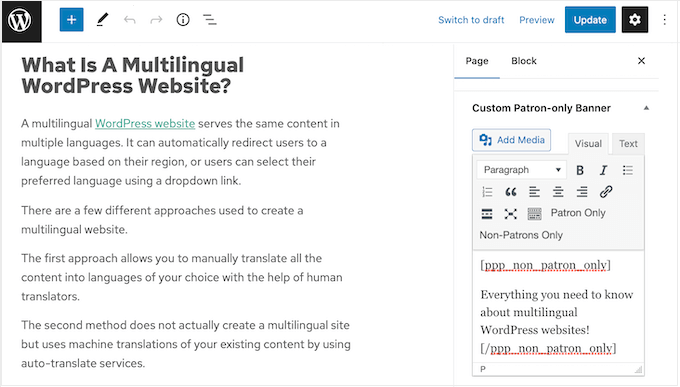
To add a message, scroll to the ‘Custom Patron-Only Banner’ section and click on the ‘Non-Patrons Only’ button.
This adds some opening and closing tags to the small text editor.
Simply type your message in between these tags. You can also add links, formatting, and more in exactly the same way you create content in the WordPress page or post editor.
When you are happy with the settings, simply click on the ‘Publish’ or ‘Update’ button.
If you visit this content while logged into your admin account, then you won’t see any changes. However, if you visit it in an incognito browser tab, then you will see the content restriction in action.
How to Add a Patreon Button to Your WordPress Posts
Adding Patreon-exclusive content to your WordPress blog is a great start. However, it’s also a good idea to promote your Patreon on other areas of your website. This will help turn visitors into paying patrons.
Patron Plugin Pro can automatically add a ‘Become a Patron’ button to all your posts. Visitors can simply click this button to visit your Patreon page.
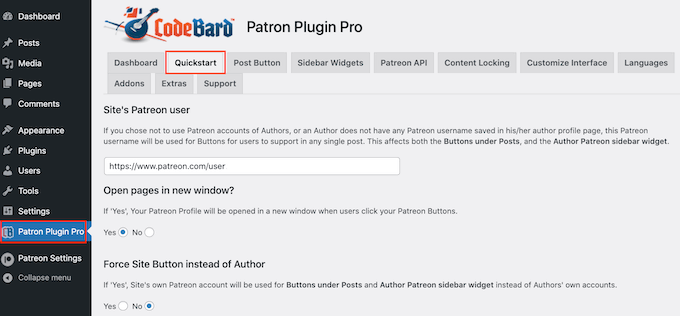
To start, select ‘Patron Plugin Pro’ from the left-hand menu, then select the ‘Quickstart’ tab.
Since we already connected the plugin to Patreon, you should see your account in the ‘Site’s Patreon user’ field.
If you don’t see the right URL, then you can add it now.
By default, the plugin opens your Patreon page in the same tab. This takes visitors away from your WordPress website, so we recommend opening the link in a new tab instead.
To do this, select ‘Yes’ under ‘Open pages in new window’.
The plugin adds the standard Patreon button to your website by default. This helps visitors recognize the button and understand that you have a Patreon page.
If you prefer, then you customize the button with your own branding using the settings under ‘Use a custom button’. When you are happy with the changes you’ve made, don’t forget to click on ‘Save’.
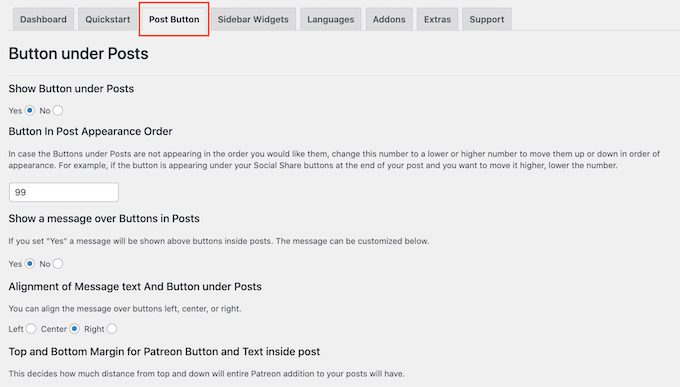
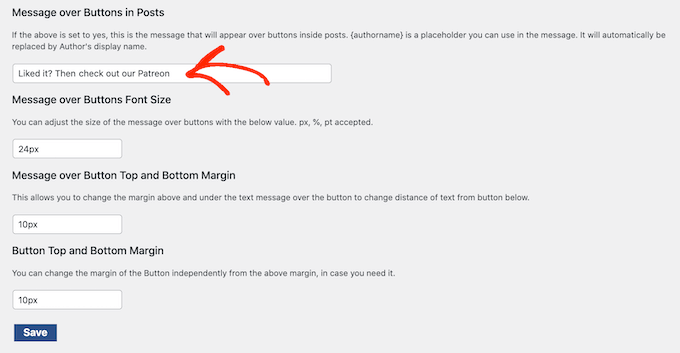
Next, click on the ‘Post Button’ tab to change how the button looks.
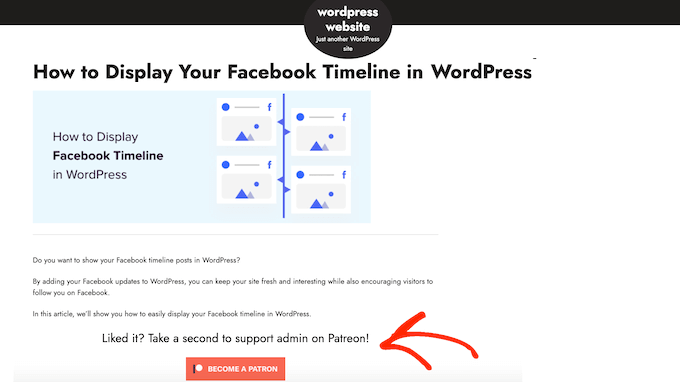
By default, the button includes the following heading: ‘Liked it? Take a second to support {authorname} on Patreon!’
To replace this with your own messaging, simply go ahead and type into the ‘Message over Buttons in Posts’ field.
You can also change the message’s alignment, adjust its size, and add margins.
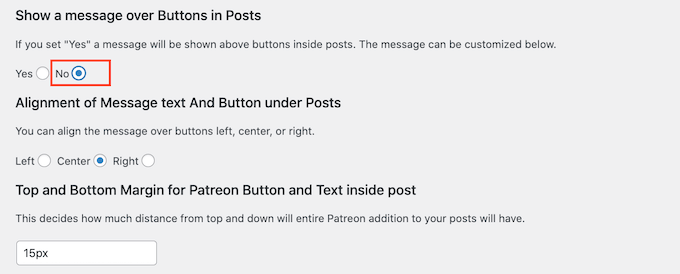
If you want to remove the message instead, then find the ‘Show a message over Buttons in Posts’ section. Here, simply click the ‘No’ button.
If you make any changes, then don’t forget to click on ‘Save’.
Now, you can visit any post on your website to see the Patreon button live.
How to Add a Patreon Button to the WordPress Sidebar
If you prefer, then you can remove the Patreon button from your blog posts and add it to the sidebar or similar section instead.
In this way, you can show the button on other areas of your website, such as the product pages in your online store.
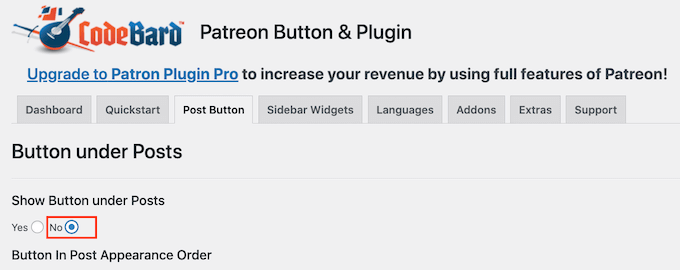
To start, you will want to remove the button from your WordPress posts so that you don’t show multiple Patreon buttons on the same page.
To do this, select the ‘Post Button’ tab and find the ‘Show Button under Posts’ section. Here, go ahead and select the ‘No’ button.
With that done, click on ‘Save’.
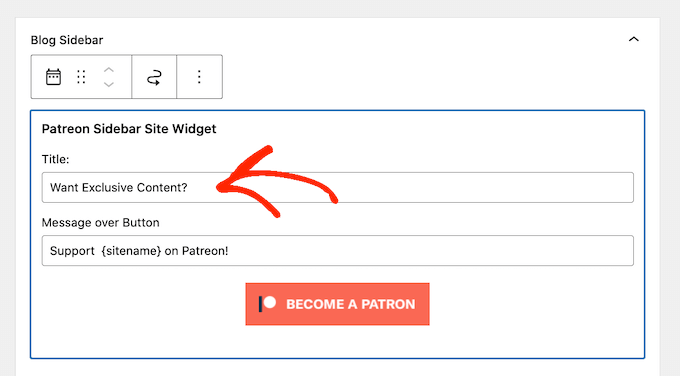
Next, click on the ‘Sidebar Widgets’ tab. Here, you can customize the message that appears next to the button, including changing the font size and adding margins.
If you do make any changes, then don’t forget to click on the ‘Save’ button.
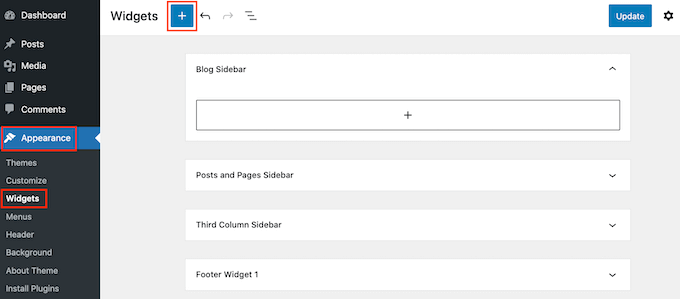
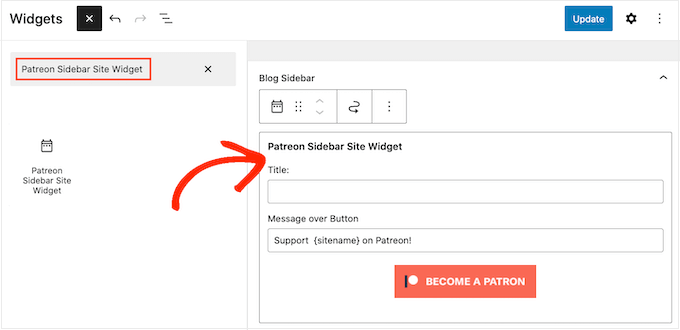
With that setup done, you can add the Patreon button to any widget-ready area by going to Appearance » Widgets. Here, click on the blue ‘+’ button.
Note: If you are using a block WordPress theme, then you will need to go to Appearance » Editor instead.
In the panel that appears, start typing in ‘Patreon Sidebar Site Widget’.
When the right block appears, drag and drop it onto the area where you want to show the Patreon button.
You can now type an optional title into the ‘Title’ field.
This will appear above the Patreon button in the theme’s sidebar or similar section.
With that done, click on ‘Update’.
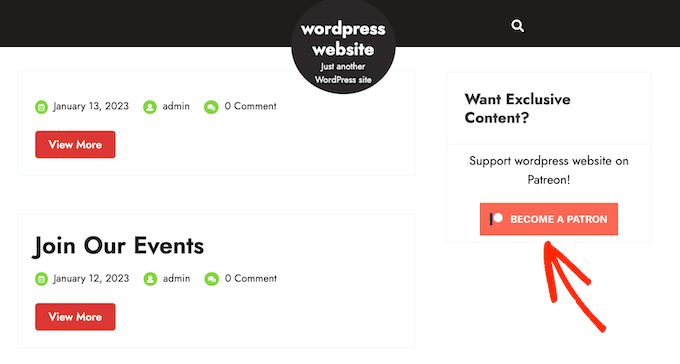
Now if you visit your WordPress blog or website, you will see the Patreon button in the widget-ready area.
Bonus: How to Create a Patreon Alternative Using WordPress
Patreon has helped countless creators monetize their content and make money online, but the platform also takes a significant cut of your earnings.
Depending on your Patreon plan, you will lose between 5%-12% of everything you earn on Patreon, plus payment processing and payout fees.
Depending on your location, you may also have to pay additional fees, including Value-added tax, Goods and services tax, Québec sales tax (QST), and US Sales tax.
All of this can really add up.
You will also need to follow all of Patreon’s terms and conditions and other guidelines. If you break any rules, then Patreon will censor your content and may even delete your account. If this happens, then paying members will lose access to your content, which reflects badly on your brand and can damage your reputation.
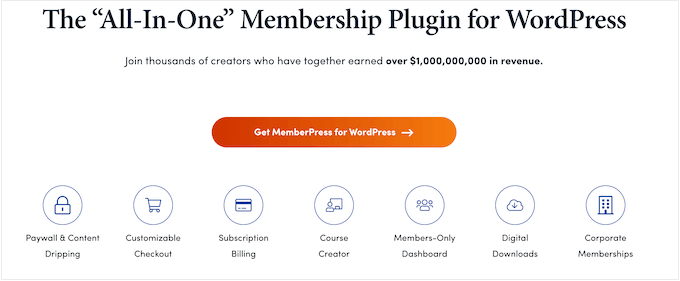
With that being said, many WordPress website owners are looking for a Patreon alternative.
It allows you to create unlimited membership levels for your WordPress website and then restrict access to your content based on the person’s membership level.
In this way, you can create members-only videos, eBooks, blog posts, online courses, downloadable files, and more.
You can even assign different content to different membership levels, which encourages members to upgrade their subscriptions.
This is exactly how the Patreon tier model works, without any of the extra transaction fees. Since MemberPress doesn’t take a cut of your earnings, you get to keep more of the money you make.
With MemberPress, you also have the freedom to create your own privacy policy, rules, and terms and conditions. This gives you more flexibility to create unique and engaging content for your fans, which will make it easier to grow your business.
Are you looking for a way to cloak affiliate links on your WordPress site?
Cloaking your affiliate links in WordPress provides clean and easy-to-read links, which can increase the likelihood of clicks and conversions. It can also increase user trust.
In this article, we will show you how to easily cloak affiliate links in WordPress.
What Is Affiliate Link Cloaking, and Why Do You Need It?
With link cloaking, you can shorten your ugly affiliate links into branded URLs like this:
http://www.yoursite.com/refer/productname
This can make your links look more trustworthy and professional to your audience, encouraging more clicks.
If you use affiliate links to make money from your WordPress blog, then you should cloak links, as doing this can increase your click-through rate and conversions.
Many link-cloaking plugins will also help you measure the performance of your affiliate marketing strategies and optimize them for better results.
Cloaking affiliate links also adds an additional layer of security by masking the actual affiliate URL. This can protect your affiliate accounts and earnings from fraud or theft.
This can also help prevent your links from being blocked by social media sites or search engines, increasing the search visibility of your affiliate content.
Having said that, let’s see how you can easily cloak affiliate links on your WordPress website, step by step.
How to Cloak Affiliate Links in WordPress
There are many link-cloaking plugins that you can use in WordPress, including Pretty Links and Thirsty Affiliates. Both plugins are great, but we will use Pretty Links for this tutorial since it’s a little more beginner-friendly for this use case.
You can easily cloak affiliate links in WordPress using Pretty Links. It is one of the best affiliate marketing tools for WordPress that lets you add, manage, and cloak affiliate links.
Note: Pretty Links also has a free version that can cloak links. However, we will be using the Pro version in the tutorial to unlock more features.
Create Your Cloaked Link
Upon activation, you need to head over to the Pretty Links » Add New page from the WordPress admin sidebar to create an affiliate link.
Once you are there, you can start by typing a name for your link into the ‘Add Title’ option.
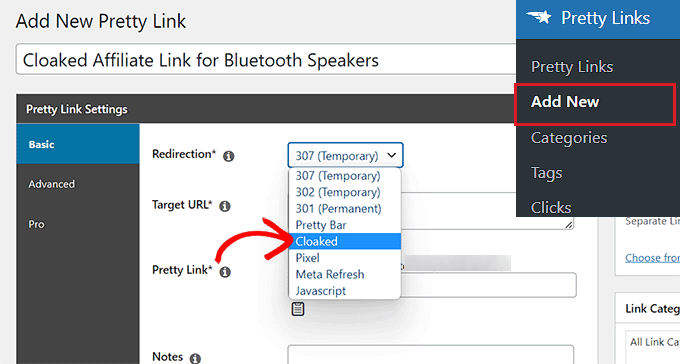
After that, you must select a link type from the ‘Redirection’ dropdown menu to create short and branded links for your affiliate program.
If you choose ‘Cloaked’, then the target URL will be hidden in your user’s browser, and they will only see your cloaked link. Some affiliate programs don’t allow this, so you will need to check first.
Another option is ‘307 Temporary’. It will replace the original URL with your new affiliate link and tell search engines that this link may change in the future.
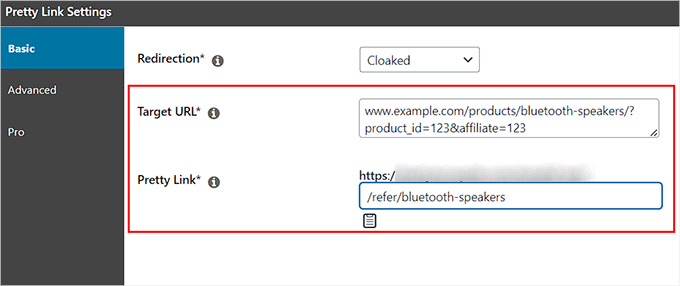
Next, simply copy and paste your affiliate link into the ‘Target URL’ field.
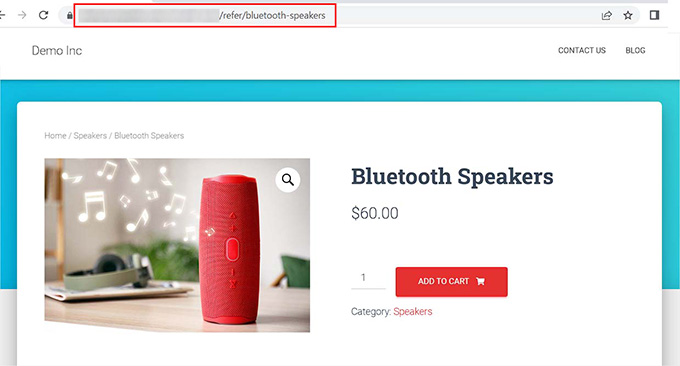
Once you have done that, type the slug you want to use for your cloaked link into the ‘Pretty Link’ field.
For example, if you want your cloaked link to be like the example below, then you will need to type the ‘/refer/bluetooth-speakers’ text into the ‘Pretty Link’ field. You will then get a link like this:
www.example.com/refer/bluetooth-speakers
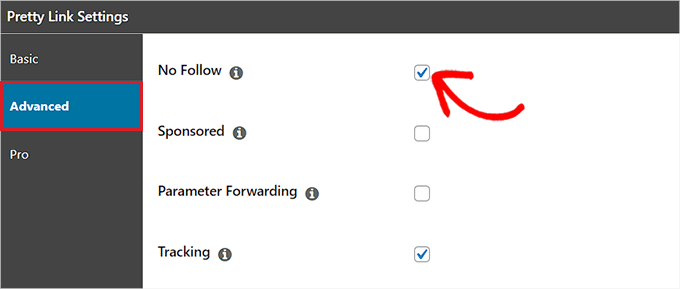
Choose Attributes for Your Cloaked Link
After that, simply switch to the ‘Advanced’ tab from the sidebar on the left.
From here, you can add different attributes to your affiliate link by checking the box next to these options.
For instance, if you want to add a nofollow attribute to the external link, then simply check the box next to ‘No Follow’. This means that search engines won’t pass on any link authority to the site you are linking to.
You can also check the ‘Sponsored’ box to tell search engines that your link is a paid advertisement.
Plus, checking the ‘Parameter Forwarding’ box can be handy if you want to pass a coupon code or customer ID to your cloaked link.
It’s also a good idea to check the box next to ‘Tracking’ so that you can view your affiliate link performance in the Pretty Links reports.
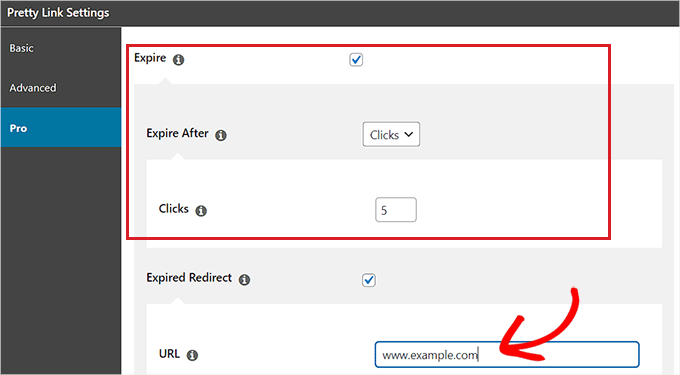
Configure Pro Settings for Your Cloaked Link
Once you have done that, you need to switch to the ‘Pro’ tab from the sidebar on the left. Now, you can set an expiry date for the affiliate link by checking the ‘Expire’ option.
This will expand a tab on your screen where you can set an expiry date for the link after a specific date or number of link clicks.
For example, if you choose the ‘Clicks’ option from the ‘Expire After’ dropdown menu and type 5 into the ‘Clicks’ field, then your affiliate link will immediately expire once 5 visitors have clicked on the link.
You can also type a URL for the expired redirect into the ‘URL’ field. This will be the link that users will be redirected to if they click on the expired affiliate link.
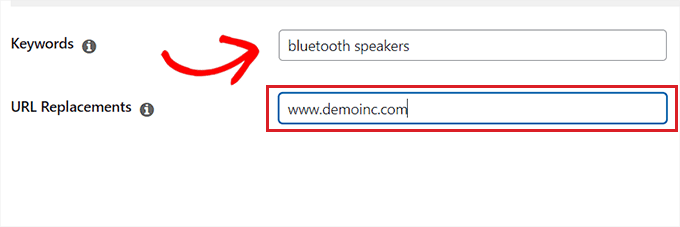
After that, you can type the keywords that you would like to be replaced with your affiliate link into the ‘Keywords’ field.
This means that whenever the keyword you choose is written in your WordPress post or page, the plugin will automatically add its affiliate link to the keyword.
You can also easily replace another URL with your affiliate link by typing it into the ‘URL Replacements’ field.
Now, whenever Pretty Links finds this URL on your website, it will replace it with the cloaked link.
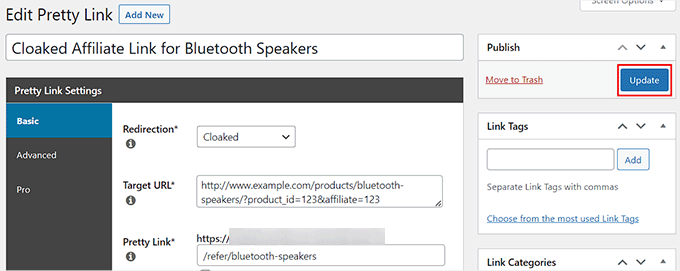
Once you are done, simply click the ‘Update’ button in the Publish section to store your changes.
After that, you need to click the ‘Publish’ button in the same section to publish your cloaked affiliate link.
Add Your Cloaked Link to a WordPress Post or Page
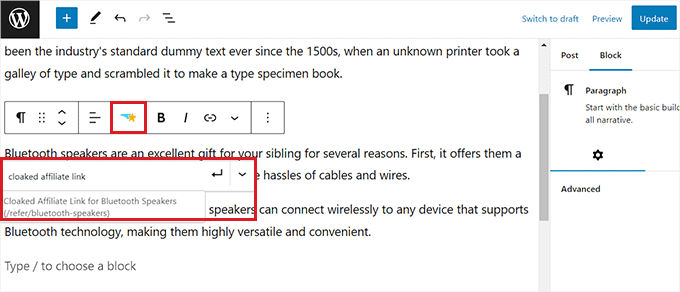
Now, you can visit a WordPress post or page where you want to add the cloaked affiliate link.
Once you are there, simply select the text that you want to link on top of and then click the ‘Pretty Links’ icon in the block toolbar at the top.
This will open up a link prompt on your screen, where you can search for the cloaked affiliate link using its title or the link itself.
Upon adding the link, just click the ‘Publish’ or ‘Update’ button at the top to store your settings.
Now, you can visit your website and click on the affiliate link. You will now see the cloaked URL redirecting you to the affiliate product page.
Are you looking for a way to create WooCommerce subscription reminder emails in WordPress?
Customers who subscribe to your products may not always remember the renewal date. This can cause confusion and panic when you automatically take money from their accounts.
In this article, we will show you how to improve the subscriber experience by creating a WooCommerce reminder email in WordPress.
Why Create a WooCommerce Subscription Reminder Email in WordPress?
Subscriptions are a great way to get consistent and ongoing revenue for your business. You might sell physical products such as subscription boxes or digital products like online memberships and digital courses.
After you have set up WooCommerce Subscriptions, it’s a good idea to create subscription reminder emails. These automatic messages let customers know that their subscriptions are about to renew.
In this way, you can give the subscriber a chance to update their payment details and contact information or make other changes before their subscription auto-renews. This can help you avoid admin headaches, refund requests, and customer complaints.
It also gives the customer a chance to cancel their subscription. Although you will want to get as many subscribers as possible, people who feel tricked into renewing their subscriptions may complain or leave negative customer reviews.
With that in mind, let’s see how to create a subscription reminder email in WordPress using the WooCommerce Subscriptions extension and FunnelKit.
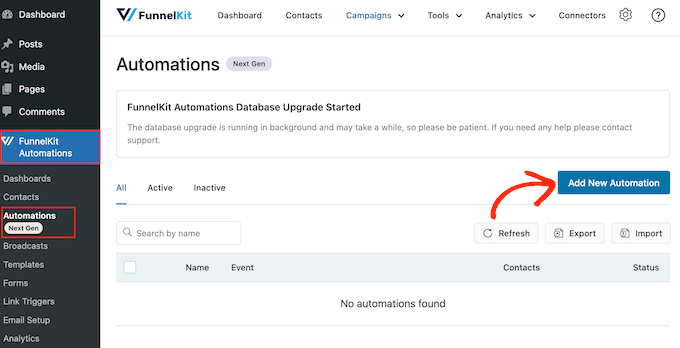
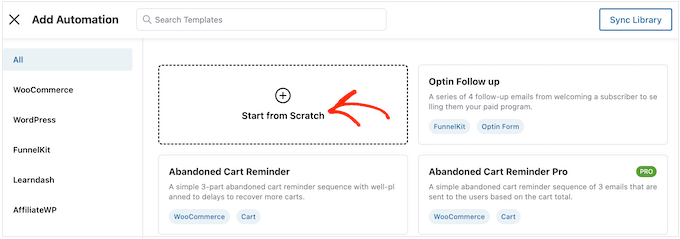
How to Create a WooCommerce Subscription Reminder Email in WordPress
FunnelKit lets you easily set up automated emails for abandoned cart recovery, lead nurturing, post-purchase education, next order coupons, subscription reminders, and more.
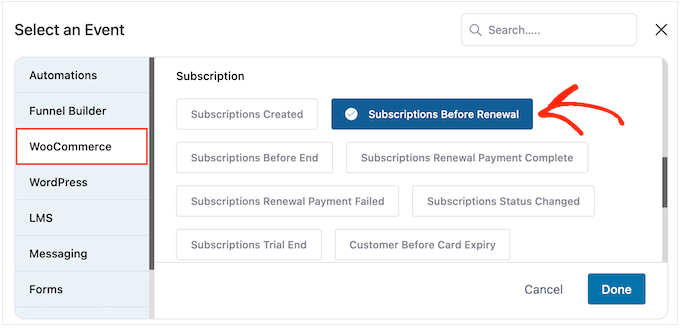
To start, click on the ‘WooCommerce’ tab and then select the following trigger: ‘Subscriptions Before Renewal’.
When you are ready, click on ‘Done.’
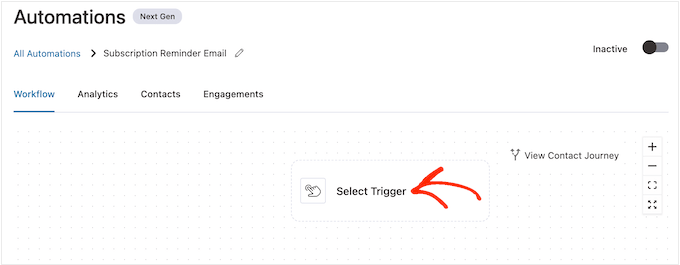
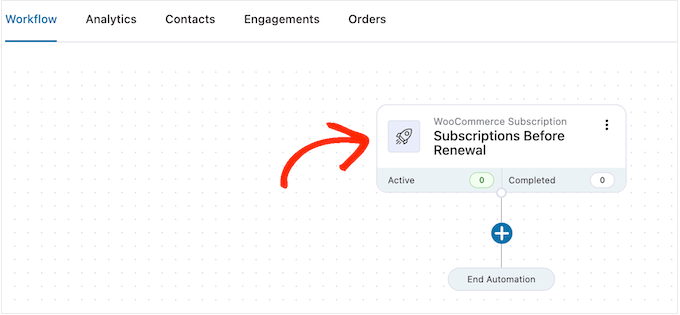
This will add a basic trigger to the FunnelKit editor. To go ahead and configure the trigger, click on ‘Subscriptions Before Renewal’.
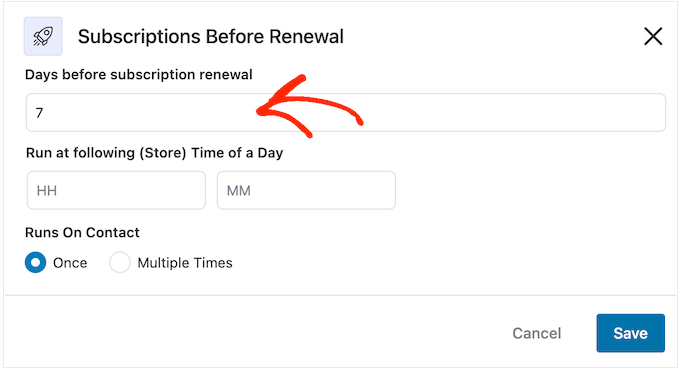
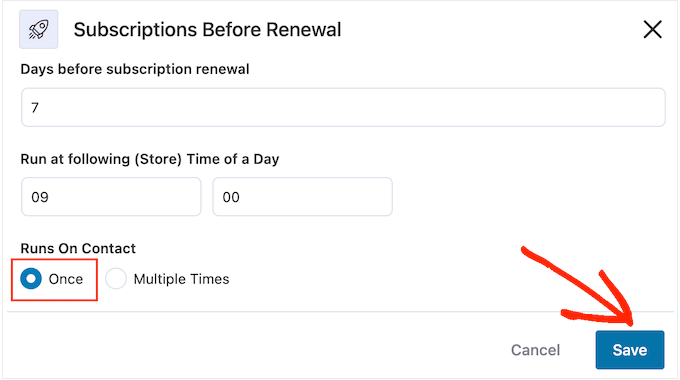
Now, you can decide when to send the reminder.
Just be aware that you can also create follow-up emails. For example, you might send an email 5 days before the subscription renewal and a follow-up the day before.
To set a date, simply type a number into the following field: ‘Days before subscription renewal’.
You can also choose the time when the email will be sent. It’s a good idea to send reminder emails when the subscriber is more likely to be online and opening messages.
That said, it helps to know as much about your subscribers as possible. If you haven’t already, then we recommend installing Google Analytics in WordPress. It will help you learn more about your customers, including their timezone and when they are most likely to be online.
After setting up your reminder emails, it’s also a good idea to track your email open rates. You can even set up A/B split testing by sending messages at different times and then seeing what gets the best results.
By continuously monitoring and fine-tuning all your custom WooCommerce emails, you should be able to improve your open rates and conversion rates.
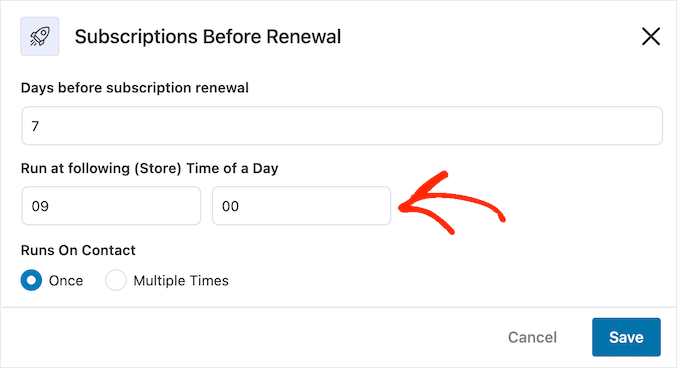
You can tell FunnelKit to send reminder emails at a specific time by typing it into the fields that show ‘HH’ (hour) and ‘MM’ (minute) by default.
After that, you can choose whether to send this email once or multiple times.
Later in this guide, we will show you how to add follow-up emails to this campaign. With that in mind, you will typically want to send this email once by selecting the ‘Once’ button.
When you are happy with how the trigger is set up, simply click on the ‘Save’ button.
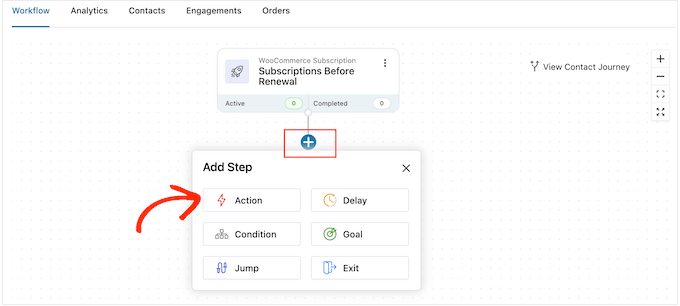
Step 3: Design the WooCommerce Subscription Reminder Email
Now, it’s time to create the WooCommerce email that will be sent to your subscribers by clicking on the ‘+’ button.
You can then select ‘Action.’
In the popup that appears, choose ‘Send Email.’
Then, click on ‘Done.’
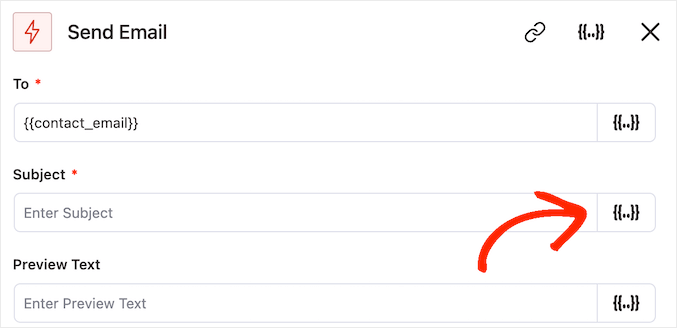
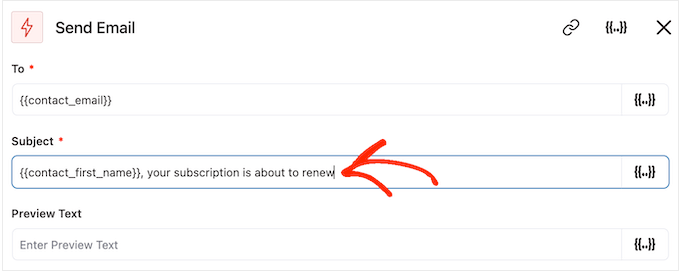
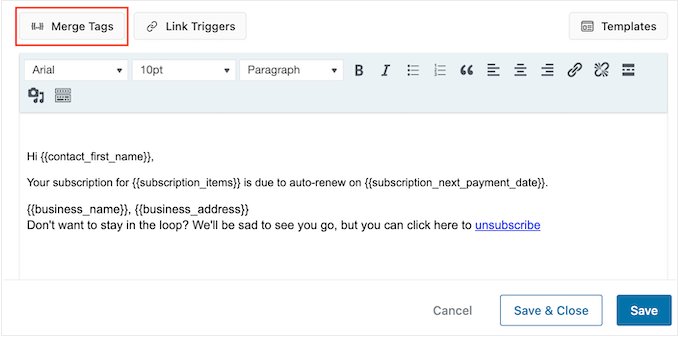
You can now create an email by typing in a subject and preview.
You can use a mix of plain text and merge tags. FunnelKit will replace any merge tags with real values every time it sends a subscription reminder email. In this way, merge tags can catch the subscriber’s attention with personalized content.
For example, you might use a merge tag to add the subscriber’s name to the subject line or the date when their subscription will auto-renew.
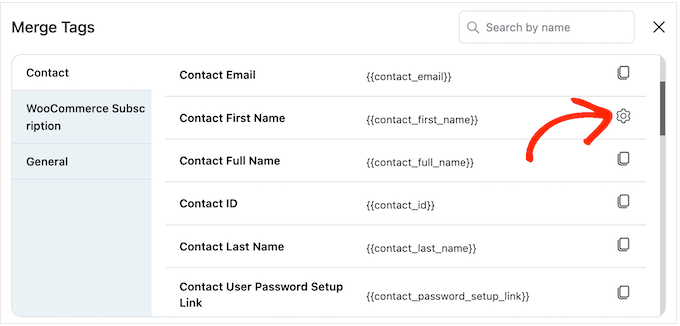
To add a merge tag, just click on the ‘{{.}}’ icon next to the field where you want to use the tag.
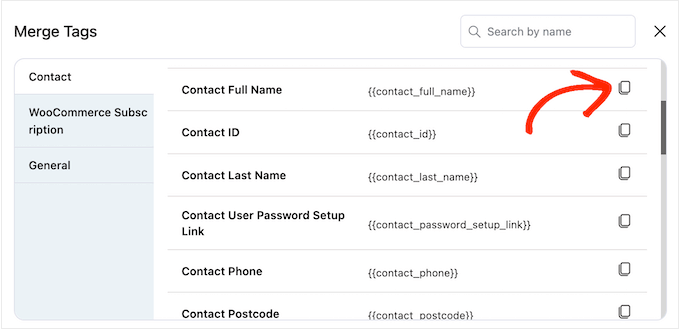
This opens a popup where you can look through all the available merge tags.
When you find a tag you want to use, you might see either a ‘Copy’ or ‘Settings’ icon. If you see the ‘Copy’ symbol, then simply click it to copy the merge tag.
With that done, you can go ahead and paste the merge tag into the email.
At this point, you may also want to add some static (plain) text by typing it directly into the field.
When looking through the merge tags, you may see a ‘Settings’ icon instead of a ‘Copy’ icon.
For example, this image shows a ‘Settings’ icon next to the Contact First Name merge tag.
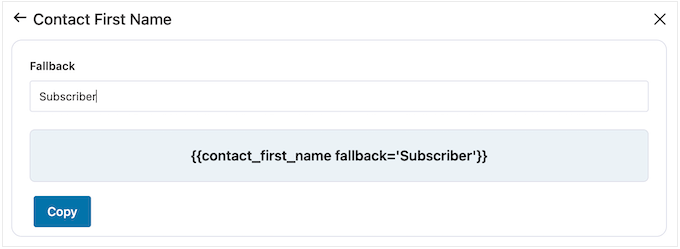
This icon allows you to set a fallback, which FunnelKit will use if it doesn’t have access to the real value.
If you see a ‘Settings’ icon, then give it a click and type some text into the ‘Fallback’ field.
After creating a fallback, click on ‘Copy.’
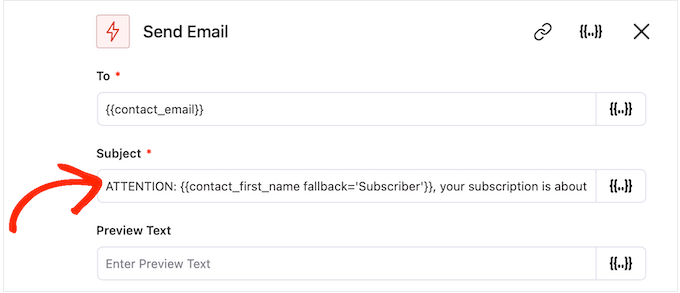
With that done, simply paste the merge tag into the field where you want to use it. You can also type static text directly into the field.
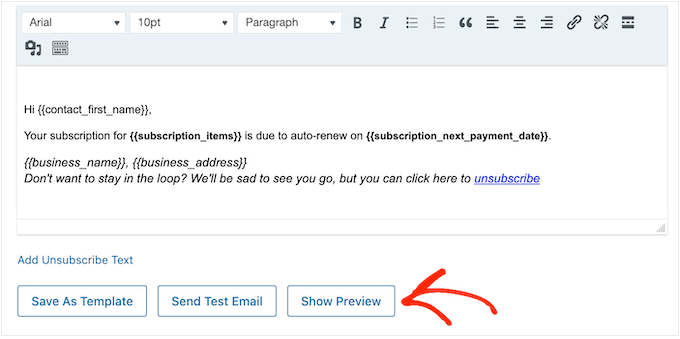
When you are happy with how the subject and preview text is set up, just scroll down to the small text editor.
Here, you can create the email body text by typing it into the editor. You can also add dynamic tags by selecting ‘Merge Tags’ and then following the same process described above.
The text editor has all the standard text formatting options, so you can add links, change the text size, change the font, and more.
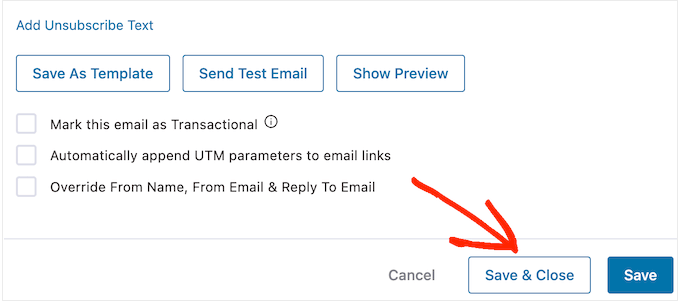
As you are creating the email, you can preview it by clicking the ‘Show Preview’ button.
When you are happy with the subscription reminder email, just click on the ‘Save & Close’ button.
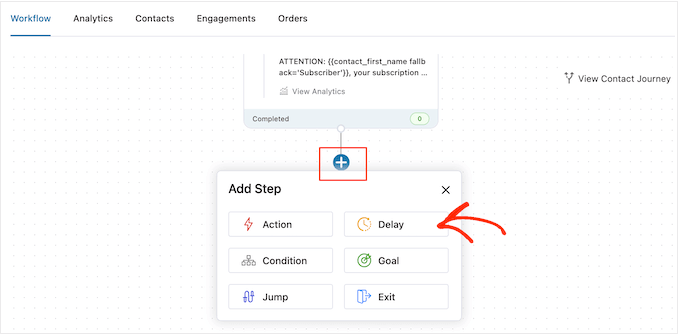
Step 4: Create Follow-up Emails
At this point, you might want to add one or more follow-up emails to the campaign.
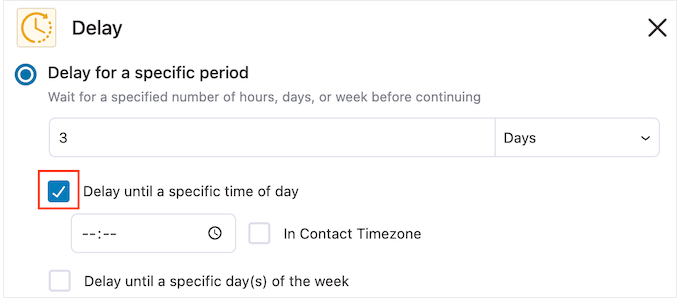
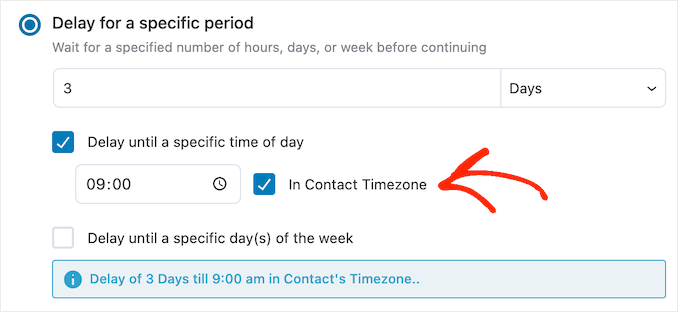
To start, you will typically add a delay between these emails by clicking on the ‘+’ icon and then selecting ‘Delay’.
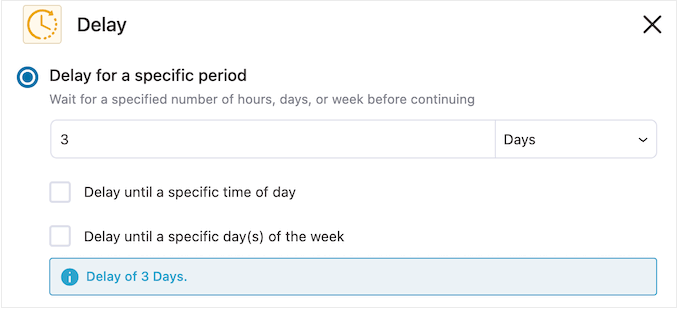
On this screen, open the dropdown that shows ‘Minutes’ by default and choose a value from the list. When creating reminder emails for your online store, you will typically want to select either ‘Days’ or ‘Weeks.’
After that, type in the value you want to use, such as 1 Week or 3 Days.
With that done, you may want to set the time when FunnelKit will send the follow-up email. You will typically want to send the reminder email when subscribers are more likely to be online or when you usually get the best open rates.
To do this, just check the following box: ‘Delay until a specific time of day’.
You can now set the time using the new settings that appear.
By default, FunnelKit will use the timezone in your WordPress settings. However, you can also send the email based on the subscriber’s timezone by checking ‘In Contact Timezone’.
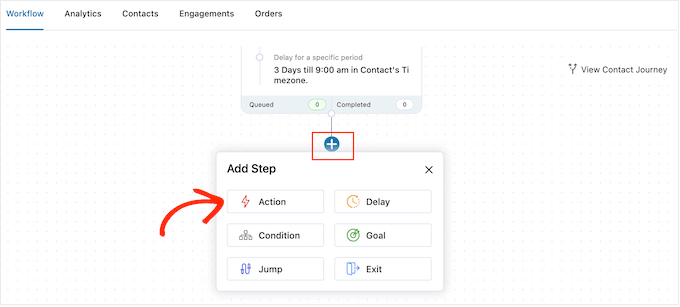
When you are happy with how the delay is set up, click on ‘Save.’
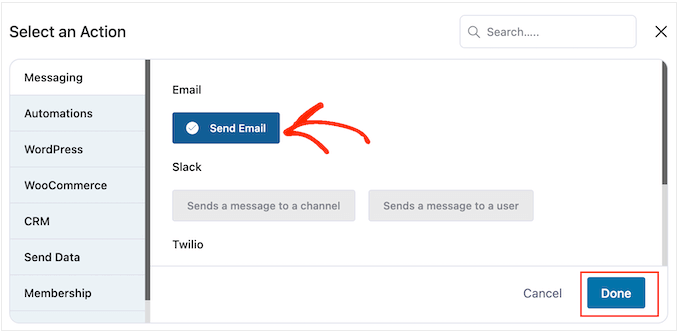
With that done, it’s time to create the follow-up email. Go ahead and click on the ‘+’ icon and then select ‘Action’.
In the popup that appears, select ‘Send Email.’
After that, you need to click on ‘Done.’
This opens a popup where you can create a subject and preview, as well as add body text by following the same process described above.
When you are happy with the follow-up email, just click on the ‘Save & Close’ button.
You can now add more delays and follow-up emails by repeating the exact same steps.
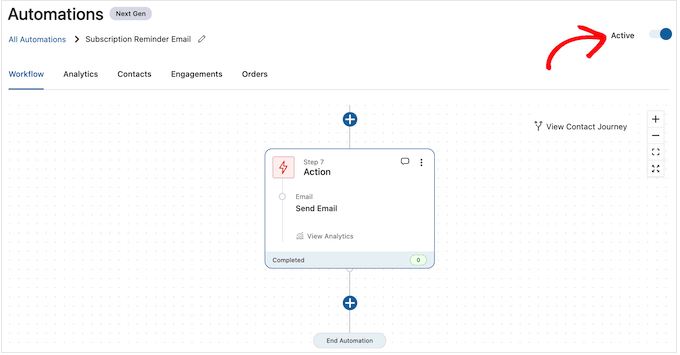
When you are ready to make the automation live on your WordPress website, click on the ‘Inactive’ slider so that it turns to ‘Active.’
Now, FunnelKit will now send automated subscription reminder emails for your online store.
Are you looking for a WordPress theme for your app?
You can use WordPress app themes to promote your app or software. These themes showcase your product screenshots, features, reviews, and other useful information.
In this article, we will share some of the best WordPress themes for apps that you can use to grow your business.
Building a WordPress Website for Apps and Software
WordPress is the most popular website builder in the world. Many top brands use WordPress for their websites, including banks, enterprise businesses, and more.
There are two types of WordPress. They are WordPress.com, which is a hosted solution, and WordPress.org, which is a self-hosted platform.
For a software or app website, you will need to use self-hosted WordPress.org. It offers the most flexibility and features you need to promote your business.
Before you begin, you will also need to purchase a domain name and web hosting. A domain name is your site’s address on the web, like wpbeginner.com or google.com. Web hosting is the storage for all your website files.
We recommend using Bluehost. It’s the most popular WordPress hosting company and an official WordPress hosting partner.
For WPBeginner users, Bluehost offers a free domain name, a free SSL certificate (for your website security), and a huge discount on web hosting.
Astra is a powerful WordPress multipurpose theme for all kinds of websites. It comes with a 1-click demo content importer and a few dozen demo websites to get you started quickly.
It has multiple blog page layouts, global design options, header and footer options, and dedicated sidebars for pages. The theme is fast, lightweight, and easy to set up, even for beginners.
SeedProd is the best WordPress theme builder on the market. It isn’t a regular WordPress theme, but SeedProd makes it easier for anyone to design a custom website from scratch without writing code.
The best part is that SeedProd comes with dozens of ready-made theme layouts. You can import a pre-built theme and customize it with the powerful drag and drop builder to launch your site.
It includes WordPress themes for apps, landing pages, and more. The theme templates are built specifically for beginners with beautiful designs and complete content.
Ultra is a modern WordPress theme for any type of website. It has a built-in professional template for your app or software.
It comes with builder addons, custom page templates, pre-designed layouts, and more. Other notable features include section scrolling, a mega menu, archive layouts, image filters, and support for WooCommerce.
Divi is a popular WordPress theme and an ultimate page builder plugin. It comes with hundreds of ready-made website layouts for different business niches.
It has a highly flexible visual page builder to customize your website from the front end. The Divi theme offers multiple design elements, visual effects, fonts and text styling, and custom backgrounds.
Infinity Pro is a professional WordPress theme designed specifically for mobile apps and software. It’s built on top of the Genesis Theme framework, making it powerful and robust.
The theme has a fullscreen layout with an image slider, a call-to-action button, a navigation menu, and a custom logo. It comes with layout options and multiple custom page templates.
OceanWP is a free WordPress multipurpose theme. It comes with several demo websites and a 1-click content importer to launch your website right away.
The theme offers fast page load time, built-in SEO optimization, RTL language support, and more. It’s also fully compatible with WooCommerce to sell your apps.
Neve is a stylish WordPress multipurpose theme that you can use to create any website. It comes with a few demo sites, including one-page and multi-page templates.
It features header and footer layouts to create an engaging user experience. The theme integrates with all popular WordPress page builders for customization. It’s also eCommerce ready to start an online store easily.
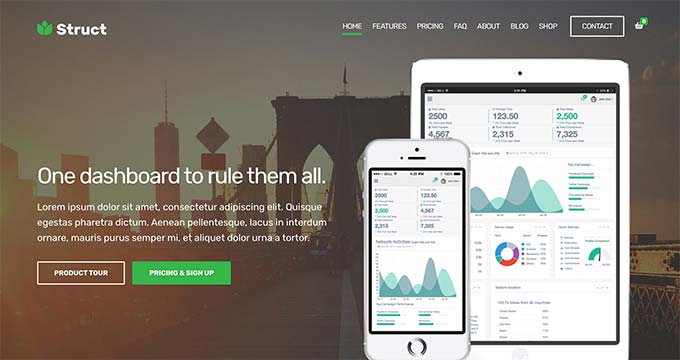
Struct is a fantastic WordPress theme designed specifically for mobile apps, SaaS startups, and software websites. It lets you display screenshots, testimonials, team members, portfolios, and app features on the homepage.
Inside, you will also find backgrounds, color schemes, typography options, and more. Struct has WooCommerce integration to sell your mobile apps online.
Hestia Pro is a one-page WordPress theme for any kind of website. It comes with a sleek and modern design to let you build your app or software website easily.
It works great with all popular drag and drop page builder plugins. Hestia is easy to customize using the WordPress live customizer.
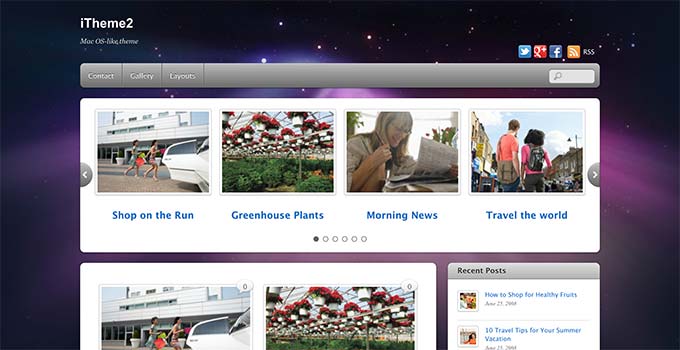
iTheme2 is a stunning WordPress apps theme. It comes with a fully customizable featured content slider on the homepage to showcase your apps and software.
It includes website templates, a header menu, a footer menu, custom footer text, and more. It also has a social media widget to add social icons in the header of your website.
Bramble is a beautiful WordPress multipurpose theme. It ships with a page builder that lets you customize your website and design custom landing pages of your own.
The theme comes with built-in homepage layouts to set up your website. It also includes an image slider plugin to display your apps beautifully.
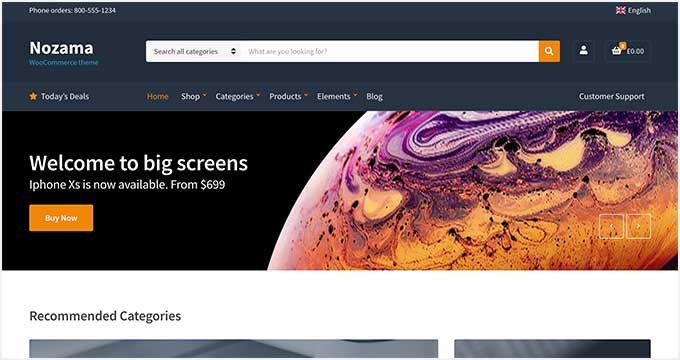
Nozama is a classic WordPress eCommerce theme built for creating Amazon-style websites for mobile apps and software. It lets you display your apps, testimonials, and other products on the homepage.
You can use this theme to share professional screenshots of your app and maximize your sales. Besides professional shop page layouts, Nozama has unlimited color schemes, custom backgrounds, Google Fonts, and parallax effects.
Specialty is an excellent WordPress theme designed specifically for job board apps and software. It comes with flexible search functionality for instant search and complex filters.
The theme includes hundreds of customizer settings for color, typography, and layout. It supports drag and drop page builders to create custom landing pages easily.
14. Altitude Pro
Altitude Pro is a black-and-white WordPress app theme. It has a fullscreen layout with a custom background image, welcome text, and call-to-action buttons.
The theme has multiple homepage widget areas and layout options. Altitude Pro is eCommerce friendly and helps you sell your apps online.
Inspiro is a WordPress multipurpose theme built for any kind of website. It features interactive homepage elements to engage your users from the first click on your site.
The theme options include parallax scrolling, video backgrounds, 1-page and multi-page templates, page builder compatibility, and more. It’s easy to set up, even for absolute beginners.
Multi Mobile App is a free WordPress theme for apps and software. It lets you showcase your apps professionally in different categories.
If you are looking for a free multipurpose apps theme, then the Multi Mobile App theme is an ideal solution. It’s translation ready and offers powerful customization options.
Cousteau Pro is a WordPress theme for travel apps. It comes with video and image slider support on the homepage to create a powerful first impression on your visitors.
Inside, you will find a search and filtering system. The theme has a fullscreen background layout that looks beautiful and professional.
Venture is a WordPress portfolio theme to display and sell your apps. It has a dynamic homepage builder and custom widgets to set up your website quickly.
You can also use the built-in visual customizer for colors, fonts, and other settings. It includes a featured content slider to showcase your most important content on the front.
Mobile App is a free WordPress multipurpose theme designed specifically for apps and software websites. It uses bright colors that make your website highly attractive.
The theme features a fullscreen image slider, a products section, an about section, and more. It’s easy to set up using the WordPress live customizer.
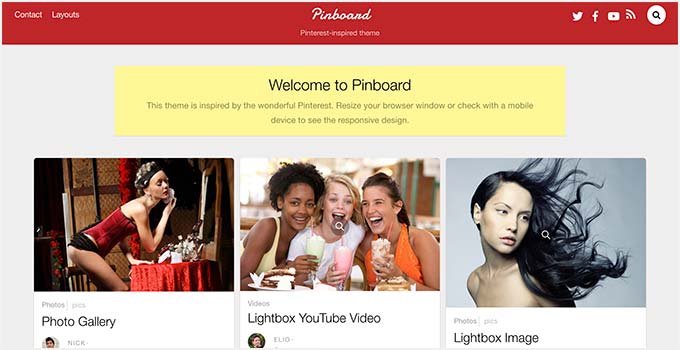
Pinboard is a modern WordPress multipurpose theme. It has a Pinterest-like layout to create an app or software review website.
It supports WordPress multisite network and lets your users sign up to post reviews. The theme is fully responsive and adjusts to any screen size beautifully.
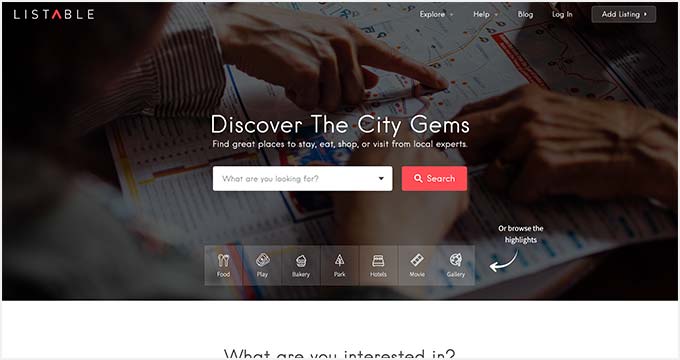
Listable is an excellent WordPress directory theme built specifically for small business websites. It has a fullscreen layout and parallax homepage sections.
The theme lets you add all your apps and allow users to submit apps from the frontend. Listable also integrates with popular WordPress page builders for easy customization.
FAQs About WordPress Themes for Apps and Software
If you are still unsure which theme is best for you, here are some frequently asked questions about WordPress themes for apps and software that can help you select the right theme for your website.
1. Which is the best WordPress theme for apps and software websites?
With so many options, picking the right theme to promote your apps and software business can confuse beginners.
We recommend Astra, SeedProd, Ultra, and Divi, as they come with multiple templates for apps, software, and technology websites.
2. Why is SeedProd included in the themes for apps and software?
SeedProd is included in the themes for apps and software because it’s a powerful theme builder for beginners. It lets you drag and drop features to design a custom theme for your apps and software website without writing code.
Moreover, SeedProd comes with ready-made coming soon and maintenance mode landing pages. You can use these pages to engage users while your website is in the development process.
SeedProd also includes hundreds of built-in theme templates that can give you a head start. You can import a template and customize it to launch your website right away.
Do you want to change the background color of the WordPress block editor for admins?
Sometimes when working on a custom client project, you may want to change the Gutenberg editor background color in WordPress to match their brand colors.
In this article, we’ll show you how to easily customize the background color of the WordPress block editor for admin area.
Note: This guide covers changing the editor color in WordPress admin. If you’re looking to change the background color in WordPress front-end, then please see our tutorial on how to change background color in WordPress.
Why Change the Background Color of the Block Editor in WordPress?
You may want to change the background color of the WordPress block editor for a number of reasons.
However, if your WordPress theme doesn’t use the same colors, then the appearance of your post inside the editor will look quite different from what your users will see on the live website.
Another reason for changing the background color could be personal preference.
For instance, by default, the block editor uses a plain white background. Some users may find it a bit stressful to look at the white screen for long hours. Eye strain can be a real issue for many people, and the default white background is not easy on the eyes.
That being said, let’s see how you can easily change the WordPress editor background color.
How to Change the WordPress Editor Background Color
You can easily change the WordPress editor background color by adding custom code to your theme’s functions.php file.
However, keep in mind that even the smallest error in the code can break your website and make it inaccessible. That’s why we recommend using the WPCode plugin. It’s the best WordPress code snippets plugin on the market and is the easiest and safest way to add custom code to your WordPress website.
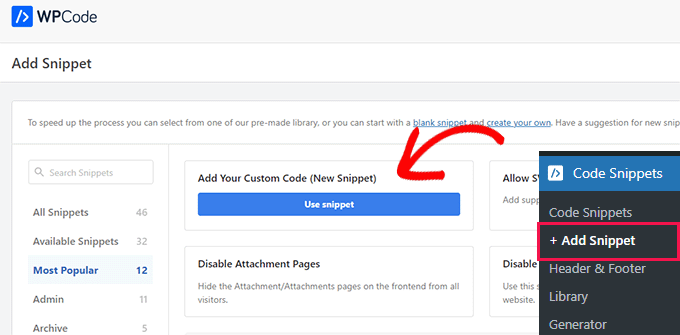
Upon activation, you need to visit the Code Snippets » + Add Snippets page from the admin sidebar.
From here, you have to click on the ‘Use Snippet’ button under the ‘Add Your Custom Code (New Snippet)’ option.
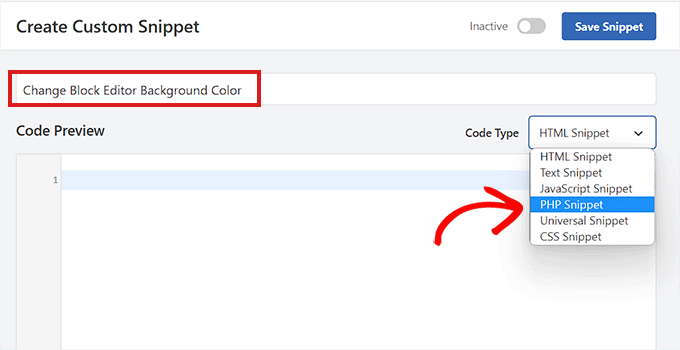
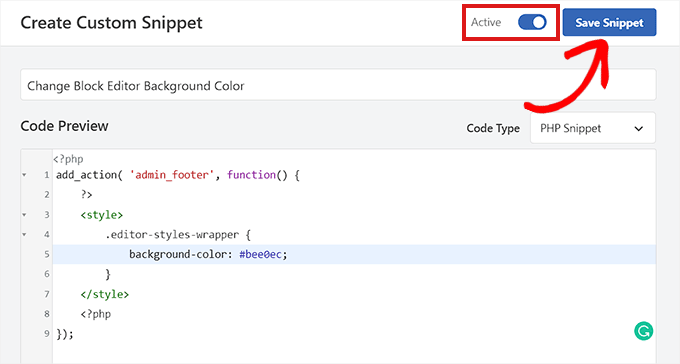
This will take you to the ‘Create Custom Snippet’ page where you can start by typing a name for your code snippet. This is just for you and can be anything that will help you identify the code.
Next, you need to choose ‘PHP Snippet’ as the ‘Code Type’ from the dropdown menu on the right.
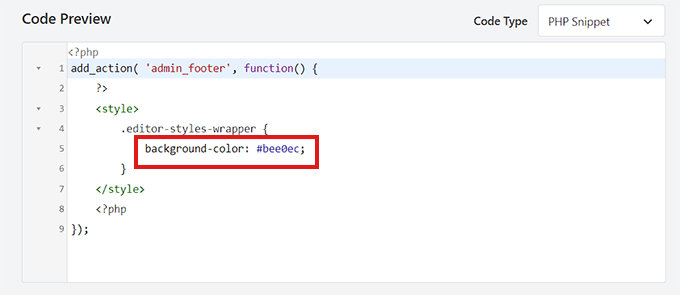
After that, you need to copy and paste the following code into the ‘Code Preview’ box.
Next, you need to look for the following code in the PHP snippet you just pasted.
background-color: #bee0ec;
Then, you have to add the hex code of your preferred color next to the background color option. If you don’t want to use a hex code, you can use some basic color names such as ‘white’ or ‘blue’ instead.
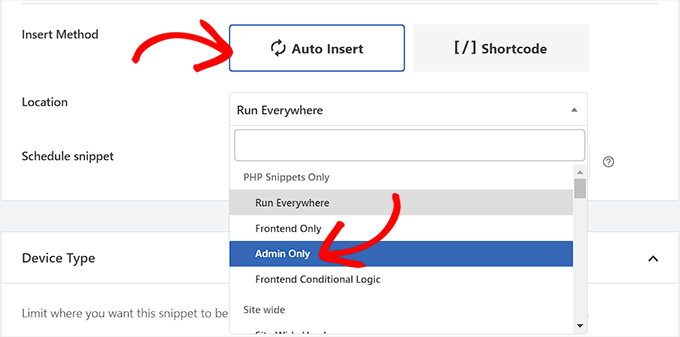
After that, you need to scroll down to the ‘Insertion’ section and choose the ‘Auto Insert’ option.
Next, you need to select the ‘Location’ of the code snippet as ‘Admin Only’ from the dropdown menu.
After that, you need to scroll back to the top of the page and toggle the ‘Inactive’ switch to ‘Active.’
Finally, don’t forget to click on the ‘Save Snippet’ button to save your changes.
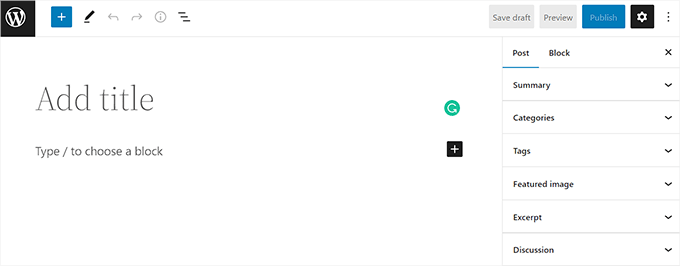
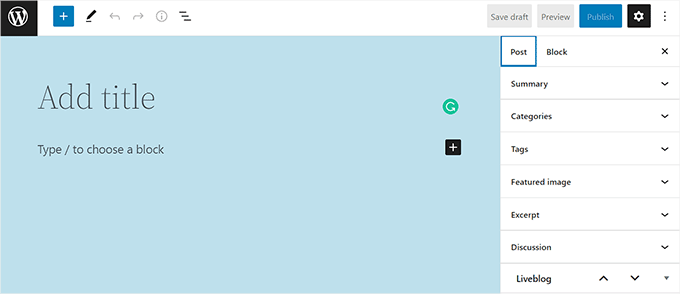
Now, go visit the block editor from the admin sidebar.
This is how the block editor looked on our site after adding the CSS code snippet.
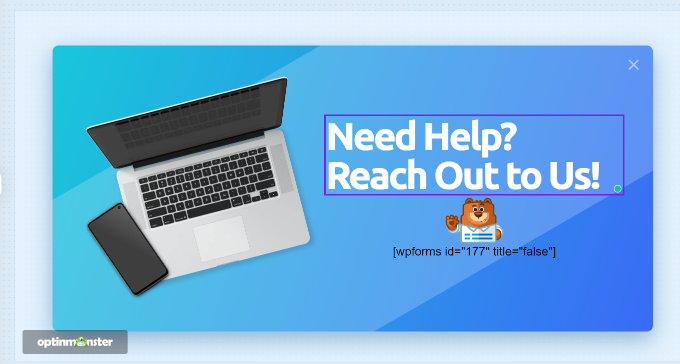
Are you looking for an easy way to show a contact form popup on your WordPress website?
Contact forms are great for communicating with your visitors. Placing them in a popup makes it even easier for your customers to contact you about your products and services.
In this article, we will show you how to add a contact form popup in WordPress.
Why Use a Contact Form Popup?
Every WordPress website or blog needs a contact form so users can reach out with questions, feedback, or problems.
However, if your contact form is only on a single page, then it’s hard for people to find it.
As a result, your users may end up leaving your site before contacting you, and you could lose potential leads and conversions.
A contact form popup helps solve this issue by allowing your visitors to quickly view the form by clicking a button, so they can get in touch with you from whatever page they’re on.
It helps keep people on your website, as they don’t have to exit the page they are viewing. You can also grow your email list using a contact form popup.
That said, you will first need to create a contact form and then place it in a popup to display on your web pages. Don’t worry, we will guide you on creating a contact form and adding it to a popup in WordPress.
There are many free and paid options you can choose from, but we recommend using WPForms as it’s the best option.
WPForms is a beginner-friendly form plugin and offers a drag & drop builder that allows you to create a contact form in WordPress in just a few clicks. It also offers prebuilt form templates and lots of customization options.
For this tutorial, we will use the WPForms Lite version because it is free and offers a contact form template.
However, you can also use its premium version to unlock more features. For instance, WPForms Pro offers multiple form templates, more customization options, powerful addons, and lets you collect online payments.
To start, you will first need to install and activate the WPForms Lite plugin. If you need help, then see our step-by-step guide on how to install a WordPress plugin.
Once the plugin is active, you are now ready to create your contact form. All you have to do is go to WPForms » Add New from your WordPress dashboard.
After that, WPForms will ask you to enter a name for your form and select a template.
Go ahead and select the ‘Simple Contact Form’ template.
Next, you can add fields in the form using the drag-and-drop builder.
Simply drag the fields you want to add to the form from the options given in the menu on your left. You can also reorder the positions of each field in the form.
WPForms also lets you customize each field in the contact form.
For example, if you click on the Name field, then you’ll get different options, such as changing its label and format. You can even add a description or mark any field as required.
Once you are done, go ahead and click the ‘Settings’ option to configure the form notification and confirmation.
In the General settings, you can rename the form, change the submit button text, enable anti-spam protection, and more.
Next, you can go to the Notifications settings option. By default, the notifications are sent to the admin email that is set up on your WordPress website.
However, you can send your contact form notification to any email address you want. If you wish to receive notifications on multiple emails, then separate each email with a comma.
For the email subject line, WPForms uses the form name you entered earlier. However, you can edit the text of the subject line to whatever you wish.
After that, go ahead and click the Confirmations option.
WPForms will use ‘Message’ as the default confirmation type, where your visitors will see a thank you message upon submitting a form.
However, you can change the message type and redirect users to a specific page on your website when they complete a form.
Once you are done creating a contact form, make sure to click the ‘Save’ button at the top right corner to save your changes.
Next, click the ‘Embed’ option in the top corner next to the Save button.
When a new window appears, select the ‘use a shortcode’ option.
WPForms will display a shortcode for your contact form as soon as you click the link. We suggest that you keep this tab/window open as you will need it in the next step, where we’ll show you how to add your contact form in a popup.
We recommend using OptinMonster as it is the best lead generation and conversion optimization plugin for WordPress. Over 1.2 million websites use the powerful tool.
For this tutorial, we will use the OptinMonster Pro version, which includes a clutter-free template and advanced display rules to show the popup.
You will first need to sign up for an account by going to the OptinMonster website. Simply visit the website and click the ‘Get OptinMonster Now’ button.
After the plugin is active, you will see the setup wizard. Go ahead and click the ‘Connect Your Existing Account’ button.
A popup window will now appear, and OptinMonster will ask to connect to your account.
Simply click the ‘Connect To WordPress’ button.
Now that your account is connected, the next thing is to create a new campaign for your contact form popup.
You can start by going to OptinMonster » Campaigns and then clicking the ‘Create Your First Campaign’ button.
On the next screen, you will have to select a campaign type.
Since we will create a contact form popup, select ‘Popup’ as your Campaign Type.
After that, scroll down to choose a template for your popup. OptinMonster offers over 75 attractive and highly converting designs for your popups.
You can select any template that you like. Next, enter a name for your campaign and click the ‘Start Building’ button.
Now using the drag-and-drop builder in OptinMonster, you can edit your popup template.
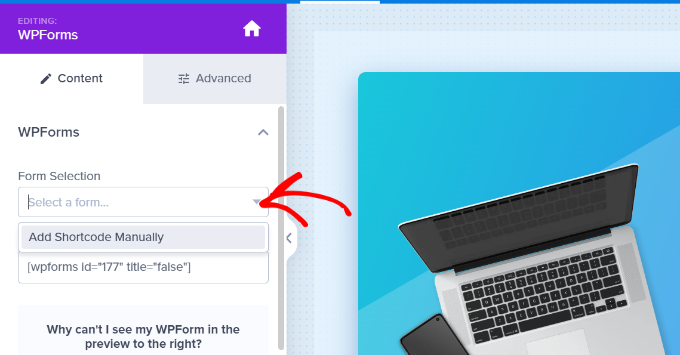
You will now see different Blocks appear in the menu on your left. Simply head over to the ‘WPForms’ block and drag and drop it on your template.
After that, you’ll need to click the ‘Form Selection’ dropdown menu from the block settings in the left menu and select the ‘Add Shortcode Manually’ option.
From here, enter your WPForms contact form shortcode in the block. To find the code, go back to your WPForms embed settings and copy the shortcode.
An important thing to note is that you won’t see a preview of the contact form in the template when you add the shortcode.
This is normal, as your contact form will appear when the campaign is published.
Next, you can go to the Display Rules tab at the top to choose when the popup should appear on your website.
By default, OptinMonster will set it to when the time on the page is 5 seconds, and the popup will appear on any page.
However, you can change the display rule settings and select different triggers and targeting options.
We suggest using the MonsterLink (On Click) targeting. This way, your popup will appear when a visitor clicks a link or a button.
After that, you can click the ‘Copy MonsterLink Code’ button and add it to any text, image, or button on your website.
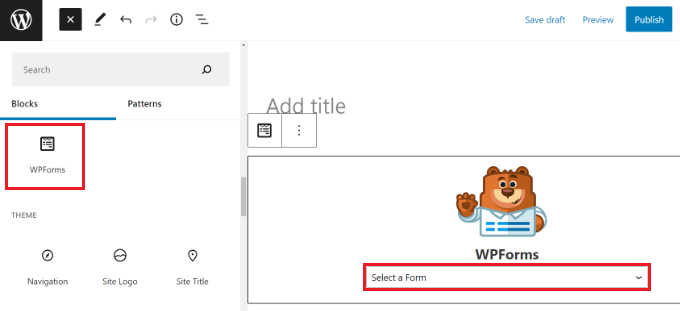
For example, let’s say you want to add a contact us button on your site. You can start by editing any page or post and go to your WordPress editor. Next, click the (+) plus sign at the top and add a ‘Buttons’ block.
After that, you can enter a text for your button and then click the link icon.
Now add the MonsterLink URL to your button.
Once you have done that, publish your WordPress post or page. The MonsterLink will now be added to your contact us button.
Next, head back to your OptinMonster campaign to complete the configuration.
After selecting MonsterLink as your target and showing it on any page, you can click the ‘Next’ button at the bottom.
On the next screen, you will see options to change the campaign view type, add a MonsterEffect animation, and play a sound when the popup appears.
Go ahead and click the ‘Next’ button when you are satisfied with the settings.
After that, OptinMonster will show a summary of your Display Rule settings.
This helps to ensure you have correctly set up when your campaigns will appear on your website.
Now, you are ready to take your campaign live and publish your contact form popup. To do that, go to the ‘Publish’ tab at the top.
Next, you can click the ‘Preview’ button before publishing your campaign. This will show you a live preview of how your popup will look on your website.
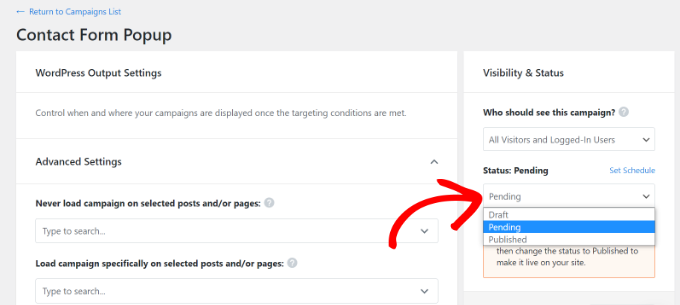
When you are happy with the appearance of your campaign, change the ‘Publish Status’ from Draft to Publish.
You can exit the OptinMonster campaign builder and check the status of your campaign from your WordPress dashboard as well.
Simply click the ‘Status’ dropdown menu on your right and change the status from Pending to Published.
Don’t forget to save the changes.
Next, go to the contact us button you created earlier with MonsterLink and see the contact form popup in action.
Are you wondering how to use OpenAI and ChatGPT on your WordPress website?
OpenAI can help with everything from generating meta descriptions for your posts to writing email sales copy. You can use OpenAI on your WordPress site to save time, cut costs, improve your SEO and workflows, and grow your business!
In this article, we will show you 14 of the best ways to use OpenAI on your WordPress website.
A (Brief) Introduction to OpenAI
You have probably heard the terms “OpenAI” and “ChatGPT” used interchangeably, but they’re not exactly the same.
OpenAI is the research laboratory (read: a group of very smart people) behind the chatbot ChatGPT and the deep-learning, image-generating model DALL-E 2, among other AI-powered products.
The team over at OpenAI created ChatGPT which is an AI assistant to help streamline your workflows and save you time.
It can write email newsletters for you, suggest blog post ideas, do keyword research, automate your workflows, and so much more.
To improve your WordPress website workflows with artificial intelligence, you will first need to create an account with OpenAI. Getting signed up is FREE. All you will need is an email and a password.
1. Generate Titles and Meta Descriptions with AIOSEO
All in One SEO (AIOSEO) is the best SEO plugin for WordPress, and it just got an AI-powered boost. After adding your keywords to your blog posts, let AIOSEO and OpenAI further optimize your content for search engines.
Then, from within the WordPress post editor, you can tell OpenAI to generate titles and meta descriptions that best fit your content with the click of a button.
Simply go to the ‘AIOSEO Settings’ at the bottom of your page and find the ‘Post Title’ box.
Next, you need to click on the robot icon. If you hover your mouse over it, you will be able to see a ‘Use AI Generator’ message.
Now, you can see 5 post title suggestions. Simply click on the ‘+’ icon next to one to use it for your post.
If you don’t like any of the suggestions, you can also click ‘Generate New Titles’ to see new ones.
Then, simply repeat the same steps by clicking on the robot icon in the ‘Meta Description’ box. AIOSEO will then suggest a few meta descriptions for your post.
Plus, connecting your OpenAI account to your AIOSEO account is as easy as copying and pasting an API key. You can check out AIOSEO’s documentation for more details.
2. Generate Ad Copy and Product Descriptions
Due to GPT-3’s talent for SEO, it is probably no surprise that it can handle more of your content creation needs. You can use OpenAI to create short, effective ad copy that matches your brand or long-form product descriptions for your WooCommerce store.
For example, we prompted ChatGPT to describe the need for running shoes using the “problem-agitate-solve” framework.
Simply edit the text to match your preferred sentence structure, include your keywords, throw in some on-brand and product-specific language, and then watch your sales increase!
3. Generate Blog Post Ideas
If you are anything like us, then coming up with content ideas for your WordPress blog can be time consuming. Fortunately, OpenAI runs on one of the world’s most powerful supercomputers.
So, you can ask it to come up with ideas for new content on your blog.
In our previous examples, we used OpenAI to help with tasks by inputting prompts directly into ChatGPT.
In our next few examples, we will look at how to integrate OpenAI directly into your WordPress workflow, truly leveraging the power of automation and AI to save time and resources.
For this example, we will use OpenAI with Uncanny Automator to generate ideas for new content based on a user’s form submission. Then, we will automatically send OpenAI’s response to your content management spreadsheet or database, like Google Sheets or Airtable, for the whole team to access.
If you don’t already have Uncanny Automator, you can download the Automator plugin for FREE to try on your WordPress site.
Once you have downloaded Automator, you will need to connect Automator to OpenAI. Then we will build the automation recipe below.
First, you need to create a new form using a contact form plugin like WPForms. From your WordPress admin sidebar, navigate to WPForms » Add New.
Then, create a new contact form and make sure to add two number fields labeled ‘Temperature’ and ‘Maximum length’, and one single line text field labeled ‘Open AI Prompt’.
Now, you must head to Automator » Add New. In the pop-up window that appears, simply select ‘Logged-in users’, followed by ‘Confirm’.
Next, give your new recipe a title that makes it easy to recognize. For example, we have named our recipe ‘OpenAI Content Ideation’.
In the ‘Triggers’ panel, you need to select ‘WPForms’. From the drop-down list that appears, select ‘A user submits a form’ and choose the WPForms form that you just made. When you are finished, just click ‘Save’.
After that, in the ‘Actions’ panel, you have to select ‘OpenAI’.
From the drop-down list that appears, choose ‘Use a prompt to generate text with the Davinci model’.
In the Actions section, map the fields from the WPForms form to the Temperature, Length, and Prompt fields in the OpenAI action.
To do this, click the ‘*’ icon to the right of each field to choose the correct token associated with the trigger.
When you are finished, simply click Save.
To send the blog post ideas to an external spreadsheet, you will need to add a second Action. To do this, click ‘Add action’ in the ‘Actions’ panel.
From the menu of available integrations, simply choose Google Sheets.
Then, from the drop-down list, select ‘Create a row in a Google Sheet’.
In the editor, you must select your content management spreadsheet. Then, click ‘Get columns’ and add the OpenAI Response token to the appropriate column(s).
Make sure to click ‘Save’ when you are done.
Finally, in the top right corner, toggle your recipe from ‘Draft’ to ‘Live.’
Now, whenever you enter information into your blog post idea generator form, Automator will tell OpenAI to suggest new content ideas and send them to your Google Sheets spreadsheet.
In our example, we entered “Give me 5 fun blog posts on pediatric dentistry” into the WPForms form.
Then, OpenAI generated a response, and Automator added it to the worksheet in the recipe.
4. Perform Sentiment Analysis
There is no way of knowing if AI has any feelings of its own. If we had to guess, we would say that it probably doesn’t. At least, not yet. But that doesn’t mean that it cannot understand human emotions.
You can use OpenAI to perform sentiment analysis by asking it to interpret the mood of your customers’ feedback.
But how can you use this with your WordPress website?
Maybe your contact forms are connected to a help desk plugin, and you want to assign priority based on the message urgency.
Alternatively, maybe you want to automatically approve positive blog comments. You could even quickly identify negative feedback in surveys powered by your favorite WordPress form plugin.
In both cases, you will be able to address negative feedback quicker, keep your customers happier, and improve your online reputation.
5. Automate Customer Support with Intelligent Sentiment Analysis
Now that you know how to use OpenAI to perform sentiment analysis, you can easily add it to your workflows. By combining OpenAI’s emotional intelligence with Uncanny Automator’s efficiency, you will be able to create a seamless customer support system.
Let’s put together an Automator recipe that creates tickets in our customer support plugin whenever a customer reviews a product.
First, we have OpenAI perform sentiment analysis on the reviews as they come in.
Then, using Automator’s Filters feature, we create tasks with different priority levels based on OpenAI’s assessment of the customer’s sentiment.
In this recipe, if OpenAI decides that a new WooCommerce product review is negative, then it creates a new help desk ticket in FluentCRM and adds an Urgent tag.
If you are ready to take things to the next level, you could even use the submission to create a draft reply for the ticket.
Just add an extra OpenAI action to generate a draft reply, then include that response as the ticket draft.
This works best with the GPT-3.5-Turbo model because you can use Automator to also send context. For example, you can tell it to answer the prompt as a helpful support agent from your website.
6. Create Event Summaries, Recap Podcast Episodes, and Take Meeting Minutes
Running special events on your WordPress website is easy with WordPress calendar plugins. Unfortunately, not every customer of yours can save the date.
After all, we cannot do everything and be everywhere all at once, but OpenAI can.
If your customers missed the big day, OpenAI can create event summaries for you. You can even choose the length and format of the summary you want OpenAI to make.
For example, we asked ChatGPT to create a 100-word summary of an October 2008 IMF town hall. In less than one minute, ChatGPT turned the 1,500-word opening remarks into a 100-word summary.
Alternatively, maybe you are trying to grow your podcast audience. To help your listeners who don’t have two hours a day to consume media, you can use OpenAI to recap your podcast episodes, hitting all of the highlights.
Using transcripts, we asked ChatGPT to summarize the first 15 minutes of a popular podcast.
Finally, some conference call tools, like Zoom and Google Meet, allow users to record their meetings with audio transcripts. You can then feed those transcripts into OpenAI and create meeting summaries in just a few seconds.
7. Draft Blog Posts (and Seamlessly Integrate Them Into Your Workflows)
For content writers (including us), few things are more stressful than a blank page. Thankfully, artificial intelligence is the sledgehammer that can break through any writer’s block.
Using one of our blog post ideas from our previous recipe, we told OpenAI to draft a blog post for us.
In this Automator recipe, a form submission (the trigger) tells OpenAI to draft a new blog post. Then, it messages the writer in Slack to let them know the draft is ready for them.
From your WordPress admin sidebar, simply go to WPForms » Add New.
Then, create a new form with at least two number fields labeled ‘Temperature’ and ‘Maximum length.’ You will also need two single-line text fields labeled ‘Title’ and ‘Open AI Prompt’.
Next, you must go to Automator » Add New. In the pop-up window that appears, select ‘Logged-in users’. Then, simply give your new recipe a title like ‘OpenAI Blog Post Draft’.
In the ‘Triggers’ panel, you need to select ‘WPForms’ From the drop-down list that appears, you must choose ‘A user submits a form’ and pick the form you just created.
When you are finished, make sure to click ‘Save’.
Moving on, in the ‘Actions’ panel, you must select ‘OpenAI’. From the drop-down list that appears, choose ‘Use a prompt to generate text with the Davinci model’.
In the editor, fill in the fields using the tokens from your form’s fields that match the fields in the editor. When you are finished, just click ‘Save.’
Now, it is time to set up an automatic blog post that will be created with the OpenAI content.
In the ‘Actions’ panel, simply click ‘Add action’. Then, from the menu of available integrations, select ‘WordPress’.
Next, from the drop-down list, hit ‘Create a post’. In the editor, you must fill in the ‘Title’ field with the Title token from your form and enter the OpenAI Response token into the ‘Content’ field.
Then, make sure to click ‘Save’.
Optional: You can also add a ClickUp action to your recipe to create a task with the post URL in the description.
Additionally, you can include a Slack action to notify your content writer that a new task and draft post is waiting for their review.
Finally, in the top right corner, toggle your recipe from ‘Draft’ to ‘Live’.
In our WPForms form, we then asked OpenAI to ‘Write a casual blog post on three ways to make dental visits fun for kids.’
And here is the draft that Automator created with OpenAI’s response.
We call that the anti- writer’s block recipe! You can also use AI to generate your SEO title, write a meta description, and even set up a featured image.
8. Draft Emails in Minutes
Writing carefully-worded emails takes time. Unless, of course, OpenAI is writing them for you.
Whether you are sending out an internal notice, responding to a customer’s questions, or reaching out to prospective clients, OpenAI can draft your email in seconds. After that, it is just a matter of proofreading and including specific information.
We prompted ChatGPT to “write a 300-word marketing email promoting a Black Friday sale on limited edition clothing.” Less than 30 seconds later, we had an email that we could easily customize to suit our branding and needs.
Promoting your blog posts on social media is important. However, sometimes, writing the appropriate character-length tweets and captions can be even more challenging than creating a whole article.
With OpenAI and Automator, you won’t have to stress about the perfect hashtags.
Here is an example of an action that takes a new blog post and sends it to OpenAI to generate a summary that can be shared on Twitter:
Automator will send that summary, complete with hashtags, to our WhatsApp account. There, we can review, edit, copy, and then paste the content into our social media accounts when we are ready to publish it.
For a post on connecting ChatGPT to LearnDash, OpenAI wrote this summary:
Embrace the robot revolution and use OpenAI and LearnDash to create the e-learning platform of your dreams. #AI revolution is here! Harness the power of AI for your #elearning platform w/ OpenAI & ChatGPT models. Automate content creation, create course outlines & answer students’ questions. Save time & money w/ Uncanny Automator! #LearnDash #NolejAI #RobotRevolution.
You could even extend your recipe to make Automator post the summary straight to Twitter, Facebook, LinkedIn, and more.
10. Generate AI Images for Your Posts or Landing Pages
Are you tired of scrolling through stock photography databases trying to find the perfect image for your blog post? Or finding a picture and then realizing that every other article with your keywords is using the same image?
Fortunately, OpenAI’s image generator DALL-E 2 can create original images from descriptive plain text.
OpenAI’s Content Policy and Terms give you all of the rights to the images that you create with DALL-E 2, “including the right to reprint, sell, and merchandise.”
Using our original WPForms form with an added field for an image prompt, we used Automator to create a draft blog post complete with a featured image.
Here is that same blog post about dental visits with a featured image created by DALL-E.
As you can see, it has a fun graphic with a tooth, toothpaste, and different toothbrushes.
To make the process even easier, whenever you tell DALL-E to create an image using Uncanny Automator, Automator will add the image to your WordPress media library, with no hotlinking necessary.
11. Create Course Outlines in Your LMS
OpenAI is smart. After all, “intelligence” is in the name.
We asked OpenAI to create an advanced 8-week course outline on supercomputers, which, funnily enough, is kind of like an OpenAI autobiography.
Once you have your course outline, don’t forget to use AIOSEO’s OpenAI integration to write your meta description.
12. Create Lessons in Your LMS
Using a similar Uncanny Automator recipe to the previous one, you can easily fill in the course outline that you created with OpenAI-generated content.
We used OpenAI’s response from our previous recipe to help us create this lesson.
Here is the first part of it.
With the right prompts, you can also create a recipe that generates unique images for your lessons and uploads them automatically to your WordPress media library.
Using Automator tokens, you can also set your new DALL-E 2 generated image as the featured image for your lesson or include it somewhere in the lesson itself.
13. Create a Chatbot
As a natural language processor, OpenAI loves to talk. You can use this feature to communicate with customers in your online store or business website.
This can help you target users who are having problems on your site or want to learn more about your products and services.
14. Have Fun! Write Short Stories, Poems or Cook Up Recipes
Once you have fully integrated OpenAI and Uncanny Automator into your workflows, you will have enough time to do the things that really matter like growing your business or spending more quality time with family.
Playing around with OpenAI and trying out new things is a great way to learn how to create better prompts that get the results you are looking for, so you can continue to save time and optimize your workflows.
OpenAI and WordPress plugin development are in the super early stages right now, and there is so much more in the works. We will be sharing more details and updates in this guide in the coming months.