Notice that some HTML attributes have been added to the link, rel="noopener" and rel="noreferrer". These attributes are added to address a security vulnerability.
The problem is that JavaScript code can be used to allow a new tab to get control of its referring window. If you link to an external website affected by the malicious code, then that website can use the window.opener property in JavaScript to change the original page (your website) to steal information and spread malicious code.
WordPress adds rel="noopener" to prevent the new tab from taking advantage of this JavaScript feature. Similarly, the rel="noreferrer" attribute prevents passing the referrer information onto the new tab.
How Does rel=”noopener” Affect Your WordPress SEO?
It doesn’t.
Even though the rel="noopener" attribute improves WordPress security, some users avoid using it because they think it will impact their WordPress SEO.
What’s the Difference Between “noopener” and “nofollow”?
It’s easy to confuse rel="noopener" with rel="nofollow". However, they are completely separate attributes.
The noopener attribute prevents your website from cross-site hacking and improves WordPress security.
On the other hand, the nofollow attribute prevents your website from passing on SEO link-juice to the linked website.
Search engines look for and consider the nofollow attribute when following a link on your website. However, they do not give any consideration to the noopener tag.
By default, WordPress does not allow you to add nofollow to your external links. If you want to add nofollow in WordPress, then you will need to use a plugin.
Does rel=”noreferrer” Affect Affiliate Links in WordPress?
The rel="noreferrer" does not affect affiliate links in WordPress. Some users believe that it does because rel="noreferrer" prevents the referrer information passing to the new tab.
However, most affiliate programs provide you with a unique URL that has your affiliate ID. This means your affiliate ID is passed along as a URL parameter for the other website to track.
Secondly, most affiliate marketers use a link cloaking plugin for their affiliate links.
With link cloaking, the affiliate link that your users click on is actually your website’s own URL, which then redirects users to the destination URL.
How Do You Disable rel=”noopener” in WordPress?
There is no need to remove rel="noopener" from links on your website. It is good for your website’s security and has no performance or SEO impact on your website.
Simply copy the following code into a new PHP snippet:
add_filter('tiny_mce_before_init','wpb_disable_noopener');
function wpb_disable_noopener( $mceInit ) {
    $mceInit['allow_unsafe_link_target']=true;
    return $mceInit;
}
Make sure you change the ‘Active’ toggle on and then click the ‘Save Snippet’ button.
This will stop WordPress from adding rel="noopener" to new links. You will also need to manually edit any old links to remove the attribute.
Want even more control over which rel attributes get added to your links in WordPress? We recommend using the AIOSEO plugin because it lets you add title, nofollow, and other link attributes right inside the WordPress editor.
Recently, one of our readers asked how do we measure the impact of our email newsletter?
You can use Google Analytics combined with special tracking links in your email newsletter to see how effective each email is for your business.
In this article, we will share how to set up email newsletter tracking in Google Analytics, step by step.
Why Track Your Email Newsletter Traffic in Google Analytics?
When you send out an email newsletter, it likely contains at least one link to your site. Your email marketing service should be able to tell you how many people click on a link (also called your click-through rate). However, most providers can’t show you what happens afterward.
That’s where Google Analytics comes in. You can use it to track what people do after clicking a link from your newsletter.
Let’s say you run a restaurant that offers home delivery. You want to see which of your weekly newsletters led to the most people filling out your online food ordering form.
Or perhaps you’re about to start an online store. It would be great to know which of your email campaigns drove the most sales.
With Google Analytics, it’s pretty easy to set up email newsletter tracking and see how many sales each email generates for your business.
With that said, let’s get started.
Creating Trackable URLs for Your Email Newsletter
If you want detailed insights in Google Analytics, then you need to add special tracking parameters to each link in your newsletter.
In other words, you can’t use a standard link like this: https://www.site.com
Instead, you need to use a URL with special parameters that look like this: https://www.site.com?utm_source=newsletter&utm_medium=email&utm_campaign=jan_sale
The ending part of this URL, everything after the question mark, is called a UTM code.
It might look complicated, but don’t worry. It’s actually quite easy to create.
Let’s take a look at two easy ways to create these trackable URLs for your email campaigns.
Method 1: Create Trackable URLs using MonsterInsights (Recommended)
It also helps you set up Google Analytics 4 (GA4) property. GA4 is the latest Analytics version by Google and it will replace Universal Analytics on July 1, 2023. With MonsterInsights, you can easily switch to GA4 in WordPress and start tracking your data.
To track email newsletters, you can use the free version of MonsterInsights to access the URL builder tool. However, we recommend upgrading to the pro plan in order to unlock more advanced features like eCommerce tracking (we will talk more about eCommerce tracking later in this article).
Upon activation, you can go to the Insights » Tools page in your WordPress dashboard and select the ‘URL Builder’ tab.
In the URL Builder tool, the first piece of information you’ll need to enter is the URL you want to add to your newsletter. This might be your main website URL if you’re linking to your home page.
In this example, we’re running a sale and linking to the website’s online store:
Google Analytics will track your email newsletter visitors as a ‘campaign’. This is simply the term Google Analytics uses for email or advertising promotions.
You’ll need to enter the source, medium, and name for your campaign, so Google Analytics can easily track them.
Source: Set this to ‘newsletter’ or something else meaningful Medium: This should be set to ’email’ Name: You can use whatever makes sense, e.g. ‘jan_sale’ or ‘april_tshirts_sale’
If you’re using more than one word for the source, medium, or name, make sure you use underscores between words. Don’t use spaces or hyphens.
Besides that, you’ll see more options in the URL Builder.
The Campaign Term field is used if you’re running ads, so you can leave that blank. The Campaign Content can be used if you’re split-testing your emails or ads. Again, you can leave it blank for this example.
Next, you can scroll down.
At the bottom of the page, you should now see your special URL, with the tracking details included:
You can now use this URL in your email newsletter and later track clicks in your Google Analytics account.
Method 2: Manually Create Trackable URLs in Google Analytics
MonsterInsight’s URL builder is a handy tool for saving time, as it creates the UTM codes for you. If you prefer to create your trackable URLs manually, here’s how to do it.
First, get the URL you want to use. We’re going to use https://www.site.com/shop for this example.
Next, you’ll need to create the UTM code yourself. We’ll take it to step by step.
Add a question mark to the end of your URL, like this:
https://www.site.com/shop?
Then, add the utm_source:
https://www.site.com/shop?utm_source=newsletter
Next, add the ampersand (&) symbol and the utm_medium:
You can use any word or phrase you want for the campaign’s name. If you’re using multiple words for the source, medium, or campaign name, you can separate the words with an underscore.
That’s it. Your tracking URL is ready to be used in your newsletter.
Using Trackable URLs in Your Newsletter Campaigns
Once you’ve created your URL, either using the MonsterInsights URL builder or manually, you can use it in emails.
You can copy and paste the URL into your email wherever you would have used the standard URL before.
Tip: You can even use trackable URLs in your regular emails. This would make sense if you do a lot of email outreach. You can also create trackable URLs to use on social media, in ads, and more.
Once you are done with your email, send out your newsletter and wait for some clicks. After that, you can go to Google Analytics to view your report.
Viewing Your Email Newsletter Report in Google Analytics
Now that you’ve set up custom URLs for tracking in email newsletter, the next step is to view the reports in Google Analytics.
View Email Newsletter Report in Universal Analytics
First, you’ll need to log in to your Google Analytics account.
After that, simply click the Acquisition » Campaigns » All Campaigns link.
You should then see data for the campaign(s) you’ve created.
Tip: If you’ve only just sent out the newsletter, change the date for the report to the current day. Google Analytics defaults to showing you data for the previous 7 days.
View Email Newsletter Report in Google Analytics 4
First, you’ll need to log in to your Google Analytics 4 account.
From here, head to Reports » Acquisition » Traffic Acquisition from the dashboard on the left.
Here, you’ll see all the traffic sources for your website, including direct, organic search, paid search, and email.
To see traffic from your newsletter, simply enter ’email’ in the search bar and hit enter.
This will filter the report and only show traffic from emails.
Next, you can click the blue ‘+’ button under the search bar.
You’ll now see more options to short your website traffic.
Go ahead and select Traffic source » Session source from the dropdown list.
After that, you should see traffic from different email campaigns.
This way, you can which campaign was most effective and helped generate revenue.
Tracking Email Newsletter Conversions
The most important part of your newsletter tracking is what users do after they arrive on your website.
For instance, if you run an online store you might want to see which emails led to a sale. If you wanted users to fill out an order form, then you might want to track that.
The easiest way to do this is by using MonsterInsights to do almost all the setup for you.
Switching on eCommerce Tracking in Google Analytics
First, you’ll need to switch on eCommerce tracking in Google Analytics. This is a quick and easy process.
Simply log in to Google Analytics and make sure you have the correct website. After that, click the Admin link on the bottom left.
You will now see different settings.
In the View column, go ahead and click the ‘Ecommerce Settings’ option.
You can now toggle ‘Enable Ecommerce’ on. We recommend also enabling the ‘ Enable Enhanced Ecommerce Reporting’ option at this point.
This will track additional data and also lets you see eCommerce reports in MonsterInsights.
Don’t forget to click the Save button when you’re done.
Switching on eCommerce Tracking in MonsterInsights
Next, you can go to Insights » Addons, find the eCommerce addon, and then click the Install button below it.
After that, you need to go to Insights » Settings and click the eCommerce tab. You should see that your eCommerce plugin (e.g. WooCommerce) has been automatically detected.
Tip: We recommend switching on ‘Use Enhanced eCommerce’ as this means you can view the MonsterInsights eCommerce report too.
That’s all you need to do because MonsterInsights handles everything else after that. Google Analytics will now be able to track eCommerce transactions on your site.
Now, when you visit Google Analytics, you’ll be able to see details of your eCommerce transactions.
In Universal Analytics, simply go to Acquisition » Campaigns and then click the ‘All Campaigns’ link. Next, select ‘E-commerce’ from the Conversions dropdown menu.
Not all websites use an eCommerce platform with a shopping cart.
For instance, if you have a simple order form, then you can track which email campaigns led users to submit that form. If you have a click to call button on your website, then you can track that as well.
WordPress, the popular open-source content management system, is celebrating its 20th anniversary in 2023. Since its launch in 2003, it has grown to become the most widely used website platform on the internet, powering over 60 million websites. Its user-friendly interface and vast array of customizable features have made it a popular choice for both [...]
Are you looking to hire developers for your website, or simply want to make a career as a WordPress developer?
As your website grows, you’ll need experts to help customize themes, write custom code, and add additional functionality to your website. A WordPress developer job site can help you find the right talent. Similarly, if you’re a developer yourself, a job website can help you land great jobs, clients, and long-term projects.
In this article, we’ll share some of the best WordPress developer job sites along with example job templates that you can use to post your WordPress job listing.
Note: If you’re a WordPress developer looking for a remote job, we are hiring. Come join our team of 200+ amazing people and work on products that are used by over 20 million websites – See Open Positions.
Why Hire WordPress Developers Using a Job Website?
If you have a WordPress website, then you’ll likely need the help of a developer as your site grows.
A developer can customize your WordPress theme, which might not be possible with default options. Similarly, you might want to add certain features and functionalities that aren’t available in any WordPress plugin. A developer can write custom code to make this possible.
Plus, a WordPress developer can help with other technical stuff for your website. For example, you might want to speed up your site and require migration from another platform. In both cases, a developer with technical skills can be really helpful for your business.
That said, finding the right talent can be a challenge for many business owners. This is where a WordPress developer job website can help you out. You can shortlist candidates from a large pool for a full-time role or for a limited-time project.
On the other hand, if you’re a developer yourself, then a job website can help you kickstart your career. With WordPress’s growing popularity, there is a high demand for developers. You can find a lot of opportunities to land a job, secure clients, and work on multiple projects.
Before we reveal the best websites for finding WordPress developers, let’s look at a sample job description template.
WordPress Developer Job Description Template
When you’re posting a job opening for WordPress developers, you’d want to attract the best talent. This is where creating an enticing and detailed job description can be handy.
A typical WordPress developer job template will include:
Company Details
You can start with a brief introduction about your company. Simply tell the candidate about what the company does, its achievements, values, work culture, what you’re looking for, and why they should join your organization.
For instance, here’s a look at the introduction for a Development Team Manager at Awesome Motive.
Job Description
Next, you can add details about the job, and what type of person would be suitable for the WordPress developer position.
For instance, you’re looking for someone who is a self-starter, has excellent communication, someone who can jump between front-end and back-end development tasks, and more.
You can take a look at the WordPress developer job description on LinkedIn for Awesome Motive for inspiration.
Responsibilities
After that, you can go ahead and list the responsibilities a WordPress developer will have to fulfill.
These can include writing and testing new plugin features, triaging bugs, providing feedback, refactoring legacy code for backward compatibility, and more.
If it is a managerial role, then you can include responsibilities like supervising other developers, giving feedback, and training new recruits.
Qualification and Skill Requirements
In this section, you’ll need to list down the skills, qualifications, and experience the candidate should have to perform the job successfully.
For instance, the WordPress developer should be proficient with PHP and MySQL. They should be familiar with JavaScript, jQuery, HTML5, CSS3, and more. Plus, you can also list the number of years of experience a developer should have before applying for the position.
Similarly, you can add more details for a managerial role, like having project management experience, a deep understanding of third-party APIs, etc.
Benefits and Perks
A WordPress developer job description should also include the perks you’re offering to the candidates. These can include health insurance, paid time off, annual retreats, reimbursement programs, personal development courses, and other benefits.
For example, here’s a list of benefits Awesome Motive offers to its employees around the world.
Other Information and Disclosures
Lastly, you can add additional details to the job description, like where you’re based.
Plus, it is also good to provide any legal discloses and inclusion statements.
With that said, let’s look at some of the best WordPress developer job sites where you can find the best WordPress developer talent.
LinkedIn is one of the best WordPress developer job sites for business owners and job seekers. It is a popular social media platform that helps connect companies with the right talent.
You can set up a company page on LinkedIn, add details, and list job openings. The best part is that it allows users an Easy Apply option. Job seekers can simply share their LinkedIn profile with the company and apply for the position.
With LinkedIn, you can also build a brand and grow followers. It lets you share recent blog posts and announcements, create a network, and more.
As a WordPress developer, LinkedIn is a great platform to search for job opportunities. You can create a profile for free, connect with other people in the industry, follow different companies, access courses on the LinkedIn Learning platform, and get notifications for the latest job posts.
You can also set a special frame on your profile picture that shows you are either ‘Looking for Work’ or ‘Looking to Hire’ so that your connections can know at a glance you’re someone they should contact.
An important thing to note is that LinkedIn is free to use. However, it also offers 4 types of premium subscription plans for recruiters and job seekers.
For instance, with the Recruiter Lite plan, you can access advanced filters, 2nd and 3rd-degree networks, get smart suggestions, candidate recommendations, and more.
Upwork is a popular work marketplace where you can find experienced WordPress developers.
The website is great for finding expert developers for specific projects. This way, you can find the right talent for a limited time and pay them an hourly rate or a fixed amount for the project’s duration.
For example, you can post projects for website restructure, build a multisite using Elementor, optimize your website for performance, and more. Developers can then submit proposals for each project, and you can then shortlist the best candidate.
As a WordPress developer, Upwork is a great place to find clients and work on different tasks. This way, you can build a career and gain experience in different areas. The best part, it is free to create a profile on Upwork. After that, you can bid on various projects
WordPress Jobs is the official job board on the WordPress.org website. You can create a job post and find a developer from the large community of WordPress experts.
There are different categories for which you can create an opening. These include performance, design, support, development, plugin development, theme customization, translation, writing, and more.
The job board is easy to use, and you can hire talent from a global pool of experts. Once your job post is reviewed and approved, it will be displayed for 21 days on the website. This gives you ample time to find the best WordPress developer for your site.
For instance, in the screenshot above, you can see different jobs listed for development. In each post, you get to see the job type and location.
Codeable is a WordPress developer job website designed specifically for WordPress experts. It has a rigorous and thorough process of hiring developers, so you always get the best talent.
The platform follows a 6 step process for vetting developers. The process starts with a professional review and then a technical exam. After that, there is a behavioral interview and live coding test. Those who pass the test must then complete a Codeable Academy course exam.
Once a WordPress developer passes these steps, candidates start working on real-life projects on a 90-day trial period. Lastly, the performance of each WordPress expert is continuously monitored.
As a website owner, you can hire a developer for consultancy or create projects on Codeable in no time.
Note that the platform will charge a fixed 17.5% of your project’s estimated cost as a service fee. For consultancy, it charges $69 for one hour.
FlexJobs is the next website on our list that you can use to hire WordPress developers. It is a popular job board for remote workers and freelancers around the world.
If you’re a WordPress developer and looking for a remote position or a freelance project, then this is the perfect platform. FlexJobs has a thorough vetting process for posted jobs and ensures all employers are reliable.
Besides that, as a developer, you can also access the library to write award-winning resumes, mock interviews, and get tips for successfully landing remote jobs.
Do note that it is a paid platform, and you’ll need to subscribe to a premium plan to access job descriptions and apply for a position.
Similarly, companies can also post jobs on FlexJobs only after successfully completing their vetting process. As an employer, you can access the large network of developers on FlexJobs.
SolidGigs is a paid WordPress developer job website for freelancers looking to secure clients and projects. It hosts the top 1% of WordPress developer jobs, so you get to work for reliable and well-paying companies.
The job board was created by WordPress developers and writers themselves. It is different from other freelancing websites like Upwork or FlexJobs.
Instead of going through a list of projects and sending proposals, SolidGigs will find the right client for you.
As a developer, you’ll first tell SolidGigs the type of work you want.
After that, the website searches for ideal clients and then alerts you when a good match is found. You can then send a pitch to the client and secure the gig.
We Work Remotely is a leading online remote job website. It is used by many startups and top tech companies like Google and Amazon. We also use We Work Remotely to hire WordPress developers for our team.
It is a paid platform where you’ll need to pay $299 to post a job opening. Besides that, you get helpful resources like a hiring guide, the latest trends, and remote job description templates.
Plus, We Work Remotely has a strong community. You can join their Slack channel and forum to interact with other members and potential candidates.
We have used WWR job board numerous times to hire developer candidates for WPBeginner as well as our sister products such as WPForms, AIOSEO, OptinMonster, and others.
As a WordPress developer, you can easily search for job openings on We Work Remotely. There are full-time roles, freelancing projects, and on-site development positions listed by many companies.
ZipRecruiter is the next WordPress developer job site on our list. It is a popular website for companies hiring developers and job seekers.
You can post a job opening on ZipRecruiter and find qualified candidates. The platform offers a matching technology feature that helps you scan through thousands of resumes and find developers with the right skills, experience, and education.
There is also an enterprise solution offered by ZipRecruiter. You can run sponsored ads and target a specific audience, access the resume database, and take assistance from dedicated specialists for developing a hiring strategy.
As a WordPress developer, you can create a free account on ZipRecruiter and find suitable jobs. You can search for jobs using different keywords, locations, or salary ranges.
WPHired is a popular WordPress developer job site founded in 2010 and is one of the oldest WordPress job boards.
You can easily find expert WordPress developers on the website. Be it for plugin development, theme customization, code creation, programming, or any other task, WPHired is the perfect place to find the right talent.
All you have to do is create an account and post a WordPress job. Next, you can choose from 1000+ WordPress experts and hire them for your website. The best part is that you can post unlimited jobs for free for 30 days.
However, if you’d like to get your job post featured and stand out, then WPHired offers premium pricing plans starting from $39.99. The post is listed at the top of other jobs on the homepage and is promoted through social feeds.
On the other hand, as a WordPress developer, there are many opportunities to land full-time roles, temporary jobs, or freelancing projects. It lets job seekers search for projects based on keywords, regions, or categories.
Remote.co is another popular job board that you can use to post an opening for a WordPress developer position. It helps you connect with talented individuals from around the world and hire developers remotely.
The platform is used by popular companies, such as GoDaddy, Aha!, and Thomson Reuters. You can post a job opening once for $299 for 30 days or purchase more credits to post multiple jobs.
As a WordPress developer, Remote.co is also a great place to find remote work. You can perform a simple job search on the website and see the latest openings.
Plus, the website also offers detailed FAQs on different topics for both, recruiters and job seekers. For instance, you can learn how to manage remote teams or what traits to look for in candidates.
Indeed is a similar website to LinkedIn and allows you to find the right talent for your company. Creating a job post is straightforward on Indeed.
All you need to do is create a free account, set up a job post by adding a title, description, and location, and post your job. Indeed also lets you create sponsored posts, which helps increase the visibility of your job opening.
Indeed also helps job seekers find the best WordPress development jobs in the market. You can perform a simple search using a keyword and country to see different openings.
Which WordPress Developer Job Site Should You Use?
In our experience, the top WordPress developer job sites are LinkedIn and FlexJobs if you’re looking for full-timers, and Codeable if you’re looking to hire WordPress developers on contract for specific projects.
If you’re looking for the best remote WordPress jobs board, then We Work Remotely is a reliable source of getting high quality candidates.
The best way to find the right talent is by posting job openings on multiple platforms. Most job boards and websites allow you to post an opening for free, so you can maximize your chances of attracting the best resources.
When you’re looking to hire a WordPress developer on a project basis, then Codeable has an advantage over Upwork because Codeable vets each developer that’s added on the platform. This leads to better overall work quality. Although you can always post the project on both Codeable and Upwork to see the price difference.
The need to achieve a competitive advantage in the business world has contributed to constant technological advancement. Creating a website is among the many options for building a brand’s online presence. Companies that have made their website on WordPress now use WordPress VR plugins to integrate virtual reality tours into their website. The virtual reality [...]
Are you looking for an easy way to create a WordPress form with a payment option?
Often small business owners need to create an easy way to accept payments on their website without setting up a complex shopping cart. A simple payment form allows you to accept custom payment amounts, setup recurring payments, and collect custom details with ease.
In this article, we will show you how you can easily create forms with a payment option.
Why Create WordPress Forms with a Payment Option?
If you want to create a simple form with custom payment options, then you don’t need to create a full online store. While eCommerce plugins like Easy Digital Downloads and WooCommerce are very powerful, you may not need something as comprehensive if you’re only selling a few items, services, or need to accept custom amounts from each customer.
In some cases, creating a simple payment form is a much better solution than using a dedicated eCommerce plugin.
For example, on a non-profit website, you may want to give visitors the option to make a donation while they’re filling out a volunteer application form.
Some website owners like to accept optional tips from visitors who are reaching out for help.
Or, you may want to offer a digital download with a ‘pay what you like’ system, where visitors choose how much they want to pay for a product or service. We’ve even seen WordPress websites offer products as a free download, while giving visitors the option to pay for a premium upgrade or extra content.
That being said, let’s look at how you can create optional payment forms. Simply use the quick links below to jump straight to the method you want to use.
The easiest way to create a simple WordPress payment form is by using WP Simple Pay.
WP Simple Pay is the best Stripe payment plugin for WordPress that lets you accept credit card payments, Apple Pay, Google Pay, and more without any having to install any special eCommerce plugins.
This free plugin is perfect for non-profits, small businesses, volunteers, and anyone who wants to collect payments without having to invest in advanced eCommerce plugins.
First, you’ll need to install and activate the WP Simple Pay plugin. If you need help, then please see our guide on how to install a WordPress plugin.
Upon activation, the plugin will automatically launch the setup wizard. Go ahead and click the ‘Let’s Get Started’ button.
In the next step, you’ll need to connect a Stripe account to WP Simple Pay. Stripe is a beginner-friendly payment processor for website owners.
To get started, click on the ‘Connect with Stripe’ button.
After that, you can either log into an existing Stripe account or create a new one.
If you’ve already registered with Stripe, then simply type in the email address and password for that account.
WP Simple Pay will now show you how to connect your Stripe account to WordPress.
If you’re not already registered with Stripe, then type in your email address and then follow the onscreen instructions to create your free Stripe account.
Once you’re logged into a Stripe account, go ahead and click on ‘Create a Payment Form.’
If you’ve clicked away from this screen by accident, then don’t worry. You can reach the same screen by going to WP Simple Pay » Add New in the WordPress dashboard.
The free WP Simple Pay plugin has a few different payment templates that can help you create different kinds of payment forms within minutes. You can unlock extra templates by upgrading to WP Simple Pay Pro, including a template that adds a Stripe donate button in WordPress.
Since we want to create a simple WordPress payment form, hover over the ‘Payment Button’ template and then click on ‘Create Payment Button’ when it appears.
In the ‘Title’ field, type in a name for your payment form.
This title is just for your reference so you can use anything you want.
You can also use the ‘Description’ field to add some information about your payment form. Again, WordPress won’t show this to your site’s visitors but it can be useful for your own reference or for anyone else who shares your WordPress dashboard.
After that, click on the ‘Payment’ tab.
By default, WP Simple Pay will create your payment form in test mode, meaning you can’t accept payments from visitors.
We recommend leaving the ‘Global Settings (Test Mode)’ radio button selected, so you can test how the form works before you start accepting payments from visitors.
However, if you want to start accepting real payments straight away, then you can select the ‘Live Mode’ button instead.
Next, you can decide how much you’ll charge visitors by typing a number into the ‘One-Time Amount’ field.
Note: By default, WP Simple Pay uses the dollar currency. If you want to accept payments in any other currency, then simply head over to WP Simple Pay » Settings. You can then select the ‘Currency’ tab and choose a new currency.
After you’ve done that, select the ‘Form Fields’ tab.
By default, your button will have the label ‘Pay Now’, but you can change this to anything you want by typing into the ‘Button Text’ field.
Since we’re creating an optional payment form, you may want to use something like ‘Send Us a Tip’ or ‘Buy Me a Coffee.’
You can also change the ‘Button Processing Text,’ which is the message that WP Simple Pay will show to shoppers while it’s processing their payment.
Again, since this is an optional payment form you might use something that reflects this, such as ‘We’re processing your donation.’
By default, WP Simple Pay will use the same button style as your WordPress theme. It also has a ‘Stripe blue’ style that you can use, as you can see in the following image.
If you want to use this button style, then simply select the ‘Stripe blue’ radio button in the ‘Payment Button’ section.
After that, select the Stripe Checkout tab and choose the information that WP Simple Pay will collect from visitors at checkout.
For example, if you’re selling a physical product then you’ll want to check the ‘Collect Shipping Address’ box.
As you’re working on the payment form, you can preview how it looks at any point simply by clicking on the ‘Preview’ button.
This opens the payment form in a new tab, in exactly the same way you preview posts and pages in the standard WordPress editor.
When you’re happy with how the payment form looks, go ahead and make it live by clicking on the ‘Publish’ button.
You can now add the payment form to any page, post, or widget-ready area using the value in ‘Form Shortcode.’
If you published the form in test mode, then the Stripe dashboard doesn’t show any payments you get during this time, which makes it difficult to test your optional payment form.
To see your transactions, you’ll need to activate test mode in Stripe by logging in to your Stripe dashboard and then selecting the ‘Payments’ tab.
Next, click on the ‘Developers’ toggle in the upper right corner.
Once you’ve done that, all of your test payments will appear in the Stripe dashboard so you can check that the form is working properly.
When you’re happy with how the form is set up, you can start accepting real payments by going to WP Simple Pay » Payment Forms in the WordPress dashboard.
Here, simply hover your mouse over the optional payment form, and click on the ‘Edit’ link.
You can now go ahead and select the ‘Payment’ tab, and then click on the radio button next to ‘Live Mode.’
Finally, click on ‘Update.’ Your payment form is now live, and you’re ready to start accepting money from your audience.
Method 2. Using WPForms (Best For Flexible and Optional Payments)
Sometimes you may want to let customers choose how much money to send as part of a payment or donation. For example, you might create a ‘pay what you want’ model.
Other times, you may want to collect additional details as part of the form or even allow users to submit paid content to your blog or website.
If you’re looking to create a flexible payment form, then you’ll need an advanced form builder plugin.
WPForms is the best form builder plugin for WordPress. You can use it to quickly create lots of different forms, including contact forms, booking forms, and more. Over 5 million website owners use WPForms.
Using this plugin, you can create a form that shows different fields depending on whether the customer wants to send you a payment or not.
For this guide, we’ll be using WPForms Pro because it comes with addons that make it easy to collect payments using popular payment gateways such as Stripe and PayPal. There is also a WPForms Lite version that is 100% free, but it doesn’t include the payment addons.
First, you’ll need to install and activate WPForms Pro. If you need help, then please see our guide on how to install a WordPress plugin.
After activating WPForms, head over to WPForms » Settings in your WordPress dashboard.
You can now enter your license key into the ‘License Key’ field. You’ll find this information in your WPForms account.
After activating the WPForms plugin, you’ll need to install at least one payment addon.
To encourage visitors to pay for your product or service, you may want to set up multiple addons so visitors can pay using their favorite method.
To install one or more payment addons, simply go to WPForms » Addons.
You can now find the addon that you want to use, and click on its ‘Install Addon’ button. WPForms lets you accept payments using Stripe, Square, PayPal, and Authorize.net.
For example, if you want to accept payments using PayPal, then you’ll need to install the PayPal Standard Addon.
After activating one or more payment addons, the next step is connecting WPForms to the related payment account. For example, if you installed the Square addon, then you’ll need to connect WPForms to your Square account.
To make this connection, go to WPForms » Settings. You can then click on ‘Payments.’
On this screen, you’ll see a ‘Connect with…’ button for each payment addon that you installed.
Here, simply click on the ‘Connect with…’ button. This will launch a setup wizard, which will guide you through the process of connecting WPForms to your payment account.
Simply repeat these steps for every payment addon that you want to use.
As soon as you’ve done that, click on the ‘Save Settings’ button at the bottom of the screen. Then, head over to WPForms » Add New.
Here, type a name for your form into the ‘Name Your Form’ field.
Your site visitors won’t see the name, so it’s just for your reference.
WPForms has different templates so you can quickly get started and build all kinds of forms.
To take a closer look at a template, simply hover your mouse over the template. Then, go ahead and click on the View Demo button.
For this guide, we’ll be using the Simple Contact Form template, but you can add a payment field to any WPForms template.
When you find a template that you want to use, simply click on its Use Template button. This will launch WPForms drag and drop form builder.
The Simple Contact Form template already has fields where customers can type in their name, email address, and message.
So next, we need to add a field where visitors can decide whether to send you a payment. The easiest way to do this is by using a Multiple Choice field.
In the left-hand menu, find the Multiple Choice field and then add it to your form using drag and drop.
To start, we need to change the label that WPForms shows at the top of the Multiple Choice section.
This is the perfect place to ask visitors whether they want to send you a payment. For example, you might use ‘Would you like to send us a donation?’ or ‘Do you want to support this website?’
To change the default label, simply click to select the Multiple Choice section in your form. The left-hand menu will now show all the settings that you can use to customize this section.
In the left-hand menu, delete the placeholder ‘Multiple Choice’ text in the ‘Label’ field. You can then type in the new text that you want to use.
By default, the Multiple Choice section has three choices, but we only need two choices.
To remove one of these choices, go ahead and click on the – button next to it.
The next step is customizing the text for ‘First Choice’ and ‘Second Choice.’
In the left-hand menu, simply delete the placeholder text and type in the text that you want to use instead. For example, you may want to type in ‘Yes, I want to support the website’ and ‘No, thanks.’
When creating WordPress forms with a payment option, you may want to let visitors decide how much money to send you.
To do this, simply click on the ‘Add Fields’ tab in the left-hand menu. Then, drag and drop a ‘Single Item’ field onto your form.
To customize this field, just give it a click.
By default, the field shows a ‘Single Item’ label. You can replace this label with your own text, by typing into the ‘Label’ field in the left-hand menu.
For example, you may want type in text such as ‘I want to send you…’ or ‘Donation Amount.’
Next, open the ‘Item Type’ dropdown and click on User Defined.
Visitors will now be able to type any value into this field, and send you this amount of money.
You may also want to suggest the amount of money you would like to get. This can make it easier for visitors to complete your form, since they can click to choose an amount rather than having to make this decision themselves.
To add some suggestions to your form, simply drag and drop a ‘Multiple Items’ field onto your WordPress form.
Then, go ahead and customize the section’s label and option text by following the same process described above.
Once you’ve done that, you’ll need to set a price for each option by typing the value into the field next to it.
By default, the Multiple Items section has three options. To add more choices, simply click on the ‘+’ icon.
You can then customize the new option’s text, and type in a value following the same process described above.
Want to remove an option from the Multiple Items section instead?
To do this, simply click on its ‘-‘ button.
After adding some fields, you can change the order these fields appear in your form by dragging and dropping them.
Once you’ve done all that, you’ll need to add at least one payment option to your form.
In the left-hand menu, scroll to the ‘Payment Fields’ section. Here, you’ll find fields for all the different payment addons that you installed.
To add a payment option to your form, just give it a click.
After adding a payment option field, it’s a good idea to click on it. WPForms will now show all the settings that you can use to configure this field.
For example, if you click on the ‘Stripe Credit Card’ field, you’ll be able to edit the label and add a description.
We only want to show the payment field to visitors who choose to send you a payment. To do this, you need to enable conditional logic for your payment field.
If you haven’t already, then click to select the payment field in your form. Then, simply click on the ‘Smart Logic’ tab in the left-hand menu.
Once you’ve done that, go ahead and click on the ‘Enable Conditional Logic’ slider to turn it from grey (inactive) to blue (active).
Next, we need to tell WPForms to only shows the payment field if the visitor selects your ‘Yes, I want to support the website’ option.
To do this, make sure the ‘this field if’ dropdown is set to ‘Show.’
Then, open the field that shows ‘Select Field’ and choose the ‘Do you want to support the website?’ field.
Once you’ve done that, open the next dropdown and click on ‘is.’
Finally, open the dropdown that shows ‘Select Choice’ by default, and choose the ‘Yes, I want to support the website’ field.
In the image above, we’re telling WPForms to only show the payment field when a visitor confirms that they want to support the website.
Adding Payment Methods to WPForms
The next step is enabling payments for the form. To do that, click on the ‘Payments’ tab in the left-hand menu.
You’ll now see all the different payment options that you can enable for the form.
To get started, simply click on the payment option that you want to configure.
After that, just check the box next to ‘Enable….’
Depending on the payment option, there may be some extra settings you need to configure. For example, if you’re enabling PayPal then you’ll need to type in the email address where you want to get your payments.
You’ll also want to use conditional logic rules with your payment settings.
To use conditional logic, click on the ‘Enable Conditional Logic’ slider. Then, open the ‘this charge if’ dropdown and select ‘Don’t process.’
Once you’ve done that, go ahead and open the dropdown that shows ‘Select Field’ by default. You can now choose your ‘Do you want to support this website?’ or a similar field.
Then, make sure the next dropdown menu is set to ‘is.’
After you’ve done that, you’re ready to open the ‘Select Choice’ dropdown menu and click on the ‘No, thanks’ or similar field.
Now, your site will refuse to process any payments if the visitor chooses the ‘No, thanks’ option, no matter what they type into the rest of your form.
If you’re offering a choice of payment options, then simply repeat the above process by checking the ‘Enable’ box and then configuring any extra settings. You can also enable conditional logic.
In the following screenshot, you can see that Stripe has different settings compared to PayPal, so it’s always worth checking these extra settings carefully.
Once you’ve done that, it’s a good idea to enable AJAX form submissions. This allows users to submit the payment form without reloading the entire page.
To enable AJAX submissions, simply go to Settings » General.
Then, just click to expand the ‘Advanced’ section.
After that, you can go ahead and check the ‘Enable AJAX form submission’ box.
When you’re happy with how your WordPress form looks, go ahead and save your changes.
To do this, just click on the ‘Save’ button at the top of the screen.
By default, WPForms will send an email to your WordPress admin every time someone submits this form. However, you may only want to get a notification when someone chooses to send you a payment.
To change WPForms’ default email settings, click on the ‘Settings’ tab. Then, go ahead and click on ‘Notifications’ in the left-hand menu.
Now, scroll to the bottom of the screen and click on the ‘Enable Conditional Logic’ slider.
As soon as you activate the slider, WPForms will show some extra settings.
Next, make sure the ‘this notification if’ dropdown is set to ‘Send.’
After you’ve done that, open the dropdown that shows ‘Select Field’ by default and click on the ‘Do you want to support the website?’ or a similar field.
Next, make sure the dropdown is set to ‘is.’
Finally, open the dropdown that shows ‘Select Choice’ by default.
The final step is choosing the ‘Yes, I want to support the website’ or a similar field.
When you’re happy with these changes, don’t forget to click on the ‘Save’ button.
By default, WPForms will send the email to your WordPress admin email. You can send these messages to any other email address, or even multiple addresses.
To change the default settings, find the ‘Send To Email Address’ field. By default this is set to {admin_email}. This is a dynamic value that tells WordPress to send its emails to your WordPress admin.
You can replace this dynamic text with any other email address by typing the new address into the ‘Send To Email Address’ field.
If you want to email multiple people, then simply separate each address with a comma as you can see in the following screenshot.
By default, WPForms uses ‘New Entry’ and the name of your form for the email subject line.
If you want to use something else then simply type the new text into ‘Email Subject Line.’
Another option is to use dynamic text in your email subject. To do this, click on the ‘Show Smart Tags’ link and then choose a tag from the ‘Available Fields’ list.
Now when WPForms creates its emails, it will automatically replace the smart tags with values taken from the submitted form. For example, if you click on ‘Total Amount’ then WPForms will show the total payment in its email subject line.
You can also change the text that’s included in the email’s body.
Once again, you have the option to use smart tags to create a more informative email.
After creating your custom email notifications, you’ll want to make sure they’re sent to the recipient’s email inbox and not to the spam folder.
You may also want to show a confirmation message to your customers. For example, you might confirm you’ve received their form safely or show them a personalized ‘Thank You’ message. WPForms will show this message automatically whenever a customer submits the WordPress form.
To configure this message, click on the ‘Confirmations’ tab. Then, just open the ‘Confirmation Type’ dropdown and choose ‘Message.’
If you want to show the same text to all visitors, then you can simply type your text into the ‘Confirmation Message’ box.
Another option is to create a personalized message by adding smart tags, following the same process described above.
Instead of showing a message, you might prefer to show a particular page or redirect visitors to another URL. To do this, simply open the ‘Confirmation Type’ dropdown.
You can now choose from ‘Show Page’ or ‘Go to URL.’
After that, you can use the settings to configure the page or URL that WPForms will show after the customer submits the form.
When you’re happy with these settings, don’t forget to save your changes by clicking on the ‘Save’ button.
After all that, you’re ready to add this form to your website.
To do this, simply open up the page or post where you want to show the form. Then click on the plus ‘+’ icon.
In the popup that appears, type ‘WPForms’ to find the right block. As soon as you click on the WPForms block, it will add the block to your page.
In your new block, go ahead and click to open the dropdown menu.
You will now see a list of all the forms you’ve created using WPForms. Simply click to select the WordPress form with a payment option.
WPForms will now show a preview of how your form will look directly in the WordPress editor.
You can also preview the entire page by clicking on the ‘Preview’ button in the toolbar.
When you’re happy with how your form looks, you can either publish or update this page as normal. Now if you visit this page or post, you’ll see the optional payment form live on your WordPress website.
Are you looking for the best footer design examples to help you get inspired?
The footer is the area at the bottom of your website, and website owners often overlook it. By checking out great website footers, you can get design inspiration and improve your footer.
In this article, we’ll show you some of the best footer design examples and offer best practices and tips to help you take action.
Why Is a Good WordPress Footer Design Important?
The footer is the area of your website that appears at the very bottom of the page. It will normally be on every page of your WordPress website.
Here’s an example of our footer on WPBeginner that millions of readers see every month.
We include links to our free tools and product sites, as well as ways for users to learn about us, find jobs with us, follow us on social media, and more.
Since it’s located at the bottom of the website, most beginners forget to optimize this area.
However, your website footer is an important area of your website. It lets you show important details and final takeaways in one place.
By customizing your footer, you can improve the overall user experience of your website and even optimize your site for WordPress SEO.
Plus, visitors who scroll to the bottom of the page are very engaged, so you can capture their attention with a call to action, email subscribe box, or send them to the most important pages on your website.
That being said, let’s show you some of the best footer design examples and best practices to optimize your WordPress footer.
Best WordPress Footer Design Examples
We’ve rounded up some of the top footer design examples to help you get design inspiration for your own footer area.
WPForms has a footer with all kinds of useful links. You’ll find links that go to the most helpful company pages, the top features of the plugin, and some useful WordPress links.
This ensures that when the reader gets to the bottom of the page and still has questions, they’ll find the exact resources they need. There’s also a floating alert bar at the bottom of the page with a call to action.
Neil Patel has a compact and straightforward footer that offers readers quick navigation links. The footer menu is the same as the navigation menu at the top of the site.
Plus, readers have the option to follow Neil Patel on social media as well.
Michael Hyatt has another simple and compact footer. It highlights the copyright date, easy social sharing buttons, and links to pages like terms of service and privacy policy.
Directly above the footer, you’ll see a call to action to download a free guide, which can convert a lot of visitors that make it to the bottom of the page.
ReddBar is a WooCommerce store with a footer that encourages email sign-ups. Directly above the footer links, there’s a massive sign-up box for readers.
Some of the helpful links include a link to their FAQ page, contact page, wholesale pricing page, and more.
The Reader’s Digest footer contains a lot of information for visitors. You’ll find links to their category pages, other company brands, social media sharing buttons, and more.
Plus, there’s an eye-catching email sign-up box to encourage visitors to join their email list.
MonsterInsights has a simple footer that focuses on helping readers find the information they need. There are links to their premium features, company resources, and other brand links.
Plus, there’s a call to action to lead visitors to the pricing page. There are also social icons.
There’s also a big email sign-up form directly above the footer and a small footer navigation menu with the same menu options as the header navigation.
TrustPulse is the best social proof notifications plugin on the market. Instead of including multiple navigation menus or page links, they feature an email newsletter sign-up box.
Although it’s different from most other brands, a minimalist footer like this can convert well since there are fewer distractions or actions the visitor can take.
The Next Web has a footer that stands out from the rest of the website. It has social media sharing buttons, links to important pages, and more.
You’ll see a social proof section directly above the footer where they feature logos from popular brands and websites they’ve been mentioned or featured.
WordPress Footer Design – Tips and Best Practices
There are a lot of ways you can improve your user experience and create a better footer for your WordPress blog.
Let’s take a quick look at some of the best practices to keep in mind as you edit your website footer.
Include Your Business Contact Information
Having contact information listed on your site is essential. You should have a separate contact form page on your website, so your visitors can get in touch.
However, the footer is also an excellent place to include your contact information, especially if you have local customers who will be looking for your physical address.
For local businesses, the more ways you can feature your contact information, address, and even business hours, the better.
Add Links to Important Website Pages
It’s important to have clear navigation across your entire website. That’s why it’s common for websites to include links in their footers.
You can add links for your most important product pages, top blog posts, about pages, and more.
Think about the most valuable pages on your website and what your visitors will find the most useful.
Adding and optimizing your links can also give you an SEO benefit and boost your search engine rankings.
Add Social Proof to Improve Conversions
One thing you may have seen certain websites do in their footer is to add social proof. This can help to earn your customer’s trust and position you as an expert in your space.
It can be as simple as a customer testimonial or a collection of logos of popular websites you’ve been featured on.
Here at WPBeginner, we highlight logos of popular websites where we’ve been featured directly above the website footer.
Add a Call to Action
When your visitors get to the bottom of your website, you’ll want to tell them the exact action they should take and how they should do it.
For some websites, this will be a call to action to sign up for their email newsletter. For others, it will be links to explore popular product features or even a call to action button.
Your footer is the last chance to get your visitors’ attention and encourage them to become subscribers and customers or simply spend more time on your website.
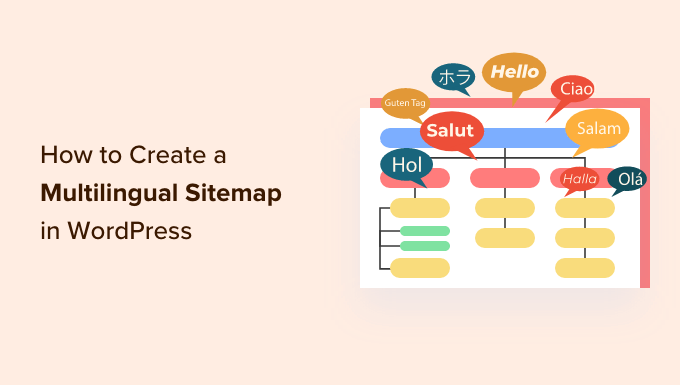
Are you looking to improve the search engine rankings of your site’s multilingual pages?
Creating a multilingual sitemap helps Google, Bing, and other search engines easily find your content and index it. You can get more international search traffic simply by giving search engines an easy way to find multilingual content on your WordPress site.
In this article, we’ll show you how to create a multilingual sitemap for WordPress.
Why Create a Multilingual Sitemap in WordPress?
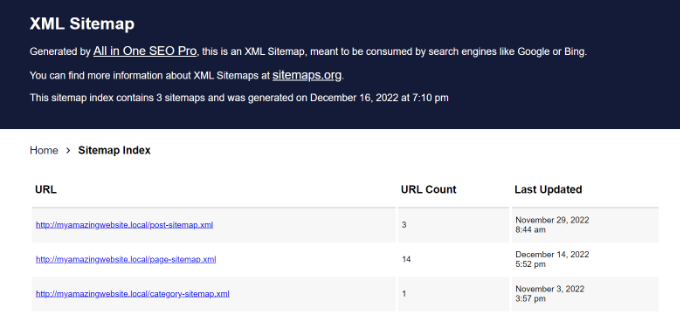
A sitemap is a file that contains all the important content on your WordPress website. It is in the XML format and is targeted toward search engines instead of people.
Creating an XML sitemap for your multilingual website helps search engines find and index your content faster. For instance, if you have different domains or subdomains translated into multiple languages, then you’ll need to create a sitemap for each website.
A sitemap is extremely important for your WordPress SEO. Let’s say you just created a new multilingual website. Your new site won’t have many backlinks, and it can be hard for search engines to discover your new articles and pages.
The sitemap provides a way for search engines to learn about your new content in another language. This way, your multilingual pages will start to get indexed and appear in search results.
That being said, let’s take a look at how you can create a multilingual sitemap in WordPress.
Creating a Multilingual Sitemap in WordPress
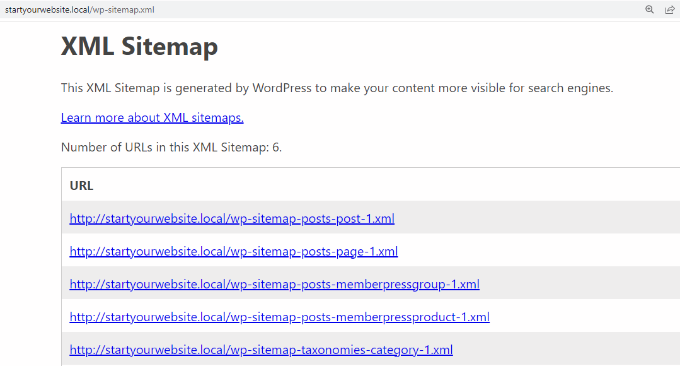
By default, WordPress automatically creates an XML sitemap for new websites. You can add wp-sitemap.xml at the end of the domain, and WordPress will display the default XML sitemap.
However, this feature is fairly limited and not very flexible. You can’t control which content to add or remove from the sitemap.
It also automatically creates a sitemap for a multilingual site and gives you more control over which pages and website sections you want to show in the sitemap.
The sitemap feature is available in the AIOSEO Lite version for free. However, if you’re looking for more features like video sitemaps, news sitemaps, redirections manager, and link assistant, then we recommend using the AIOSEO Pro version.
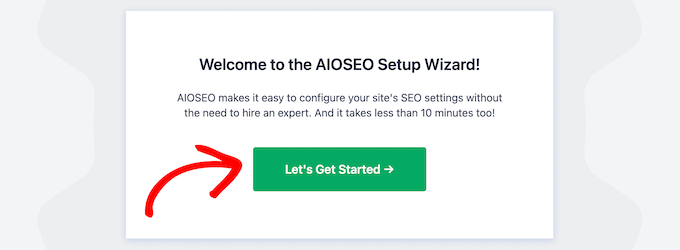
First, you’ll need to install and activate the AIOSEO plugin. If you need help, then please see our guide on how to install a WordPress plugin.
Upon activation, you’ll see the AIOSEO setup wizard. Simply click the ‘Let’s Get Started’ button and follow the onscreen instructions. For more details, you can visit our guide on how to set up All in One SEO plugin for WordPress.
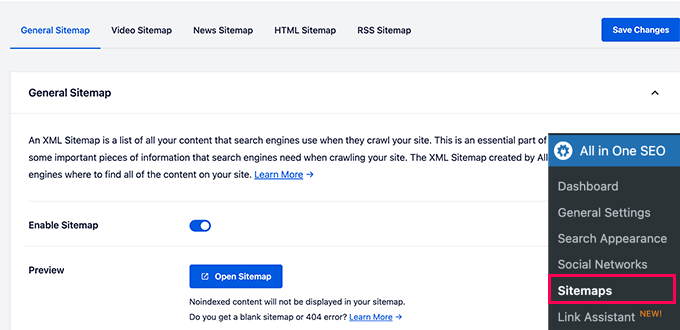
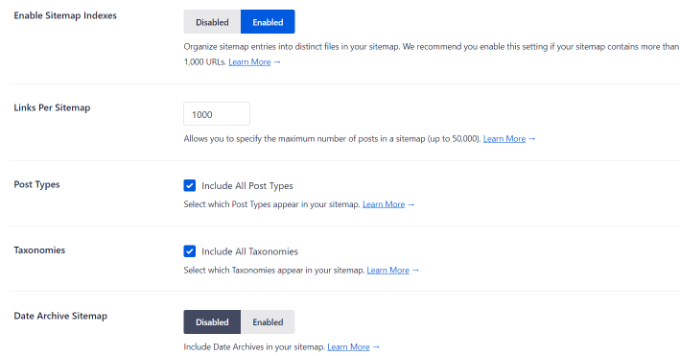
After that, you’ll need to go to All in One SEO » Sitemaps from your WordPress dashboard and ensure that the ‘Enable Sitemap’ option is enabled.
AIOSEO will automatically create a sitemap for your multilingual website.
You can click the ‘Open Sitemap’ button to preview it or simply add ‘sitemap.xml’ to your website URL.
Please note that if you’re using WPML to create multilingual sites, then AIOSEO will automatically serve sitemaps across different languages.
For instance, your sitemap URL will be something like /nl/sitemap.xml, /de/sitemap.xml, or /fr/sitemap.xml.
If you’re using TranslatePress to create your WordPress multilingual site, then you will need to install their SEO pack addon which is fully compatible with AIOSEO.
To further customize your multilingual sitemaps, you can scroll down in AIOSEO Sitemaps settings to view more options.
By default, the plugin lets you include all post types and taxonomies in the sitemap. It also gives the option to include date archives and author sitemaps.
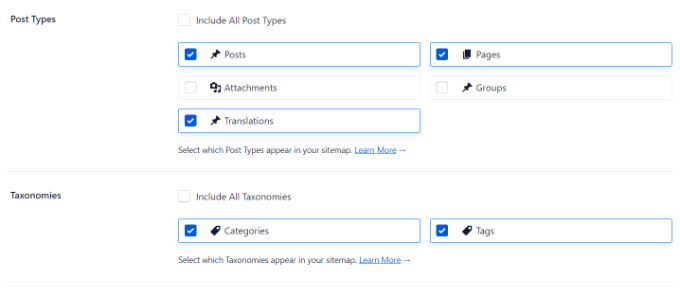
However, you can uncheck the ‘Post Types’ and ‘Taxonomies’ options and view more options.
For example, let’s say you have translated content as a custom post type. You can simply check that option to include in the sitemap and exclude other post types.
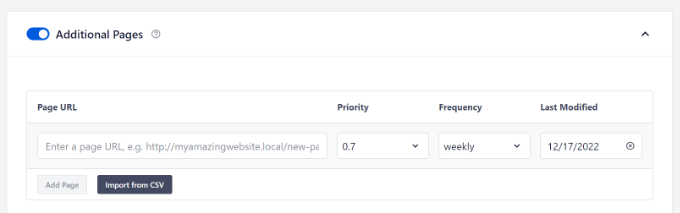
Besides that, you can also add more pages from your multilingual website to the sitemap.
For example, let’s say you’ve translated a pillar article or an evergreen content into another language. You can add the page URL to the sitemap using AIOSEO and help search engines easily find your content.
Simply scroll down and click the ‘Additional Page’ toggle to enable the option. After that, you can add the page URL, and choose the priority and the frequency.
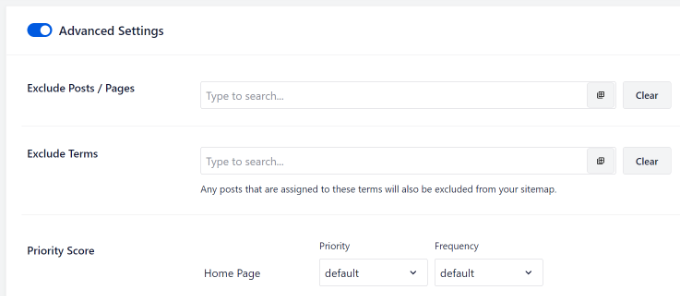
AIOSEO lets you exclude posts, pages, and specific terms from your WordPress sitemaps.
For instance, you can add different multilingual posts and pages that you don’t to include in the sitemap. These can be contact us page, or terms of service pages translated in another language.
First, you’ll need to enable the ‘Advanced Settings’ option. Then enter the URLs in the ‘Exclude Posts / Posts’ field and the terms in the ‘Exclude Terms’ field.
Submitting Your Multilingual Sitemap to Search Engines
Now that you’ve created a multilingual sitemap, the next step is to submit it to different search engines. This way, Google, Bing, and other search engines can easily find new content.
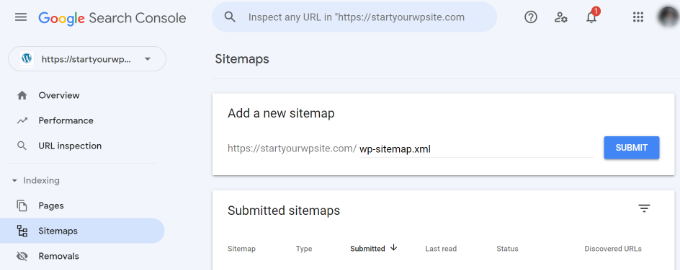
Submit Multilingual Sitemap to Google
Google Search Console is a free tool by Google that you can use to monitor your site’s performance on search results. It helps you see which keywords people use to find your website and resolve any errors that might prevent you from appearing on Google.
Submitting your multilingual sitemap to the Search Console helps Google quickly discover new content.
You can simply log in to your account and head to the ‘Sitemaps’ option from the menu on your left. Next, enter your multilingual sitemap URL under the ‘Add a new sitemap’ option and click the ‘Submit’ button.
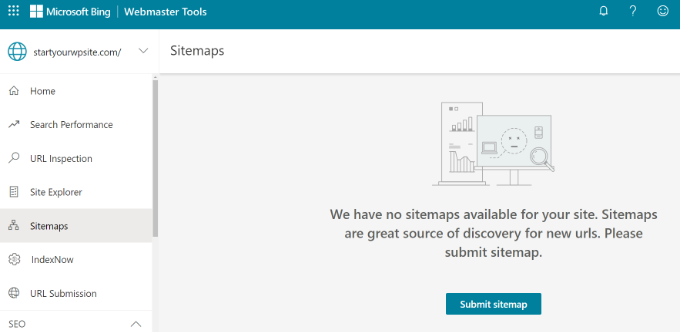
Submit Multilingual Sitemap to Bing, Yahoo, and DuckDuckGo
Similarly, you can submit the sitemap to Bing using the Webmaster Tools. The best part is that, when you submit your site to Bing, it’s also automatically submitted to the Yahoo and DuckDuckGo search engines.
Are you looking for a way to embed Facebook status posts in WordPress?
Facebook statuses are an easy way to share important updates and time-sensitive information with your audience. By embedding your Facebook timeline in WordPress, you can get more engagement, let people know what’s happening on your Facebook page or group, and grow your followers.
In this article, we will show you how to embed Facebook status posts in WordPress.
Why Embed Facebook Status in WordPress?
Facebook is the most popular social media platform in the world and has billions of active users. For website owners, Facebook is a powerful way to connect with a new audience and engage with the people who already know about your brand.
Facebook is also perfect for sharing time-sensitive information in real time. In this way, you can use FOMO to create a sense of urgency.
For example, you might post a status about how visitors are running out of time to enter your giveaway in WordPress, or take advantage of your flash sale.
However, people won’t see your Facebook status if they just visit your website. This makes it difficult to grow your Facebook following and build a relationship with your audience.
By embedding your Facebook status posts in WordPress, you can promote your social media page and encourage more people to follow you on Facebook.
As you post new statuses, they’ll appear on your site automatically, so it’s also a great way to keep your website fresh, even for regular visitors.
That being said, let’s see how to embed Facebook status posts in WordPress.
This plugin lets you display text and links from your Facebook page or group.
In this guide, we’ll be using the free version of Smash Balloon as it allows you to embed Facebook statuses no matter what your budget. However, there’s Smash Balloon Facebook Feed that lets you embed different kinds of content. For example, you can embed a Facebook video in WordPress, and show images and videos in a lightbox popup on your site.
The first thing you need to do is install and activate the Smash Balloon Social Post Feed plugin. For more details, see our guide on how to install a WordPress plugin.
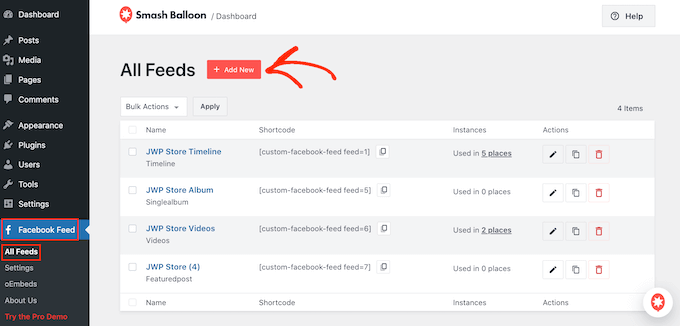
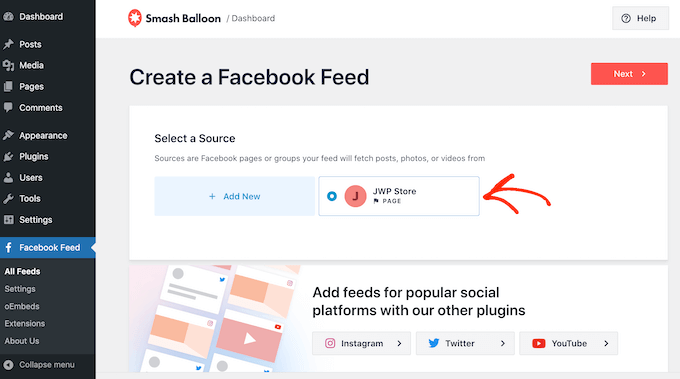
After that, you’ll need to connect Smash Balloon to your Facebook page or group, by going to Facebook Feed » All Feeds. Here, click on ‘Add New.’
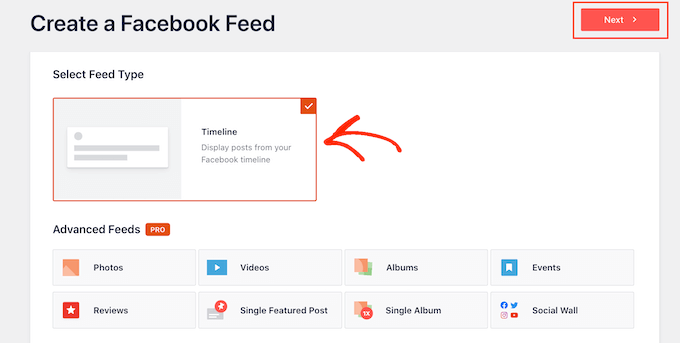
Smash Balloon pro lets you show posts from your photo albums, timeline, events, and more.
However, the free version only allows you to embed your Facebook statuses so click on ‘Timeline’ and then select ‘Next.’
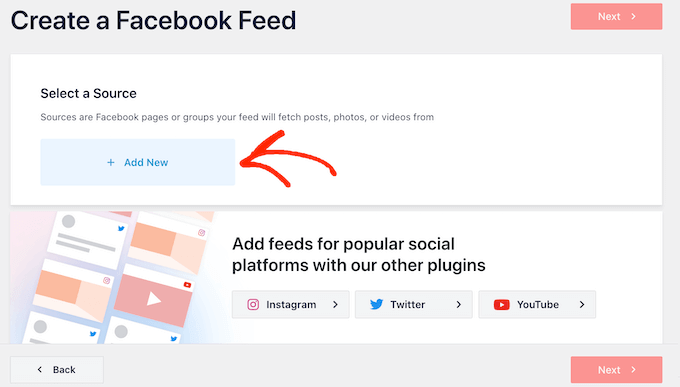
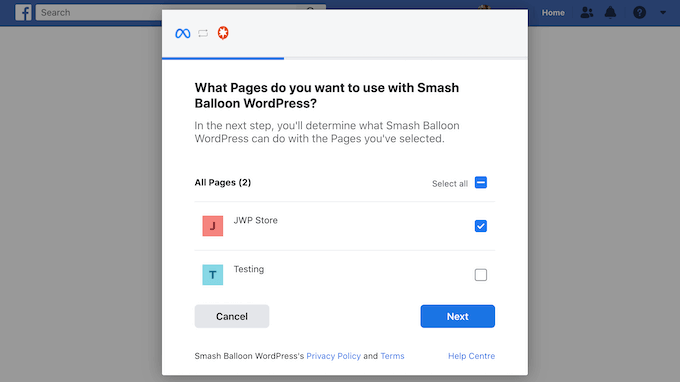
Now, you need to select the page or group which you’ll get the Facebook statuses from.
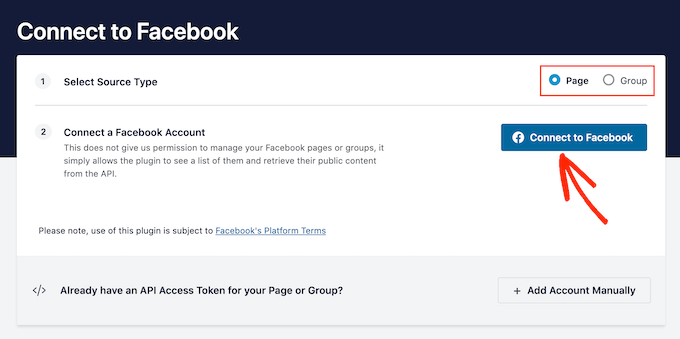
After that, go ahead and click on ‘Connect to Facebook.’
This opens a popup where you can log into your Facebook account and choose the pages or groups which you want to get the status updates from.
As soon as you’ve done that, click on ‘Next.’
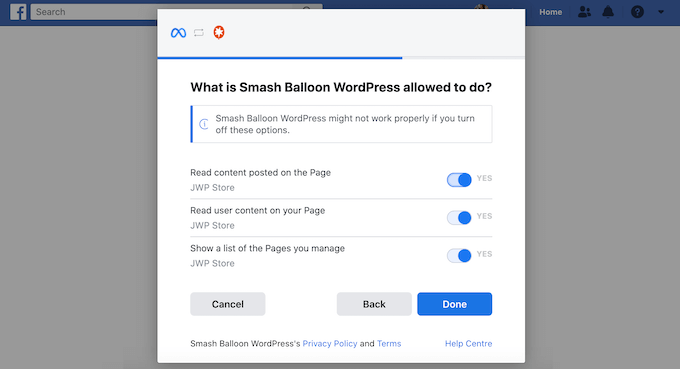
Facebook will then show all the information that Smash Balloon will have access to and the actions it can perform.
To restrict Smash Balloon’s access to your Facebook account, just click any of the switches to turn it from ‘Yes’ to ‘No.’ Just be aware that this may affect the content that you can embed on your WordPress blog or website.
With that in mind, it’s a good idea to leave all the switches enabled.
When you’re happy with how your Facebook permissions are set up, click on ‘Done.’
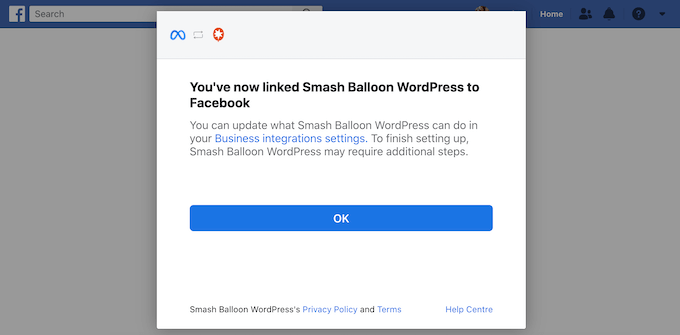
After a few moments, you should see a message confirming that you’ve connected your WordPress website to Facebook. With that done, click on the ‘OK’ button.
Smash Balloon will now take you back to the WordPress dashboard automatically.
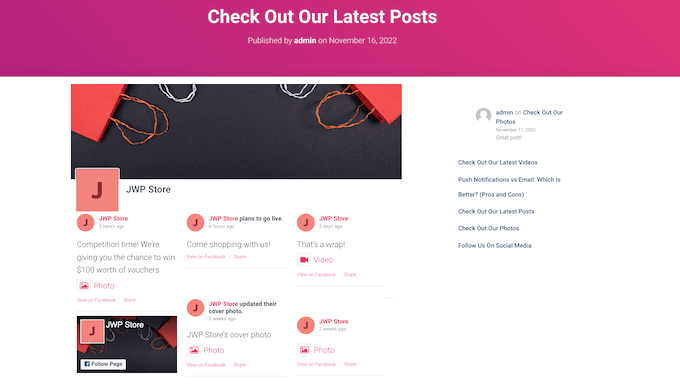
How to Embed Facebook Status Posts in WordPress
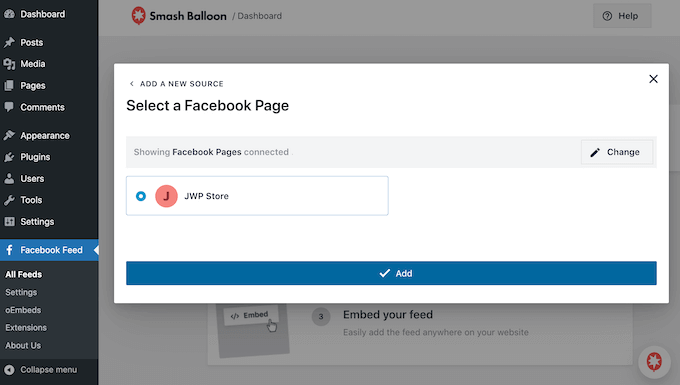
You will now see a popup with the source you just linked to your website. Simply select the radio button next to your Facebook page or group and then click on the ‘Add’ button.
If you accidentally closed the popup, then don’t worry. You can simply refresh the tab to reopen the popup.
After that, Smash Balloon will take you back to the Facebook Feed » All Feeds page automatically. Just like before, click on the ‘Add New’ button, select ‘Timeline,’ and then click on the ‘Next’ button.
Now, select your Facebook page or group, and click on ‘Next.’
Smash Balloon will now go ahead and create a timeline feed from the Facebook page or group you’ve chosen.
This is a good start, but Smash Balloon has lots of settings that you can use to customize your embedded timeline.
How to Customize Your Embedded Facebook Status Posts
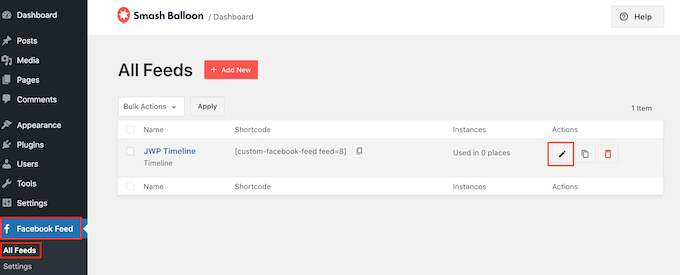
To fine-tune your timeline, go to Facebook Feed » All Feeds in the WordPress dashboard.
Here, find the timeline feed you just created and click on the ‘Edit’ button next to it.
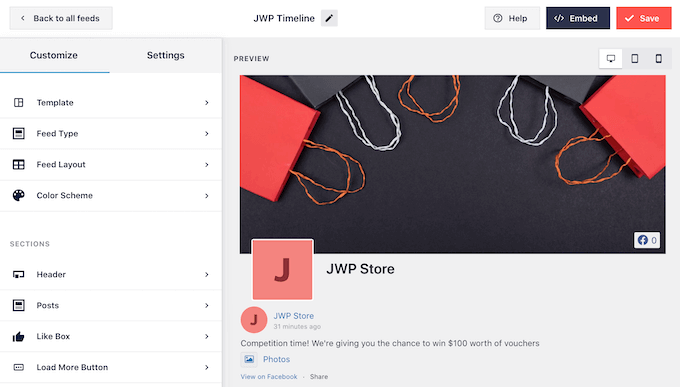
This opens the Smash Balloon feed editor, which shows a preview of your timeline to the right.
On the left-hand side, you’ll see all the different settings you can use to customize how the timeline looks on your site. Most of these settings are self-explanatory, but we’ll quickly cover all the main areas.
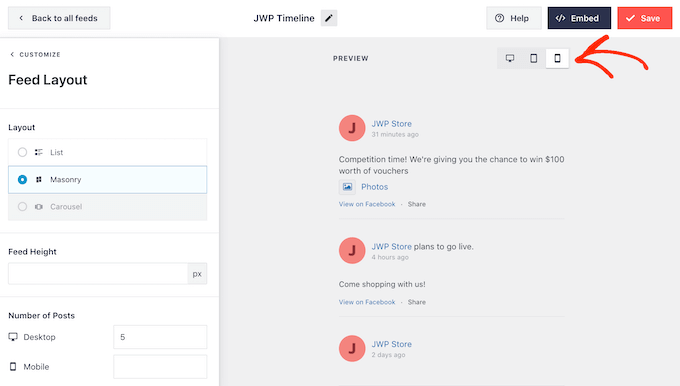
To start, you can change how the statuses are displayed by clicking on ‘Feed Layout.’
On this screen, you can switch between list and masonry layouts, as well as change the feed height. As you make changes, the preview will update automatically so you can try different settings to see what looks the best for your website.
You can preview how your status feed will look on desktop computers, tablets, and smartphones using the row of buttons in the upper-right corner.
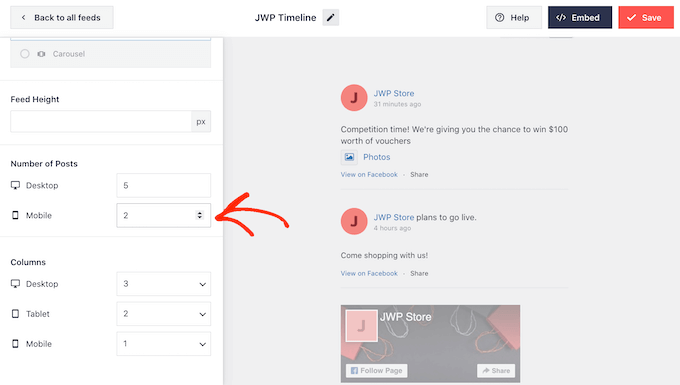
Mobile devices usually have smaller screens and less processing power, so if you’re not happy with how the feed looks then it’s smart to show fewer statuses on tablets and smartphones.
To make this change, just type a different number into the ‘Mobile’ field in the ‘Number of Posts’ section.
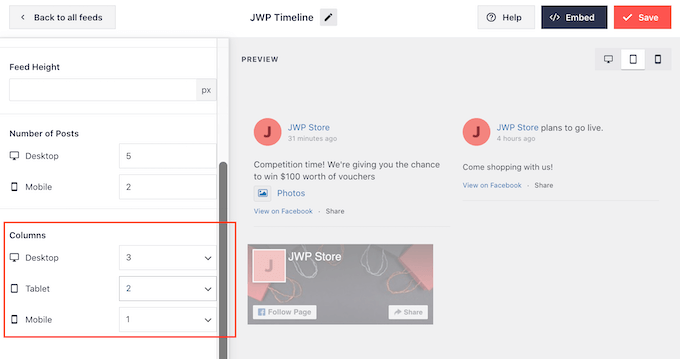
By trying out different layouts you can create a Facebook status feed that looks great across all devices.
By default, Smash Balloon feed shows fewer columns on smartphones and tablets, compared to desktop computers. This helps your Facebook statuses fit comfortably on smaller screens.
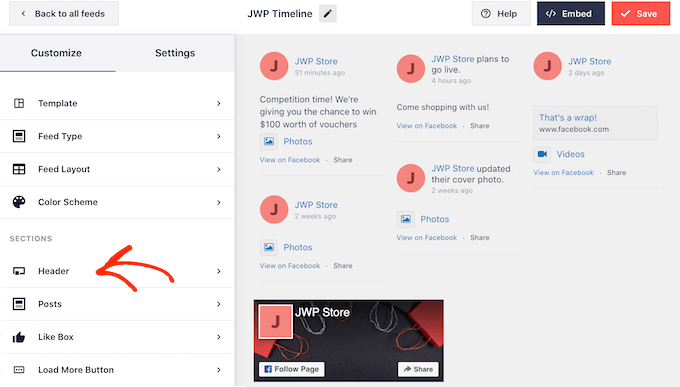
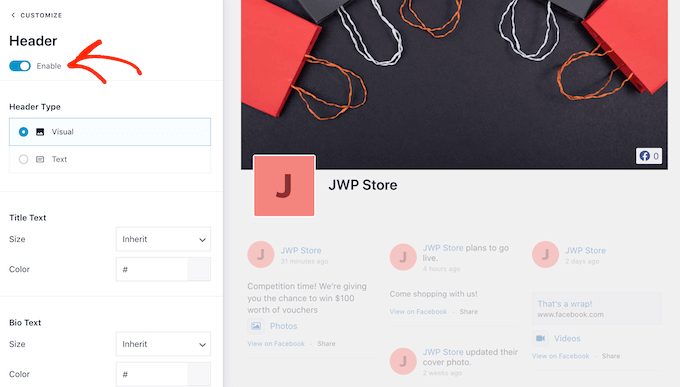
By default, Smash Balloon adds a header to your feed, which is your Facebook profile picture and the name of the group or page.
To customize this section, click on ‘Header’ in the left-hand menu.
Here, you can change the header size and color, hide your Facebook profile picture, and more.
If you would prefer to remove the header entirely, then click to turn off the ‘Enable’ toggle.
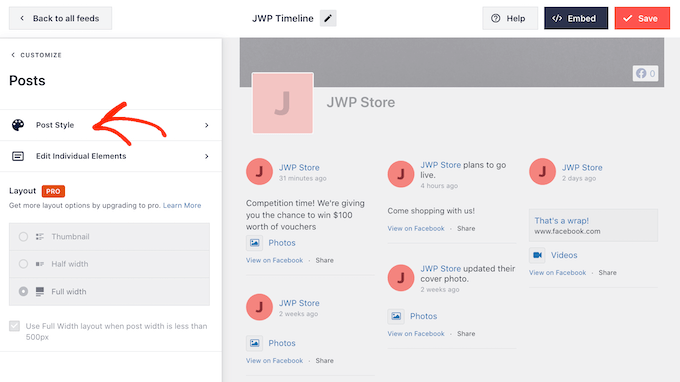
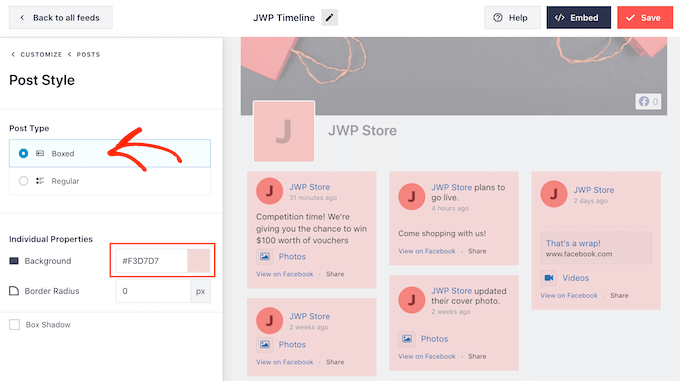
Next, you can change how the individual posts look inside your feed by selecting ‘Post Style’ from the left-hand menu.
After that, click on ‘Post Style’ again.
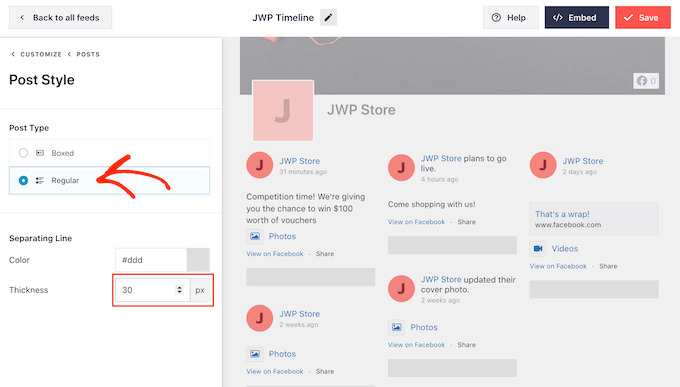
On this screen, you can choose between a regular and boxed layout.
If you select ‘Boxed’ then you can create a colored background for each Facebook post.
If you choose ‘Regular’ then you can change the thickness and color of the line that separates your different social media posts.
In the following image, we’ve added a thicker line to our Facebook status feed.
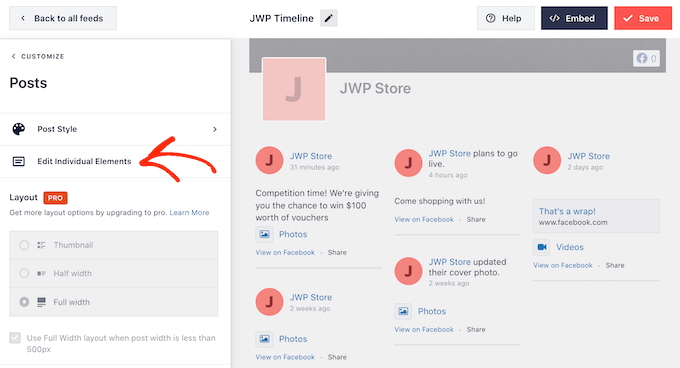
You can also customize the individual parts within each status by going back to the main settings screen.
Once again, select ‘Post Style’ but this time choose ‘Edit Individual Elements’ instead.
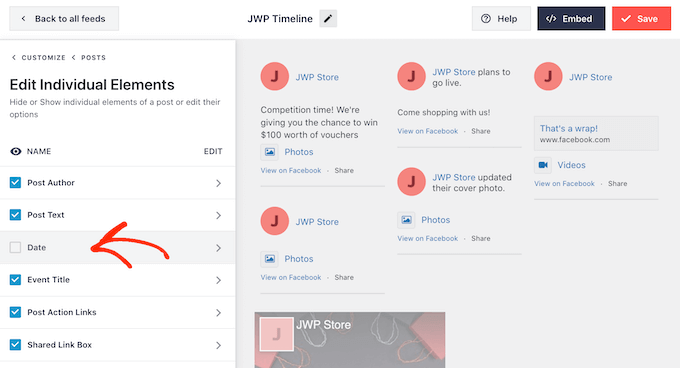
You will now see a list of all the different content that Smash Balloon includes in each post, such as the date, post author, and event title.
To remove a piece of content from your feed, simply click to uncheck its box.
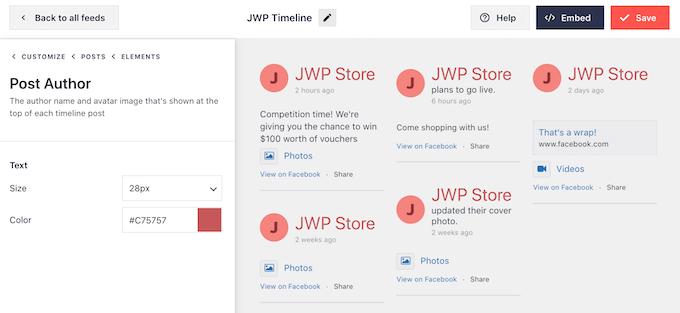
You can also customize how each type of content looks by clicking on it.
For example, in the following image, you can see settings to change the size and color of the author text.
By default, Smash Balloon doesn’t include the Facebook ‘like’ button in your feed.
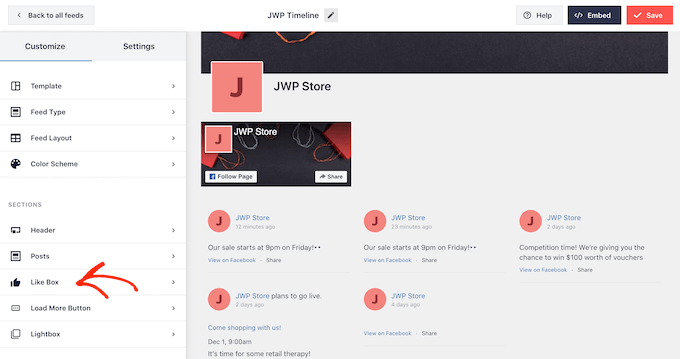
This button makes it easier for visitors to follow you on Facebook, so you may want to add it to your status feed by selecting the ‘Like Box’ settings.
After that, simply click on the ‘Enable’ button so that it turns blue.
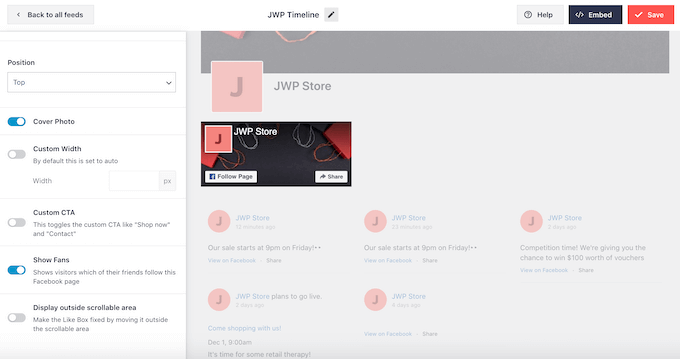
You can now use the settings to change where the link box appears and the kind of content included in the box, such as your Facebook cover photo and total number of followers.
If you upgrade to Smash Balloon premium, then there are some more settings to explore. This includes a lightbox feature that allows visitors to explore your content in a popup.
Since you’re using the free version of Smash Balloon for now, you can go ahead and click on ‘Save’ to store your changes.
The next step is adding the Facebook status feed to your WordPress website.
How to Embed Facebook Status Posts in WordPress
You can add your Facebook status feed to WordPress using a block, widget, or shortcode.
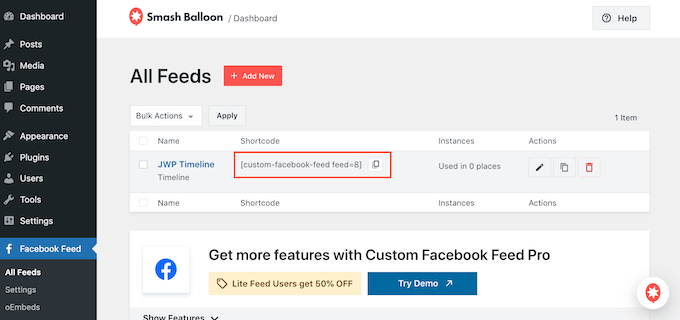
If you’ve created more than one feed using Smash Balloon, then you’ll need to know the feed’s code if you’re going to add it using a block or widget.
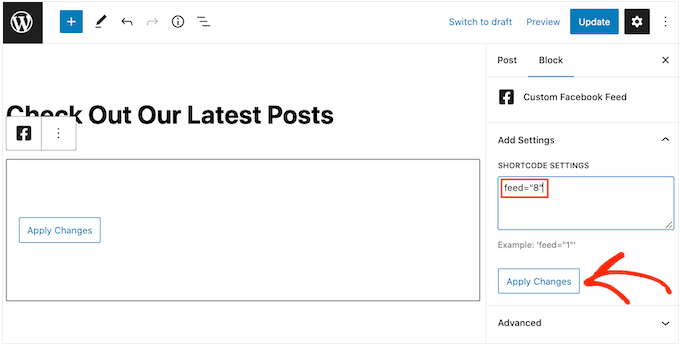
To get this information, simply go to Facebook Feed »All Feeds and then look at the feed="" part of the shortcode. You’ll need to add this code to the block or widget, so make a note of it.
In the following example, we’ll need to use feed="8".
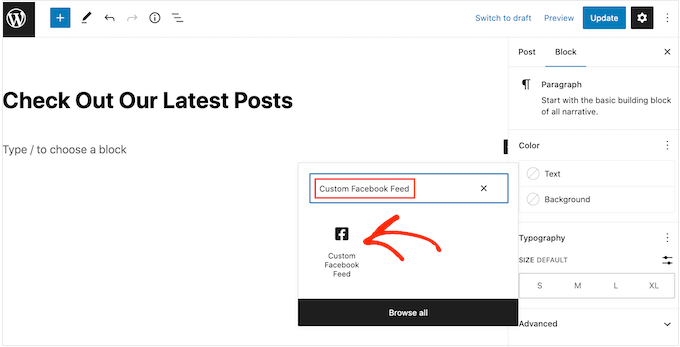
If you want to embed your Facebook statuses in a page or post, then we recommend using the ‘Custom Facebook Feed’ block.
Simply open the page or post where you want to embed the status feed. Then, click on the ‘+’ icon to add a new block and start typing ‘Custom Facebook Feed.’
When the right block appears, click to add it to the post or page.
The block will show one of your Smash Balloon feeds by default. If you want to use a different feed instead, then simply find ‘Shortcode Settings’ in the right-hand menu.
You can now add the feed="" code to this box. Once you’ve done that, click on the ‘Apply Changes’ button.
The block will now show all the status updates from your Facebook page or group. Just publish or update the page to make the feed live.
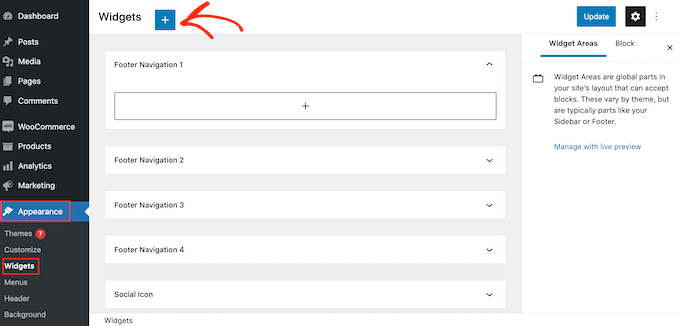
Another option is to add the feed to any widget-ready area, such as the sidebar or similar section. This allows visitors to see your latest Facebook updates across your entire website.
Simply go to Appearance » Widgets in the WordPress dashboard and then click on the blue ‘+’ button.
Now, start typing ‘Custom Facebook Feed’ into the search bar to find the right widget.
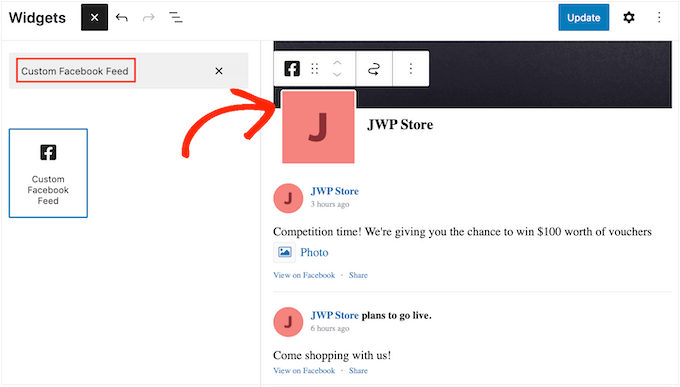
You can now drag it onto the area where you want to show your Facebook status updates. By default, the widget will show one of the feeds you created using Smash Balloon.
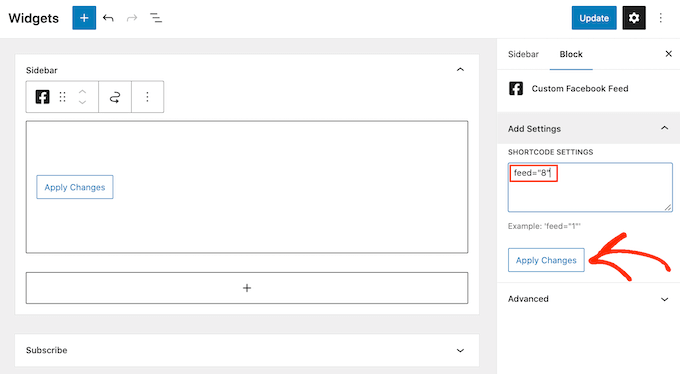
To show a different feed instead, type the feed’s code into the ‘Shortcode Settings’ box and then click on ‘Apply Changes.’
You can now click on the ‘Update’ button to make the widget live.
Finally, you can embed your status on any page, post, or widget-ready area using a shortcode. To get the shortcode, simply go to Facebook Feed »All Feeds and copy the value in the ‘Shortcode’ column.
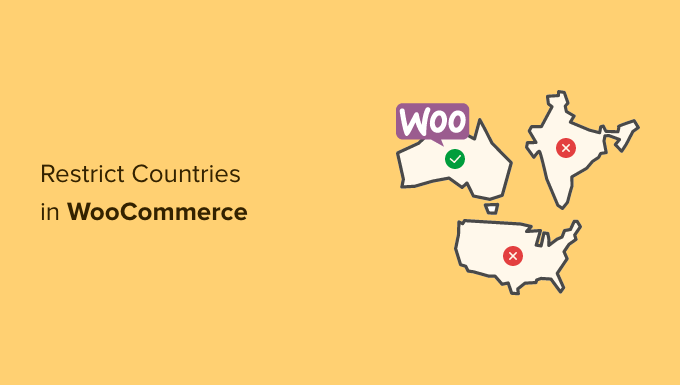
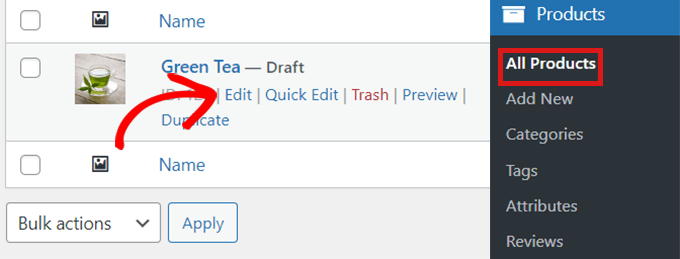
Recently one of our readers asked if it was possible to restrict countries in your WooCommerce store?
By hiding your WooCommerce store from specific countries, you can control your product visibility around the world. That way, your products will only be available in specific countries.
In this article, we will show you how to easily add country based restriction to WooCommerce products or even your entire WooCommerce store.
Why Restrict Your WooCommerce Store in a Country?
When selling products online, an online store owner can come across a lot of problems. For example, you can get a product order from a country where that product is illegal, or your payment gateways can’t process fees.
When building a WooCommerce store, it is important to provide the best user experience to your customers. You don’t want the customer to place an order only to find out that they can’t complete their purchase.
This can result in customer frustration, and it can keep them from ever coming back to your site or buying something else from you.
To avoid these kinds of situations, it is better to restrict access to your WooCommerce store or products from specific countries.
With that being said, let’s take a look at how you easily can restrict your WooCommerce store and products in specific countries.
You can jump to either method by clicking the links below:
Method 1. Restricting Countries Using WooCommerce Settings
You can easily hide your online store in specific countries using WooCommerce default settings.
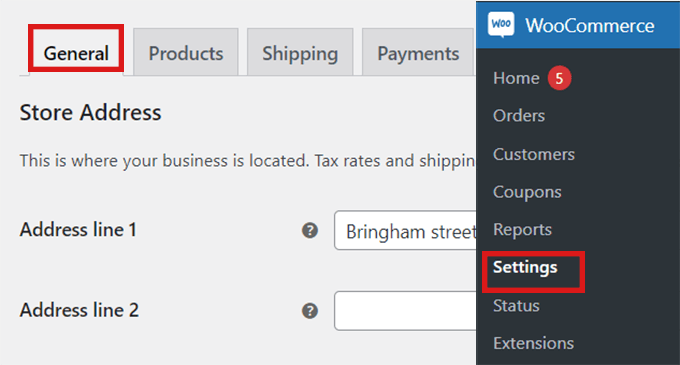
First, go ahead and click on the WooCommerce » Settings option in your WordPress dashboard and then go to the ‘General’ tab.
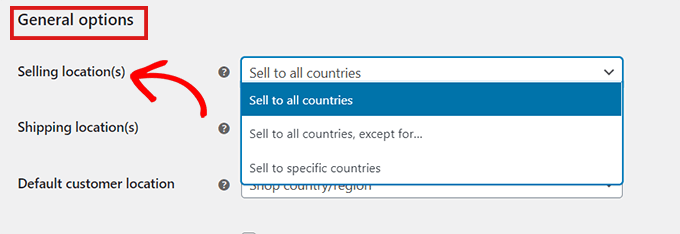
Once there, scroll down to the ‘General Options.’ Here you will find the ‘Selling Location’ section. Simply click on the dropdown menu in the field where you will find three options.
You can either select the ‘Sell to specific countries, except for…’ option, or you can choose the ‘ Sell to specific countries’ option.
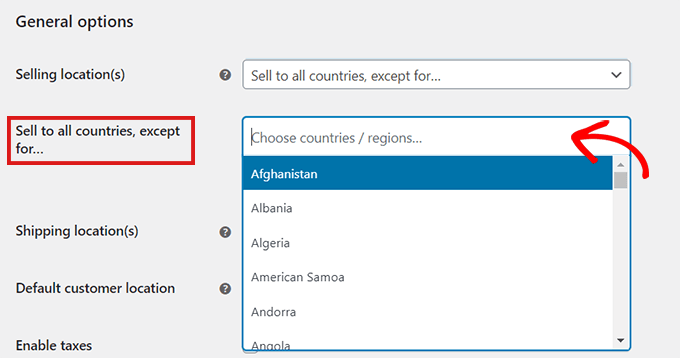
When you select the ‘Sell to specific countries, except for…’ option, another field will appear.
Now, just select from the dropdown any countries where you don’t want to sell your products.
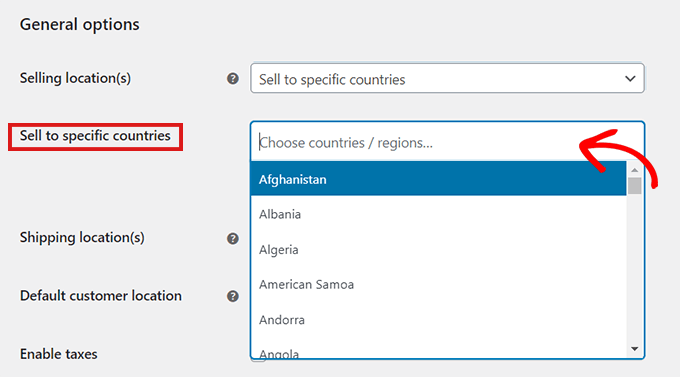
If you’ve chosen the ‘Sell to specific countries’ option, a ‘Sell to specific countries’ field will appear in the settings below.
Now you can select all the countries where your store will be available.
The main downside of this method is that you cannot hide specific products.
By restricting countries using the default settings method in WooCommerce, the restrictions will be applied to your whole online store, and users in those countries won’t be able to buy any of your products.
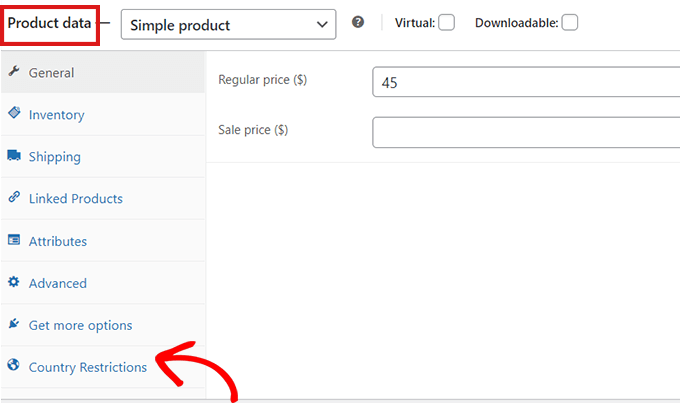
If you only want to hide some specific products in different countries, it is better to use a plugin mentioned in Method 2. Let’s take a look at how to restrict specific WooCommerce products in different countries.
Method 2. Add Country Based Restrictions for WooCommerce Products
It is a free WooCommerce plugin that allows you to hide your products in specific countries.
First, you’ll need to install and activate the ‘Country Based Restrictions For WooCommerce’ plugin. For more details, please take a look at our guide on how to install a WordPress plugin.
After you’ve activated the plugin, go to Plugins » Installed Plugins.
Here, click on the ‘Settings’ link in the ‘Country Based Restrictions for WooCommerce’ entry.
Once you’re on the ‘Settings’ page, just click on the ‘Catalog Visibility’ option.
After you’ve clicked on the ‘Catalog Visibility’ option, you will have 3 choices:
Hide Completely – Restricted products will not appear in your store.
Hide Catalog Visibility – Restricted products will only be available by direct links, but not through browsing or search results.
Catalog Visible (non purchasable) – Restricted products will appear as normal, but customers will be unable to purchase them.
Once you’ve chosen an option, simply click on the ‘Save Changes’ button.
Next, go to WooCommerce » All Products in your WordPress dashboard.
Locate the product that you want to restrict and simply click on the ‘Edit’ link.
This will open the ‘Edit Product’ page. You can then scroll down to the ‘Product Data’ section.
Next, simply click on the ‘Country Restrictions’ option to the left.
After you’ve clicked on the ‘Country Restrictions’ option, you’ll see a ‘Restriction Rule’ field.
Simply click on the dropdown menu beside the field and select the ‘Product Not Available For Selected Countries’ option.
After that, go to the ‘Select Countries’ field and click on the dropdown beside it.
Then, simply choose the countries where your product won’t be available for purchase.
Once you’re happy with your choice, don’t forget to click on the ‘Publish button.’
Now, if a customer from the chosen country visits your store, the product you’ve restricted won’t appear.
Bonus: Geolocation Targeting for WooCommerce to Grow Sales
Did you know that geotargeting in WooCommerce can help you grow sales?
For example, you can use a plugin like OptinMonster to run specific discounts for certain locations, offer different prices based on countries, and so much more.
We hope this article helped you learn how to restrict countries in your WooCommerce store. You may also want to see our ultimate WooCommerce SEO guide to improve your SEO rankings, or see our tutorial on how to fix WooCommerce not sending email issue to improve your email deliverability.
If you liked this article, then please subscribe to our YouTube Channel for WordPress video tutorials. You can also find us on Twitter and Facebook.

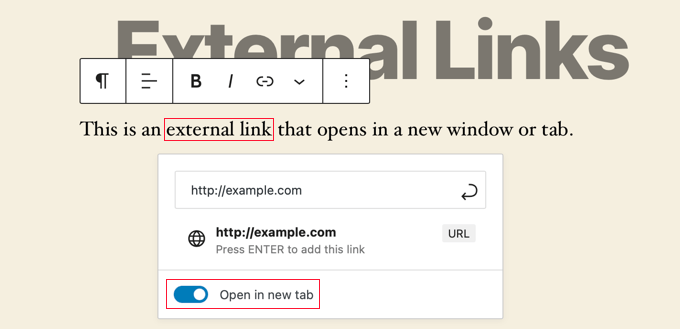
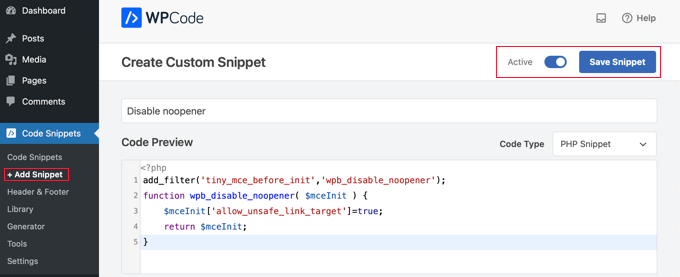
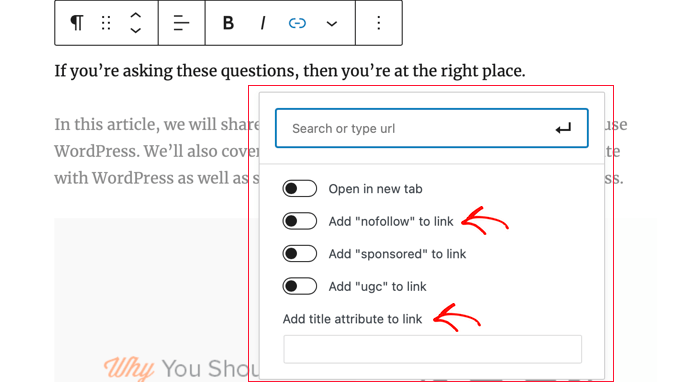


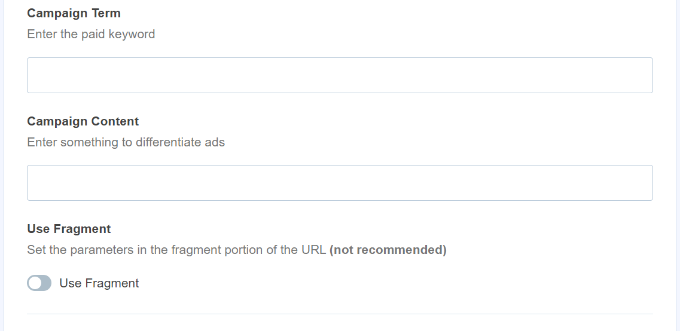


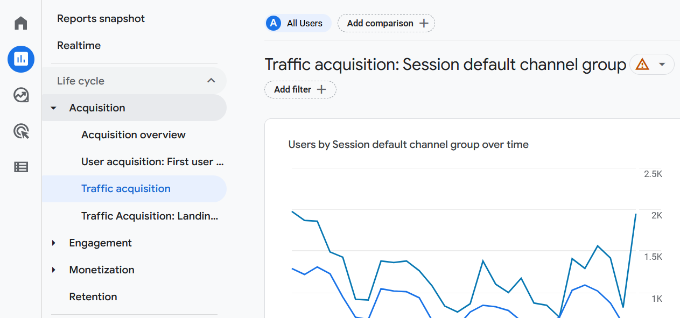
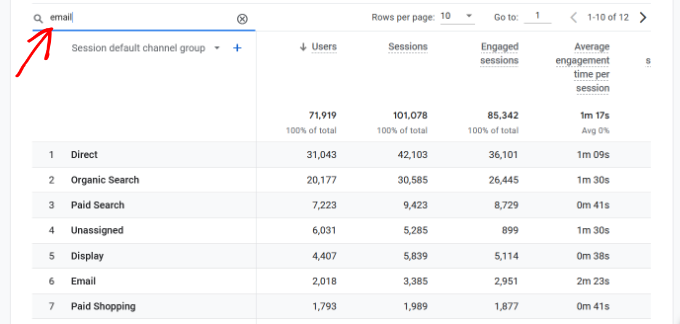
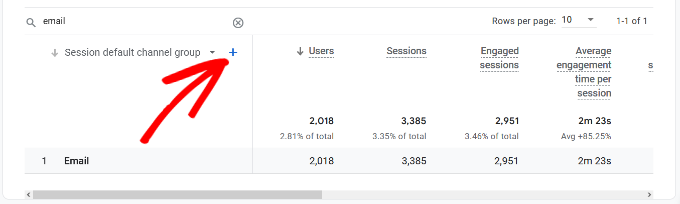

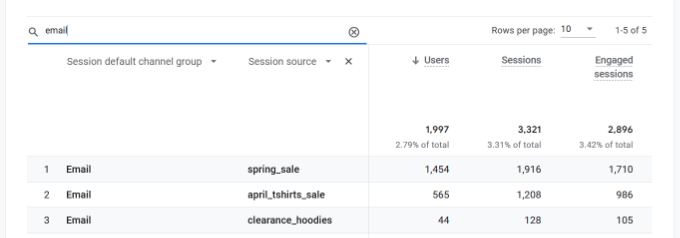


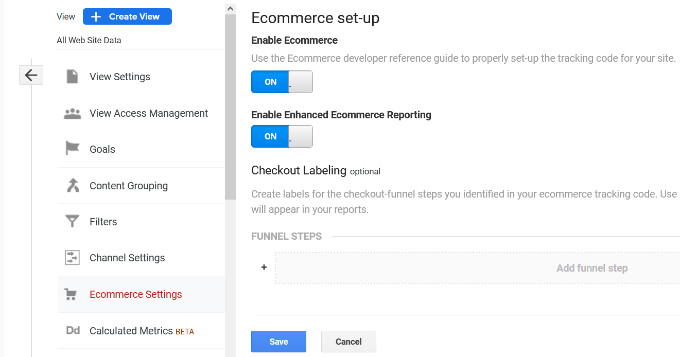


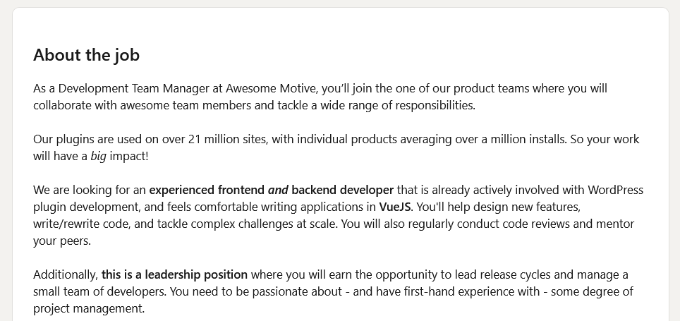
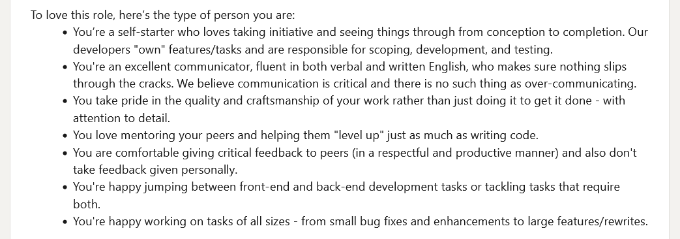

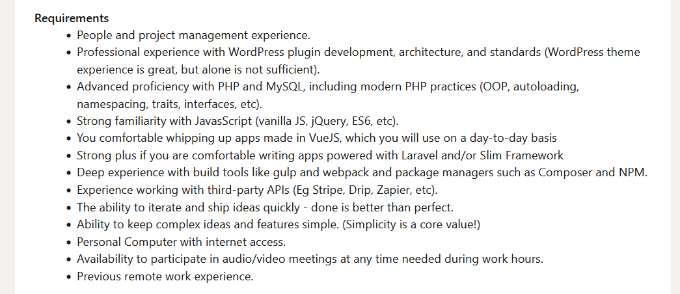

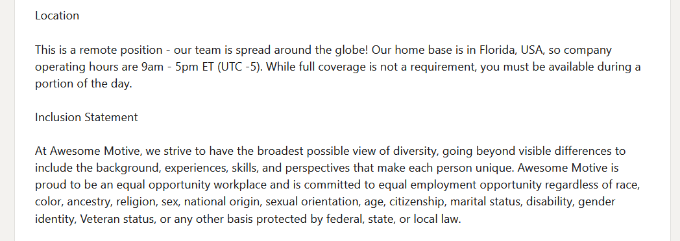

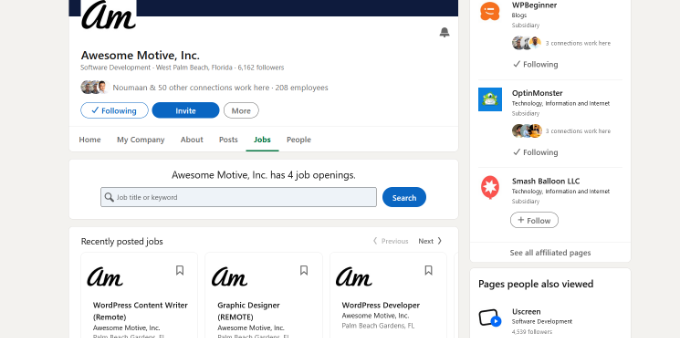


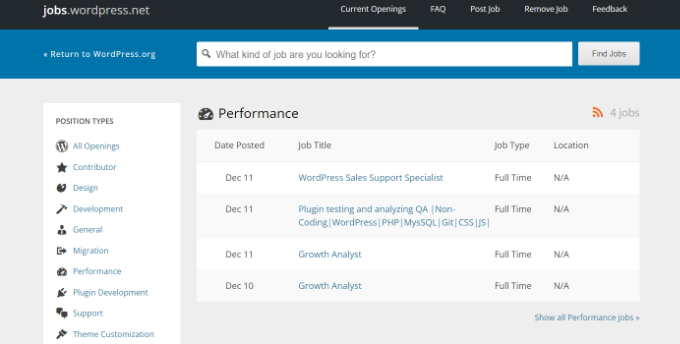
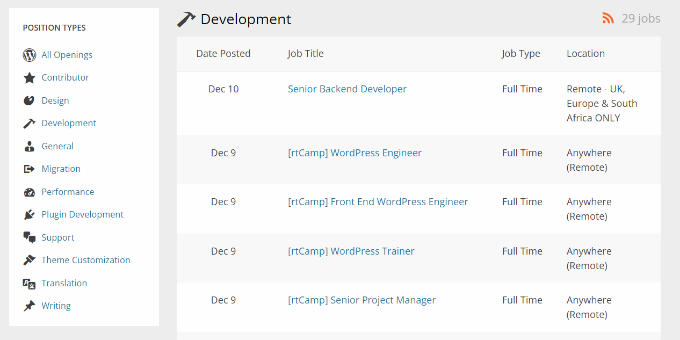
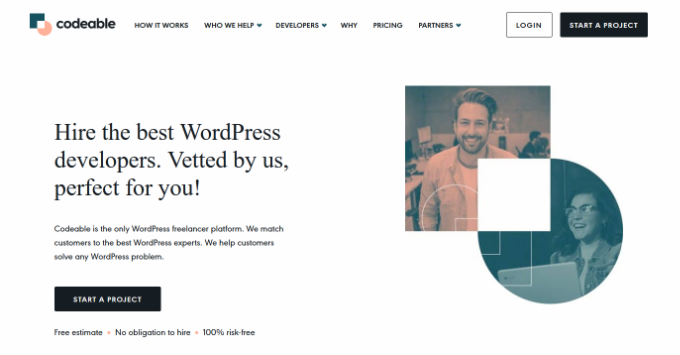
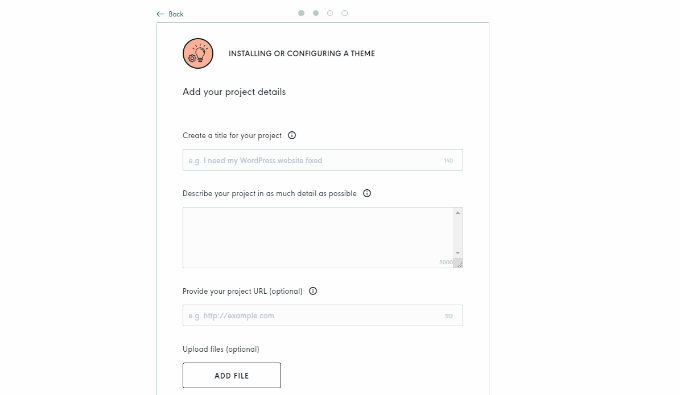
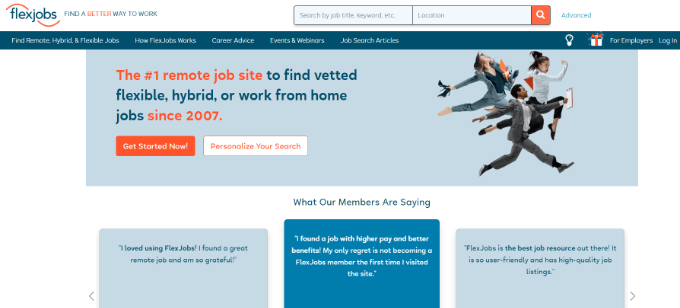
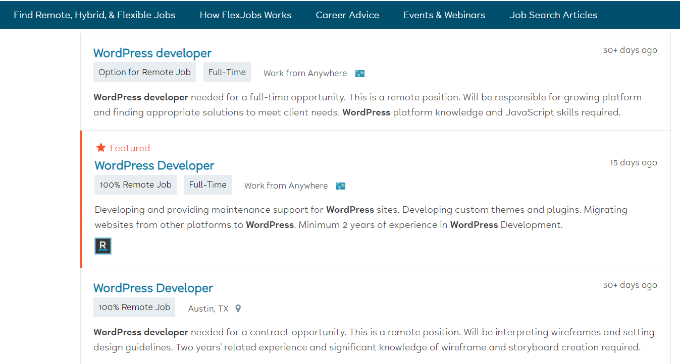

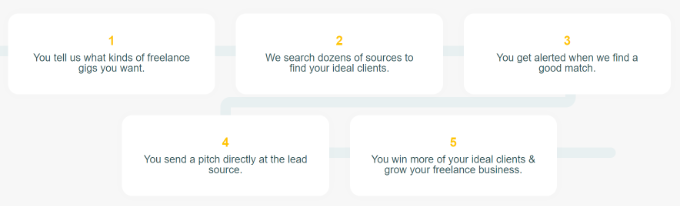
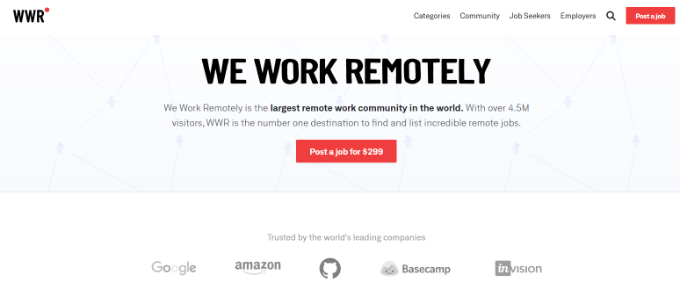
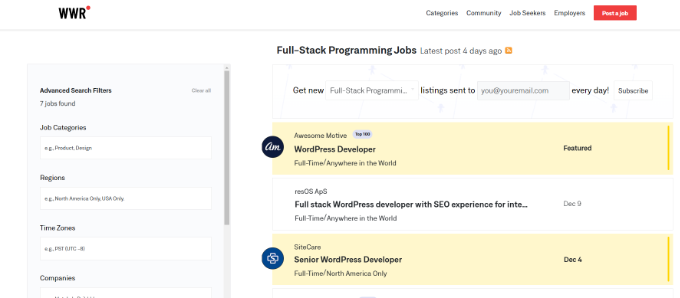
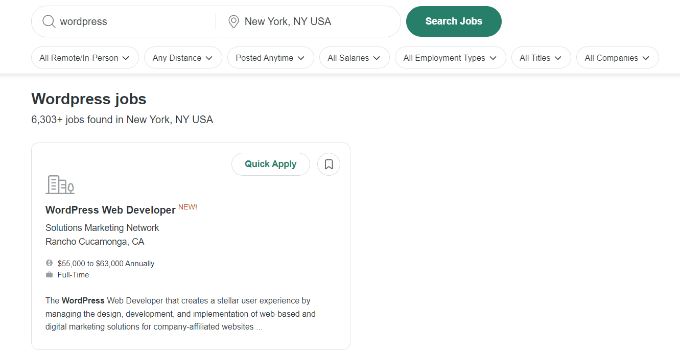

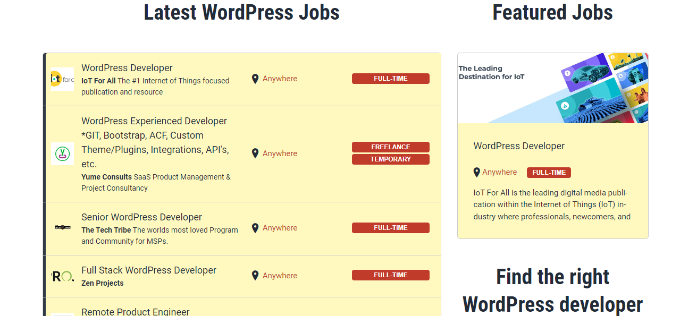
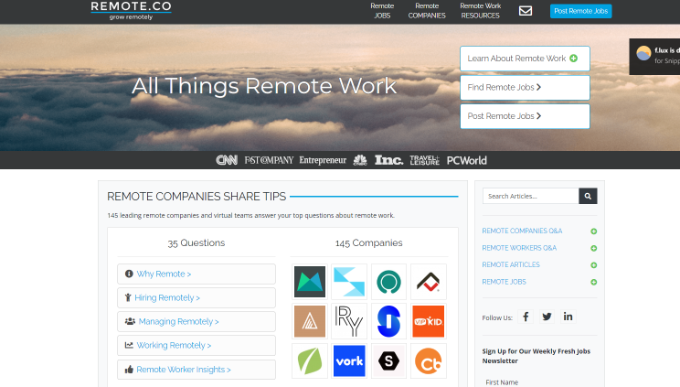

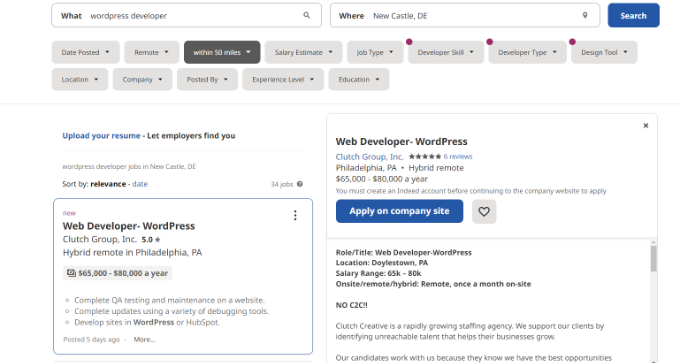
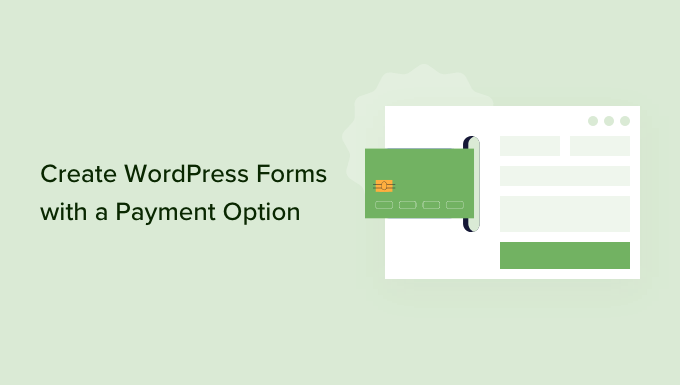
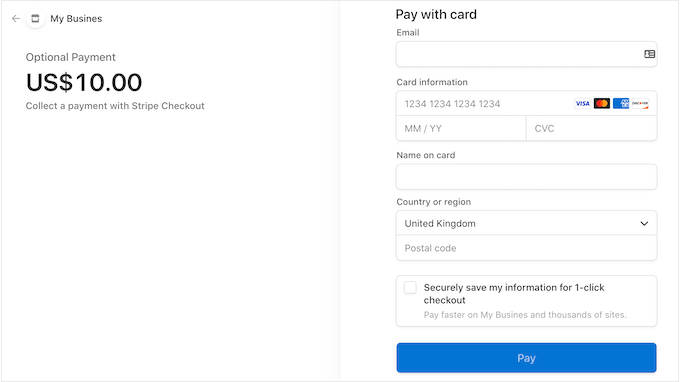
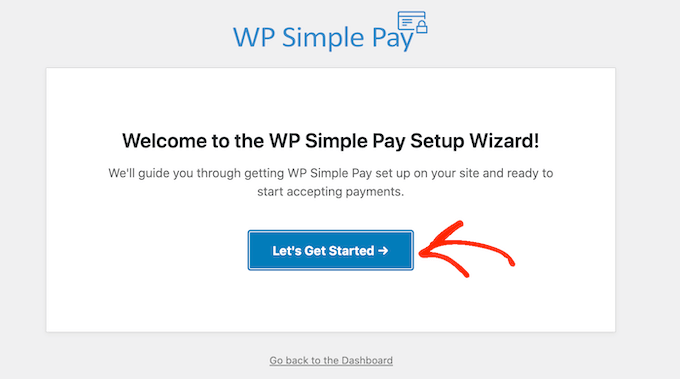
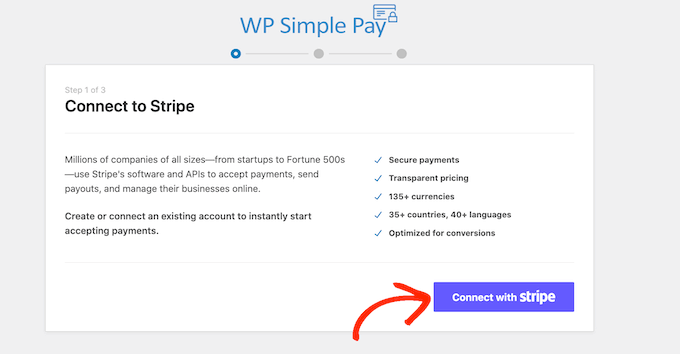
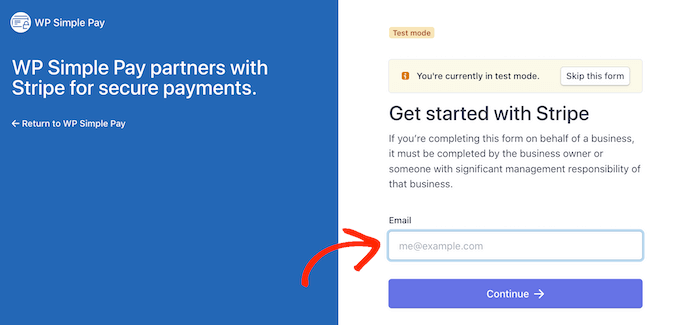
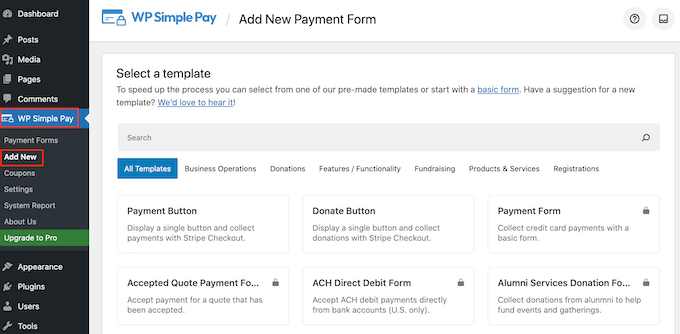
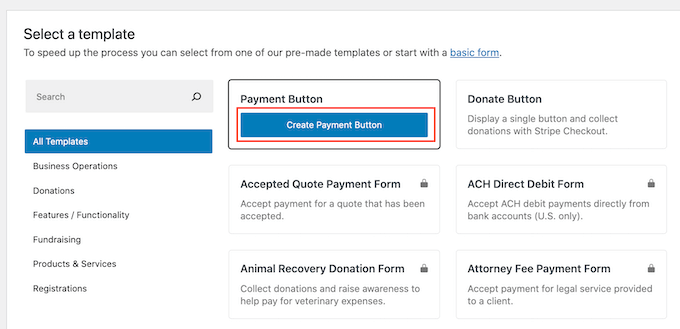
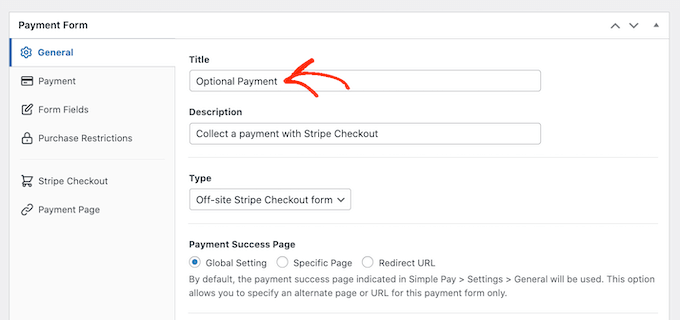
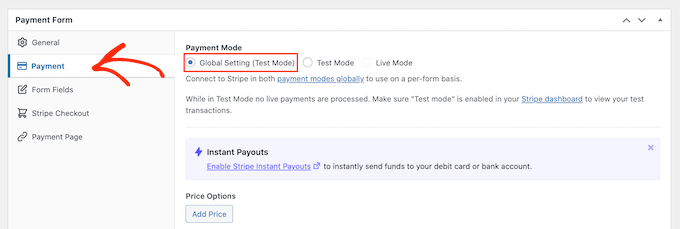
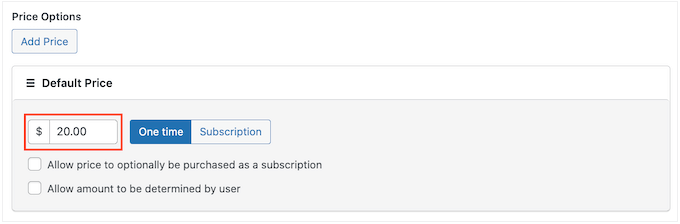
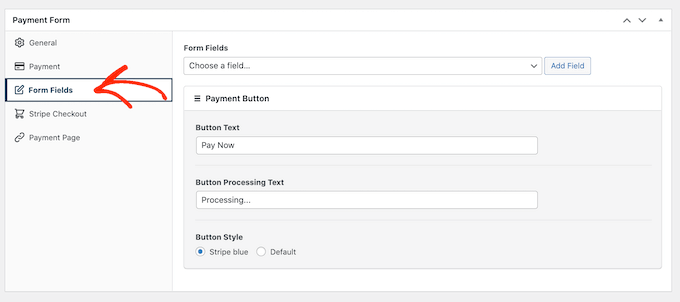
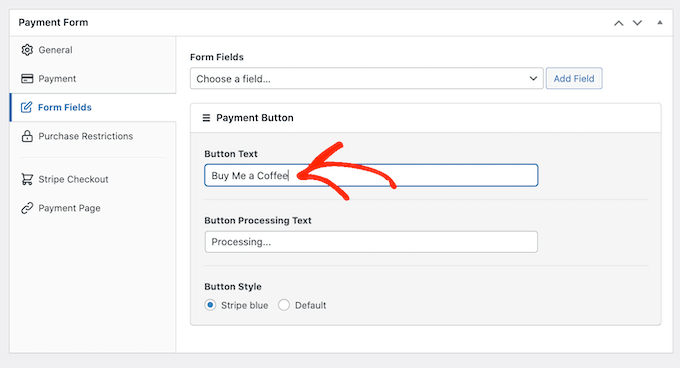
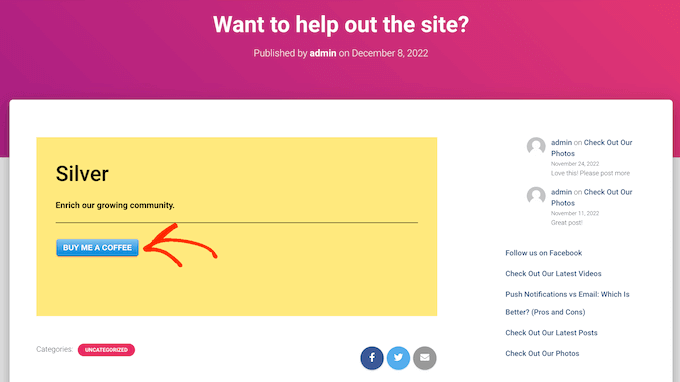
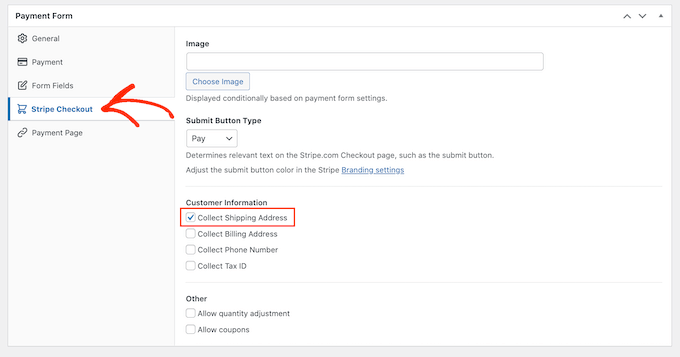
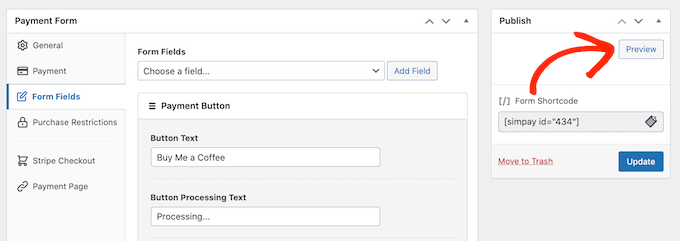
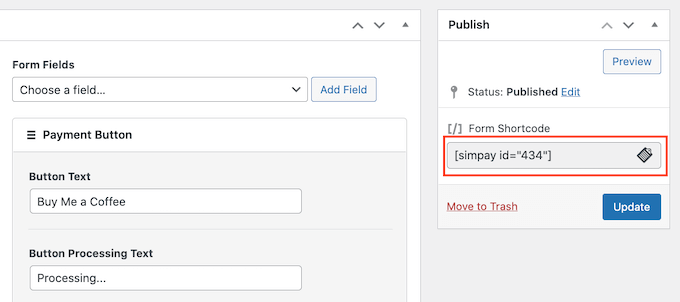
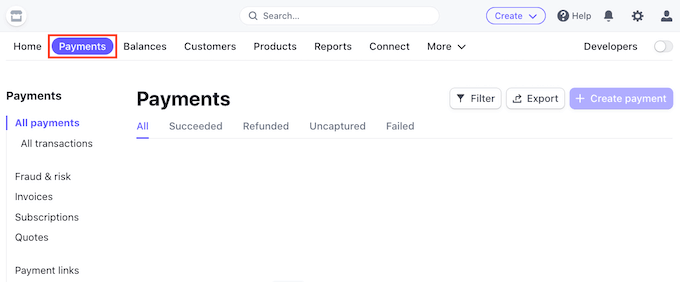
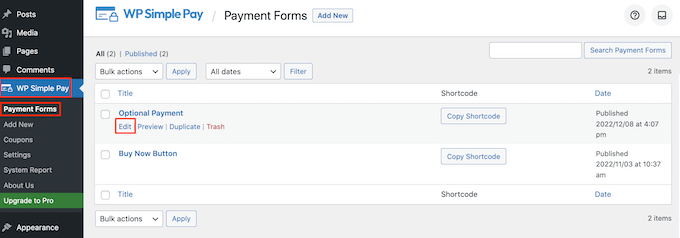
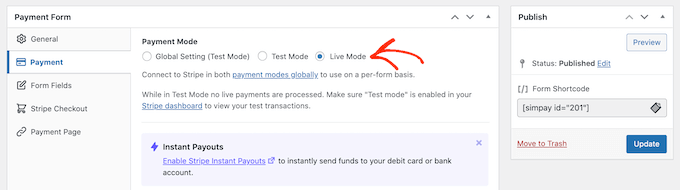
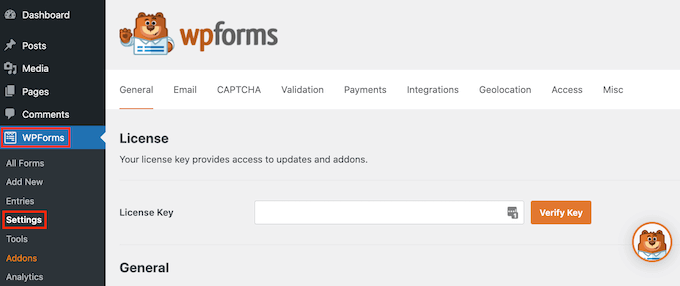
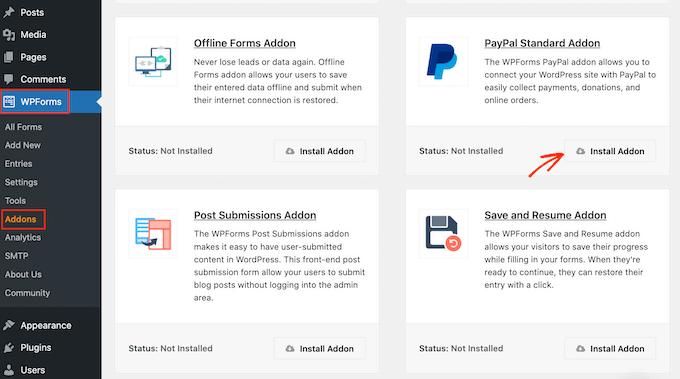
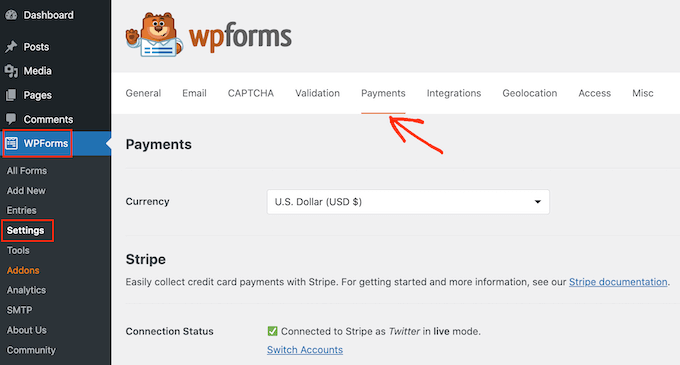
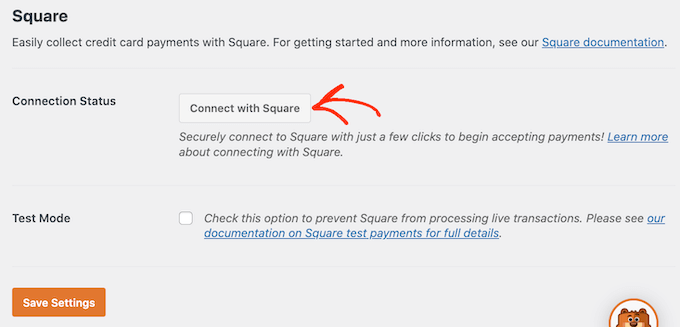
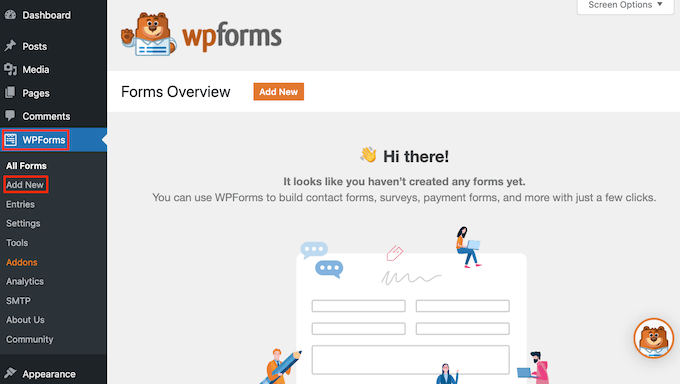
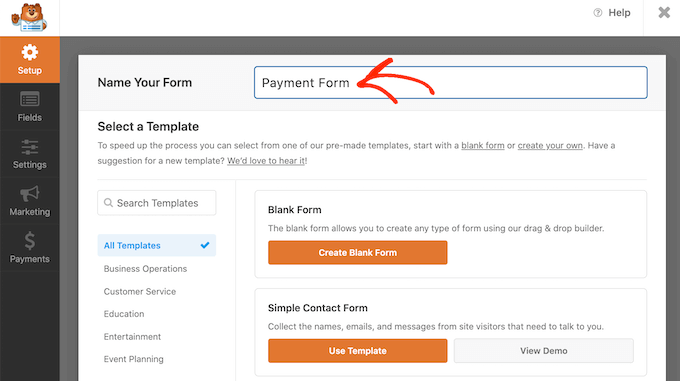
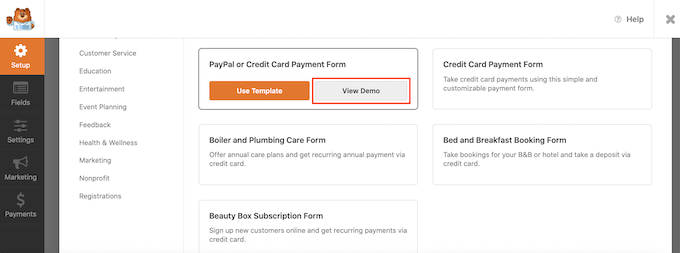
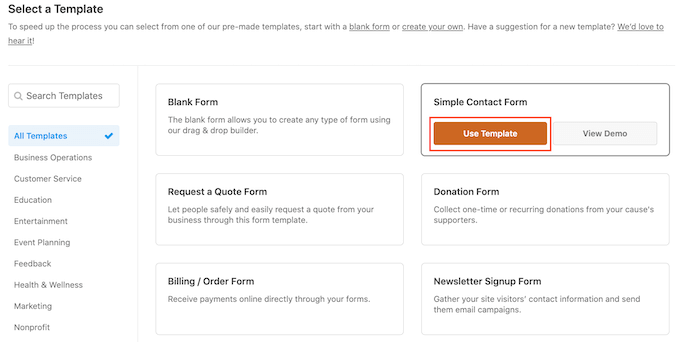
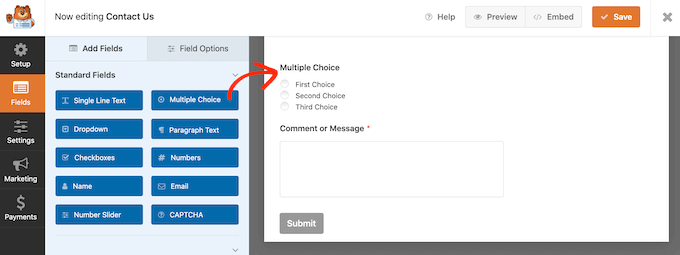
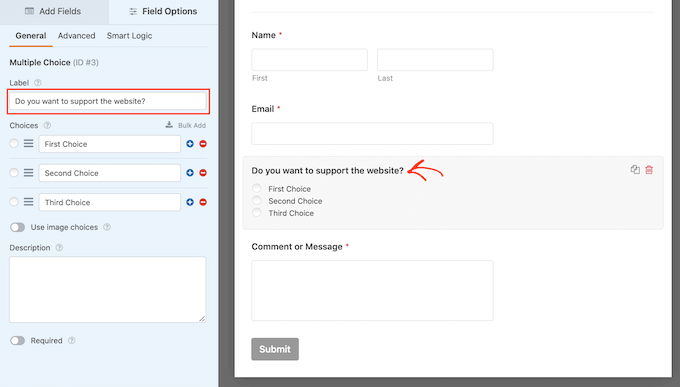
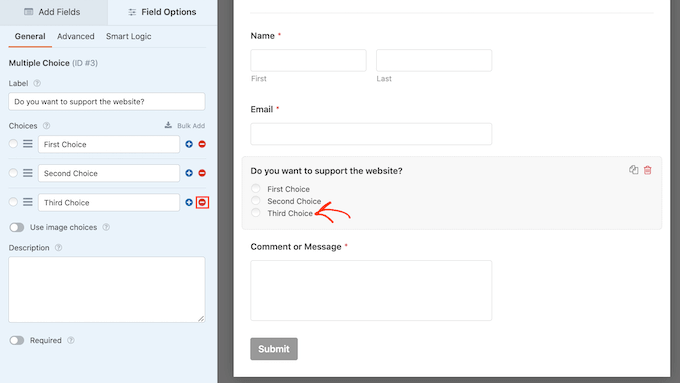
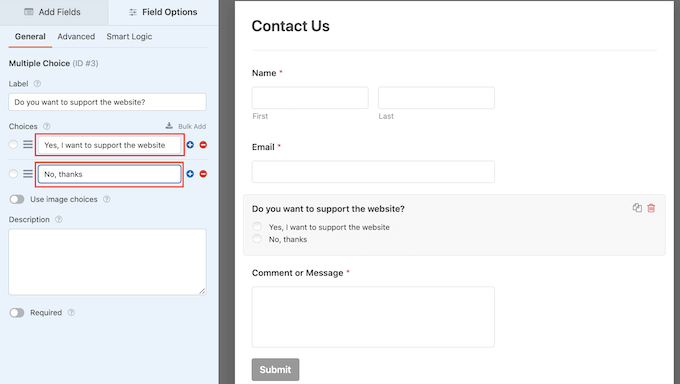
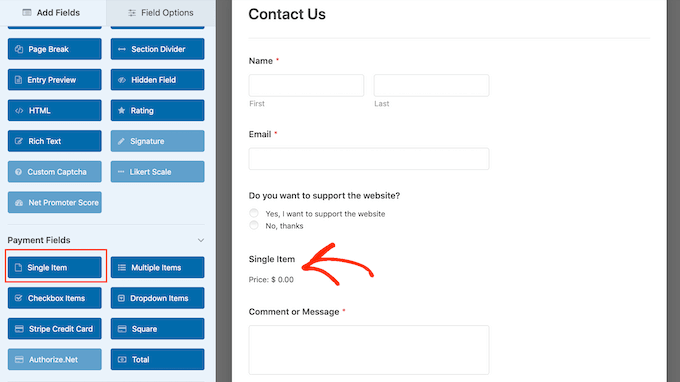

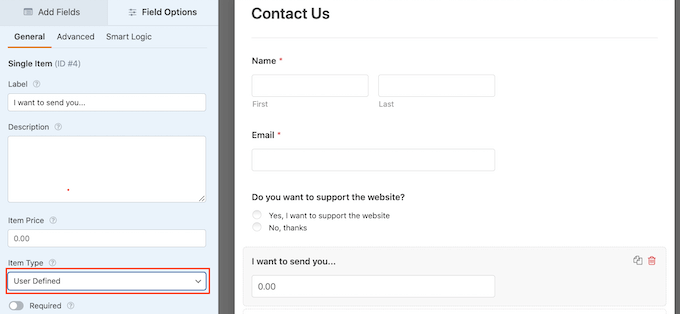
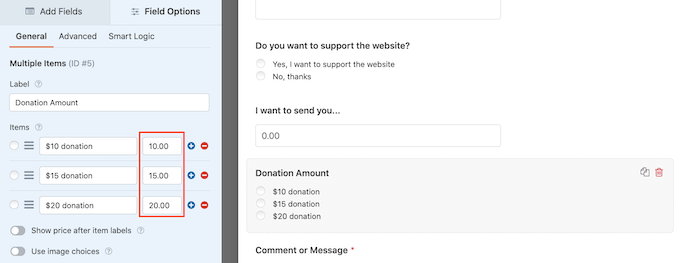
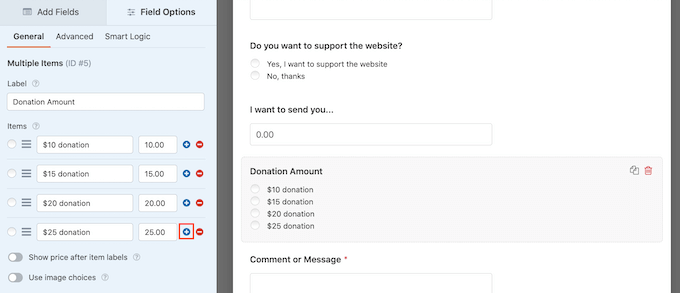
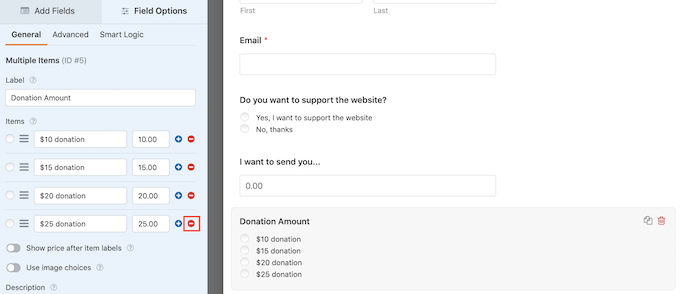
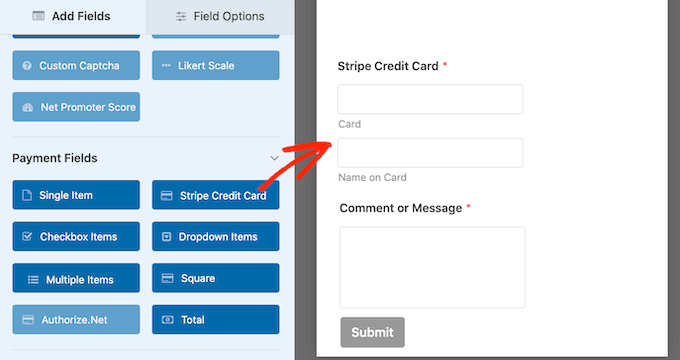
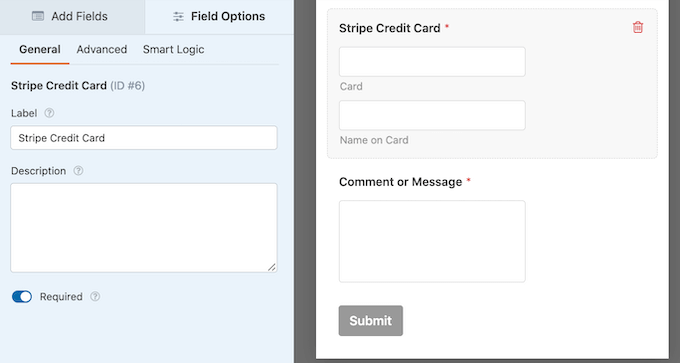
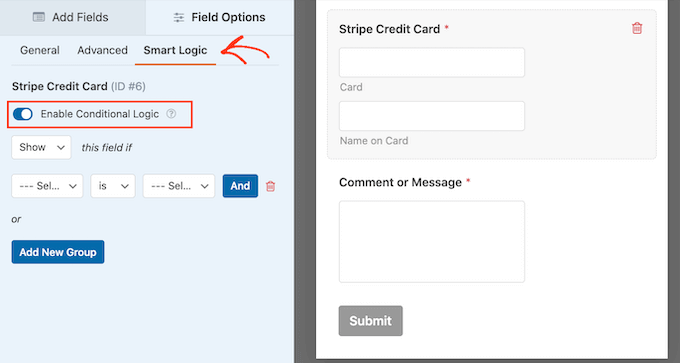
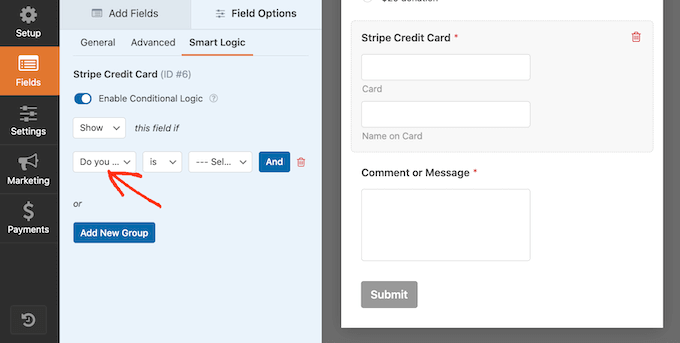
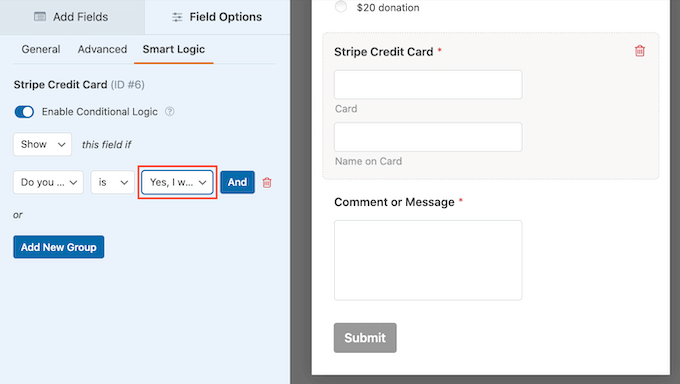
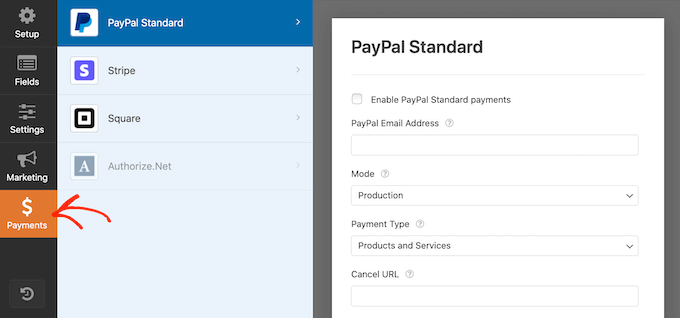
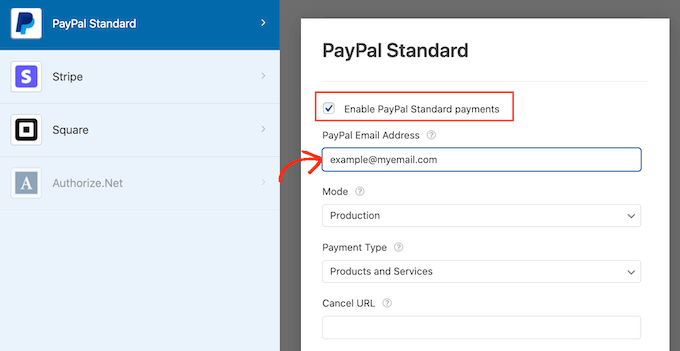
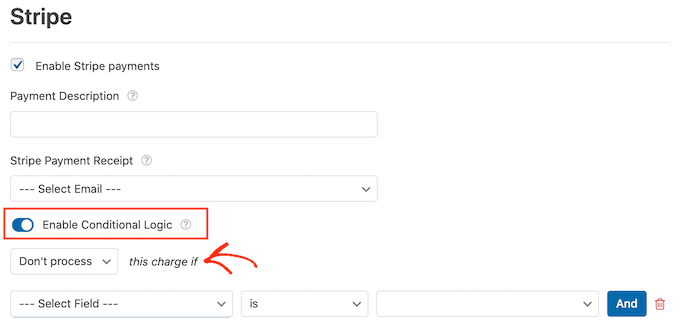
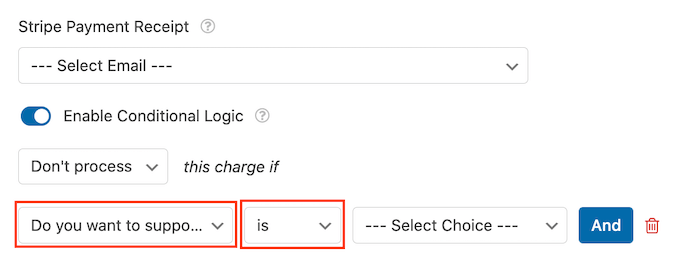
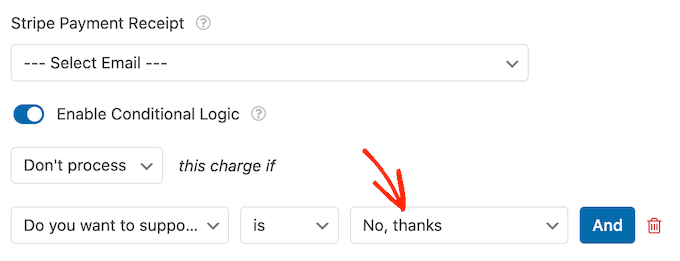
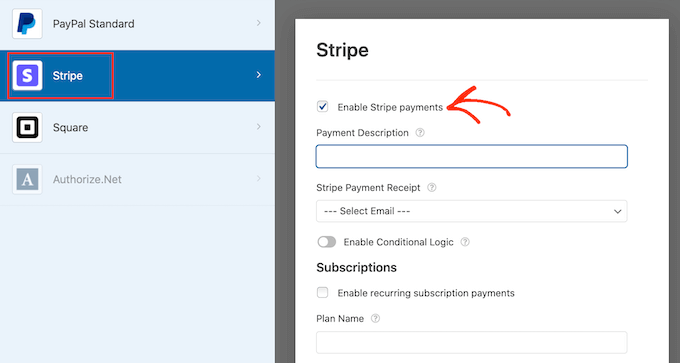
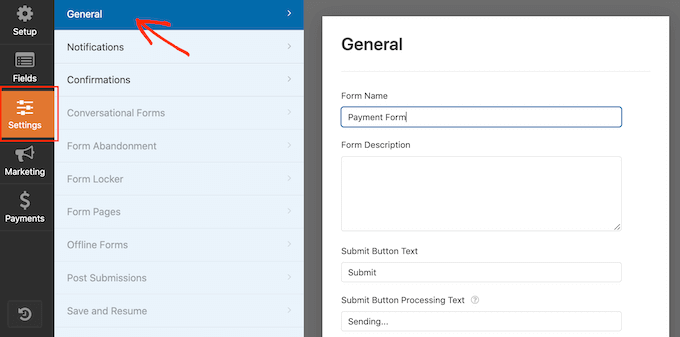
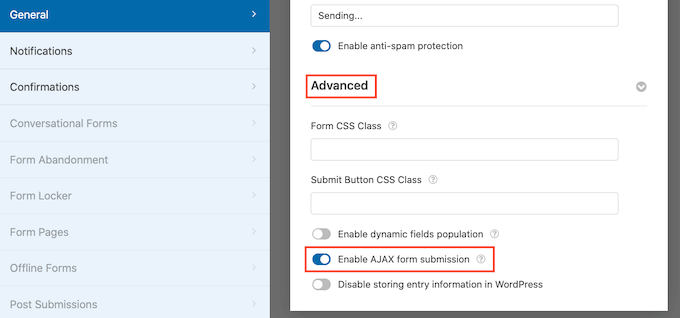
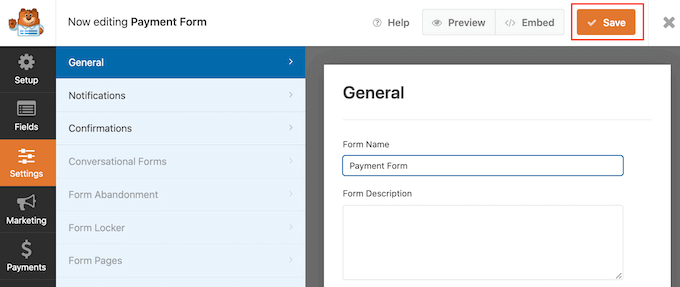
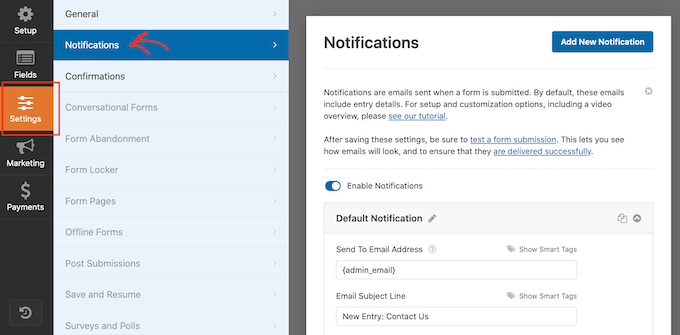
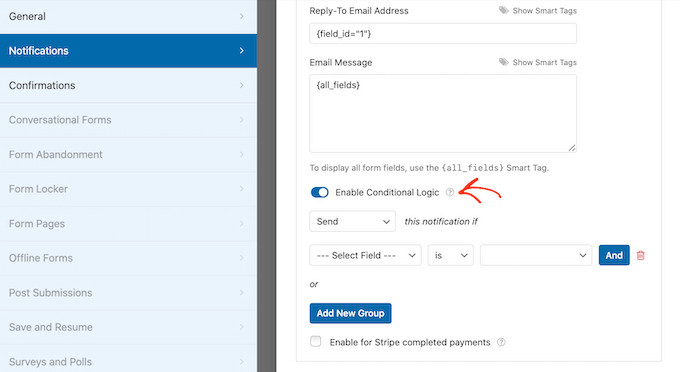
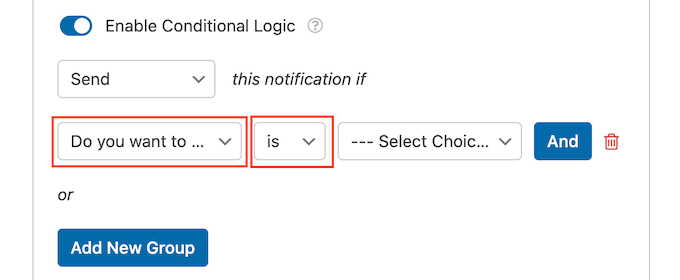
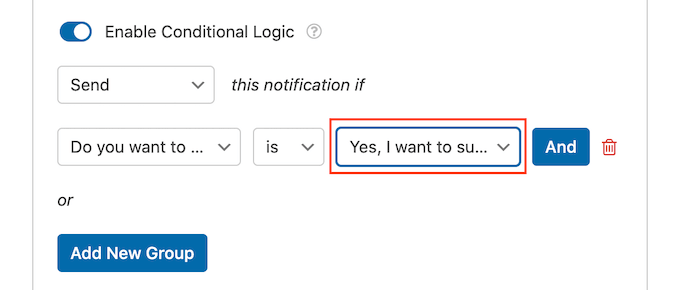
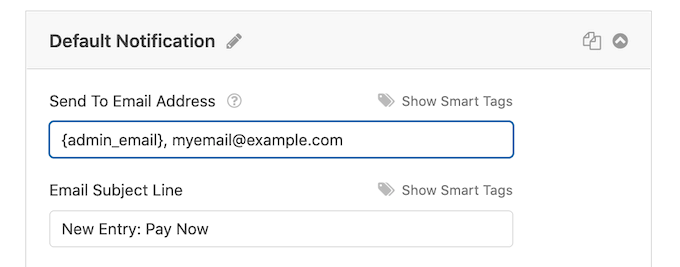
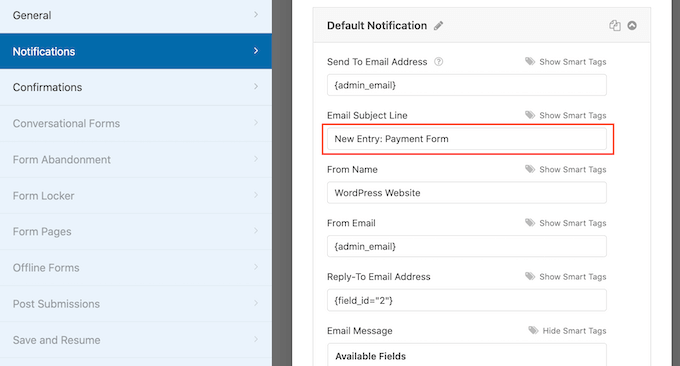
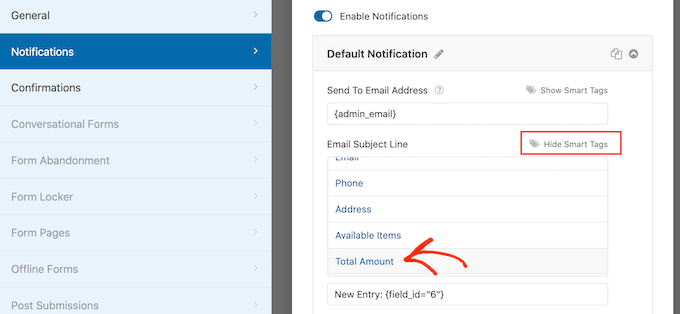
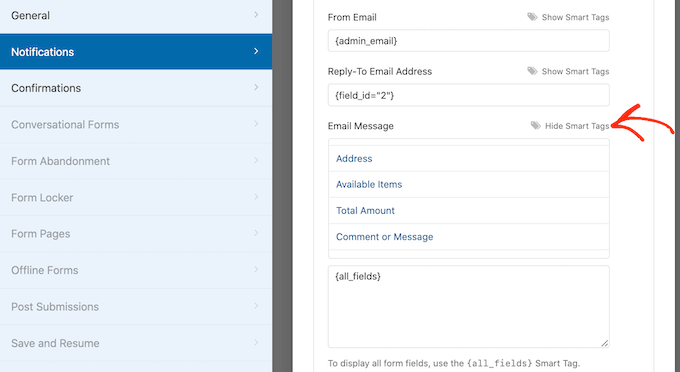

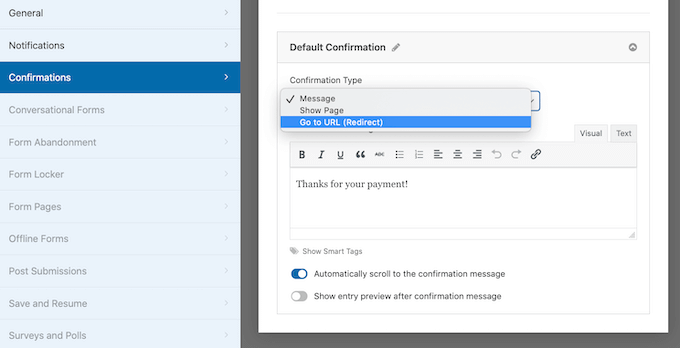
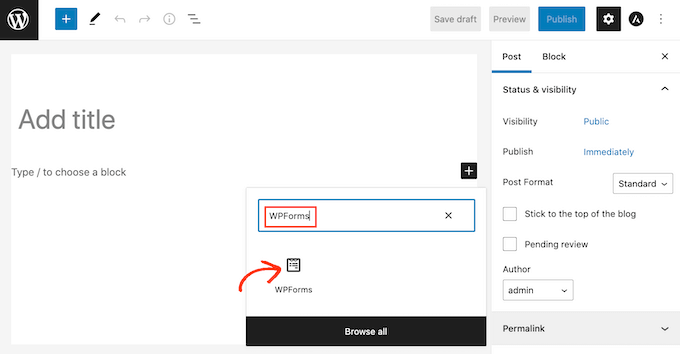
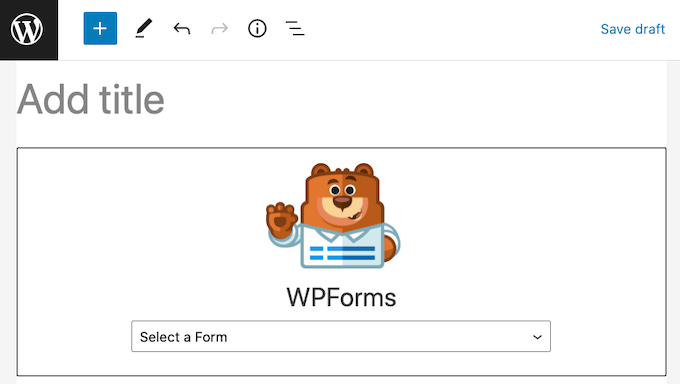
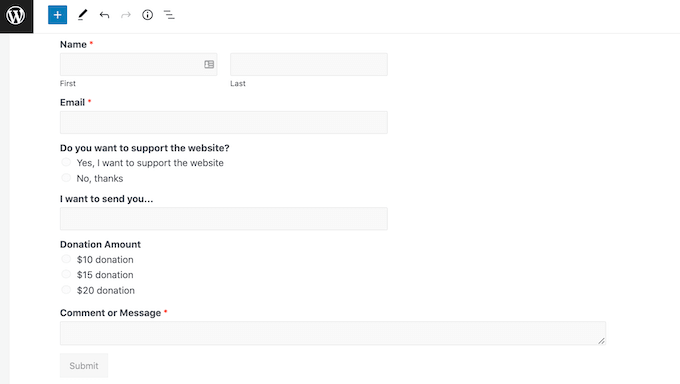
")