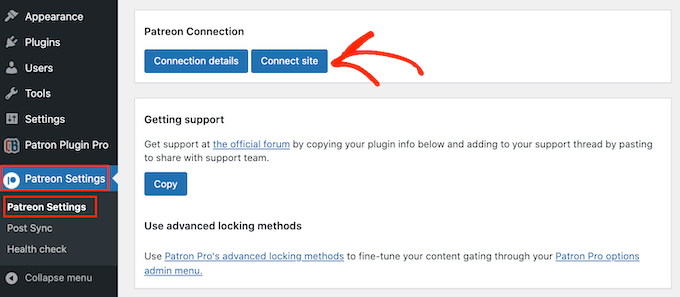
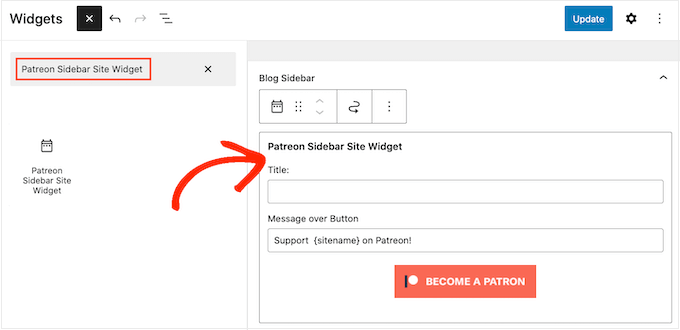
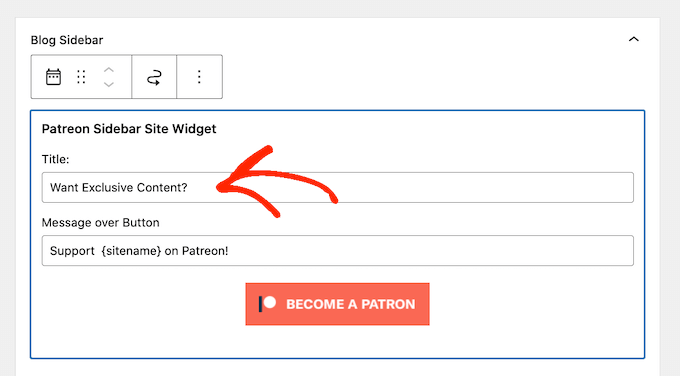
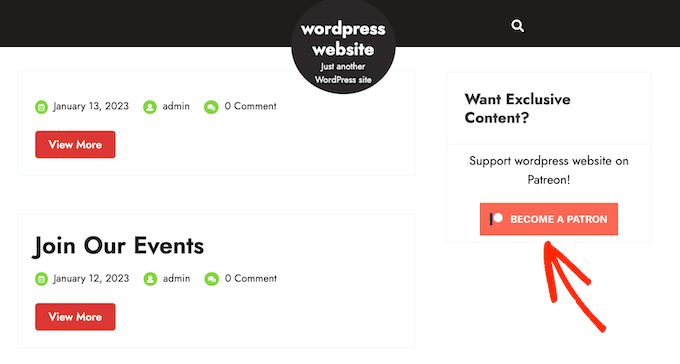
Do you want to add a screenshot to your blog post but are not sure of the best way to do it?
Screenshots allow you to share an image snapshot of your desktop or mobile screen in your blog posts. This makes it easier for your audience to follow the steps in a tutorial and better understand your content.
In this article, we will show you how to take a screenshot for your WordPress blog posts.
The Benefits of Taking Screenshots for Your Blog Posts
Adding screenshots to your WordPress blog can make your content more engaging. These are screen captures or snapshots of whatever is on your mobile or desktop screen.
You can use screenshots for a tutorial and guide users step by step. This way, people will know exactly where to click and what to enter when setting up software or plugins.
Similarly, you can use screenshots for a roundup or list post. For example, let’s say you are writing about the top 10 best email marketing tools. You can take screenshots of each tool’s homepage and show them in your content.
Since there are so many different ways to take a screenshot, we have created a step-by-step guide on how to take a screenshot on different devices and apps.
To make it easy for you, we have also created a table of contents below, so you can quickly find the method that’s applicable to you.
Droplr is a popular screen capture app. It allows you to easily take a screenshot on your computer and share it.
Droplr automatically saves the screenshot and screen recordings to the cloud and provides a link to share with others. Plus, you can manage all your screenshots from a dashboard and share them on any platform, including WordPress.
It works great with Mac, Windows, and Chromebook devices to quickly capture a selected area or entire screen. There is also a Chrome extension, so you can quickly take screenshots from your browser.
To take a screenshot using Droplr, you will first need to install the app for your preferred device. After that, you can click the Droplr icon in the Mac menu bar or the Windows Taskbar.
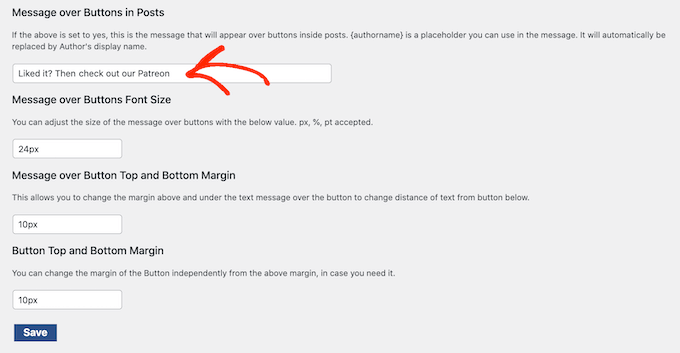
From here, simply click the ‘Screenshot’ option.
If you are a Mac user, then you can also press ‘Option + Shift + 4’ to capture the screenshots. You can press ‘Alt + Shift + 4’ on Windows to take a screenshot with Droplr.
Next, you need to select the area you’d like to take a screenshot of.
Droplr will open the screenshot in a browser window as soon as you are done. Here, you can download the image or share the link with others.
If you click the ‘Markup’ button at the top, then you will find options to edit the screenshot.
For instance, you can add arrows to point at a button or an important feature. You can also draw shapes, add emojis, blur different parts of the image, add text, and more.
Once you are done, simply save the image or download it.
Taking Screenshots Using Droplr Chrome Extension
You can also use the Droplr Chrome extension to take screenshots and screen recordings. The extension works just like the desktop app, and you can easily access it from the Chrome extension toolbar.
First, you will need to install the Droplr extension by visiting the Chrome web store.
Then, click on ‘Add to Chrome’.
Once the extension is added, you can click on the Droplr icon from the toolbar at the top of your browser.
Next, you can screenshot a selected area, application window, full screen, or entire page.
After taking a screenshot, Droplr will open the image in a new tab with a link that you can share.
Droplr also allows you to create a video screencast to create quick tutorials with audio. Simply click the Droplr icon in your browser’s menu bar and select the TV icon to record your screen.
If you choose the ‘Full desktop’ option, then you will need to select which window to record. On the other hand, you can use the ‘Current tab’ option and screencast your browser tab.
How to Take a Screenshot on Mac
If you are using a Mac device and want to take a screenshot, then there are several options.
On Mac devices, you can capture the entire screen, a selected portion of your screen, a specific window, and more.
To take a screenshot of the entire screen on a Mac device, simply press ‘Shift + Command + 3’, and it will capture your screen.
If you want to capture a selected portion, then press ‘Shift + Command + 4’. Next, click and drag the crosshair (pointer) to take a screenshot of the selected area.
If you want to take a screenshot of a specific window, then press ‘Shift + Command + 4’ and also press the ‘Space bar’ on your keyboard.
You will see that the pointer will change into a camera icon. Simply drag the camera icon on a window to highlight and capture it.
Note: Not all apps will allow you to take a screenshot of their window. In that case, you can take a screenshot of the selected portion and crop it.
By default, all the screenshots will be saved on your desktop with the capturing time/date as the filename and .png as the file extension.
How to Take a Screenshot on Windows
To take a screenshot on Windows devices, you will need to press the ‘PrtSc’ keys. This will capture the entire screen.
Next, you can open this screenshot in an image editing software like Adobe Photoshop or Affinity Photo to crop the required area and save it on your computer.
Another way of taking screenshots is by using the Snipping tool. The tool lets you capture a specific part of your screen and automatically save it to a clipboard.
Another way to take screenshots in Windows is by pressing the ‘Windows + Shift + S’ keys to start taking screenshots with the Snipping tool.
Next, click and drag the pointer to select an area on your screen. It will capture the screenshot automatically when you release the right click.
Since the screenshot is saved to a clipboard, you can paste it into any image editing software like Adobe Photoshop for further changes and then save it on your computer.
How to Take a Screenshot on Chromebook
In Chromebook, you can simply click the Screenshot key with a camera icon. This will take a screenshot of your entire screen or a selected area.
Besides that, you can click the Quick Settings option in the right corner and then select the ‘Screen Capture’ option.
After that, you need to choose whether you’d like to capture the entire screen or a selected area.
Once you have taken a screenshot, it will be automatically copied to the Clipboard.
If you are using Chrome OS 64.0.3282.134 or later, then you can simply press the ‘Power + Volume Down’ buttons to capture your entire screen.
To take a screenshot of a selected area, you need to press the ‘Ctrl + Shift + Switch Window’ keys. Then, click and drag the crosshair (pointer) to select the area that you want to capture.
Upon releasing the click, you will see a notification in the bottom right corner of your screen that shows your screenshot is saved in the ‘Downloads’ folder.
If you are using a Chromebox with an external (general) keyboard attached to it, then press ‘Ctrl + F5’ to take a screenshot. The F5 key will function the same as the ‘Switch Window’ key on a Chromebook.
How to Take a Screenshot on iPhone
Taking a screenshot on iPhones and other smartphones is actually quite simple.
If you are using an iPhone X or higher, then you need to open your blog post or the app on the screen. After that, simply press the ‘Side’ button on the right side and the ‘Volume Up’ button on the left side of your phone.
Make sure that you press both buttons at the same time. This will take a screenshot of the screen and save it to the ‘Screenshots’ folder on your phone.
If you are using an iPhone 8 or earlier model, then open the screen that you want to capture. Then, simply press the ‘Power + Home’ buttons at the same time to take a screenshot.
How to Take a Screenshot on Android Phone
There are many different phone manufacturers that sell smartphones with Android OS (such as Samsung Galaxy, Motorola, Google Pixel, etc). However, most new devices follow the same universal process to take a screenshot.
On your Android phone, you need to open the screen that you want to capture. Next, press the ‘Power + Volume Down’ buttons together.
This will take the screenshot and save it in your photo gallery.
Are you looking for WordPress FAQ plugins to use on your website?
Using FAQ plugins can improve the customer experience by making it easier for users to find answers to their questions without leaving your website. It can also boost your search engine rankings and help more people find your content.
In this article, we will share some of the best WordPress FAQ plugins that can help add an attractive FAQ section to your website.
Why Use a WordPress FAQ Plugin?
FAQ plugins create a Frequently Asked Questions (FAQ) section on your WordPress website with a list of some commonly asked questions and their answers.
This helps build trust and credibility with your customers by letting them know that you understand their questions and worries. FAQs can even increase conversion rates.
FAQs also allow users to find an answer to their questions without needing to contact customer service. This saves time and enables your customer support team to focus on other issues.
Additionally, using these plugins can also improve your search engine rankings because most FAQs often contain long-tail keywords that users commonly search for using search engines.
That being said, let’s look at some of the best WordPress FAQ plugins that can help improve user experience on your website.
The plugin comes with an FAQ block that helps you create an attractive FAQ section in the block editor. Within the block, you can enter questions and answers for your FAQ section.
You can also customize your FAQ section from the block panel, including its text color, background color, typography, and title wrapper.
Moreover, All in One SEO even allows you to add FAQ schema to your WordPress website. This schema markup can increase your visibility on Google and bring more traffic to your website.
Note: The AIOSEO free version comes with an FAQ block. However, you will need to buy the Pro version of the plugin to unlock the FAQ schema feature.
To activate the FAQ schema, you need to scroll down to the AIOSEO section in the block editor and switch to the ‘Schema’ tab.
After that, click the ‘Generate Schema’ button to open up a prompt.
Once the Schema Generator opens up, click on the ‘FAQ’ option to add the schema.
Next, you can add questions and answers to the schema template. For more detailed instructions, please see our tutorial on how to add FAQ schema in WordPress.
Apart from FAQs, AIOSEO has custom sitemaps, advanced redirects, SEO titles and descriptions, multiple keyphrases, and more. These features make it the ultimate toolkit for improving SEO on your website.
Heroic FAQs is a premium WordPress plugin that comes with a drag-and-drop interface to organize, reorder, or group related questions together.
It offers 5 pre-designed FAQ templates and a visual editor that lets you insert images, blockquotes, lists, videos, and more into your FAQ content.
You can display the FAQs in accordion or toggle format. You are also able to choose from 15 different FAQ icon styles to match your website’s design.
Using the Heroic FAQs plugin can also improve your website visibility and search engine rankings because it has a built-in FAQ schema.
Some of its other features include fast loading, FAQ search, analytics reports, mobile responsiveness, and page builder integrations. It is the perfect solution if you are looking for an all-in-one FAQs management kit.
It also comes with an Accordion block that lets you create FAQs by adding text sections that expand and collapse to any part of your page.
First, you will need to choose a template and start building your page with SeedProd. For detailed instructions, you may want to see our guide on how to create a landing page in WordPress.
Then, you can drag and drop the ‘Accordion’ block onto the landing page from the block panel on the left side of the screen.
You can now add a question and an answer in the text box to start creating an FAQ section.
After that, you can also customize the font size, icon image, typography, text color, and background color for your FAQs.
You can even add custom CSS and animation effects to your FAQs.
SeedProd also comes with built-in SEO features that will allow you to optimize your landing pages for search engines and increase visibility.
Thrive Architect is another powerful drag-and-drop page builder that helps you easily create custom landing pages, layouts, and content for your WordPress site.
It comes with a Toggle element that lets you add an FAQ section in an accordion style to your landing pages. Once you drag and drop the Toggle onto your page, its settings will open up in the settings menu on the left.
You can now add content to the toggle headlines. To expand the toggle and add an answer to the question, click the ‘Expand’ button in the block toolbar above each toggle.
You are able to customize the FAQ section by adjusting the columns, width, vertical space, and dropdown animations.
With Thrive Architect, you can also further customize the FAQs section by changing the icons, typography, layout, background color, borders, adding HMTL attributes, and more.
It allows you to create an FAQ section for your product pages and also enables customers to submit their own questions that can be answered by the support team.
This can help increase user engagement in your WooCommerce store and provide a better customer experience.
It is a highly customizable plugin with a category filter and search feature to make it easier for users to find the answers to their questions.
With YITH WooCommerce Questions and Answers, you can even implement a voting system, activate the email notification process, hide inappropriate questions, and encourage users to post their own answers in the FAQs section.
Ultimate FAQ is a popular WordPress plugin that provides shortcodes and blocks in the Gutenberg editor to add an FAQ section to your website.
It comes with unlimited support for categories and tags and even lets you add an unlimited number of FAQs to a single section.
By default, the plugin comes with accordion and toggle styles. However, you can also use custom CSS to style your FAQs according to your liking.
Other than that, it lets you import FAQs in bulk by using Google Sheets and even offers a search and filtering feature that customers can use to find the answers to their questions.
The plugin is super easy to use and helps create SEO-friendly FAQs to improve your search engine rankings.
Moreover, Ultimate FAQ also integrates with WooCommerce, so you can easily add an FAQ section for your online store.
Some of its other features include email support, social sharing, custom fields, multiple FAQ layouts, video/image support, and more.
Easy Accordion is a powerful FAQ builder plugin that provides a drag-and-drop interface to create an accordion-style FAQ section.
It’s lightweight, fast, and SEO-friendly, helping you quickly optimize your website content for search engines.
The plugin offers more than 16 pre-designed templates and other customization options, including typography, icon sets, font colors, themes, animation effects, padding, color schemes, and more.
This makes it the perfect choice if you want to create a highly customizable FAQ section.
Besides that, Easy Accordion has a responsive layout that works on various devices, including mobile phones, iPads, desktops, and tablets.
WP Responsive FAQ with Category is a simple WordPress plugin that uses shortcodes to add FAQ sections to your pages or posts.
If you are looking for a beginner-friendly and easy-to-use solution to create FAQs, then this plugin is for you.
It comes with a drag-and-drop interface and 15+ pre-designed templates that will help you create an aesthetically-pleasing FAQ section for your website.
Other than that, WP Responsive FAQ also offers WooCommerce support and makes it super easy for you to display an FAQ section in your online store.
Some of its other features include image/video support, customization settings, accordion animation adjustments, and more.
Which Is the Best WordPress FAQ Plugin?
In our expert opinion, All in One SEO is the best WordPress FAQ plugin because it allows you to easily add FAQ sections and schema to your pages and posts.
However, if you want to create an FAQ section on a landing page, then you can also use SeedProd or Thrive Architect. They are the best WordPress page builders on the market that come with built-in features to help create an attractive FAQ section.
You can also use the Heroic FAQs plugin if you are looking for an all-in-one solution. Its user-friendly, drag-and-drop interface allows you to easily build FAQs and FAQ schema.
Do you want to use the free Cloudflare CDN on your WordPress site?
Cloudflare is one of the best WordPress CDN services available in the market. They offer a free CDN that speeds up your website along with a suite of powerful security features for small business websites.
The challenge is that many entry-level users are not able to use Cloudflare because they think it is hard to set up.
In this guide, we will walk you through a complete Cloudflare setup in WordPress to help you improve your website speed.
What Is a CDN?
A CDN or content delivery network is a system of distributed servers that helps deliver your website files faster to users based on their location.
Typically, a web hosting service serves your website visitors from a single location. All the users access the same server, no matter where they are located.
This can cause a delay in content delivery for users living further away from your website’s central hosting server.
That’s why CDNs set up multiple edge servers in different locations around the globe.
These CDN servers cache static content from your website’s origin server and present it to users when they visit your WordPress website.
When there is a user request, the CDN server closest to the user’s location will handle it.
For example, if someone in the USA wants to access a UK-hosted website, then a CDN server in the USA will serve that request, not the main server in the UK.
With a CDN, all the user requests are handled by the nearest CDN servers. This reduces the physical distance between the visitors and your website’s server.
As a result, a CDN improves your website performance and speed for all users regardless of their geographic location.
A faster website also improves the user experience and can give your website a slight boost in SEO rankings. Using a CDN also reduces the load on your primary server and protects it from crashing during traffic spikes.
Cloudflare is one of the most popular free CDN providers available on the internet. It is a large network of globally-distributed servers that automatically cache static content and deliver dynamic content quickly.
On top of a CDN service, Cloudflare is also a cloud-based website firewall and a distributed proxy server. It monitors all incoming traffic to your website and blocks suspicious traffic even before it reaches your server.
They offer a free basic plan that’s suitable for small business websites and blogs. They also offer paid plans starting at $20 per month.
Cloudflare is an excellent choice for small businesses looking for a free CDN. However, if you want to fully utilize all of Cloudflare’s features, then you will need the Business plan, which costs $200 per month.
Note: We do not use Cloudflare on WPBeginner. Instead, we use Sucuri as a website firewall and CDN. This firewall has the double benefit of improving speed and security. You can learn more in our comparison of Sucuri vs. Cloudflare.
With that being said, let’s take a look at how to set up Cloudflare Free CDN in WordPress. You can use the quick links below to jump to the different parts of the tutorial:
To begin, you need to visit the Cloudflare website and click on the ‘Sign Up’ button.
On the next page, you need to enter your email address and password to create a Cloudflare account.
Simply enter the information required, and then click on the ‘Sign up’ button.
When you finish signing up, you will see a thank you page confirming that your Cloudflare account has been set up.
The next step is to add your website to Cloudflare. You should click the ‘Add a website or application’ button to get started.
You can now enter your website into the ‘Enter your site’ field.
Make sure you only type your site’s domain name, such as example.com. You don’t need to type the full URL or any extra characters.
On the next screen, you will be asked to choose the type of Cloudflare plan you want.
For this tutorial, we will choose the free Cloudflare plan. Then, click the ‘Continue’ button.
After that, Cloudflare will show you a list of all DNS records their systems found. These will include your subdomains as well.
The DNS records you want to be passed through Cloudflare should have an orange cloud icon. The DNS records that will bypass Cloudflare will have a gray cloud icon.
You need to review the list to make sure that your primary domain is active on Cloudflare with an orange cloud icon. Simply click the ‘Proxy status’ toggle to change the status.
Once you have verified your DNS records, just click on the ‘Continue’ button at the bottom.
During the next step of your setup, Cloudflare will ask you to update your nameservers. You will be asked to change your nameservers and point them to Cloudflare nameservers.
Note: Changing nameservers can take some time to propagate throughout the internet. During this time, your website may become inaccessible to some users.
Or, if you got a free domain from your web hosting provider like Bluehost, then you will have to change the name server by logging in to your hosting account.
For the sake of this tutorial, we will be showing you how to change the nameservers from the Bluehost control panel.
While the process is similar across hosting companies, you can always ask your hosting provider for detailed instructions for their control panel.
Once you are logged in to your Bluehost cPanel dashboard, go to the ‘Domains’ section, and select your domain name. After that, click on the ‘Name Servers’ tab and the ‘Edit’ button.
Next, you need to select ‘Custom’ and enter the nameservers provided by Cloudflare.
Then, click the ‘Save’ button.
After that, you need to go back to the Cloudflare setup page, and click the ‘Done, check nameservers’ button to finish the setup.
It will now check your new nameservers automatically.
That’s it! It will take a few minutes to update your domain nameservers and activate Cloudflare.
Once activated, you will see the success message in your Cloudflare dashboard.
In the meantime, the Cloudflare Quick Start Guide will open automatically, and you can use it to customize your Cloudflare settings. We will show you how in the next section.
Note: The above screenshots show the Bluehost control panel. Your nameserver settings may look different if you are using a different hosting provider.
Configuring Cloudflare With the Quick Start Guide
The Cloudflare Quick Start Guide should have opened automatically after you clicked on the ‘Done, check nameservers’ button above. This setup wizard will help you improve the security and performance of your website.
The first setting is ‘Automatic HTTPS Rewrites’.
This will help you avoid the mixed content error in WordPress. It does this by automatically changing ‘http’ to ‘https’ in the URLs of all resources and links on your site that can be served with a secure ‘https’ URL.
This setting is on by default. We recommend you leave it on and click the ‘Save’ button.
The next setting is ‘Always Use HTTPS’.
Some users have reported issues when using this setting with Cloudflare. This setting is disabled by default, and we recommend you leave it that way. We will show you how to redirect from HTTP to HTTPS using the All in One SEO plugin later in this article.
Now you can click the ‘Save’ button to move on to the next option.
The next setting is Brotli compression.
Cloudflare can use Brotli compression to unlock 15-20% speed improvements. This setting is on by default, and we recommend you leave it on.
Make sure you click the ‘Save’ button to store this setting.
Now you will see a summary of what you have configured with the Quick Start Guide.
You should see:
Automatic HTTPS Rewrites: ON
Always Use HTTPS: OFF
Brotli: ON
You have now completed the Quick Start Guide and can click the ‘Finish’ button. However, there are still some additional important settings that need to be configured.
Configuring Additional Important Cloudflare Settings
Your basic Cloudflare setup is complete, but there are a few essential settings you need to configure to keep your WordPress site secure.
1. Secure Your WordPress Login Page
You can set up page rules to customize how Cloudflare works on specific pages on your site. This is especially useful for securing critical pages such as the login page and wp-admin area.
The Cloudflare free account allows you to set up 3 page rules. If you want to add more page rules, then you need to pay $5 per month for 5 extra rules.
First, you need to click the ‘Rules’ option in the menu on the left of the page. After that, you can click the ‘Create Page Rule’ button.
Now you can set up 3 different page rules. You can start by creating a rule that secures your WordPress login page.
Simply add the following settings below to secure your website:
Page URL: example.com/wp-login.php*
Settings: Security Level – High
When you are done, just click ‘Save and Deploy’ to store and activate the rule.
2. Exclude the WordPress Dashboard from Cloudflare
You will be returned to the Page Rules page, where you can see your first rule listed.
Now you can create a second rule to exclude the WordPress dashboard from Cloudflare caching and enable high security.
You’ll need to click on the ‘Create New Rule’ button to create your second rule.
After that, you need to type the following settings into the rule. You can click the ‘+ Add a Setting’ button to add new rows for additional settings:
Page URL: example.com/wp-admin*
Settings: Security Level – High
Cache Level – Bypass
Disable Performance
Disable Apps
When you are done, make sure you click ‘Save and Deploy’ to add the new rule.
3. Configure SSL Certificate Settings
Another important setting is the SSL certificate available in the ‘SSL/TLS’ menu on the left.
Make sure to click the ‘Full’ radio button if you are already using SSL.
Once you are done, Cloudflare will provide the essential green padlock in your visitors’ address bar to signify that your website is secure.
4. Redirect from HTTP to HTTPS Using All in One SEO
We mentioned earlier that we don’t recommend using Cloudflare’s ‘Always Use HTTPS’ feature. A great alternative is to use the All in One SEO plugin. It’s the best SEO plugin for WordPress, used by over 3 million sites.
The first thing you need to do is activate and install the All in One SEO plugin. For more details, see our guide on how to install a WordPress plugin.
After that, navigate to All in One SEO » General Settings and then enter your license key into the ‘License Key’ box and click ‘Connect’.
You can find your license key in your account profile on the All in One SEO website.
Next, navigate to All in One SEO » Redirects and then click the ‘Full Site Redirects’ menu navigation option.
You will need to scroll down the page until you find the ‘Canonical Settings’ toggle. You should click this toggle so that it turns blue.
Next, turn on the ‘Redirect from HTTP to HTTPS’ toggle. This will create a redirect from HTTP to HTTPS, making sure that your visitors always have a secure connection to your website.
When you are done, make sure to click the ‘Save Changes’ button at the bottom or top of the screen to store this setting.
Optimizing Cloudflare for WordPress Using a Plugin
Cloudflare offers a dedicated WordPress plugin for one-click WordPress-optimized settings.
The plugin lets you quickly set up Cloudflare on your WordPress site, add web application firewall (WAF) rulesets, automatically purge the cache, and more.
Once done, you need to visit Settings » Cloudflare in your admin panel to configure the Cloudflare settings.
On the settings page, you will see a ‘Create Your Free Account’ button and a sign-in option for existing accounts. Simply click the ‘Sign in here’ link.
On the next screen, you will need to enter your Cloudflare email and API key.
Click the ‘Get your API key from here’ link.
This will bring up a popup for your account area on the Cloudflare website.
Make sure you are on your ‘My Profile’ page, and then click on the ‘API Tokens’ tab in the left sidebar.
After that, go to the ‘Global API Key’ section and click on the ‘View’ button.
This will open a popup and display your API key.
Simply click on the key to copy it.
Next, you need to come back to your WordPress dashboard and enter your email address and API key.
Then, click the ‘Save API Credentials’ button.
After that, the Cloudflare settings will appear on your dashboard.
From here, you can apply a single-click WordPress optimization, purge the cache, enable automatic cache, and more.
To optimize your WordPress site, just click the ‘Apply’ button next to ‘Apply Default Settings’.
Next, click on the ‘Settings’ menu option.
Here you will find more site optimization settings.
You can scroll down on this screen to find the ‘Security’ section.
By default, the security level is medium. To improve your website’s security, you can select ‘High’ from the dropdown list.
We hope this article helped you to learn how to set up Cloudflare free CDN in WordPress. You may also want to see our ultimate WordPress security guide and our expert picks for the best WordPress security plugins to further protect your website.
If you liked this article, then please subscribe to our YouTube Channel for WordPress video tutorials. You can also find us on Twitter and Facebook.
Are you looking for a way to back up your WordPress site to Dropbox?
It is a best security practice to regularly back up your site and store it in a separate location, like Dropbox. This way, you can easily restore your content, plugins, databases, and important settings if there is a security breach or something goes wrong.
In this article, we will show you how to back up a WordPress site to Dropbox.
Why Back Up a WordPress Site to Dropbox?
Whether you are running a small WordPress website, an eCommerce store, or any other type of website, then creating regular backups is essential.
A backup is a copy of your website that includes important files, folders, databases, site content, themes, plugins, and other information.
With backups, you will have a copy of your website or ready in case of a fatal error or security vulnerability. Then, you can restore your website to its previous state in just a few clicks.
Storing your WordPress backups on your computer’s hard disk or website server can be risky. If your hard disk fails or the website server gets compromised, you will lose all your backups.
That’s why storing backups in multiple locations is a good practice, including cloud storage services like Dropbox.
Dropbox is a popular file-hosting service that lets you store and back up files to the cloud. The best part is that you can access, save, and share these files from anywhere.
That being said, let’s see how to back up WordPress to Dropbox.
Connecting Your WordPress Site to Dropbox
The easiest way to create WordPress backups and save them in Dropbox is by using the Duplicator plugin. It is the best WordPress backup plugin that is beginner-friendly and helps you to back up, migrate, and clone your website.
Plus, the Duplicator plugin easily integrates with different cloud services like Dropbox, Google Drive, Amazon S3, OneDrive, FTP, and SFTP – SSH.
Note: We will use the Duplicator Pro plugin for this tutorial because it includes cloud storage integrations. There is also a free version of Duplicator you can use to create site backups, but it doesn’t allow you to automatically store those backups in Dropbox.
First, you will need to install and activate the Duplicator Pro plugin. If you need help, then please see our guide on how to install a WordPress plugin.
Upon activation, you need to head to Duplicator Pro » Settings from the WordPress admin panel and click the ‘Licensing’ tab.
Next, you will need to enter your license key and click the ‘Activate’ button. You can easily find the license key in your Duplicator account area.
Next, you will need to connect your Dropbox account with Duplicator.
Simply go to Duplicator Pro » Storage from your WordPress dashboard. Here, you will see your local storage option, where the backups will be stored by default.
Go ahead and click the ‘Add New’ button to add Dropbox.
After that, you can enter a name for your new storage option so it is easily recognizable. For example, we will name it ‘Dropbox’.
Next, you must click the ‘Type’ dropdown menu and select the ‘Dropbox’ option.
From here, you will see new settings for your storage option.
Go ahead and click the ‘Connect to Dropbox’ button.
After clicking the button, more settings will appear in the Authorization section.
First, you will need to click the ‘Authorize Dropbox’ button.
Next, a new window or tab will open. Simply log in to your Dropbox account.
You can use your Google or Apple account to sign in or enter the email and password you used when signing up for Dropbox.
Once you are logged in, you will need to allow access to your Dropbox account.
Go ahead and click the ‘Allow’ button.
Next, Dropbox will show you an authorization code.
Simply copy this code.
You can now return to the browser tab or window where you are configuring the Duplicator Pro storage settings.
Go ahead and enter the code into the ‘Step 2: Paste code from Dropbox authorization page’ field.
Once that’s done, simply click the ‘Finalize Setup’ button.
You have now successfully added Dropbox as a cloud storage option to save your WordPress backups.
Creating a Dropbox Backup of Your WordPress Website
The next step is to create a backup of your WordPress blog or website and save it to Dropbox.
To start, go to Duplicator Pro » Packages from the WordPress admin panel and click the ‘Create New’ button.
Next, you will need to enter a name for your package.
Duplicator will also give you the option to select a template. We recommend keeping it as ‘Unassigned’ because it will keep the settings from the last scan/build.
After that, you can expand the ‘Storage’ section.
Here, you will need to select ‘Dropbox’ as the storage option to store your WordPress backup.
You can also change the ‘Archive’ settings before backing up your site. By default, the plugin will package your site’s content, plugins, themes, databases, and all other files.
However, you can customize your backup by selecting which part of your site to back up. For instance, you might archive only the WordPress database.
When you are done, simply click the ‘Next’ button at the bottom.
On the next screen, Duplicator will scan your website and check if everything is fine before creating a backup. You will see a notice or a warning for any issues that need to be resolved before backing up your site.
Once everything checks out, simply click the ‘Build’ button.
The plugin will take a few seconds or minutes to create a backup package. The time will depend on the size of the files and folders.
Once the package is ready, it will be saved in Dropbox. You can view the Dropbox location by clicking the ‘Storage’ icon.
A new window will now open with the location.
You can simply click on the link to view your WordPress backup in the Dropbox dashboard.
Scheduling WordPress Backups to Dropbox (Pro Plugin Only)
With Duplicator Pro, you can schedule regular website backups and store them in Dropbox.
First, you will need to go to Duplicator Pro » Schedules from the WordPress dashboard and click the ‘Add New’ button.
On the next screen, you can enter a name for your backup schedule and select a template. We recommend using the default template so that all your website files, folders, and databases are backed up.
After that, select ‘Dropbox’ as the storage location for your backups.
Next, you will need to scroll down and choose when the plugin should automatically create a backup.
You can select whether you’d like to build a package hourly, daily, weekly, or monthly. For instance, if you select the weekly option, then you can choose which day to schedule the backup.
There is also an option to choose the start time for your schedule. Lastly, make sure that the ‘Enable This Schedule’ option is checked so that your schedule is active.
Once you are done, simply click the ‘Save Schedule’ button.
Restoring a WordPress Backup From Dropbox
Now that you have scheduled regular backups, you will always have a copy of your site in Dropbox. This way, you can easily restore the backup if there is a fatal error, data loss, or security breach.
To restore your site, you will first need to open your Dropbox account and head to the Duplicator Pro folder.
Next, select the website backup you would like to download.
Simply click the 3 dotted icons and then select the ‘Download’ option.
From here, you can save the zip file on your computer.
After that, you must go to your WordPress dashboard and head to Duplicator Pro » Import. Go ahead and click the ‘Select File’ button.
Next, you can select the zip file from your computer to restore the website backup.
Once the file is uploaded, you can scroll down to see the package details. Simply click the ‘Continue’ button.
On the next screen, you will see an overview of your package. For instance, it will show the number of posts, pages, media files, plugins, and more that are in the backup.
Go ahead and click the ‘Launch Installer’ button.
Once you click the button, the Duplicator installer wizard will launch.
First, you will need to choose an Install Type for your package. Go ahead and select the ‘Restore single site’ option.
Next, you can scroll down to view the Validation checkpoints and make sure the system is ready to install the backup. If there are any warnings or notices, then you must resolve them before restoring the backup.
Once that’s done, click the checkbox for ‘I have read and accepted all terms & notices’ and click the ‘Next’ button.
A popup will now open with install confirmation details.
You can click the ‘OK’ button to move forward.
The plugin will now extract archive files from the package.
Once the extraction is finished, you will see the install results. To complete the backup, you must click the ‘Admin Login’ button and log back in to your site to finalize the installation.
You have now successfully restored your website backup from Dropbox.
Contact someone at your company through live chat.
Talk to a chatbot (automated chat).
Call your sales team, or book a call with them.
Lead generation is essential for all online businesses. Of course, it’s also important to have a strong process for converting the leads into customers. However, most businesses struggle to get enough leads in the first place.
Even if you run a nonprofit, lead generation matters. It can help you get more donations and more support.
Our goal with this list is to share the absolute best WordPress lead generation plugins that you can use to grow your business faster.
Unlike other best lead generation tool lists, we are not just sharing a list of plugins that do the same thing. Instead, we’re focusing on lead generation from a holistic point of view.
For each lead generation solution category, we share an expert pick along with one alternative option for that category. This will help us keep this list comprehensive without causing choice paralysis.
With that said, here are the best lead generation plugins for WordPress.
WPForms is the best contact form plugin on the market. Over 6 million website owners use the beginner-friendly, drag-and-drop builder to create any kind of online form for their WordPress sites.
It comes with over a hundred pre-built form templates you can use as a starting point. After that, you can customize the form to match your needs using the drag-and-drop form builder interface.
Here are just some of the lead generation forms you can create:
Each time someone submits the form, you will automatically get an email notification. You can easily turn this off if you prefer not to receive email alerts. WPForms will store each completed form entry in your WordPress database too.
It’s also possible to send notifications to multiple recipients using WPForms. For example, you might want to send a customer inquiry notification to a specific person in the sales team and their supervisor.
Price:
WPForms pricing starts at $49.50/year. There’s also a free version of the plugin, which has limited features.
Alternative:
Formidable Forms ($39.50 per year) is a good alternative to WPForms. It has powerful tools that let you create different forms, including lead generation calculators. However, it’s not as beginner friendly as WPForms.
OptinMonster is a powerful lead generation and popup plugin that you can use on your WordPress site.
It lets you create high-converting popups and email signup forms that help you turn abandoned website visitors into subscribers and customers.
It has lots of useful features, including Exit Intent® technology. This lets you show your popup at the exact moment when someone is about to leave your site.
You can combine it with their page targeting feature to show customized popup messages for each page on your site, which is proven to increase conversions.
With OptinMonster, you even get special popups like spin the wheel popups and Yes/No optins. These can boost your conversion rate even further.
There are lots of different professionally designed templates included in the app. This makes it quick and easy to create your lead forms using the drag-and-drop builder.
You can also use OptinMonster to generate leads in other ways. For instance, you might use the content-locking feature to ask visitors to join your email list before they can read your full content.
You don’t necessarily need to use it to generate email leads, either. You could add a click-to-call button to your popup, use it to show special discount codes, and more.
Price:
OptinMonster starts at $9/month when billed annually. To get advanced features like Exit Intent technology and Yes/No forms, you need the Pro plan from $29/month.
Alternative:
Thrive Leads ($99 per year) is a good alternative to OptinMonster. It offers a range of different types of lead generation forms and popups. It also has a built-in template library to speed up the building process.
SeedProd is the best WordPress website and theme builder on the market. It’s used by over a million website owners to easily create any type of website without writing any code.
It has dozens of professional templates you can customize easily with the drag and drop builder.
SeedProd also provides you with a beginner-friendly landing page builder. And you will find a ready-made sales page, opt-in page, webinar registration, coming soon page templates, and more.
All of these landing page templates can be completely customized to help you start generating leads as quickly and easily as possible.
It includes dozens of blocks designed to help you build better landing pages, like testimonial blocks, countdown timers, CTA buttons, pricing tables, and so much more.
You will find a searchable stock photo library with over 2 million photos that you can add to your pages to improve conversions.
It also has powerful integrations with the top email marketing software and thousands of third-party apps via Zapier. This lets you easily send your leads to your lead management tool of choice.
For online store owners, you can use the WooCommerce blocks to build custom WooCommerce product pages easily, thank you pages, and more to collect leads and sell more products.
Price:
SeedProd starts from $39.50 per year (only $3.29 per month). Plus, there’s a free version you can try to see how the plugin works.
Alternative:
Instapage offers similar page builder features but is more expensive and starts at $199 per month (billed annually).
LiveChat is the best live chat software for WordPress websites. It’s very easy to set up, and you can integrate it with dozens of other marketing services.
By adding live chat support to your WordPress website, you can build a better relationship with your users and convert more visitors into customers.
This plugin places a chat button in the bottom right-hand corner of your website. Visitors can click on this to chat with your team in real time.
Plus, your support team members don’t need to log in to WordPress to use LiveChat. Instead, they can use the LiveChat app on their laptop or mobile devices.
LiveChat will create a support ticket if a visitor contacts your team outside of support hours.
LiveChat is fast and easy to use for your visitors and your support team. It lets you quickly turn leads into customers by answering pre-sales questions straight away.
Price:
LiveChat starts at $20 per month when billed annually with a 14-day free trial. Our LiveChat coupon gives you an extended 30-day free trial plus a 30% discount.
Alternative:
Brevo (Previously Sendinblue) offers a simple, free live chat feature that you can use on your website. It also offers email, SMS, and a CRM tool that integrate with live chat.
ChatBot is one of the best AI chatbot software options on the market and lets you use automated live chat to connect with your potential customers and respond to questions 24/7.
To help you get started quickly, ChatBot has lots of pre-designed templates. For instance, you can use the lead generation bot to book calls. Meanwhile, the sales bot template allows you to sell products directly from the chat window.
ChatBot can be used in Facebook Messenger as well as on your website. That makes it a great option for companies and organizations that get a lot of inquiries through Facebook.
It’s easy to integrate it with other apps, such as LiveChat. A live agent can step into the conversation seamlessly if needed.
Price:
ChatBot pricing starts at $52 per month. There’s a 14-day free trial available.
Alternative:
Hubspot offers a suite of business CRM tools, including a chatbot builder and live chat. You can get started free, and paid plans start at $30 per month.
RafflePress is one of the best WordPress giveaway plugins on the market. It allows you to easily create viral giveaways and contests that you can use to grow your website traffic and email list.
You can use the drag and drop builder to quickly create giveaway campaigns in minutes without writing any code. Plus, there’s a built-in template library to help make giveaway creation even faster.
A unique refer-a-friend feature lets you do word-of-mouth marketing by letting users share your contest on their social media profiles.
This helps to build engagement and can get you a lot of new visitors to your WordPress blog.
You will find many other powerful features that help improve your campaigns, like email verification, fraud protection, social logins, giveaway landing pages, success tracking, and more.
Plus, your giveaways will run on mobile devices, so you can reach your visitors no matter where they happen to be.
RafflePress has a free version of the plugin you can use to get started. Paid plans start at $39.50 per year for the starter plan.
Alternative:
Gleam is an advanced giveaway platform you can use to run contests and giveaways. However, it’s not as beginner friendly, and you will need at least the $97 per month Pro plan to unlock useful features.
It lets you easily send targeted push messages to visitors after they leave your website.
We use push notifications here at WPBeginner, and they are consistently a top 5 source of our traffic. They are a highly-effective way to convert website visitors into loyal followers and customers.
Visitors simply give their permission to receive push notifications by clicking a button:
You can set up push notifications to automatically send out to your subscribers whenever you publish a blog post or use them to send completely custom messages.
It’s a very easy-to-use solution for beginners to advanced users. You will find powerful features like A/B testing, custom-triggered campaigns, interactive messages, custom drip campaigns, and so much more.
Plus, you can use the marketing automation features to create abandoned card sequences, scheduled messages, and more.
You will be able to see a detailed breakdown of your subscriber engagement and even the transactional revenue generated from your push campaigns.
Price:
PushEngage starts at $9 per month and gives you support for 100,000 subscribers and unlimited campaigns. There’s also a free plan available that gives you 30 campaigns per month for 200 subscribers.
Alternative:
OneSignal has a free plan for unlimited notifications on mobile. For advanced features like delayed notifications, pricing starts at $99 per month.
FunnelKit, formerly known as WooFunnels, is the best sales funnel builder for WordPress.
You can use it to create lead-generation funnels, sales funnels, high-converting checkout pages, one-click upsells, and more.
It’s essentially a ClickFunnels alternative that helps you convert website visitors into leads and customers.
FunnelKit comes with a built-in library of beautiful funnel templates that you can import in one click.
You can easily customize the templates using the WordPress block editor as well as popular page builder plugins like Elementor, Divi, and others.
FunnelKit offers in-depth analytics so that you can see how your funnels are performing in real time. Plus, it comes with A/B testing that lets you experiment with different versions of your funnels to find out which one converts best.
In addition, FunnelKit has a marketing automation solution called FunnelKit Automations. It allows you to set up automated email and SMS campaigns for lead nurturing, welcome series, abandoned cart recovery, post-purchase upsell, and more.
Price:
FunnelKit starts at $99.50 per year. To access FunnelKit Automations, you need at least the Professional plan, which costs $249.50 per year.
Alternative:
SeedProd, which we mentioned earlier in this list, can also be used to easily create lead generation pages, sales pages, custom WooCommerce checkout pages, and more.
WP Call Button allows you to easily add a ‘click to call’ button on your WordPress website or WooCommerce store. Visitors can simply click or tap the button to call you straight away.
If your customers need to call you before purchasing a service or booking an appointment, adding a click-to-call button on your website will increase your leads and sales.
WP Call Button makes adding your button to any post or page easy. You can include it in your WordPress sidebar, too. It’s also easy to create a sticky floating call button that stays visible all the time.
By creating an affiliate program, you can have your own team of affiliates promoting your products in exchange for a commission.
This can help you get more visibility online, traffic, and of course, make more sales. You can even create your very own WooCommerce affiliate program using this plugin.
It comes with everything you need to manage your program, including accurate affiliate tracking, integrated payouts, real-time reporting, affiliate coupon tracking, and so much more.
With manual affiliate approval and top-performing affiliate data, you can build lasting partnerships with your most valuable affiliates for years to come.
Price:
AffiliateWP starts at $149.50 per year and has everything you need to run a successful affiliate program.
Alternative:
Easy Affiliate is another popular WordPress plugin for creating and managing an affiliate program. The basic plan starts at $99.50 per year.
All in One SEO is the best WordPress SEO plugin used by over 3 million websites. It’s the most comprehensive SEO toolkit that makes it easy to improve your SEO rankings without learning any complicated SEO jargon.
Doing WordPress SEO is an important part of lead generation. You need to bring people to your website before they can join your email list, call you, subscribe to push notifications, or do anything else on this list.
Once you install and activate the plugin, an easy-to-use setup wizard will help you choose the best SEO settings for your business, so you can start getting more traffic.
It has a TruSEO score, which offers detailed on-page SEO analysis and gives you an actionable SEO checklist to help you easily optimize your posts and pages.
All in One SEO can help you improve your post SEO titles and meta descriptions, generate rich snippet schema markup and create smart XML sitemaps and RSS sitemaps.
Plus, there are built-in WooCommerce SEO settings, like individual product optimizations, product image SEO, and more, to help your online store get more visitors from the search results.
Price:
AIOSEO starts at $49.60 per year for access to advanced SEO features. You can also try out the free version to begin optimizing your site for SEO.
Alternative:
Yoast SEO is another popular SEO plugin for WordPress that will help you optimize your site. There is a free version and a premium version that starts at $99 per year.
This means you can easily find out what’s working and what’s not, focusing on the areas that really matter.
For instance, you might use MonsterInsights to enable author tracking and see which writers for your site are producing the best-performing posts.
Or you could use MonsterInsights to track link clicks and button clicks. This lets you figure out which links and buttons are getting clicked and which ones aren’t, letting you pinpoint areas for improvement.
MonsterInsights is quick and easy to set up and gives you real-time stats. It can even track things like your eCommerce data, form completions, and file downloads. This gives you more insights into your lead generation efforts.
Price:
MonsterInsights starts at $99.50/year. There’s also a free version available for WordPress with limited features.
Alternative:
ExactMetrics offers similar features to MonsterInsights and starts at $99.50 per year.
If your business relies on phone calls for lead generation, then Nextiva can help you improve your business communication across the board.
It has a web-based admin panel that will let you manage your entire unified communications platform in one place.
You will find business phone features like call routing, voicemail to text and email, SMS messaging, unlimited domestic calling, online faxing, and so much more.
Every new account can get a free local or toll-free number. Plus, you get all standard features like caller ID, call forwarding, routing, custom greetings, and more.
You can even integrate your business phone with powerful features like live chat and CRM services.
We use Nextiva at WPBeginner for our business phone service. It works well for our remote team since they can receive business calls on their cell phones while still keeping their numbers private.
Price:
Nextiva starts at $14.95 per month per user for all your business phone needs. The Enterprise plan costs $26.95 per month per user and includes video conferencing, call recording, and more.
Alternative:
RingCentral is another popular business phone provider that’s packed with features. Paid plans start at $20 per month per user.
What Is the Best Lead Generation Plugin for WordPress?
We believe you need multiple plugins for a robust lead-generation strategy on your site.
With that said, WPForms is the best lead generation plugin for WordPress. You can use their drag-and-drop form builder to create any online form.
If you are looking for a live chat solution to improve leads and support, then LiveChat and ChatBot are both great options.
If you want to improve your overall conversion rate on your website, then nothing beats the powerful features that OptinMonster has to offer.
If you want to improve your existing website and product pages to generate more leads and make more sales, then SeedProd is a must-have plugin.
With any lead generation strategy, attracting leads is only the first part. You have to ensure a proper sales process to close the deal.
If you rely on phone calls, then we recommend using Nextiva. It comes with auto-attendant, call-routing, CRM, and powerful sales features that you can use to increase your sales.
Have you ever encountered a 414 request URI too long error on your WordPress website?
The error is usually caused when there is a critical error between your web browser and a server. You’ll see this error when clicking on a link or any action performed by a WordPress plugin.
In this article, we will show you what is the ‘414 request URI too long’ error and how to fix it.
What is 414 Request URI Too Long Error?
A 414 request URI too long error occurs when a URL or an action you’re requesting is too long for the server to handle.
Do note that there is a difference between URI and URL. A URI or Uniform Resource Identifier can be a resource’s name, location, or both. On the other hand, a URL or Uniform Resource Locator can only be the location of a resource.
Both terms are usually used interchangeably because URL is part of URI. However, the 414 error can be triggered by both components, so let’s look at the causes.
What Causes 414 Request URI Too Long Error?
You might see the 414 error when you click on the link, and the server is unable to process it because it’s too long.
One situation where a link might to very long is using UTM (Urchin Tracking Module) parameters. If you’re using UTM codes to track conversions on your WordPress website and there are a lot of parameters in the URL, then it can cause this error.
Another situation that can cause a 414 error is a redirect loop. This is when a misconfiguration or a setting in a WordPress plugin causes a lot of redirect requests.
As a result, you get incredibly long URLs and 414 requests URI too long error.
Similarly, some plugins can also generate lengthy URIs as part of their functionality. You’re most likely to encounter this error if you have all-in-one WordPress security plugins installed on your site.
In a rare event, a developer-side issue can also trigger a 414 error when a POST request converts into a GET request with query information being too long. Lastly, cyber attacks on your website server can also result in 414 URI too long issues.
That said, let’s see how you can fix the 414 error on your WordPress website.
Fixing 414 Request URI Too Long Error
A quick way to fix this issue is by increasing the size of the URI your website server can process.
Before we move forward, we recommend creating a WordPress backup. That’s because fixing the 414 error involves editing the website configuration files. In case anything goes wrong, you’ll have a backup copy of your site ready to restore.
Determine if Your Website is Using Apache or Nginx
First, you’ll need to find out the type of server your WordPress website is using. There are 2 main types of servers, which includes Apache and Nginx.
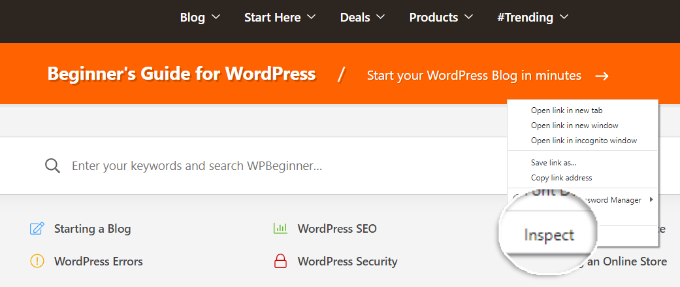
A simple way to do that is by opening your site in a browser. After that, you can right-click on the homepage and select the ‘Inspect’ option.
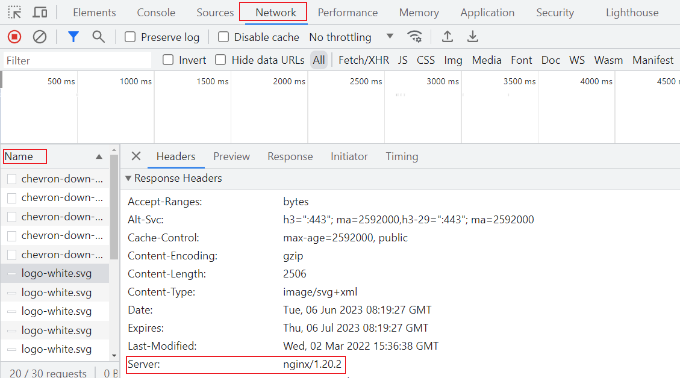
Next, you’ll need to switch to the ‘Network’ tab at the top.
From here, you can select any element under the Name column. After that, you will need to scroll down to the ‘Response Headers’ section and see the ‘Server’ details.
This will show you whether your site is using Nginx or Apache.
If you’re still unsure which server type to use, then you can reach out to your WordPress hosting provider to get more details.
Once you’ve determined the server type, let’s look at how to fix the 414 request URI too long error for Apache and Nginx.
Fixing 414 Request URI Too Long Error in Nginx
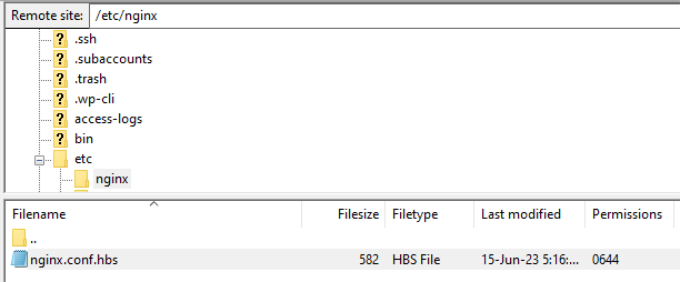
First, you’ll need an FTP or file transfer protocol client to access website configuration files.
There are many FTP clients you can use. For this tutorial, we will use Filezilla. If you need help setting up FTP and accessing website files, then please see our guide on how to use FTP to upload files to WordPress.
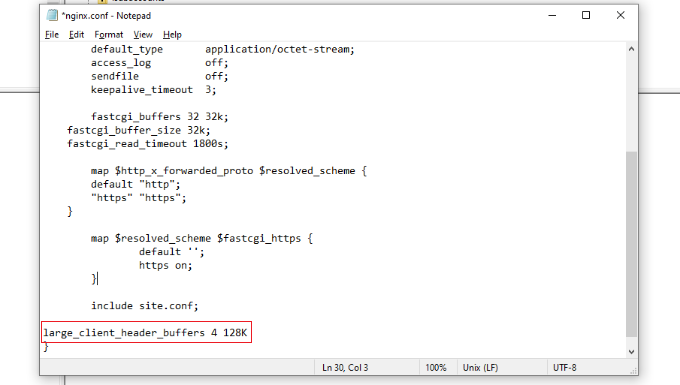
Once you’re logged in, you’ll need to download the ‘nginx.conf’ file. You can access this by following this path: /etc/nginx/nginx.conf
After locating the file, go ahead and download it on your computer and then open it in a notepad software.
From here, you can search for large_client_header_buffers 4 8K settings. If it’s not there, then simply add it to the end of the file.
You will see 2 sets of values, which relate to a number and size. Simply edit the size from 8K to 128K. This will increase the URI size and allow the site server to process long URLs.
Once you’re done, simply save the text file and reupload it to your website using the FTP client.
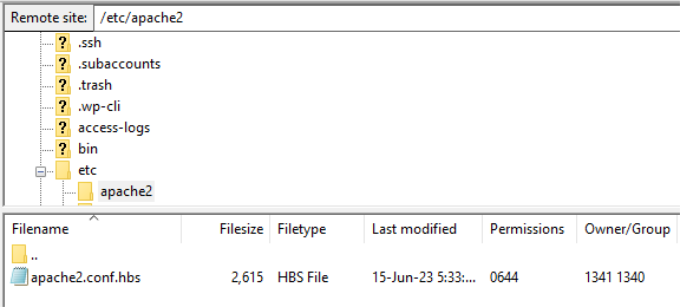
If you’re using the Apache server type, then the process is similar to that of Nginx. First, you’ll need an FTP client to access website files.
Once you’re logged in, you’ll need to locate the ‘apache2.conf’ file. Simply head to the following path using the FTP client: /etc/apache2/apache2.conf
Next, you’ll need to download the file and open it in notepad software.
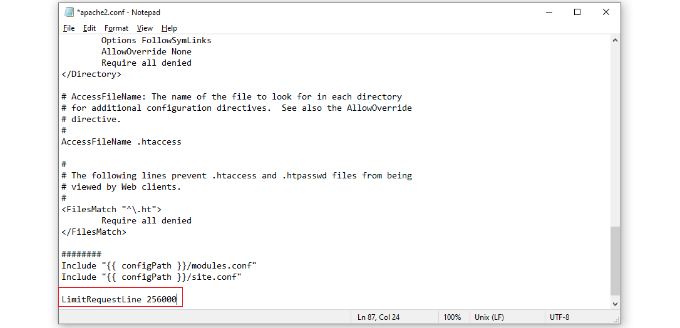
After that, you can look for LimitRequestLine 128000 settings. If you don’t see one, then simply add it to the end of the file.
Usually, LimitRequestLine is set to 128000. However, you can increase this to 256000 or higher to remove the 414 error. Just make sure that the value you set is a multiple of 2.
Once you’re done, simply upload the file back to the website using the FTP client. This should help resolve the 414 error on your WordPress website.
We hope this article helped you learn about what is 414 request URI too long error and how to fix it. You may also want to see our guide on WordPress security and the most common WordPress errors.
If you liked this article, then please subscribe to our YouTube Channel for WordPress video tutorials. You can also find us on Twitter and Facebook.
Do you want to disable automatic update email notifications in WordPress?
By default, WordPress sends email notifications for automatic updates of WordPress plugins, themes, and the core itself. These notification emails can get annoying.
In this article, we will show you how to easily disable automatic update email notifications in WordPress.
Some of these updates are automatically installed, and you will receive an email notification that your site has been updated.
Similarly, WordPress also allows you to enable automatic updates for WordPress plugins and themes. This means that you can spend less time updating plugins and more time growing your business.
You can enable automatic updates for plugins that you trust by visiting the Plugins » All Plugins page in your WordPress admin dashboard.
Simply click on the ‘Enable auto-updates’ link next to the plugin that you want to update itself.
For WordPress themes, you can visit the Appearance » Themes page and click on a theme.
This will bring up a theme information popup where you must click on ‘Enable auto-updates’.
WordPress will send you an email notification when any of your plugins, theme, or WordPress core is updated.
This can get annoying, particularly for users who manage multiple WordPress websites. Wouldn’t it be nice if you could control and turn off these email notifications?
Let’s take a look at how to easily disable automatic update email notifications in WordPress. You can use the quick links below to jump to the method you want to use:
Method 1: Disable Automatic Update Email Notification Using Code (Recommended)
This method requires you to add code to your WordPress files. If you haven’t done this before, then take a look at our beginner’s guide on pasting snippets from the web into WordPress.
You can manually add the code below to your theme’s functions.php file. But this can be tricky since a mistake can bring down your whole website. Plus, if you update your theme, then any custom code snippets will be erased.
We will show you a better approach below, which is using a code snippets plugin.
1. Disable Auto Update Notification Emails for WordPress Core, Themes, and Plugins
Luckily, there is an easy and safe way to disable auto update notification emails in WordPress, and that’s using the WPCode plugin.
WPCode lets you easily add custom code snippets in WordPress without editing your theme’s functions.php file.
Plus, it has a full code library inside the plugin that includes ready-to-use, verified code snippets for popular feature requests like disabling automatic update emails, removing the WordPress version number, disabling comments, and more.
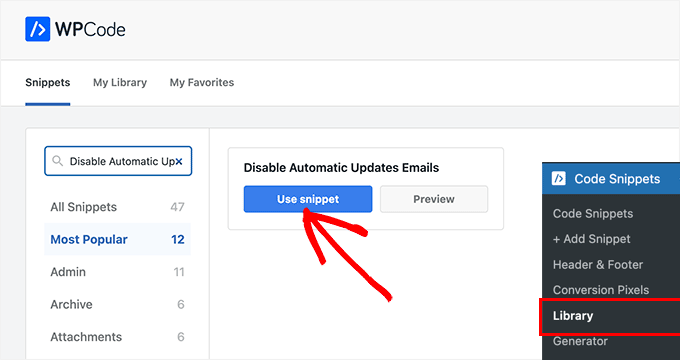
Once the plugin is activated, you need to go to Code Snippets » Library from your WordPress admin dashboard.
Then, search for the ‘Disable Automatic Updates Emails’ snippet and click on the ‘Use snippet’ button.
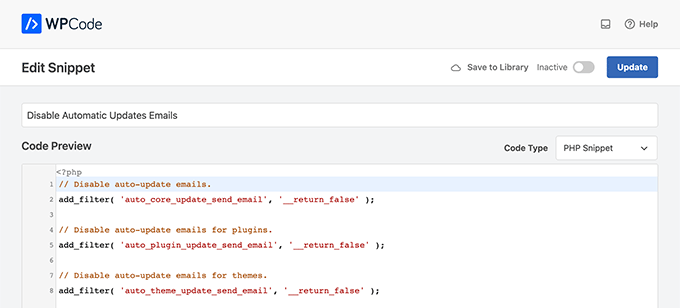
WPCode will then automatically add the code and set the proper insertion method.
The snippet has three filters, with one for each type of auto-update email: WordPress core, WordPress plugins, and WordPress themes.
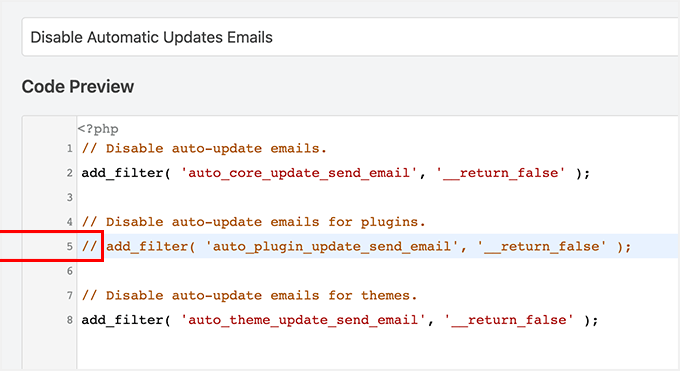
If you don’t want to use a particular filter, simply add a // at the beginning of the filter line.
For example, if you still want to get auto-update emails for WordPress plugins, add a // to the plugin, and the filter will stop it from executing.
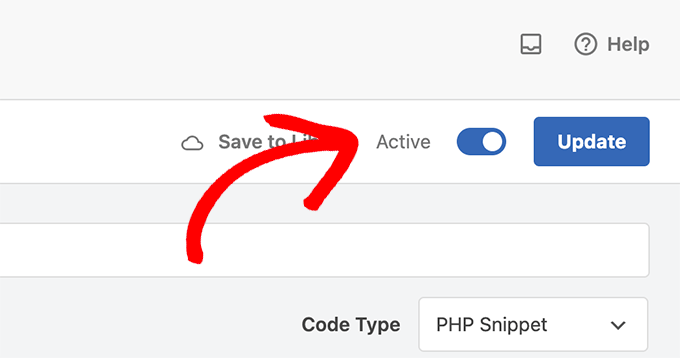
After that, all you have to do is toggle the switch from ‘Inactive’ to ‘Active’.
Then, click the ‘Update’ button.
Now you will no longer get automatic update emails from WordPress.
2. Disable Auto Update Notification Emails for Core Updates
You can also use WPCode to disable notification emails for automatic WordPress core updates. Instead of choosing an existing code snippet, you will need to add this code as a custom snippet:
Upon activation, you need to visit the Settings » Notification emails page. This is where the plugin allows you to manage all WordPress notification emails, including auto-update notifications.
Simply scroll down to the auto-update options and uncheck the box next to the notifications you want to disable.
Finally, don’t forget to click on the ‘Save Changes’ button to store your settings.
2. WP Mail SMTP
Another plugin you can use to disable automatic update email notifications is WP Mail SMTP. It’s the best SMTP service for WordPress and ensures your emails are delivered to your inbox.
WP Mail SMTP lets you easily manage the emails sent by WordPress through its Email Controls. However, you will need the WP Mail SMTP Pro license to unlock the Email Controls option.
Next, you will need to install and activate WP Mail SMTP Pro on your website. You can check out our guide on how to install a WordPress plugin for more details.
Once the plugin is active, navigate to WP Mail SMTP » Settings from your WordPress admin panel and click the ‘Email Controls’ tab.
After that, scroll down to the ‘Automatic Updates’ section and disable email notifications for plugins, themes, WP core status, and full log.
When you are done, don’t forget to click the ‘Save Settings’ button.
That’s all. You have successfully disabled WordPress auto-update email notifications for your website.
Rolling Back WordPress Updates if Something Goes Wrong
Because WordPress plugins run on many independent WordPress hosting and server configurations, sometimes a plugin update may break a feature on your website or make it inaccessible.
This is easy to troubleshoot and fix. First, you need to figure out which plugin has caused the issue by deactivating all WordPress plugins and reactivating them one by one.
Once you have isolated the plugin causing the issue, you can use the WP Rollback plugin. It allows you to switch to the previous version of a WordPress plugin or theme.
You will also want to make sure that emails sent to users are delivered, including forgotten password emails, payment receipt emails, and order confirmation notifications.
To send emails, WordPress uses the PHP mail function. This function is easily misused by spammers, and your emails may end up in the spam folder.
To make sure all your important WordPress notification emails reach your users’ inboxes, you will need a proper SMTP service to send emails.
This is where the WP Mail SMTP plugin comes in. It uses an SMTP service to send all your WordPress notification emails.
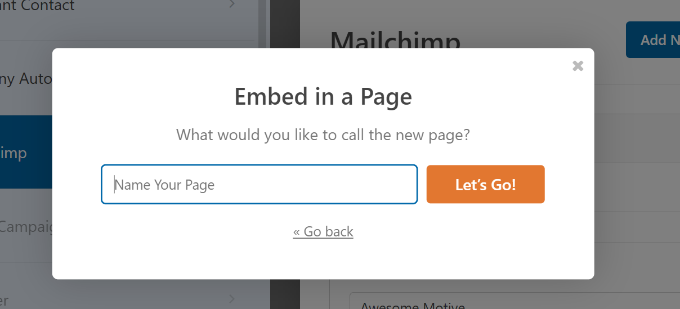
Are you looking to add a Mailchimp subscribe form to your WordPress website?
Mailchimp is a popular email marketing tool that offers a form builder. However, this builder has limited features and customization options. Adding a custom subscribe form gives you more flexibility and helps grow your email list.
In this article, we will show you how to create a Mailchimp subscribe form in WordPress with custom fields.
Why Add a Custom Mailchimp Subscribe Form in WordPress?
Adding a subscription form to your WordPress website is a great way of communicating with your users.
You can send newsletters, new product releases, announcements, and other information while creating a direct connection with your audience.
Mailchimp is one of the most popular email marketing services. It helps you build an email list, send emails, and set up automated email campaigns. Plus, it also offers a form builder that you can use to create a subscription form and embed it on your website.
However, Mailchimp’s form builder is very basic and doesn’t offer a lot of customization options. You get limited form fields to choose from, and there are no settings to change color, font, and more. It also adds Mailchimp branding at the bottom.
Creating a custom Mailchimp subscribe form gives you more flexibility and control. You can add all types of form fields, edit their appearance, add conditional logic to show fields based on the user’s responses, and more.
That being said, let’s look at how you can create a Mailchimp subscription form with custom fields.
How to Create a Mailchimp Subscribe Form in WordPress
The easiest way of adding a Mailchimp subscribe form in WordPress is by using WPForms. It is the best contact form plugin for WordPress that’s used by over 5 million professionals.
WPForms is a beginner-friendly plugin that offers a drag-and-drop form builder, prebuilt templates, and lots of customization options. The best part is it easily integrates with Mailchimp.
Note: For this tutorial, we will be using the WPForms Pro version because it includes the Mailchimp addon and custom form fields. There is also the WPForms Lite version that is available for free, but it doesn’t offer a Mailchimp integration.
Step 1: Connect Mailchimp With WPForms
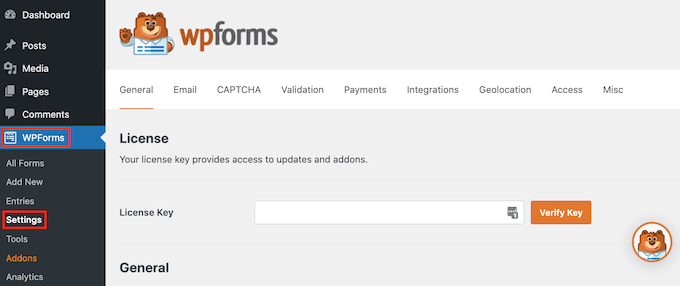
First, you will need to install and activate the WPForms plugin. If you need help, then please see our guide on how to install a WordPress plugin.
Upon activation, you will need to go to WPForms » Settings and add the license key. You can find the key in your WPForms account area.
After entering the license key, go ahead and click the ‘Verify Key’ button.
Next, you will need to install the Mailchimp addon.
You can do that by going to WPForms » Addons from the WordPress admin panel. From here, navigate to the Mailchimp addon and click the ‘Install Addon’ button.
The addon should now install and activate.
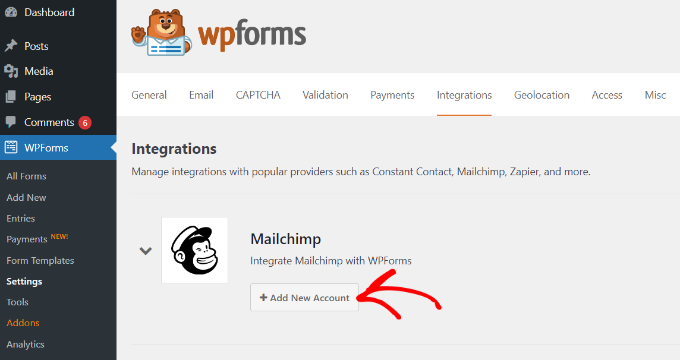
Once that’s done, simply go to WPForms » Settings from your WordPress dashboard and switch to the ‘Integrations’ tab.
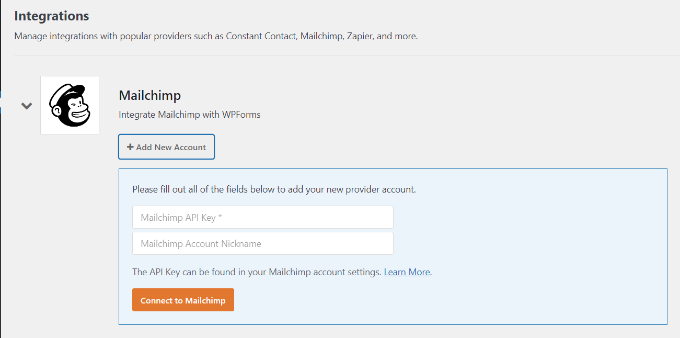
Next, you can expand the Mailchimp settings and then click the ‘+ Add New Account’ button under Mailchimp.
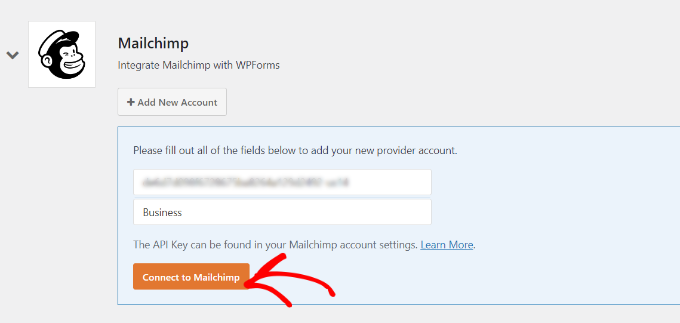
As soon as you do that, you will see more options. To integrate Mailchimp, you must enter the API key and account nickname. This will allow WPForms to communicate with your Mailchimp account.
Creating Mailchimp API Keys for WPForms Integration
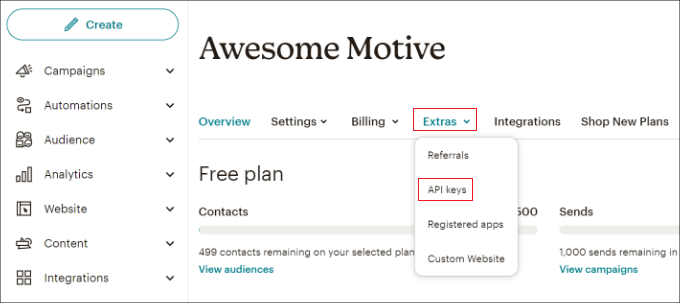
To create an API key to connect WPForms, you will first need to log in to your Mailchimp account.
Once you are logged in, simply click on your avatar in the top right corner and select the ‘Account & billing’ option.
On the next page, you will see different account settings.
Simply click the ‘Extras’ dropdown menu and then select the ‘API keys’ option.
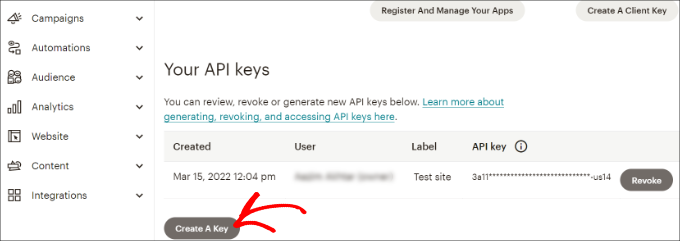
Next, you can copy an existing API key to use for your WPForms integration.
If you haven’t generated a key previously, then simply click the ‘Create A Key’ button.
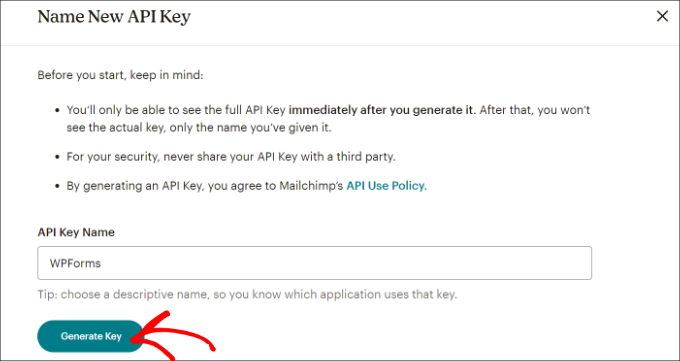
After that, you can enter a name for your new API key.
Once that’s done, just click the ‘Generate Key’ button.
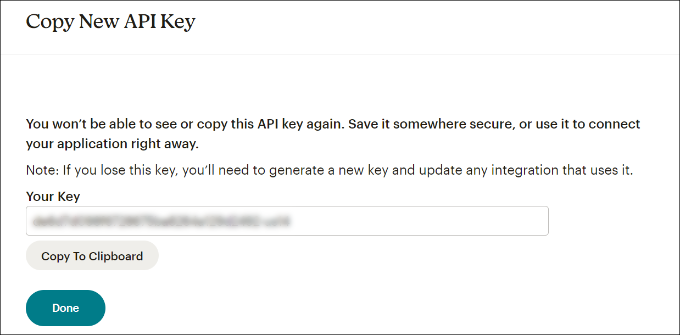
Next, you will see the new API key.
Go ahead and copy the key and click the ‘Done’ button.
You can now return to the browser tab or window with your WPFroms integration settings.
From here, simply paste the key into the ‘API Key’ field. You can also add a Mailchimp account nickname to remember which account you are connected to.
After entering the key, go ahead and click the ‘Connect to Mailchimp’ button.
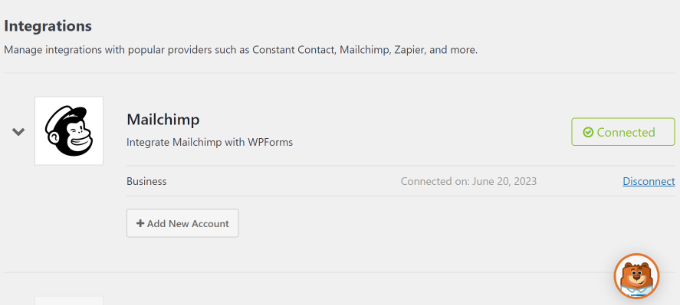
You should now see a green ‘Connected’ button next to the Mailchimp settings, showing that the email marketing tool is successfully integrated with WPForms.
Step 2: Design a Mailchimp Subscribe Form With Custom Fields
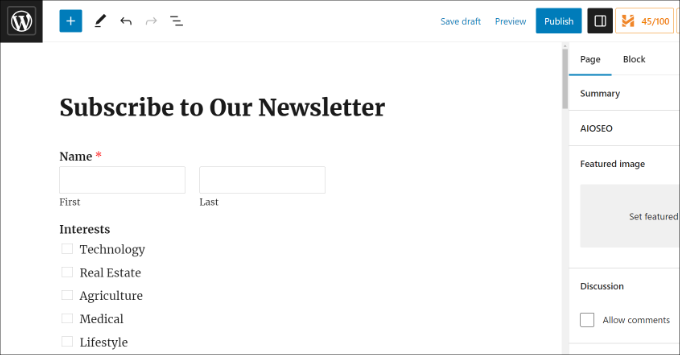
Now that you have integrated Mailchimp with WPForms, the next step is to create a subscription form with custom fields.
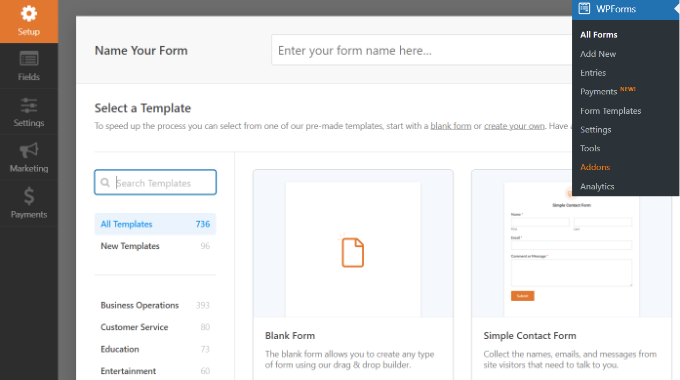
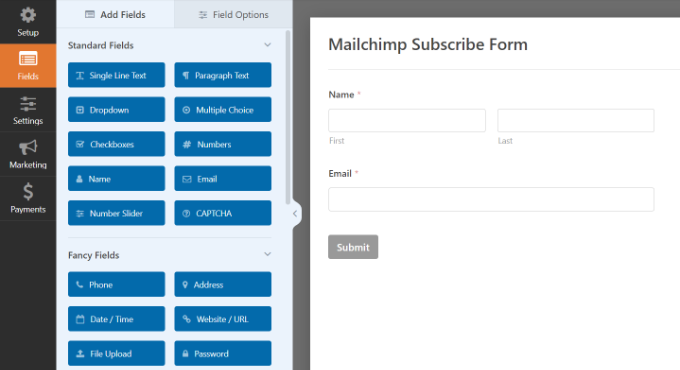
First, you will need to go to WPForms » Add New from the WordPress dashboard. Next, you can enter a name at the top and select a form template.
WPFomrs offers lots of prebuilt form templates, so you can quickly pick one and customize it.
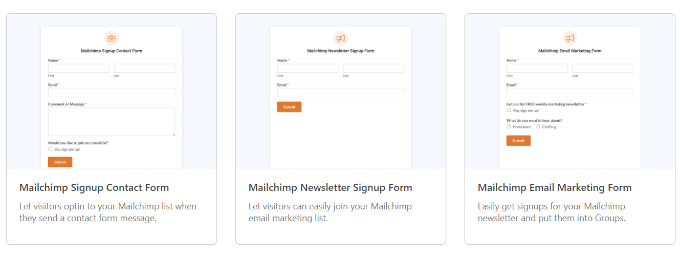
It even offers form templates for Mailchimp. For instance, you can create a signup contact form, newsletter signup form, or email marketing form.
For this tutorial, we will choose the Mailchimp Newsletter Signup Form template.
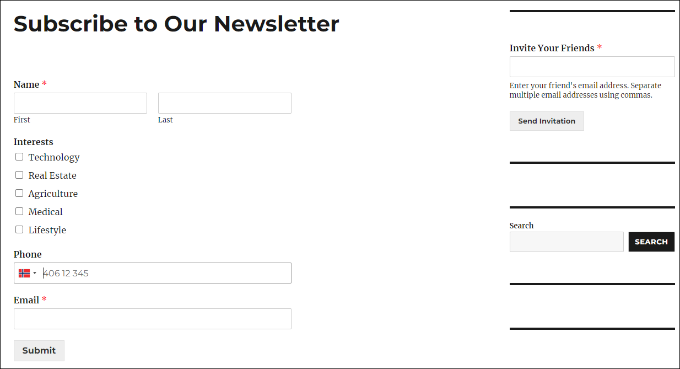
On the next screen, you will see the WPForms drag-and-drop form builder. Here, you can customize the form and add custom fields from the menu on the left.
The default form template will come with a Name and Email field.
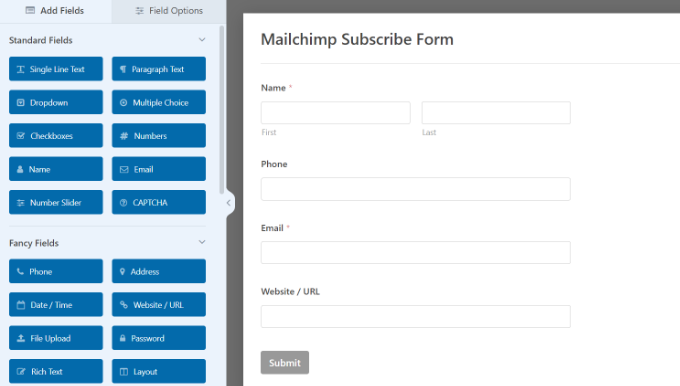
However, you can simply drag any form field and drop it onto the template. There are fields to add text, dropdown options, multiple choice, phone number, address, date and time, website, password, and more.
For instance, if you are using a business phone service, then you can add a Phone field. This will help you send SMS messages or reach out to subscribers via phone calls.
You can add a checkbox field and allow users to select their interests. This way, you can segment your subscribers and send them targeted emails.
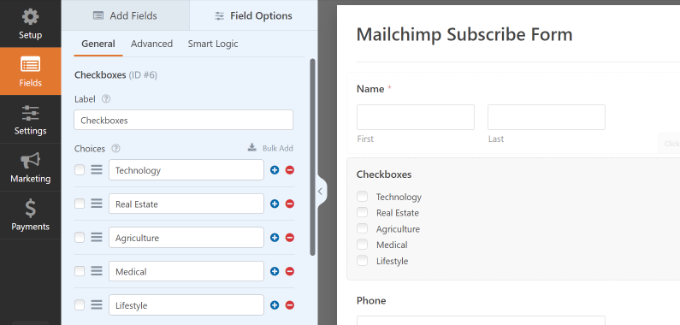
Next, you can further edit each form field in the template. Simply choose a field, and you will see more options in the left panel.
For example, we changed the options in the Checkboxes form field.
You can also edit the label of the form field, make it a required field, add images to the checkbox options, and more.
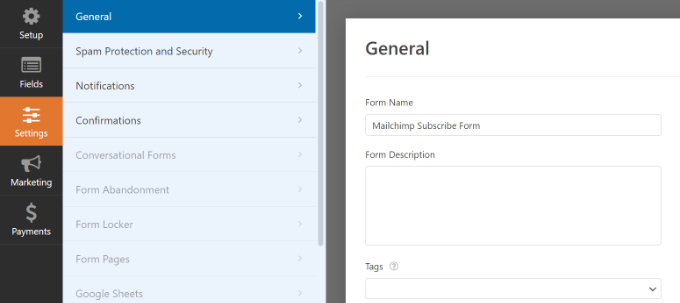
Once you have finished adding custom form fields, switch to the ‘Settings’ tab from the left menu. In the General settings, you can change the form’s name and description, add tags, edit the submit button text, and more.
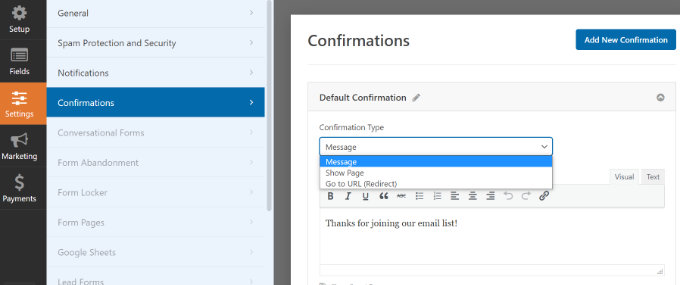
Next, you can switch to the ‘Confirmations’ tab and choose what subscribers will see once they submit a form.
WPForms lets you show a message, a specific page like a thank you page, or redirect users to a URL.
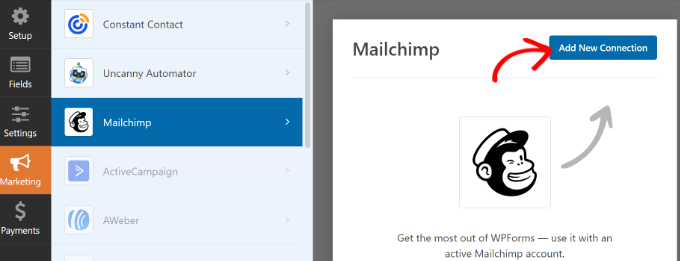
After that, you can go to the ‘Marketing’ tab from the left panel and then select Mailchimp.
From here, simply click the ‘Add New Connection’ button.
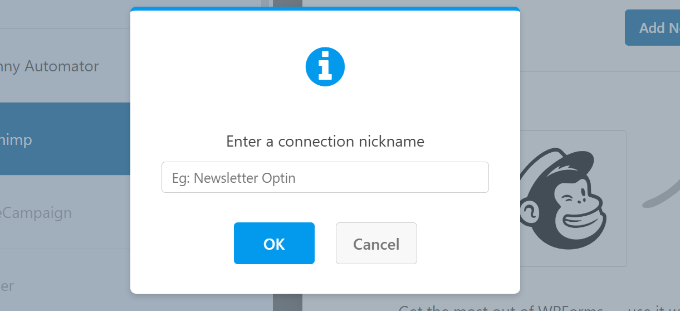
Next, a small popup will open where you will need to enter the Mailchimp nickname.
After entering it, go ahead and click the ‘OK’ button.
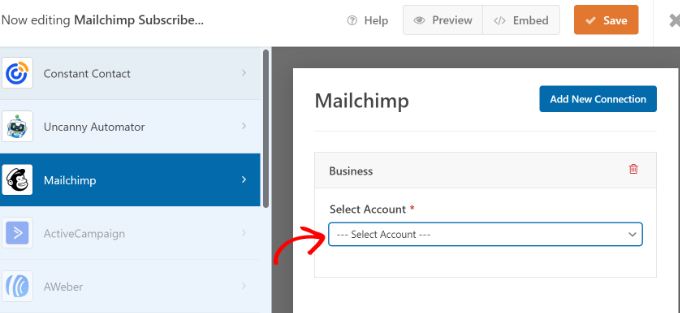
Next, you can pick the Mailchimp account that you connected to earlier.
Simply click the ‘Select Account’ dropdown menu and choose your account.
After that, more options will appear.
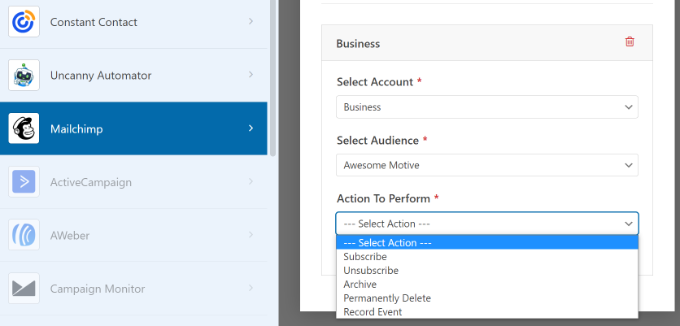
You can go ahead and select the audience from the dropdown menu to which the new subscribers will be added.
There are different actions to choose from, but we will select the ‘Subscribe’ option for this tutorial. This will add the user as a new contact to your Mailchimp account.
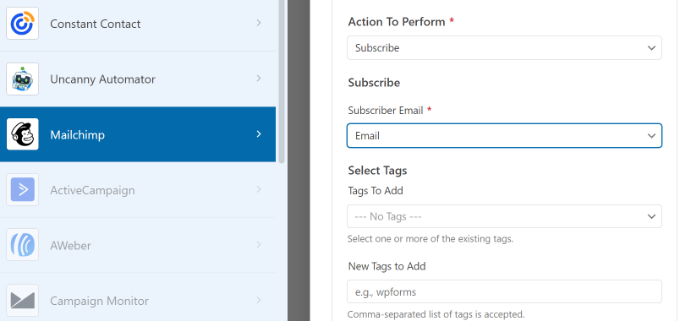
Next, you can scroll down to see additional settings. For instance, there is an option to choose the WPForms field where users can enter their email addresses.
You also have options to add tags to new subscribers and a note to the user’s profile.
If you scroll down further, then you will see more optional settings. For instance, you can enable double opt-in, mark the subscriber as VIP, update their profile if the contact is already in an audience, and more.
Now, you are ready to add your Mailchimp subscribe form to your WordPress blog or website.
In the WPForms form builder, you will see an ‘Embed’ option at the top. Go ahead and click on the ‘Save’ button to store your changes, and then click the ‘Embed’ button.
Next, a popup will open where you will need to select an existing page or create a new page.
For this tutorial, we will use the ‘Create New Page’ option.
After that, you will need to enter a name for your new page.
Once that’s done, simply click the ‘Let’s Go!’ button.
You can then click the ‘Publish’ button at the top to make your Mailchimp subscribe form live.
You have now successfully created a Mailchimp subscribe form with custom fields.
You can go ahead and visit your website to see the form in action.
You can also do a lot more with Mailchimp and WordPress. For instance, you can integrate it with OptinMonster and show your subscribe forms in popup campaigns.
We hope this article helped you learn how to create a Mailchimp subscribe form in WordPress with custom fields. You may also want to see our guide on easy ways to grow your email list faster andour expert picks for the must have WordPress plugins to grow your website.
If you liked this article, then please subscribe to our YouTube Channel for WordPress video tutorials. You can also find us on Twitter and Facebook.
Do you want to add CAPTCHA to your WordPress site’s login and registration forms?
WordPress login and user registration pages are often prime targets for hackers, spammers, and brute force attacks. One way to avoid these attacks is by using CAPTCHA, which effectively blocks spambots and protects your site from being hacked.
In this article, we will show you how to add CAPTCHA to WordPress login and registration forms.
What Is CAPTCHA?
A CAPTCHA is a computer program that can tell whether someone is a human or an automated user. It does that by showing a test that would be quite easy for a human user to pass but almost impossible for automated scripts or bots to get right.
In the earlier days of CAPTCHA, users were asked to enter the text they saw in an image. This image displayed random letters, words, or numbers in a distorted style.
Later, a newer technology called reCAPTCHA was introduced.
It showed random words as a challenge and used user input to help digitalize books.
This technology was acquired by Google in 2009. Since then, it has helped digitalize thousands of books and complete New York Times archives.
However, these new CAPTCHAs were still annoying and often ruined the user experience on websites.
To fix this, Google introduced ‘No CAPTCHA reCAPTCHA’, which uses artificial intelligence (AI) and user interactions to catch spambots.
It shows an easier checkbox for human users to click on. For other suspicious traffic, it will show a more difficult CAPTCHA, like identifying objects in images.
That being said, let’s take a look at how WordPress websites can improve security with CAPTCHA.
Why Use CAPTCHA for WordPress Login and Registration?
WordPress login and registration pages are an easy target for spammers, wannabe hackers, and brute force attacks.
That’s because WordPress is the most popular website builder in the world, which makes it a common target for malicious attempts.
The attacker’s motivation is often to get unauthorized access to your WordPress admin area to distribute malware. In other cases, the attacker can crash the entire network of websites hosted with a specific web hosting company to collect a ransom.
The easiest solution to protect your WordPress site is using a WordPress firewall plugin like Sucuri. It will block bad traffic from reaching your website and prevent unauthorized access.
Another solution is to add a secondary layer of password protection on WordPress login and registration pages. However, the problem with this method is that you will have to share that second password with each user, and this simply doesn’t scale for large multi-author blogs or membership sites.
CAPTCHA provides an easier alternative to those solutions. It uses Google’s AI technologies to detect genuine visitors and present CAPTCHA challenges to suspicious users.
Default vs. Custom WordPress Login and Registration Form
The default WordPress login and registration form provides a basic set of features.
The login page allows users to access the back end of your website according to their respective user roles and permissions.
The default WordPress registration form lets visitors create an account on your site. Once they are registered, they can also log in to your website’s back end and perform specific tasks allowed by their user role.
A lot of website owners want to customize the default WordPress login and registration page with their own logos, styles, and more. They use one of the many plugins to create their own custom login and registration page to replace the default ones.
Whether you are using the default pages or custom ones, we have got you covered.
In this guide, we will show you how to set up reCAPTCHA for both default and custom login and registration pages in WordPress. You can click the links below to jump ahead to any section:
Once the plugin is activated, you need to visit theCAPTCHA 4WP » CAPTCHA Configuration page from your admin panel.
You will then see a setup wizard. Simply click the ‘Next’ button to continue.
After that, you will need to select the type of reCAPTCHA you’d like to use.
There are 3 options to choose from, including Version 2, where users can check the ‘I am not a robot’ checkbox, or Version 2, where no user interaction is needed, but a CAPTCHA will appear for suspicious traffic. Finally, Version 3 verifies requests with a score without user interaction.
For this tutorial, we will select the ‘Version 2 (Users have to check the “I’m not a robot” checkbox)’ type.
Once that’s done, click the ‘Next’ button.
On the next screen, you will need to enter the Google reCAPTCHA site and secret key.
To get these Google reCAPTCHA API keys, you need to visit the reCAPTCHA website.
Then, click on the ‘v3 Admin Console’ option at the top.
On the next screen, Google will ask you to sign in to your account. Once you are logged in, you will see the Register a new site page.
First, you need to enter your website name in the ‘Label’ field. After that, you must select a reCAPTCHA type. For example, we will choose the reCAPTCHA v2 ‘I’m not a robot’ checkbox.
Next, you need to enter your domain name in the ‘Domains’ section.
Make sure to enter your domain name without the ‘https://www’ part.
Once done, just click on the ‘Submit’ button.
Next, you will see a success message along with the site key and secret key that you can use on your WordPress website.
You can copy the site and secret keys.
Next, you will need to return to the browser tab or window where the CAPTCHA 4WP setup wizard is open. From here, you can enter the Google CAPTCHA site key and secret key.
Once you are done, you will need to check the ‘I’m not a robot’ checkbox and click the ‘Next’ button.
Then, you will see a success message. Simply click the ‘Finish’ button.
After that, you can configure additional CAPTCHA 4WP settings.
For instance, there are options to change the language, edit the error message, select a theme, and more.
When you are done, simply click the ‘Save Changes’ button.
That’s it! You have successfully added reCAPTCHA in the default WordPress login and registration form.
To preview it, you can open your WordPress login URL in your browser. For example, www.example.com/wp-login.php.
If you want to check the reCAPTCHA in the registration form, then just click on the ‘Register’ link below the login form. After that, the WordPress registration form will open, and you can see how reCAPTCHA works.
reCAPTCHA in Custom WordPress Login and Registration Forms
As we mentioned earlier, custom WordPress login and registration forms offer more user-friendly membership options to your website’s members and visitors.
First, these forms allow users to register or log in to your website from the front end. This improves the user experience and lets you keep the same overall design experience across your website.
Next, you can add your website logo and customize the login and registration pages in your style.
Plus, creating a custom WordPress login form and user registration form is easy with the most user-friendly WordPress form plugin, WPForms. It is the best contact form plugin for WordPress.
For this tutorial, we will use the WPForms Pro version because it includes the User Registration addon and more customization options. However, there is also a free WPForms Lite version you can use to get started.
To get started, you need to install and activate the WPForms plugin on your WordPress site. For more details, see our step-by-step guide on how to install a WordPress plugin.
Upon activation, head over to the WPForms » Settings page to enter your WPForms license key. You can get this key from your account area on the WPForms website.
After that, click on the ‘CAPTCHA’ tab at the top to configure reCAPTCHA for your custom-made WordPress forms.
First, you need to choose a CAPTCHA type. Go ahead and click on the ‘reCAPTCHA’ option.
Since we chose v2 earlier, we will choose reCAPTCHA v3 in this example so that you can see the different options.
However, our recommendation is still v2.
After that, you will see the site key and secret key fields. To get these keys, you need to register your site on the Google reCAPTCHA website.
Just go to the Google reCAPTCHA website and then click on the ‘v3 Admin Console’ button in the top right corner.
After that, Google will ask you to sign in to your account. Once done, you will see the ‘Register a new site’ page.
Next, you can enter your website name and then select ‘Score based (v3)’ from the reCAPTCHA types.
Next, you need to enter your domain name (without https://www.), as shown in the screenshot below.
Once done, simply click on the ‘Submit’ button.
After that, Google will show a success message along with the site key and the secret key to add reCAPTCHA to your site.
Go ahead and copy these keys.
Now that you have the Google reCAPTCHA API keys, you need to return to the browser tab or window where the WPForms reCAPTCHA settings are open.
Next, simply go to the reCAPTCHA tab and enter the site key and secret key. Once that’s done, you can save your settings.
Now that you have successfully added reCAPTCHA to WPForms, you can easily enable reCAPTCHA in your custom login form, user registration form, or any form built with WPForms.
Now let’s go ahead and create a custom WordPress registration form.
First, you must visit the WPForms » Addons page and find the User Registration Addon. From here, click the ‘Install Addon’ button.
After that, WPForms will download and install the addon. Once you see the User Registration Addon’s status is ‘Active,’ you are ready to add a new user registration form.
Now you need to go to WPForms » Add New to launch the WPForms Builder. On the WPForms setup page, select the ‘User Registration Form’ template and enter a name for your form.
Once you select a template, it will launch the WPForms drag-and-drop form builder.
After that, WPForms will automatically build a custom user registration form and open the form setup page.
Now, you can customize your form by adding new fields or editing the field options. If you like the default form, then you can use it without making any changes.
Next, you need to go to the ‘Settings’ tab in the left menu to configure your form settings. Then switch to the ‘Spam Protection and Security’ settings and enable Google v3 reCAPTCHA.
Once that’s done, just click the ‘Save’ button in the top right corner.
That’s it! You have created a custom WordPress user registration form and also added reCAPTCHA to it.
The next thing you need to do is add the custom user registration form on your website. You can do that by clicking the ‘Embed’ button in the form builder.
Next, you will need to select an existing page or create a new one to embed your form.
For this tutorial, we will use the ‘Create New Page’ option.
After that, you can enter a name for your new page.
Once that’s done, simply click the ‘Let’s Go’ button.
Next, you will see a preview of your registration form in the content editor.
Alternatively, you can also use the WPForms block to add your form.
Now, you can publish the page and visit it in your web browser to see the custom user registration form with Google reCAPTCHA in action.
Since we chose reCAPTCHA v3 in this example, you won’t see a Google reCAPTCHA checkbox like ‘I’m not a robot.’ This is because reCAPTCHA v3 works in the background, but you will still see a small badge in the bottom right corner.
The process of creating a custom login form is almost the same.
The only difference is that you need to choose the User Login Form template from the WPForms setup page.
Do you want to restrict content on WordPress to Patreon members?
By adding patron-only content to your website, you can encourage visitors to join your Patreon and increase your profits. It’s also a great way to get Patreon users to visit your website, which will boost your traffic and can increase revenue further.
In this article, we will show you how to restrict content on WordPress to Patreon members.
Why Restrict Content on WordPress to Patreon Members?
If you are a content creator, then you may want to earn money from your writing, music, podcasts, stock photos, and other content.
Patreon allows you to sell memberships and then give those people access to different content based on their subscriptions.
Patreon is also a great way to build relationships with your fans. For example, you can automatically send a welcome note to new patrons.
You can also create private Discord servers or chat rooms where members can talk to each other and even message you directly.
After creating a Patreon, it’s a good idea to publish members-only content to your WordPress website. This encourages visitors to join your Patreon in order to unlock exclusive WordPress content.
This can also increase your blog traffic since patrons will need to visit your WordPress site to see the exclusive content.
That said, let’s see how you can restrict content on WordPress to Patreon members.
How to Create a Patreon Account for Your WordPress Website
If you don’t already have an account, then head over to the Patreon website and click on the ‘Create on Patreon’ button.
You can now type in your email address and create a password. If you prefer, then you can also register using your existing Google or Facebook login.
After entering this information, the setup wizard will ask some questions about how you plan to use Patreon. Simply follow the onscreen instructions to build an engaging and informative Patreon page.
With that done, you can use the Patreon tools to customize your page, add membership tiers, set up billing, and more.
When you are happy with how your Patreon page looks, you are ready to add it to your WordPress website.
How to Connect WordPress to Your Patreon Account
The easiest way to create Patreon-only content is by using Patron Plugin Pro. This plugin allows you to restrict access to individual pages and posts or even lock all the content from a specific tag or category.
You can also automatically lock and unlock content based on a schedule. This allows you to create free trials, automatically drip content, and more.
First, you will need to install and activate Patron Plugin Pro. If you need help, then please see our guide on how to install a WordPress plugin.
Upon activation, you will need to connect the plugin to your Patreon account. To do this, go to Patreon Settings » Patreon Settings, and then click on ‘Connect site’.
When you are ready, select ‘Start connection wizard’.
On the next screen, you need to click on ‘Let’s start!’
To connect Patreon to your WordPress website, you will need to create an OAuth client.
If you are happy to do this, then click on ‘Allow’.
If prompted, type in the login information for your Patreon account.
After a few moments, Patron Plugin Pro will take you back to the main WordPress dashboard. Your Patreon account is now connected to WordPress.
Before you restrict any content, it’s a good idea to look at the plugin’s settings by going to Patreon Settings » Patron Settings.
The default settings should work well for most websites, but it’s still worth checking whether you need to make any changes.
If you do customize the settings, then scroll to the bottom of the screen and click on the ‘Update Settings’ button.
How to Restrict Content to Patreon Members
The easiest way to create patron-only content is by restricting access to entire content types, categories, or tags. For example, you might lock all content that has the ‘Patreon’ tag.
To do this, simply select ‘Patreon Plugin Pro’ from the left-hand menu and then click on the ‘Content Locking’ tab.
Here, you must click to expand the ‘Make post types Patron only’ section.
To start, open the ‘Select Post Type’ dropdown and choose the content you want to restrict, such as page, post, media, or some other content type.
Then, open the new ‘All’ dropdown and choose whether you want to restrict this content type based on format or categories and tags.
Depending on your selection, you will get access to some additional settings. For example, if you select ‘Tag’, then you will need to choose the tag you want to make Patreon-only.
Finally, open the ‘Select how to lock’ dropdown and choose how you want to lock and unlock the content.
The easiest option is ‘Lock all posts of this type’. However, you can also lock the most recent example of this content and use the older content as a preview for non-members.
You can also unlock or lock content after a certain number of days has passed. This allows you to offer exclusive early access to Patreon members.
Similarly, you can use this feature to create a free trial. For example, you might make your latest online course available to non-patrons for the first 24 hours. This can create a buzz around the launch while also encouraging people to join your Patreon so that they don’t lose access after 24 hours.
Based on your selection, you will see some additional options.
Most importantly, you will need to enter a minimum $ value membership tier.
This should be linked to the cost of your memberships. For example, if your Silver tier is $5, then typing ‘$5’ will unlock this content for everyone with a Silver or higher membership.
When you are happy with how the content locking is set up, click on ‘Add post type to gating.’
To lock more content, simply follow the same process described above. When you have finished, don’t forget to scroll to the bottom of the screen and click on ‘Save.’
How to Restrict Specific Pages and Posts to Patreon Members
Another option is to mark individual pages and posts as Patreon-exclusive. This allows you to control exactly what content your patrons have access to.
Next, you will need to set some rules about who can access this content. In the right-hand menu, scroll to the ‘Patreon Level’ section and choose from the dropdown menu.
You can either select a Patreon level or choose ‘Any Patreon’. For example, you might select ‘Any Patreon’ if this is entry-level content that all members should have access to or if you have only created a single Patreon tier.
Often, you will want to give new patrons access to your entire back catalog of members-only content. Another option is to restrict access to people who were already patrons when the content was published.
This is useful for creating time-sensitive Patreon promotions, such as exclusive holiday content or a ‘limited edition’ video.
To add this restriction, find the ‘Require a pledge active at the time….’ section and check its ‘Yes’ box.
Another option is to show or lock the content automatically based on a schedule. This is perfect for offering exclusive early access to Patreon members.
To lock and unlock content automatically, find the ‘Advanced Locking’ section. Here, open the dropdown that shows ‘No change’ by default and choose an option from the list.
You can then use the new settings to configure the automatic locking and unlocking.
By default, the plugin will show the following message to all non-Patreon members: ‘To view this content, you must be a member of (name) content at (cost) or more.’
You may want to add your own message for non-Patreon members. For example, you might say why the content is restricted or why they should buy a Patreon subscription.
To add a message, scroll to the ‘Custom Patron-Only Banner’ section and click on the ‘Non-Patrons Only’ button.
This adds some opening and closing tags to the small text editor.
Simply type your message in between these tags. You can also add links, formatting, and more in exactly the same way you create content in the WordPress page or post editor.
When you are happy with the settings, simply click on the ‘Publish’ or ‘Update’ button.
If you visit this content while logged into your admin account, then you won’t see any changes. However, if you visit it in an incognito browser tab, then you will see the content restriction in action.
How to Add a Patreon Button to Your WordPress Posts
Adding Patreon-exclusive content to your WordPress blog is a great start. However, it’s also a good idea to promote your Patreon on other areas of your website. This will help turn visitors into paying patrons.
Patron Plugin Pro can automatically add a ‘Become a Patron’ button to all your posts. Visitors can simply click this button to visit your Patreon page.
To start, select ‘Patron Plugin Pro’ from the left-hand menu, then select the ‘Quickstart’ tab.
Since we already connected the plugin to Patreon, you should see your account in the ‘Site’s Patreon user’ field.
If you don’t see the right URL, then you can add it now.
By default, the plugin opens your Patreon page in the same tab. This takes visitors away from your WordPress website, so we recommend opening the link in a new tab instead.
To do this, select ‘Yes’ under ‘Open pages in new window’.
The plugin adds the standard Patreon button to your website by default. This helps visitors recognize the button and understand that you have a Patreon page.
If you prefer, then you customize the button with your own branding using the settings under ‘Use a custom button’. When you are happy with the changes you’ve made, don’t forget to click on ‘Save’.
Next, click on the ‘Post Button’ tab to change how the button looks.
By default, the button includes the following heading: ‘Liked it? Take a second to support {authorname} on Patreon!’
To replace this with your own messaging, simply go ahead and type into the ‘Message over Buttons in Posts’ field.
You can also change the message’s alignment, adjust its size, and add margins.
If you want to remove the message instead, then find the ‘Show a message over Buttons in Posts’ section. Here, simply click the ‘No’ button.
If you make any changes, then don’t forget to click on ‘Save’.
Now, you can visit any post on your website to see the Patreon button live.
How to Add a Patreon Button to the WordPress Sidebar
If you prefer, then you can remove the Patreon button from your blog posts and add it to the sidebar or similar section instead.
In this way, you can show the button on other areas of your website, such as the product pages in your online store.
To start, you will want to remove the button from your WordPress posts so that you don’t show multiple Patreon buttons on the same page.
To do this, select the ‘Post Button’ tab and find the ‘Show Button under Posts’ section. Here, go ahead and select the ‘No’ button.
With that done, click on ‘Save’.
Next, click on the ‘Sidebar Widgets’ tab. Here, you can customize the message that appears next to the button, including changing the font size and adding margins.
If you do make any changes, then don’t forget to click on the ‘Save’ button.
With that setup done, you can add the Patreon button to any widget-ready area by going to Appearance » Widgets. Here, click on the blue ‘+’ button.
Note: If you are using a block WordPress theme, then you will need to go to Appearance » Editor instead.
In the panel that appears, start typing in ‘Patreon Sidebar Site Widget’.
When the right block appears, drag and drop it onto the area where you want to show the Patreon button.
You can now type an optional title into the ‘Title’ field.
This will appear above the Patreon button in the theme’s sidebar or similar section.
With that done, click on ‘Update’.
Now if you visit your WordPress blog or website, you will see the Patreon button in the widget-ready area.
Bonus: How to Create a Patreon Alternative Using WordPress
Patreon has helped countless creators monetize their content and make money online, but the platform also takes a significant cut of your earnings.
Depending on your Patreon plan, you will lose between 5%-12% of everything you earn on Patreon, plus payment processing and payout fees.
Depending on your location, you may also have to pay additional fees, including Value-added tax, Goods and services tax, Québec sales tax (QST), and US Sales tax.
All of this can really add up.
You will also need to follow all of Patreon’s terms and conditions and other guidelines. If you break any rules, then Patreon will censor your content and may even delete your account. If this happens, then paying members will lose access to your content, which reflects badly on your brand and can damage your reputation.
With that being said, many WordPress website owners are looking for a Patreon alternative.
It allows you to create unlimited membership levels for your WordPress website and then restrict access to your content based on the person’s membership level.
In this way, you can create members-only videos, eBooks, blog posts, online courses, downloadable files, and more.
You can even assign different content to different membership levels, which encourages members to upgrade their subscriptions.
This is exactly how the Patreon tier model works, without any of the extra transaction fees. Since MemberPress doesn’t take a cut of your earnings, you get to keep more of the money you make.
With MemberPress, you also have the freedom to create your own privacy policy, rules, and terms and conditions. This gives you more flexibility to create unique and engaging content for your fans, which will make it easier to grow your business.

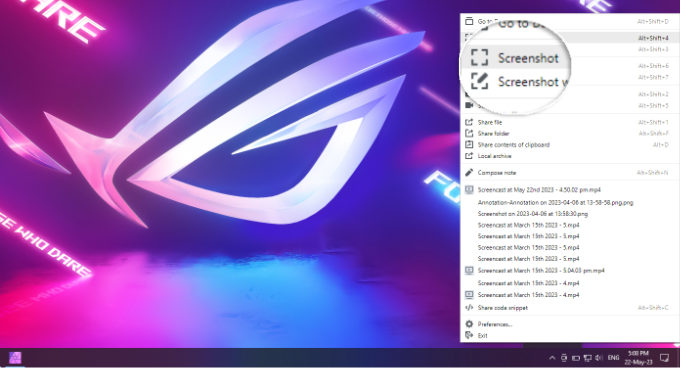
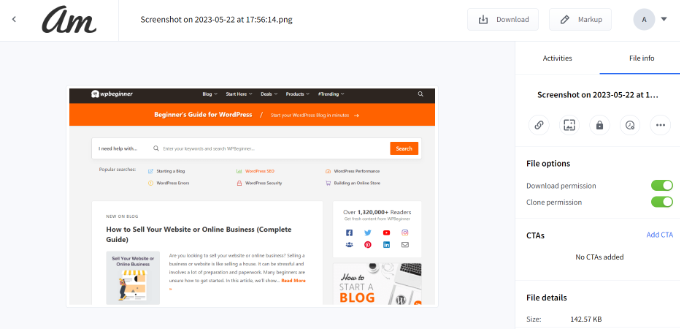
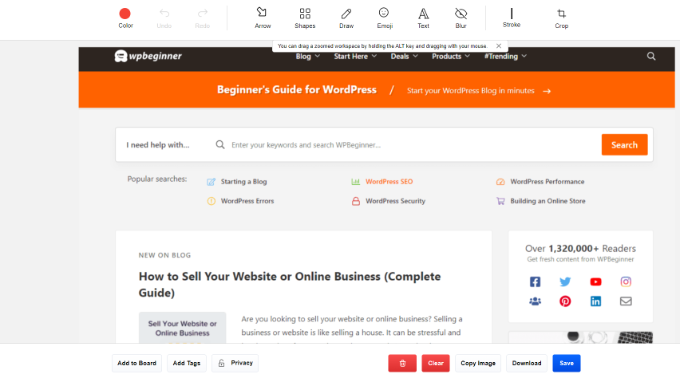
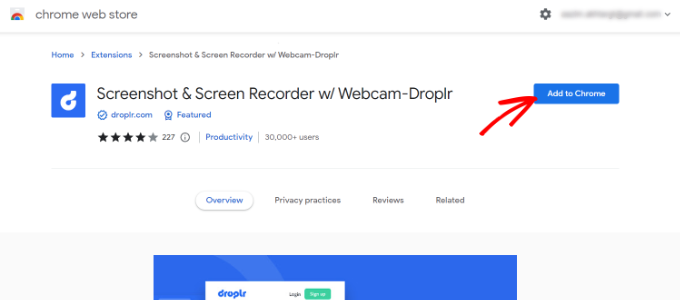
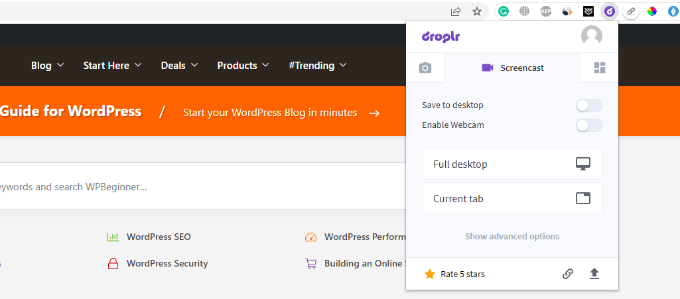

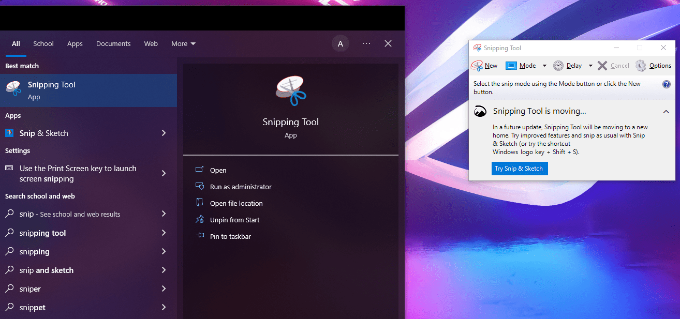


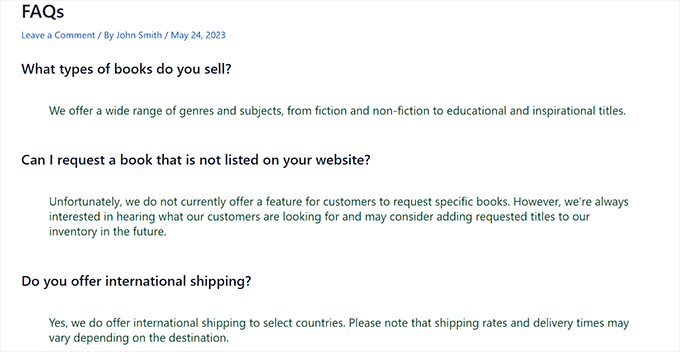
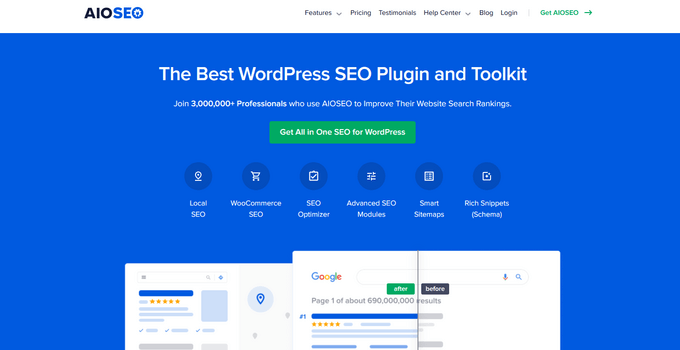
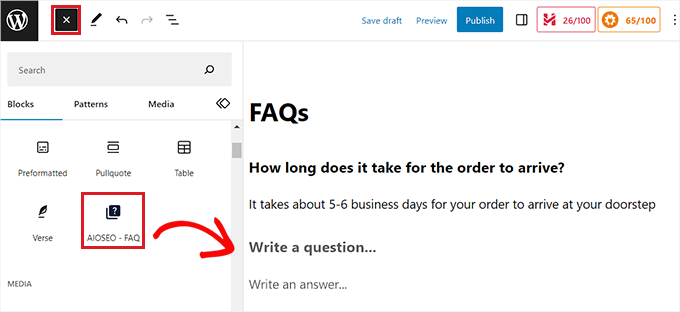
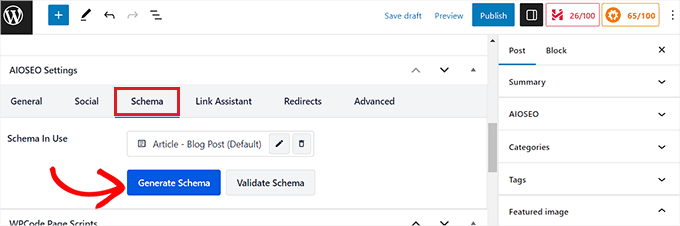
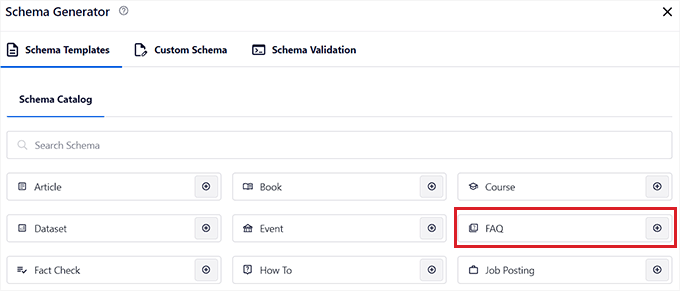
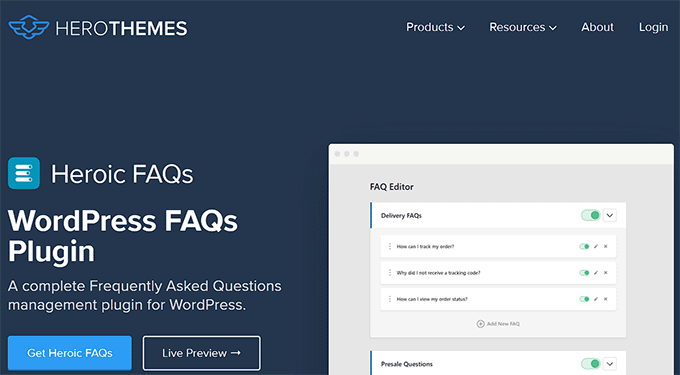
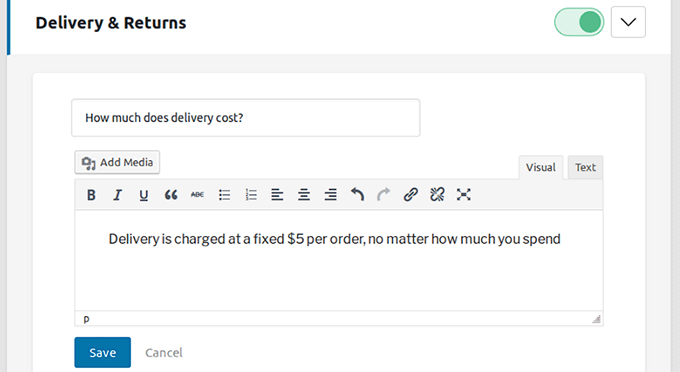
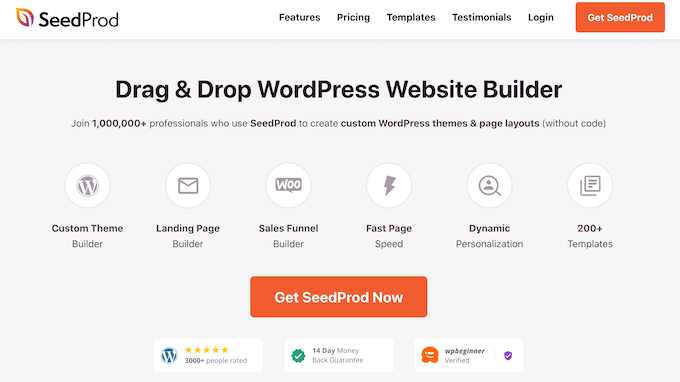
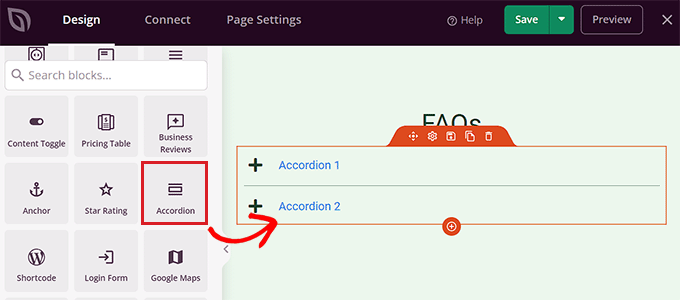
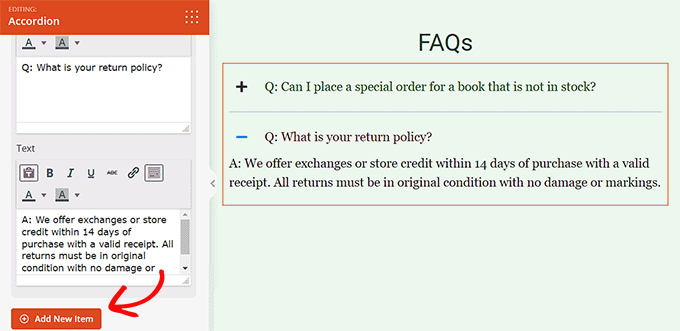

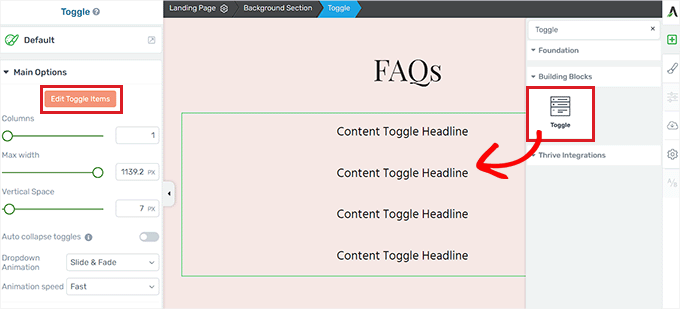
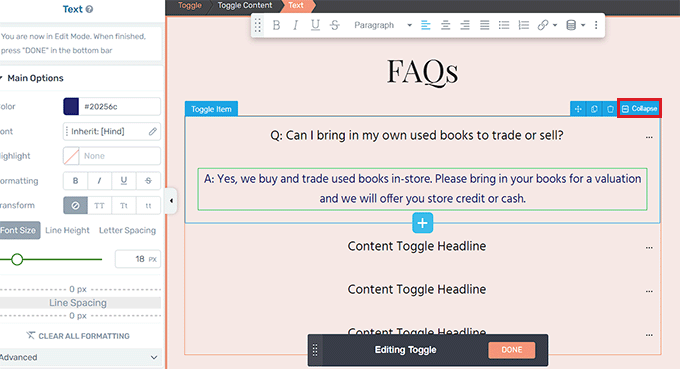
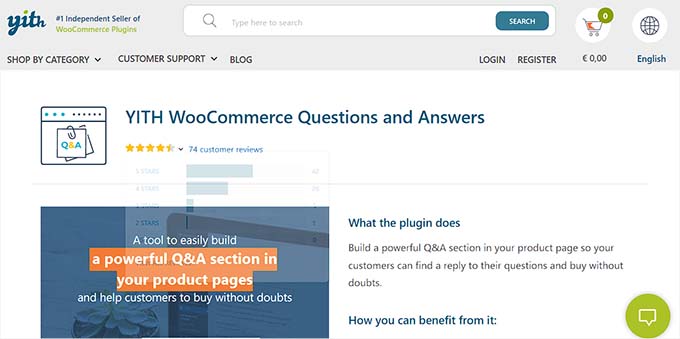

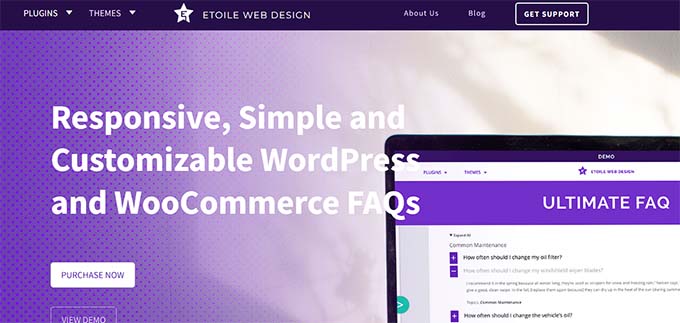
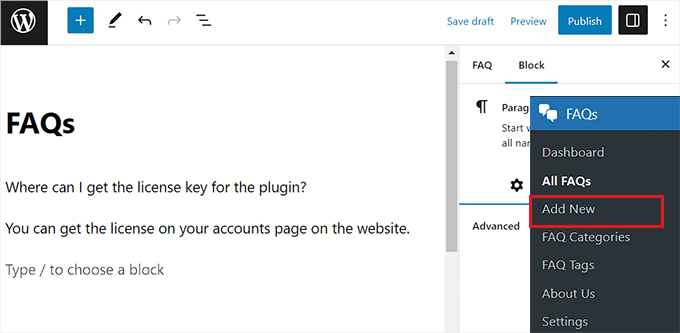
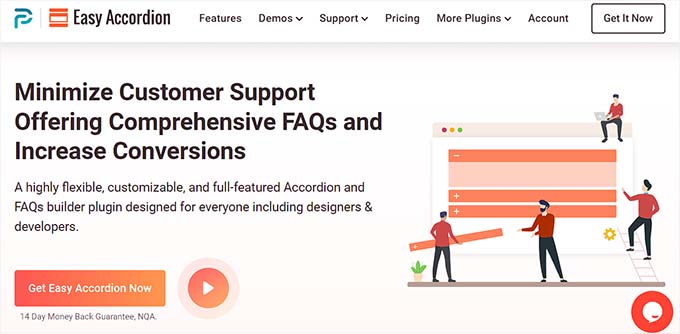
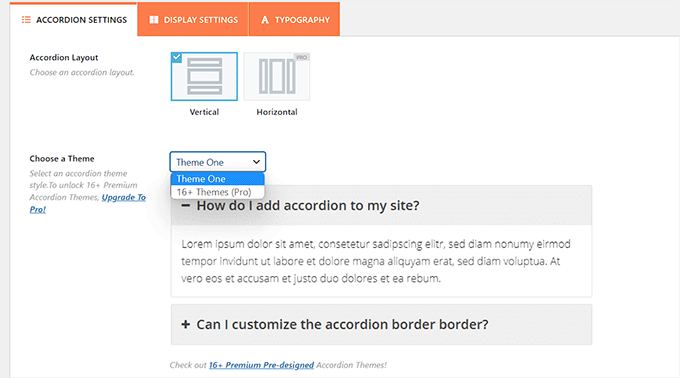
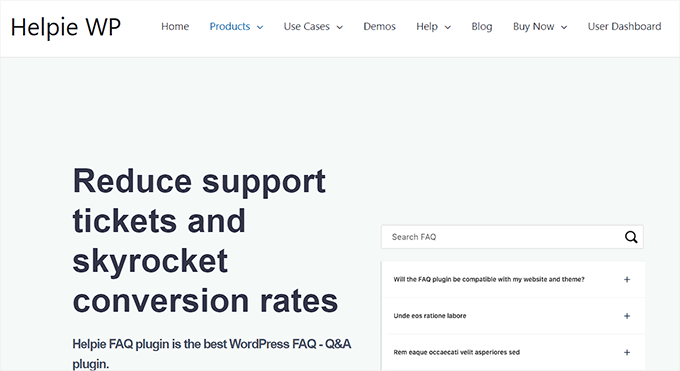
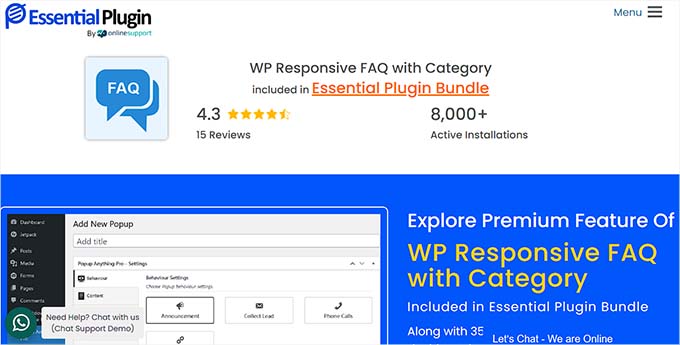
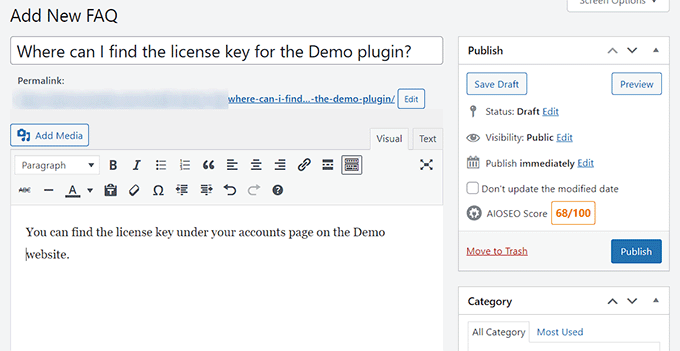

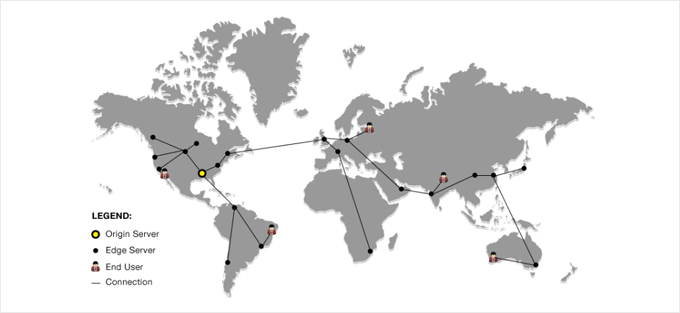

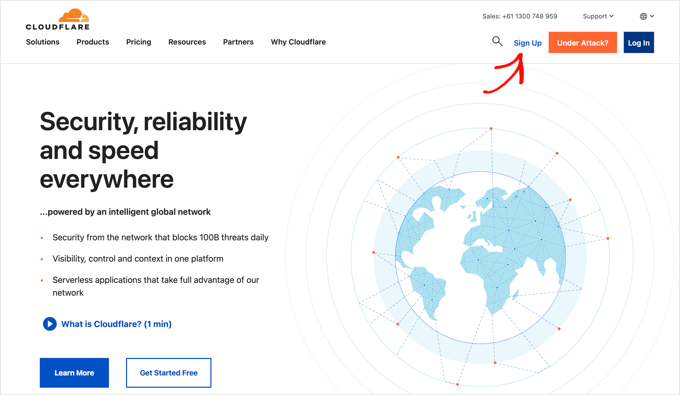

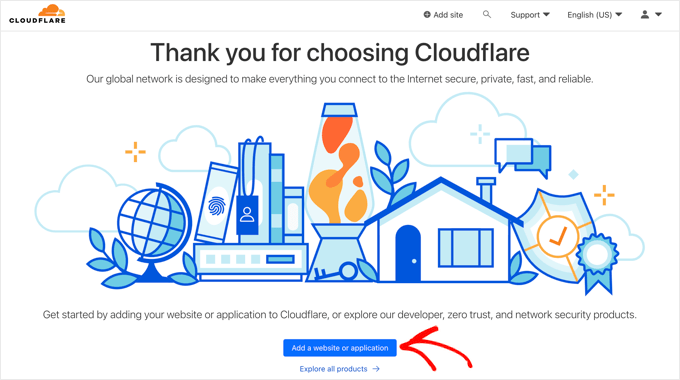
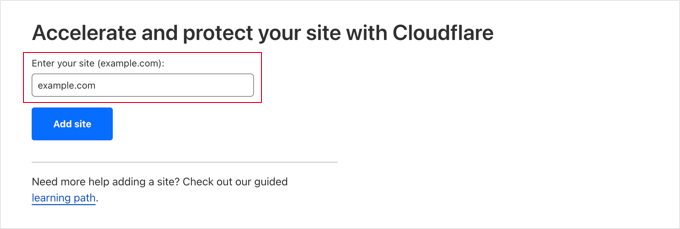
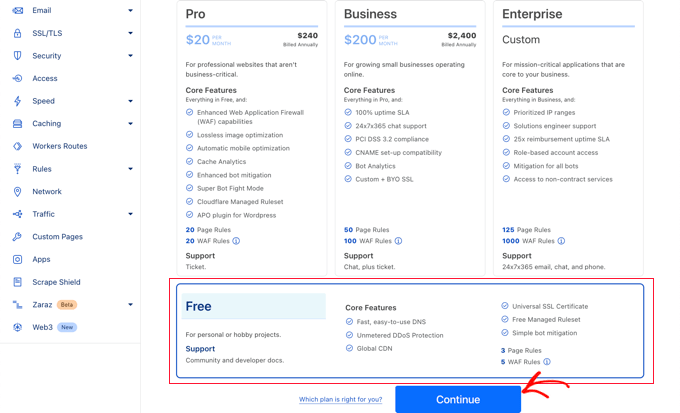
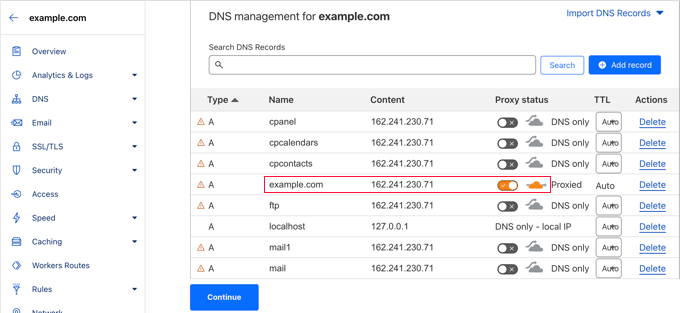

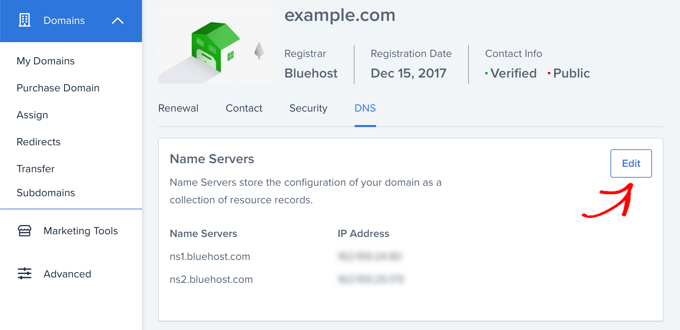
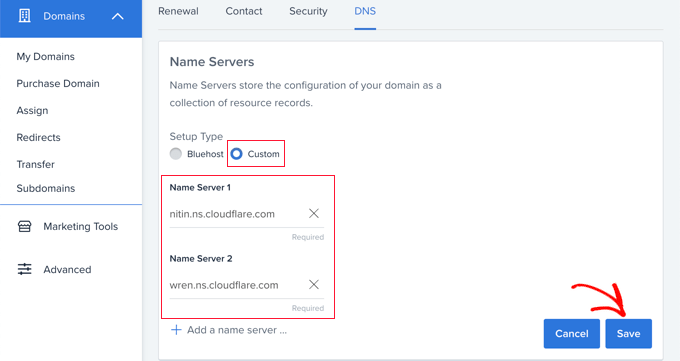
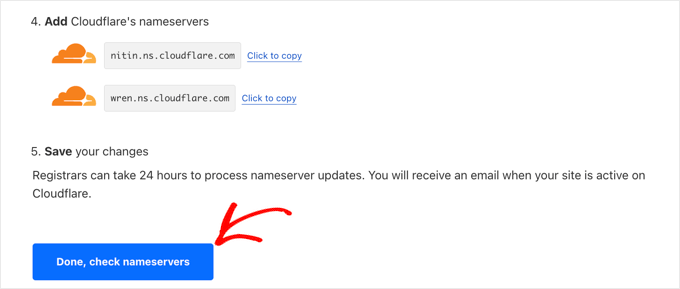
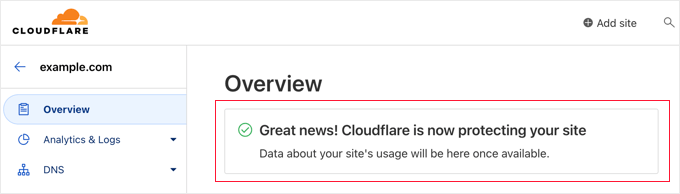
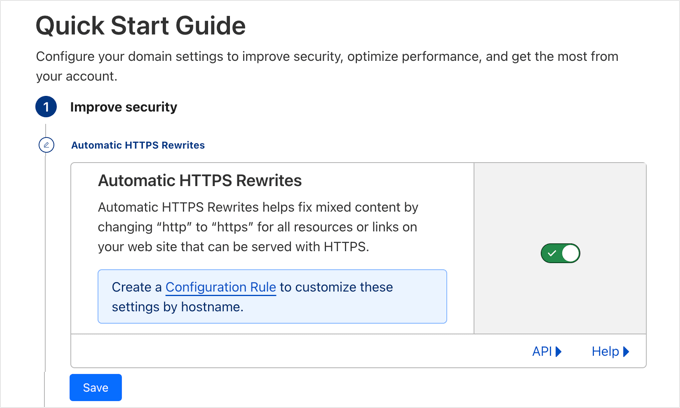
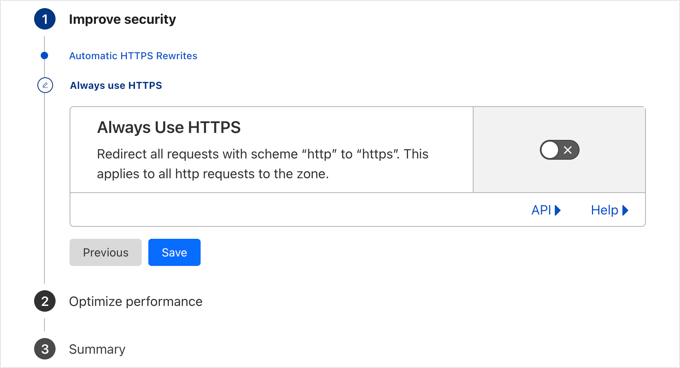
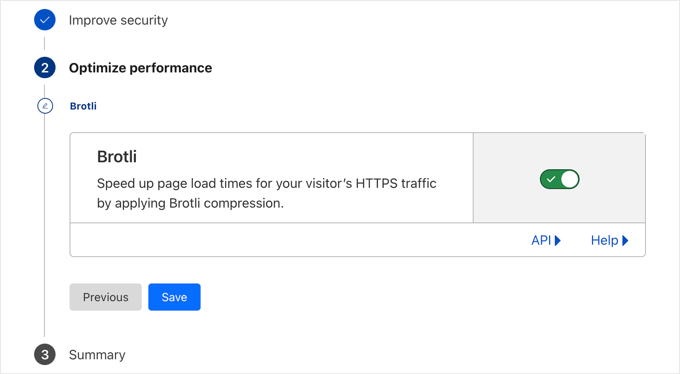

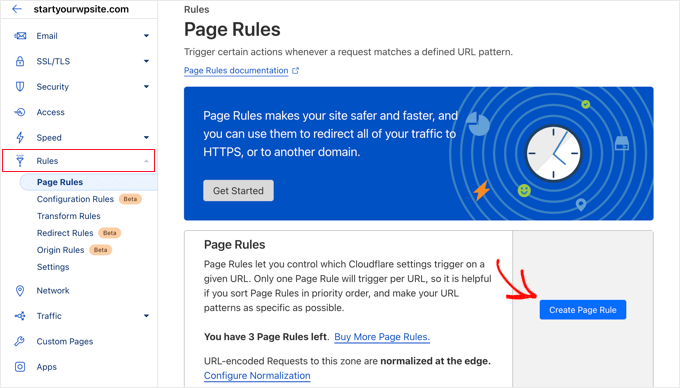
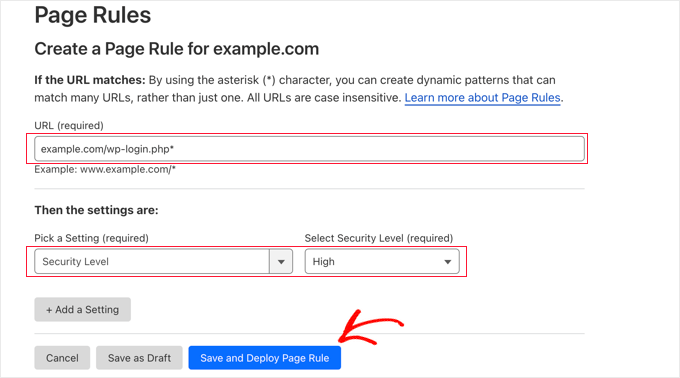
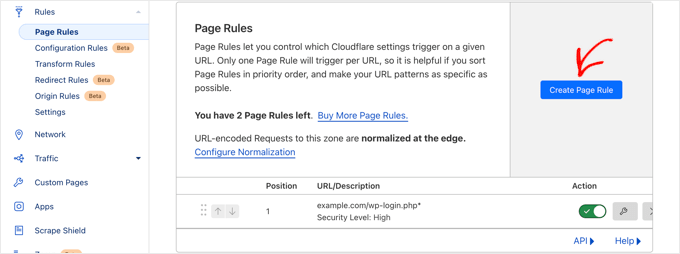
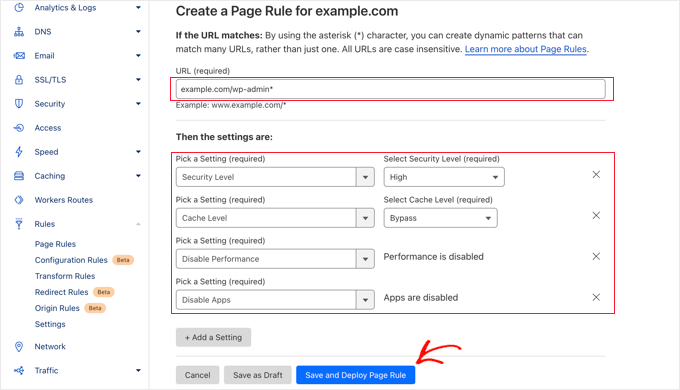
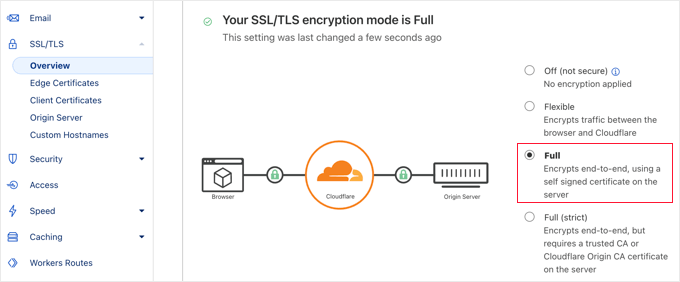
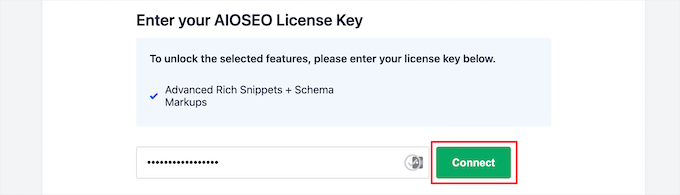
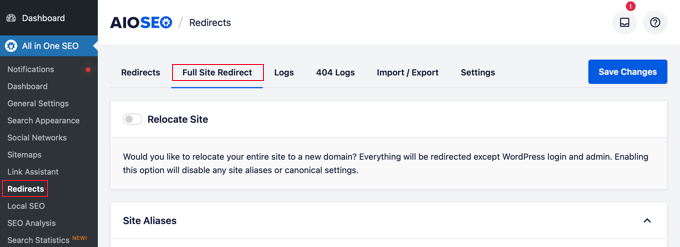
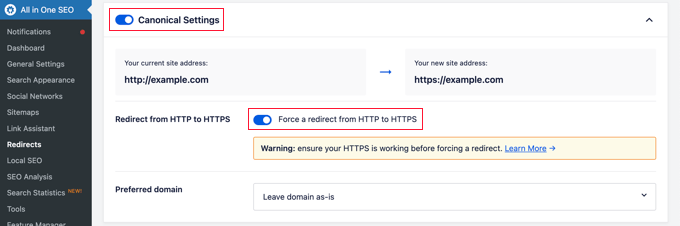
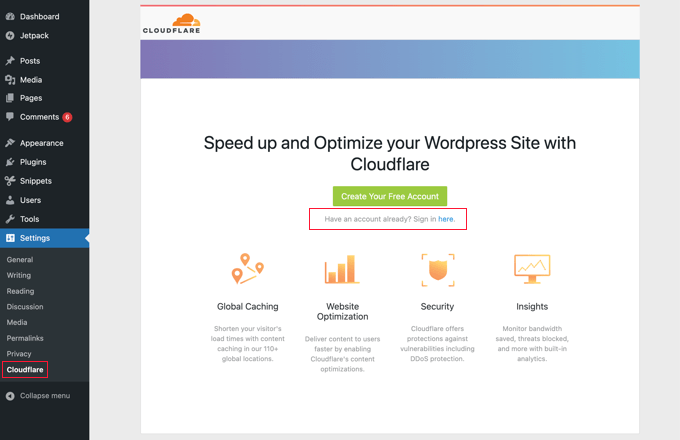
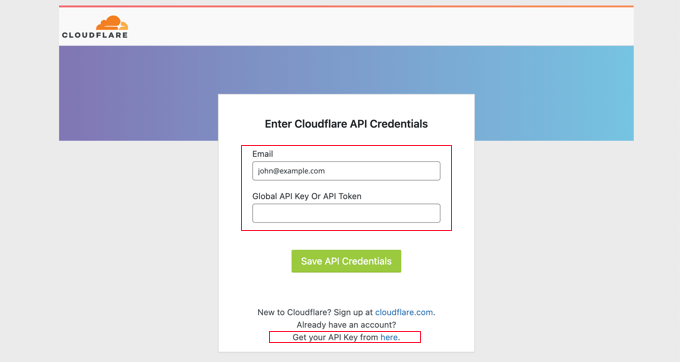
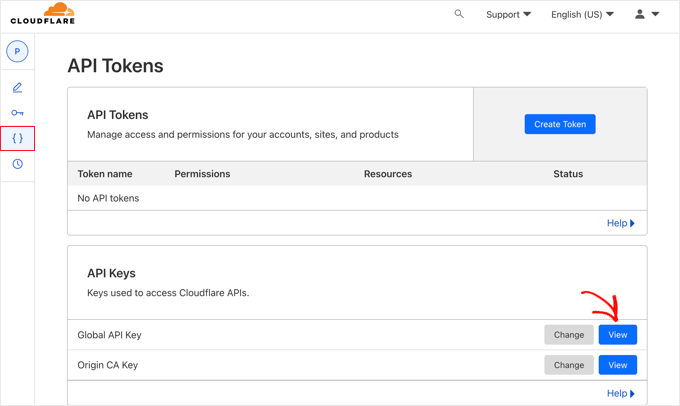
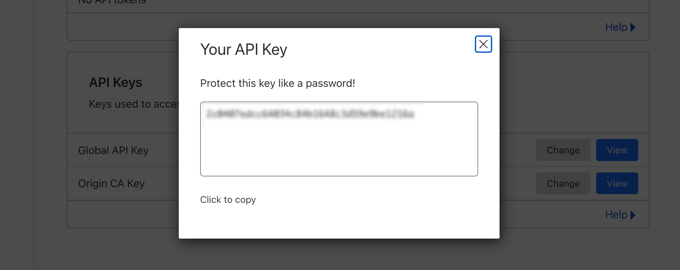
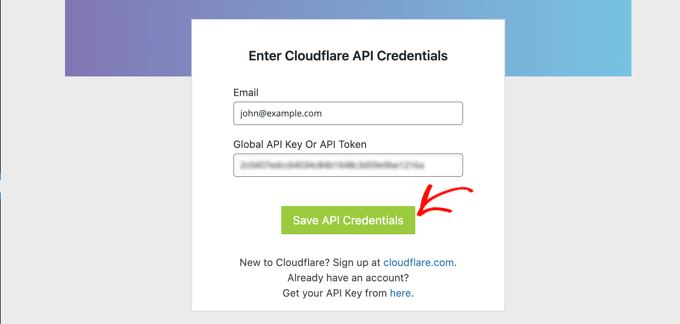
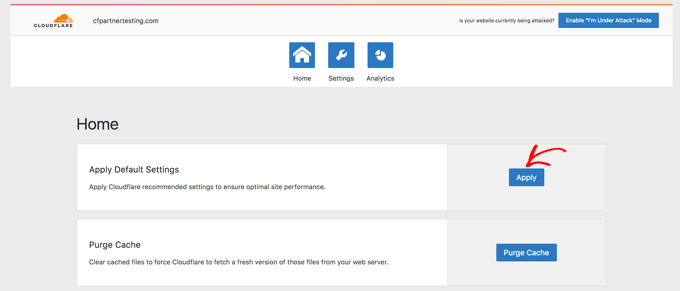
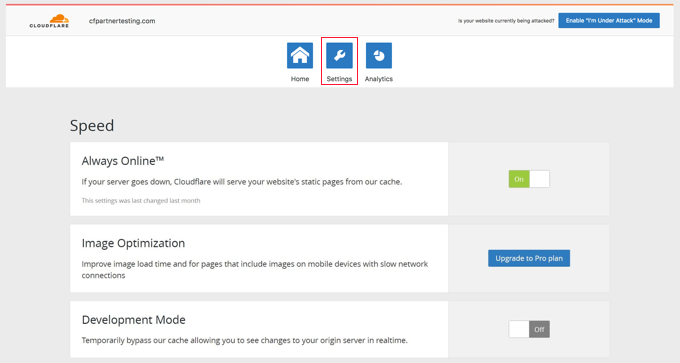
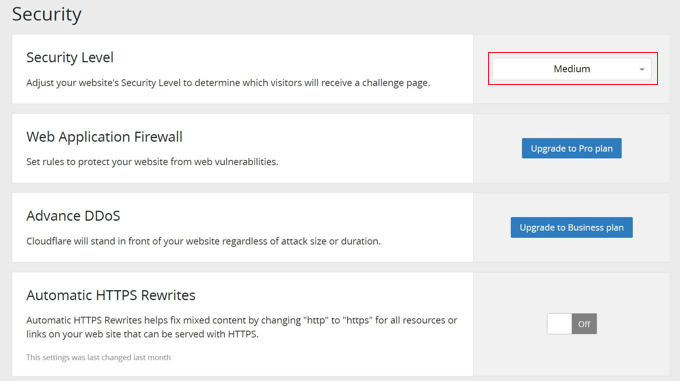
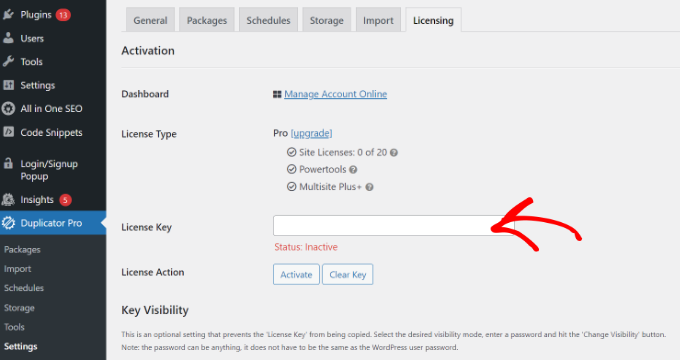
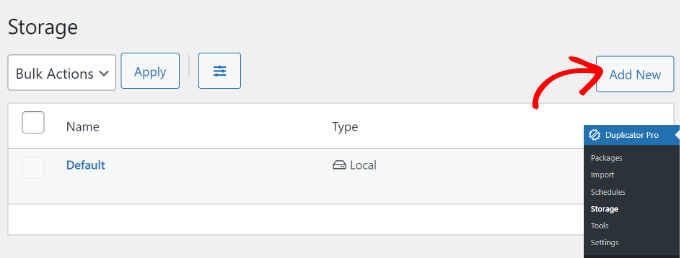
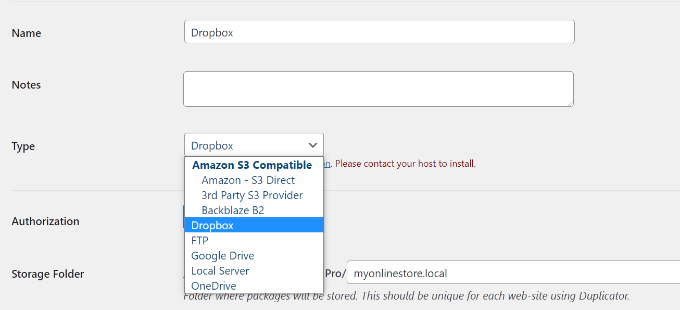
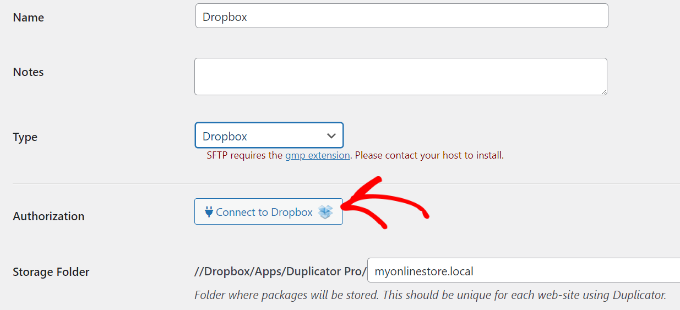
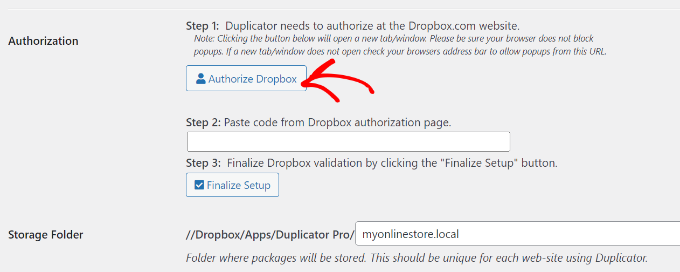
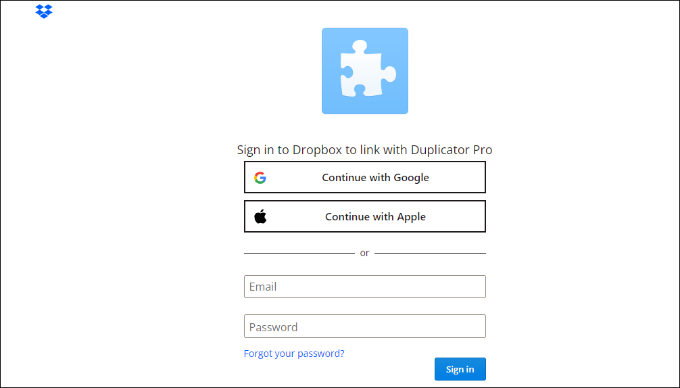

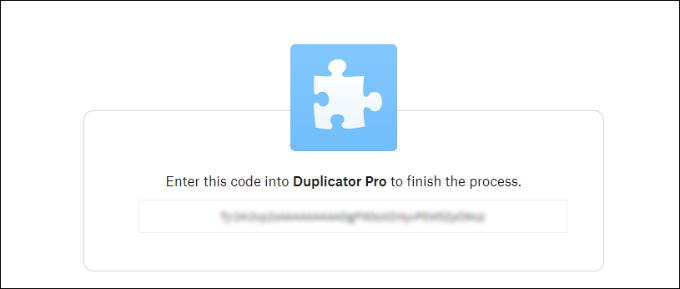
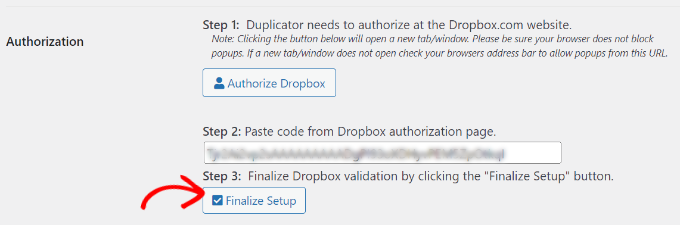
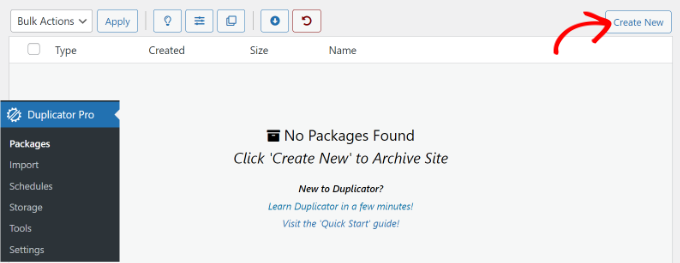
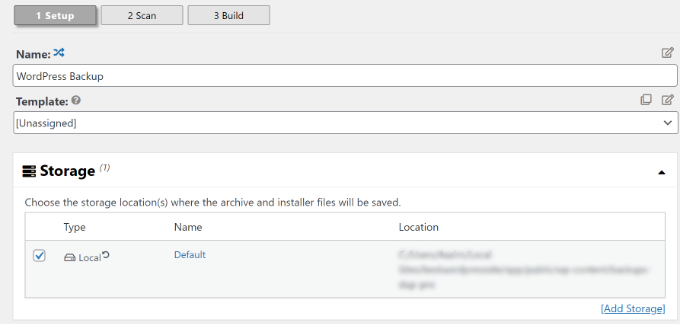
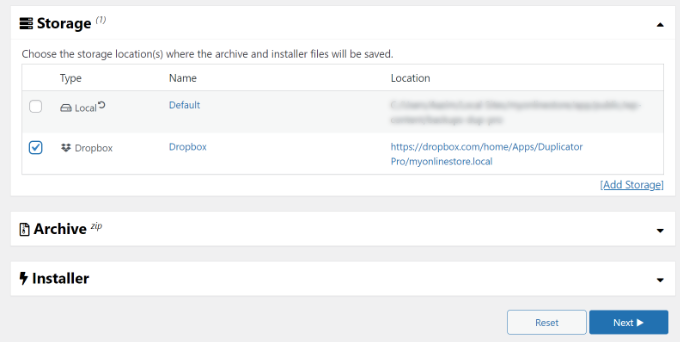

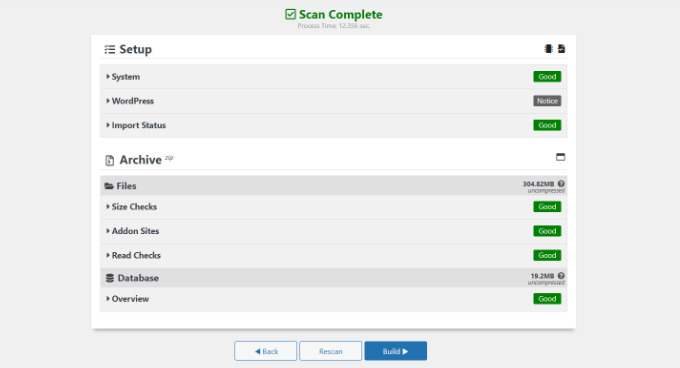
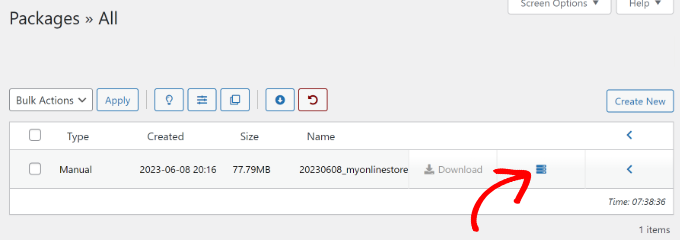
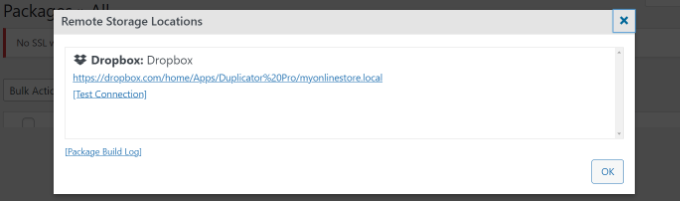
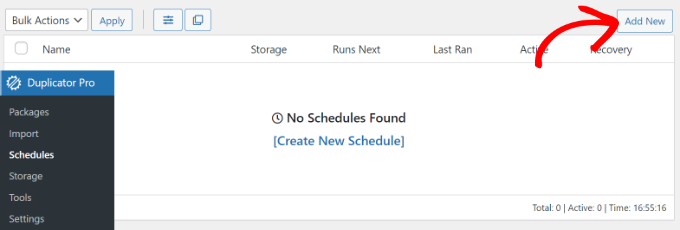
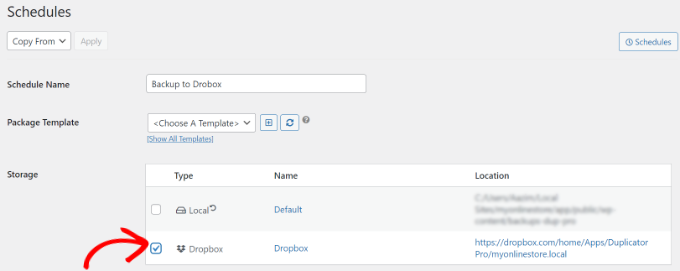
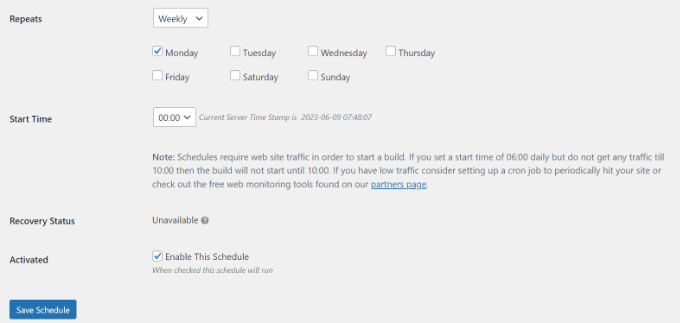
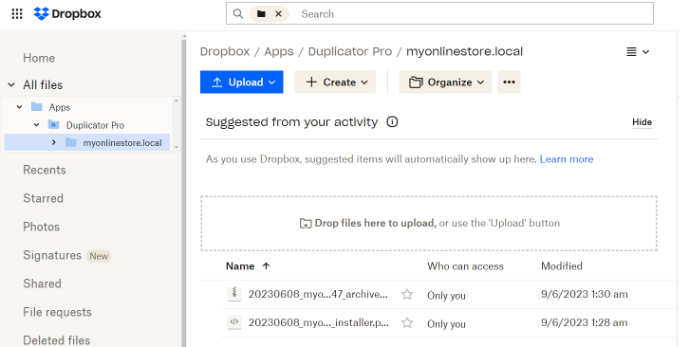
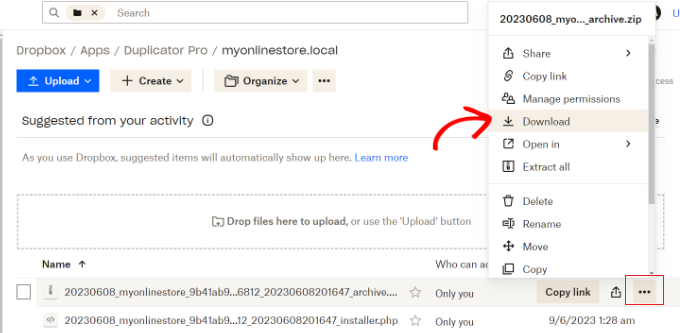
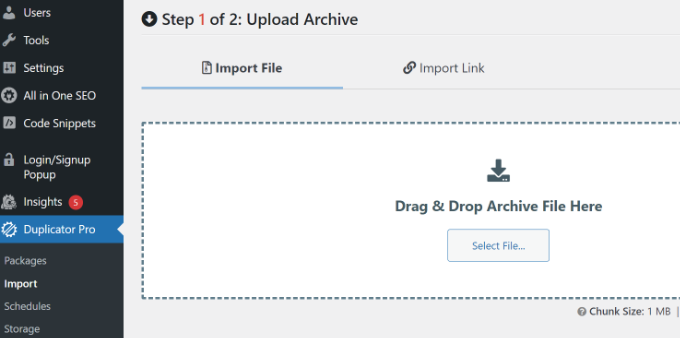
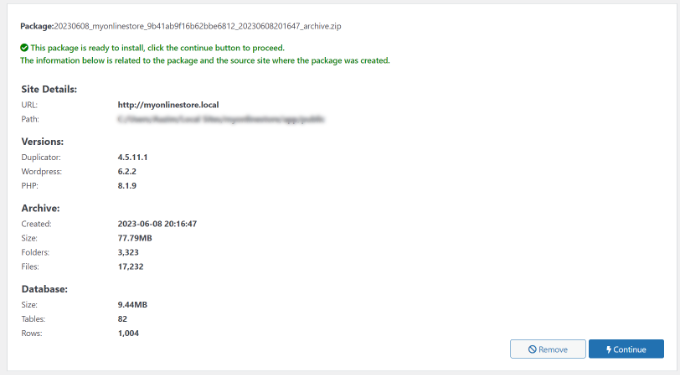
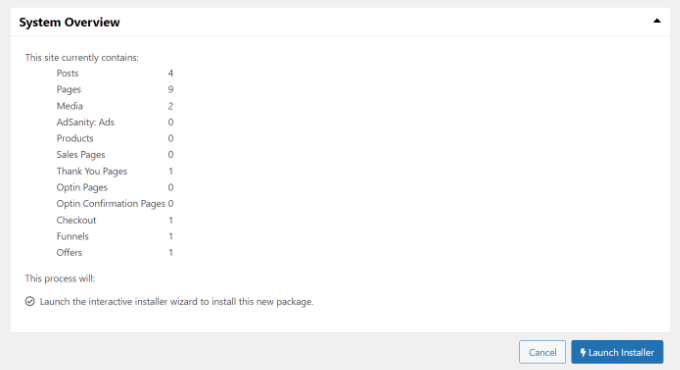
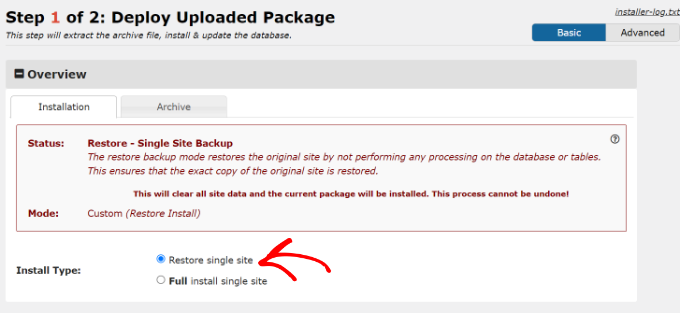
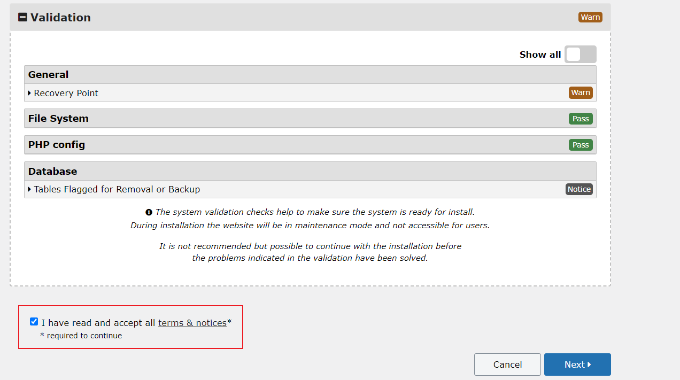

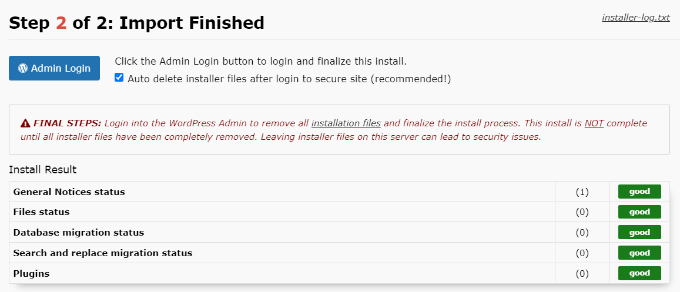
")